Dickey-John INSTALAB 700 User manual

INSTALAB 700 QUICK START GUIDE
Instalab 700 Quick Start Guide
11001-1608-201702 Rev B
1
Safety notices are one of the primary ways to call attention to potential hazards.
This Safety Alert Symbol identifies important safety messages in this manual. When you see this
symbol, carefully read the message that follows. Be alert to the possibility of personal injury or death.
Use of the word WARNING indicates a potentially hazardous situation which, if not avoided, could result in death or
serious injury.
Use of the word CAUTION with the Safety Alert Symbol indicates a potentially hazardous situation which, if not
avoided, may result in minor or moderate injury.
Use of the word CAUTION without the safety alert symbol indicates a potentially hazardous situation which, if not
avoided, may result in equipment damage.
DISCLAIMER
DICKEY-john reserves the right to make engineering refinements or procedural changes that may not be reflected in this manual.
Material included in this manual is for informational purposes and is subject to change without notice.
INTRODUCTION
This quick start guide provides the minimum requirements to begin using the Instalab 700 NIR Grain Analyzer and is organized
according to typical sequential actions for installation, startup, analyzation, and results.
More detailed information is available in the Operator’s manual that addresses:
•Installation
• Calibrations
• Sample preparation
• Navigation
• Password restrictions
• System setup
•Startup
• Analyzing
• Results
• Database Storage and Record Deletion
• Diagnostics
• Troubleshooting
• Maintenance
!
Instalab 700 Quick Start Guide
11001-1608-201702 Rev B
2
INSTALAB 700 QUICK START GUIDE
INSTALLATION
Inspect the unit for damage that may have occurred during shipping. If damage is found, immediately file a claim with the carrier
and notify your DICKEY-john sales representative and return unit in original packing materials.
IMPORTANT: The Instalab and printer (optional) must not be used in hazardous (classified) locations as defined in
Article 500 of the NFPA Handbook of the National Electrical Code.
1. The Instalab should be placed on a level surface and in a location where it is protected from rapid changes in ambient
temperature.
2. Connect the power cord to a 3-wire (grounded) 120 VAC, 60 Hz or a 220 VAC, 50 Hz outlet. The unit
automatically adjusts for 120V or 220V.
CAUTION: Proper grounding must be made to ensure the safe and proper operation of the unit.
The grounding pin on the power cord plug is connected to the Instalab enclosure. If an adapter with a grounding
wire is used, verify the grounding wire is connected to a good earth ground. Otherwise, a shock hazard may be
present. Do not use a 3-pin to a 2-pin adapter.
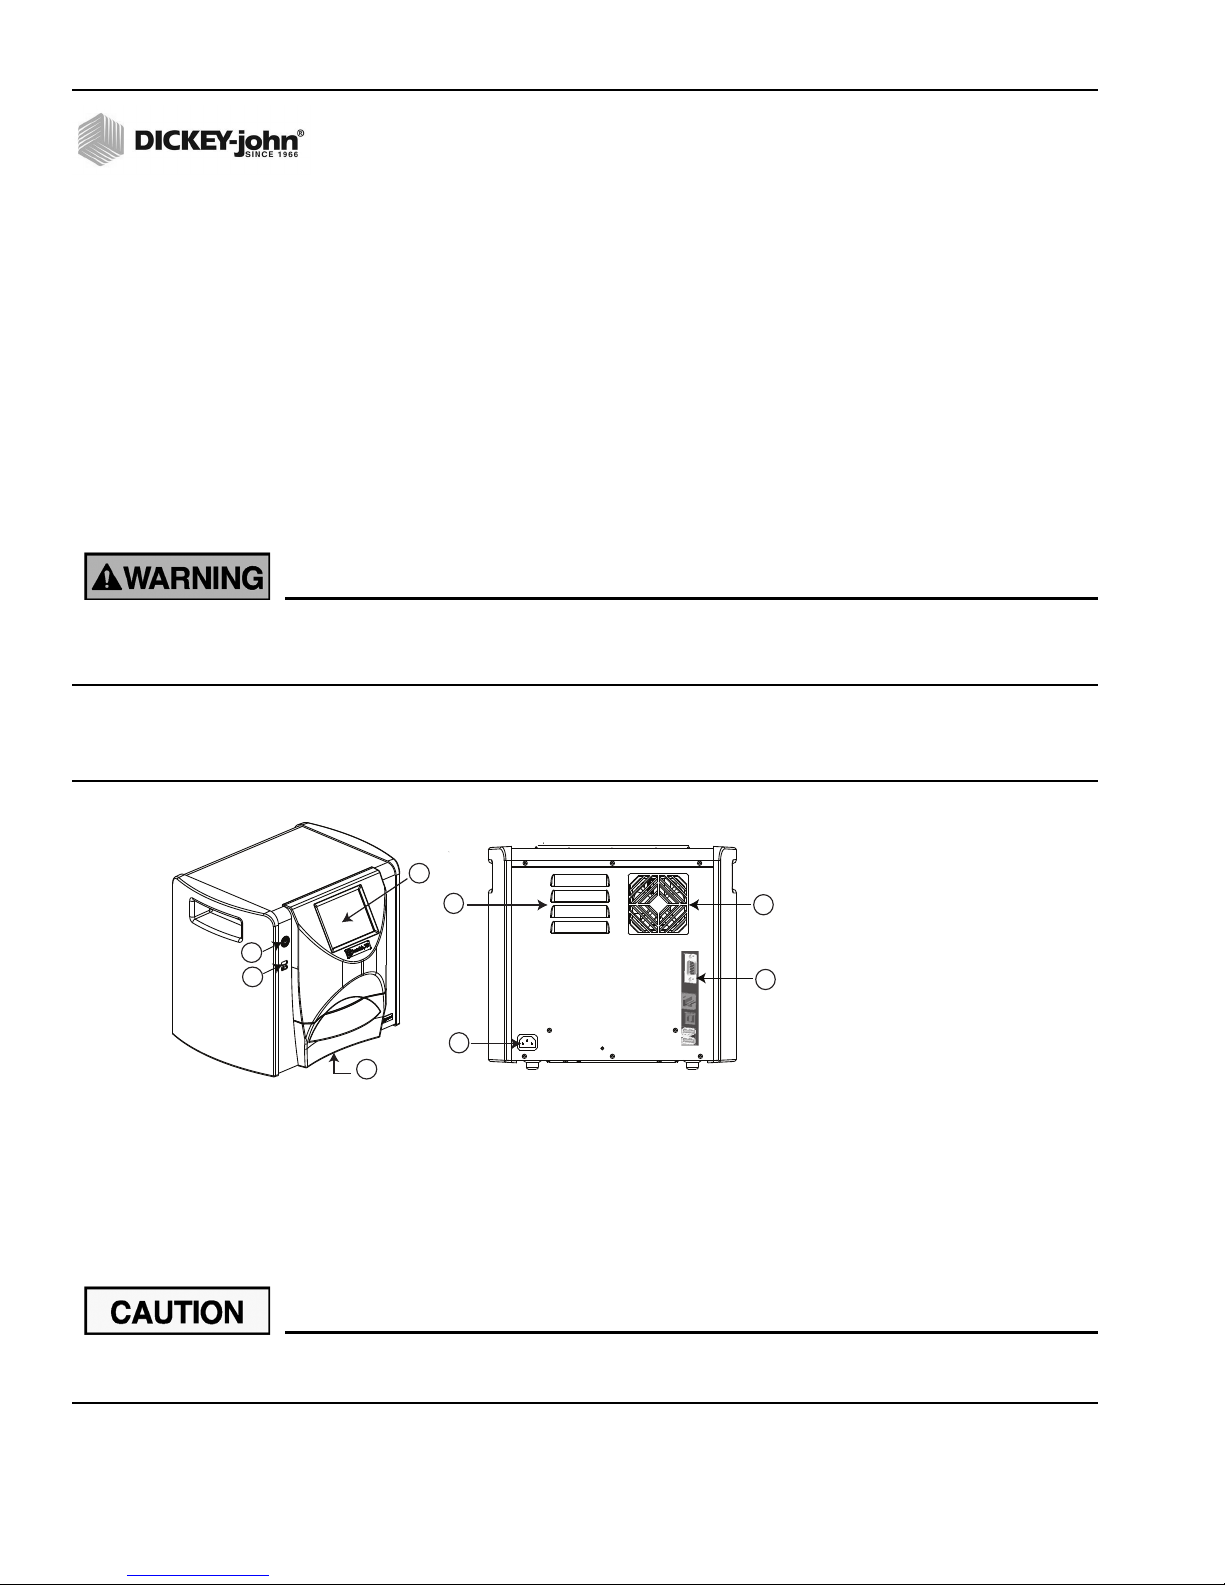
UNIT OVERVIEW
Figure 1
IL700
Appropriate space must be left around the input power connector to allow easy disconnection at the unit.
1) Power On/Off Button
3) USB Connections
2) Display
4) Sample Drawer
2
6) Power Outlet
7) Fan
8) Connections
(1) RS232
Serial Port
Printer Connection
(1) LAN
(1) USB (B)
(2) USB (A)
5) Vents
5
6
7
8
4
1
3
External Communication Connections
- 4 USB Type A connections
(2 in front, 2 in back) for
connection to a keyboard, mouse,
printer or flash drive (only 3 USB
devices are supported at any
one time).
- 1 USB Type B connection to
connect the IL700 to a PC for
downloading of software to the
device, installing calibrations, or
remotely accessing data from the
instrument
- 1 RS232 serial port connection
(9 pin)
- 1 ethernet LAN connection

Instalab 700 Quick Start Guide
11001-1608-201702 Rev B
3
INSTALAB 700 QUICK START GUIDE
NAVIGATION
The user interacts with the IL700 via the LCD touch screen display. Screen interaction by finger touch or using a dull, pointed
object, such as a stylus or retracted pen is recommended.
Do not use any sharp objects on the display. Damage to screen can result.
TOUCH SCREEN BUTTON FUNCTIONS
Button Image Button Function Description Button Image Button Function Description
HOME Returns to the Main Menu
screen.
USB Connects the unit direct to a
computer for downloading
software and installing
calibrations.
POWER OFF Turns the system off from
the touch screen display.
The system must be turned
on using the On/Off button
located on the front panel
but can be turned off from
either the screen display or
the On/Off button.
CLEAR Removes a test result and does
not save the result to the
database.
PRINT Prints test results to a
connected printer.
INSTRUMENT
INFORMATION
Appears on the Main Menu
screen providing details
regarding unit service date,
serial number, and software
version. Typically used for
troubleshooting purposes.
BACK Returns to the previous
screen.
LCD DISPLAY
TOUCH SCREEN
CALIBRATION
Re-calibrates the display when
screen responsiveness does not
occur effectively to a finger touch
or stylus.
ENTER Accepts the action taken
and proceeds to next
screen. Parameters
changed on the screen
typically requires the Enter
button to be pressed to
save changes.
KEYPAD Keypad icon appears on those
screens that require text entry.
Pressing the Keypad icon opens
the virtual keyboard for typing
text on the screen. The virtual
keyboard is used when an
external keyboard, mouse, or
barcode scanner are not
available.
ID Displays the ID screen to
manually modify or add a
Customer ID or Sample ID.
ID

Instalab 700 Quick Start Guide
11001-1608-201702 Rev B
4
INSTALAB 700 QUICK START GUIDE
STARTUP
The Instalab IL700 is powered on by pressing the on/off switch located on the front panel. A series of Startup screens load after
the system is turned on. A status bar will indicate the loading of forms and upon completion, the Instrument Information screen
displays for several seconds before the Main Menu screen displays.
IMPORTANT: The unit is designed to remain on and not be turned off. If turned off, it is recommended that the unit be
powered on for 3 hours before measurements are taken.
Figure 2
Startup Screens
MAIN MENU SCREEN
NOTE: Regular maintenance routines are recommended for optimum unit performance. Frequency is dependent on
environmental conditions. Refer to the Operator’s manual for maintenance instruction.
The Main Menu screen appears after all Startup screens have loaded. The “Home” menu is the main screen that all other screens
are accessed. Main functions available at the Main Menu are analyzing, accessing test results, and system setup.
Optics Temperature Thermometer
An optics temperature thermometer displays the
temperature of the optics chamber. The bar is red until the
temperature reading is within +/- .50 degrees C of the
optimum set point of 50.00 degrees C. The bar turns
green when the temperature is within +/-.10 degrees
C of the setpoint. Upon power up of the unit, the
temperature will climb to 50.00 degrees C and likely
overshoot. Some oscillation will occur before stabilizing. A
temperature warning appears when the bar is red but
analysis can still occur and is flagged with a symbol
indicating the result is suspect.
IMPORTANT: It is highly recommended that NO analysis is
performed until the temperature bar is consistently green. Stabilization can take a minimum of 30 minutes but is highly
recommended the unit be on for 3 hours before performing an analysis.
Optics Temp
Bar Status
Operating Temperature
Limits
Green Within normal range for analysis +/-.10 degrees C
Yellow Optics temperature is within +/-.50 degrees C of set point. Grain
analysis is not inhibited but not recommended.
Red Optics temperature is greater than +/- .50 degrees C of set point. Grain
analysis is not inhibited but not recommended.
DICKEY-john Corporation
DICKEY-john Corporation
Instrument Info INSTALAB 700
Instrument Info INSTALAB 700
S/N: 1811-00005
Software Versions: 169.254.0.37
IP Address: 169.254.0.37
Last Update: Nov 04, 2011 (14:44)
Model: IL700
DICKEY-john Corporation
INSTALAB 700
DICKEY-john Corporation
INSTALAB 700
Analyze SetupResults
Power Off Instrument
Information
Optics Temperature (49.90 degrees C)
Green (normal range)
Red (out of limits/
triggers alarm)
Yellow (out of limits
/no alarm)
15 25 35 45 50 55 65

Instalab 700 Quick Start Guide
11001-1608-201702 Rev B
5
INSTALAB 700 QUICK START GUIDE
PASSWORD RESTRICTIONS
Setting an administrator user name and password to restrict modification of system settings to an administrator are optional. The
unit is shipped with an Admin user name of “GUEST” and password setting of “GUEST”. The Admin user name screen is found in
the Setup.
Keeping the Admin user name and password as “GUEST” retains the unit in open access mode allowing any user to enter System
Settings and modify unit settings. Press the Enter button to proceed. IMPORTANT: To restrict access to System Setup that affects
overall unit functionality, a new Admin User name and password must be created. Refer to the Operator’s manual (System Setup)
for creating a name and password.
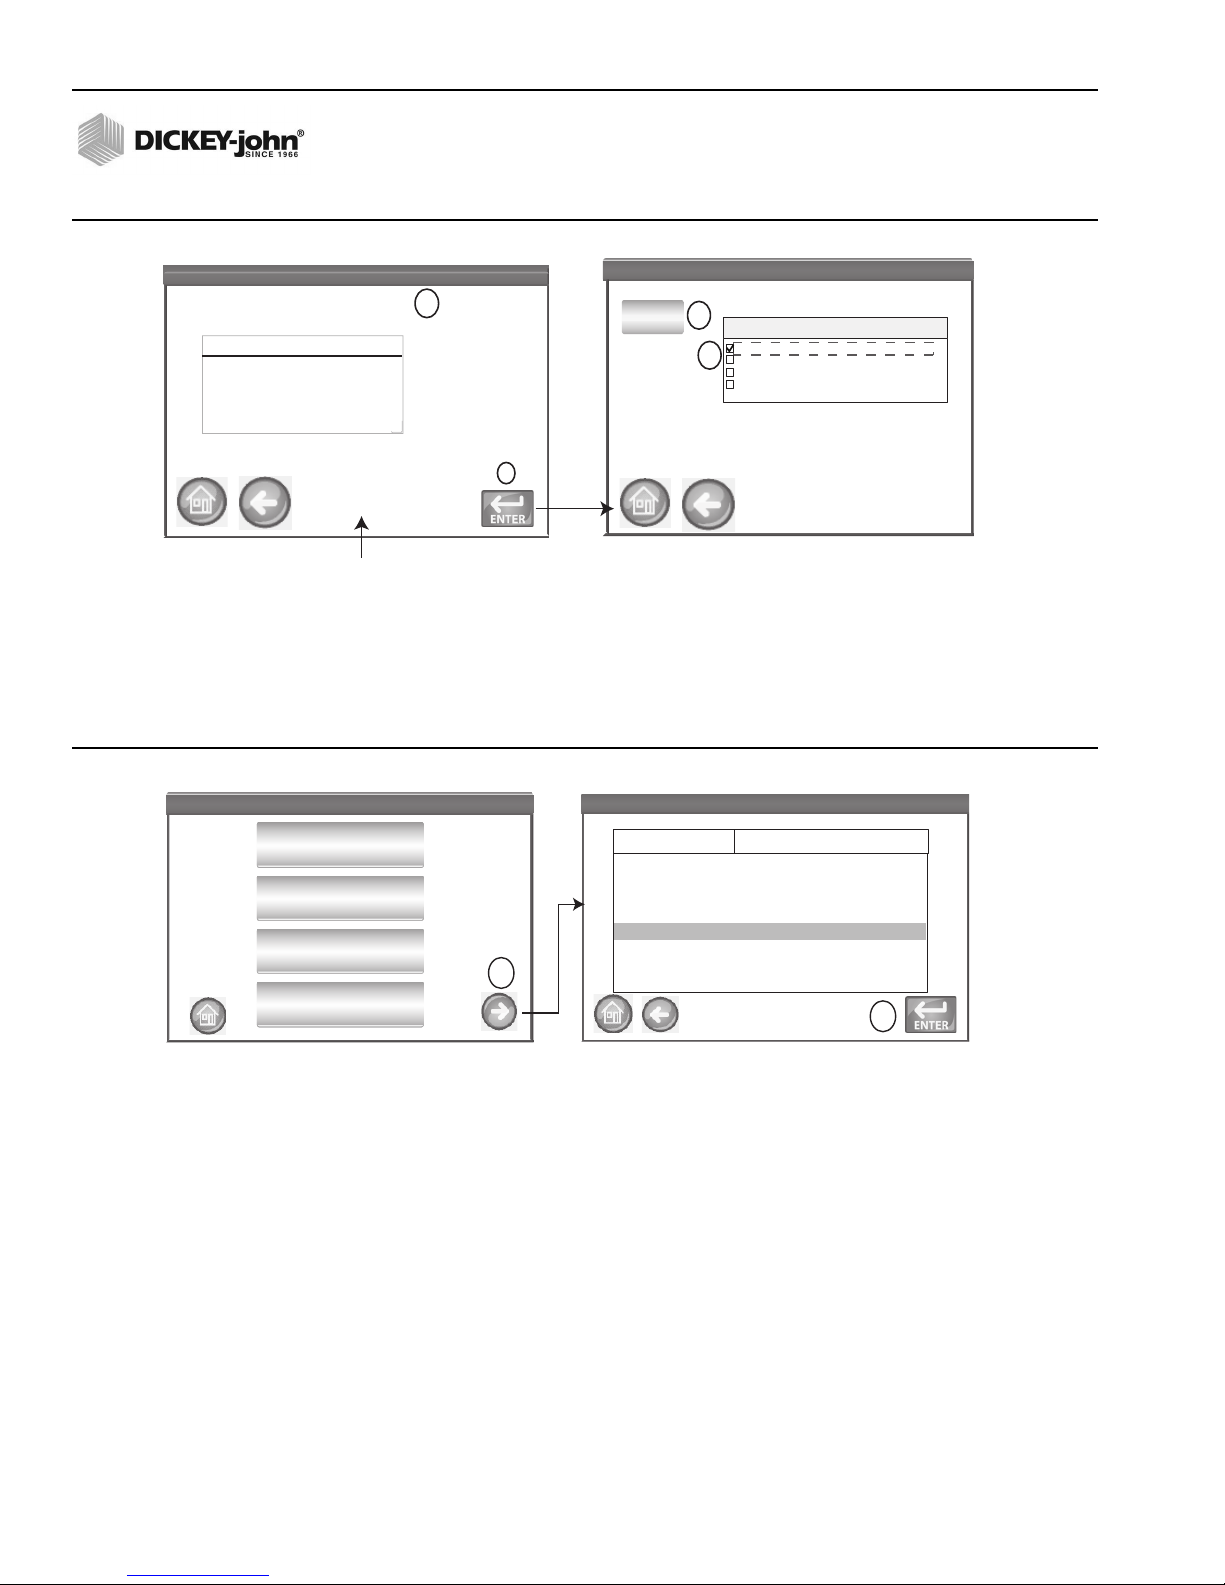
Figure 3
Password Screen (Open Access)
IMPORT PRODUCT
New products can be loaded to the IL700 using a USB memory device. Follow the onscreen instructions to begin file import.
1. Insert USB memory device into unit.
2. At the Main Menu, press the Setup button.
3. At the System Setup screen, press the Product button.
4. At the Products List screen, press the Import button.
5. Select the desired directory, if shown, displayed in the Directory Contents window. The number of directories and/or files on
the USB displays on screen.
6. Press the Enter button to view calibration (.cal) files.
Figure 4
Import Product
7. The number of files stored on the USB device display in the Directory Contents window. Pressing “..\” displayed in the
Directory Contents window returns to the previous level in the directory structure.
8. Press the Enter button again to display the file name on the USB.
9. Select the checkbox(s) for the files to import.The box must be checked for the download to occur.
10. Press the Import button to begin import.
11. Verify product(s) imported at the Product List screen.
Admin Username INSTALAB 700
Admin Username INSTALAB 700
GUEST
Enter User Name:
Enter Password: GUEST
Please Log in
Select Directory
INSTALAB 700
Select Directory
INSTALAB 700
Directory Contents
1 Directories, 0 Files Exist. Push ENTER to
view.
\Hard Disk\
Products List
INSTALAB 700
Products List
INSTALAB 700
Copy
Barley IL700.Barley.20091229.cal
Corn Meal IL700.Corn_Meal.20080405.cal
DDGS IL700.DDGS.20100528.cal
DDGS_1 IL700.DDGS.20100529.cal
HRW Wheat IL700.HRWW.20091124.cal
Delete
Edit
Import
Label File
IL700.HRWW.2011050
IL700.SOYBEANS.20110505
CORN IL700.CORN.20110505
HRWW
SOYBEANS
4
5
6
11
Samples\
System Setup INSTALAB 700
System Setup INSTALAB 700
Product
System
Database
Diagnostics
3
Instalab 700 Quick Start Guide
11001-1608-201702 Rev B
6
INSTALAB 700 QUICK START GUIDE
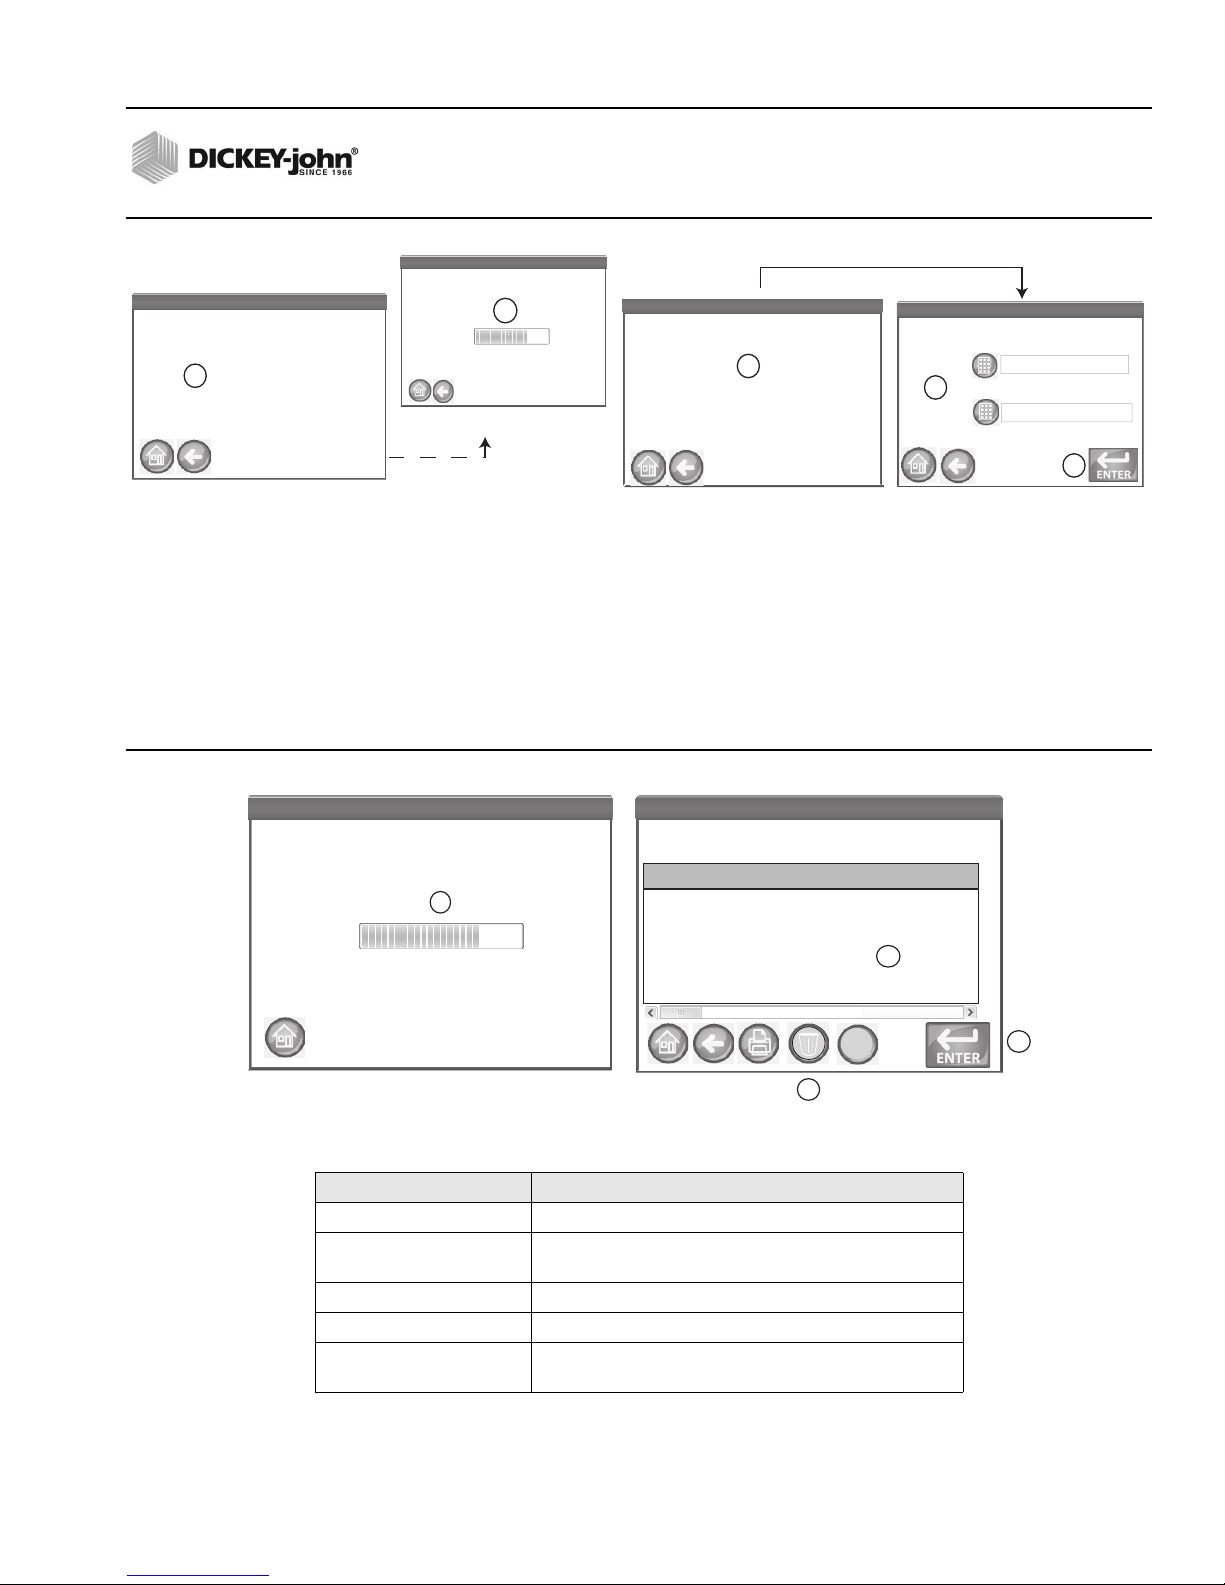
Figure 5
Import Product
ANALYZE
1. At the Main Menu screen, press the Analyze button. A pre-defined list of the 4 most recent products tested appear on the
Select Product screen. Products are saved in a “last used” order.
2. To view additional products, press the More button.
3. Highlight the desired product and press Enter to select.
Figure 6
Select Product
4. A screen may prompt to open the drawer to prepare for analysis if not already open or if a recent reference has
not been recorded.
5. Open drawer to complete open position and insert sample. A reference scan will not start if drawer is not in the complete
open position.
– A status bar indicates progress if a scanning reference is required.
6. Insert Sample and close drawer at screen prompt to begin analysis.
7. The Enter ID screen appears only if a sample ID and/or a customer ID is required.
8. Press the Enter button to proceed.
– When enabled, Auto Sequencing will automatically enter the next sample ID number.
– When enabled, Last Used Customer ID will continue loading a Customer ID until the next power cycle occurs.
– If neither are required, this screen is skipped.
INSTALAB 700
INSTALAB 700
Label File
HRWW_4 IL700.HRWW_4.20110908
Directory: \Hard Disk\Samples\
CORN IL700.CORN.20110505
HRWW IL700.HRWW.20110505
SOYBEANS IL700.SOYBEANS.20110505
9
INSTALAB
Select Directory
INSTALAB
0 Directories, 4 Files Exist. Push ENTER to
view.
\Hard Disk\Samples\
8
7
Directory Contents
..\
Import
10
Select Product
INSTALAB 700
Select Product
INSTALAB 700
WHEAT RED
WHEAT WINTER
SOYBEANS
CORN
Select Product INSTALAB 700
Select Product INSTALAB 700
WHEAT RED
SOYBEANS
Data Collect
Data Collect
Data Collect
Data Collect
CORN
Label
IL700.Wheat-Red.20080504
IL700.Soybeans.20090321
SM Enabled. Standard Gain
SM Disabled. Standard Gain
SM Enabled. Enhanced Gain
SM Disabled. Enhanced Gain
IL700.Corn.20100629
File
2
3
Instalab 700 Quick Start Guide
11001-1608-201702 Rev B
7
INSTALAB 700 QUICK START GUIDE
Figure 7
Analyzation Process Screens
9. During analysis, a testing status bar indicates progress.
10. The Analysis Results screen displays:
– Product tested
– Sample ID, if enabled
– File name
– Customer ID, if enabled
– Constituent results (An alternate moisture basis reading displays when required by the calibration)
11. Test results are automatically saved to the unit unless the Clear button is pressed.
12. Press the Enter button to analyze another sample or open the drawer.
Figure 8
Analysis Results Screen
ANALYSIS READINGS DEFINED
READING DESCRIPTION
As-Is Actual sample moisture is moisture basis
Out of Limits (*) A reading that is above or below defined parameters.
Example: 12.5% @ As-Is*
Cal MB Native moisture basis of calibration
Alt MB Alternate moisture basis
Temp Out of Limits +/- A reading taken when the optics temperature is too
high (+) or too low (-)
INSTALAB 700
INSTALAB 700
OPEN DRAWER
Product: CORN*
File: IL700 .Corn .2101229 .cal
INSTALAB 700
INSTALAB 700
INSERT SAMPLE
Ref Scanning ... INSTALAB 700
Ref Scanning ... INSTALAB 700
Please wait ...
Produc t : COR N
File : IL700 .Corn .2101229 .cal
Screen does not appear if
reference already recorded
Screen does not appear if drawer
is open or reference already recorded
4
5
6
Enter ID INSTALAB 700
Enter ID INSTALAB 700
Sample ID
Customer ID
Sample ID
Customer ID
7
8
Product: CORN*
File: IL700 .Corn .2101229 .cal
Analysis Complete INSTALAB 700
Analysis Complete INSTALAB 700
Constituent Cal MB Alt MB
Moisture 10.9%
Crude Protein 12.5%@As-Is 11.92%@15.0%
Crude Fat 15.8%@As-Is
Starch 67.2%@As-Is
Crude Fiber 5.6%@0.0%
Produc t : COR N*
File: IL700 .Corn.2101229 .cal
ID
Sample : 22
Customer : Brown
Analyzing . . . INSTALAB 700
Analyzing . . . INSTALAB 700
Please wait ...
Produc t : CORN
File: IL700 .Corn.2101229 .cal
9
10
11
12
Instalab 700 Quick Start Guide
11001-1608-201702 Rev B
8
INSTALAB 700 QUICK START GUIDE
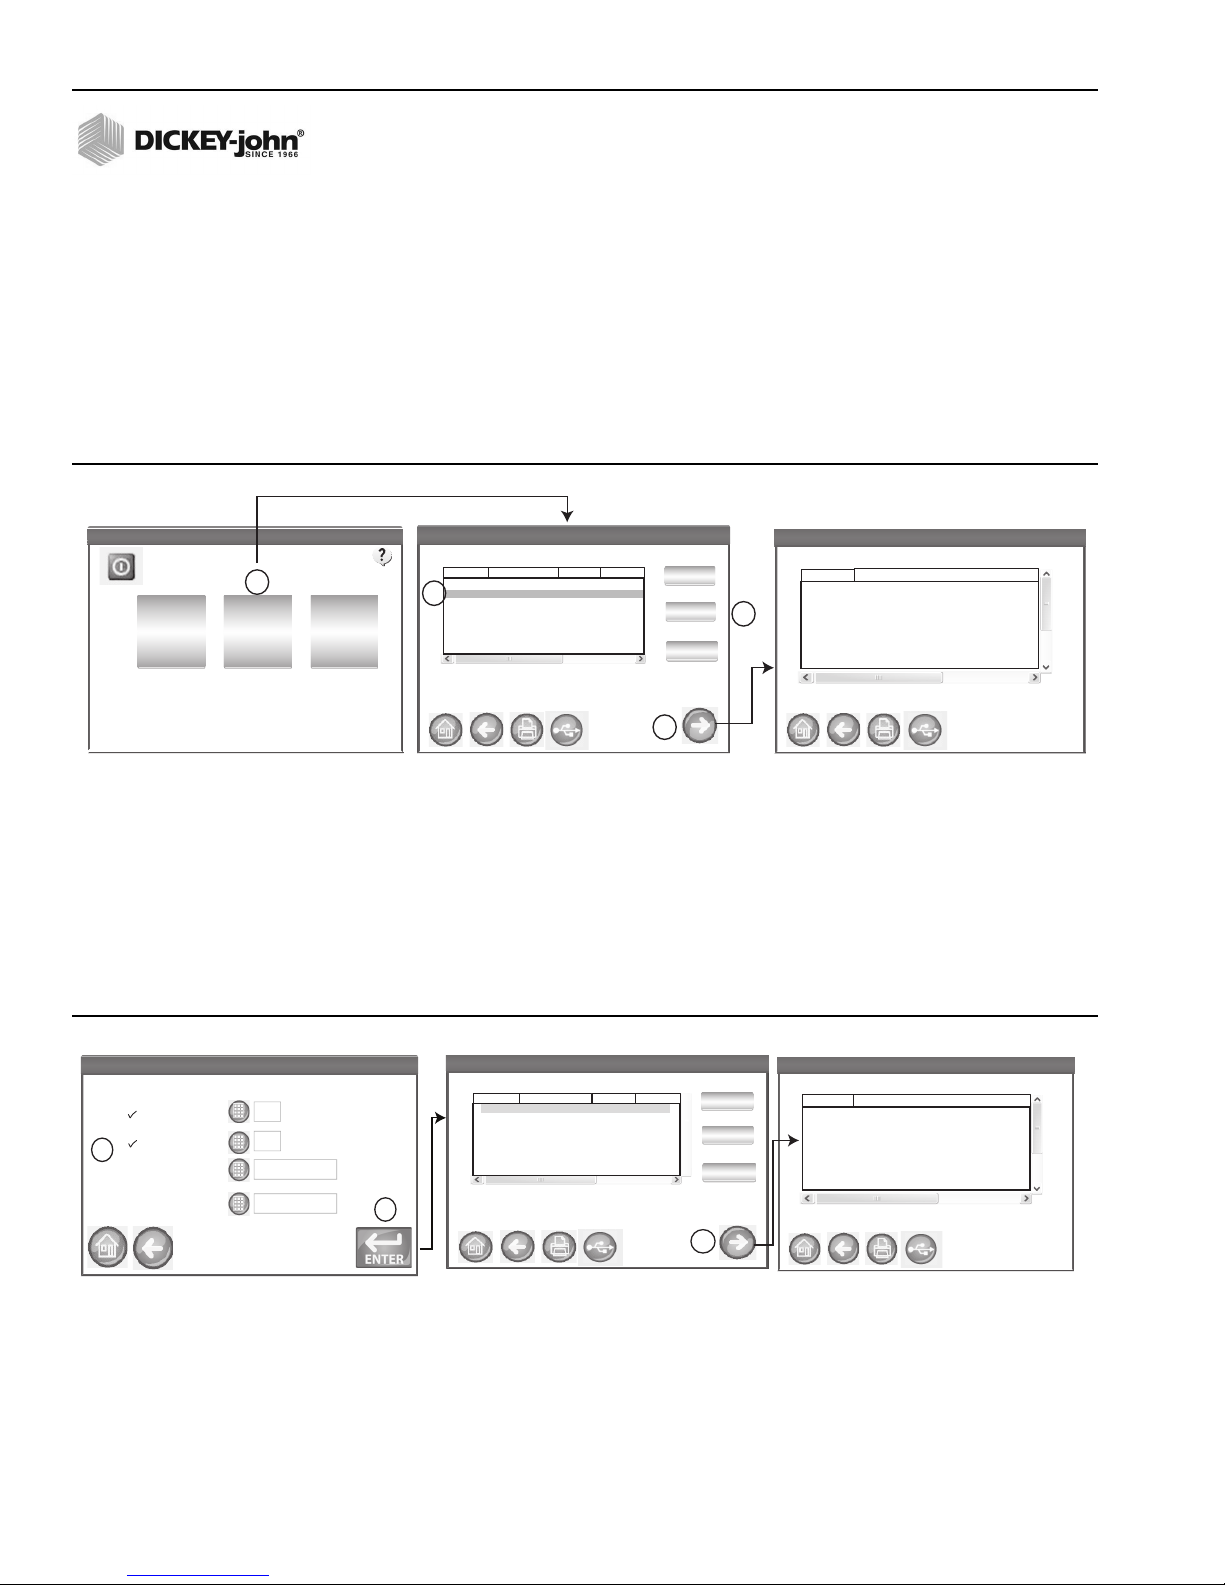
RESULTS
The Results screen displays a listing of sample test results and date relevant to a specific test (Counter, Date and Time, Sample
ID, and Customer ID)
To display Results:
1. At the Main Menu screen, press the Results button. The Results View screen default displays all stored test results.
– Press the Previous and Next buttons to scroll up and down the window to view additional results.
2. Highlight a product and press the More button to view that product’s specific results details.
– Press the Back button to return to the Results view screen.
3. At the Results View screen, press the Query button to display the Refine Query screen.
Figure 9
Results Screen
To refine Query Options:
4. A query of records can be performed by selecting a check box to enable:
– last number of records
– last number of days
– by product name
– by customer id
5. Press the Enter button to display query results. At the Results View screen, the table displays the results based on enabled
queries.
6. To view a sample’s specific details, press the More button.
Figure 10
Query Screen
LAST NUMBER OF RECORDS: Allows entry of a specified number of records to display or print starting with the last sample
taken, such as printed the last 5 samples.
LAST NUMBER OF DAYS: Allows entry of a specified number of days to display or print starting with the most current date.
PRODUCT NAME: Allows entry of a product name to perform a product search. Exact product name must be entered to find
results but is case insensitive.
CUSTOMER ID: Allows entry of a specific customer ID to view or print.
Results View INSTALAB 700
Results View INSTALAB 700
06 Mar 09 02:04 PM
06 Mar 09 02:04 PM
06 Mar 09 02:04 PM
08 Mar 09 02:04 PM
06 Mar 09 02:04 PM
Dat e/Time Sample
231
345
345
654
345
Customer
Next
Prev
Query
Query: Page 1/1
DICKEY-john Corporation
INSTALAB 700
DICKEY-john Corporation
INSTALAB 700
Analyze SetupResults
Counter
0007
0006
0005
0004
0003
Log Results
Log Results
Log Results
1
3
2
Log Results
2
Results Details View
INSTALAB 700
Results Details View
INSTALAB 700
Item Data
Date 03/08/2009 02:04 PM
Sample ID Log Results
Product Log Results
CalFile CORN
L0 348.5019
L1 169.5342
L2 183,7473
Results Query
INSTALAB 700
Results Query
INSTALAB 700
□ Last 5Records
□ Product Name
□ Customer ID
10 Days
Select Results By:
□ Last
Results View
INSTALAB 700
Results View
INSTALAB 700
06Mar0902:04
PM
06Mar0902:04
PM
06Mar0902:04
PM
06Mar0902:04
PM
06Mar0902:04
PM
Dat e/Time Sample
231
345
345
654
345
Customer
Next
Prev
Query
Query: Days, Count Page 1/1
Counter
0007
0006
0005
0004
0003
Log Results
Log Results
Log Results
4
5
6
Results Details View
INSTALAB 700
Results Details View
INSTALAB 700
Item Data
Date 03/06/2009 02:04 PM
Sample ID Log Results
Product Log Results
CalFile CORN
L0 348.5019
L1 169.5342
L2 183.7473
Table of contents
Other Dickey-John Measuring Instrument manuals

Dickey-John
Dickey-John C-2000 User manual

Dickey-John
Dickey-John GAC500XT User manual

Dickey-John
Dickey-John MINI GAC 2500 NBT User manual

Dickey-John
Dickey-John Dj F-2000 User manual

Dickey-John
Dickey-John GAC 2500-AGRI User manual

Dickey-John
Dickey-John GAC 2500 User manual

Dickey-John
Dickey-John Instalab 700 NIR User manual

Dickey-John
Dickey-John Seed Manager SE User manual

Dickey-John
Dickey-John mini GAC User manual

Dickey-John
Dickey-John GAC 2500 User manual


