Dictaphone WALKABOUT 5215 User manual

Walkabout 5215
ENGLISH

2
CONTENTS_____________________________________________
4 Notes
4 Safety
4 Environmental protection
5 Scope of delivery
5 Accessories
6 MultiMediaCard or Secure
Digital card (SD)
7 The Control Elements
9 The Display
10 Preparations
10 Battery operation
10 Mains operation
10 Safety hints for power
supply/charging units
(Accessories)
11 Rechargeable battery
operation
11 Operation using rechargeable
batteries
11 Inserting rechargeable batteries
12 Charging the rechargeable
battery
13 Notes on rechargeable battery
462
14 Inserting the MultiMedia
Card or SecureDigital card
(SD)
15 Formatting the MultiMedia
Card or SecureDigital card
(SD)
16 Switching On
16 Switching on and off
16 Initial switch-on
16 Subsequent switching on
16 Switching off
16 Safety lock
17 Recording
17 Saving dictation
17 Dictation
18 New dictation
18 Recording-pause
18 Ending recording
19 Info function
19 Editing a dictation
20 Inserting part of a
dictation or info message
21 Hearing a Dictation
21 Selecting a dictation and
playing back
21 Fast skip to the beginning
or the end of the dictation
21 Volume control
21 Fast playback
22 Fast forward and rewind
22 Searching for info
23 Deleting Dictations
23 Deleting an entire dictation
23 Deleting a part of a
dictation
24 Deleting info
25 The menu
25 Functions in the menu
26 Overview of the menu
settings

3
ENGLISH
CONTENTS_____________________________________________
27 Functions in the menu
27 Menu navigation
27 Dictation status
28 Folder
29 Typist
30 Dictation type
31 Group
32 No./Ref.
33 Priority
34 Author
35 Formatting
36 Settings in the menu
36 Voice Activation
36 Microphone sensitivity
37 PC microphone
38 Power off
38 Illumination
39 Time, date
40 Dictation counter
41 Version
42 Reset all
43 Language
44 Communication with
the PC
44 Walkabout Transfer
44 System requirements for
Walkabout Transfer
45 Connectiong the dictation
machine with the PC and
disconneting it
46 Firmware update
46 Carrying out a firmware
update

4
Your Walkabout 5215 is a digital hand dictation device. It can be
used as a single-station dictation system with the Walkabout
Transfer software supplied.
To simplify the revision editing of recordings, the machine has been
provided with new functions, such as the insertion or deletion of
text passages. Using a PC, dictations can be transmitted Voice Mail
(E-Mail).
Safety
This digital portable dictation machine has been designed for the
recording and playback of voice.
Make absolutely sure that the machine is protected against damp-
ness (rain, water splashes).
Do not place the dictation machine close to the heating or in direct
sunshine.
You may not open the dictation machine under any circumstances.
Opening the device invalidates the guarantee.
Open only the cover of the battery compartment.
Use only a dry cloth for cleaning. Never use chemical cleaning
agents.
Environmental protection
The batteries – those free of heavy metals too – must not be dis-
posed of in the domestic refuse. Used batteries must be taken to an
old battery collection point at the dealer’s and disposed of
properly.
CE This product complies with the EC regulations 89/336/CEE,
73/23/CEE, 93/68/CEE.
Technical data and design subject to change.
NOTES___________________________________________________

5
ENGLISH
Scope of delivery
– PC software Walkabout Transfer
– USB cable
– Batteries
– Pouch
Accesssories
– Power supply/charging unit 472 (Europe only, excluding the UK).
– Power supply/charging unit 473 enclosed with adapter cables,
for Europe (including the UK), USA and Canada.
– Rechargeable battery 462 (rechargeable NiMh batteries, which
may be loaded in the dictation machine using charging unit
472 or 473).
– External microphone:
Commercially available microphones with Ø 3.5 mm mono
jack plug may be used. The built-in microphone is automatically
disconnected.
– External headphone:
any commercial mono or stereo earphone or headset (impe-
dance: min. 32 Ω) with Ø 3.5 mm jack plug can be used.
The built-in loudspeaker is automatically switched off.
The volume level at the headphone connector is limited to
85 dB (A) (with 32 Ωheadphone).
– MultiMediaCards/SecureDigital cards:
standard, commercially-available MultiMediaCards/
SecureDigital cards from various manufacturers (SanDisk, Intel,
Panasonic SDCard, Infineon etc.) can be used.
The features indicated by Dictaphone apply only when using
original Dictaphone accessories.
Defects due to the use of accessories which are not original
Dictaphone accessoires or which do not comply with the legal
regulations or the corresponding standards lead automatically to
the expiration of any guarantee rights.
NOTES___________________________________________________

6
MultiMediaCard or SecureDigital card
(not included)
We recommend commercially-available MultiMediaCard/
SecureDigital Card cards from various manufacturers (SanDisk,
Intel, Panasonic SDCard, Infineon etc).
Make absolutely sure that the electrical contacts at the bottom
side of the MultiMediaCard/SecureDigital Card are not exposed
to strong mechanical stress.
The cards are insensitive to dirt and moisture but must nevertheless
be introduced into the machine in dry and proper condition.
New MultiMediaCard/SecureDigital Card must be formatted
before writing is possible. It is essential that the notes in the chap-
ter ”MENU FUNCTIONS – Format card” be observed.
Note:
Do not remove the cards during dictation or during data
transfer from PC to PC. This can result in data loss.
NOTES___________________________________________________

7
ENGLISH
THE CONTROL ELEMENTS_______________________
m 5215
Card slot
On/off/PC mode button
Socket for external
microphone
Recording on/off
Slide switch for recording,
play-back, stop,
fast-forward and rewind
Safety lock
Button for new dictation/
escape
Microphone
Recording indicator
Display
Function buttons:
labeled in the bottom
display line
Up/down button
Menu/OK button

8
THE CONTROL ELEMENTS_______________________
EAR
3 V
0,35 A
Power connection
3 V
–
---
/ 0.35 A
Earphone connection
impedance min. 32 Ω
Card-ejection
switch
Battery-compartment
cover
USB interface
EAR
3 V
0,35 A
HOLD

9
ENGLISH
THE DISPLAY__________________________________________
Available
recording time
Dictation number
Current function
(status line)
Current button
function
Selected folder
Operation with:
– Battery
– Rechargeable
battery
– Power supply
Indication for voice
activation (va) and
microphone sensitivity
for conferences (c)
Dictation position,
total length
Free 0:37h vac
DICTOO1 O:O6
Record Pause
INFO INS NEW
A

10
PREPARATIONS______________________________________
Battery operation
The dictation machine can be used for approximately 12
hours when the alkaline manganese batteries are fully
charged.
•Open the battery compartment.
•Insert batteries (Mignon types, e.g. R6, UM3 or AA,
2 x 1.5 V). Make certain the polarity is correct.
•Close the battery compartment.
– Display for battery operation .
Note:
A signal will be omitted when batteries are weak (but not
during recording). The battery symbol flashes on the
upper right edge of the display. You will still be able to dic-
tate for a few minutes until the dictation machine automa-
tically switches off.
Mains operation
If the dictation machine has been switched on and is
connected to a charging unit, the unit will supply the dictation
machine with power. Inserted batteries or rechargeable
batteries will be neither used nor charged.
– Display for mains operation .
Safety hints for power supply/charging units
(Accessories)
Before putting the machine into operation, please ensure that
the supply voltage corresponds to the input voltage specified on
the power unit. A temperature rise in the housing during ope-
ration is normal and no cause for concern. During operation,
the charging unit should have good ventilation and should not
be used in the vicinity of radiators or in direct sunlight.
Maintenance: Only a dry cloth should be used to wipe off the
unit. Do not use solvents.

11
ENGLISH
PREPARATIONS______________________________________
Rechargeable battery operation
Operation using rechargeable batteries
To ensure smooth operation using rechargeable batteries, you
should always switch off the dictation machine once the
dictation is complete and reconnect it to the power supply so
that it can be recharged.
– Display for operation with rechargeable batteries .
Inserting rechargeable batteries
Only rechargeable batteries 462 may be charged inside the
dictation machine using mains/charging units 472/473.
•Switch off the dictation machine.
•Open the battery compartment.
•Insert the rechargeable batteries, making certain that
polarity and position are correct. Insert the rechargeable
battery with the removed sheathing into the compartment
with the lateral charging contact (see figure).
Warning:
Never place a standard battery together with a rechar-
cheable battery in the battery compartment.
This can destroy the battery.
HOLD

12
PREPARATIONS______________________________________
Warning:
The dictating machine gives an optical and audible war-
ning of weak rechargeable batteries. This is however only
the case when using 462 rechargeable batteries. When
using 462 rechargeable batteries there is also the guaran-
tee that if the batteries may become completely drained
the current task will be stopped in good time, and the dic-
tation saved.
As a result of technical differences between rechargeable
batteries 462 and some other makes, it is possible that
part or all of the dictation could be lost if original rechar-
geable batteries are not used.
Rechargeable batteries from other manufacturers are
identified by the dictation machine as non-rechargeable
batteries, and shown in the display by the symbol.
Charging the rechargeable battery
•Switch off the dictation machine.
•Plug the power supply into a wall outlet.
•Plug the power supply cord into the 3V
–
---
0.35A dictati-
on machine socket.
– The charging indication will be displayed after a short
time.
– The empty rechargeable batteries will be recharged
after approximately 3 hours; the charging indication
then disappears.
•Disconnect the power supply from the wall outlet and
remove the power supply cord from the 3V
–
---
0.35A
socket.

13
ENGLISH
PREPARATIONS______________________________________
Notes on rechargeable battery 462
New rechargeable batteries do not reach full capacity until
they have been recharged several times. For this reason the
operating time for new rechargeable batteries is a maximum
of 3 hours.
When these batteries are fully charged, you can use the
dication machine up to 7 hours.
The rechargeable batteries’ charge state is shown on the
dictation machine display.
– Rechargeable batteries charged;
– After approx. 2 hours operating time;
– After approx. 4 hours operating time;
– After approx. 7 hours operating time.
If the rechargeable batteries were completely recharged, a
brief warning beep (rechargeable battery/battery warning)
will sound after 7 hours operating time. During recording
mode, operation will automatically switch over to play mode.
The rechargeable battery symbol will flash on the display.
You will still be able to dictate for a few minutes before the dic-
tation machine automatically switches off. We recommend eit-
her starting the charging process after the warning beep or to
use the power supply to operate the dictation machine.
The rechargeable batteries will not be charged if the dictation
machine has been switched on and connected to the power
supply. You are now using the dictation machine in mains
operation.
The dictation machine’s operating system is ”shut down”
(as for a PC) when it is switched off. Sufficient power must still
be available for this purpose. If, after the dictation machine
has automatically switched off, you switch it back on again
without plugging in the power supply or if the rechargeable
batteries have not been recharged, your saved dictations may
be permanently lost.
14
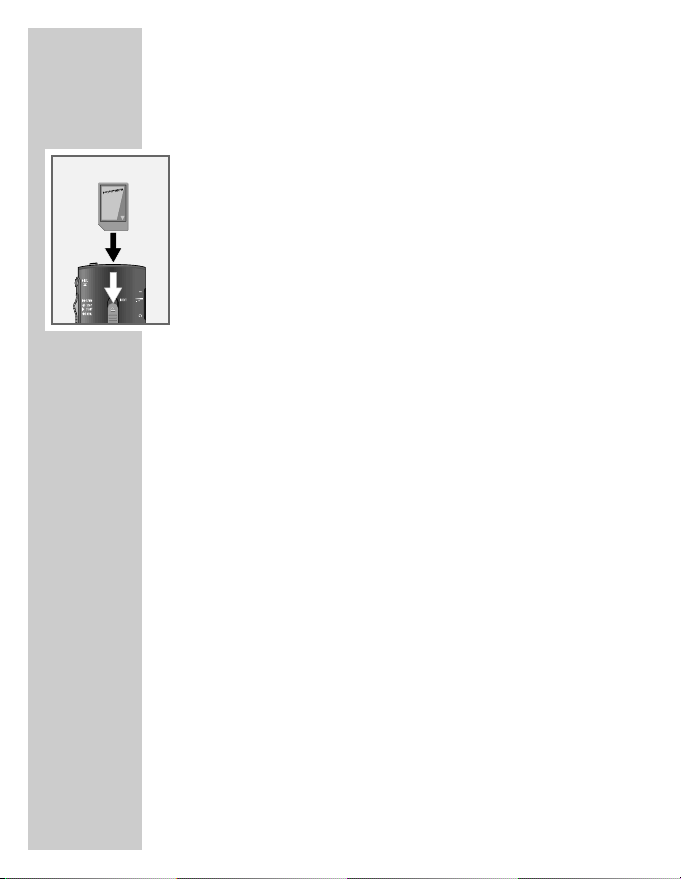
Inserting the MultiMediaCard or
SecureDigital card (not included)
You can use the MultiMediaCard/SecureDigital card
(MMC/SD) instead of an internal memory.
•Insert the MultiMediaCard/SecureDigital card (MMC/SD)
in the card slot with the sloping edge facing the direction
shown on the display or the back of the device.
Notes:
Do not insert the card with force. Slight pressure is
sufficient.
If a full memory card (e.g. with over 300 dictations) is
inserted into the dictation device with factory default
settings (or with a reset dictation counter), it takes up to
20 seconds to create a new dictation. This time is required
for the dictation device to search for the first free dictation
number starting from dictation number 1. This time also
varies depending on the brand of the memory card in use.
MultiMediaCards/SecureDigital cards from various manu-
facturers (SanDisk, Intel, Panasonic SDCard, Infineon etc)
have been tested which can be recommended.
PREPARATIONS______________________________________
EAR
3 V
0,35 A

15
ENGLISH
Formatting the MultiMediaCard or
SecureDigital cards (MMC/SD)
Memory cards – including those which have been preformat-
ted – must first be formatted with the dictation machine prior
to initial writing.
If an error message appears after a non-formatted memory
card is inserted, acknowledge this with the OK button.
The Format memory? and Memory formatted displays
should also be acknowledged with the OK button.
The memory card may not be formatted as a removable data
carrier using a PC formatting function.
New memory cards may only be formatted using the
“Formatting” menu function. It is essential that the notes in the
“MENU FUNCTIONS – Formatting” chapter be observed.
We recommend reformatting the memory card on a PC once
it has been overwritten several times. The memory card is
defragmented during formatting. Access to the next dictations
is then faster – especially when memory cards are full.
PREPARATIONS______________________________________

16
Switching on and off
Initial switch-on
•Press the ON/OFF button until appears in the display.
– The software is loaded.
– A menu with language selection appears in the display.
•Select a language using the up-down buttons ļor Ļ, for
example, English.
•Press the OK button.
– The device is ready for operation.
Subsequent switching on
•Press the ON/OFF button until the display is activated.
Switching off
•Briefly press the ON/OFF button.
Safety lock
•Push the ļ
HOLD slide-switch up.
Note:
If the safety lock is activated, the message Keys locked
appears in the display. If the machine is switched on inad-
vertently (e.g. when carrying it in a pocket), it is switched
off automatically.
SWITCHING ON ____________________________________
Deutsch
ŁEnglish
Francais
Ļļ OK ESC

17
ENGLISH
Saving dictations
Dictations are saved on the internal memory of the
dictation device (32 MB) if no memory card is in use.
– Brief display in the status line for internal memory: INT.
Commercially-available MultiMediaCards (MMC) or
Secure-Digital Cards (SD) can be used as an alternative to
archive dictations.
We recommend memory cards with a capacity of up to
max. 32 MB.
If a MultiMediaCard or SecureDigital card is inserted, all
dictations are saved on this memory card. The internal
memory is protected against access during this. It is not
possible to copy between the internal memory and the
memory card.
– Brief display in the status line for MultiMediaCard or
SecureDigital card: MMC/SD.
Dictation
•Speak over the dictation machine.
– The figure shows the optimum position of the dictation
machine. The high-quality microphone allows also for
recordings over greater distances.
RECORDING __________________________________________
Free 0:37h
no dictations va c
INT
Free 0:37h
no dictations va c
MMC/SD
D
igta
4015

18
New dictation
•Push the sliding switch to STOP.
•Press the NEW button.
– A new dictation with the next highest number is created,
display: »DICT002«, for example. The date and the
time are saved along with every dictation (displayed only
on the PC).
– The red recording display flashes, Record Pause
appears in the display.
Notes:
The dictation counter can be reset in the Settings menu.
If the Folder, Typist, Dictation type, Group or
No./Ref. functions are activated, the appropriate
selection lists appear, please refer to the “MENU
FUNCTIONS” chapter.
Use the up-down button ļor Ļto select the entry you
want and confirm with OK.
•Push the sliding switch to ŁSTART.
– The recording display illuminates, Record, appears in
the display and the device begins to record.
Recording-pause
•Set the slide-switch to STOP.
– The recording indicator flashes, the message Record
Pause appears in the display.
Ending recording
•Press the red recording button ļ
–
DICT.
Fast forward or rewind during a recording also ends the
recording.
Note:
When recording is ended, the date and the time are saved
along with every dictation (displayed only on the PC).
RECORDING __________________________________________
Free 0:37h
no dictations va c
MENU
NEW

19
ENGLISH
Info function
You can dictate and mark information for your transcriber as
an integral part of your dictation.
The transcriber can listen to all information separately from the
letter text before starting transcription.
•Press the red recording button ļ
–
DICT and then the INFO button.
– INFO appears in the display and the number for the
information (from 01 to 16). This information is trans-
ferred to the PC with the dictation.
Editing a dictation
When playing back a dictation, you may speak a new text
from the current dictation position, or add a recording to the
end of the dictation.
Note the memory which is available; this is displayed as
Free -:--h (in hours and minutes).
•Push the sliding switch to STOP.
•Use the up-down button DICT+
_to select the desired
dictation.
•Push the sliding switch to ŁSTART.
•Press the red recording button ļ
–
DICT at the point where the
dictation is to be changed and start dictation.
– Record appears in the display.
•At the end of dictation push the sliding switch to
STOP.
•Press the red recording button ļ
–
DICT or push the sliding switch
to ĵĵ REW. or ŁŁ F.FWD.
– Dictation is switched off.
RECORDING __________________________________________
Free 0:37h
DICTOO1 O:17
vac
Record

20
Note:
If the dictation machine is switched off during a dictation
using the ON/OFF button, you will skip to the end of the
dictation when switching the machine on again with the
ON/OFF button and then pressing the recording
button ļ
–
DICT .
Inserting part of a dictation or info message
During playback you can add a new recording or add infor-
mation for the transcriber at the current dictation position.
•Push the sliding switch to STOP during play-back.
•Press the red recording button ļ
–
DICT.
– Record Pause appears in the display.
•Press the INS button (if you want to insert part of a dictati-
on) or the INFO button (to record an info message).
– Insert Pause appears in the display.
•Push the sliding switch to ŁSTART and record the text to
be inserted.
– Insert appears in the display.
•At the end of the dictation, push the sliding switch to
STOP.
•Press the red recording button ļ
–
DICTor push the sliding switch
to ĵĵ REW. or ŁŁ F.FWD.
– Dictation is switched off.
RECORDING __________________________________________
Free
0:37h va c
DICTOO1 O:14
..................[.............................
Insert Pause
NEW
Free
0:37h va c
DICTOO1 O:14
..................[.............................
Insert
Table of contents
Other Dictaphone Voice Recorder manuals

Dictaphone
Dictaphone ExecTalk Plus 1709 User manual

Dictaphone
Dictaphone Walkabout 5210 User manual

Dictaphone
Dictaphone Walkabout Quest User manual

Dictaphone
Dictaphone 1925 Thought Tank User manual

Dictaphone
Dictaphone Digital Express DX4000 User manual

Dictaphone
Dictaphone 1244 User manual

Dictaphone
Dictaphone Walkabout User manual

Dictaphone
Dictaphone travel master 220 User manual

Dictaphone
Dictaphone Walkabout 5210 User manual

Dictaphone
Dictaphone 2225 User manual


