Dictaphone ExecTalk Plus 1709 User manual


Description
The Dictaphone ExecTalk PlusTMvoice pro-
cessing system is a deluxe, fully-featured
machine with enhanced features designed
for the convenience of both the dictator and
the transcriptionist. Dictation features in-
clude a 3-line time line display, a combined
alarm clockltape counter/stopwatchltime
counter, voice-activated recording
(VOX),
one-step Conference recording, Telephone
recording (using an induction coil or
adapter), a mute control for filtering out or
reducing background noise, and a full
series of alert tones. The ExecTalk Plus dic-
tatingltranscribing machine uses a Lite
MikeTMhand microphone with separate Let-
ter and Special Instruction Q-AlertB indexing
controls. An optional telephone style hand-
set microphone and cradle are also
available.
For the transcriptionist, the ExecTalk Plus
desktop includes scan (for displaying the
contents of the cassette on the time line),
search (for previewing special instructions),
letter and instruction counters, a hold fea-
ture, audible single and double cue tones,
fully adjustable auto backspace and built-in
erase. To transcribe from the ExecTalk Plus
unit, add a DictamaticBfoot control and
choice of headsets.
Machines equipped with a two-speed TAPE
SPEED switch, permit you to record (and
play back) at half speed, doubling the re-
cording capacity of a single cassette to up
to two full hours. Machines with a FAST
PLAY button permit you to listen to play-
back at a speed approximately
25%
faster
than normal.
The ExecTalk Plus unit comes with an AC
power supply, a blank cassette and a dust
cover.
CONTENTS
..........
Description Inside Front Cover
.............
Controls and Indicators 1
...............
Dictating Instructions
3
...................
Dictation Setup
3
...................
Power OnIOff
3
..............
Setting ClockIAlarm
3
................
Loading Cassette
4
...............
Recording Dictation
5
....
Voice-Activated (Vox) Recording
5
................
Q-Alert@Indexing 6
..............
Reviewing Dictation 6
FastPlay
......................
7
.................
Editing Dictation 7
.................
Ending Dictation
7
.............
Conference Recording 7
..............
Telephone Recording 7
.................
Dictation Display
8
..............
Dictation Alert Tones 10
Accessories and Options for Dictation 11
............
Transcribing Instructions 12
...............
Transcription Setup 12
...................
Power OnIOff
12
..............
Setting ClocklAlarm 13
.............
TranscriptionDisplay
14
...........
Transcribing Procedures 16
................
Loading Cassette 16
.........
Previewing Tape Contents 16
...........
Beginning to Transcribe 17
..................
Auto Backspace 17
..........................
Erase 18
...........
Transcription Alert Tones 18
Accessories and Options for
.....................
Transcription 18
...........
Transcription-at-a-Glance 18
.....................
Specifications 19
Notices
..........................
19
Controls and Indicators
This section contains a brief description of
all controls and indicators on the ExecTalk
PlusTMvoiceprocessingsystem. Refer to the
labeled photograph on the front foldout for
location of these controls and indicators. For
complete operating instructions, see appro-
priate sections of this manual.
Recorder
On Press to turn unit on or off. Red LED
illuminateswhen unit is on. With hand
microphone and cradle attached, lifting
microphone turns unit on. Replacingthe
microphone in the cradle turns unit off. Red
ON LED also serves as a voice-modulation
monitor during recording modes.
Conf (Conference) Press to enter Con-
ference Record mode. Red LED illuminates.
Press CONF or STOP to terminate.
Tel Rec (Telephone Record) With a
telephone adapter attached, press and hold
until red LED illuminates. Disables all other
functions. Press again to cancel Telephone
mode.
Search Press to locate rapidly and listen to
special instructions recordedon tape before
beginning transcription.
Play Press to listen to dictation. Green
LEDs illuminate. Touch STOP, REWIND or
FF (Fast Forward) to cancel.
Stop Press to terminate any tape motion
functions except Telephone Record.
Rewind Press to rewind tape. Green LED
illuminates.Touch STOP, FF (Fast Forward)
or PLAY to cancel.
FF
(Fast Forward) Press to advance tape
rapidly. Green LED illuminates.Touch STOP,
REWIND or PLAY to cancel.
Scan Press to rewind and simultaneously
display cassette contents.
F
Play (Fast Play) If your machine has an
F Play button, press to hear fast playback
of recording from play mode. Amber LED
illuminates. All playback will be 25% faster
than normal. Press F Play again to cancel
Fast Play mode.
Erase Press simultaneouslywith either
REWIND or FF to erase dictation. Red LED
illuminates.
Speaker Move switch to ON position to
hear playback through internal speaker.
When in OFF position, playback is heard
through the microphone or headset.
Tape Speed If your machine has a TAPE
SPEED switch, the standard setting is
2.4,
which provides optimum sound quality.
'
Move switch to 1.2 (half speed) position to
double recording capacity.
VOX Move switch to ON position for voice-
activated recording in Record Lock, Con-
ference or Telephone Record mode.

Mute Move switch to ON position to filter
out or reduce recording of background
noise when dictating in noisy locations.
Clear With the recorder turned on, press
to reset digital counter to zero.
Hold Press to "freeze" the display when a
cassette is removed temporarily. "Hold"
indicator appears in the far right section of
the display.
Mode Tap to enter any of the five display
modes-Clock, Alarm, Timer, Time Counter
and Counter.
Select Press to select the time element
(hours, minutes, AMlPM12Chour format) you
want to change.
Set Press to change the selected time and
to turn on and off the alarm andlor timer.
Display Window Contains Letter and
InstructionsCounters, Time Line display,
digital Clock and Timers, No Cassette and
End of Tape indicators.
Eject Press to open cassette compartment
door and clear display.
Volume Adjusts volume of playback.
ToneNOX Adjusts playback bassltreble
range; in VOX mode, adjusts recording sen-
sitivity level.
Microphone/Foot ControlJack Receptacle
on left side panel of recorder for connecting
hand microphone or foot control.
HeadsetJack Receptacle on right side
panel of recorder for connecting headset.
Lite MikemHand Microphone
Stop Press to terminate any function ex-
cept Telephone mode.
Rewind/Play Hold down to rewind tape;
release for auto playback. Green LED
illuminates in Play mode.
Lock Press to Lock unit into Continuous
Record mode. Red LED illuminates. Press
STOP, RECORD or REWINDIPLAYto
cancel.
Record Hold down to record dictation;
release to stop recording. Red LED
illuminates.
L
Cue Button To mark end-of-letter, press
L (Letter) cue button. A tone will sound.
F
Fwd Hold down to fast forward tape.
Release button to stop or to enter autoplay
mode (if recorder was in Play mode prior to
fast forward).
S Cue Button Press S (Special Insrruction)
cue button once to record a Special Instruc-
tion cue. Two tones will sound.
Speed Adjusts playback speed when unit
is in use as a transcriber.

Dictating Instructlons
Dictation Setup
Attach the microphone cradle to the left
side of the machine.
Insert the microphone plug into the
MICROPHONEIFOOTCONTROL jack on
the left side of machine with the cable
exiting toward the front.
If your machine has a TAPE SPEED
switch, move the switch to the 2.4 posi-
tion. (The slower 1.2 cmlsec speed may
be used for lengthy recordings.)
Power OnlOff
Plug the power supply cord into the
POWER jack on the rear of the machine.
Plug the power supply cable into any
grounded AC 120V wall outlet.
Pick up the hand microphoneor press
the ON button on the desktop control
panel to turn on the unit. On LED
illuminates.
To turn off unit, replace the hand micro-
phone in its cradle or press the ON but-
ton on the desktop control panel. On LED
extinguishes.
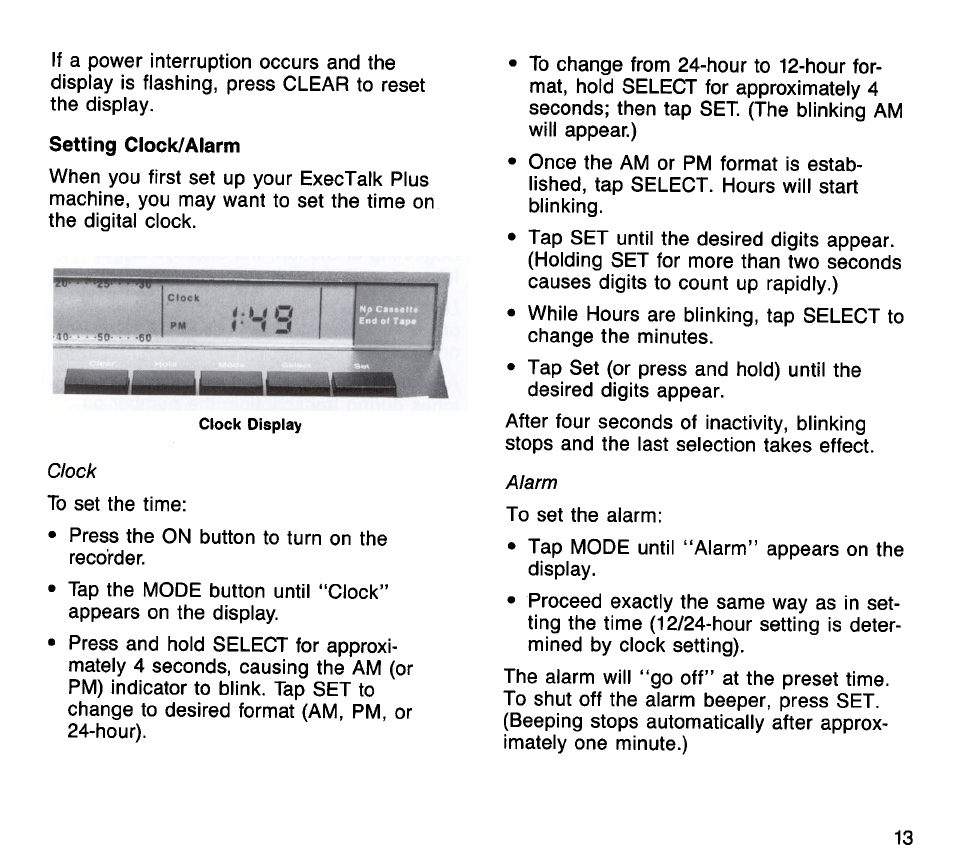
If
a power interruptionoccurs and the
display is flashing, press CLEAR to reset
the display.
Setting ClocklAlarm
When you first set up your ExecTalk Plus
machine, you may want to set the time on
the digital clock.
Clock
Display
Clock
To set the time:
Press the ON button to turn on the
recorder.
Tap the MODE button until "Clock" ap-
pears on the display.
Press and hold SELECT for approxi-
mately 4 seconds, causing the AM (or
PM) indicator to blink. Tap SET to change
to desired format (AM, PM, or 24-hour).
To change from 24-hour to 12-hour for-
mat, hold SELECT for approximately
'4:
seconds; then tap SET. (The blinking AM
will appear.)
Once the AM or PM format is estab-
lished, tap SELECT. Hours will start
blinking.

Tap SET until the desired digits appear.
(Holding SET for more than two seconds
causes digits to count up rapidly.)
While Hours are blinking, tap SELECT to
change the minutes in the same way you
changed the hours.
Tap SET (or press and hold) until the
desired digits appear.
After four seconds of inactivity, blinking
stops and the last selection takes effect.
Alarm
To set the alarm:
Tap MODE until "Alarm" appears on the
display.
Proceed exactly the same way as in set-
ting the time (12124-hour format is deter-
mined by clock setting).
The alarm will "go off" at the preset time.
To shut off the alarm beeper, press SET.
(Beeping stops automatically after approx-
imately one minute.)
To turn off Alarm mode, press SET while in
Alarm mode. Whenever the alarm setting is
changed, the alarm is turned on.
When the alarm is on, "Alarm" remains on
the digital display regardless of current
mode.
NOTE: If using a
C
30 standard cassette,
tap MODE until "C 60" appears on the
display; then tap SET to change cassette
length setting to
"C
30."
(See Dictation Display section for informa-
tion on the Timer and Counter modes.)
Loading Cassette
Press EJECT button to open cassette
compartment door.
Alarm
Insert tape as illustrated in the diagram
AM
b-4
.
~4
1-4
7
inside the cassette compartment, with
1P
'n
tn
3.~
U
J
Side 1 up and exposed tape toward you.
";I
Press down on cassette compartment
door until it latches.
Alarm
Display

Recording Dictation
To record dictation:
Lift microphone from its cradle.
Holdingthe microphone approximately
3
inches from your mouth, press and hold
the RECORD button. (Record LED illumi-
nates and On LED modulates.) Begin
speaking in a normal voice.
Release the RECORD button to stop
recording. (Record LED extinguishes.)
For continuous recording, use Record Lock
mode. If you wish to record "hands free,"
you can leave the microphone in its cradle.
Press
ON
button on the desktop control
panel.
Press LOCK button on the hand micro-
phone. To stop recording, press STOP
If you are recording in
a
noisy location,
move the MUTE switch to the
ON
position
to reduce recording of excessive back-
ground noise.
(See Dictation Display section for informa-
tion on the multi-functionLCD display.)
Voice-Activated
(VOX)
Recording
While using the Vox mode, you can dictate
hands-freeand pause as much as you want
without wasting tape. Your voice causes
recording to start. When you pause, the
tape stops moving until you begin speaking
again.
For Vox recording:
Press ON button.
Move VOX switch on control panel to ON
position.
Control Panel

Depending upon the amount of
background noise, you may need to ad-
just Vox sensitivity; slide the TONENOX
control to the right
(+)
to increase sen-
sitivity or towards the left
(-)
to decrease
sensitivity.
Press LOCK button on hand microphone.
(Microphone may remain in cradle.)
Recording begins when you start speak-
ing. Tape movement continues for approx-
imately four seconds after voice stops
and resumes when speaking continues.
-
To stop Vox recording:
Move VOX switch to OFF position. To
stop tape motion, press STOP.
NOTE: Cue tones can be recorded in Vox
mode. (See Q-Alert Indexing.) Vox can also
be used in conferenceand Telephone
Record modes.
Q-Alert@Indexing
When you finish dictating a letter or docu-
ment, mark this position on the tape. Mark-
ing the place where each letter ends makes
it easy for you to find your place for review
and allows the transcriptionist to locate eas-
ily each individual letter andlor special
instruction.
To record a Letter cue tone:
At the end of your letter or document,
press and release the
"C'
(Letter) cue
button on the hand microphone. A tone is
recorded, the count on the Letters
counter increases by one, and a space
appears on the upper time line to
separate the segment bars representing
that document from the next document.
To record a Special instruction such as a
priority designation for the transcriptionist:
At the point where you want to record a
special instruction, press and release the
"S" (Special Instruction)cue button on
the hand microphone before dictating the
instruction. Two tones are recorded, a
segment bar appears on the lower time
line display and the count on the Instruc-
tions counter increases by one.
A maximum of
28
cues of each type can be
recorded on a single cassette.
Reviewing Dictation
You may listen to your dictation through the
speaker in the hand microphone or through
the unit's internal speaker (move SPEAKER
switch on the desktop unit to the ON
position).
To rewind, press and hold the REWIND1
PLAY button on the Lite Mike microphone.
During rewind you will hear audible feed-
back and all cue tones to facilitate place-
finding. Release button for automatic,
playback.

Adjust volume and tone by moving the
VOLUME and TONE controls to the left or
right.
Press F FWD (Fast Forward) to return
rapidly to the last word dictated. An alert
tone sounds, telling you that you have
reached the end of recording and may
continue dictating.
Fast Play
If your machine has a F Play (Fast Play)
button, you can listen to playback at a
speed approximately
25%
faster than
normal.
Press
F
PLAY on the desktop control
panel. Amber LED illuminates.
Release REWINDIPLAY button on hand
microphone or press PLAY button on
desktop control panel.
To terminate Fast Play, press F PLAY but-
ton. LED extinguishes.
Editing Dictation
To edit dictation, rewind or fast forward tape
to the desired location.
Press RECORD and dictate over
unwanted material.
Ending Dictation
When dictation is complete:
Press EJECT to remove the cassette.
NOTE: For your convenience and for more
efficient transcribing, it is recommended
that the cassette be rewound by the
transcriptionist.
Conference Recording
The ExecTalk Plus desktop dictating
machine can be used to record meetings,
small group conferences, interviews, etc.
Conference recordings can also be used as
reminders or for verification and may not
necessarily be transcribed.
To record conferences:
Place the microphone in a central
location.
Press the ON button.
Press the CONF (Conference) button on
the desktop control panel. The red Conf
LED illuminatesand continuous recording
begins.
Voice-activated recording (Vox) may be
used by moving the VOX button to the
ON position before or after putting the
unit into Conference mode.
To terminate Conference mode:
Press STOP or CONF on the control
panel.
Telephone Recording
Telephone recording is used to record two-
way telephone conversationswhen an
optional telephone record adapter is con-
nected. You may wish to record telephone
conversationsto review information as well
as to verify notes and reminders for
follow-up.
To record two-way telephone conversations:
Plug the optional telephone induction coil
or record adapter into the TEL REC jack
on the back of the unit. Attach the other
end to your telephone.
Press the ON button.
Press and hold the TEL REC (Telephone
Record) button until the red Tel Rec LED
illuminates. (Conference mode is ac-
tivated automatically to pick up weak
telephone line signals.)
Press the TEL REC control to stop record-
ing and to terminate Telephone mode.
Letters ~etterb
Counter (Upper
T~me
L~ne)
\
NOTE: If the telephone recording device is
not attached prior to pressing the TEL REC
button, recordingwill not occur; a warning
tone will alert you to connect the telephone
adapter.
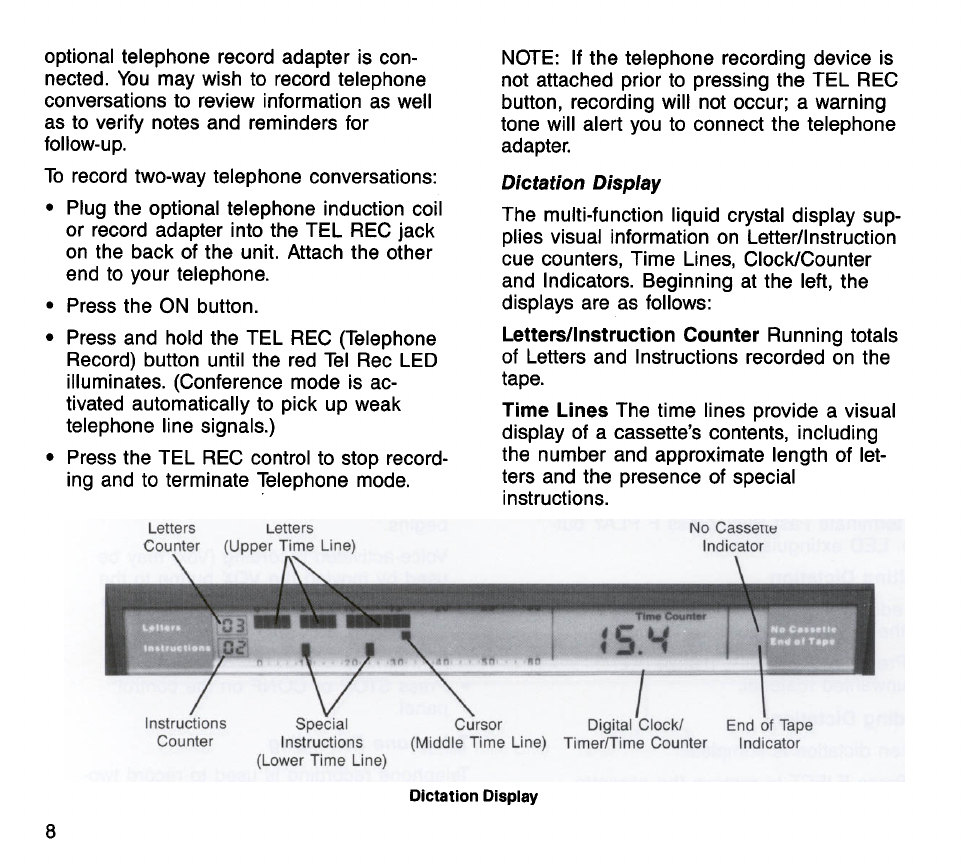
Dictation Display
The multi-functionliquid crystal display sup-
plies visual informationon Letterllnstruction
cue counters, Time Lines, ClocklCounter
and Indicators. Beginning at the left, the
displays are as follows:
Letters/lnstruction Counter
Running totals
of Letters and Instructions recorded on the
tape.
Time Lines
The time lines provide a visual
display of a cassette's contents, including
the number and approximate length of let-
ters and the presence of special
instructions.
/
Instructions Special
v
\
Cursor
Digitel
I
Clockl End
1
of
Tape
Counter lnstrudions (Middle Time Line) TimedTime Counter Indicator
(Lower Time Line)
DictationDisplay
Upper Time Lines: Shows amount of dicta-
tion and approximate location of each letter
on the tape. Each bar represents approx-
imately one minute of dictation. Letters are
separated visually by a space between the
bars. (Very short letters may not show up on
the time line; however, the letter counter
gives an accurate count of all letters on the
tape.)
Middle Time Line: Blinking bar (cursor)
shows current position on tape regardless of
mode.
Lower Time Line: Shows number and loca-
tion of instructions.
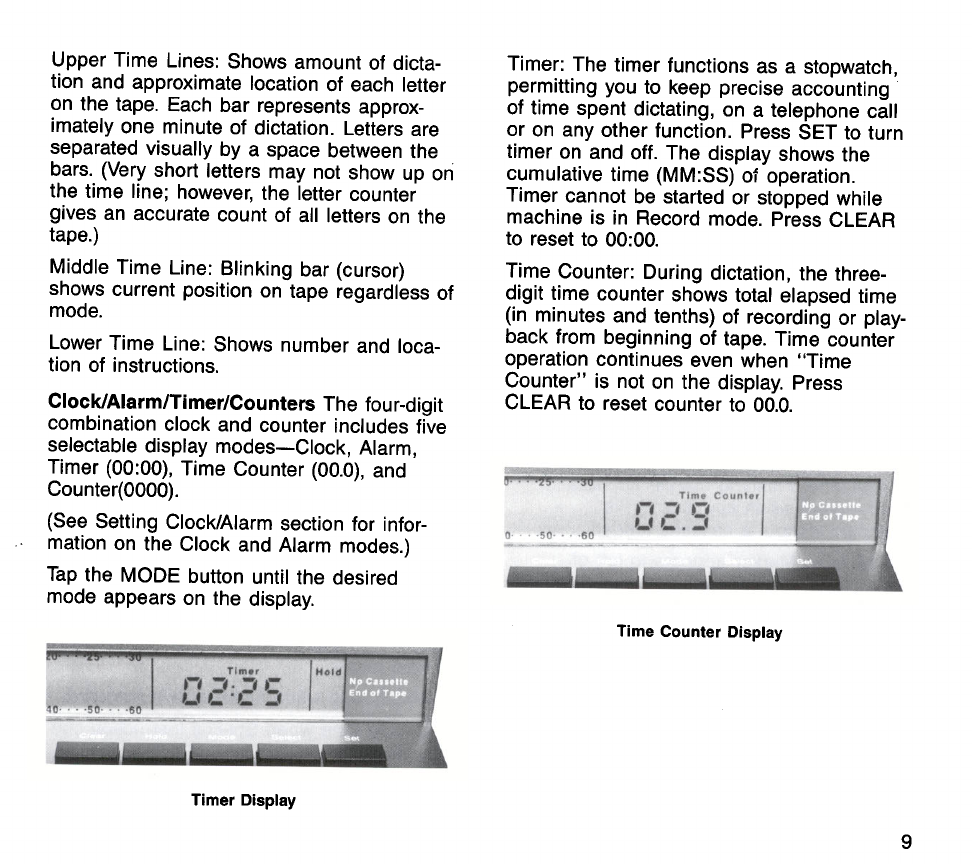
Clock/Alarm/Timer/Counters
The four-digit
combination clock and counter includes five
selectable display modes-Clock, Alarm,
Timer (00:00), Time Counter (00.0), and
Counter(0000).
(See Setting ClockIAlarm section for infor-
mation on the Clock and Alarm modes.)
Timer: The timer functions as a stopwatch,
permitting you to keep precise accounting
of time spent dictating, on a telephone call
or on any other function. Press SET to turn
timer on and off. The display shows the
cumulative time (MM:SS) of operation.
Timer cannot be started or stopped while
machine is in Record mode. Press CLEAR
to reset to 00:OO.
Time Counter: During dictation, the three-
digit time counter shows total elapsed time
(in minutes and tenths) of recording or play-
back from beginning of tape. Time counter
operation continues even when "Time
Counter" is not on the display. Press
CLEAR to reset counter to 00.0.
Tap the MODE button until the desired
mode appears on the display.
Time
Counter
Display
Timer
Display

Counter: The tape counter counts up with
forward motion of tape and down during re-
wind motion. Counter operation continues
even when "Counter" is not on the display.
Press CLEAR to reset counter to
0000.
Dictation Alert Tones
A continuous tone will sound if record or
playback is attempted under the following
conditions:
Counter
Displav
Indicators
No Cassette: Flashing marker appears to
left of legend when any function is
attempted without a cassette loaded.
End of Tape: Marker appears to left of
legend when any forward tape motion is
attempted at end of tape. Approximately two
minutes before end of tape, marker is
steadily illuminated and a continuous tone
sounds.
Hold: "Hold" appears in the far right sec-
tion of the display when HOLD button is
pressed to freeze the entire display of the
cassette's contents.
No cassette loaded
Record protect tabs removed
Broken tape
No tape motion
brief tone will sound when:
Machine is first turned on and no
cassette is loaded
Beginning of tape is reached in Rewind
or end of tape is reached in Fast Forward
or Play modes
Last word recorded is reached in Play or
Fast Forward modes using desktop or
microphone controls
End zone is reached (tone every
15
seconds for final
2-3
minutes before end
of tape)
TEL REC is pressed and no telephone
adapter is connected
Q-Alert tones:
Single tone when Letter cue is recorded
Double tone when Special Instruction cue
is recorded
Singleldoubletones (easily distin-
guishable during rewind or fast forward
using hand microphone controls)
Accessories and Options for Dictation
Handset Terminal (PIN 860057)-provides
telephone style handset convenience for
recording dictation. All the benefits of
Q-Alert indexing and status indicators are
contained on the handset cradle for easy
operation.
Telephone Record Adapters-For recording
two-way telephone conversations.
Conference Microphone(PIN 878829)-
Specially designed microphone for record-
ing conferences, interviews, meetings, etc.
Hands-Free Dictate Station-Provides
hands-free recording using
a
foot control.
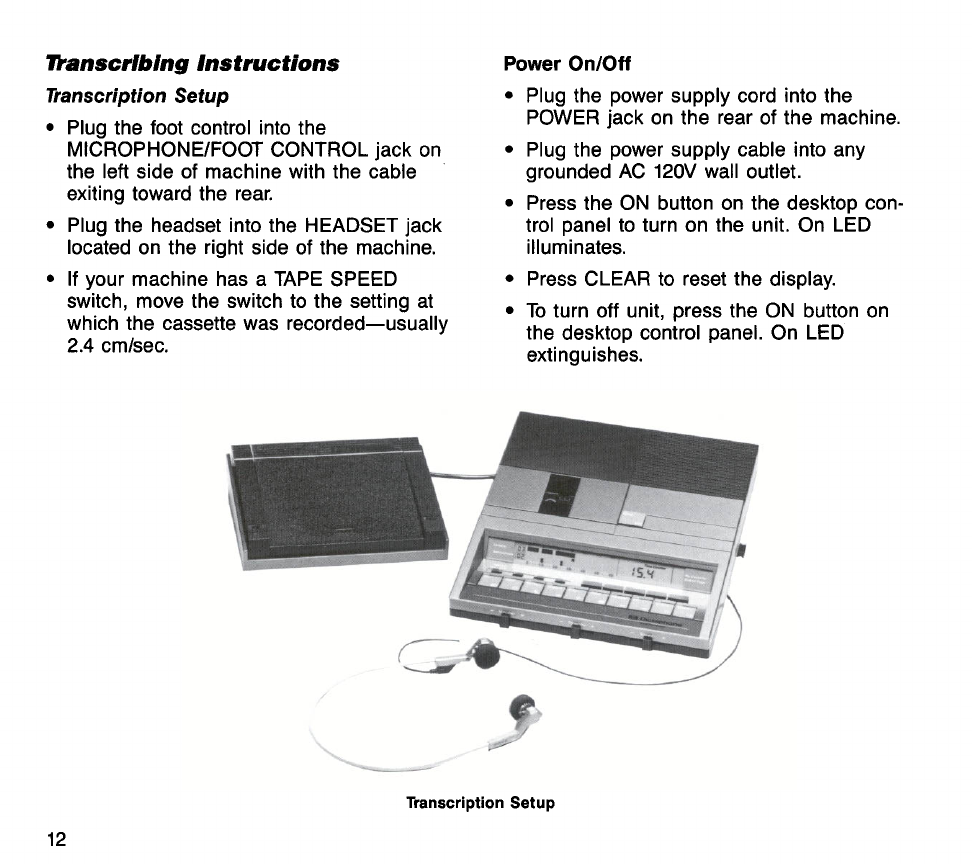
Wanscribing Instructions
Transcription Setup
Plug the foot control into the
MICROPHONEIFOOTCONTROL jack on
the left side of machine with the cable
exiting toward the rear.
Plug the headset into the HEADSET jack
located on the right side of the machine.
If your machine has a TAPE SPEED
switch, move the switch to the setting at
which the cassette was recorded-usually
2.4
cmlsec.
Power
OnIOff
Plug the power supply cord into the
POWER jack on the rear of the machine.
Plug the power supply cable into any
grounded AC
120V
wall outlet.
Press the ON button on the desktop con-
trol panel to turn on the unit. On LED
illuminates.
Press CLEAR to reset the display.
To turn off unit, press the ON button on
the desktop control panel. On LED
extinguishes.
Transcription
Setup
If a power interruption occurs and the
display is flashing, press CLEAR to reset
the display.
Setting
ClockIAlarm
When you first set up your ExecTalk Plus
machine, you may want to set the time on
the digital clock.
Clock
Display
Clock
To set the time:
Press the ON button to turn on the
reco'rder.
Tap the MODE button until "Clock"
appears on the display.
Press and hold SELECT for approxi-
mately 4 seconds, causing the
AM
(or
PM) indicator to blink. Tap SET to
change to desired format (AM, PM, or
24-hour).
To change from 24-hour to 12-hourfor-
mat, hold SELECT for approximately 4
seconds; then tap SET. (The blinking AM
will appear.)
Once the AM or PM format is estab-
lished, tap SELECT. Hours will start
blinking.
Tap SET until the desired digits appear.
(Holding SET for more than two seconds
causes digits to count up rapidly.)
While Hours are blinking, tap SELECT to
change the minutes.
Tap Set (or press and hold) until the
desired digits appear.
After four seconds of inactivity, blinking
stops and the last selection takes effect.
Alarm
To set the alarm:
Tap MODE until "Alarm" appears on the
display.
Proceed exactly the same way as in set-
ting the time (12124-hoursetting is deter-
mined by clock setting).
The alarm will "go off" at the preset time.
To shut off the alarm beeper, press SET.
(Beeping stops automatically after approx-
imately one minute.)
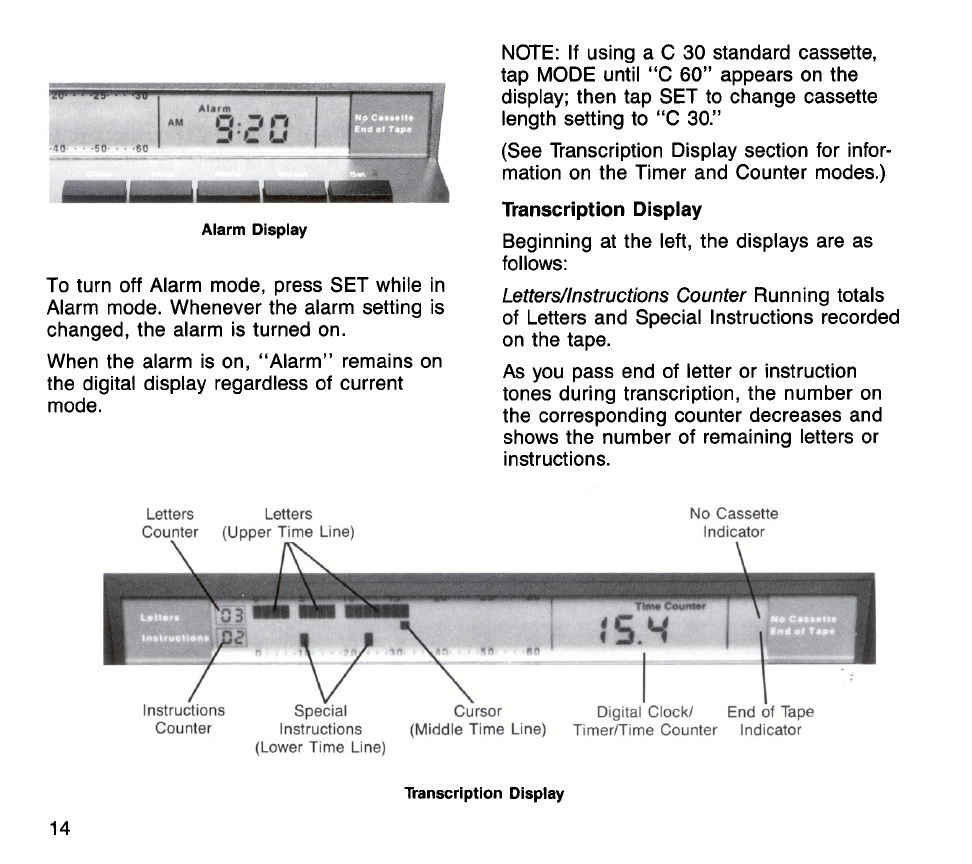
Alarm Display
To turn off Alarm mode, press SET while in
Alarm mode. Whenever the alarm setting is
changed, the alarm is turned on.
When the alarm is on, "Alarm" remains on
the digital display regardless of current
mode.
Letters Letters
Counter NmerTime Line)
NOTE: If using a C 30 standard cassette,
tap MODE until
"C
60" appears on the
display; then tap SET to change cassette
length setting to
"C
30."
(See Transcription Display section for infor-
mation on the Timer and Counter modes.)
Transcription Display
Beginning at the left, the displays are as
follows:
Letters/lnstructions Counter Running totals
of Letters and Special Instructions recorded
on the tape.
As you pass end of letter or instruction
tones during transcription, the number on
the correspondingcounter decreases and
shows the number of remaining letters or
instructions.
No Cassette
lndicator
Digital Clock1 End of
Tape
Counter Instructions (Middle Time Line) TimerKime Counter Indicator
(Lower Time Line)
Transcription Display

Time Lines The time lines provide a visual
display of a cassette's contents, including
the number and approximate length of let-
ters and the presence of special instruc-
tions.
Upper Time Line: Shows amount of dicta-
tion and approximate location of each letter
on the tape. Each bar represents approx-
imately one minute of dictation. Letters are
separated visually by a space between bars.
(Very short letters may not show up on the
time line; however, the letter counter gives
an accurate count of all letters on the tape.)
Middle Time Line: Blinking bar (cursor)
shows current tape position regardless of
mode.
Lower Time Line: Shows number and loca-
tion of instruction cues.
ClocWAlarm/Timer/Counters
The four-digit
combination clock and counter includes five
selectable display modes-Clock, Alarm,
Timer (00:00), Time Counter (00.0), and
Counter (0000).
(See Setting ClocklAlarm section for infor-
mation on the Clock and Alarm modes.
Timer mode would not be used during
transcription.)
Time Counter You will probably use the
Time Counter mode frequently during
transcription since it provides you with an
indication of the exact length of each letter
before you begin transcribing.
Time Counter Display
To view the length of the current letter as
you begin transcribing, tap MODE until
"Time counter" appears on the display.
During transcription, the time counter shows
the total length of a letter in minutes and
tenths when tape is at the beginning of a
letter. As transcription progresses, the
counter counts down until it reaches 00.0 at
the end of each letter.
Counter The tape counter counts up with
fast forward motion of tape and down during
rewind motion. To view this setting, tap
MODE until "Counter" appears on the
display. Press CLEAR to reset counter to
0000.
Counter
Display
Indicators
No Cassette: Flashing marker appears to
left of legend when any function is
attempted without a cassette loaded.
End of Tape: Marker appears to left of
legend when any forward tape motion is
attempted at end of tape.
Hold: "Hold" appears in the far right sec-
tion of the display when the HOLD button is
pressed. When you need to remove a cas-
sette temporarily, press HOLD to "freeze"
the entire display of the cassette's contents.
You may then transcribe from another cas-
sette without losing the display for the first
cassette. When you re-load the first cas-
sette, press HOLD to "unfreeze" the display
before continuing to transcribe.
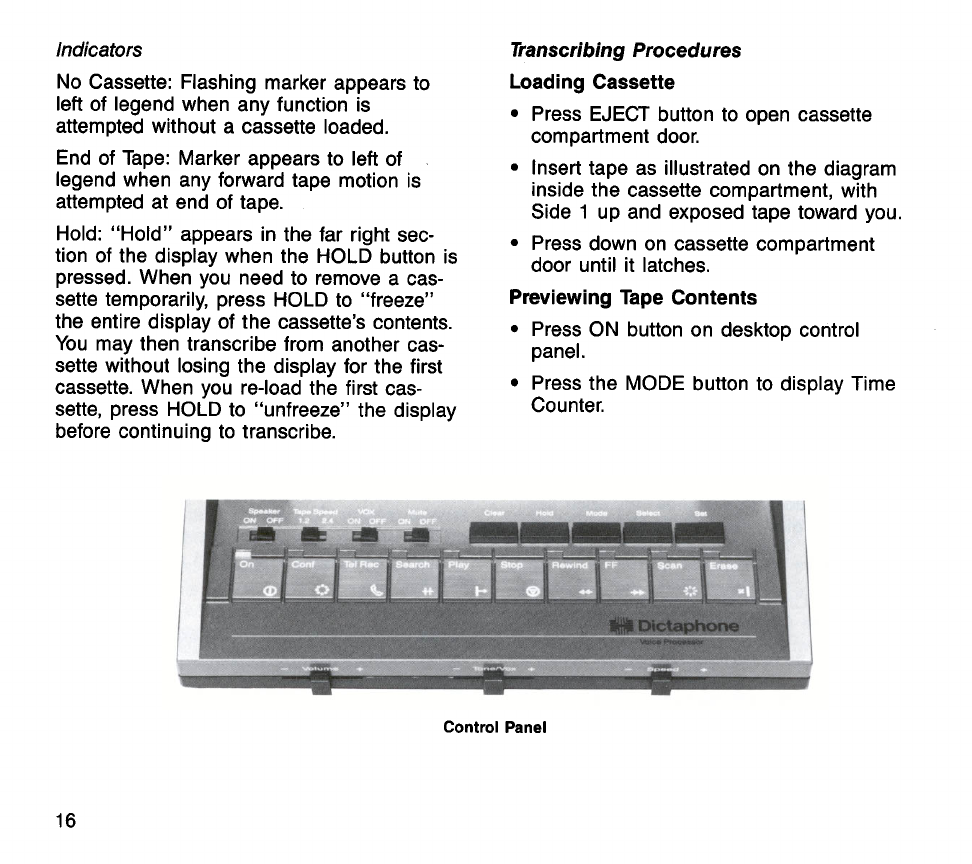
Transcribing Procedures
Loading Cassette
Press EJECT button to open cassette
compartment door.
Insert tape as illustratedon the diagram
inside the cassette compartment, with
Side
1
up and exposed tape toward you.
Press down on cassette compartment
door until it latches.
Previewing Tape Contents
Press ON button on desktop control
panel.
Press the MODE button to display Time
Counter.
This manual suits for next models
4
Table of contents
Other Dictaphone Voice Recorder manuals

Dictaphone
Dictaphone Walkabout Quest User manual

Dictaphone
Dictaphone Walkabout 5210 User manual

Dictaphone
Dictaphone Walkabout User manual

Dictaphone
Dictaphone Digital Express DX4000 User manual

Dictaphone
Dictaphone WALKABOUT 5215 User manual

Dictaphone
Dictaphone 1244 User manual

Dictaphone
Dictaphone Walkabout 5210 User manual

Dictaphone
Dictaphone 1925 Thought Tank User manual

Dictaphone
Dictaphone 2225 User manual

Dictaphone
Dictaphone travel master 220 User manual


