Dictaphone Walkabout Quest User manual

http://www.dictaphone.com
Dictaphone products are manufactured under the
International Standard ISO 9002 approved quality process.
Dictaphone®is a registered trademark of the
Dictaphone Corporation, Stratford, CT. Boomerang,™
Walkabout,
™and Voicedata™are trademarks of the
Dictaphone Corporation.Windows®and Microsoft®are
registered trademarks of the Microsoft Corporation.
Sound Blaster®is a registered trademark of Creative
Technology Ltd.
©1998 Dictaphone Corporation.All rights reserved.
L-2378 10/98 Operating Instructions
The In-Touch Digital Recorder

vi
Contents
Section 1:
Overview
. . . . . . . . . . . . . . . . . . . . . . . . . . . . . . . . . . . . . 1
■
PC-Connectivity . . . . . . . . . . . . . . . . . . . . . . . . . . . . . . . . . . . . . . . . . 1
■
Features . . . . . . . . . . . . . . . . . . . . . . . . . . . . . . . . . . . . . . . . . . . . . . . 1
Section 2:
Getting Started
. . . . . . . . . . . . . . . . . . . . . . . . . . . . . . . 2
■
Load the Batteries . . . . . . . . . . . . . . . . . . . . . . . . . . . . . . . . . . . . . . . 2
■
Turn on the Portable . . . . . . . . . . . . . . . . . . . . . . . . . . . . . . . . . . . . . 2
■
Set the Time/Date . . . . . . . . . . . . . . . . . . . . . . . . . . . . . . . . . . . . . . . 2
■
Operate the Portable . . . . . . . . . . . . . . . . . . . . . . . . . . . . . . . . . . . . . 2
Section 3:
Using the Quest Digital Recorder
. . . . . . . . . . . . . 5
■
Record a Voice Message . . . . . . . . . . . . . . . . . . . . . . . . . . . . . . . . . . 5
Section 4:
Using the Voice Folders Directory
. . . . . . . . . . . . 7
■
Select a Voice Folder . . . . . . . . . . . . . . . . . . . . . . . . . . . . . . . . . . . . . 7
■
Record in a Selected Folder . . . . . . . . . . . . . . . . . . . . . . . . . . . . . . . . 7
■
View and Select Voice Messages . . . . . . . . . . . . . . . . . . . . . . . . . . . . 8
■
Play Back One Voice Message . . . . . . . . . . . . . . . . . . . . . . . . . . . . . . 8
■
Play Back All Voice Messages . . . . . . . . . . . . . . . . . . . . . . . . . . . . . . 8
■
Rewind. . . . . . . . . . . . . . . . . . . . . . . . . . . . . . . . . . . . . . . . . . . . . . . 10
■
Fastforward . . . . . . . . . . . . . . . . . . . . . . . . . . . . . . . . . . . . . . . . . . . 10
■
Delete One or All Voice Messages . . . . . . . . . . . . . . . . . . . . . . . . . . 10
■
Move a Message to a New Folder . . . . . . . . . . . . . . . . . . . . . . . . . . 10
■
Rename a Folder . . . . . . . . . . . . . . . . . . . . . . . . . . . . . . . . . . . . . . . 10
Section 5:
Using the Address Book
. . . . . . . . . . . . . . . . . . . . . 11
■
Enter a New Contact . . . . . . . . . . . . . . . . . . . . . . . . . . . . . . . . . . . . 11
■
View the Address Book . . . . . . . . . . . . . . . . . . . . . . . . . . . . . . . . . . 11
■
Search the Address Book. . . . . . . . . . . . . . . . . . . . . . . . . . . . . . . . . 12
■
View Contact Details . . . . . . . . . . . . . . . . . . . . . . . . . . . . . . . . . . . . 12
quest1911TOC.fm Page vi Monday, November 23, 1998 11:41 AM
Black spot plate

vi
■
Edit Contact Information . . . . . . . . . . . . . . . . . . . . . . . . . . . . . . . . .12
■
Create a New Contact with Voice . . . . . . . . . . . . . . . . . . . . . . . . . . .12
■
Add a Voice Message to an Existing Contact . . . . . . . . . . . . . . . . . .13
■
Play Back One Contact Voice Message. . . . . . . . . . . . . . . . . . . . . . .13
■
Play Back All Contact Voice Messages . . . . . . . . . . . . . . . . . . . . . . .13
■
Delete Contact Information. . . . . . . . . . . . . . . . . . . . . . . . . . . . . . . .13
Section 6:
Using E-mail
. . . . . . . . . . . . . . . . . . . . . . . . . . . . . . . . .14
■
Record and Send E-mail. . . . . . . . . . . . . . . . . . . . . . . . . . . . . . . . . .14
■
View E-mail in the Inbox. . . . . . . . . . . . . . . . . . . . . . . . . . . . . . . . . .15
■
View E-mail in the Outbox . . . . . . . . . . . . . . . . . . . . . . . . . . . . . . . .15
■
Play Back E-mail Messages . . . . . . . . . . . . . . . . . . . . . . . . . . . . . . .16
■
Delete Inbox E-mails and Voice Messages . . . . . . . . . . . . . . . . . . . .16
■
Delete Outbox E-mails and Voice Messages. . . . . . . . . . . . . . . . . . .16
Section 7:
Using the Appointment Book
. . . . . . . . . . . . . . . .18
■
Voice Markers . . . . . . . . . . . . . . . . . . . . . . . . . . . . . . . . . . . . . . . . .18
■
Enter an Appointment. . . . . . . . . . . . . . . . . . . . . . . . . . . . . . . . . . . .19
■
View the Calendar. . . . . . . . . . . . . . . . . . . . . . . . . . . . . . . . . . . . . . .19
■
View Appointment Details . . . . . . . . . . . . . . . . . . . . . . . . . . . . . . . .20
■
Edit an Appointment. . . . . . . . . . . . . . . . . . . . . . . . . . . . . . . . . . . . .20
■
Create an Appointment with a Voice Message . . . . . . . . . . . . . . . . .21
■
Add a Voice Message to an Existing Appointment . . . . . . . . . . . . . .21
■
Play Back an Appointment Voice Message. . . . . . . . . . . . . . . . . . . .21
■
Play Back All Appointment Voice Messages. . . . . . . . . . . . . . . . . . .21
■
Delete One or All Appointment(s). . . . . . . . . . . . . . . . . . . . . . . . . . .22
Section 8:
Using the To-Do List
. . . . . . . . . . . . . . . . . . . . . . . . .23
■
Enter a To-Do Reminder. . . . . . . . . . . . . . . . . . . . . . . . . . . . . . . . . .23
■
View All To-Do Reminders . . . . . . . . . . . . . . . . . . . . . . . . . . . . . . . .24
■
Edit a To-Do Reminder. . . . . . . . . . . . . . . . . . . . . . . . . . . . . . . . . . .24
quest1911TOC.fm Page vii Monday, November 23, 1998 11:41 AM
Black spot plate

viii
■
Add Voice Messages to a To-Do Reminder . . . . . . . . . . . . . . . . . . . 25
■
Play Back a To-Do Voice Message. . . . . . . . . . . . . . . . . . . . . . . . . . 25
■
Delete To-Do Reminders and/or Voice Messages . . . . . . . . . . . . . . 26
Section 9:
Using the Calculator
. . . . . . . . . . . . . . . . . . . . . . . . . 27
Section 10: Quest Status. . . . . . . . . . . . . . . . . . . . . . . . . . . . . . . . 28
Section 11: Quest Options . . . . . . . . . . . . . . . . . . . . . . . . . . . . . . 29
■Record Options: User Preferences. . . . . . . . . . . . . . . . . . . . . . . . . . 29
■Adjust the Display Contrast and Time-Out . . . . . . . . . . . . . . . . . . . . 30
■Erase Card or Erase All: . . . . . . . . . . . . . . . . . . . . . . . . . . . . . . . . . . 31
Section 12: Voicedata S Card Handling . . . . . . . . . . . . . . . . 32
■The Voicedata S Card. . . . . . . . . . . . . . . . . . . . . . . . . . . . . . . . . . . . 32
■Install and Format a New Voicedata S Card . . . . . . . . . . . . . . . . . . . 32
■Eject the Voicedata Card . . . . . . . . . . . . . . . . . . . . . . . . . . . . . . . . . 32
Section 13: Parts and Accessories . . . . . . . . . . . . . . . . . . . . . . 33
Appendix A: Screen Messages . . . . . . . . . . . . . . . . . . . . . . . . . . 34
Appendix B: Specifications . . . . . . . . . . . . . . . . . . . . . . . . . . . . . 35
quest1911TOC.fm Page viii Monday, November 23, 1998 11:41 AM
Black spot plate

Section 1: Overview
1
Section 1: Overview
Congratulations on your purchase of the Walkabout
TM
Quest portable
from Dictaphone! The Quest portable combines voice and data to make
your work and life simpler.
PC-Connectivity
The Quest portable was designed to work in tandem with your PC.With
the Quest portable, you can integrate PC power with the convenience of
a totally portable tapeless recorder. Using its Docking Station and the
Desktop software application, you can transfer digital recordings and
Personal Information Management (PIM) data to and from your PC and
network. For the first time, one device integrates voice and data
capabilities for the mobile professional.
Features
Digital Voice Recorder
Address Book
E-mail
Appointment Book
To-Do List
Calculator
Main Menu
Current Date
Current Time
quest1911.fm Page 1 Tuesday, November 24, 1998 1:32 PM
Black spot plate

Section 2: Getting Started
2
Section 2: Getting Started
Before you begin using the Quest Digital Recorder, you need to
initialize some of the settings on the Portable.
Load the Batteries
The Quest portable requires two AA alkaline batteries, two Nicad
Rechargeable batteries, or a DC 3V Power Supply.
To load the batteries:
1
Push and slide the battery compartment/door (9) downward.
2
Insert new batteries according to the label inside the battery
compartment. Lower and slide the cover back to its original position.
%
Do NOT mix alkaline and rechargeable batteries; for best
performance, use only fresh batteries. If you already have installed
alkaline batteries, the DC 3V Power Supply will not damage them.
%
If you do not intend to use the Quest portable for some time, remove
the batteries to avoid possible leakage.
Turn on the Portable
Slide the
On/Off
button (15) to the
On
position.
Set the Time/Date
You should set the date and time settings when you first begin using the
Portable or whenever you change the batteries. When new batteries are
installed and the portable is first turned on, the date is set to
06-01-98.
Operate the Portable
Many procedures refer to using both a slide control and a button.You
can ignore the button reference if your Portable has a slide control.
To set the time:
With the Quest portable, two time formats are available. The 12-hour
setting, which identifies the time as
AM
or
PM
, and the 24-hour setting.
Specify the desired format on Screen 2.
quest1911.fm Page 2 Monday, November 23, 1998 11:30 AM
Black spot plate
3
1
Select the
Option
button from the Main Menu.
2
Scroll to the Time/Date screen.
3
Select the
Time
field to display the Time screen.
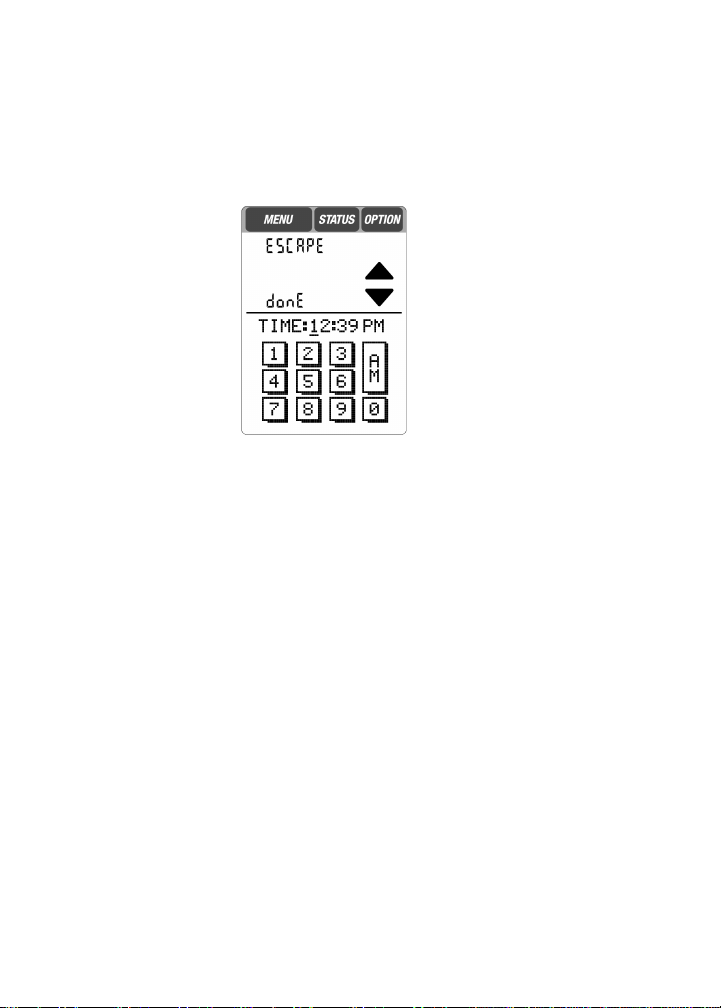
4
Select the arrows in the top half of the display to move the cursor
right and left.
Time Setup
5
Position the cursor under the number to be changed and press the
correct number on the keyboard display. Repeat for all numbers to be
changed. Change AM or PM, if necessary.
Hint:
Position the cursor under the left-most number and you can
optionally “retype” all four numbers consecutively from the keypad.
6
To save changes and exit this screen, select
donE
, or select
Escape
to
return to the previous screen without making or saving any changes.
%
If you enter an invalid number and select
donE
, the same screen
continues to display. Reenter an appropriate time setting and press
donE
again.
To set the date:
1
Select the
Option
button from the Main Menu.
2
Use the
Scroll Arrows
to display the Time/Date Record screen.
3
Select the format for the month, day, and year:
•
MDY
– Month/Day/Year
•
DMY
– Day/Month/Year
•
YMD –
Year/Month/Day
quest1911.fm Page 3 Monday, November 23, 1998 11:30 AM
Black spot plate

4
4
Select the
Date
field to display the following screen.
Date Setup
5
Select the lower left or right arrow key until the desired month
appears.
6
Select the current date from the calendar.
This date is highlighted.
7
Select
donE
.
Scrolls Months
quest1911.fm Page 4 Monday, November 23, 1998 11:30 AM
Black spot plate

Section 3: Using the Quest Digital Recorder
5
Section 3: Using the Quest Digital Recorder
This section describes how to use the Quest portable as
a digital voice recorder. The Portable recording
controls are similar to conventional analog recorder
controls. Depending on the model you purchased, your
portable has either a slide control or buttons.
Record a Voice Message
1
Move the slide control to the
Record
position, or push the
Record
button.
When recording, the
Record
indicator turns red.
2
The following options are available.
3
To end recording, move the slide control to the
Stop
position, or push
the
Stop
button.
4
If you would like to review your recording, move the slide control to
the
Rewind
position, then to the
Play
position, or push the
Rewind
button, then the
Play
button.
5
When you are satisfied with your recording, select
donE
.
%
If you record from the Main Menu, the message is automatically
stored in
Voice Folder 1
(see
Using the Voice Folders Directory
).
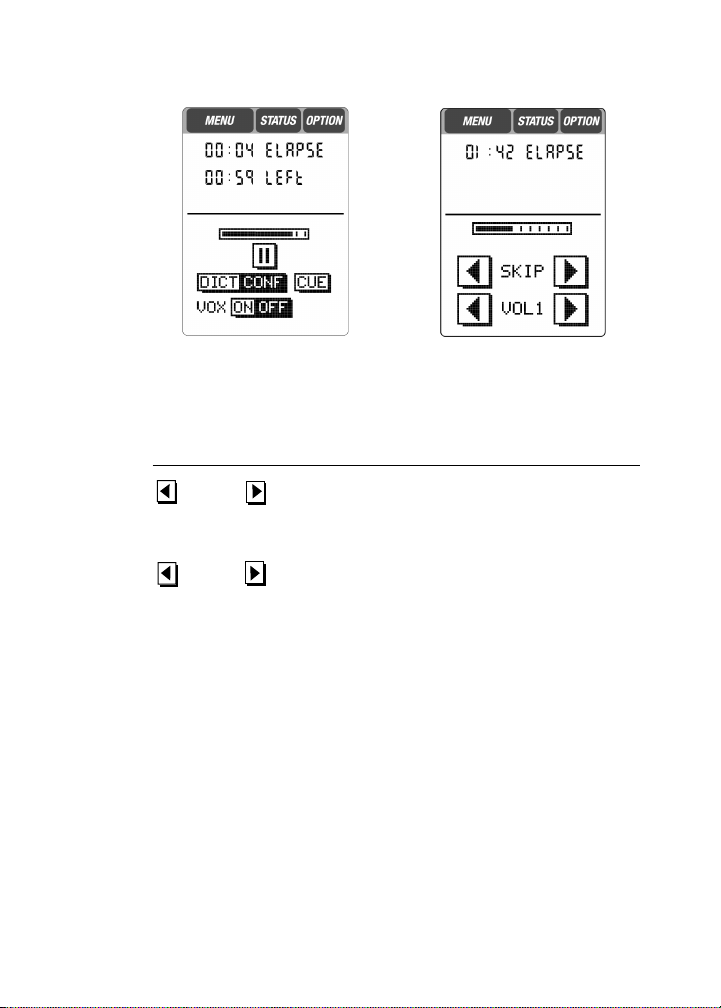
Select... To...
Pause recording...select again to continue
recording.
Change from Dictate to Conference recording.
Add a mark to a location in the recording for a
quick search. Ten marks maximum per
recording (available only during intial
recording).
Choose Voice-activated record (VOX) mode.
quest1911.fm Page 5 Monday, November 23, 1998 11:30 AM
Black spot plate
6
Record Details Playback Screen
Playback Screen... Tools...
Push the
SKIP
arrow to advance to
the previous or upcoming cue
mark.
Volume adjustments. Left and right
arrows decrease/increase volume,
respectively.
SKIP
VOL1
quest1911.fm Page 6 Monday, November 23, 1998 11:30 AM
Black spot plate

Section 4: Using the Voice Folders Directory
7
Section 4: Using the Voice Folders Directory
The Quest portable lets you organize all of your
recordings into Voice Folders. The portable has 14
Voice Folders which are arranged in chronological
order.You can even rename the folders to help
organize your work flow.
Select a Voice Folder
1
Select the Voice Folders Directory from the Main Menu.
2
Select a
Voice Folder
. (If you do not select a Folder, Folder 1 will
automatically be selected.) If you do not see a Folder listed, push the
nearest sequential number to change the Folders that are displayed.
Onceyou select a Folder, its outlineappearsinbold and its nested folders
appear, along with any associated voice messages listed in the top
portion of the screen.
Voice Folders Directory
Record in a Selected Folder
1
Select the Voice Folders Directory from the Main Menu.
2
Select a
Voice Folder
.
3
Record a voice message.
Message
Number Date
quest1911.fm Page 7 Tuesday, November 24, 1998 1:39 PM
Black spot plate

8
After recording, the selected folder contains the new voice message
with the following assigned to it:
• A message number.
• The current date.
View and Select Voice Messages
1
Select the Voice Folders Directory from the Main Menu.
2
Select a
Voice Folder
.
3
Use the
Scroll Arrows
to scroll any displayed messages.
4
Select a voice message.
An arrow appears above the voice marker.
5
Press
Play
.
The Playback screen displays.
Play Back One Voice Message
1Select the Voice Folders Directory from the Main Menu.
2Select a Voice Folder and then a message.
3Move the slide control to play, or push the Play button.
The Playback screen displays.
Play Back All Voice Messages
1Select the Voice Folders Directory from the Main Menu.
2Select Option.
3Select Play All. If you have the slide control, move it to the Play
position.
The Playback screen displays.
quest1911.fm Page 8 Monday, November 23, 1998 11:30 AM
Black spot plate
9
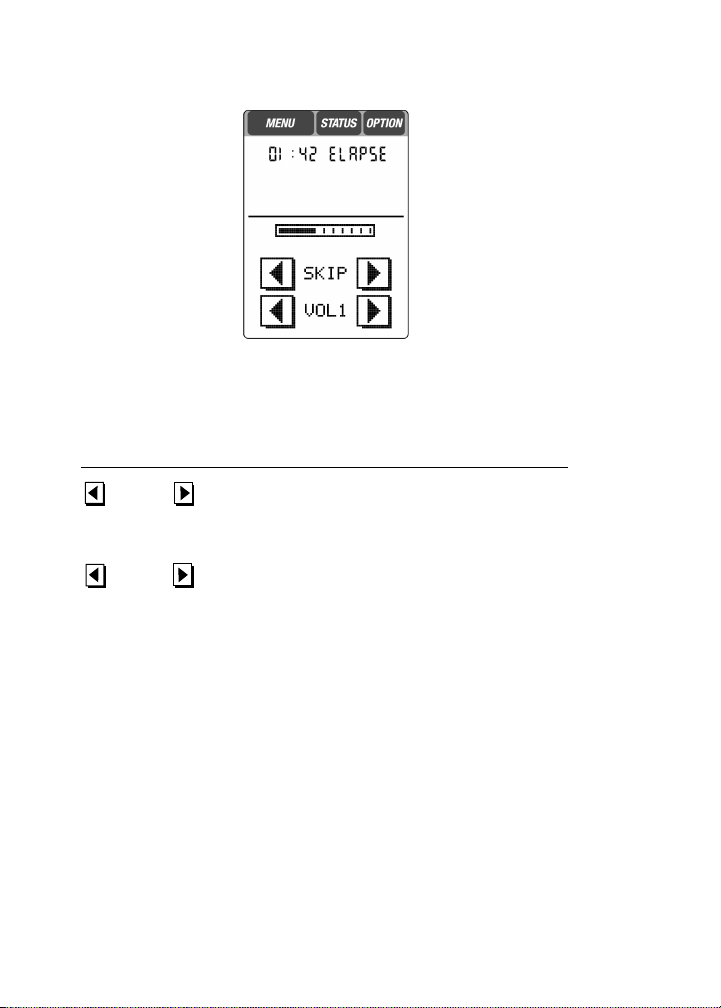
Playback Screen
To stop playback:
• Move the slide control to Stop, or push the Stop button.
The prompt, donE, appears, allowing you to save the message and
exit.
If no message plays, the selected message is not on the currently
inserted Voicedata S Card. The prompt Insert Card appears. Insert the
appropriate Voicedata S Card and make the selection again.
%If you select Play without selecting a message, the screen displays
Return To Stop. Otherwise, an arrow appears above the voice marker.
Playback Screen... Tools...
Push the SKIP arrow to advance to
the previous or upcoming cue
mark.
Volume adjustments. Left and
right arrows decrease/increase
volume, respectively.
SKIP
VOL1
quest1911.fm Page 9 Monday, November 23, 1998 11:30 AM
Black spot plate

10
Rewind
• Move the slide control to Rewind (REW), or press the Rewind (REW)
button.
Fastforward
• Push the Fastforward (FF) button.
Delete One or All Voice Messages
1Select the Voice Folders Directory from the Main Menu.
2Select a Voice Folder to delete all messages, or select a message to
delete.
3Select Option.
4Select Del Voice to delete the voice message, or select Del All Voice to
delete all voice messages.
5Select Confirm Delete.
Move a Message to a New Folder
1Select the Voice Folders Directory from the Main Menu.
2Select a Voice Folder, then select the desired message.
3Select Option, then select Move Voice.
4Select Start (to move the message to another folder), and select the
destination folder.
5Select donE.
Rename a Folder
1Select the Voice Folders Directory from the Main Menu.
2Select a desired folder.
A bold border appears around the selection.
3Select Option.
4Select Edit Name from the screen.
5Enter a folder name (up to five characters) from the keyboard display.
6Select donE to save the name and exit.
quest1911.fm Page 10 Monday, November 23, 1998 11:30 AM
Black spot plate

Section 5: Using the Address Book
11
Section 5: Using the Address Book
The Quest portable
Address Book
lets you store
business and personal contact information, such as
names, addresses, phone numbers, and e-mail
addresses.
To use theAddress Book, first select the
Address Book
icon (shown
above) from the Main Menu. The screen displays your list of contacts,
alphabetically organized by last name, first name.A voice marker
appears before any contact name that includes a voice message.
Address Book
Enter a New Contact
1
Select the Address Book from the Main Menu, then select
Option
.
2
Select
New Name
.
The keyboard display appears.
%
To exit this screen without saving the contact, select
Escape
.
3
Enter contact information.
4
Select
donE
.
View the Address Book
• Use the
Scroll Arrows
, if present, to scroll through the list.
Voice
Marker
Contacts
quest1911.fm Page 11 Tuesday, November 24, 1998 1:41 PM
Black spot plate
12
Search the Address Book
1Select the Address Book from the Main Menu, then select Find.
2Using the keyboard display, enter the first few characters of the
desired last name.
3Select SEArCH.
If the name is in your list, the contact name displays.
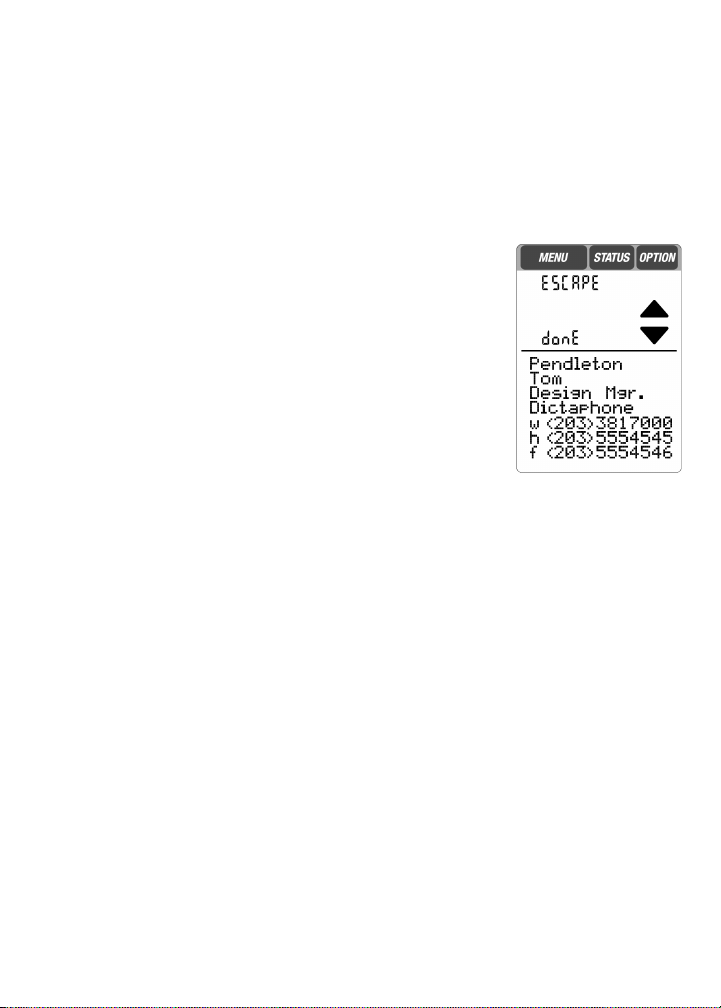
View Contact Details
Once you have located the desired contact, you
can view more details.
• Select theAddress Book from the Main Menu,
then select the desired contact’s Last Name,
First Name.
• The contact’s details display.
Edit Contact Information
1Select theAddress Book from the Main Menu,
then select the contact record that you want to
change.
2Select Option.
3Select Edit Name.
The Detail screen for the selected contact displays.
4Select the line that you want to change.
The Keyboard screen displays.
%If you accidentally select the wrong line, select Escape to return to the
previous screen. Make the correct choice.
5Enter data by selecting characters with the stylus.
6Select donE to save and exit.
Create a New Contact with Voice
1Select the Address Book from the Main Menu.
2Record your message.
3When you stop recording, select donE from the Stop screen.
A blank Contact Details screen displays.
Contact Details
quest1911.fm Page 12 Monday, November 23, 1998 11:30 AM
Black spot plate

13
4Enter the contact information.You do not have to fill all fields.
5Select donE again.
Add a Voice Message to an Existing Contact
1Select the Address Book from the Main Menu, then select a contact
name and display the detail screen.
2Create a recording.
3When you have finished, select donE.
The contact list displays with a Voice Marker to the left of the name.
Play Back One Contact Voice Message
1Select the Address Book from the Main Menu, then select a name
with a Voice Marker.
2Move the slide control, or push the Play button.
Play Back All Contact Voice Messages
1Select the Address Book from the Main Menu, then select Option.
2Select Play All; if you have a slide control, move it to Play.
Delete Contact Information
%Before information is deleted from your Address Book, you must
select Confirm Delete. To cancel deletion, select Escape.
To delete a contact’s information and/or voice messages:
1Select the Address Book from the Main Menu, then select a specific
contact to be deleted.
2Select Option.
3Select Del Name to delete the specific contact and the associated
voice message(s), or select Del Voice to delete only the voice message.
4Select Confirm Delete.
To delete all contact information and/or all voice messages:
1Select the Address Book from the Main Menu, then select Option.
2Select Del All Names to delete all contact information (text and voice),
or select Del All Voice to delete all associated voice messages.
3Select Confirm Delete.
quest1911.fm Page 13 Monday, November 23, 1998 11:30 AM
Black spot plate

Section 6: Using E-mail
14
Section 6: Using E-mail
The Quest portable
E-mail
feature allows you to take
your PC e-mail (voice and/or text) with you.You must
have an existing SMTP/POP3 e-mail account on your
PC to use this feature.
To use e-mail, select the
E-mail
icon (shown above) from the Main
Menu. The screen changes to the e-mail
Inbox
and lists e-mails by sender
names. If there are more e-mails than can fit on a single display,
Scroll
Arrows
appear. Also, the Voice Marker appears if a voice message is
attached.
%
The e-mail sender name is highlighted if the e-mail has not been read.
E-mail Inbox
%
To view the contents of your
Inbox
, first download e-mail from your
PC.
Record and Send E-mail
1
Select E-mail from the Main Menu, then start recording.
2
Select
donE
.
3
Select the contact name(s), up to four recipients, to receive the
outgoing mail. To deselect a recipient, simply select the name again.
4
Select
donE
.
%
Youcan only sendmail to recipientslisted in theAddress Book. Make
Voice
Marker
Sender
Name
quest1911.fm Page 14 Tuesday, November 24, 1998 1:42 PM
Black spot plate

15
sure to add complete e-mail address in Address Book.
View E-mail in the Inbox
1Select E-mail from the Main Menu.
2Select the sender name of the e-mail you want to view.
A details screen appears.
3Use the Scroll Arrows to view all the information.
View E-mail in the Outbox
1Select E-mail from the Main Menu, then select Option.
2Select Out Mail.
The screen displays the Outbox of outgoing e-mail sorted by date.
3Select the e-mail date.
The screen lists the e-mail recipient(s). You may play or append a
recording to the outgoing mail.
4Select donE.
%Select List Mail to change the destination of the e-mail.
E-mail Outbox
quest1911.fm Page 15 Monday, November 23, 1998 11:30 AM
Black spot plate

16
Play Back E-mail Messages
To play back an e-mail message:
1Select E-mail from the Main Menu.
2From the Inbox or Outbox, select an e-mail.
3Move the slide control, or push the Play button.
To play back all e-mail messages:
1Select E-mail from the Main Menu.
2From the Inbox or Outbox, select Option.
3Select Play All to hear all the voice e-mail in the box in sequential
order.
Delete Inbox E-mails and Voice Messages
To delete an e-mail from the Inbox:
1Select E-mail from the Main Menu.
2From the Inbox, select a sender’s e-mail.
The e-mail appears.
3Select Option.
4Select Del Mail to delete the voice and text of the e-mail.
5Select Confirm Delete.
To delete all e-mails from the Inbox:
1Select E-mail from the Main Menu, then select Option.
2Select Del All Mail to delete, read and unread e-mail messages, both
voice and text; select Del Old Mail to delete only read e-mail
messages, both voice and text.
3Select Confirm Delete.
Delete Outbox E-mails and Voice Messages
To delete an e-mail from the Outbox:
1Select E-mail from the Main Menu, then select the Outbox.
2Select an e-mail and the date stamp of the message.
The screen displays the recipient(s).
3Select Option.
quest1911.fm Page 16 Monday, November 23, 1998 11:30 AM
Black spot plate
Table of contents
Other Dictaphone Voice Recorder manuals

Dictaphone
Dictaphone Walkabout 5210 User manual

Dictaphone
Dictaphone travel master 220 User manual

Dictaphone
Dictaphone Digital Express DX4000 User manual

Dictaphone
Dictaphone Walkabout 5210 User manual

Dictaphone
Dictaphone 2225 User manual

Dictaphone
Dictaphone 1244 User manual

Dictaphone
Dictaphone Walkabout User manual

Dictaphone
Dictaphone 1925 Thought Tank User manual

Dictaphone
Dictaphone ExecTalk Plus 1709 User manual

Dictaphone
Dictaphone WALKABOUT 5215 User manual


