Digital deep sea 4GXtream User manual

4GXtream
3G/4G ROUTER

Product Handbook for 4GXtream V1.00
TEL + 44 1179 554474 www.digitalyacht.co.uk sales@digitalyacht.co.uk
1. Introduction
Congratulations on the purchase of your 4GXtream 3G/4G Router. This unit is designed for permanent installation on
board a sail or motor boat. The 4GXtream comprises of the following parts;
•4GXtream Router/Modem unit
•2x internal Wi-Fi antenna
•2x External LTE antennas, 7m Cables and Mounts
•1x GPS Antenna
•1x Power Cable
•User Manual
Before operating 4GXtream you should familiarise yourself with this User Manual and the manuals for
any other equipment you wish to connect to it.
2. Before you start
The 4GXtream is configured and controlled via its built-in web interface. In order to access this, you will need a wireless
device such as a PC/Mac, Tablet or Smart Phone running a modern web browser such as Chrome, Safari, Edge or
Firefox. No special drivers or software are required to make the 4GXtream work.
Do not plug in the 4GXtream to the Ethernet port of your computer whilst the 4GXtream is powered up
and always ensure that the 4GXtream antennas are connected before powering up the 4GXtream.
3. Installation
The 4GXtream is designed to be mounted below deck. When deciding on the best location, a central location will give
best Wi-Fi reception in all areas of the boat. You should also consider the 7m coax cable length of the external 3G/4G
Antennas, which should not be extended. It is better to locate the 4GXtream unit within the 7m limit of the supplied 3G/4G
antenna cables, and then use a wireless repeater if Wi-Fi reception is poor in some areas of the vessel.
If the 3G/4G antenna cable run is a problem, Digital Deep Sea can supply 10m or 20m antenna cables, but these are
larger and more expensive LMR400 cables (10.5mm Diameter) which must be purchased separately.
The power cable can be easily extended, as can the LAN/WAN Ethernet cables.
The default settings of the 4GXtream have been chosen for optimum performance and we do not
recommend users make any changes to them, except to change the default wireless network name (SSID)
and wireless password.
3.1 Mounting the 4GXtream
The 4GXtream should be mounted in position using M4 screws or other fixings appropriate to the mounting location. It
can be mounted in any orientation, as the Wi-Fi antennas can be rotated and bent for best reception, although we
recommend mounting the 4GXtream vertically with the antennas pointing upwards, to avoid stress on the cables and to
ensure any moisture/condensation falls away from the connectors.
On the next page (Fig.1) is a dimensioned drawing of the 4GXtream. When rotating the supplied Wi-Fi antennas, always
rotate them clockwise to avoid loosening them. Make sure you allow suitable space around the top and bottom of the unit,
to comfortably route the cables (avoiding tight bends) and to secure them so that the weight of the cables is not just being
taken by the cable connectors.


Product Handbook for 4GXtream V1.00
TEL + 44 1179 554474 www.digitalyacht.co.uk sales@digitalyacht.co.uk
3.2 Mounting the LTE (3G/4G) Antennas
The 4GXtream is supplied with two LTE antennas, two base mounts
and two 7m lengths of LMR200 coax cables.
Installation and siting of the external LTE antennas is very important for
maximum range, so take your time in working out the best location for
these two antennas.
The 7m LMR200 cables should not be extended and it is better to move
the 4GConnect Router/Modem unit closer to the antennas than extend
the cables. The high frequency 3G/4G signals will be attenuated by
0.3dB per each additional meter of cable, so if you must have a longer
coax cable run, contact Digital Yacht about swapping these cables for
thicker LMR400 cables.
The two LTE antennas should ideally be mounted at least 40cm apart
(1 wavelength) to maximise the positive effect of the MIMO technology
that the 4GConnect uses. It should be noted that there are no
significant additional gains to be made in making the antennas even
further apart.
Avoid the antennas being blocked by other metal objects and do not
place them close to other high-power transmitting antennas like VHF,
HF or SSB antennas. To avoid the LTE transmissions affecting other
devices; GPS, TV, etc. try to mount them at least 1m away from other
antennas.
The external LTE antennas have a 1.25” Pipe Thread and are supplied with two mounts. These mounts, designed for
securing to a horizontal platform, are fine for most installations, but should you wish to use another type of mount such as
those designed for VHF/GPS antennas, then you will need a 1” x 14TPI to 1.25” Pipe Thread adaptor, which are available
from Digital Yacht (P/No.ZCELN280S).
Once a suitable location has been found for the two external LTE antennas, secure the base mounts, attach the N-Type
connectors to the base of each antenna and then route the LMR200 cables through to the Router/Modem unit.
Screw the N-Type connectors from the two LMR200 antenna cables, to the 4GXtream –it does not matter which LTE
antenna goes to which LTE connector.
3.3 Mounting the 4GXtream GPS Antenna
The 4GXtream has a powerful GNSS (GPS+GLONASS+GAILEO)
receiver, which can provide position and timing data for logging and
geo-fencing. It is also possible to configure it to send this data to the
NMEA 2000 interface, but this is not enabled by default.
A small passive, adhesive backed, GPS antenna is supplied with 3m of
cable. It is designed for discrete mounting, inside the boat and should
be mounted close to a window or where there is just glass or GRP
between the antenna and the sky.
The SMA connector should be screwed into the GPS connector on the
4GXtream.
For installations that require an external GPS sensor, Digital Yacht can supply the MA800 antenna (Part/No X500.391)
which comes with 10m of cable and can be fitted on a standard 1”x14TPI thread VHF/GPS mounting bracket.
Product Handbook for 4GXtream V1.00
TEL + 44 1179 554474 www.digitalyacht.co.uk sales@digitalyacht.co.uk
3.4 Power Requirements
The unit is designed to work on vessels with a 12V or 24V DC system (9-30V DC Input voltage). It should be wired to a 1
Amp fused or circuit breaker protected circuit and if connected to a higher amperage circuit, then a 1A in-line fuse should
be used to protect the 4GXtream wiring.
The 4GXtream has a two-core power cable with a Red (+) and Black (-) wire. Be very careful to ensure that the correct
supply voltage polarity is connected to the 4GXtream, as reverse polarity will damage the unit.
Once connected to the vessel’s 12v/24v DC system, do not apply power but continue with the installation steps below.
3.5 Network Connections
The 3GConnect has four RJ45 Ethernet connectors; 3x LAN and 1x WAN.
If you wish to connect additional wired devices to the 4GXtream’s local area network (LAN) such as a Smart TV, fixed
mount computer, VOIP Phone, etc. then use a conventional network cable to connect the devices to any of the 3x LAN
sockets of the 4GXtream.
If you wish to connect an Ethernet based long range wireless adaptor, such as the Digital Yacht WL510, so that you can
access wireless hotspots in bars, marinas, etc. then connect the adaptor using a normal network cable to the 4GXtream’s
WAN socket. The 4GXtream expects to receive an IP address automatically from the long-range wireless adaptor.
Whether the 4GXtream uses its mobile connection or wired WAN connection to access the internet, can be selected in
the units web interface, which is covered later in this manual.
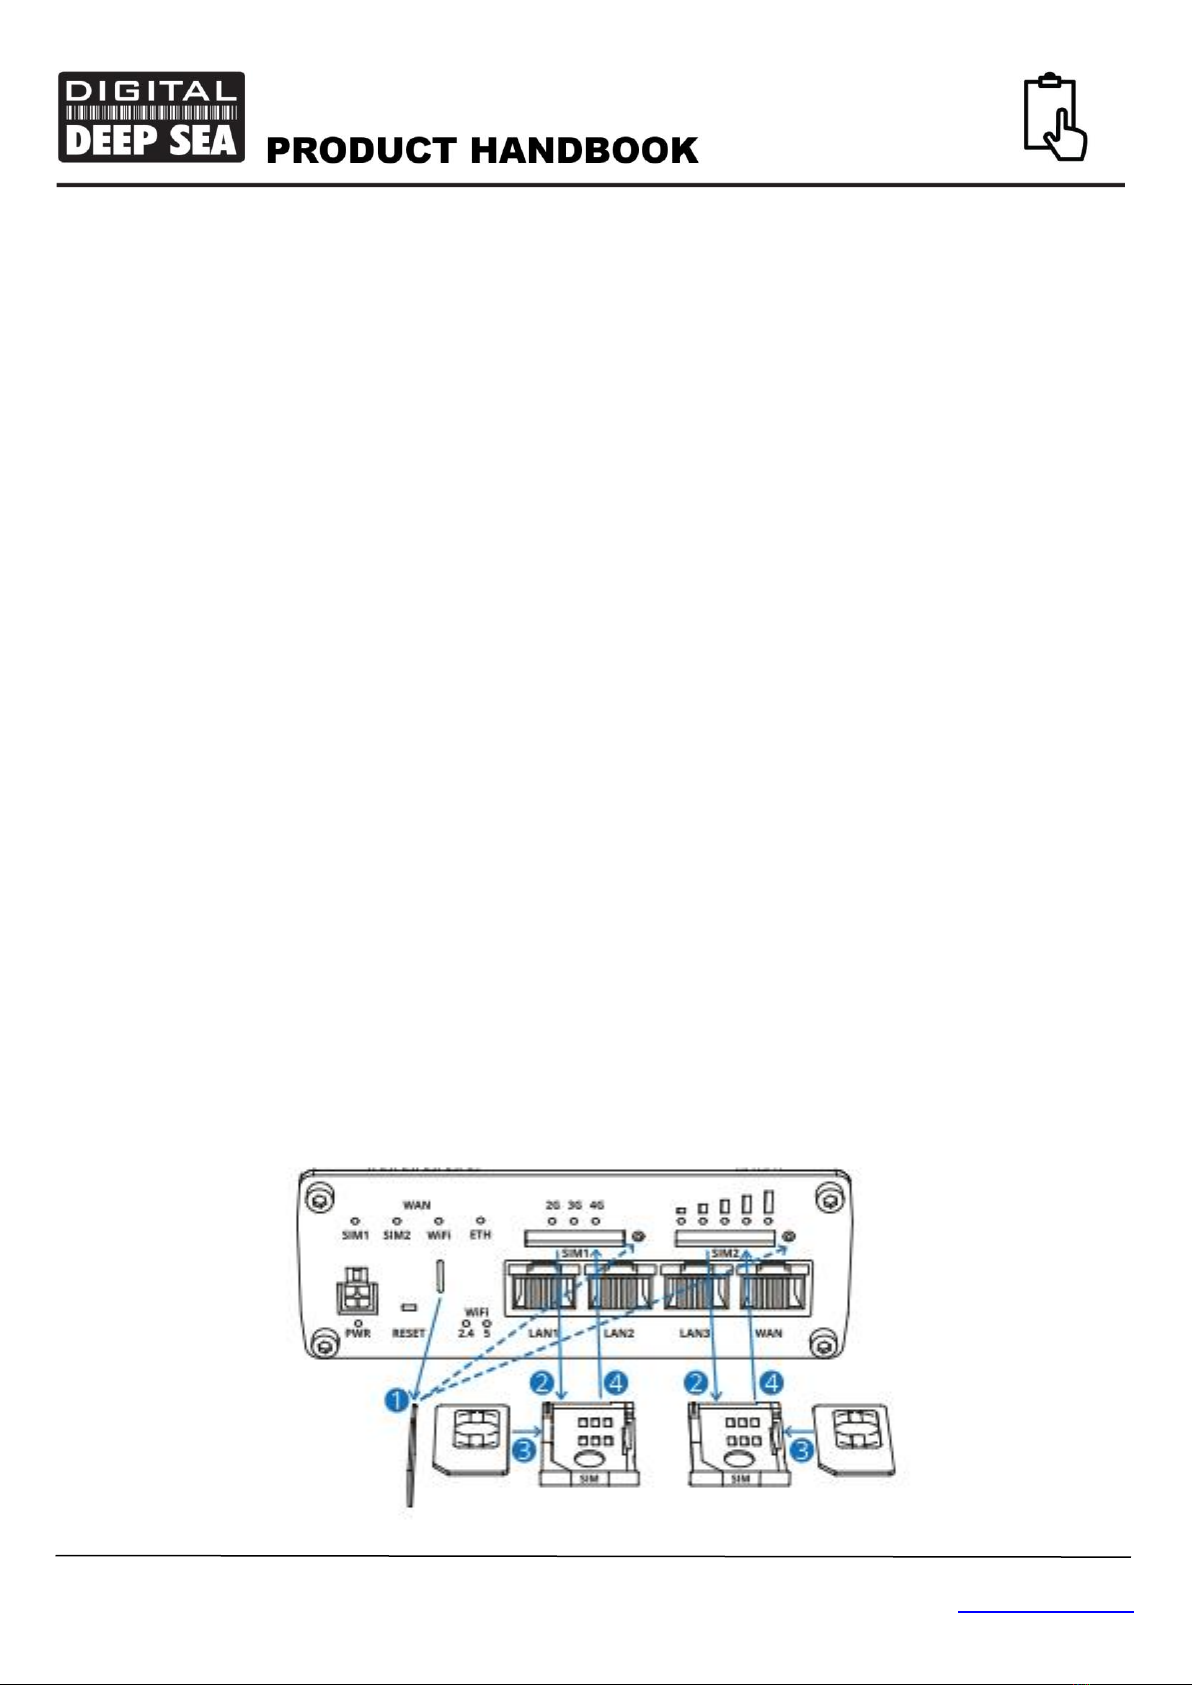
3.6 Inserting a 3G/4G data SIM card
To connect to the internet, the 4GXtream must have a 3G/4G data SIM inserted which is registered to a valid mobile
operator account. Any mobile operator’s SIM can be used that is the Standard SIM (15 x 25mm) size.
The 4GXtream has two standard SIM slots and it is possible to fit two SIMs from two different network operators. You can
set SIM switching rules to decide which SIM is given preference i.e. No network, weak signal, data limit reached, etc.
To insert a SIM (Fig 2), remove the SIM extractor tool (1) and gently press the end of the tool into the hole to the right of
the SIM tray you wish to use. The tray will partially eject and you can then pull the SIM tray out completely. Place the SIM,
gold contacts up, into the tray. Finally re-insert the SIM tray making sure that it is correctly lined up with the slot and goes
in straight/perpendicular and not at an angle. Don’t forget to replace the SIM extractor tool back into its slot for future use.
Figure 4

Product Handbook for 4GXtream V1.00
TEL + 44 1179 554474 www.digitalyacht.co.uk sales@digitalyacht.co.uk
3.7 Connecting to NMEA 2000 Network
4GXtream has an integrated NMEA 2000 interface that can receive NMEA 2000 data and convert it to wired and/or
wireless NMEA data, that it transmits over its Local Area Network, via TCP. Multiple devices can receive this data by
setting up a TCP data connection with IP Address = 192.168.1.1 and Port = 2000.
The 4GXtream’s integral NMEA2000 cable, has a standard Micro Male connector that can connect to a standard
NMEA2000 network via a spare “T-Piece”. If you are creating a new NMEA2000 network, then you should consider Digital
Yacht’s NMEA2000 Starter Kit, that provides all the cables, connectors and terminators for a basic NMEA2000 network.
Only enough power is taken from the NMEA2000 network, to power the 4GXtream’s NMEA 2000 interface (LEN = 1).
If you are connecting 4GXtream to a non-standard NMEA2000 network, then a suitable adaptor cable will need to be
sourced from the relevant manufacturer;
•SeaTalkNG (Raymarine P/No A06045)
•Simnet (Simrad P/No 24006199)
The following NMEA Sentences are transmitted via TCP, subject to suitable NMEA 2000 data being available.
APB, DPT, HDG, MDA, MTW, MWV, RMB, RMC, ROT, RSA, VHW, VLW, VDM, VDO and XTE
It is possible to have a 4GXtream with an NMEA 0183 Interface, please contact Digital Yacht for more details..
3.8 Powering Up
Double check that all power and Ethernet connections are correctly made and then apply power for the first time. A series
of external LED indicators on the 4GXtream which illuminate to show the status of the unit as detailed below….
WiFi band LEDs
The WiFi band LEDs are located at the bottom of the front panel of the device, to the left of the Ethernet ports. They
display whether a WiFi Access Point (AP) is active on a specific band.
State
Description
2.4 LED turned on.
At least one 2.4 GHz Access Point is running.
2.4 LED turned off
No 2.4 GHz Access Points are running.
5 LED turned on
At least one 5 GHz Access Point is running.
5 LED turned off
No 5 GHz Access Points are running.
WAN type LEDs
The WAN type LEDs are located at the top-right of the front panel. They indicate which type of Internet connection is
currently active.
State
Description
SIM1 LED on
A mobile data connection on SIM1 is active.
SIM1 LED off
A mobile data connection on SIM1 is inactive.
SIM2 LED on
A mobile data connection on SIM2 is active.
SIM2 LED off
A mobile data connection on SIM2 is inactive.
WiFi LED on
A WiFi data connection (WiFi WAN) is active.
WiFi LED off
A WiFi data connection (WiFi WAN) is inactive.
ETH LED on
An Ethernet data connection (wired WAN) is active.
ETH LED off
An Ethernet data connection (wired WAN) is inactive.

Product Handbook for 4GXtream V1.00
TEL + 44 1179 554474 www.digitalyacht.co.uk sales@digitalyacht.co.uk
Ethernet port LEDs
There are two LEDs located at the top of each Ethernet port. They provide information on the current states of the
Ethernet ports. Each port has two LEDs:
Orange - 10/100 Mbps connection
Green - 1000 Mbps connection
Below is an explanation of the behaviour of the green and orange LEDs.
State
Description
LED on
A data connection on the port is operational (cable plugged in, end device visible, no data is
being transferred).
LED off
No data connection on the port is operational (no cable, bad cable or end device not visible
for some other reason (such as damaged network card)).
LED blinking
Connection established and data is being transferred over this port.
Mobile network type LEDs
The mobile network type LEDs are located near the SIM card slot. They display which type of Internet connection is
currently active.
Action
Description
3G LED turned on
Device is connected to a 3G network.
4G LED turned on
Device is connected to a 4G network.
3G blinking
Device is connected to a 3G network but hasn't received an IP
address.
4G blinking
Device is connected to a 4G network but hasn't received an IP
address.
3G & 4G LEDs blinking at the same time every 500 ms
No SIM card or incorrect PIN.
3G & 4G LEDs turns on and off in a sequence one after
the other
The device is attempting to connect to a mobile network
operator.
Mobile signal strength indication LEDs
The mobile signal strength indication LEDs are located near the SIM card slot. The number of lit up LEDs represents a
different mobile signal strength (RSSI) value in dBm.
No. of lit up LEDS
Signal strength
0
≤ -111 dBm
1
-110 dBm to -97 dBm
2
-96 dBm to -82 dBm
3
-81 dBm -67 dBm
4
-66 dBm to -52 dBm
5
≥ -51 dBm
Product Handbook for 4GXtream V1.00
TEL + 44 1179 554474 www.digitalyacht.co.uk sales@digitalyacht.co.uk
In many cases the 4GXtream will be installed behind a bulkhead or inside a locker, making it difficult to see the status of
the unit. However, under normal circumstances after power is applied, the “4GXtream” wireless network (SSID) should
appear within 50-60 seconds.
If after 60 seconds, you scan for wireless networks and cannot see “4GXtream”, it will be necessary to gain access to the
unit to check the status LEDs and to contact Digital Yacht support by email support@digitalyacht.co.uk
4. Configuration
Assuming your wireless device sees the “4GXtream” network, join it using the default wireless password, shown below.
Once connected, your device should automatically get an IP address, via DHCP, in the 192.168.1.xxx range.
Wireless Password = 4GXtream
Many operating systems, including iOS and Android, will complain about the connection saying “No Internet Connection”.
This is perfectly normal and indicates that the 3G/4G connection is not setup yet. As soon as the SIM card is inserted and
configured (if necessary) this warning should disappear.
In addition, Apple have recently started warning about “Weak Security” on WPA and WPA2 encrypted wireless networks.
However, 4GXtream supports the latest WPA3 encryption and by default we enable “WPA2 and WPA3 Mixed Mode” so
that new devices that support WPA3 and older devices that only support WPA2 can both join the same network.
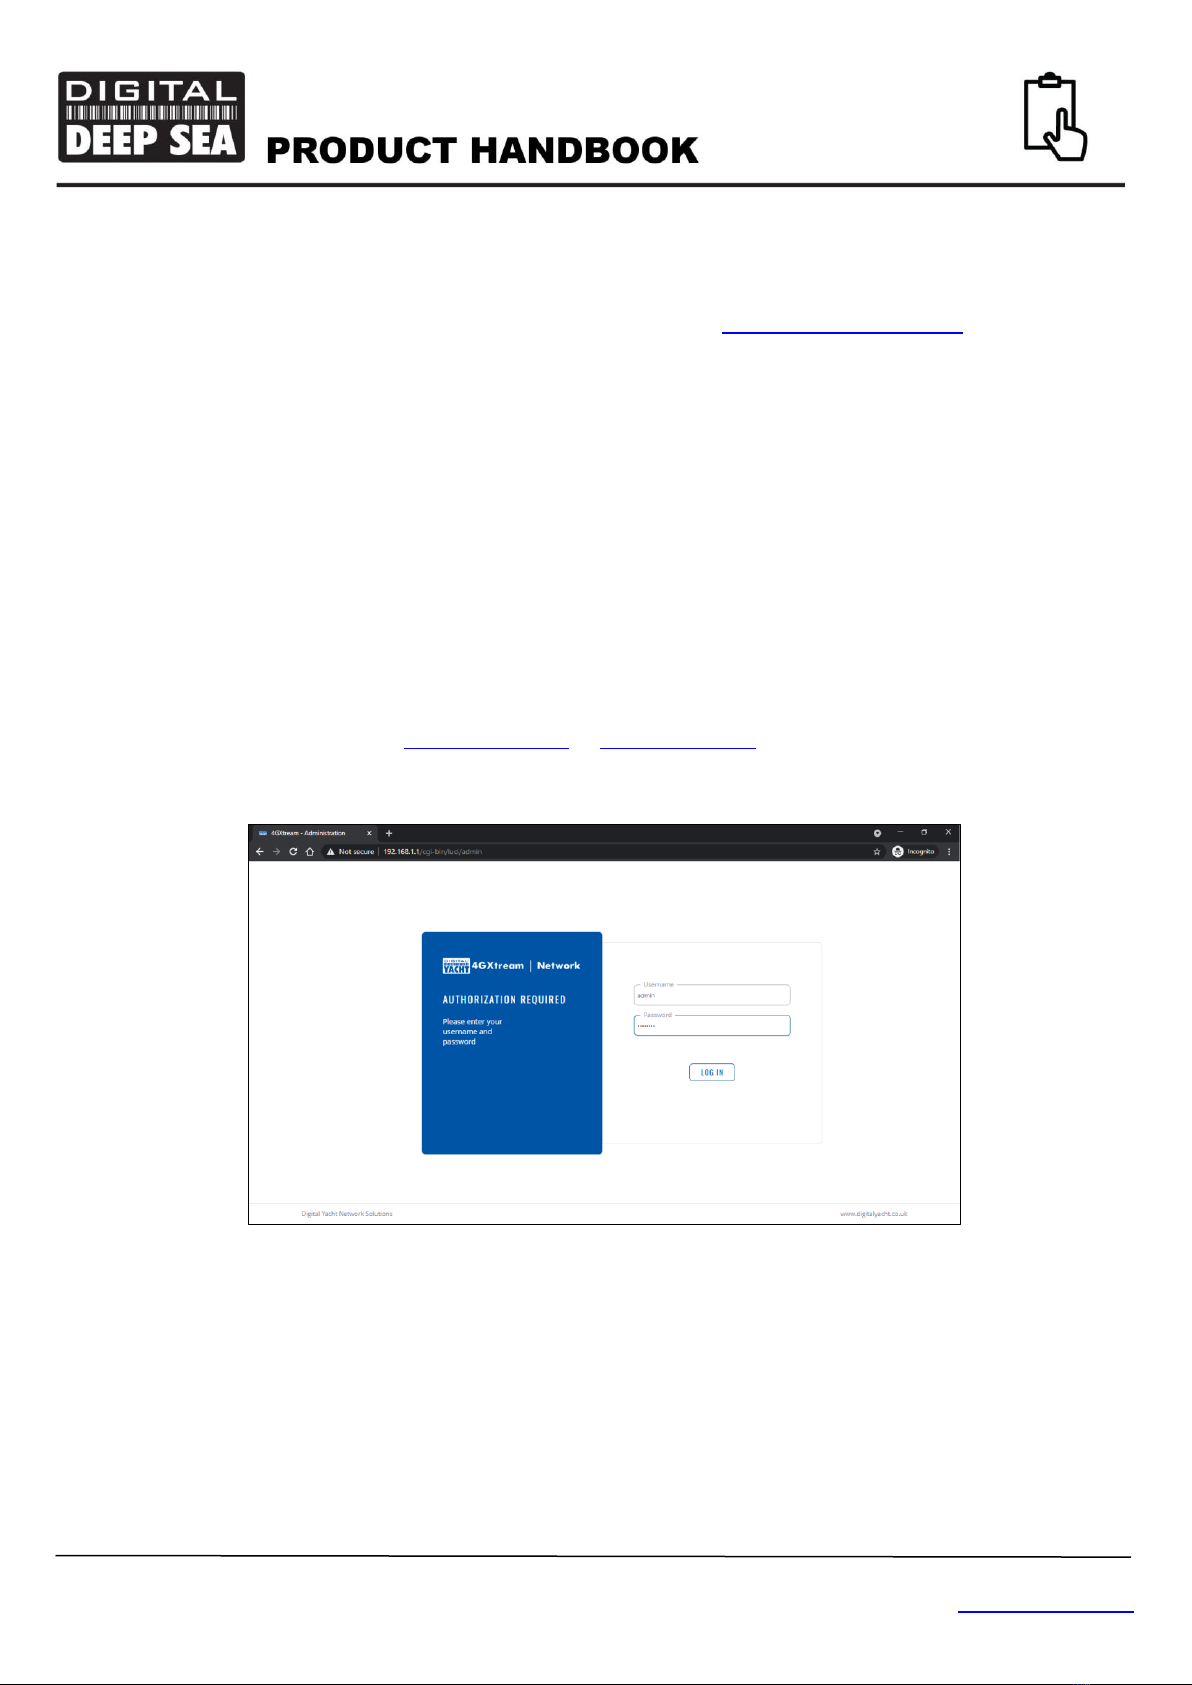
You should now be able to type either http://4gxtream.lan or http://192.168.1.1 in to the address bar of your browser and
see the 4GXtream login page appear (see Fig 5). Make sure you use the http:// pre-fix or your browser may try to do a
web search.
Now login to the 4GXtream by entering the default login password as below…
Admin Password = 4GXtream
Once logged in you will be taken to the main Overview Page as shown in Fig.6.
Figure 5

Product Handbook for 4GXtream V1.00
TEL + 44 1179 554474 www.digitalyacht.co.uk sales@digitalyacht.co.uk
Figure 6
This page provides a “Dashboard” showing the status of the 4GXtream’s network connections and settings. From this
page, you can access the main menu bar down the left side of the page which will take you to various status,
configuration, tools and services menus.
The default 4GXtream settings have been carefully chosen to work well in most situations/installations, commonly found
on marine vessels.
Digital Yacht strongly recommend that you do not change any settings except those specifically
mentioned in this manual and we cannot support or warranty repair any 4GXtream that fails due to wrong
settings
We do not generally recommend changing the Admin password of the router, as this can be difficult to reset when
forgotten. Also, this can only be used by someone wirelessly connected to the 4GXtream, so make sure your wireless
security is good and that you trust the people you allow to connect to the network and there should be no need to change
the default Admin password.
If you do decide to change the Admin password, make sure you record the new password somewhere you can easily
refer to in the future, as resetting this involves a full factory reset.
The key setting that all customers must set are the Wireless Network settings. This secures your 4GXtream and ensures
only you and the people you want to connect, can join the 4GXtream wireless network.
4.1 Changing the Wireless Network Settings
It is very important that you “lock down” your wireless network, with your own network name (SSID) and wireless
password. This ensures that only people that you give the network information to, can connect, stopping other less
trustworthy individuals from connecting to your network and using your internet connection.
To change the default wireless network name and password of your 4GXtream, login to the web interface and click on the
Network>Wireless menu options, which will take you to the page shown in Fig 7.

Product Handbook for 4GXtream V1.00
TEL + 44 1179 554474 www.digitalyacht.co.uk sales@digitalyacht.co.uk
Figure 7
As you can see, the 4GXtream creates both a 2.4GHz and a 5GHz wireless network. Both wireless networks are enabled
by default and devices joining either wireless network are bridged together so they are on the same Local Area Network
(LAN). The 5GHz network will provide optimum speed but may not reach as far around the boat as the 2.4GHz network.
You can set different SSIDs (Wireless Network Names) and Passwords for the 2.4GHz and 5GHz networks. We
recommend including the number 2 or 5 in the respective network name, to identify the 2.4GHz or 5GHz network. To
change the wireless network settings, click on the “Edit” icon (Pencil) in either the 2.4GHz or 5GHz network’s row.
Now you will be taken to the screen shown in Fig 6, where you can enter the SSID (Wireless Network Name) that you
wish to use. Please avoid using
Figure 6
When choosing network names, it is best to avoid spaces and special characters (such as apostrophes) in the SSID or
password, otherwise some wireless devices will not connect properly. Instead of using a space, use the underscore
character, i.e. for “My Network” use “My_Network”.
Once you have changed your network’s SSID, do not click “Save & Apply”. Click the “Wireless Security” option and the
page will change to that shown in Fig 8.

Product Handbook for 4GXtream V1.00
TEL + 44 1179 554474 www.digitalyacht.co.uk sales@digitalyacht.co.uk
Figure 8
The best password encryption to use is the default “WPA2-PSK/WPA3-SAE Mixed Mode” and try to use a strong
password with at least one capital letter and a mix of numbers and letters. As with the SSID, it is best to avoid special
characters and spaces.
Make sure to record the details of your password somewhere secure but easy for you to access, as resetting a wireless
password requires a wired connection to the 4GXtream which is not always easy or practical.
Once the Network Name and Password have been entered, click the “Save & Apply” button and the 4GXtream will apply
the new settings and reboot. Due to the network name change, your wireless device will be dis-connected, so wait for the
new wireless network name to appear in your Wi-Fi scan list (50-60 secs) and connect to it using the new password.
4.2 Changing the Internet (WAN) Connection
In most installations the 4GXtream will connect to the internet using the mobile SIM connection. However, if you want to
add a second SIM card or use a long range wireless adaptor, like Digital Yacht’s WL510 (Part/No ZDIGWL510) then it is
necessary to select which WAN connection should be used to access the internet. To do this, click on Network>WAN
and you will see the page shown in Fig 9.
Figure 9

Product Handbook for 4GXtream V1.00
TEL + 44 1179 554474 www.digitalyacht.co.uk sales@digitalyacht.co.uk
You can then turn ON the interface you want to use for internet connection and turn OFF the other two connections. The
WAN connection is the wired WAN socket on the 4GXtream and if you have one of our WL510 Long Range WiFi
systems, this is how it will be connected.
5. Normal Operation
The 4GXtream will always create its own wireless network within 50-60 seconds of being powered up and any wireless
device should be able to scan for wireless networks, select the 4GXtream and connect to it.
Assuming you are within 3G/4G coverage, then any device connected to the 4GXtream wireless network, or wired to one
of the LAN sockets should be able to access the internet. If you are using a “Pay As You Go” SIM or “Pay Monthly” SIM
with a monthly data limit, please ensure you have not used up all of your data allowance.
To check that you have a good 4G mobile data connection to the internet, go to the main Status>Overview page and look
at the “Internal Modem” panel where you should have a good signal strength shown on the Bar meter and Data
Connection should say “Connected”. In the MOB1S1A1 pane, which is the SIM1 status, you should have an IP Address
shown, which is the IP address the 4GXtream has received from the mobile network.
If you have good signal strength, the Data Connection says “Connected” and you have an IP address, then you should be
online and be able to browse the internet, get email, stream movies, etc.
Sometimes, it is useful to know what devices are on the network and what their IP address is. You can view a list of all
devices that have received an IP Address from the 4GXtream via DHCP.
To access the DHCP Client List, go to Status>Network>LAN and you will see the page shown in Figure 11. Please note
that this 4GXtream was using a different 192.168.42.xxx IP address range, than the default 4GXtream range which is
192.168.1.xxx.
Figure 10

Product Handbook for 4GXtream V1.00
TEL + 44 1179 554474 www.digitalyacht.co.uk sales@digitalyacht.co.uk
If you want to monitor the performance of the 4GXtream, go to Status>Realtime Data and you will see the page shown in
Fig 12 or if you want to monitor how much data you are using go to Status>Mobile Usage.
Figure 11
Figure 11
This manual suits for next models
1
Table of contents
 manual")


