Facnor FD110 User manual

INSTALLATION MANUAL
FD110-190-230-310 MODELS
IMPORTANT : before assembling make sure that the diameter
of turnbuckle cage does not exceed the dimensions below.
Model FD110 FD190 FD230 FD310
Max turnbuckle cage Ø (mm) 24 38 38 46
If the diameter of the open cage is too important, try a closed cage.
Link to: Step In Portugal - Enrolador Genoa FD190 Installation Manual

Facnor
–
FlatDeck furlin
g
& reefin
g
systems
–
Installation manual
e
Congratulations, you have purchased a Facnor reefing system. Over 20 years Facnor has
gained an excellent reputation in manufacturing furling systems that feature Innovation and
Reliability. Sturdy and easy-to-use, your Facnor reefing system will give you satisfaction
when either cruising or racing.
TABLE OF CONTENTS
1- Assembly drawing ........................................................................................ p. 18
2- Package inventory ....................................................................................... p. 18
2.1 – Box content .......................................................................................... p. 19
2.2 – Tube content ........................................................................................ p. 20
2.3 – Determining which section length should be used .................................... p. 20
3- Pre-installation notes .................................................................................... p. 21/22
4- Assembly stages .......................................................................................... p. 23
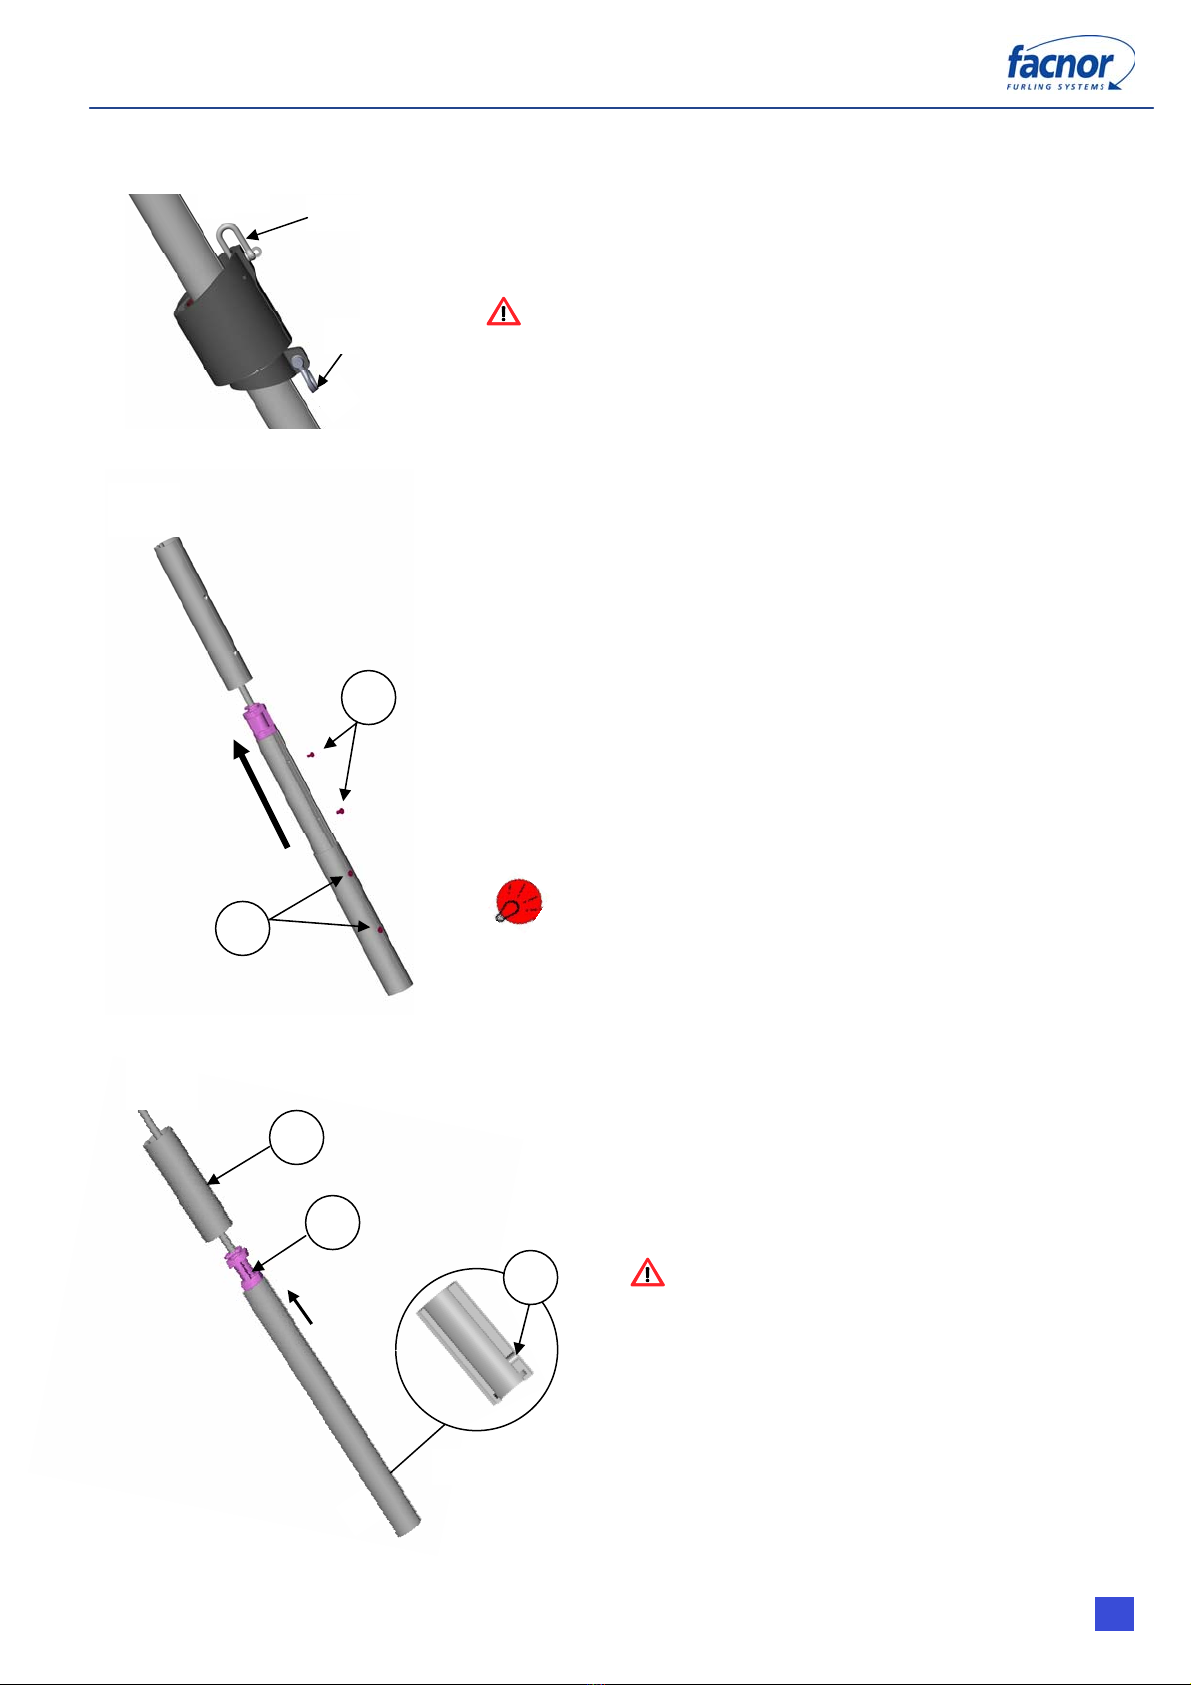
4.1 – Assembly of the halyard deflector ........................................................... p. 23
4.2 – Assembly of the top cap and the top section ............................................ P. 23
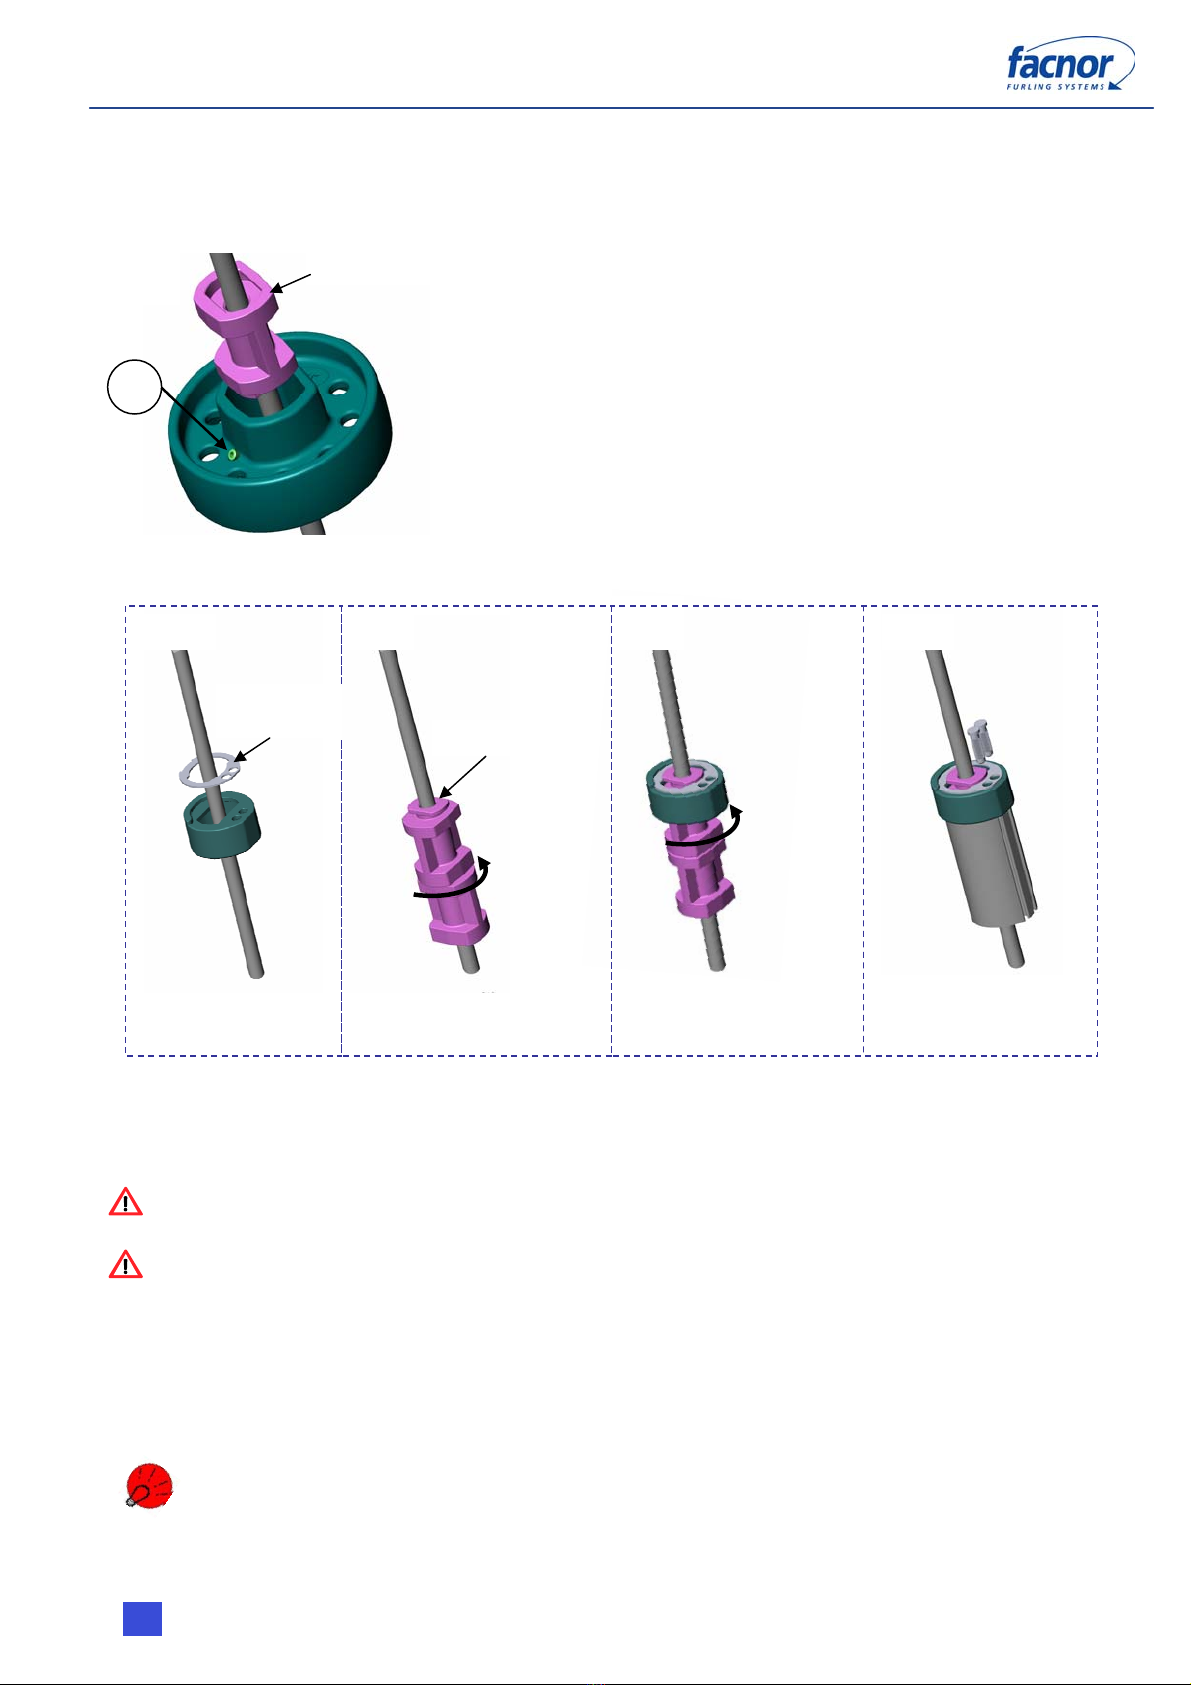
4.3 – Fitting the halyard swivel ....................................................................... p. 24
4.4 – Assembling foil sections ......................................................................... p. 24
4.5 – Fitting the telescopic section .................................................................. p. 24
4.6 – Fitting the feeder .................................................................................. p. 25
4.7 – Fitting the bushing into the telescopic section .......................................... p. 25
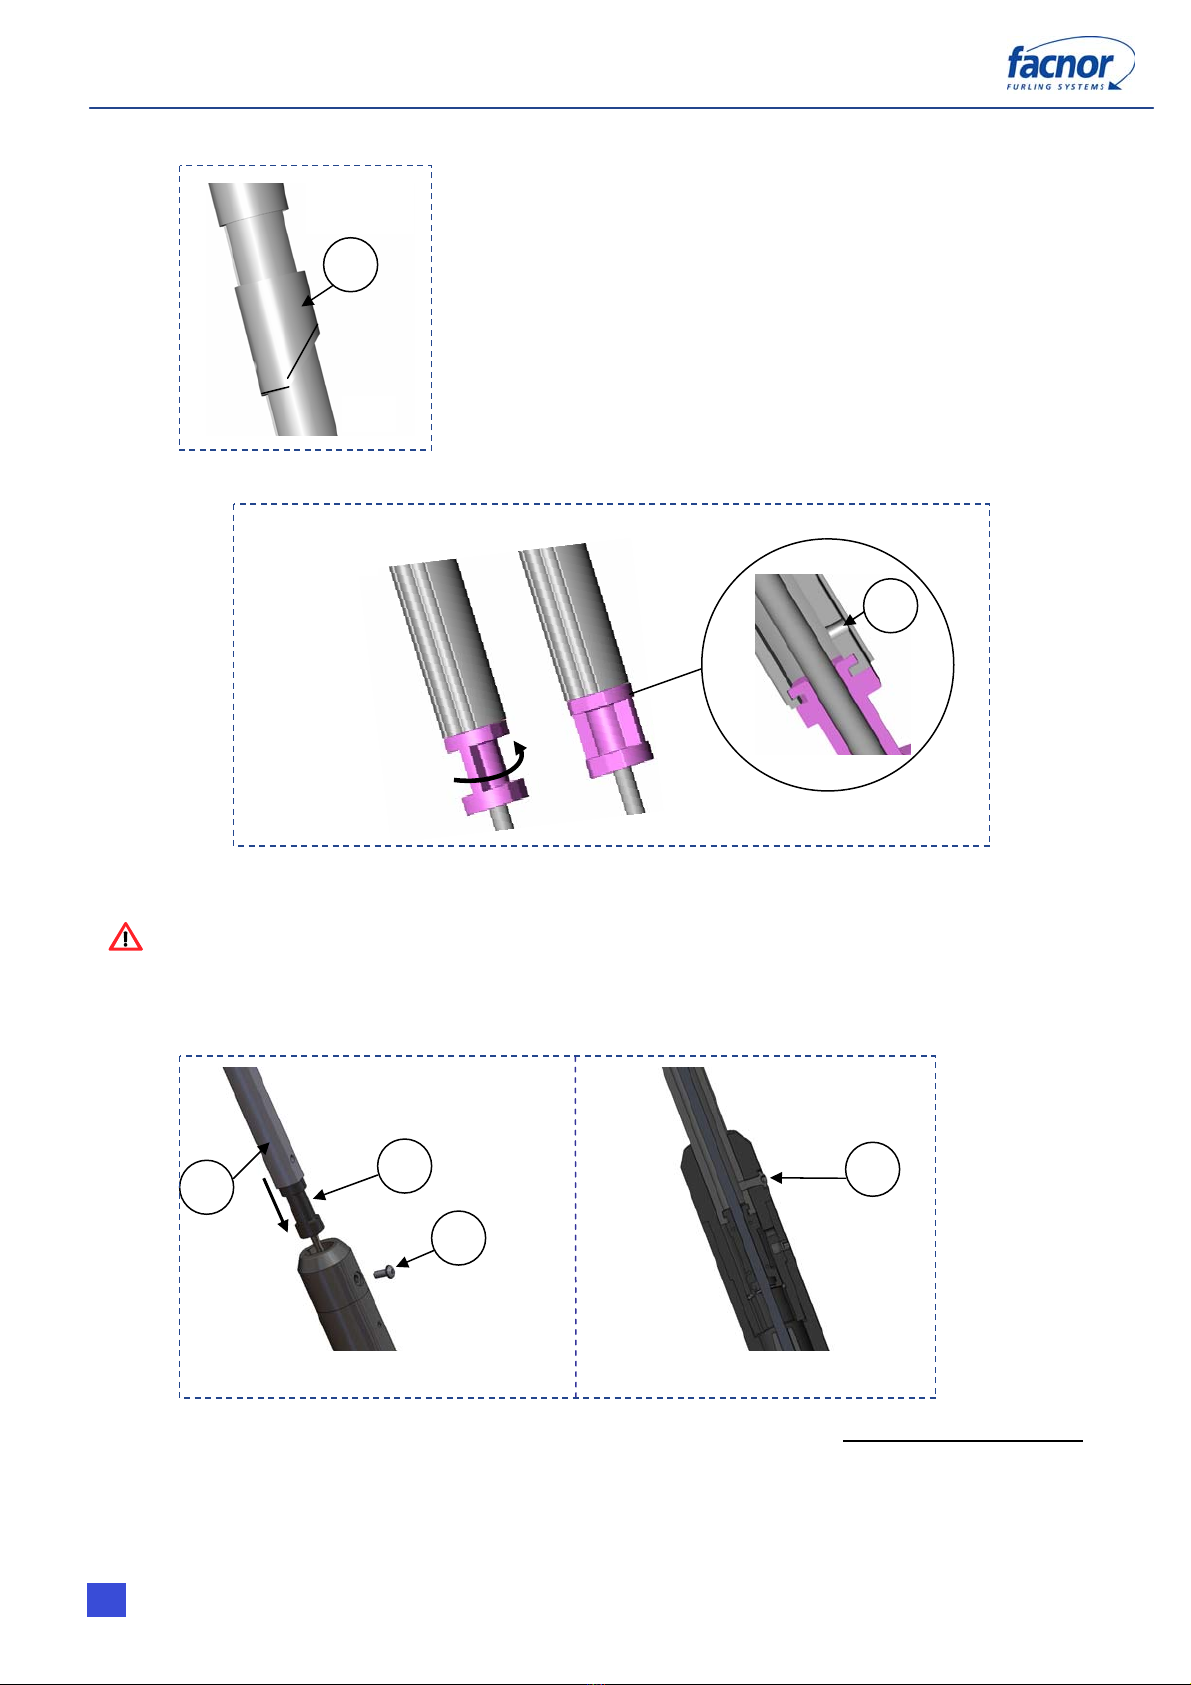
4.8 – Fixing the telescopic section in the drum ................................................. p. 25
4.9 – Fixing the bottom of the drum ................................................................ p. 26
4.10 – Adjusting sections ................................................................................ p. 27
4.11 – Fixing the sail feeder ............................................................................ p. 27
5- Installation of the reefing line/webbing .......................................................... p. 28
5.1 – Fitting the reefing line/webbing .............................................................. p. 28
5.2 – Fitting the 1st lead block ........................................................................ P. 28
5.3 – Cutting the webbing .............................................................................. p. 28/29
5.4 – Fitting the webbing into the drum ........................................................... p. 29
6- Adjusting the furling line guide ..................................................................... p. 29
7- Specific installations ..................................................................................... p. 30
8- Furling tips .................................................................................................. p. 31
Before beginning assembly, we recommend that you read these instructions
carefully so as to familiarize yourself with the parts, installation and the use of
your Facnor furling and reefing system.
18
English

Facnor
–
FlatDeck furlin
g
& reefin
g
systems
–
Installation manual
1- ASSEMBLY DRAWING
halyard deflector wheel
top cap
top section
swivel
2-meter standard section
connection
black bushing (split into 2 half bushings)
sail feeder
drum
19
3
7
9
6
2
1
1
2
3
4
5
6
7
8
9
4
5
8
English

Facnor
–
FlatDeck furlin
g
& reefin
g
systems
–
Installation manual
2- PACKAGE INVENTORY
The Facnor headsail reefing system comprises:
2.1 BOX CONTENT
2.1.1 Standard components
Chart No1
Maximum forestay length 8M30 10M40 12M40 14M40 16M40 18M40 20M40 22M40
A = Number of bushings necessary* 7 8 9 10 11 12 13 14
B = Number of screws necessary * 16 20 24 28 32 36 40 44
* NOTE : the quantity contained in the bag is superior to the number of screws or bushings required
Chart No2
Models FD110 FD190 FD230 FD310
Rope length x Ø9M x Ø08MM 13M x Ø10MM 15M x Ø10MM 18M x Ø10MM
Webbing length 8M 16M 16M 27M
Quantity C 4 4 4 5
20
2 x
A x B x
See chart No1
See chart No1
2 x 1 x
1 ou 2 x
2 x x C
English
2 x
1 x
+
See chart No2

Facnor
–
FlatDeck furlin
g
& reefin
g
systems
–
Installation manual
2.2 TUBE CONTENT
1. one telescopic section (1M40)
2. external twin-groove sections
3. connectors
* For OEM furling systems, delivered originally to the shipyard, the top section may be
shorter than 2 meters. For those systems, the top section is cut at a specific length.
Example : if you order an FD190 12M40, according to the chart below you will receive five
2-meter sections, one half-length section, the telescopic section and five
connectors.
Chart No.3
Forestay
max. length
No. of 2m
sections
No. of 1m
sections
No. of
connectors
Telescopic
section
7M30 3 0 2 1
8M40 3 1 3 1
10M40 4 1 4 1
12M40 5 1 5 1
14M50 6 1 6 1
16M50 7 1 7 1
18M50 8 1 8 1
20M50 9 1 9 1
22M50 10 1 10 1
2.3 DETERMINING WHICH SECTION LENGTH SHOULD BE USED
The example given is of a FD190 12M40, standard (i.e. not delivered to a shipyard), for a
forestay measuring between 10.4 and 12.4 metres. According to the table above, you will
receive: 5 two-metre external sections and 1 one-metre external section.
EXAMPLE No1 : your forestay measures between 10.40 and 11.40 metres (fig. A), you
do not need the 1-metre section.
EXAMPLE No2: your forestay measures between 11.40 and 12.40 metres, you do need
the 1-metre section (fig. B); the latter fits above the last section.
In both examples, the exact length will be reached with the telescopic section (fig. C).
21
English

Facnor
–
FlatDeck furlin
g
& reefin
g
systems
–
Installation manual
3- PRE-INSTALLATION NOTES
3.1 GENERAL REMARKS WITH REGARD TO FACNOR FURLING SYSTEM:
Simple to assemble: no mast unstepping, no section cutting, no drilling
The FACNOR headsail furling system is one of the easiest to install:
- it does not require unstepping the mast
- under most circumstances you will not need to cut any section on account of the
patented Facnor telescopic section.
- no drilling is necessary.
Maintenance
The FlatDeck does not require
any specific maintenance as
the drum and the swivel are
fitted with torlon®bearings. Just
clean the mechanisms several
times each season to remove the
salt deposits. Hose the
mechanisms as shown. There is a
hole in the upper part of the
drum specially designed for
flushing.
3.2 ELECTRICAL DANGER AND MAST SUPPORT
DO NOT BRING YOUR FURLING SYSTEM IN CONTACT WITH ELECTRIC
CABLES OR HIGH TENSION LINES. The headsail reefing system is made from aluminium
sections which are highly conductive. Contact by the system with power lines can be fatal.
DO NOT INSTALL YOUR REEFING SYSTEM WHEN STORMY WEATHER HAS
BEEN FORECAST. A lightening striking the mast can travel down the system. Death could
result from shocks induced from touching the reefing system.
MAKE SURE THE MAST IS SECURED BEFORE REMOVING THE BOTTOM
FIXING PIN OF THE FORESTAY.Facnor reefing system can be assembled with the forestay
in place. Kit components will be fed over the bottom of the forestay. Therefore, the bottom
fixing pin will have to be removed. Before operating, support the front mast with a Spinnaker
or Genoa halyard. DO NOT USE A SNAP SHACKLE OR SHACKLE HALYARD BUT LASH IT.
We recommend that you change your forestay if it is too old. You may contact one of our
dealers. For information about the nearest Facnor retailer, contact us at +33 (0)2 33 88 50 22 or visit
our web site : www.facnor.com .
The services of a professional yacht rigger or sailmaker could end up saving you
time and should you improperly install the furler or encounter an unusual rigging
problem.
22
English

Facnor
–
FlatDeck furlin
g
& reefin
g
systems
–
Installation manual
3.3- PREPARING FOR ASSEMBLY:
Protecting the components
During assembly, we recommend you protect both the sections and the other items of the
furling system, as rough ground may damage them.
Tools needed for assembly :
- a manual or electric screwdriver
- a hammer
- an adjustable spanner for the lower drum connection bolt
Different allen keys are supplied with the kit, as well as the Pozi drive/No2 bit for the section
screws.
Preparing foil sections
We recommend you prepare the sections before assembly. This involves fixing a connector
(fig. D) to all of the twin-groove sections apart from one. The latter will be the top section. All
of the external sections, including the top section*, have symmetrical holes at each end
(fig. E).
BEWARE: DO NOT TIGHTEN SCREWS AT THIS STAGE.
* For furling systems installed for the first time, delivered to the shipyard, the top
section may be shorter than 2 metres. For these reefing systems, the top section is cut to length.
Therefore, there is no hole on the upper end of the top section, on which the top cap will be
fixed.
23
D
E
English

Facnor
–
FlatDeck furlin
g
& reefin
g
systems
–
Installation manual
4- ASSEMBLY STAGES :
4.1 – ASSEMBLY OF THE HALYARD DEFLECTOR*
Slip the disk around the forestay, screw pointing up.
Assemble the two half bushings above the deflector disk and
around the forestay, the “female” part pointing up.
Fit the bushing into the halyard deflector. Then tighten the
screw (fig. F), which will fix the bushing in place.
*NOTE : for LS/LX330 models, the halyard deflector wheel has
been replaced by a block diverting the halyard and this is to be
riveted onto the mast (see page p29 for further explanations).
4.2- ASSEMBLY OF THE TOP CAP AND THE TOP SECTION
4.2.1 4.2.2 4.2.3 4.2.4
4.2.1- Slip the stainless steel plate and then the top cap around the forestay. Position the plate
by slipping it into the notches on the cap, designed for this purpose.
4.2.2- Around the forestay, assemble a 1st bushing, then a 2nd, the “male” part pointing up. Fit
the bushings together, and give the bottom bushing a quarter turn.
IMPORTANT : These two bushings are now joined.
4.2.3- Put the bushing set into the cap, then give another quarter turn to the bushings.
IMPORTANT : Doing this ensures that the bushings are fixed in place in the top
cap.
4.2.4- Take the top section and fix it snugly into the top cap. If assembly is not possible, give
the bushings a half turn in the cap.
Place the 2 pins into the holes in the top cap and the stainless steel plate. Then, tap them into
the section grooves with a mallet.
The pins are simply used to fix the cap. Therefore, do not hit too hard or you may
damage the cap.
24
English
top Female
p
art
toptop
top top
F
Male
p
art
Give the
bushing
a
quarter
turn
Give both
bushing a
quarter
turn
together
Stainless
steel plate

Facnor
–
FlatDeck furlin
g
& reefin
g
systems
–
Installation manual
4.3- FITTING THE HALYARD SWIVEL
Ensure you fit the halyard swivel the right way up. Fix the
two shackles. In order to raise the sections as high as
possible, we recommend that you fit the halyard swivel
and raise everything by way of a halyard.
IMPORTANT : Be sure to attach a down haul line
to the halyard swivel so as to be able to recover it
later.
4.4- ASSEMBLING FOIL SECTIONS
The top section is in place. Assemble a bushing around the
forestay. Slip the next section, already assembled (see
preparing the sections p.4), with the connector pointing
towards the top of the forestay. With the help of the
connector, push the bushing all the way up into the top
section until the connector holes coincide with those of the
top section.
Fit both screws (fig. G). then, slowly and firmly tighten the
4 screws (fig. G+H).
Repeat the operation until you reach the last section. DO
NOT FIX ANYTHING TO THE LAST SECTION.
If your forestay requires the use of a 1-meter
section, fit it above the lowest 2-meter section.
4.5- FITTING THE TELESCOPIC SECTION
Once the sections have been hoisted as high as possible,
assemble a bushing around the forestay.
Fit the telescopic section and push it up. That way, the
bushing (fig. J) goes into the lowest foil section (Rep. I).
BEWARE : FIT THE TELESCOPIC
SECTION TO THE FORESTAY AS INDICATED
(fig. K). THE SIDE WITH ONLY ONE HOLE
MUST BE POINTING DOWN.
25
H
G
I
K
J
Lon
g
U shackle
bow shackle
top
top
top
English

Facnor
–
FlatDeck furlin
g
& reefin
g
systems
–
Installation manual
4.6- FITTING THE FEEDER
First fit the sail feeder (fig. M) to the telescopic
section as indicated.
4.7- FITTING THE BUSHING INTO THE TELESCOPIC SECTION
Assemble one bushing beneath the telescopic section, the male side pointing up. Fit the
bushing to the telescopic section and give it a quarter turn.
IMPORTANT: Doing this ensures that the bushing is fixed in place at the bottom
of the telescopic section (fig. L).
4.8- FIXING THE TELESCOPIC SECTION IN THE DRUM
4.8.1 4.8.2
4.8.1- Slip the drum around the forestay. Loosen the screw (fig. P) slightly but sufficiently so
that the telescopic section can slide inside the nose of the drum. Lower the telescopic section
(fig. N), with its bushing (fig. O), until the bushing fits in snugly.
4.8.2- Tighten the locking screw (fig. P), which will join the drum to the telescopic section.
26
L
NOP
P
M
English
top
bottom
top
Give the
bushing a
quarter turn

Facnor
–
FlatDeck furlin
g
& reefin
g
systems
–
Installation manual
4.9- FIXING THE BOTTOM OF THE DRUM
Slip the two flexible plastic strips (fig. Q) into the slots
situated on either side of the drum’s base.
Fix the top of the stainless steel link plates (fig. R),
found in the «Facnor turnbuckle kit», to the drum
with the screws provided (fig. S). Lightly grease both
threads before fixing.
Then, fix the bottom of the plates to the turnbuckle
with the pin (fig. T), being careful to correctly position
the nylon bushes (fig. U).
BEWARE: THE FITTING PIN (FIG. T) MUST
ALWAYS BE FIXED TO THE UPPER SECTION OF THE
JAW.
NEVER FIX THE
BOTTOM OF THE PLATES
IN THE LOWER SECTION
OF THE JAW.
WITH SUCH AN INSTALLATION
THE FORESTAY IS NOT
CORRECTLY ARTICULATED
.
IMPORTANT : In order to reach the optimum articulation of the forestay fitted with a furling
system, it is absolutely necessary to have a toggle at the top end of the forestay. Furthermore,
concerning the bottom terminal, it is recommended to have also a toggle.
4.10- ADJUSTING SECTIONS
Tighten the backstay to put some tension onto the forestay.
Leave the feeder piece resting on the drum.
Raise all of the sections together until they touch the top terminal of the forestay. Insert a
screw into one of the lower holes of the last section.
BEWARE: DO NOT OVERTIGHTEN IT
. Press the screw with your thumb and let the
sections slowly descend until a hole coincides with the first of the threads on the telescopic
section.
IMPORTANT :
Make sure that sections have descended at least
50mm before the screw slots into place. Otherwise,
proceed to the next hole, 100mm below.
Leave a margin of 40-139 mm between the halyard
deflector and the bottom of the forestay top terminal.
The ideal position of the feeder is between 600 and
800 mm above the drum shackle.
27
Q
R
S
T
U
English
40 mm-139mm
top
CORREC
T
INCORREC
T

Facnor
–
FlatDeck furlin
g
& reefin
g
systems
–
Installation manual
4.11- FITTING THE SAIL FEEDER
At this step, the bottom foil section being
assembled, the feeder needs finally to be screwed.
Align the holes in the telescopic section with holes
in the feeder. Then, screw down the feeder with the
screw provided.
5- INSTALLATION OF THE REEFING LINE/WEBBING
5.1 Mise en place de la drosse
The furling line/webbing of the FlatDeck is fitted as any
traditional furling line. Use the special blocks delivered.
Furl in and out as a test in order to check the correct
position of the swivel: just in front of the cleat (sail furled
in) and just behind the drum (sail furled out). If the swivel
is correctly positioned, then it is not necessary to cut the
webbing. However:
⇒If the swivel is situated behind the cleat, the
webbing needs to be shortened (see 5.3).
⇒If the swivel is not close to the drum, then turn the
Genoa sheets round the forestay.
5.2 Fitting the front deck block
The furling line should be installed as shown on the
drawing.
The furling line should run off at 90° to the forestay
(if
the webbing guide is uncorrectly positioned, see 6. hereafter)
Fit the front deck as far as possible from the drum.
5.3 Cutting the webbing (if the swivel is situated behind the cleat)
The length of the delivered webbing corresponds to the maximum length that can be rolled
round the drum. According to the boat configuration, the webbing may need to be cut. It is
better to keep the maximum webbing within the drum for an optimum furling power.
28
English
1. Count the
number Xof turns
of foil sections
necessary to
tightly and
completely furl the
sail (keep the
sheets under
tension)
2. Measure
the
distance D
from the
drum to the
rope cleat.
3. See the
chart
hereafter and
match the X
and D datas
with the
length L dof
the webbing
9
CORRECT
X
INCORRECT
90°

Facnor
–
FlatDeck furlin
g
& reefin
g
systems
–
Installation manual
Distance Dfrom the drum to cleat in m (webbing running on the deck)Lgth Lwebbing
(m) FD110 3,5 4 4,5 5 5,5 6 6,5 7 7,5 8
12 - 4,6 6,3 7,2 7,2 7,2 7,2 7,2 7,2 7,2
13 - - 5,4 6,7 7,2 7,2 7,2 7,2 7,2 7,2
14 - - 4,6 5,84 7,2 7,2 7,2 7,2 7,2 7,2
15 - - - 5,42 6,7 7,2 7,2 7,2 7,2 7,2
16 - - - - 5,8 7,2 7,2 7,2 7,2 7,2
17 - - - - - 6,7 7,2 7,2 7,2 7,2
18 - - - - - - 7,2 7,2 7,2 7,2
19 - - - - - - 6,7 7,2 7,2 7,2
« X+1 » or « X+2 »* turns
to roll in the sail
20 - - - - - - - 7,2 7,2 7,2
Distance Dfrom the drum to cleat in m (webbing running on the deck)
Lgth Lwebbing
FD19/230- 4 4,5 5 5,5 6 6,5 7 7,5 8 8,5 9 9,5 10 10,5 11
12 - 4,7 6,5 8,5 10,6 13,0 13,0 13,0 13,0 13,0 13,0 13,0 13,0 13,0 13,0
13 - - 5, 6 7 9,0 10,6 13,0 13,0 13,0 13,0 13,0 13,0 13,0 13,0 13,0
14 - - - 6 7,5 9,5 11,2 13,0 13,0 13,0 13,0 13,0 13,0 13,0 13,0
15 - - - - 6,5 8,0 9,5 11,2 13,0 13,0 13,0 13,0 13,0 13,0 13,0
16 - - - - - 7.0 8,5 10,1 11,8 13,0 13,0 13,0 13,0 13,0 13,0
17 - - - - - - 7,5 9,0 10,6 11,8 13,0 13,0 13,0 13,0 13,0
18 - - - - - - - 8,0 9,5 10,6 13,0 13,0 13,0 13,0 13,0
19 - - - - - - - - 8,5 9,5 11,2 13,0 13,0 13,0 13,0
20 - - - - - - - - - 9,0 10,1 11,2 13,0 13,0 13,0
21 - - - - - - - - - - 9,5 10,6 11,8 13,0 13,0
« X+1 » ou « X+2 »* turns
to roll in the sail
22 - - - - - - - - - - - 10,1 11,2 13,0 13,0
Distance Dentre enrouleur et taquet en m (cheminement sangle sur pont))
Lgth Lwebbing
(m) FD310 5 5,5 6 6,5 7 7,5 8 8,5 9 9,5 10 10,5 11 11,5
12 - 6,5 8,7 11,0 13,5 15,5 18,3 21,3 21,3 21,3 21,3 21,3 21,3 21,3
13 - - 7,0 9,2 11,0 13,5 15,5 18,3 20,5 21,3 21,3 21,3 21,3 21,3
14 - - - 7,6 9,2 11,0 13,5 15,5 17,6 19,8 21,3 21,3 21,3 21,3
15 - - - - 8,1 9,8 11,6 13,5 15,5 17,6 19,8 21,3 21,3 21,3
16 - - - - - 8,1 9,8 11,6 13,5 15,5 16,9 19,0 21,3 21,3
17 - - - - - - 8,7 10,4 11,6 13,5 15,5 16,9 19,2 21,3
18 - - - - - - - 9,2 10,4 12,2 13,5 15,5 16,9 19,0
19 - - - - - - - - 9,2 11,0 12,2 13,5 15,5 16,9
20 - - - - - - - - - 9,8 11,0 12,2 14,1 15,5
21 - - - - - - - - - - - 11,6 12,8 14,1
« X+1 » ou « X+2 »* turns
to roll in the sail
22 - - - - - - - - - - - - 11,6 12,8
Distance Dentre enrouleur et taquet en m (cheminement sangle sur pont))
Lgth Lwebbing
(m) FD310 12 12,5 13 13,5 14 14,5
12 - 21,3 21,3 21,3 21,3 21,3 21,3
13 - 21,3 21,3 21,3 21,3 21,3 21,3
14 - 21,3 21,3 21,3 21,3 21,3 21,3
15 - 21,3 21,3 21,3 21,3 21,3 21,3
16 - 21,3 21,3 21,3 21,3 21,3 21,3
17 - 21,3 21,3 21,3 21,3 21,3 21,3
18 - 20,5 21,3 21,3 21,3 21,3 21,3
19 - 19,0 20,5 21,3 21,3 21,3 21,3
20 - 16,9 18,3 20,5 21,3 21,3 21,3
21 - 15,5 16,9 18,3 20,5 21,3 21,3 - -
« X+1 » ou « X+2 »* turns
to roll in the sail
22 - 14,1 15,5 16,9 18,3 19,8 21,3 - -
*add one turn in order to secure the furling or 2 turns if the sail is new
If the length of the webbing (L) match to an empty
box in one of these charts above, then the furling line
must run longer (distance D) by adding a block at the
back of the boat.
29
English
Cut the webbing
with a heat cutter.
Make a hole at mid-width
and at 1.5cm from the edge
with the sharp point of a
soldering.

Facnor
–
FlatDeck furlin
g
& reefin
g
systems
–
Installation manual
5.4 Fitting the webbing into the drum
5.4.1 5.4.2
5.4.1 & 5.4.2- Remove the stainless steel screws (Rep. V). Be careful not to lose the washers
(Rep. W) and notice the way these parts are installed. Then, open the guide to access the
webbing fixing screws (Rep. X). Remove the hex socket screw (Rep. X) and introduce the
screw through the hole at the end of the webbing. Fix the webbing to the drum by tightening
the hex socket screw (Rep. X). When fitting the webbing load the drum according to the UV
strip fitted to the sail. UV strip must be covering the sail when the sail is furled.
5.4.3- Close up the stainless steel webbing
guide and fix the screws (Rep. V) with the
washers (Rep. W) as shown.
5.4.3
6- ADJUSTING THE FURLING LINE GUIDE
6.1 6.2
6.1- Loosen the 4 stainless steel fixing screws (Rep. Y) in order to release the rotation of the
guide. Turn the guide to the appropriate position.
6.2- Tighten the 4 stainless steel fixing screws (Rep. Y) firmly but too much.
If the rotation angle is not sufficient, fix the 4 screws (Rep. Y) into the 4 next adjusting
holes.
30
English
X
V
W
W
V
Example :
Y

Facnor
–
FlatDeck furlin
g
& reefin
g
systems
–
Installation manual
40mm
–
139mm
15°
8- SPECIFIC INSTALLATIONS
Installation without deflector wheel or when using a sail with shorter luff:
Without deflector wheel (installation for the
LS/LX330):
If the halyard swivel is not used, fix a block on the mast
(fig. A’), so that the halyard runs off at 15° to the
forestay. Also insure that the top cap is positioned
between 40mm and 139mm from the bottom end of the
forestay terminal.
Sail with shorter luff (i.e. Storm Sails and Working Jibs):
The halyard swivel virtually eliminates halyard wrap ;
however, when using a shorter sail, rig a short strop (fig.
B’) between the head of your sail to allow the top of the
halyard swivel to be positioned around 50mm from the
top section cap, when your sail is fully hoisted.
8- POST-INSTALLATION CHECK LIST
□The furling line runs at 90° to the foil sections
(if not, see p.30 «adjusting the furling line guide)
□The bottom pin of the forestay is correctly bolted, at least
one thread is showed beyond the bolt
(If the furling system is fiited with link plates, check the upper fixing
srews)
When the sail is hoisted and the halyard is tensioned correctly :
□distance between halyard deflector & bottom end of the top
forestay terminal =40mm minimum – 139mm maximum
□distance between halyard swivel & top cap
=75mm minimum – 150 mm maximum*
Recommended datas (may vary according to rigging fitting)
* space to allow for change in luff length of Genoa. The bigger is the
distance between the top swivel and the top cap, the more important is
the risk for the halyard to twist round the forestay. Make sure that the
halyard/forestay angle is bigger than 15° (if not, see page 29)
□The swivel is clear of any halyard
□The Genoa halyard is correctly tensioned
□The forestay is sufficiently tight
31
90°
English
A
’
B
’
minimum
40 mm
minimum
75 mm
CLEAR SWIVEL ?
GENOA
HALYARD, OK ?
TIGHT
FORESTAY ?

Facnor
–
FlatDeck furlin
g
& reefin
g
systems
–
Installation manual
11- FURLING TIPS
When you reef, check the Genoa car to ensure the correct tension on the leach and foot.
Keep the Genoa halyard tight when furling in and out.
It is recommended that you have a spare sail on board. You can use an old Genoa with a
luff tape to fit the Facnor groove.
Before leaving your boat, make sure that the sail is tightly furled and that the jib sheets
are wrapped around the furled sail two or three times, and the reefing line is secured.
When reefing in light airs, maintain some tension on the jib sheets to ensure the sail is
properly rolled up.
DO NOT FORCE the reefing system. Check for reasons if the sail is difficult to furl.
Please do not hesitate to contact our experienced sales team or the
FACNOR dealers whose list is available on our web site :
www.facnor.com
and discover the wide range of FACNOR products.
ENJOY YOUR SAILING !
www.facnor.com
32
English
This manual suits for next models
3
Table of contents
Other Facnor Marine Equipment manuals