Digital Juice MATTE BOX PRO User manual

Getting Started Guide
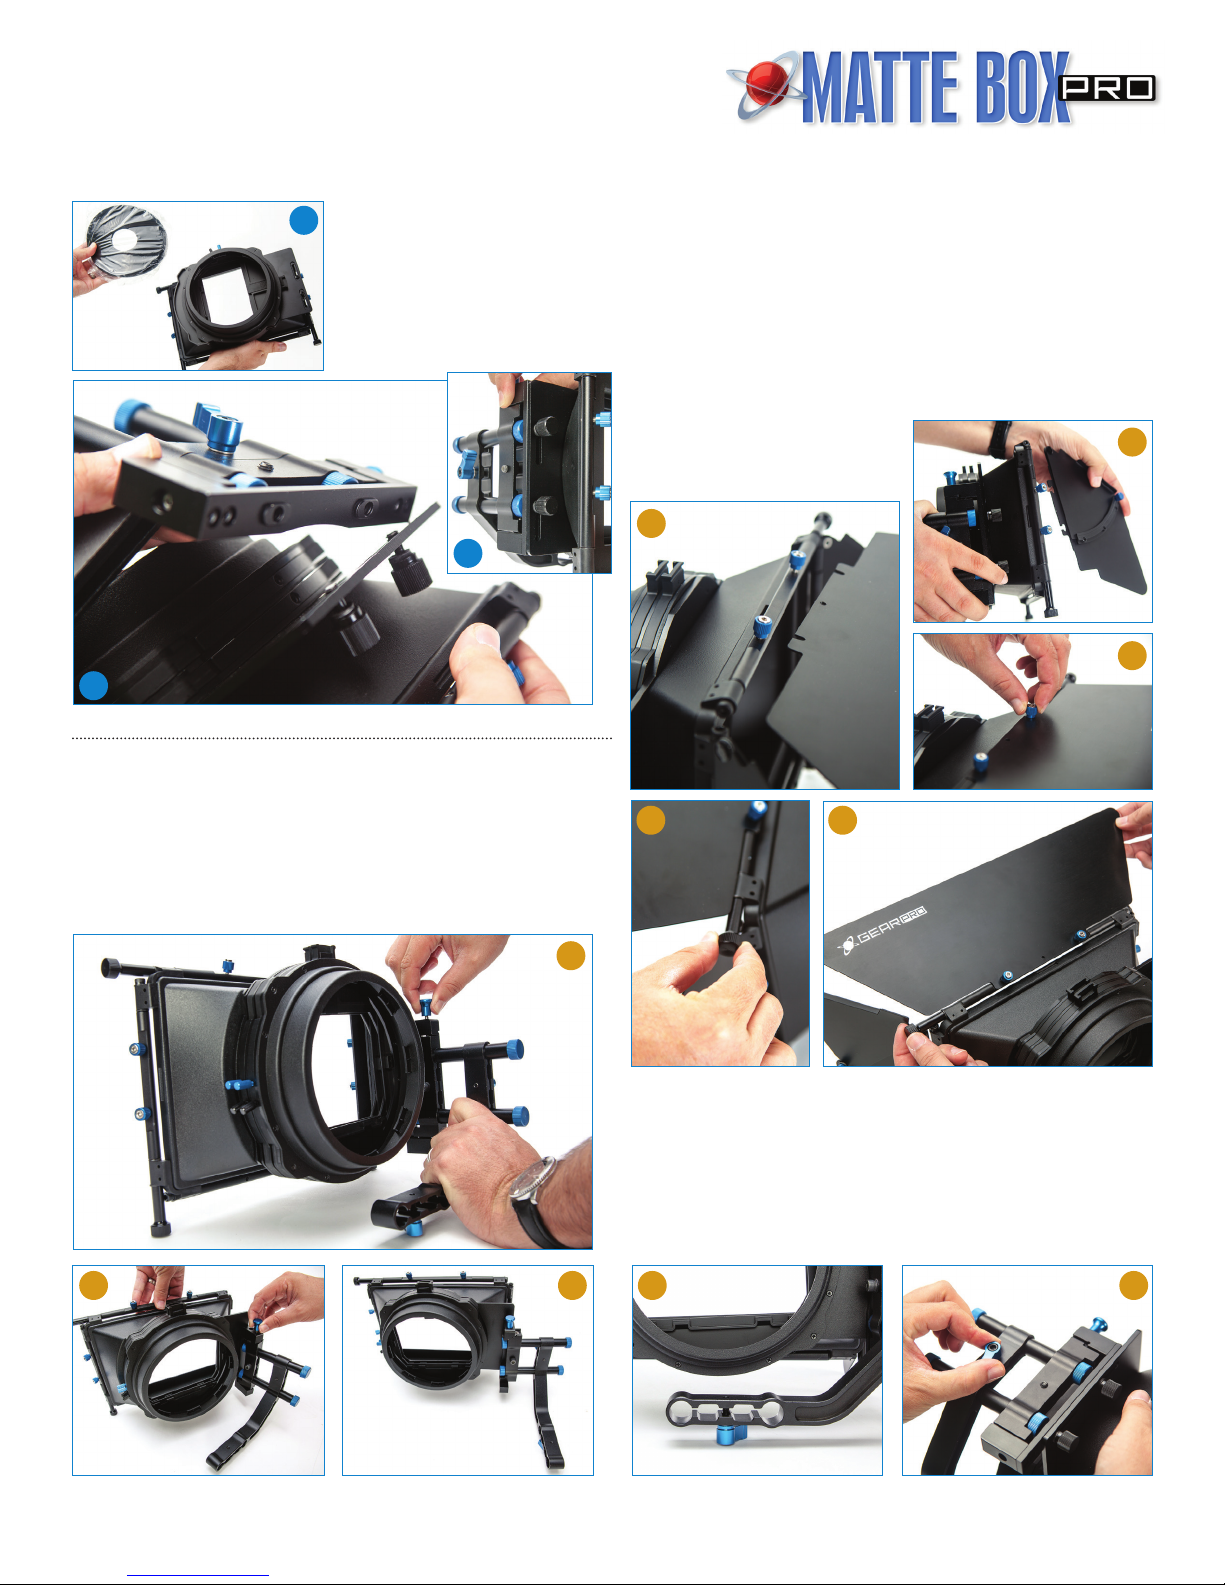
1. After opening the box (11), remove
all the contents from the foam
packing (12).
2. Take out the matte from the front of
the matte box (13).
3. Remove the wrapped package
from inside the matte box (14) and
unwrap the pieces from it.
Unpacking & Assembling the Digital Juice Matte Box PRO
(continued on reverse >)
1
7
8
4
3
9
10
6
What’s Included:
• 1mattebox(1) with 2 filter stage trays (2), 4 flag hinges (3) & 1 matte (4)
• 1swing-awayrodadaptorarm(5)
• 2sidewingflags(6), adjustable for partial or full coverage
• 1toporeyebrowflag(7)
• 2filtertrayadaptersfor4x4”professionalfilters(8)
• 4neoprenelenssurrounddonutstocontrollightleaks(9)
• 2hexkeys/Allenkeys(10)
5
2
11 12 13 13
The Digital Juice Matte Box PRO is the perfect addition to your DSLR camera
rig for productions big and small. It can help you control light spill and lens
flares when using the matte box (1) in combination with the adjustable top
(7) and side (6) flags. These flags can be easily angled, added, removed and
locked into position, giving you complete control over how much light you
allow into your lens. Along with the matte box, this kit also has two different
filter stages (2) which can be rotated 360 degrees, independently from the
box.Theseallowtheuseofboth4x4”and4x5.65”professionalfiltersthatcan
be easily interchanged and rotated for different looks.
Theswing-awaycapabilityoftheDJMatteBoxPROrodadapter(5) allows
you to access your lens without removing the entire matte box assembly
from your rails. To prevent light leaks from behind the matte box, this kit also
includes rubber lens surrounds (9) in four
different sizes to accommodate different
lens diameters.
Getting Started Guide (continued)
Unpacking & Assembling the DJ Matte Box PRO (continued) Using Your DJ Matte Box PRO
4. Remove the package of donuts from
the rear of the matte box (15).
5.Usingtheblackthumbscrews,
attach the matte box to the swing
away rail adaptor (16). These
thumbscrews also adjust the height
of the matte box from the rails (17).
YourDJMatteBoxPROkithasseveralfunctionsanduniqueadjustmentsthatyou
can change depending on your specific shooting situation.
Making Adjustments to Your Matte Box PRO Unit:
Flags can be attached or removed using the blue thumbscrews located on
the flag hinges on the top, bottom and sides of each matte box. Each flag
has a tab with screw slots (18 & 19). Loosen the thumbscrews, slip the
flag’s tab under the screw heads, then tighten the thumbscrews down (20).
To adjust the flags, ensure that the flag hinge is loose by turning the black
hinge tension knob counterclockwise (21).Oncethehingeisloose,adjust
the flag to the desired position and
re-tightenthehingetensionknobto
lock the flag in place (22).
Accessing the Camera Lens While Using the Matte Box PRO:
Togainaccesstoyourlenswithoutremovingthemattebox,liftthespring-
loadedblueknobonthetopofthematteboxswing-awayhinge(28) and
swing the matte box out and away from your lens (29). When the matte box
is fully open, release the knob. This will lock the matte box open and keep it
from swinging (30). To close, lift the knob and swing the matte box toward
the lens again.
To move the matte box closer or further away from your lens, first loosen
the blue thumbscrew handle located on the bottom of the matte box’s
15mmrailadaptor(23), then slide the matte box to the desired position
on the rails and tighten the thumbscrew. For minor adjustments, you can
loosentheotherbluethumbscrewhandle,locatedonthesideofthe15mm
rail adaptor (near the swing away hinge) and slide the matte box backward
orforwardontheshort15mmrailsattachedtothehinge(24).
15
16
18
17
19
20
21
29 30
28
22
23 24
(continued on next page >)

Making Adjustments to Your Matte Box PRO Unit (continued)
Inserting Filters in the Matte Box PRO
Getting Started Guide (continued)
To adjust the height of the matte box, loosen the black thumb screws which
attach the matte box to the swing away hinge (25).Onceloose,raise(26)
or lower (27)thematteboxtoyourdesiredpositionthenre-tightentheblack
thumb screws to lock the matte box in place.
The2dual-purpose360-degreerotatingfiltertraysandthetwofiltertray
adaptersincludedwithyourmatteboxallowtheuseofboth4x4”and
4x5.65”professionalfiltersthatcanbeeasilyinterchangedandrotatedfor
different looks (31).
To insert a filter, grip the filter tray tab and loosen the blue thumb screw on
the side of the filter stage (32), then lift the filter tray free from the matte box
(33).Placeyourfilterintotheholderbypullingbackonthespringloaded
clamp attached to the filter tray tab (34).Releasethespring-loadedclamp
to secure the filter in place (35). Replace the filter tray in the matte box and
tighten the blue thumb screw to secure the tray in place.
NOTE: Do not let go of the filter holder tab until the blue thumb screw is
tightened or the filter holder could fall through the matte box.
Rotating Filters
To rotate the filter, loosen the black thumbscrew (36) on the side of the filter
stage. Rotate the filter stage to the desired position (37)thenre-tightenthe
black thumbscrew.
Using the Rubber Lens Surrounds to Control Light Leaks
The 4 neoprene lens surrounds or donuts included in the package fit lenses of
varying diameters and help you control light leaks from behind the camera and
matte box. To install a donut, fit it into the back slot on the circular end of the
matte box unit (38) so that it fits snugly around your lens (39).
25 26 27
www.digitaljuice.com
Specifications
Lens Fit and Mount:Universalwith4neoprenedonuts
Camera Rig Support:15mmrod
Filter Type: 4x4”,4x5.65”
360° Rotating Filter Stages: 2
Materials:Heavydutymachinedaluminum,high-gradeABS
Weight: MatteBoxPROwithrubberdonutsandflags:4.4lbs/2kg,4rubber
donuts:.6lbs/.27kg,3flags:.8lbs/.36kg
31
32
33
34
35
36
38
37
39
Other Digital Juice Camera Accessories manuals

Digital Juice
Digital Juice SHARP SHOOTER User manual

Digital Juice
Digital Juice Orbit Dolly FlexTrac User manual

Digital Juice
Digital Juice Standard Follow Focus User manual

Digital Juice
Digital Juice FOLLOW FOCUS PRO User manual

Digital Juice
Digital Juice EVO PRO Fluid Head User manual

Digital Juice
Digital Juice Shoulder Mount Stabilizer User manual


