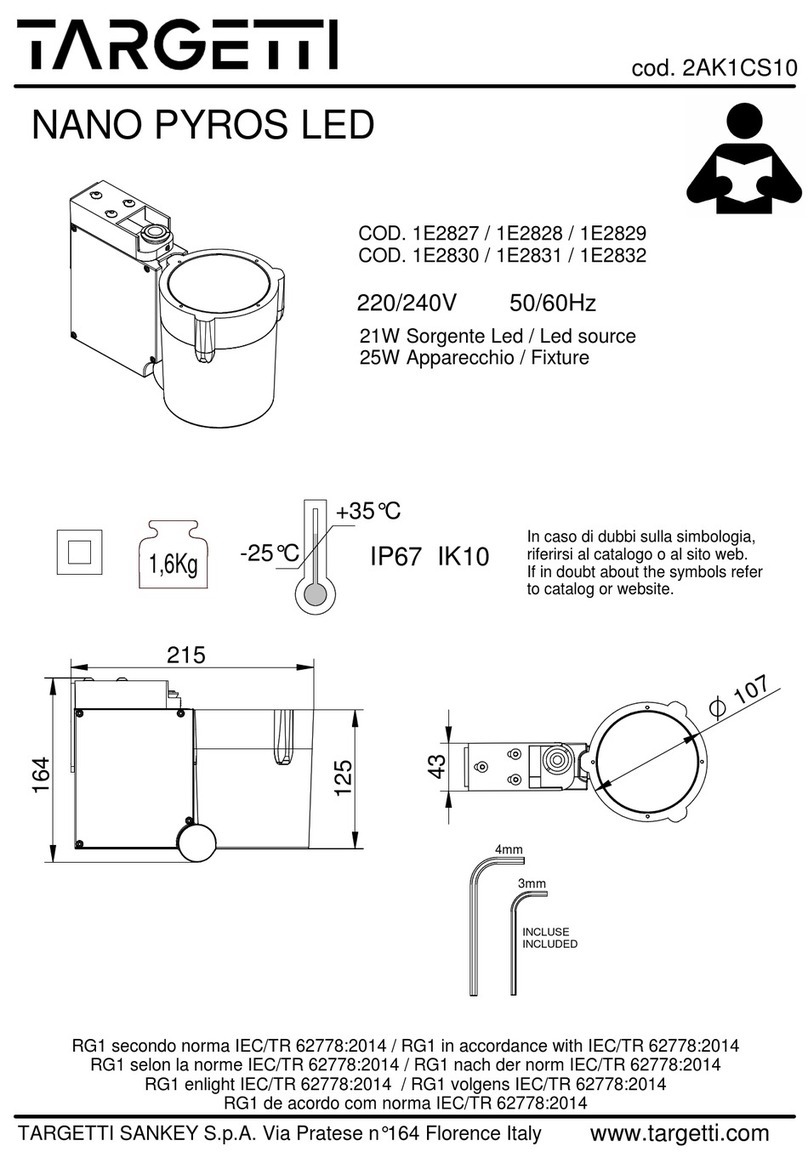
Digital Lumens RLE User manual

Installation Instructions | Installationsanleitung | Instructions d'installation | Instrucciones de Instalación
OVERVIEW
ÜBERBLICK
APERÇU
VISIÓN GENERAL
The RLE Intelligent LED High-Bay Luminaire enables
advanced lighting controls for impressive energy savings,
unlocks beyond lighting applications, and empowers
users to more efficiently and affordably maintain a
state-of-the-art facility for the lifetime of the luminaire.
For more information on product specifications and
lighting tools visit digitallumens.com.
Die RLE Intelligent LED High-Bay Luminaire ermöglicht
fortschrittliche Beleuchtungssteuerungen für beeindruckende
Energieeinsparungen, öffnet sich über
Beleuchtungsanwendungen hinaus und ermöglicht Benutzern
eine effizientere und kostengünstigere Wartung von a
State-of-the-Art-Anlage für die Lebensdauer der Leuchte.
Weitere Informationen zu Produktspezifikationen und
Lichtwerkzeugen finden Sie unter digitallumens.com.
Le luminaire RLE Intelligent LED High-Bay permet des
commandes d'éclairage avancées pour des économies
d'énergie impressionnantes, déverrouille au-delà des
applications d'éclairage et permet aux utilisateurs de maintenir
plus efficacement et à moindre coût un installation de pointe
pour la durée de vie du luminaire. Pour plus d'informations sur les
spécifications des produits et les outils d'éclairage,
visitez digitallumens.com.
La luminaria RLE Intelligent LED High-Bay permite controles de
iluminación avanzados para ahorros de energía impresionantes,
desbloquea más allá de las aplicaciones de iluminación y
permite a los usuarios mantener de manera más eficiente y
económica un instalación de última generación para la vida útil
de la luminaria. Para obtener más información sobre las
especificaciones del producto y las herramientas de iluminación,
visite digitallumens.com.
RLE
Intelligent LED High-Bay Luminaire
GETTING STARTED | EINSTIEG |
COMMENCER | EMPEZANDO

2RLE Installation Instructions | Installationsanleitung | Instructions d'installation | Instrucciones de Instalación
RLE
PRODUCT SAFETY | PRODUKTSICHERHEIT | SÉCURITÉ DES PRODUITS | SEGURIDAD DEL PRODUCTO
When using electrical equipment, basic safety precautions should
always be followed, including the following:
This product must be installed in accordance with the applicable
installation codes by a person familiar with the construction and
operation of the product and the hazards involved.
To avoid risk of electrical shock, disconnect power before installing,
wiring, or servicing the luminaire.
The light source contained in this luminaire shall only be replaced by
the manufacturer of this service agent or similarly qualified person.
Do not apply paint, lubricants or other coatings to luminaire,
suspension cables, or fasteners.
Do not use luminaire if the housing, aircraft cables, optics, or power
cable are damaged. If the supply cord is damaged, it must be
replaced by the manufacturer, its service agent or similarly qualified
persons in order to avoid a hazard.
Only handle luminaire by sheet metal surfaces. Do not grasp or
handle optical lenses with your fingers or hands. In the event you
need to clean the lens, use a damp cloth and gently swab the
affected area. Clean with mild soap and water only.
Maintain10ft(3m)setbackfromwallsopentoexterior.
Operation of this equipment is subject to the following two
conditions:(1)thisequipmentordevicemaynotcauseharmful
interference,and2)thisequipmentordevicemustacceptany
interference, including interference that may be caused by
undesired operation.
Bei der Verwendung elektrischer Geräte sollten immer grundlegende
Sicherheitsvorkehrungen getroffen werden, einschließlich der folgenden:
Dieses Produkt muss gemäß den geltenden
Installationsvorschriften von einer Person installiert werden, die
mit der Konstruktion und dem Betrieb des Produkts und den damit
verbundenen Gefahren vertraut ist.
Um das Risiko eines Stromschlags zu vermeiden, trennen Sie die
Stromversorgung, bevor Sie die Leuchte installieren, verkabeln
oder warten.
Die in dieser Leuchte enthaltene Lichtquelle darf nur vom Hersteller
dieses Servicepartners oder einer ähnlich qualifizierten Person
ausgetauscht werden.
Geeignet für den Innenbereich.
Tragen Sie keine Farbe, Schmiermittel oder andere Beschichtungen
auf Leuchten, Aufhängekabel oder Befestigungselemente auf.
Leuchte nicht verwenden, wenn Gehäuse, Flugzeugkabel, Optik
oder Stromkabel beschädigt sind. Wenn das Netzkabel beschädigt
ist, muss es vom Hersteller, seinem Kundendienst oder ähnlich
qualifizierten Personen ersetzt werden, um Gefahren zu vermeiden.
Nur mit milder Seife und Wasser reinigen.
Leuchte nur an Blechoberflächen anfassen. Fassen oder
handhaben Sie optische Linsen nicht mit den Fingern oder Händen.
Falls Sie die Linse reinigen müssen, verwenden Sie ein feuchtes
Tuch und wischen Sie die betroffene Stelle vorsichtig ab.
HaltenSieeinenAbstandvon3mvonWändenein,dienachaußen
offen sind.
Der Betrieb dieses Geräts unterliegt den folgenden zwei
Bedingungen:(1)DiesesGerätoderGerätdarfkeineschädlichen
Störungenverursachen,und(2)diesesGerätoderGerätmuss
Störungen akzeptieren, einschließlich Störungen, die durch
unerwünschten Betrieb verursacht werden können.
Lors de l'utilisation d'équipements électriques, des précautions de
sécurité de base doivent toujours être suivies, notamment les suivantes:
Ce produit doit être installé conformément aux codes d'installation
applicables par une personne familière avec la construction et le
fonctionnement du produit et les risques impliqués.
Pour éviter tout risque de choc électrique, débranchez
l'alimentation avant d'installer, de câbler ou d'entretenir le luminaire.
La source lumineuse contenue dans ce luminaire ne doit être
remplacée que par le fabricant de cet agent de service ou une
personne de qualification similaire.
Convient pour une utilisation en intérieur.
N'appliquez pas de peinture, de lubrifiants ou d'autres revêtements
sur le luminaire, les câbles de suspension ou les attaches.
N'utilisez pas de luminaire si le boîtier, les câbles d'avion, l'optique
ou le câble d'alimentation sont endommagés. Si le cordon
d'alimentation est endommagé, il doit être remplacé par le
fabricant, son agent de service ou des personnes de qualification
similaire afin d'éviter tout danger.
Ne manipulez le luminaire que par des surfaces en tôle. Ne
saisissez pas et ne manipulez pas les lentilles optiques avec vos
doigts ou vos mains. Si vous devez nettoyer la lentille, utilisez
un chiffon humide et tamponnez doucement la zone affectée.
Nettoyer avec du savon doux et de l'eau seulement.
Maintenirunretraitde10pi(3m)desmursouvertsversl'extérieur.
Le fonctionnement de cet équipement est soumis aux deux
conditionssuivantes:(1)cetéquipementouappareilnedoitpas
causerd'interférencesnuisibles,et(2)cetéquipementouappareil
doit accepter toute interférence, y compris les interférences qui
peuvent être causées par un fonctionnement indésirable.
Al usar equipos eléctricos, siempre se deben seguir las precauciones
básicas de seguridad, incluidas las siguientes:
Este producto debe ser instalado de acuerdo con los códigos
de instalación aplicables por una persona familiarizada con la
construcción y operación del producto y los peligros involucrados.
Para evitar el riesgo de descarga eléctrica, desconecte la energía
antes de instalar, cablear o reparar la luminaria.
La fuente de luz contenida en esta luminaria solo debe ser
reemplazada por el fabricante de este agente de servicio o una
persona calificada similar.
Apto para uso en interiores.
No aplique pintura, lubricantes u otros revestimientos a la luminaria,
cables de suspensión o sujetadores.
No utilice la luminaria si la carcasa, los cables del avión, la óptica o el
cable de alimentación están dañados. Si el cable de alimentación está
dañado, debe ser reemplazado por el fabricante, su agente de servicio
o personas calificadas de manera similar para evitar un peligro.
Manipule la luminaria únicamente por superficies de chapa. No
agarre ni manipule lentes ópticos con los dedos o las manos. En
caso de que necesite limpiar la lente, use un paño húmedo y frote
suavemente el área afectada. Limpiar solo con agua y jabón suave.
Mantengaunretrocesode10pies(3m)desdelasparedesabiertas
hacia el exterior.
La operación de este equipo está sujeta a las siguientes dos
condiciones:(1)esposiblequeesteequipoodispositivonocause
interferenciaperjudicialy(2)esteequipoodispositivodebeaceptar
cualquier interferencia, incluyendo la que pueda causar su operación
no deseada.
SAVE THESE INSTRUCTIONS. | ANLEITUNG AUFBEWAHREN.
CONSERVEZ CES INSTRUCTIONS. | GUARDA ESTAS INSTRUCCIONES.
READ THESE INSTRUCTIONS BEFORE USING THE PRODUCT
LESEN SIE DIESE ANWEISUNGEN BEVOR SIE DIESES PRODUKT VERWENDEN
LIRE CES INSTRUCTIONS AVANT D'UTILISER CE PRODUIT
LEA ESTAS INSTRUCCIONES ANTES DE USAR ESTE PRODUCTO

3
RLE Installation Instructions | Installationsanleitung | Instructions d'installation | Instrucciones de Instalación
RLE
MAGNETIC MOUNT
MAGNETISCHE BEVESTIGING
SUPPORT MAGNÉTIQUE
MONTAJE MAGNÉTICO
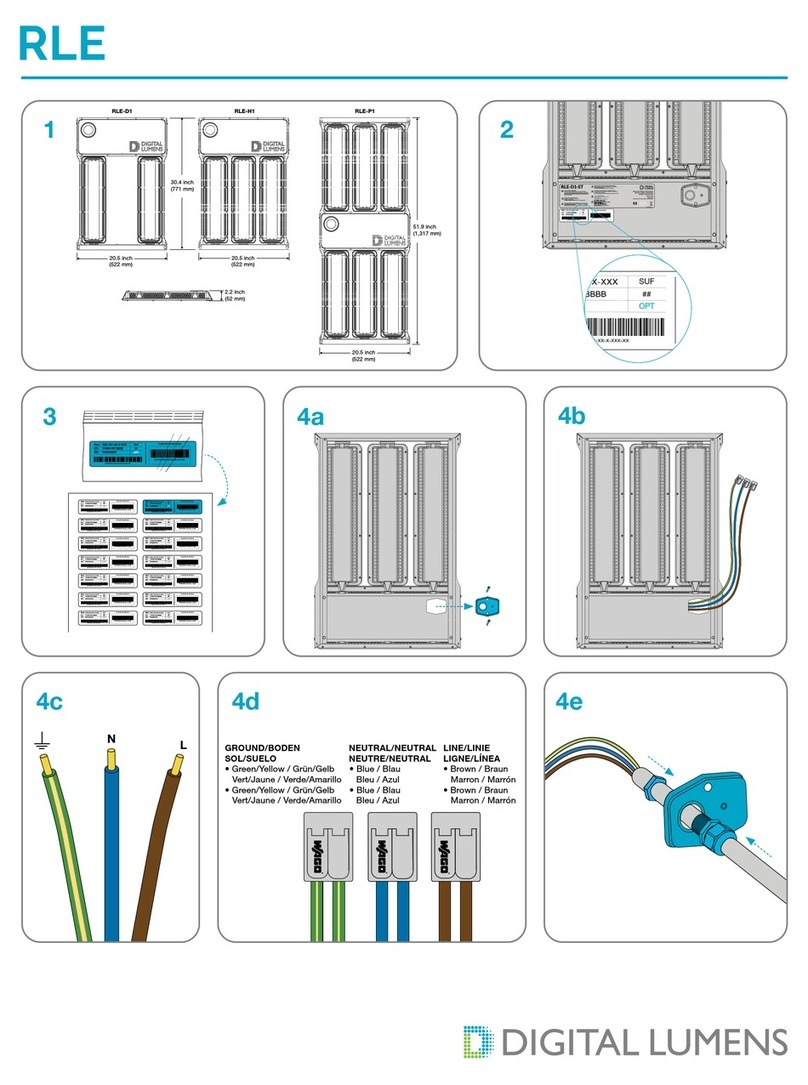
RLE-D1 RLE-H1
RLE-P1
STEP 1 | SCHRITT 1 | ÉTAPE 1 | PASO 1
Verify RLE Model.
Überprüfen Sie das RLE-Modell.
Vérifiez le modèle RLE.
Verifique el modelo RLE.
Product Ratings:
RLE-D1-ST:120to277VAC,50/60Hz,145W(maximum),1.21A(maximum)
RLE-H1-ST:120to277VAC,50/60Hz,214W(maximum),1.79A(maximum)
RLE-P1-ST:120to277VAC,50/60Hz,428W(maximum),3.56A(maximum)
RLE-D1-HV:347to480VAC,50/60Hz,148W(maximum),0.43A(maximum)
RLE-H1-HV:347to480VAC,50/60Hz,217W(maximum),0.63A(maximum)
RLE-P1-HV:347to480VAC,50/60Hz,434W(maximum),1.25A(maximum)
Produktbewertungen:
RLE-D1-ST:120zu277VAC,50/60Hz,145W(maximal),1.21A(maximal)
RLE-H1-ST:120zu277VAC,50/60Hz,214W(maximal),1.79A(maximal)
RLE-P1-ST:120zu277VAC,50/60Hz,428W(maximal),3.56A(maximal)
RLE-D1-HV:347zu480VAC,50/60Hz,148W(maximal),0.43A(maximal)
RLE-H1-HV:347zu480VAC,50/60Hz,217W(maximal),0.63A(maximal)
RLE-P1-HV:347zu480VAC,50/60Hz,434W(maximal),1.25A(maximal)
Calificaciones de productos:
RLE-D1-ST:120pour277VAC,50/60Hz,145W(maximum),1.21A(maximum)
RLE-H1-ST:120pour277VAC,50/60Hz,214W(maximum),1.79A(maximum)
RLE-P1-ST:120pour277VAC,50/60Hz,428W(maximum),3.56A(maximum)
RLE-D1-HV:347pour480VAC,50/60Hz,148W(maximum),0.43A(maximum)
RLE-H1-HV:347pour480VAC,50/60Hz,217W(maximum),0.63A(maximum)
RLE-P1-HV:347pour480VAC,50/60Hz,434W(maximum),1.25A(maximum)
Évaluations du produit:
RLE-D1-ST:120para277VAC,50/60Hz,145W(máximo),1.21A(máximo)
RLE-H1-ST:120para277VAC,50/60Hz,214W(máximo),1.79A(máximo)
RLE-P1-ST:120para277VAC,50/60Hz,428W(máximo),3.56A(máximo)
RLE-D1-HV:347para480VAC,50/60Hz,148W(máximo),0.43A(máximo)
RLE-H1-HV:347para480VAC,50/60Hz,217W(máximo),0.63A(máximo)
RLE-P1-HV:347para480VAC,50/60Hz,434W(máximo),1.25A(máximo)

4RLE Installation Instructions | Installationsanleitung | Instructions d'installation | Instrucciones de Instalación
RLE
DC:
SN:
Item:
XXX- XX-X X-XX
YYWWFFF BBBB
PPHHHHHH
PPHHHH HH-XXX- XX-XX-XX -SUF-# #
SUF
##
OPT
DC:
SN:
Item:
XXX-XX-XX-XX
YYWW FFF BBBB
PPHHHHHH
PPHHHHHH-XXX-XX-XX-XX-SUF-##
SUF
##
OPT
STEP 2 | SCHRITT 2 | ÉTAPE 2 | PASO 2
Verify and use optic type specified in the project plan — Wide, Narrow, Wide Glass, or Narrow Glass. The optic type
is printed on the luminaire serial number label.
Note: Wide and Narrow optics are made of plastic.
Überprüfen und verwenden Sie den im Projektplan angegebenen Optiktyp – Wide, Narrow, Wide Glass oder Narrow Glass.
Der Optiktyp ist auf dem Seriennummernschild der Leuchte aufgedruckt.
Hinweis: Wide- und Narrow-Optiken bestehen aus Kunststoff.
Vérifiez et utilisez le type d'optique spécifié dans le plan de projet — Wide, Narrow, Wide Glass ou Narrow Glass. Le type
d'optique est imprimé sur l'étiquette du numéro de série du luminaire.
Remarque: Les optiques larges et étroites sont en plastique.
Verifique y use el tipo de óptica especificado en el plan del proyecto: ancho, estrecho, vidrio ancho o vidrio estrecho. El tipo
de óptica está impreso en la etiqueta del número de serie de la luminaria.
Nota: Las ópticas ancha y estrecha están hechas de plástico.

5
RLE Installation Instructions | Installationsanleitung | Instructions d'installation | Instrucciones de Instalación
RLE
DC:
SN:
Item:
XXX-XX-XX-XX
YYWW FFF BBBB
PPHHHHHH
PPHHHHHH-XXX-XX-XX-XX-SUF-##
SUF
##
OPT
D
C:
S
N:
I
te
m:
XXX-XX-XX-X
X
YYWW
FFF
BBBB
PP
HHHHHH
PPHHHHHH-XXX-XX-XX-XX-
SU
F-#
#
S
U
F
#
#
O
P
T
Example of an Excel spread sheet sticker book file.
18
29
310
411
512
613
714
DC:
SN:
Item:
XXX-XX-XX-XX
YYWW FFF BBBB
PPHHHHHH
PPHHHHHH-XXX-XX-XX-XX-SUF-##
SUF
##
OPT
DC:
SN:
Item:
XXX-XX-XX-XX
YYWW FFF BBBB
PPHHHHHH
PPHHHHHH-XXX-XX-XX-XX-SUF-##
SUF
##
OPT
DC:
SN:
Item:
XXX-XX-XX-XX
YYWW FFF BBBB
PPHHHHHH
PPHHHHHH-XXX-XX-XX-XX-SUF-##
SUF
##
OPT
DC:
SN:
Item:
XXX-XX-XX-XX
YYWW FFF BBBB
PPHHHHHH
PPHHHHHH-XXX-XX-XX-XX-SUF-##
SUF
##
OPT
DC:
SN:
Item:
XXX-XX-XX-XX
YYWW FFF BBBB
PPHHHHHH
PPHHHHHH-XXX-XX-XX-XX-SUF-##
SUF
##
OPT
DC:
SN:
Item:
XXX-XX-XX-XX
YYWW FFF BBBB
PPHHHHHH
PPHHHHHH-XXX-XX-XX-XX-SUF-##
SUF
##
OPT
DC:
SN:
Item:
XXX-XX-XX-XX
YYWW FFF BBBB
PPHHHHHH
PPHHHHHH-XXX-XX-XX-XX-SUF-##
SUF
##
OPT
DC:
SN:
Item:
XXX-XX-XX-XX
YYWW FFF BBBB
PPHHHHHH
PPHHHHHH-XXX-XX-XX-XX-SUF-##
SUF
##
OPT
DC:
SN:
Item:
XXX-XX-XX-XX
YYWW FFF BBBB
PPHHHHHH
PPHHHHHH-XXX-XX-XX-XX-SUF-##
SUF
##
OPT
DC:
SN:
Item:
XXX-XX-XX-XX
YYWW FFF BBBB
PPHHHHHH
PPHHHHHH-XXX-XX-XX-XX-SUF-##
SUF
##
OPT
DC:
SN:
Item:
XXX-XX-XX-XX
YYWW FFF BBBB
PPHHHHHH
PPHHHHHH-XXX-XX-XX-XX-SUF-##
SUF
##
OPT
DC:
SN:
Item:
XXX-XX-XX-XX
YYWW FFF BBBB
PPHHHHHH
PPHHHHHH-XXX-XX-XX-XX-SUF-##
SUF
##
OPT
DC:
SN:
Item:
XXX-XX-XX-XX
YYWW FFF BBBB
PPHHHHHH
PPHHHHHH-XXX-XX-XX-XX-SUF-##
SUF
##
OPT
DC:
SN:
Item:
XXX-XX-XX-XX
YYWW FFF BBBB
PPHHHHHH
PPHHHHHH-XXX-XX-XX-XX-SUF-##
SUF
##
OPT
DC:
SN:
Item:
XXX-XX-XX-XX
YYWW FFF BBBB
PPHHHHHH
PPHHHHHH-XXX-XX-XX-XX-SUF-##
SUF
##
OPT
DC
:
S
N:
I
tem:
XXX
-
XX
-
XX
-
XX
YYWW
FFF
BBBB
PP
HHHHHH
PPHHHHHH-XXX-XX-XX-XX-
S
UF-#
#
S
UF
##
O
P
T
D
S
I
SERIAL NUMBER LABELS
SERIENNUMMERN-ETIKETTEN
ÉTIQUETTES DE NUMÉRO DE SÉRIE
ETIQUETAS DE NÚMERO DE SERIE
STEP 3 | SCHRITT 3 | ÉTAPE 3 | PASO 3
Detach the plastic bag from luminaire. Open the bag and remove the serial number label. Track the label using
thepreferredserialnumberstickertrackingprocess(eg.stickerbook).
Note: For more information contact your Digital Lumens Representative.
Lösen Sie die Plastiktüte von der Leuchte. Öffnen Sie die Tüte und entfernen Sie das Etikett mit der Seriennummer. Verfolgen
SiedasEtikettmitderbevorzugtenVerfolgungdesSeriennummernaufklebersverarbeiten(z.B.Stickerheft).
Hinweis: Für weitere Informationen wenden Sie sich bitte an Ihren Digital Lumens-Vertreter.
Détachez le sac en plastique du luminaire. Ouvrez le sac et retirez l'étiquette du numéro de série. Suivez l'étiquette à l'aide du
suivid'autocollantdenumérodesériepréféréprocessus(parexemple,livred'autocollants).
Remarque: Pour plus d'informations contactez votre Représentant Digital Lumens.
Separe la bolsa de plástico de la luminaria. Abra la bolsa y retire la etiqueta del número de serie. Realice un seguimiento
delaetiquetautilizandoelseguimientodelaetiquetaadhesivadelnúmerodeseriepreferidoproceso(porejemplo,libro
depegatinas).
Nota: Para más información póngase en contacto con su Representante de Digital Lumens.

6RLE Installation Instructions | Installationsanleitung | Instructions d'installation | Instrucciones de Instalación
RLE
STEP 4 | SCHRITT 4 | ÉTAPE 4 | PASO 4
Remove(2x)Phillips®screws retaining the wiring compartment access panel.
Note:WiringcompartmentaccesscoverissuitableforcableswithØ7to9mm (0.275to0.365inch).
EntfernenSie(2x)Phillips®-Schrauben, die die Verkabelung halten Zugangsklappe zum Fach.
Hinweis:DieZugangsabdeckungzumAnschlussraumistfürKabelmiteinemDurchmesservonØ7bis9mm (0.275bis0.365
inch)geeignet.
Retirezles(2x)visPhillips®retenant le câblage panneau d'accès au compartiment.
Remarque:Lecouvercled'accèsaucompartimentdecâblageconvientauxcâblesdeØ7à9mm
(0.275à0.365inch).
Quitelos(2x)tornillosPhillips®que retienen el cableado panel de acceso al compartimento.
Nota:LatapadeaccesoalcompartimentodecableadoesadecuadaparacablesdeØ7a9mm (0.275a0.365inch).
MAKE ELECTRICAL CONNECTIONS
ELEKTRISCHE ANSCHLÜSSE HERSTELLEN
FAIRE LES RACCORDEMENTS ÉLECTRIQUES
REALIZAR CONEXIONES ELÉCTRICAS
To avoid risk of damage or electrical shock,
disconnect power before installing, wiring, or
servicing the luminaire.
Um das Risiko einer Beschädigung oder eines
Stromschlags zu vermeiden,Trennen Sie die
Stromversorgung vor der Installation, Verkabelung
oder Wartung der Leuchte.
Pour éviter tout risque de dommage ou de choc
électrique, débrancher l'alimentation avant d'installer,
de câbler ou l'entretien du luminaire.
Para evitar el riesgo de daños o descargas eléctricas,
desconecte la alimentación antes de instalar, cablear
o mantenimiento de la luminaria.

7
RLE Installation Instructions | Installationsanleitung | Instructions d'installation | Instrucciones de Instalación
RLE
NL
STEP 5 | SCHRITT 5 | ÉTAPE 5 | PASO 5
Extract the internal three-wire bundle from wiring compartment and identify the wire leads.
Entnehmen Sie das interne Dreidrahtbündel aus der Verkabelung Fach und identifizieren Sie die Kabeladern.
Extraire le faisceau interne de trois fils du câblage compartiment et identifier les fils conducteurs.
Extraiga el paquete interno de tres cables del cableado compartimento e identifique los cables conductores.
GROUND/BODEN
SOL/SUELO
• Green/Yellow / Grün/Gelb
Vert/Jaune / Verde/Amarillo
• Green/Yellow / Grün/Gelb
Vert/Jaune / Verde/Amarillo
NEUTRAL/NEUTRAL
NEUTRE/NEUTRAL
• Blue / Blau
Bleu / Azul
• Blue / Blau
Bleu / Azul
LINE/LINIE
LIGNE/LÍNEA
• Brown / Braun
Marron / Marrón
• Brown / Braun
Marron / Marrón
STEP 6 | SCHRITT 6 | ÉTAPE 6 | PASO 6
Connect external wiring to internal wire bundle using
supplied WAGO®splicing connectors.
Verbinden Sie die externe Verkabelung mit dem internen
Kabelbündel mit mitgelieferten WAGO®-Spleißverbindern.
Connectez le câblage externe au faisceau de fils interne à
l'aide connecteurs d'épissage WAGO®fournis.
Conecte el cableado externo al paquete de cables interno
usando conectores de empalme WAGO®suministrados.

8RLE Installation Instructions | Installationsanleitung | Instructions d'installation | Instrucciones de Instalación
RLE
OPTION A
MÖGLICHKEIT A
OPTION A
OPCIÓN A
OPTION B
MÖGLICHKEIT B
OPTION B
OPCIÓN B
STEP 7 | SCHRITT 7 | ÉTAPE 7 | PASO 7
Use supplied cable gland or suitable IP-rated wiring
connector(suppliedbyinstaller)toroutepowercable
through access panel.
Verwenden Sie die mitgelieferte Kabelverschraubung oder
einegeeigneteIP-geschützteVerkabelungAnschluss(vom
Installateurbereitgestellt),umdasNetzkabeldurchdie
Zugangsabdeckung zu führen.
Utilisez le presse-étoupe fourni ou un câblage IP approprié
connecteur(fourniparl'installateur)pouracheminerlecâble
d'alimentation à travers le panneau d'accès.
Utilice el prensaestopas suministrado o un cableado
adecuadoconclasificaciónIPconector(suministradoporel
instalador)paraenrutarelcabledealimentaciónatravésdel
panel de acceso.
Ensure cable gland is installed with correct torque. Required
torqueforsuppliedcableglandis5N-m(44.2inch/lb)for
innernut,and3.36N-m(29.5inch/lb)forouternut.
Stellen Sie sicher, dass die Kabelverschraubung mit dem
richtigen Drehmoment installiert ist. Das erforderliche
Drehmoment für die mitgelieferte Kabelverschraubung
beträgt5N-m(44.2inch/lb)fürInnenmutterund3.36N-m
(29.5inch/lb)füräußereMutter.
Assurez-vous que le presse-étoupe est installé avec un
couple correct. Le couple requis pour le presse-étoupe
fourniestde5N-m(44.2inch/lb)pourl'écrouintérieuret
3.36N-m(29.5inch/lb)pourécrouextérieur.
Asegúrese de que el prensaestopas esté instalado con el par
de apriete correcto. El par de apriete requerido para el
prensaestopassuministradoesde5N-m(44.2inch/lb)parala
tuercainteriory3.36N-m(29.5inch/lb)paratuercaexterior.
Use supplied pre-assembled IP-rated wiring
connector(suppliedbyinstaller)toroutepowercable
through access panel.
Verwenden Sie den mitgelieferten vormontierten
IP-bewertetenKabelstecker(vomInstallateurbereitgestellt),
um das Netzkabel durch . zu führen Zugangspanel.
Utilisez le connecteur de câblage IP pré-assemblé fourni
(fourniparl'installateur)pouracheminerlecâble
d'alimentation à travers Panneau d'accès.
Utilice el conector de cableado con clasificación IP
preensamblado(suministradoporelinstalador)paraenrutar
el cable de alimentación panel de acceso.

9
RLE Installation Instructions | Installationsanleitung | Instructions d'installation | Instrucciones de Instalación
RLE
STEP 8 | SCHRITT 8 | ÉTAPE 8 | PASO 8
Replacewiringcompartmentaccesspanelandtightenscrewsto0.49N-m(4.3inch-lb).
ErsetzenSiedieZugangsabdeckungdesKabelraumsundZiehenSiedieSchraubenmit0.49N-m(4.3inch-lb)anziehen.
Remplacerlepanneaud'accèsaucompartimentdecâblageetserrezlesvisà0.49N-m(4.3inch-lb).
Vuelvaacolocarelpaneldeaccesoalcompartimientodecableadoyaprietelostornillosa0.49N-m(4.3inch-lb).

10 RLE Installation Instructions | Installationsanleitung | Instructions d'installation | Instrucciones de Instalación
RLE
STEP 9 | SCHRITT 9 | ÉTAPE 9 | PASO 9
Arrows indicate
aisle direction.
Pfeile zeigen Gangrichtung.
Flèches indiquer
direction allée.
Flechas indicar
dirección del pasillo.
If you attach a safety cable, attach it to the luminaire in accordance with all national,
state, and local construction codes.
Wenn Sie ein Sicherheitskabel anbringen, befestigen Sie es an der Leuchte in
Übereinstimmung mit allen nationalen, staatlichen und lokalen Bauordnungen bzw.
Si vous attachez un câble de sécurité, attachez-le au luminaire conformément à
toutes les réglementations nationales, étatiques et locales codes de construction.
Si conecta un cable de seguridad, conéctelo a la luminaria de acuerdo con todas las
normas nacionales, estatales y locales. códigos de construcción.
Fastening hardware supplied by installer.
• Refer to sticker map to confirm the correct
location and orientation of luminaire
• Secure aircraft cable to a beam, truss, or other
secure mounting point
• Connect cable to luminaire housing using aircraft
cable hanging hardware
• Use a box level to level the luminaire
Notes:Luminairemustbepositionedatleast203mm
(8inches)fromceiling.Foraisleillumination,verify
that luminaire is oriented correctly.
Befestigungsmaterial vom Installateur geliefert.
• Beziehen Sie sich auf die Aufkleberkarte, um die
Richtigkeit zu bestätigen Standort und Ausrichtung der
Leuchte
• Sichern Sie das Flugzeugkabel an einem Balken, einer
Traverse oder einem anderen sicheren
Befestigungspunkt
• Verbinden Sie das Kabel mit dem Flugzeugkabel-
Aufhängungsmaterial mit dem Leuchtengehäuse
• Verwenden Sie eine Kastenwaage, um die Leuchte
zu nivellieren
Anmerkungen:DieLeuchtemussmindestens203mm
(8inches)vonderDeckeentferntpositioniertwerden.
Vergewissern Sie sich bei der Gangbeleuchtung, dass die
Leuchte richtig ausgerichtet ist.
Matériel de fixation fourni par l'installateur.
• Reportez-vous à la carte des autocollants pour confirmer
le bon emplacement et orientation
du luminaire
• Fixez le câble de l'avion à une poutre, une poutre ou un
autre point de montage sécurisé
• Connectez le câble au boîtier du luminaire à l'aide du
matériel de suspension de câble d'avion
• Utilisez un niveau de boîte pour niveler le luminaire
Remarques: Le luminaire doit être positionné à
aumoins203mm(8inches)duplafond.Pourl'éclairagede
l'allée, vérifiez que le luminaire est correctement orienté.
Hardware de fijación suministrado por el instalador.
• Consulte el mapa de calcomanías para confirmar la
correcta ubicación y orientación de la luminaria
• Asegure el cable de la aeronave a una viga,
armadura u otro punto de montaje seguro
• Conecte el cable a la carcasa de la luminaria
utilizando accesorios para colgar cables de aviones
• Use un nivel de caja para nivelar la luminaria
Notas:Laluminariadebecolocarsealmenos203mm
(8inches)deltecho.Paralailuminacióndepasillos,
verifique que la luminaria esté orientado correctamente.
AIRCRAFT CABLE MOUNT
FLUGZEUGKABELHALTERUNG
SUPPORT DE CÂBLE D'AVION
MONTAJE DE CABLE DE AVIÓ
RLE-P1
Proceed to Step 10 if you are not using Aircraft Cable Mount.
Fahren Sie mit Schritt 10 fort, wenn Sie keine Flugzeugkabelhalterung verwenden.
Passez à l'étape 10 si vous n'utilisez pas le support de câble d'avion.
Continúe con el paso 10 si no está utilizando el soporte de cable para aeronaves.

11
RLE Installation Instructions | Installationsanleitung | Instructions d'installation | Instrucciones de Instalación
RLE
STEP 10 | SCHRITT 10 | ÉTAPE 10 | PASO 10
RIGID MOUNT
STARRE HALTERUNG
SUPPORT RIGIDE
MONTAJE RÍGIDO
RLE-H1
Fastening hardware supplied by installer.
• Refer to sticker map to confirm the correct
location and orientation of luminaire
• Assemble mounting bracket and make sure the
legsgounderthelip(Step1)
• Fastenmountingbracketscrews(Step2)
• Snap luminaire into mounting bracket and fasten
screws into luminaire housing, ensuring that they
arefullyinserted(Step3)
• Secure mounting bracket and luminaire to
mounting surface
• Use a box level to level the luminaire
Note: For aisle illumination applications, verify that
luminaire is oriented correctly in relation to the aisle axis.
Befestigungsmaterial vom Installateur geliefert.
• Beziehen Sie sich auf die Aufkleberkarte, um die
Richtigkeit zu bestätigen Standort und Ausrichtung
der Leuchte
• Montieren Sie die Halterung und stellen Sie sicher, dass
dieBeineunterdieLippegehen(Schritt1)
• Befestigungsschraubenanziehen(Schritt2)
• Leuchte in Montagebügel einrasten und Schrauben im
Leuchtengehäusefesteinschrauben(Schritt3)
• Befestigungsbügel und Leuchte an Montagefläche
• Verwenden Sie eine Kastenwaage, um die Leuchte
zu nivellieren
Anmerkungen: Überprüfen Sie dies für
Gangbeleuchtungsanwendungen Leuchte korrekt
zur Gangachse ausgerichtet ist.
Matériel de fixation fourni par l'installateur.
• Reportez-vous à la carte des autocollants pour confirmer
le bon emplacement et orientation du luminaire
• Assemblez le support de montage et assurez-vous que
lespiedspassentsouslalèvre(Étape1)
• Fixezlesvisdusupportdemontage(Étape2)
• Enclenchez le luminaire dans le support de montage et
serrez les vis dans le boîtier du luminaire, en vous
assurantqu'ellessontcomplètementinsérées(Étape3)
• Fixez le support de montage et le luminaire à surface
de montage
• Utilisez un niveau de boîte pour niveler le luminaire
Remarque: Pour les applications d'éclairage d'allée, vérifiez
que luminaire est correctement orienté par rapport à l'axe
de l'allée.
Hardware de fijación suministrado por el instalador.
• Consulte el mapa de calcomanías para confirmar la
correcta ubicación y orientación de la luminaria
• Ensamble el soporte de montaje y asegúrese de que las
pataspasenpordebajodelborde(Paso1)
• Aprietelostornillosdelsoportedemontaje(Paso2)
• Encaje la luminaria en el soporte de montaje y apriete los
tornillos en la carcasa de la luminaria, asegurándose de
queesténcompletamenteinsertados(Paso3)
• Fije el soporte de montaje y la luminaria a superficie
de ensamblaje
• Use un nivel de caja para nivelar la luminaria
Nota: Para aplicaciones de iluminación de pasillos, verifique
que la luminaria está orientada correctamente en relación
con el eje del pasillo.
Proceed to Step 11 if you are not using Rigid Mount.
Fahren Sie mit Schritt 11 fort, wenn Sie keine starre Halterung verwenden
Passez à l'étape 11 si vous n'utilisez pas le support rigide.
Continúe con el paso 11 si no está utilizando el montaje rígido.

12 RLE Installation Instructions | Installationsanleitung | Instructions d'installation | Instrucciones de Instalación
RLE
STEP 11 | SCHRITT 11 | ÉTAPE 11 | PASO 11
ROTATE LIGHT BARS
LICHTBALKEN DREHEN
ROTATION DES BARRES LUMINEUSES
BARRAS DE LUCES GIRATORIAS
Rotate the lightbars into position as specified in the project plan. Refer to Appendix A for typical lightbar
position examples.
Note: Ensure the light bar release buttons are secured within the appropriate detents.
Drehen Sie die Lichtleisten in die im Projektplan angegebene Position. In Anhang A finden Sie typische Beispiele für die
Position der Lichtleiste.
Hinweis: Stellen Sie sicher, dass die Entriegelungsknöpfe der Lichtleiste in den entsprechenden Rasten gesichert sind.
Faites pivoter les barres lumineuses dans la position spécifiée dans le plan du projet. Reportez-vous à
l'annexe A pour des exemples de position de barre lumineuse typique.
Remarque: Assurez-vous que les boutons de déverrouillage de la barre lumineuse sont fixés dans les crans appropriés.
Gire las barras de luces a su posición como se especifica en el plan del proyecto. Consulte el Apéndice A para ver ejemplos
típicos de posiciones de barras de luces.
Nota: Asegúrese de que los botones de liberación de la barra de luces estén asegurados dentro de los
seguros adecuados.

13
RLE Installation Instructions | Installationsanleitung | Instructions d'installation | Instrucciones de Instalación
RLE
0° 0°
RLE-D1
RLE-H1/P1
0°
0° 0°0°
APPENDIX A | ANHANG A | ANNEXE A | APÉNDICE A
LIGHTBAR EXAMPLE 1
LICHTBALKEN BEISPIEL 1
EXEMPLE DE BARRE LUMINEUSE 1
EJEMPLO DE BARRA DE LUCES 1
Open Area Application
(manufacturing,storage,loadingdoc)
Luminaire Optic Light
Bar Setting
RLE-D1 WIDE 0˚, 0˚, 0˚, 0˚
RLE-H1/P1 WIDE 0˚, 0˚, 0˚, 0˚
Open Area-Anwendung
(herstellung,lagerung,ladenvondokumenten)
Leuchte Optik Lichtbalkeneinstellung
RLE-D1 WEITWINKEL 0˚,0˚,0˚,0˚
RLE-H1/P1 WEITWINKEL 0˚,0˚,0˚,0˚
Application de zone ouverte
(fabrication,stockage,chargementdedoc)
Luminaire Optique Réglage de
la Barre Lumineuse
RLE-D1 LARGE 0˚,0˚,0˚,0˚
RLE-H1/P1 LARGE 0˚,0˚,0˚,0˚
Solicitud de área abierta
(fabricación,almacenamiento,cargadedocumentos)
Luminaria Óptica Ajuste de Barra de Luz
RLE-D1 AMPLIA 0˚,0˚,0˚,0˚
RLE-H1/P1 AMPLIA 0˚,0˚,0˚,0˚

14 RLE Installation Instructions | Installationsanleitung | Instructions d'installation | Instrucciones de Instalación
RLE
-10° 10°
-20° 0° 20°
RLE-D1
RLE-H1/P1
0°
APPENDIX A (cont.) | ANHANG A (fortsetzung) | ANNEXE A (suite) | APÉNDICE A (cont.)
LIGHTBAR EXAMPLE 2
LICHTBALKEN BEISPIEL 2
EXEMPLE DE BARRE LUMINEUSE 2
EJEMPLO DE BARRA DE LUCES 2
Application High-Bay/Racked
Luminaire Optic Light
Bar Setting
RLE-D1 NARROW -10˚,10˚
RLE-H1/P1 NARROW -20˚,0˚,20˚
Anwendung High-Bay/Racked
Leuchte Optik Lichtbalkeneinstellung
RLE-D1 RICHTSTRAHL -10˚,10˚
RLE-H1/P1 RICHTSTRAHL -20˚,0˚,20˚
Application Grande Hauteur/en Rack
Luminaire Optique Réglage de
la Barre Lumineuse
RLE-D1 ÉTROIT -10˚,10˚
RLE-H1/P1 ÉTROIT -20˚,0˚,20˚
Aplicación High-Bay/Rack
Luminaria Óptica Ajuste de Barra de Luz
RLE-D1 ESTRECHA -10˚,10˚
RLE-H1/P1 ESTRECHA -20˚,0˚,20˚

15
RLE Installation Instructions | Installationsanleitung | Instructions d'installation | Instrucciones de Instalación
RLE
-20° 20°
-30° 0° 30°
RLE-D1
RLE-H1/P1
0°
APPENDIX A (cont.) | ANHANG A (fortsetzung) | ANNEXE A (suite) | APÉNDICE A (cont.)
LIGHTBAR EXAMPLE 3
LICHTBALKEN BEISPIEL 3
EXEMPLE DE BARRE LUMINEUSE 3
EJEMPLO DE BARRA DE LUCES 3
Application High-Bay/Racked
(widely-spacedluminaires)
Luminaire Optic Light
Bar Setting
RLE-D1 NARROW -20˚,20˚
RLE-H1/P1 NARROW -30˚,0˚,30˚
Anwendung High-Bay/Racked
(weitauseinanderliegendeleuchten)
Leuchte Optik Lichtbalkeneinstellung
RLE-D1 RICHTSTRAHL -20˚,20˚
RLE-H1/P1 RICHTSTRAHL -30˚,0˚,30˚
Application Grande Hauteur/en Rack
(luminairesespacés)
Luminaire Optique Réglage de
la Barre Lumineuse
RLE-D1 ÉTROIT -20˚,20˚
RLE-H1/P1 ÉTROIT -30˚,0˚,30˚
Aplicación High-Bay/Rack
(luminariasmuyespaciadas)
Luminaria Óptica Ajuste de Barra de Luz
RLE-D1 ESTRECHA -20˚,20˚
RLE-H1/P1 ESTRECHA -30˚,0˚,30˚

16 RLE Installation Instructions | Installationsanleitung | Instructions d'installation | Instrucciones de Instalación
RLE
APPENDIX B | ANHANG B | ANNEXE B | APÉNDICE B
To avoid risk of electrical shock, disconnect the RLE power before installing, wiring,
or servicing the module.
Um das Risiko eines Stromschlags zu vermeiden, trennen Sie die
RLE-Stromversorgung, bevor Sie das Modul installieren, verdrahten oder warten.
Pour éviter tout risque de choc électrique, débranchez l'alimentation RLE avant
d'installer, de câbler ou d'entretenir le module.
Para evitar el riesgo de descarga eléctrica, desconecte la alimentación del RLE
antes de instalar, cablear o reparar el módulo.
REMOVING THE LIGHTELLIGENCE SENSING AND COMMUNICATIONS MODULE
ENTFERNEN DES LIGHTELLIGENCE SENSOR- UND KOMMUNIKATIONSMODULS
RETRAIT DU MODULE DE DÉTECTION ET DE COMMUNICATION LIGHTELLIGENCE
EXTRACCIÓN DEL MÓDULO DE DETECCIÓN Y COMUNICACIONES DE LIGHTELLIGENCE
TwisttheLightelligenceModule1/4turncounterclockwiseandremove.
Drehen Sie das Lightelligence-Modul um eine Vierteldrehung gegen den Uhrzeigersinn und entfernen.
TournerlemoduleLightelligenced'1/4detourdanslesensinversedesaiguillesd'unemontreetretirez-le.
GireelMóduloLightelligence1/4devueltaensentidocontrarioalasagujasdelrelojyretírelo.

17
RLE Installation Instructions | Installationsanleitung | Instructions d'installation | Instrucciones de Instalación
RLE
APPENDIX B (cont.) | ANHANG B (fortsetzung) | ANNEXE B (suite) | APÉNDICE B (cont.)
INSTALLING THE LIGHTELLIGENCE SENSING AND COMMUNICATIONS MODULE
INSTALLIEREN DES LIGHTELLIGENCE SENSOR- UND KOMMUNIKATIONSMODULS
INSTALLATION DU MODULE DE DÉTECTION ET DE COMMUNICATION LIGHTELLIGENCE
INSTALACIÓN DEL MÓDULO DE DETECCIÓN Y COMUNICACIONES DE LIGHTELLIGENCE
InserttheLightelligenceModuleintotheLightelligencePortandtwista1/4turnclockwise.
Setzen Sie das Lightelligence-Modul in den ein Lightelligence-Port und drehen Sie eine Vierteldrehung im Uhrzeigersinn.
Insérez le module Lightelligence dans le Port Lightelligence et tournez d'un quart de tour dans le sens des aiguilles
d'une montre.
InserteelMóduloLightelligenceenelpuertoLightelligenceygire1/4devueltaenelsentidodelasagujasdelreloj.

18 RLE Installation Instructions | Installationsanleitung | Instructions d'installation | Instrucciones de Instalación
RLE
Masked Sensor Optic
Maskierte Sensoroptik
Optique de Capteur Masqué
Óptica del Sensor Enmascarado
Sensor Optic
Sensoroptik
Capteur Optique
Óptica del Sensor
Sensor Mask Decals
Sensormaskenaufkleber
Décalques de Masque de Capteu
Calcomanías de Máscara de Sensor
APPENDIX C | ANHANG C | ANNEXE C | APÉNDICE C
Sold separately.
Separat erhältlich.
Vendu séparément.
Se vende por separado.
INSTALLING AN OPTIONAL SENSOR MASK
INSTALLIEREN EINER OPTIONALEN SENSORMASKE
INSTALLATION D'UN MASQUE DE CAPTEUR EN OPTION
INSTALACIÓN DE UNA MÁSCARA DE SENSOR OPCIONAL
SENSOR MASK ORIENTATION
AUSRICHTUNG DER SENSORMASKE
ORIENTATION DU MASQUE DU CAPTEUR
ORIENTACIÓN DE LA MÁSCARA DEL SENSOR
The sensor mask decals must align with the short
edge of the luminaire.
Ausrichtung der Sensormaske Die Aufkleber der
Sensormaske müssen an der kurzen Kante der Leuchte
ausgerichtet sein.
Les autocollants du masque de capteur doivent être alignés
avec le bord court du luminaire.
Las calcomanías de la máscara del sensor deben
alinearse con el borde corto de la luminaria.
APPLY SENSOR MASK
SENSORMASKE ANWENDEN
APPLIQUER LE MASQUE DE CAPTEUR
APLICAR MÁSCARA DE SENSOR
One at a time, remove the adhesive backing. Carefully,
place each mask decals along either side of the
sensor optic, as shown above. Do not cover any other
part of the optic.
Entfernen Sie nacheinander die Klebefolie. Platzieren Sie
die Aufkleber jeder Maske vorsichtig auf beiden Seiten der
Sensoroptik, wie oben gezeigt. Decken Sie keine anderen
Teile der Optik ab.
Un à la fois, retirez le support adhésif. Avec précaution,
placez chaque autocollant de masque le long
de chaque côté du optique du capteur, comme
illustré ci-dessus. Ne couvrez aucune autre partie
de l'optique.
Uno a la vez, retire el respaldo adhesivo. Con cuidado,
coloque las calcomanías de cada máscara a lo largo de cada
lado de la sensor óptico, como se muestra arriba. No cubra
ninguna otra parte de la óptica.

19
RLE Installation Instructions | Installationsanleitung | Instructions d'installation | Instrucciones de Instalación
RLE
Contains FCC ID: S4GEM35XA
APPENDIX D | ANHANG D | ANNEXE D | APÉNDICE D
COMMISSIONING
INBETRIEBNAHME
MISE EN SERVICE
PUESTA EN MARCHA
In order for the device to communicate with SiteWorx®(orLightRules),providethestickerbook(orcollected
serialnumberlabel)tothecommissioningagent.Thedevicewillonlycommunicateaftercommissioning
is complete.
Damit das Gerät mit SiteWorx®(oderLightRules)kommunizierenkann,übergebenSiedasAufkleberheft(oderdas
gesammelteSeriennummernetikett)demBeauftragten.DasGerätkommunizierterstnachderInbetriebnahmeistkomplett.
Pour que l'appareil puisse communiquer avec SiteWorx®(ouLightRules),fournissezlecarnetd'autocollants(oul'étiquettedu
numérodesériecollecté)àl'agentdemiseenservice.L'appareilnecommuniqueraqu'aprèslamiseenserviceestcomplet.
Para que el dispositivo se comunique con SiteWorx®(oLightRules),proporcioneellibrodecalcomanías(olaetiquetacon
elnúmerodeserierecopilado)alagentedepuestaenmarcha.Eldispositivosolosecomunicarádespuésdelapuestaen
marcha Esta completo.
VISIT OUR SUPPORT CENTER | BESUCHEN SIE UNSER SUPPORT-CENTER |
VISITEZ NOTRE CENTRE D'ASSISTANCE | VISITE NUESTRO CENTRO DE SOPORTE
For a repository of knowledge base topics, product documentation, commissioning guides, and
troubleshooting, please scan the QR Code or visit digitallumens.force.com/SupportCenter.
Für ein Repository mit Themen der Wissensdatenbank, Produktdokumentation, Anleitungen zur
Inbetriebnahme und Fehlerbehebung scannen Sie bitte den QR-Code oder besuchen
Sie digitallumens.force.com/SupportCenter.
Pour un référentiel des rubriques de la base de connaissances, de la documentation produit, des guides de
mise en service et de dépannage, veuillez scanner le code QR ou
visiter digitallumens.force.com/SupportCenter.
Para obtener un repositorio de temas de la base de conocimientos, documentación de productos, guías de
puesta en servicio y resolución de problemas, escanee el código QR o
visite digitallumens.force.com/SupportCenter.

digitallumens.com
Copyright © 2022 Digital Lumens, Incorporated. All rights reserved. Digital Lumens, the
Digital Lumens logo, We Generate Facility Wellness, SiteWorx, LightRules, Lightelligence,
Encelium, the Encelium logo, Polaris, GreenBus and any other trademark, service mark,
or tradename (collectively “the Marks”) are either trademarks or registered trademarks of
Digital Lumens, Inc. in the United States and/or other countries, or remain the property of
their respective owners that have granted Digital Lumens, Inc. the right and license to use
such Marks and/or are used herein as nominative fair use. Due to continuous improvements
and innovations, specifications may change without notice.
DOC-000406-00 Rev E 07-22
Model: RLE
Brand: Digital Lumens
IFT: XXXXXXXXX-XXXX
Includes: SCN-GA
Importador mexicano
H2O Arquitectos
Asociados S.A. de C.V.
Nuevo León #501 A
Col. Alameda
Celaya, Guanajuato
México C.P. 38050
Phone +52 (461) 613 3751
Energetika Sustentable y
Ecologica, S.A. DE C.V.
Patriotismo 12-2-201
Col. Hipódromo
México D.F. 06100
Phone (52 55) 8526.2496
This manual suits for next models
9
Other Digital Lumens Lantern manuals
Popular Lantern manuals by other brands

WE-EF
WE-EF ETC330-GB LED Installation and maintenance instructions
RCA
RCA NT2 Series installation manual
Wista
Wista AF100 installation guide
Allen + Roth
Allen + Roth LW688839 Assembly instructions
Larson Electronics
Larson Electronics RUL-9 Series instruction manual
Eaton
Eaton hpl-3l series operating instructions
WESTECH
WESTECH WT-F002-3Classic manual
Universal Lighting Technologies
Universal Lighting Technologies EVERLINE BLC48 installation instructions
Anslut
Anslut 422-310 operating instructions
Gama Sonic
Gama Sonic IMPERIAL III GS-97K Series operating instructions

WE-EF
WE-EF VFL530 Installation and maintenance instructions
Gavita
Gavita GAN Electronic 250W 400V Interlight manual
