manuals.online logo
Brands
  1. Home
  2. •
  3. Brands
  4. •
  5. Allen + Roth
  6. •
  7. Lantern
  8. •
  9. Allen + Roth LW688839 User manual

Allen + Roth LW688839 User manual

CARE AND MAINTENANCE/ENTRETIEN/CUIDADO Y MANTENIMIENTO
TROUBLESHOOTING/DÉPANNAGE/SOLUCIÓN DE PROBLEMAS
PACKAGE CONTENTS/CONTENU DE L’EMBALLAGE/CONTENIDO DEL PAQUETE
WARRANTY/GARANTIE/GARANTÍA
To get the best performance from the solar disc, periodically clean the top surface of the solar disc with a soft cloth and
water. Do not use chemical solvents.
Printed in China
Imprimé en Chine
Impreso en China
LANTERN
LANTERNE
LINTERNA
ITEM/ARTICLE/ARTÍCULO #0688839
EB15352
MODEL/MODÈLE/MODELO #LW688839
Purchase Date/Date d’achat/Fecha de compra
allen + roth® is a registered trademark
of LF, LLC. All Rights Reserved.
allen + roth® est une marque de commerce
déposée de LF, LLC. Tous droits réservés.
allen + roth® es una marca registrada de
LF, LLC. Todos los derechos reservados.
Questions?/Des questions?/¿Preguntas?
Call customer service at 1-866-439-9800,
8 a.m. - 6 p.m., EST, Monday - Thursday,
8 a.m. - 5 p.m., EST, Friday.
Communiquez avec notre service à la
clientèle au 1 866 439-9800, entre 8 h et 18 h
(HNE), du lundi au jeudi, ou entre 8 h et 17 h
(HNE) le vendredi.
Llame al Servicio al Cliente al 1-866-439-9800,
de lunes a jueves de 8 a. m. a 6 p. m., hora
estándar del Este y los viernes de 8 a. m. a
5 p. m., hora estándar del Este.
ATTACH YOUR RECEIPT HERE
JOIGNEZ VOTRE REÇU ICI
ADJUNTE SU RECIBO AQUÍ
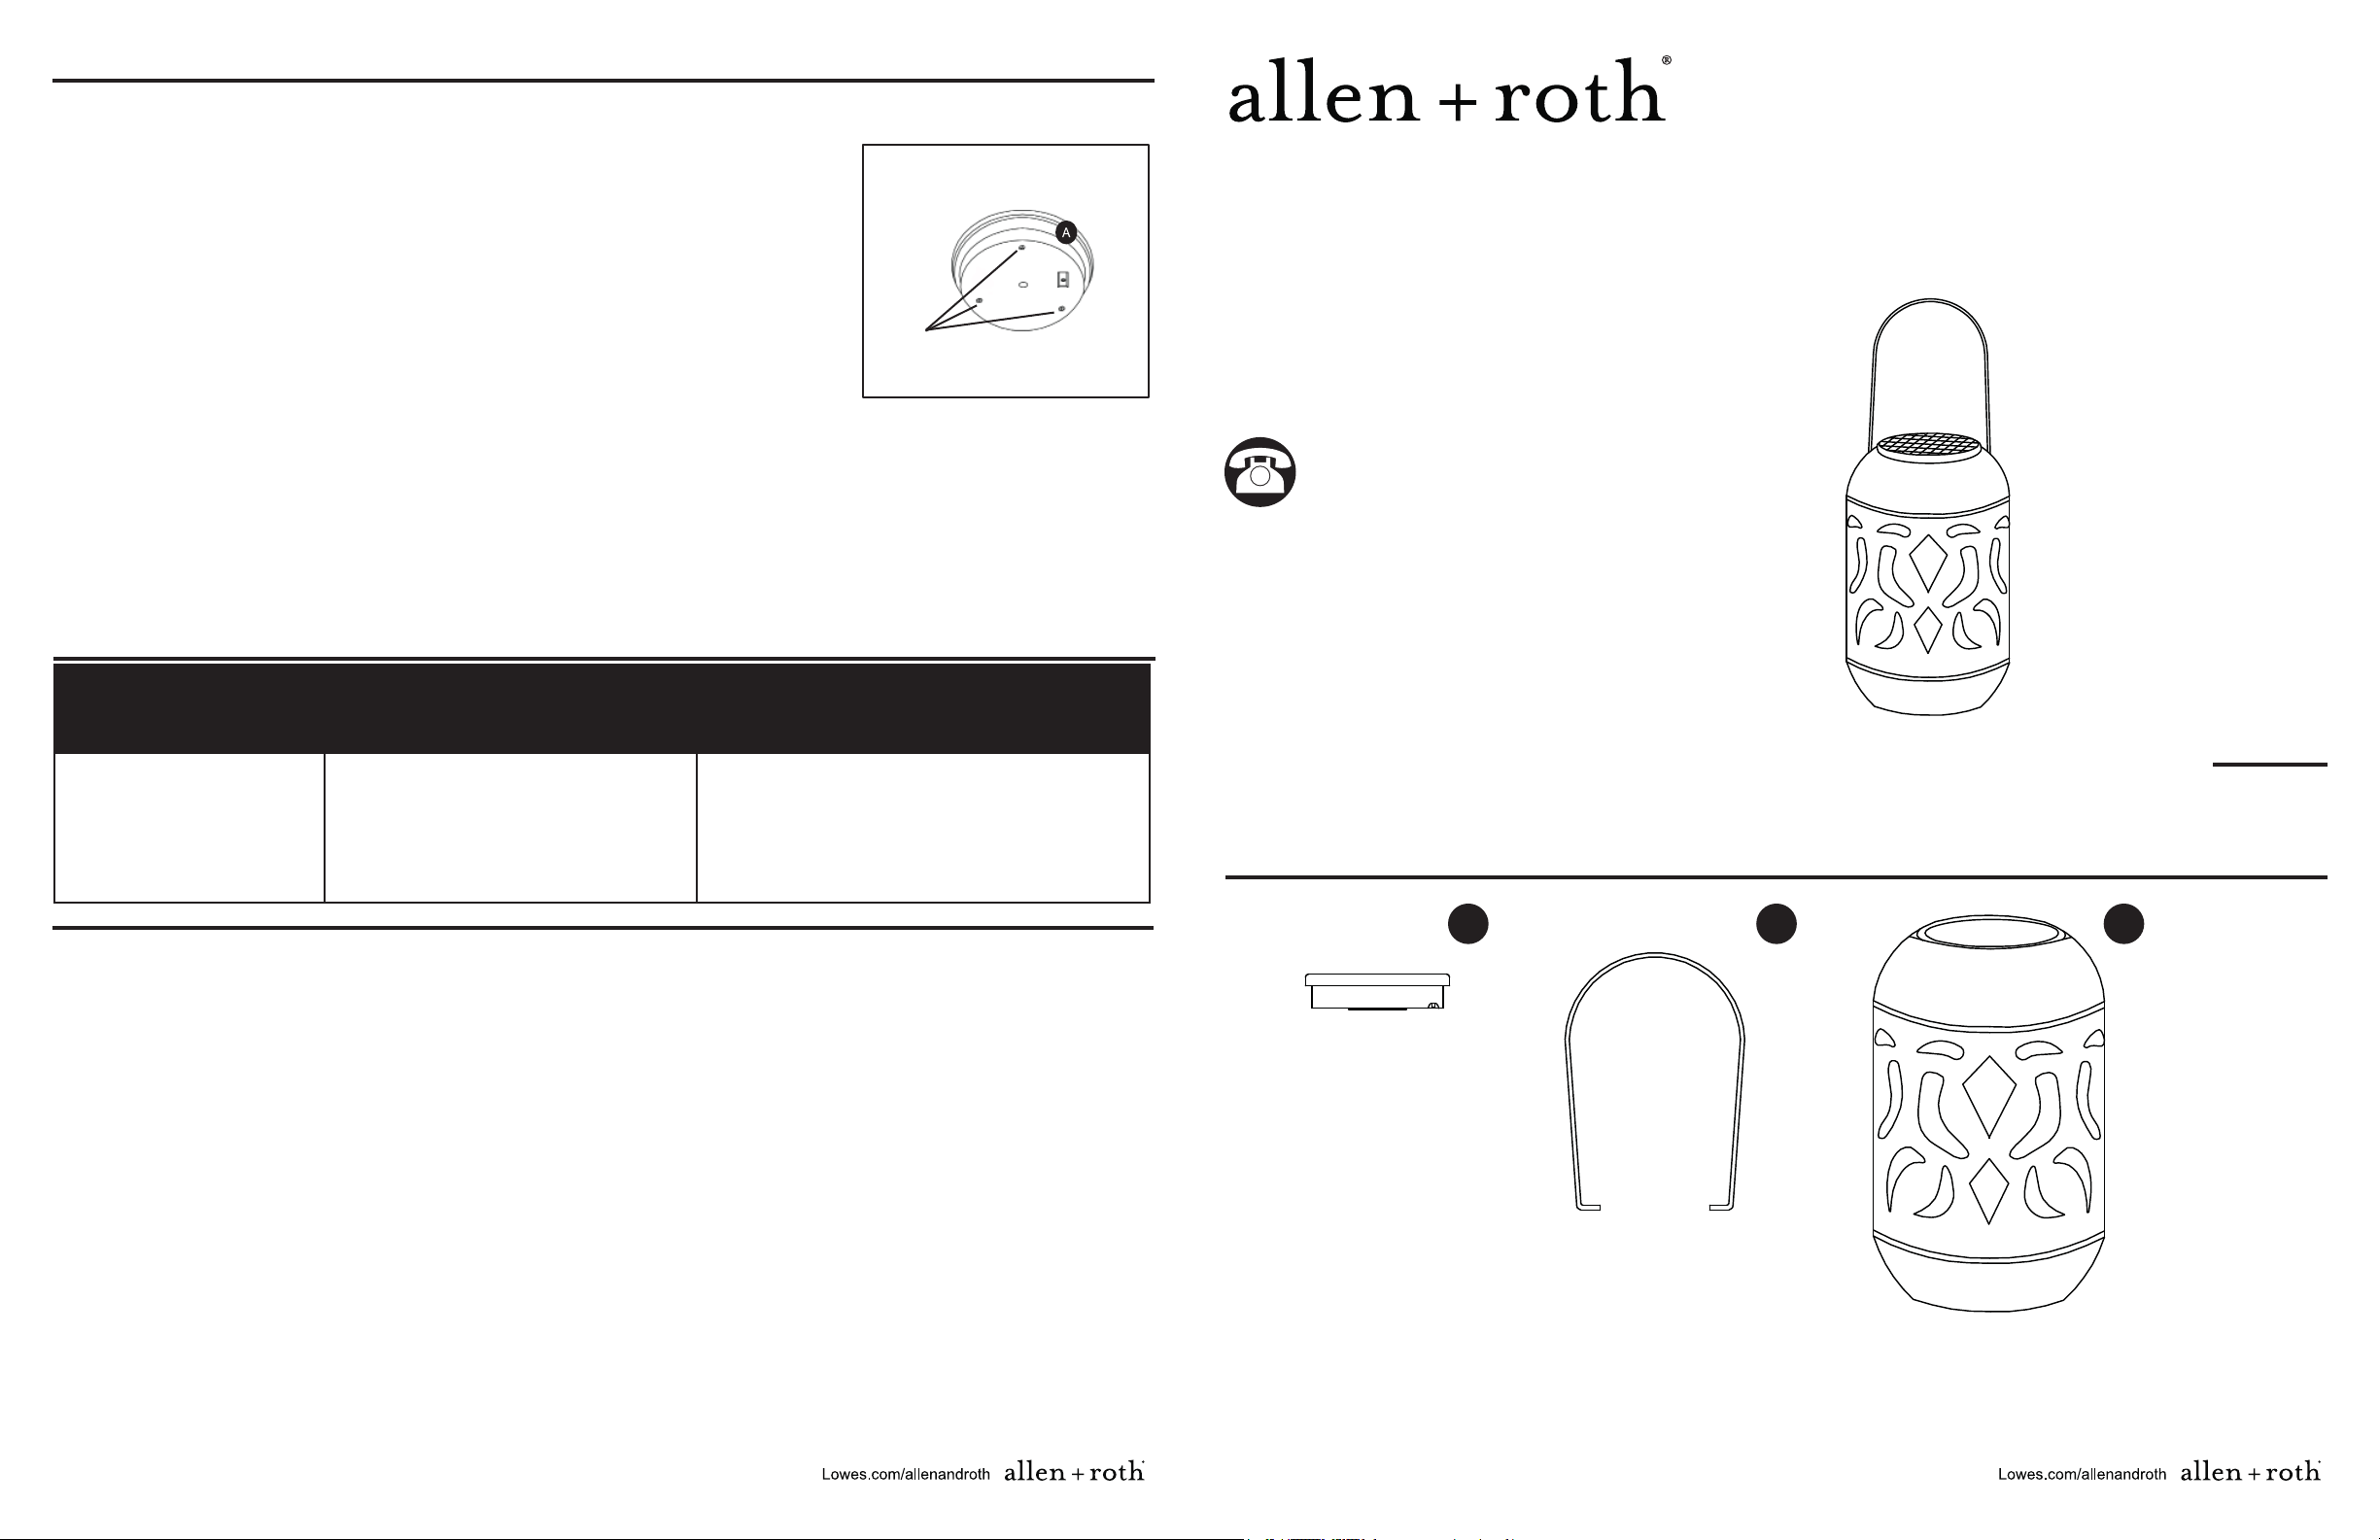
Solar Disc
Disque solaire
Disco solar
Lantern
Lanterne
Linterna
Handle
Poignée
Manija
x 1 x 1 x 1
ABC
PROBLEM
PROBLÈME
PROBLEMA
POSSIBLE CAUSE
CAUSE POSSIBLE
CAUSA POSIBLE
CORRECTIVE ACTION
MESURE CORRECTIVE
ACCIÓN CORRECTIVA
LED light does not work./
Le luminaire à DEL ne
s’allume pas./ La bombilla
LED no funciona.
1. Not enough sunlight./Le disque
solaire ne reçoit pas suffi samment de
lumière du jourt./No hay sufi ciente luz
solar.
1. Check that the solar disc is in direct sunlight./
Vérifi ez que le disque solaire est placé en plein
soleil./Verifi que que el disco solar de la lámpara
esté bajo la luz solar directa.
allen + roth ® is a registered
trademark of LF, LLC. All
Rights Reserved.
allen + roth® est une marque
de commerce déposée
de LF, LLC. Tous droits
réservés.
allen + roth® es una marca
registrada de LF, LLC. Todos
los derechos reservados.
1
4
This product is warranted to be free of defects in workmanship and materials for a period of 2 years from the original date of
purchase. IN NO CASE SHALL THE COMPANY BE LIABLE FOR ANY INCIDENTAL OR CONSEQUENTIAL DAMAGES. NO
CHARGES WILL BE ACCEPTABLE FOR UNAUTHORIZED REPAIRS, PARTS OR SERVICE.
Some states do not allow limitations on how long an implied warranty lasts and do not allow exclusions or limitation of incidental
damages, so parts or all of this warranty limitations or exclusions may not apply to you. Legal warranty rights will vary from state
to state and you may have other rights.
Ce produit est garanti exempt de défauts de fabrication et de matériaux pour une période de 2 ans à
compter de la date d’achat originale. EN AUCUN CAS L’ENTREPRISE NE DOIT ÊTRE TENUE
RESPONSABLE DE TOUT DOMMAGE ACCESSOIRE OU CONSÉCUTIF. AUCUNE PLAINTE NE SERA
REÇUE POUR DES RÉPARATIONS, DES PIÈCES OU DES SERVICES NON AUTORISÉS.
Certains États ou certaines provinces ne permettent pas la limitation de la durée des garanties implicites,
ou l’exclusion ou la limitation des dommages accessoires ou consécutifs, de sorte que la garantie ou une
partie de celle-ci peut ne pas s’appliquer à vous. Les droits en vertu de la garantie varient d’un État ou
d’une province à l’autre et il est possible que vous disposiez également d’autres droits.
Este producto está garantizado de estar libre de defectos de fabricación y materiales por un período de
2 años a partir de la fecha original de compra. EN NINGÚN CASO, LA EMPRESA SE HARÁ RESPON-
SABLE DE DAÑOS ACCIDENTALES O RESULTANTES. NO SE ACEPTARÁN CARGOS POR REPARA-
CIONES, PIEZAS O SERVICIO SIN AUTORIZACIÓN.
Algunos estados no permiten limitaciones en cuanto a la duración de una garantía implícita ni permiten la
exclusión o limitación de daños resultantes, de modo que algunas de las limitaciones anteriores, o todas
ellas, pueden no aplicarse a usted. Los derechos legales en virtud de esta garantía varían según el estado
y usted puede tener otros derechos.
Battery Replacement: Use 1 AA, 1,000 mAh, 1.2-volt NiMH rechargeable battery. To
replace the battery, remove the screws on the back of the solar disc (A) and remove
cover. Replace old battery with new one, then replace the battery compartment cover
and re-tighten screws to secure.
Total fi xture wattage is 0.1 watts; do not attempt to replace the LED.
•
•
•
1
Screws/Vis/
Tornillos
Pour assurer le rendement maximal du disque solaire, nettoyez périodiquement
la surface supérieure du disque avec un linge doux et de l’eau. Ne pas utiliser de
solvants chimiques.
Remplacement de la pile : utilisez 1 pile AA rechargeable de 1000 mAh et de 1,2 V
au nickel-métal-hydrure. Pour remplacer la pile, retirez les vis situées à l’arrière du
disque solaire (A) et retirez le couvercle. Remplacez la pile par une pile neuve, puis
replacez le couvercle du compartiment à piles et resserrez les vis.
La puissance totale du luminaire est de 0,1 watt. Ne tentez pas de remplacer l’ampoule à DEL.
•
•
•
Para lograr el mejor rendimiento del disco solar, limpie periódicamente la superfi cie del
disco solar con un trapo suave y agua. No utilice solventes químicos.
•
Reemplazo de la batería: use 1 batería recargable AA de Ni-MH de 1,2 voltios y 1000 mAh. Para reemplazar la batería,
retire los tornillos de la parte posterior del disco solar (A) y quite la cubierta. Reemplace la batería antigua por una
batería nueva, vuelva a colocar la cubierta del compartimiento de baterías y asegúrela ajustando los tornillos.
•
El vataje total de la lámpara es de 0,1 vatios; no intente reemplazar la bombilla LED.
•
2
C
SAFETY INFORMATION/CONSIGNES DE SÉCURITÉ/INFORMACIÓN DE SEGURIDAD ASSEMBLY INSTRUCTIONS/INSTRUCTIONS POUR L’ASSEMBLAGE/INSTRUCCIONES DE ENSAMBLAJE
PREPARATION/PRÉPARATION/PREPARACIÓN
Please read and understand this entire manual before attempting to assemble, operate or install the product./
Assurez-vous de lire et de comprendre l’intégralité du présent manuel avant de tenter d’assembler, d’installer ou d’utiliser
l’article./ Lea y comprenda completamente este manual antes de intentar ensamblar, usar o instalar el producto.
Before beginning installation of product, make sure all parts are present. Compare parts with package contents list. If
any part is missing or damaged, do not attempt to assemble, install or operate the product.
Estimated Assembly Time: 2 minutes.
No Tools Required for Assembly.
Avant de commencer l’installation de l’article, assurez-vous d’avoir toutes les pièces. Comparez les pièces avec la liste
du contenu de l’emballage. S’il y a des pièces manquantes ou endommagées, ne tentez pas d’assembler, d’installer, ni
d’utiliser l’article.
Temps d’assemblage approximatif : 2 minutes.
Aucun outil n’est nécessaire pour l’assemblage.
Antes de comenzar a instalar el producto, asegúrese de tener todas las piezas. Compare las piezas con la lista del
contenido del paquete. No intente ensamblar, instalar ni usar el producto si falta alguna pieza o si están dañadas.
Tiempo estimado de ensamblaje: 2 minutos.
No se necesitan herramientas para el ensamblaje.
1. Press On/Off switch on
solar disc (A) to turn on
light.
Appuyez sur l’interrupteur
du disque solaire (A) pour
allumer le luminaire.
Para encender la luz,
presione el interruptor de
encendido/apagado del
disco solar (A).
Although there may be some initial charge in the battery, it is recommended you fully charge the battery in good sunlight for
approximately 12 hours before its fi rst use. The full run time of the LED light is 6-8 hours when the battery is fully charged./
Même si la pile est déjà partiellement chargée, nous vous recommandons de la laisser charger complètement pendant
environ 12 heures en plein soleil avant la première utilisation. La durée d’éclairage totale du luminaire à DEL est de
6 à 8 heures lorsque la pile est entièrement chargée./ Aunque es posible que la batería cuente con carga inicial, se
recomienda cargar la batería por completo con buena luz solar por aproximadamente 12 horas antes de su primer uso. El
tiempo de uso completo de la bombilla LED es de entre 6 y 8 horas cuando la batería está completamente cargada.
Rechargeable battery become less effi cient with repeated charge and discharge cycles. To prolong the life of the battery, try
turning off solar disc (A) for approximately 2-3 days and leaving it in the sunlight so it will receive the maximum charge./ La
pile rechargeable devient moins performante avec chaque cycle de chargement et de déchargement. Pour prolonger la durée
de vie de la pile, éteignez le disque solaire (A) pendant environ 2 à 3 jours et laissez-le au soleil pour qu’il puisse se charger
à sa capacité maximale./ La batería recargable pierde efi ciencia con los repetidos ciclos de carga y descarga. Para
prolongar la vida útil de la batería, apague el disco solar (A) por aproximadamente 2 o 3 días dejándolo bajo la luz solar para
que reciba la carga máxima.
OPERATION INSTRUCTIONS/MODE D’EMPLOI/INSTRUCCIONES DE FUNCIONAMIENTO
2. Insert solar disc (A) into
lantern (C).
Insérez le disque solaire
(A) dans la lanterne (C).
Inserte el disco solar (A) en
el farol (C).
3. Attach the handle (B) into the holes on the lantern (C).
Fixer la poignée (B) dans les trous de la lanterne (C).
Coloque la manija (B) en los orifi cios de la linterna (C).
3
WARNING/AVERTISSEMENT/ADVERTENCIA
CAUTION/ATTENTION/PRECAUCIÓN
• Do not open, short circuit or mutilate battery as injury may occur./Évitez d’ouvrir, de court-circuiter ou
d’endommager la pile; vous risqueriez de vous blesser/ No abra, no las exponga a cortocircuitos ni mutile la batería ya
que puede producirse una lesión.
23
• Do not dispose of battery in the regular trash, municipal waste stream or by fi re as batteries may leak or explode./ Ne
jetez pas les piles avec les déchets courants ou les ordures ménagères et ne les jetez pas au feu; elles pourraient couler ou
exploser./ No deseche las baterías en los basureros comunes, en los basureros municipales, en corrientes de agua ni
incinerándolas, ya que podrían explotar o fi ltrarse.
• Recycle or dispose of battery in accordance with local, state and federal regulations./ Recyclez ou jetez les piles
conformément aux règlements locaux, provinciaux et fédéraux en vigueur./ Recicle o deseche las baterías de acuerdo con los
reglamentos locales, estatales o federales.
• Use rechargeable battery only./ N’utilisez que des piles rechargeables./ Utilice la batería recargable solamente.
•
•
1
ON/OFF
SWITCH

This manual suits for next models

1

Other Allen + Roth Lantern manuals

Allen + Roth WLL105BK User manual

Allen + Roth

Allen + Roth WLL105BK User manual

Allen + Roth LWS0547G User manual

Allen + Roth

Allen + Roth LWS0547G User manual

Allen + Roth VBL12-12BNK User manual

Allen + Roth

Allen + Roth VBL12-12BNK User manual

Allen + Roth VBL2-18GD User manual

Allen + Roth

Allen + Roth VBL2-18GD User manual

Allen + Roth 398465 User manual

Allen + Roth

Allen + Roth 398465 User manual

Allen + Roth VBL4-18CH User manual

Allen + Roth

Allen + Roth VBL4-18CH User manual

Allen + Roth 39508 User manual

Allen + Roth

Allen + Roth 39508 User manual

Allen + Roth RDY1742-01-ORB User manual

Allen + Roth

Allen + Roth RDY1742-01-ORB User manual

Allen + Roth 39426 User manual

Allen + Roth

Allen + Roth 39426 User manual

Allen + Roth WL133MBK User manual

Allen + Roth

Allen + Roth WL133MBK User manual

Allen + Roth LWS0547A User manual

Allen + Roth

Allen + Roth LWS0547A User manual

Allen + Roth RDY1996-01-MWI User manual

Allen + Roth

Allen + Roth RDY1996-01-MWI User manual

Allen + Roth WSL11BNK User manual

Allen + Roth

Allen + Roth WSL11BNK User manual

Allen + Roth GLL30C User manual

Allen + Roth

Allen + Roth GLL30C User manual

Popular Lantern manuals by other brands

DW Windsor Sofia installation instructions

DW Windsor

DW Windsor Sofia installation instructions

Westfalia WeTeLux Copper instruction manual

Westfalia

Westfalia WeTeLux Copper instruction manual

Conrad 11 04 73 operating instructions

Conrad

Conrad 11 04 73 operating instructions

Heitronic 35371 Installation and operating instructions

Heitronic

Heitronic 35371 Installation and operating instructions

Bo-Camp HARLINGTON instruction manual

Bo-Camp

Bo-Camp HARLINGTON instruction manual

Quoizel COR8410K Assembly instruction sheet

Quoizel

Quoizel COR8410K Assembly instruction sheet

Waldmann LINURA.edge LEA Instructions for use

Waldmann

Waldmann LINURA.edge LEA Instructions for use

Anslut 422-351 operating instructions

Anslut

Anslut 422-351 operating instructions

LUCCI MFL by Masson 240802 installation instructions

LUCCI

LUCCI MFL by Masson 240802 installation instructions

KUNDALINI TOOT Table Assembly instructions

KUNDALINI

KUNDALINI TOOT Table Assembly instructions

Chalmit Sterling III Installation, operation and maintenance instructions

Chalmit

Chalmit Sterling III Installation, operation and maintenance instructions

SLV ANGOLUX WALL 231351 operating manual

SLV

SLV ANGOLUX WALL 231351 operating manual

Lighting Technologies LZ Series manual

Lighting Technologies

Lighting Technologies LZ Series manual

Reggiani SPLYT Series installation guide

Reggiani

Reggiani SPLYT Series installation guide

nordlux HELIX 77498038 Mounting instruction

nordlux

nordlux HELIX 77498038 Mounting instruction

BALTENSWEILER HALO LED S Mounting and operating instructions

BALTENSWEILER

BALTENSWEILER HALO LED S Mounting and operating instructions

ETC High End Systems SolaFrame Studio user manual

ETC

ETC High End Systems SolaFrame Studio user manual

BEGA 24 210 Instructions for use

BEGA

BEGA 24 210 Instructions for use

manuals.online logo
manuals.online logoBrands
  • About & Mission
  • Contact us
  • Privacy Policy
  • Terms and Conditions

Copyright 2025 Manuals.Online. All Rights Reserved.