DIGITAL YACHT NOMAD Quick guide

www.digitalyachtamerica.com
NOMAD
CLASS B AIS
TRANSPONDER

Quick Start Guide for NOMAD V1.02
Web: www.digitalyachtamerica.com E-Mail: sales@digitalyachtamerica.com
1. Introduction
Congratulations on the purchase of your NOMAD Class B AIS Transponder. This product is designed to be portable, with
quick and simple installation that can be carried out by any practical person. With its wireless interface, NOMAD will work
with any of the AIS apps on the market today, that support wireless NMEA data via UDP or TCP.
This Quick Start Guide provides important information that we recommend you read before attempting to
install or use this NOMAD unit. If you have any concerns or questions please visit the Support section of
our website www.digitalyachtamerica.com and raise a support ticket or email support@digitalyacht.co.uk
2. Before you start
You will need the following items and tools to complete the installation:
•NOMAD Class B AIS Transponder.
•VHF/AIS antenna and cable –supplied
•A USB power source i.e 12v to USB power adaptor, USB power pack, etc.
•2x Velcro Strips (supplied) or 4x M4 screws (not supplied) or other fixings appropriate to the mounting location.
To configure the unit you will need:
•An MMSI number for your vessel
•A PC running Microsoft Windows XP®/Vista® /7/8/10 or Mac OSX with a free USB port.
•proAIS2 Class B AIS Transponder configuration software –Windows and Mac versions of software are supplied
on the latest Digital Yacht CD-ROM or available for download from the www.digitalyachtamerica.com website.
OR
•An Android Phone/Tablet and a copy of our free AISConfig App which is available from the Google Play Store...
https://play.google.com/store/apps/details?id=com.digitalyacht.aisconfig&hl=en
Note: You can obtain an MMSI (Maritime Mobile Service Identity) from the same authority that issues ship radio
licences in your area. An MMSI may have already been provided with your existing VHF radio licence. The MMSI
number used for the AIS Transponder should be the same as that programmed into your VHF DSC radio.
If you do not have an MMSI number the AIS Transponder will still operate in receive only mode.
Do not enter an invalid MMSI number.
3. Installation
Before starting installation select a suitable location for the AIS Class B Transponder. The unit is water resistant; however
it should not be permanently installed outside on-deck and we only recommend permanent mounting below deck in a dry
location. The NOMAD unit can be temporarily mounted outside, in which case choose a sheltered location where it will
not be subjected to constant exposure to water. Basically, if you would be happy to leave your smart phone or tablet in
the same location, then it will be fine for NOMAD When locating the unit you should consider:
•Routing of the USB cable to a suitable power source
•Mounting of VHF antenna and routing the cable to the unit
•If the internal GPS antenna will get good signals (see Step 2)
•If you need Wi-Fi reception around the whole boat
•Maintaining the compass safe distance of 0.5m
•Visibility of the LED indicators

Quick Start Guide for NOMAD V1.02
Web: www.digitalyachtamerica.com E-Mail: sales@digitalyachtamerica.com
Installation Step 1 –VHF/AIS Antenna or Splitter
•Install the VHF/AIS antenna (supplied) as high up as possible. The suction cup base sticks well to smooth GRP
surfaces. For maximum performance, the antenna should be mounted on a horizontal surface so that it is pointing
vertically in to the air.
•The AIS antenna supplied with the NOMAD comes with 4m of cable and a BNC type connector. It is possible to
use NOMAD with another model of AIS/VHF antenna or even connect it to a Class B Splitter for more permanent
installation.
Installation Step 2 –Locating and Fixing the unit
•The NOMAD has a high sensitivity GPS receiver with an
internal antenna which is designed to be used below deck
in GRP Fibreglass hulled boats. The GPS antenna is
located in the top left corner of the unit below the “GPS
Inside” circle.
•The NOMAD unit must be mounted on a vertical bulkhead
so that the GPS antenna is pointing towards the sky. Care
should be taken to ensure that only GRP fibreglass is
between the GPS antenna and the sky, with no metallic or
electrical objects above the antenna.
•Location of the NOMAD is critical for good GPS reception
and it is strongly recommended that before permanently
fixing the NOMAD in the chosen location, that the GPS
reception is checked.
•The supplied proAIS2 software for PC/Mac is ideal for this
purpose. With the unit connected via the USB cable to a
PC/Mac running the proAIS2 software, view the “GNSS
Status” page and ensure there is good GPS reception with
the NOMAD in this location.
Unit Dimensions
•Once you are confident that the NOMAD is in the best location for good GPS reception, secure the AIS
Transponder to a flat vertical surface in the selected location, either using the two strips of Velcro supplied or
using four M4 wood screws (not supplied) or other fixings suited to the material the unit is being fixed to.
GPS
Antenna
This
Way
Up
Quick Start Guide for NOMAD V1.02
Web: www.digitalyachtamerica.com E-Mail: sales@digitalyachtamerica.com
Installation Step 3 - Power
•Power is supplied to the unit, via its integral USB cable. Simply plug the USB cable in to a suitable USB socket of
a computer, USB charger or USB Power Pack. The Nomad unit will take approximately 0.4A to 0.6A of current at
the 5V USB voltage. Some older computers may complain about the amount of current, disabling the USB port
until the Nomad is removed, in which case you may need to connect the Nomad to a powered USB Hub.
•Most modern USB 2.0 or the latest USB 3.0 ports should work quite happily with Nomad, providing power to the
unit and also creating a virtual COM port for data transmission.
•It is also possible to power the Nomad unit from one of the many USB power packs that are now available online.
These units vary in power capacity (measured in mA/Hours) and below is a table showing the approximate
amount of continuous Nomad use you could expect from these packs;
USB Power Pack Capacity
Continuous Use Time (approx.)
3350mA/H
5.5 Hours
5000mA/H
8 Hours
15000mA/H
24 Hours
22000mA/H
36 Hours
Installation Step 4 –USB Interface
•As well as taking power from the USB interface, Nomad appears as a Virtual COM Port on the computer it is
connected to and can transmit and receive data through the USB cable at 38400baud.
•If you need to extend the USB cable, please use a USB extension cable that is no more than 4m in length. The
maximum length of USB cable without the use of a powered extender cable or Hub is 5m.
•Please do not plug in the USB cable of the NOMAD to your PC until after you have installed the proAIS2
software, which also installs the USB drivers for the NOMAD. Installing proAIS2 is covered in section 4 -
Configuration.
•After the NOMAD is configured, the USB connection can be used to provide data to navigation program running
on a PC or Mac. Please note that only one navigation program at a time can receive data from the NOMAD.
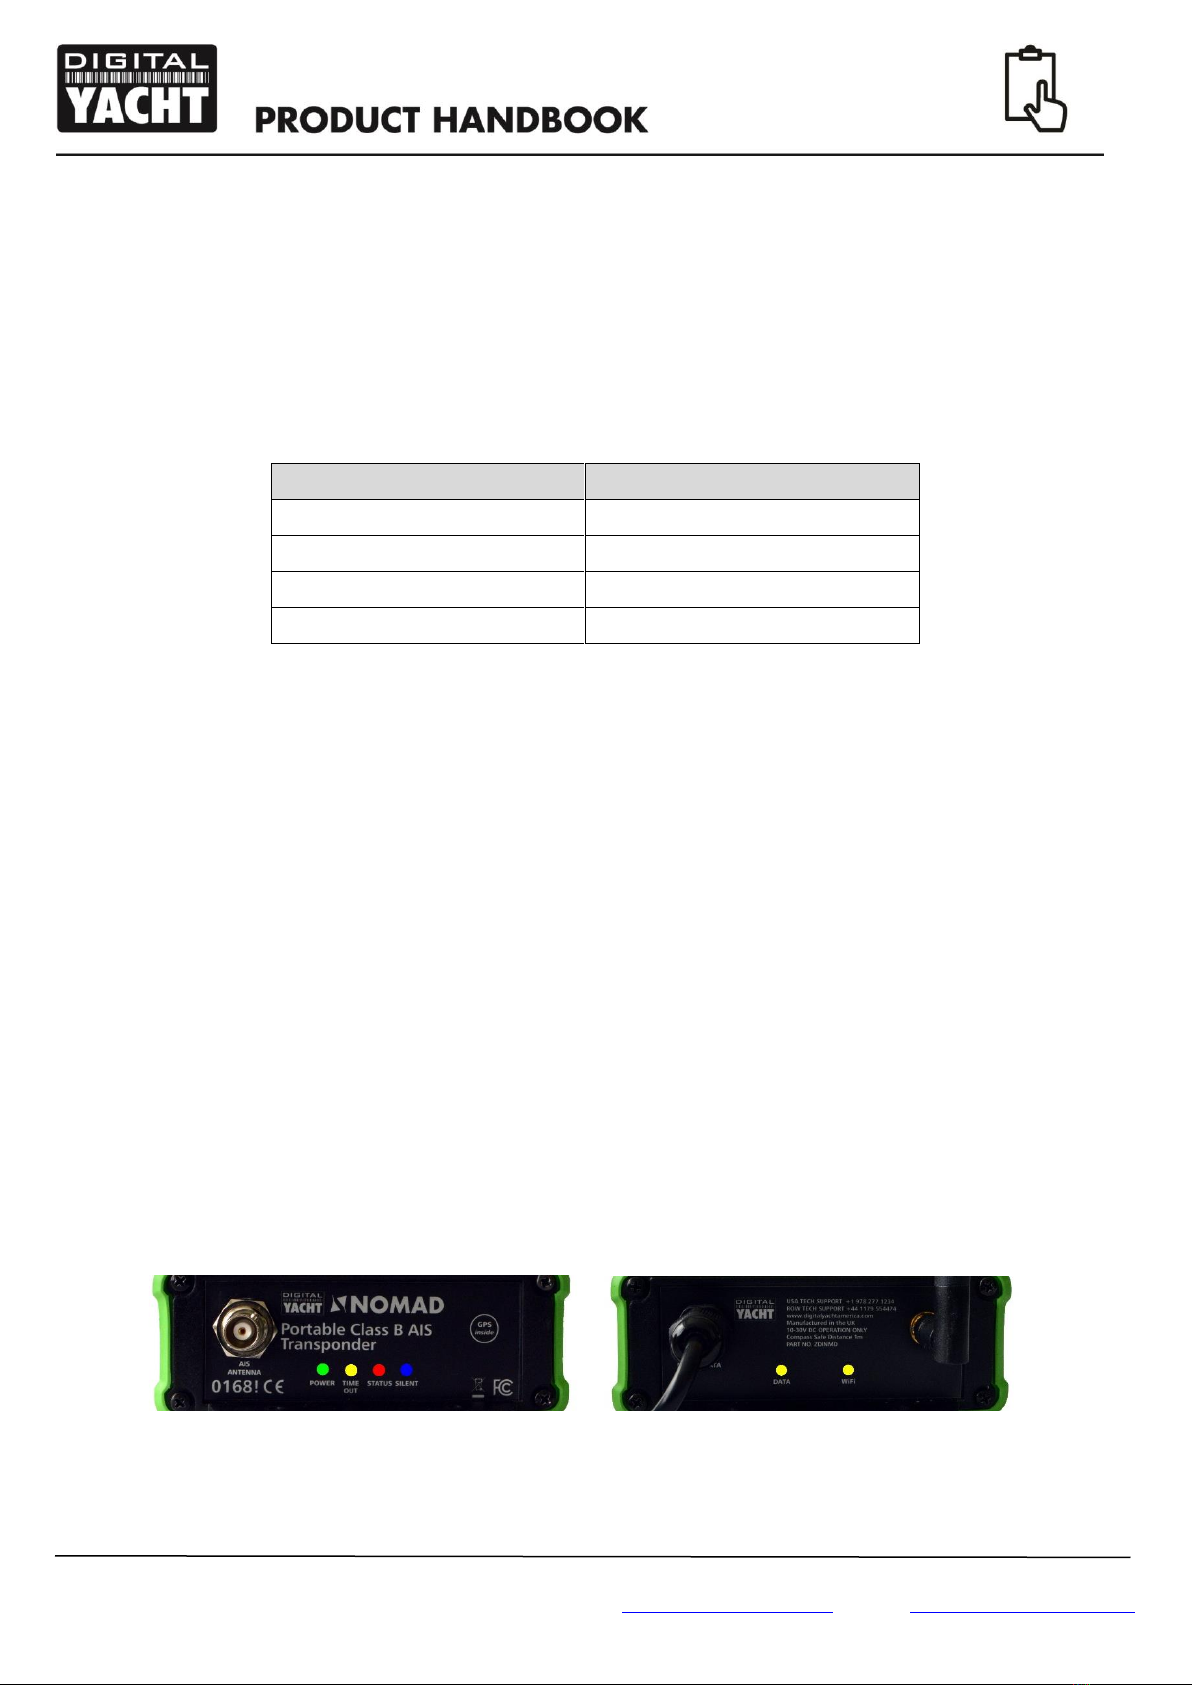
Installation Step 5 –Power Up
•Plug the NOMAD USB cable in to the computer or power pack
•Verify that on the top end cap of the NOMAD, that the green LED illuminates for a short period and then all four
LED indicators flash once, followed by illumination of the amber and red LED’s.
•Verify that the Data and WiFi LEDs on the bottom end cap are flashing.
•Scan for wireless networks and confirm that there is a new network called “DY-Nomad-xxxx” where xxxx is a four
digit code unique to your NOMAD unit.
•Installation is now complete. The NOMAD needs to be configured using the proAIS2 software –see next section.
Top End Cap Bottom End Cap

Quick Start Guide for NOMAD V1.02
Web: www.digitalyachtamerica.com E-Mail: sales@digitalyachtamerica.com
4. Configuration
The NOMAD transponder must be correctly configured for your vessel before operation. All configuration information must
be entered carefully as this information will be transmitted to other AIS equipped vessels and shore stations.
•The AIS transponder can be configured by connecting to a PC or Mac running the ‘proAIS2’ configuration tool
supplied or wirelessly using an Android device running the free AIS Config App which is available from the
Google Play Store... https://play.google.com/store/apps/details?id=com.digitalyacht.aisconfig&hl=en
•For Windows PCs, insert the supplied Digital Yacht Software CD-ROM and run the Setup.Exe program located in
the “proAIS2 for AIT1500+AIT2000+AIT3000” folder. This installs both the USB drivers for the NOMAD and the
proAIS2 application.
•For Macs, insert the supplied Digital Yacht Software CD-ROM and install the “proAIS2.dmg” located in the
“proAIS2 for AIT1500+AIT2000+AIT3000/Mac OSX” folder. This just installs proAIS2 as the drivers are already
pre-installed on Macs.
•Plug in the NOMAD USB cable in to your computer and then launch proAIS2. Select the COM port that the
NOMAD has been allocated by Windows or OSX. Click the ‘Connect’ button The computer will now query the
NOMAD and display any “Static” boat data stored in the unit. All new units will have no data stored and so you will
just have a series of blank boxes in which you will need to enter your boat’s data (see below).
1. Enter Vessel Name, Call Sign and MMSI
2. Enter vessel dimensions and location of GPS antenna to the nearest metre.
3. Select the most appropriate vessel type.
4. Click “Write Configuration” to save the data to the NOMAD
5. Read the warning message carefully and proceed only if the MMSI number is correct.
6. Configuration of the AIS Class B Transponder is now complete
*Note: For safety and security reasons the correct MMSI number for the vessel that the NOMAD is being
used on must be programmed into the unit before use. Make sure you enter the correct number and
double check when ProAIS2 warns you regarding MMSI programming. Please contact Digital Yacht if
you need to change the MMSI number.

Quick Start Guide for NOMAD V1.02
Web: www.digitalyachtamerica.com E-Mail: sales@digitalyachtamerica.com
5. Operation
Once installed and configured, correct operation of the AIS transponder should be verified as follows:
1. Check that at least one of the LED's on the front of the unit is illuminated. If the red 'Error' LED is illuminated
please refer to the troubleshooting section in the NOMAD User Manual.
2. Check that the unit has a good GPS lock. If the GPS is locked the Latitude and Longitude will be displayed on the
“GPS Status” tab in proAIS2 along with a number of green bars in the signal strength graph.
3. If the unit does not have GPS fix within a few minutes check that the NOMAD’s internal GPS antenna is pointing
upwards and only has fibreglass above it. Use the proAIS2 GNSS status page to check the signal strengths.
4. Check that the Green 'Power' LED on the front of the unit illuminates. This will not happen until the unit has GPS
fix and has transmitted its first position report. Please allow up to 5 minutes for this to occur. If the Green LED is
illuminated you have successfully installed and configured the unit. The proAIS2 application can be closed
and the PC disconnected from the unit.
5. If you are in an area with other AIS equipped vessels you can check the "Other vessels" tab in ProAIS2 to view
position reports received from other ships.
NOMAD is designed to be used with compatible navigation software running on a Laptop (PC, MAC or LINUX) connected
via its USB cable or Wi-Fi interface. There are also many Apple iOS and Android apps to allow mobile phones and tablets
to wirelessly receive and display the AIS data from NOMAD.
To configure navigation software to read AIS+GPS data from NOMAD, via USB, find the relevant setup menu in the
software you are using and select the same “Virtual COM Port” that the proAIS2 software used to talk to NOMAD and
make sure the data rate/speed is set to 38400 baud (default for AIS) –note that you cannot use the navigation software
and proAIS2 software at the same time.
To configure navigation software or an iOS/Android App to read AIS+GPS data from NOMAD, via Wi-Fi, first scan for
wireless networks and connect to the NOMAD network (SSID). Once a wireless network connection is established, run
the software/app and find the relevant setup menu for configuring a network (TCP of UDP) data connection.
All NOMAD units are pre-programmed with the following IP address and Port number, which are the values you will need
to enter in the software/apps setup menu;
NOMAD IP address = 192.168.1.1
NOMAD Port number = 2000
Normally if you select a TCP connection (single device) then you will have to enter both the IP address and Port, while if
you select a UDP connection (multiple devices) you usually will only have to enter the Port number.
Ensure that the NOMAD DATA LED is flashing (indicates AIS or GPS data is being received) and then you should start to
see AIS and GPS data appear in the software/app.
For more information on compatible software and apps, please visit our blog http://digitalyacht.net and search for “iOS
Apps”, “Android Apps”, etc.

Quick Start Guide for NOMAD V1.02
Web: www.digitalyachtamerica.com E-Mail: sales@digitalyachtamerica.com
6. Troubleshooting
If the green LED is not illuminated after around 5 minutes then please check the following:
1. Is the MMSI number programmed?
Check the “Diagnostics” tab in proAIS2. If there is a red cross next to the "AIS Transceiver MMSI Valid" item then you
have not correctly configured the MMSI.
2. Does the unit have a GPS position fix?
Check the “Diagnostics” tab in proAIS2. If there is a red cross next to the "GPS position fix" item then the unit does
not have GPS fix. Check your GPS antenna and connections.
3. Is the unit reporting any alarms?
Check the "Active alarms" area in the “Diagnostics” tab of ProAIS2 & refer to the troubleshooting guide at the back of
the ProAIS2 user guide
.
4. Is there a good USB power connection?
Is the computer or USB power pack providing enough power to the NOMAD. If you run ProAIS2 and go to the
Diagnostics page, you should be able to see a supply voltage of approximately 12v. If this is lower than 10v then the
USB port is not providing enough voltage/current and you should try another USB port or power pack.
For more troubleshooting information on the NOMAD transponder please consult Tech Note 00036-2012 in the Support
section of www.digitalyachtamerica.com
For more general information about AIS please Google “Introduction to AIS White Paper”
and/or “Non-Idiots Guide to AIS” to find two useful AIS articles that we have published.
Table of contents
Other DIGITAL YACHT Marine Radio manuals

DIGITAL YACHT
DIGITAL YACHT AIT2000 Specification sheet

DIGITAL YACHT
DIGITAL YACHT AIT2500 Quick guide

DIGITAL YACHT
DIGITAL YACHT AIT2000 Quick guide

DIGITAL YACHT
DIGITAL YACHT AIT1000 Datasheet

DIGITAL YACHT
DIGITAL YACHT iAIS TX Quick guide

DIGITAL YACHT
DIGITAL YACHT AIT5000 User manual

DIGITAL YACHT
DIGITAL YACHT AIT250 Datasheet

DIGITAL YACHT
DIGITAL YACHT AIT2000 Specification sheet

DIGITAL YACHT
DIGITAL YACHT AIT3000 Quick guide

DIGITAL YACHT
DIGITAL YACHT AIT2000 User manual


