DIHL KA-PRSCK-01 User manual
Pressure Cooker
KA-PRSCK-01
USER GUIDE
Contents
Introduction
Parts Included
Important Safeguards
Using the Appliance
Cleaning
Technical Specifications
Environmental Info and Support

1
Introduction
Congratulations on your new purchase and thank you for choosing Dihl.
Your new Dihl pressure cooker allows you to make food easily and quickly. Read this user manual careful-
ly before you use the appliance and save it for future reference.
PARTS INCLUDED
1.
2.
3.
4.
5.
6.
7.
8.
9.
10.
11.
12.
13.
14.
15.
16.
17.
18.
19.
Handle Cover
Handle
Lid
Relief Valve
Floating Pressure
Relief Valve
Auto Bolt
Inner Pot
Housing
Upper Edge
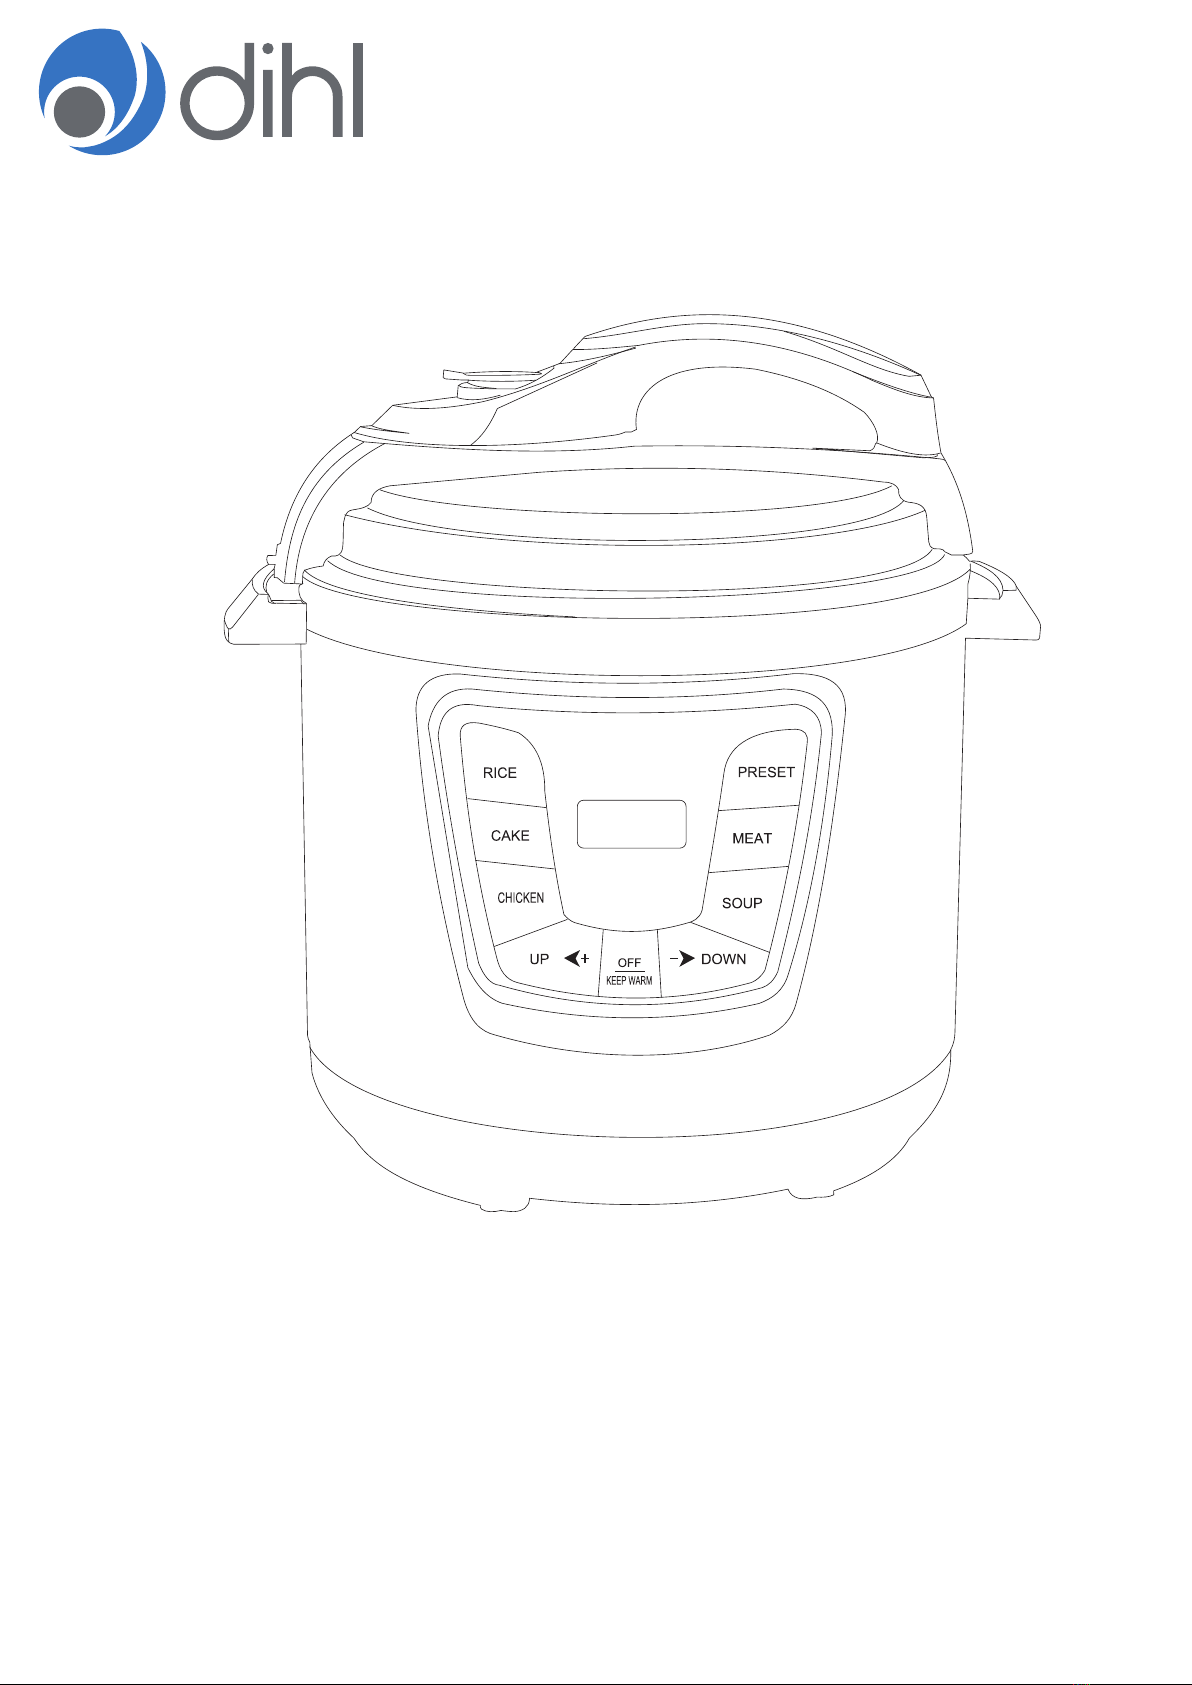
Control panel
Heating Plate
Unit Base
Floater
Water Collector
Power Cord
Seal Ring for Valve
Filter
Silicon Seal Ring
Aluminium Lid

Read this user manual carefully before you use the appliance and save it for future
reference.
2
Caution
1.
2.
3.
4.
5.
6.
7.
8.
9.
10.
11.
12.
13.
Read all instructions carefully before use.
Before first use, check to ensure the voltage indicated on the unit corresponds to the voltage of
your home.
Do not let the cord hang over the edge of a table or counter, and keep away from hot surfaces
or naked flames.
Do not put the appliance in the refrigerator.
Do not lean the appliance or operate it upside down.
For indoor, domestic use only.
This appliance is not intended for use by persons with reduced physical, sensory or mental
capabilities, or lack of experience and knowledge unless they have been given supervision or
instruction concerning use of the appliance by a person responsible for their safety.
Keep away from children. Do not allow children to play with the unit.
To prevent electric shock or another injury, never immerse the appliance in water or any other
liquid, nor rinse it under the tap.
Only use the parts provided by Dihl with this appliance.
Ensure that the appliance is switched off and unplugged before cleaning.
Do not leave the appliance unattended when ins use.
If the cord or plug is damaged, it must be replaced by Dihl.
IMPORTANT SAFEGUARDS
USING THE APPLIANCE
Using the Appliance
Ensure that the appliance is switched off and unplugged.
Wipe the unit down with a soft, damp cloth. Never immerse the main unit in water.
Note; on first use, there will be a slight odour. This will disappear after the first few uses. Please ensure that
there is enough ventilation for the appliance when in use.
Before First Use
Remove all packaging material.
Remove any stickers or labels from the appliance.
Clean the main body and all detachable parts.
1.
2.
3.

3
Hold the handle firmly, turn it clockwise to the clamping position and then lif. See Fig1.
Wash the inner pot with warm soapy water before use. The amount of food and water should not go
above the 3/5 level. See Fig2.
Ensure that no food or water spils onto the outer pot or on the surface of the heating plate. Turn the
inner pot to click into place. See Fig3.
Place the lid on and close. Place the silicone seal ring around the aluminum lid, this should fit snug in
place.
Turn the handle counter clockwise until it clicks into place. See Fig4.
Put the relief valve in place and turn it to ‘Airproof’ and check that the floater has fallen as this should
be down before cooking starts. See Fig5.
Switch the appliance on, it will beep and the display will read ‘00:00’. This is standby mode ready to
use.
1.
2.
3.
4.
5.
6.
7.
Choose an option on the menu depending on the food you
are cooking. Once the setting has been selected the timer
and menu will flash at the same time. You can change the
cooking time at this stage by using the ‘UP’ and ‘DOWN’
buttons on the menu.
This allows you to set the appliance to turn the appliance on at a
prefered time. The time will increase in five minute increments up to
a maximum of 23 hours and 55 minutes. If you press and hold the
button to increase the time quickly.
The Rice setting will add a default time of 12 minutes. You can
adjust the time by pressing the ‘UP’ and ‘DOWN’ buttons on the
menu. Once a time has been selected, cooking will begin.
The Cake setting will add a default time of 25 minutes. You can
adjust the time by pressing the ‘UP’ and ‘DOWN’ buttons on the
menu. Once a time has been selected, cooking will begin.
Using the Programmes
‘Preset’
‘Rice’
‘Cake’

4
‘Meat’
Warning
For ingredients with liquids, e.g. soups, the relief valve should mot be moved to ‘Exhaust’ to release
the pressure. This is to avoid any of the contents spilling out of the vents. Wait until the pressure has
reduced considerably. A wet towel can be placed on the lid to speed up the cool down pocess.
Once you have finished cooking, turn off thr appliance and let the pressure reduce. Turn the pressure relief
valve to ‘Exhaust’to release the seam until the floating valve is in place. See Fig5.
Hold the handle tighly, turn it clockwise until it clicks into place and then lift the lid. See Fig1.
The meat setting will add a default time of 40 minutes. You can adjust the time by pressing the ‘UP’ and
‘DOWN’ buttons on the menu. Once a time has been selected, cooking will begin.
‘Chicken’
The chicken setting will add a default time of 10 minutes. You can adjust the time by pressing the ‘UP’ and
‘DOWN’ buttons on the menu. Once a time has been selected, cooking will begin.
‘Soup’
The chicken setting will add a default time of 45 minutes. You can adjust the time by pressing the ‘UP’ and
‘DOWN’ buttons on the menu. Once a time has been selected, cooking will begin.
‘OFF/Keep Warm’
To cancel any setting, press the off button. You can lick it again and it will keep the contents warm until
you are ready to take it out.

5
Warnings
When removing the lid after cooking, take extra care as there will a lot of hot steam and avoid
touching the blade.
Ensure that the silicon seal ring is never damaged.
Never twist the inner lid with your hand or other tools with force. If the inner lid becomes damaged,
it will need to be replaced.
Ensure that the floating valve is down before attempting to open the lid.
The bottom of inner pot and heating plate surface should be kept clean. Never heat the inner pot
on other thermal sources or have it replaced with other cookers.
If you hear an alarm while cooking, please turn the appliance off immediately and contact Dihl.
Clean the appliance after every use.
1.
2.
3.
4.
5.
6.
7.
1.
2.
3.
4.
5.
6.
Before cleaning, turn the appliance off and remove from the socket.
Never immerse the main body or the lid in water or under the tap.
Clean the lid, including the seal ring, pressure relief valve, filter vent, floater, floating valve. Wipe
with a damp cloth.
Remove the water collector and empty it. Clean it with a damp cloth.
Once cooled down, clean the inner pot with a moist cloth and dry with a dry cloth.
Ensure that the pressure relief valve and the holes are cleaned with a soft brush to allow smooth
flow of the steam.
Cleaning
TECHNICAL SPECIFICATIONS
KA-PRSCK-01
1000W
Pressure Cooker
240V
60-80
6L
Temp
Capacity
Model
Product Name
Voltage
Rated Power

6
Do not throw away the appliance with the normal household waste at the end of its life; hand it in at
an official collection point for recycling. By doing this, you help to preserve the environment. (Fig. 14)
Environmental Info
Warranty
Your new Dihl product is supplied with a warranty of 12 months from the date of purchase.
The product must be used in the manner indicated within this manual.
Any abuse of any parts of the product will invalidate the warranty.
you have purchased your item from another retailer, please contact them directly.
Support
To view our entire product range, visit
www.dihl.co.uk
value
quality
no compromise
Table of contents
Popular Electric Pressure Cooker manuals by other brands

Fagor
Fagor Fagor Rapida Pressure Cooker user manual

Ninja
Ninja FOODI TENDERCRISP OP300ANZ Series instructions

AIGOSTAR
AIGOSTAR 30KYE instructions

Tower Hobbies
Tower Hobbies T90100 Safety and instruction manual

Magefesa
Magefesa STAR Y STAR instruction manual

Mellerware
Mellerware Juno Instruction manual and recipe book


