Disty Notruf Neo User manual

www.disty.de
Operating
Instructions
German
English
French
Italian
Spanish
DE
EN
FR
IT
ES

Verpackungsinhalt
Package contents
Contenu de la livraison
Volume di fornitura
Volumen de suministro
distyNotruf NEO
Bedienungsanleitung
Operating instructions
Mode d‘emploi
Manuale di istruzioni
Manual de instrucciones
Netzteil/Ladekabel
(USB-Kabel)
Mains adapter/charging lead
(USB cable)
Câble d‘alimentation/Câble du
chargeur (Câble USB)
Cavo di alimentazione/Cavo di
ricarica (cavo USB)
Cable de alimentación/Cable del
cargador (cable USB)
Halsband
Neckband
Collier
Collare
Collar
Gürtelclip
Belt clip
Clip de ceinture
Clip da cintura
Clip del cinturón
zweites Armband
second wristband
deuxième bracelet
secondo bracciale
segunda pulsera
Inhaltsverzeichnis
distyNotruf NEO 4
Inbetriebnahme 6
Auaden 6
Einbuchen und Alarmnummern speichern 7
Funktionsweise 8
Direktruf tätigen 8
Meldekette/Alarmbestätigung 8
Zurücknehmen eines Direktrufs/Alarms 9
Anrufe annehmen 9
Reichweitenwarnung 9
Anordnung der Benutzerschnittstelle 9
Problembehebung 10
Tragevarianten 12
Tipps & Tricks 14
Gerät komplett ausschalten 14
Personal Alarm 14
Einrichten des Gerätes
ohne „ProgrammierApp“ (PC) 15
Rücksetzen/Ausbuchen 17
Technische Daten 18
Konformitätserklärung 18
Sicherheitshinweise 19
DE
Bedienungsanleitung 3

Herzlichen Glückwunsch!
Mit distyNotruf
NEO
haben Sie ein DECT/GAP-
Telefonzusatzgerät erworben, das Sie ganz
einfach per Knopfdruck bedienen
distyNotruf NEO
ist die direkte Verbindung zu
Ihren Vertrauenspersonen
Sie legen fest, mit wem Sie im Notfall direkt sprechen
möchten. Dazu können bis zu 5 Telefonnummern gespeichert
werden. Dafür muss distyNotruf NEO zuvor in die DECT-
Basisstation Ihres Telefons eingebucht werden (siehe Seite 6).
Sobald Sie den Alarmknopf drücken, wählt distyNotruf NEO
automatisch die erste der einprogrammierten Telefonnummern
an. Sie können direkt sprechen, sobald der Empfänger das
Telefonat angenommen hat. Der Empfänger muss durch Drücken
der „#“-Taste an seinem Telefon die Anrufannahme bestätigen.
Erfolgt diese Bestätigung nicht, weil der Empfänger nicht da
ist, besetzt ist oder der Anrufbeantworter anspringt, dann
wählt distyNotruf NEO automatisch die nächste gespeicherte
Rufnummer so lange, bis der Notruf persönlich angenommen
und bestätigt wird.
4Bedienungsanleitung Bedienungsanleitung 5
distyNotruf NEO
als Telefon mit Freisprechfunktion
distyNotruf NEO können Sie auch als Telefon nutzen.
Alle eingehenden Anrufe können Sie mit einem Knopfdruck
annehmen. So sind Sie jederzeit erreichbar, von jedem Platz
Ihres Zuhauses aus. Sogar im Garten oder Keller können Sie
distyNotruf NEO nutzen.* distyNotruf NEO ist strahlwasser-
geschützt und kann auch in der Dusche genutzt werden.
distyNotruf NEO
einfach wie
eine Armbanduhr tragen
Auf Knopfdruck
kommunizieren Sie sofort
bei Unwohlsein/Angst,
gesundheitlichen
Problemen, Überfall,
Sturz etc.
* bis 50 Meter von der Basis in Gebäuden
DEDE

6Bedienungsanleitung Bedienungsanleitung 7
Inbetriebnahme
Die Inbetriebnahme besteht grundsätzlich aus drei Schritten:
Auaden,EinbuchenanderBasisstationundEingabeder
Alarmnummer(n).
Auaden
Vor Inbetriebnahme muss distyNotruf NEO vollständig
aufgeladen werden (mindestens 4 Stunden). Zuerst das
Ladekabel an den distyNotruf NEO stecken und mit dem
Netzteil verbinden und dieses dann in eine Steckdose stecken.
distyNotruf NEO ist vollständig aufgeladen, wenn die rote
LED erloschen ist.
Einbuchen und Alarmnummern speichern
Das Einbuchen an einer Basisstation und Speichern der
Alarmnummer(n) können Sie einfach und komfortabel mit
der „ProgrammierApp“ durchführen.
Dazu den distyNotruf NEO über USB-Kabel mit dem PC
verbinden.
Mit der „ProgrammierApp“ (für Windows 7/8/10), die Sie
von www.disty.de bezogen haben, speichern Sie die Ruf-
nummern in das Gerät und buchen den distyNotruf NEO
in Ihr DECT-Telefon ein. Das Ausbuchen bzw. Rücksetzen
einzelner Parameter geschieht ebenfalls über die
„ProgrammierApp“.
AlleEinstellmöglichkeitenndenSieinderausführlichen
Bedienungsanleitung zur „ProgrammierApp“, die Sie als
PDF-Datei zusammen mit der Installationsdatei herunter-
geladen haben.
Steht Ihnen momentan kein PC zur Verfügung, können Sie
das Einbuchen und Speichern der Alarmnummer(n) auch per
Telefon durchführen (s. Kapitel „Tipps & Tricks“ ab Seite 14).
distyNotruf NEO
ist nun betriebsbereit.
DEDE

8Bedienungsanleitung Bedienungsanleitung 9
Funktionsweise
Direktruf tätigen
Drücken Sie die Alarmtaste. distyNotruf NEO wählt nun die
erste der hinterlegten Telefonnummern. Die rote LED blinkt
und zeigt, dass die Verbindung aufgebaut wird.
Meldekette/Alarmbestätigung
Die Annahme des Direktrufs muss von
dem Empfänger bestätigt (quittiert)
werden, indem er nach Annahme
des Telefonats die
„#“-
Taste auf
seinem Telefon drückt. Der Ange-
rufene wird durch eine Ansage zum
Bestätigen aufgefordert. Wird der Notruf
von der angerufenen Person nicht innerhalb
von 20 Sekunden bestätigt, wählt distyNotruf NEO
automatisch die zweite – und im Fall der Nichtannahme –
die nächste hinterlegte Telefonnummer. Dies wiederholt sich
so lange, bis eine persönliche Sprachverbindung zu einer
Ihrer Vertrauenspersonen hergestellt werden konnte.
#
Diese Taste müssen
die Empfänger Ihres Anrufs
drücken, um den Direktruf an-
zunehmen. (So wird vermieden,
dass „nur“ ein Anrufbeant-
worter angeht). Sagen
Sie das bitte Ihren
Rufpartnern!
Zurücknehmen eines Direktrufs/Alarms
Sollten Sie versehentlich einen Alarm ausgelöst haben,
drücken Sie einfach die Alarmtaste erneut.
Anrufe annehmen
Alle eingehenden Anrufe können Sie komfortabel über
die
Taste annehmen. Ein eingehender Anruf wird am
distyNotruf
NEO durch die grün blinkende LED und durch
Pieptöne signalisiert.
Reichenweitenwarnung
Bewegen Sie sich mit distyNotruf
NEO
an der Reichweiten-
grenze,
erfolgt ein Warnton (nur während Telefonat).
Anordnung der Benutzerschnittstelle
Integriertes Mikrofon
und Leuchtdiode
Taste für
Notruf und
Rufannahme
Integrierter
Lautsprecher
DEDE

10 Bedienungsanleitung Bedienungsanleitung 11
Problembehebung
Wenn ich auf den Alarmknopf drücke, um einen Alarm
auszulösen, passiert nichts.
- Prüfen Sie, ob die LED Rot blinkt. Dann ist Ihr
distyNotruf NEO nicht mit der Basisstation verbunden.
Beachten Sie, dass Sie sich innerhalb der Reichweite
derBasisstationbendenmüssen(max.Reichweiteim
Gebäude: etwa 50m).
- Prüfen Sie, ob distyNotruf NEO ausreichend geladen
ist. Laden Sie es ggf. über das mitgelieferte Ladekabel
an einer Steckdose auf.
Ich kann einen Alarm auslösen, bekomme aber keine
Sprechverbindung.
- Beachten Sie, dass sich distyNotruf NEO im Empfangs-
bereichderBasisstationbendet(biszu50mimGebäude
und bis zu 300m im Freien).
- Überprüfen Sie, ob distyNotruf NEO ausreichend gela-
den ist.
- Evtl. liegt eine Telefonnetzstörung vor. Bekommen Sie mit
Ihrem normalen Telefon auch keine Verbindung, so liegt
eine Telefonnetzstörung vor.
Modus Laden Leuchtdiode/Ton
Mit dem Lade-
kabel verbinden Signalton,
rote LED leuchtet einmal
Mit dem span-
nungsversorgten
Ladekabel
verbunden
Rote LED blinkt im Sekunden-
takt während des Ladevor-
ganges und erlischt, wenn
das Laden abgeschlossen ist
Modus Leuchtdiode/Ton
Akkuladung
niedrig Rote LED blinkt alle 30 Sek.,
Signalton
Eingebucht,
registriert Grüne LED blinkt einmal alle
10 Sek.
Eingebucht,
außerhalb der
Reichweite/keine
Basisstation
Rote LED blinkt im
Sekundentakt
DECT-
Verbindung Grüne LED leuchtet
Alarm Rote LED blinkt schnell
Ankommender
Anruf Grüne LED blinkt,
Signalton einmal
Reichweite
(Grenze) Rote LED blinkt schnell,
Signalton
DEDE

12 Bedienungsanleitung Bedienungsanleitung 13
Tragevarianten
Der distyNotruf NEO kann auf drei unterschiedliche Arten
am Körper getragen werden:
Möglichkeit 1:
Befestigung des
distyNotruf NEO
am Handgelenk
Das Armband ist bereits werksseitig
vormontiert. Der distyNotruf NEO ist
so am Arm anzulegen, dass die Lade-
buchse in Richtung Körper zeigt. Das
kürzere Ende des Armbandes ist durch
die Öffnung der anderen Armband-
hälfte zu ziehen und entsprechend der
Armdicke festzuziehen. Die beiden
Zapfen des Verschlussstückes sind fest
in die gegenüberliegenden Löcher
einzudrücken und einzurasten.
Bei einer möglichen Demontage drückt
man von der Außenseite der Bohrung
mit einer Nadel oder einer Büroklam-
mer auf den Federstift, so dass dieser
zusammengedrückt wird und aus der
Bohrung entnommen werden kann.
Falls das vormontierte Armband in
Länge und Schließmechanismus nicht
Ihren Vorstellungen entspricht, können
Sie es durch das beiliegende zweite
Armband ersetzen.
Möglichkeit 2:
Befestigung mit dem Gürtelclip
Armband demontieren (siehe Absatz
linke Seite zu Möglichkeit 1) Federstifte
aus dem
Armband entfernen und ein
Federstift
auf der Seite der Ladebuchse
einsetzen.
Mittlere Lasche des Clips bis auf die
Clipunterseite durchdrücken und unter
den montierten Federstift schieben.
Zweiten Federstift in den Clip einschie
ben
Clip in die annähernde Endposition
bringen,
dabei die eine Seite des Federstiftes in die
dafür vorgesehene Bohrung einschieben.
Die zweite Seite des Federstifts in Richtung
Clip eindrücken und dabei den Clip in die
endgültige Position drücken.
Möglichkeit 3:
Befestigung mit dem Halsband
Zuerst den Clip wie vor beschrieben
montieren. Halsband unter die äußere
Lasche schieben.
DEDE

14 Bedienungsanleitung Bedienungsanleitung 15
Einrichten des Gerätes ohne
„ProgrammierApp“ (PC)
Einbuchen
Starten Sie an der Basisstation Ihres normalen DECT-Telefons
den Einbuchvorgang zum Anmelden eines weiteren Mobil-
teils (s. Bedienungsanleitung der Basisstation).
Den distyNotruf NEO mit dem Ladekabel verbinden und
mit Spannung versorgen. Nun die Taste so lange drücken
(10Sek.),bisdiegrüneLEDaueuchtet.Tasteinnerhalbvon
5 Sekunden loslassen. Jetzt blinkt die grüne LED, d.h.
distyNotruf NEO sucht eine einbuchbereite Basisstation.
Nach erfolgreichem Einbuchen ertönt ein hoher Signalton.
Damit ist der Einbuchvorgang abgeschlossen.
„Erster kommender Anruf“ (nur die erste Notrufnummer
speichern) –>spannungsversorgtes Ladekabel nicht gesteckt
Bitten Sie die Person (z.B. einen Angehörigen, einen Nach-
barn), die Sie auf Knopfdruck erreichen wollen, bei Ihnen
anzurufen. Dadurch wird die Rufnummer des Anrufers (CLIP)
nach dem Einbuchen als Notrufnummer gespeichert. Das
erfolgreiche Speichern der Notrufnummer erkennen Sie
daran, dass distyNotruf NEO sofort nach Anrufannahme
die Verbindung wieder beendet.
Tipps & Tricks
Gerät komplett ausschalten
Wenn Sie das Gerät längere Zeit nicht benötigen (z.B. wäh-
rend einer Abwesenheit im Urlaub), können Sie es komplett
ausschalten.
- distyNotruf NEO mit dem spannungsversorgten Ladekabel
verbinden, als Bestätigung leuchtet die rote LED auf und ein
akustisches Signal ertönt
- nach spätestens 5 Sek. die Alarmtaste drücken und gedrückt
halten.
- jetzt gleichzeitig das spannungsversorgte Ladekabel ab-
ziehen und die Taste loslassen
Personal Alarm
Dieses Leistungsmerkmal ist nicht in allen Geräten verfügbar.
Obwohl das Gerät nur über einen einzigen Knopf verfügt, ist
es möglich, gezielt eine zweite Alarmnummer anzurufen. Die
notwendigenEinstellungenndenSieinder„ProgrammierApp“
unterdemReiter„Konguration2“.
Zum gezielten Wählen dieser zweiten Rufnummer müssen
Sie die Notruftaste 2x schnell hintereinander drücken. Die
Wahl der ersten Notrufnummer durch Drücken der Notruftaste
von mindestens 1 Sekunde bleibt dadurch unverändert.
DEDE

16 Bedienungsanleitung Bedienungsanleitung 17
Rücksetzen/Ausbuchen
Die von Ihnen vorgenommenen Einstellungen können wieder
auf den Auslieferungszustand rückgesetzt werden. Die pro-
grammierten Notrufnummern bleiben dabei erhalten. Die
Anmeldedaten der Basisstation werden gelöscht. Sie müssen
das Gerät also vor einer weiteren Benutzung wieder an einer
Basisstation anmelden.
Führen Sie dazu bitte folgende Schritte aus (dazu muss
distyNotruf NEO
eingebucht sein):
-
distyNotruf NEO
mit dem spannungsversorgten Ladekabel
verbinden, als Bestätigung leuchtet die rote LED auf und ein
akustisches Signal ertönt
- nach spätestens 5 Sek. die Alarmtaste drücken und für
10 Sek. gedrückt halten – die grüne LED geht an
- Alarmtaste loslassen, bevor die LED ausgeht (5 Sek. Zeit)
- ein Ton ist zu hören und die rote LED geht an
-
distyNotruf NEO
vom spannungsversorgten Ladekabel
abnehmen
-
distyNotruf NEO
schaltet sich aus
Um Ihren
distyNotruf NEO
auf Werkseinstellung zu bringen,
nutzen Sie dazu die „ProgrammierApp“.
Alle Alarmnummern speichern
Zum Speichern der Alarmnummern per Telefon verfahren Sie
bitte wie folgt (die Speicherung einer jeden Alarmnummer
erfordert einen neuen Anruf):
- Rufen Sie Ihren distyNotruf NEO von einem ganz normalen
Telefon oder einem Mobiltelefon/Handy an (kein Intern-
gespräch von einem anderen Mobilteil an derselben Basis-
station)
- Nehmen Sie das Gespräch am
distyNotruf NEO
entgegen.
Um akustische Rückkopplungen zu vermeiden, sorgen
Sie nach Möglichkeit dafür, dass sich das Telefon und der
distyNotruf NEO
während der Programmierung nicht im
gleichenRaumbenden.
-
Geben Sie am Telefon die nachfolgend beschriebenen
Ziffern
folgen ein, wobei „xxxx“ für die Telefonnummer
steht, die Sie einspeichern wollen. Bei der Speicherung
werden bereits vorhandene Einträge überschrieben.
- Für die 1. Alarmnummer: **9 [1-2 Sek. Pause] 2xxxxx #
Für die 2. Alarmnummer: **9 [1-2 Sek. Pause] 61xxxxx #
Für die 3. Alarmnummer: **9 [1-2 Sek. Pause] 62xxxxx #
Für die 4. Alarmnummer: **9 [1-2 Sek. Pause] 63xxxxx #
Für die 5. Alarmnummer: **9 [1-2 Sek. Pause] 64xxxxx #
- Beenden Sie die Verbindung
DEDE

18 Bedienungsanleitung Bedienungsanleitung 19
Technische Daten
DECT/GAP, EN 300 444 (Frequenzbereich und Sendeleistung:
Einhaltung der Vorgaben mit EU/EFTA, sowie AUS)
Kompatibel zu allen Konsumer DECT/GAP-Basisstationen und
allen professionellen DECT-Systemen
Kompatibel zu FRITZ!Box und Speedport Neo
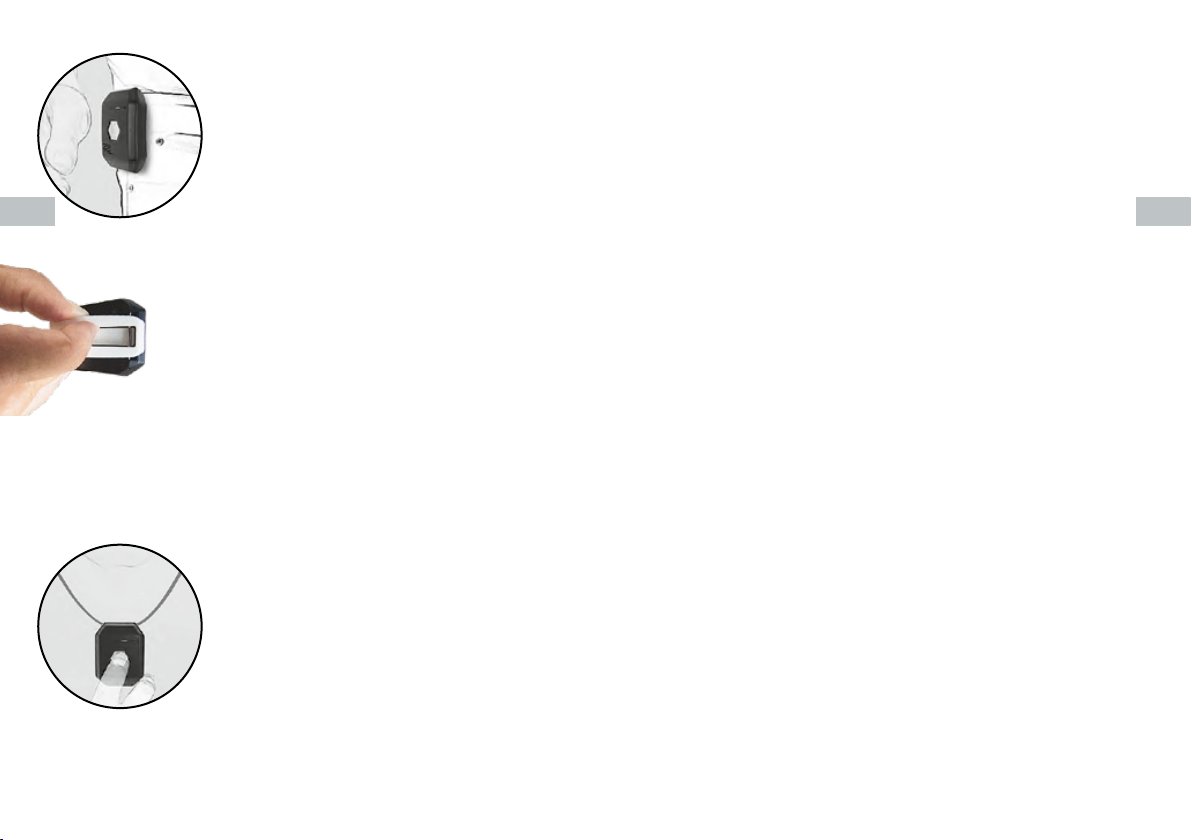
Taste für Alarmruf und Bedienung
LEDs zur Betriebsanzeige (2-farbig)
Mikrofon und Lautsprecher
Standby-Zeit: >120 Std. |
Gesprächszeit: >4 Std.
Schnittstelle für Programmierung
Kabel USB, Type A — USB, Type C
Systemanforderung: Windows 7/8/10
Lithium-Ionen Akku, Kapazität: 450 mAh
Betriebs-/Lagertemperatur: -10°C bis +40°C/-10°C bis +60°C
Gewicht ca. 46 g (inklusive Armband)
Kunststoffgehäuse, 56mm x 42mm x 14mm, Farbe: Anthrazit
Schutzklasse: IP 65
Sicherheitshinweise
Bitte beachten Sie die folgenden Sicherheitshinweise und überprüfen
Sie vor der ersten Benutzung den Verpackungsinhalt.
1. distyNotruf NEO ist für die Kommunikation in einer
DECT-Installation vorgesehen.
2. Heben Sie die Bedienungsanleitung bitte auf.
3. Reinigen Sie das Gerät nur mit einem feuchten Tuch.
4.
Nutzen Sie das Gerät nicht in extremen Umgebungsbedingungen.
5. distyNotruf NEO ist gegen Spritzwasser geschützt
und kann
in der Dusche gentutz werden. Nicht in Wasser eintauchen.
6. Halten Sie das Gerät niemals direkt ans Ohr! Der Schalldruck
des Lautsprechers könnte Ihr Hörvermögen beeinträchtigen.
7. Verwenden Sie für den Ladevorgang nur das mitgelieferte
Netzteil.
8. Das Gerät wird mit einem Lithium-Ionen Akku betrieben.
Laden Sie distyNotruf NEO regelmäßig und vollständig auf.
9. VerwendenSiefürdieKongurationnurdasbeschriebene
Zubehör.
10. Versuchen Sie nicht, das Gerät selbstständig zu zerlegen oder
zu reparieren. Alle Wartungs- und Reparaturarbeiten müssen
durchgutausgebildetesundqualiziertesPersonaldurchgeführt
werden.
Konformitätserklärung
Wir, die disty communications GmbH, erklären, dass distyNotruf NEO
mit den grundlegenden Anforderungen und anderen relevanten Bestim-
mungen der Richtlinie 2014/53/EU (Radio Equipment Directive; RED) über-
einstimmt. Die Übereinstimmung ist durch das CE Kennzeichen bestätigt.
Die vollständige Konformitätserklärung kann auf unserer Internetseite
eingesehen werden: www.disty.de
ProfessionelleAnwenderndenweitereInformationen
im Servicebereich unter www.disty.de.
Weitere Informationen und Kontaktmöglichkeiten
ndenSieunter:www.disty.de
Servicetelefon: 04 31 · 3 64 58 22
Mo.–Fr. von 9.00 – 16.30 Uhr (außer an Feiertagen)
oder
distynotruf@disty.de
DE DE

EN EN
Table of contents
distyNotruf NEO
21
Commissioning 23
Charging 23
Subscribe and pre-programm
the alarm numbers 24
Mode of operation 25
Make a direct call 25
Contactchain/alarmconrmation 25
Cancelling a direct call/an alarm 26
Accepting calls 26
Range warning 26
Alignment of the user interface 26
Troubleshooting 27
Wearing options 29
Tips & tricks 31
Switch device off 31
Personal alarm 31
Conguringthedevicewithout
the “ProgrammerApp” (PC)
32
Reset/Unsubscribe 34
Technical data 35
Declaration of conformity 35
Safety information 36
20 Operating instructions Operating instructions 21
Congratulations!
You are the owner of a distyNotruf
NEO
DECT/
GAP telephone accessory, which can be easily
operated with the touch of a button
distyNotruf NEO
is the direct connection to your
trusted contacts
You determine who you would like to speak to directly in the
case of an emergency. You may pre-programm up to 5 telephone
numbers. For this, distyNotruf NEOmustberstsubscribed
into the DECT base station of your telephone (see page 23).
Once you have pressed the alarm button, distyNotruf NEO
dialstherstofyourpre-programmedtelephonenumbersand
you can speak directly as soon as the receiver answered the
incomingphonecall.Thereceivermustconrmtheiracceptance
of the call by pressing the “#” key on their telephone. If this
conrmationisnotreceivedbecausethereceiverisnotthere,
the line is engaged or the answer machine is triggered, then
distyNotruf NEO automatically calls the next pre-programmed
number until the emergency call is personally accepted and
conrmed.

22 Operating instructions Operating instructions 23
distyNotruf NEO
as a telephone with
hands-free function
distyNotruf NEO can also be used as a telephone.
All incoming calls can be accepted with a single touch of a
button. You are now contactable from any place in your home.
distyNotruf NEO can even be used in the garden or the
cellar.* distyNotruf NEO is spray-proof and can even be
used in the shower.
distyNotruf NEO
is worn
just like a wristwatch
When feeling unwell/
frightened, if you have
health problems,
are attacked, fall, etc.,
you can communicate
immediately with the
touch of a button.
* up to 50 metres from the base station within buildings
EN EN
Commissioning
Andthreesimplestepsareallthatareneededtocongure
and activate the device: charge, register with the base station,
enter the alarm number(s).
Charging
Before putting into operation, distyNotruf NEO must be fully
charged (at least 4 hours). First, attach the charging lead
to the distyNotruf NEO and connect to the mains adapter
and then plug it into the socket. distyNotruf NEO is fully
charged when the red LED is off.

24 Operating instructions Operating instructions 25
Subscribe and pre-programm the alarm numbers
The “ProgrammerApp” can be used to simply and quickly
register the device with a base station and pre-programm the
alarm number(s). Simply connect the distyNotruf NEO to a
PC using the USB cable.
With the “ProgrammerApp” (for Windows 7/8/10), which
can
be obtained from www.disty.de, you can pre-programm
the
telephone numbers on the device and register distyNotruf
NEO with your DECT phone. The “ProgrammerApp” is also
used to deregister the device or reset individual parameters.
Allcongurationoptionscanbefoundintheuserguidefor
the “ProgrammerApp”, which you can download as a PDF
togetherwiththeinstallationle.
If no PC is available at hand, you can also register the
device and pre-programm the alarm number(s) by phone
(see chapter “Tips & tricks”, from page 31)
distyNotruf NEO
is now operational.
EN EN
Mode of operation
Make a direct call
Press the alarm button. distyNotruf NEO is now calling the
rstofthepre-programmedtelephonenumbers.TheredLED
ashesandshowsthattheconnectionisbeingestablished.
Contact chain/alarm conrmation
The acceptance of the direct call
mustbeconrmedbythereceiver
(acknowledged) by them pressing
the “#” button on their telephone after
answering the incoming phone call.
The person being called will receive a
messagerequestingthemtoconrm.
This spoken phrase is available in several
languages.Iftheemergencycallisnotconrmed
within 20 seconds, distyNotruf NEO automatically
calls the second number and, if this is not accepted, the next
pre-programmed number. This is repeated until personal
contact to a trusted person has been established.
#
This key must be pressed
by the receiver of your call in
order to accept the direct call.
(This ensures that an answering
machine does not accept the
call). Please inform your
trusted contacts!

26 Operating instructions Operating instructions 27
Cancelling a direct call/an alarm
If you accidentally trigger an alarm, simply press the
alarm button again.
Accepting calls
All incoming calls can be conveniently accepted via the
button. The
distyNotruf
NEO signals an incoming call with
agreenashingLEDandbeeps.
Range warning
If you move to the limits of the distyNotruf
NEO
range, an
alert will sound (only during phone call).
Alignment of the user interface
Integrated microphone
and LED
Button for
emergency
call and call
acceptance
Integrated
loudspeaker
EN EN
Troubleshooting
When I press the alarm button to trigger an alarm call,
nothing happens.
-CheckwhethertheLEDisashingred.
Your distyNotruf NEO is not connected to the base
station. Be aware that you must be within the range of
the base station/max. range: 50 m.
- Check whether distyNotruf NEOissufcientlycharged.
If necessary, charge it using the supplied charging lead at
a power outlet.
I can trigger the alarm, but cannot make contact.
- Make sure that the distyNotruf NEO is within the recep-
tion range of the base station (up to 50 m in the house
and up to 300 m outdoors).
- Check whether distyNotruf NEOissufcientlycharged.
- There could be a telephone network problem. If you also
cannot make a connection using your normal telephone,
then there is a telephone network error.

28 Operating instructions Operating instructions 29
Charging mode
LED/tone
Connect to the
charging lead Signal tone,
red LED lights up once
Connected to the
charging lead TheredLEDashesduring
the charging process and
disappears when the charg-
ing process is complete
(ashingrhythmoncea
second)
Mode
LED/tone
Battery low RedLEDashesevery
30 secs., signal tone
Subscribed,
registered GreenLEDashesonce
every 10 secs.
Subscribed, out-
side the range/
no base station
RedLEDashesevery
second
DECT
connection Green LED lights up
Alarm RedLEDashesquickly
Incoming call GreenLEDashes,
signal tone once
Range (limit) RedLEDashesquickly,
signal tone
EN EN
Wearing options
The distyNotruf NEO can be worn on the
body in three different ways:
Option 1:
Attachment the
distyNotruf NEO
to the wrist
The wrist strap is pre-assembled in the
factory. The distyNotruf NEO should be
attached to the wrist so that the charging
socket faces the body. The shorter end of
the strap should be pulled through the
opening of the other half of the strap and
tightened against the wrist. Both pins on
the closure must be pressed into the
opposing holes and clicked into place.
In case of disassembly, from the outside
of the hole, press with a pin or paper clip
on the spring bolt so that this is pressed
together and can be removed from the
hole. If the length and closing mechanism
of the pre-assembled armband are not
appropriate, you can replace it with the
second armband provided.

Option 2:
Attachment using the belt clip
Remove the wrist strap (see paragraph
in Option 1) Remove the spring bolts
from the wrist strap and insert a spring
bolt on the side of the charging socket.
Press through the centre lug of the clip
until it reaches the underside of the clip
and slide under the mounted spring
bolt. Slide the second spring bolt into
the clip. Bring the clip almost into its
end position while sliding one side of
the spring bolt into the hole provided.
Press the second side of the spring bolt
towards the clip, thus pressing the clip
intoitsnalposition.
Option 3:
Attaching using the neckband
First of all, mount the clip as described
above. Slide the lanyard strap under
the outer lug.
30 Operating instructions Operating instructions 31
EN EN
Tips & tricks
Switch device off
If you do not need the device for a longer period of time
(e.g. when away on holiday), you can switch it off completely.
- connect the
distyNotruf NEO
with the voltage-supplied
charging lead, the red LED will then shine and an acoustic
signalwillringouttoconrmitisconnected
- after 5 seconds at the latest, press and hold the alarm button
- now remove the voltage-supplied charging lead and let go
off the button at the same time
Personal alarm
This feature is not available in all devices.
Although the device only has a single button, it is still possible
toringaspecicsecondalarmnumber.Therequiredsettings
for this can be found in the “ProgrammerApp” under the
tab„Conguration2“.
To dial this second number, you need to press the emergency
callbuttontwiceandquickly.Therstemergencycallnumber,
which is activated by pressing the button for at least 1 second,
is not affected by this.

32 Operating instructions Operating instructions 33
Conguring the device without the
“ProgrammerApp” (PC)
Subscription
Start the process on the base station of your normal DECT
telephone for registering a further mobile handset (see the
operating instructions of your base station).
Connect the charging lead to the distyNotruf NEO and then
plug the cable into a power supply. Now press and hold the
button until the green LED starts to shine (10 seconds). Release
the button within 5 seconds. The green LED will now start
ashing,whichmeansthedistyNotruf NEO is looking for a
base station that it can register with.
After successful registration, a loud acoustic signal will ring out.
This means the registration process has been completed.
“First incoming call”(onlysavetherstemergencynumber)
–>
voltage-supplied
charging lead not plugged in
Ask the person (e.g. a family member, neighbour), who you
want to reach after pressing the button, to call you. Following
this the telephone number of the caller (CLIP) will be saved as
an emergency number after registration has been completed.
You will know that the emergency number has been saved
successfully when the distyNotruf NEO ends the connection
as soon as the call has been accepted.
EN EN
Programm all alarm numbers
To programm the alarm numbers by telephone, proceed as
follows (a new call is needed to save each individual alarm
number):
- Call your
distyNotruf NEO
from a normal telephone or
a mobile phone (not an internal call from another mobile
handset to the same base station)
- Accept the call with your
distyNotruf NEO
. In order to
avoid acoustic feedback, try to ensure the telephone and
the
distyNotruf NEO
are not in the same room when
programming the device.
- Enter the following numbers on the telephone, whereby
„xxxx“ relates to the phone number you want to save.
When saving, any existing entries will be overwritten.
- For the 1st alarm number: **9 [wait 1-2 sec.] 2xxxxx #
For the 2nd alarm number: **9 [wait 1-2 sec.] 61xxxxx #
For the 3rd alarm number: **9 [wait 1-2 sec.] 62xxxxx #
For the 4th alarm number: **9 [wait 1-2 sec.] 63xxxxx #
For the 5th alarm number: **9 [wait 1-2 sec.] 64xxxxx #
- End the connection

34 Operating instructions Operating instructions 35
Reset/Unsubscribe
Thesettingsconguredbyyoucanberesettotheoriginalfactory
settings. The emergency numbers that have been programmed
are not removed, however. The registration details of the base
station are deleted. This means you will have to reregister the
device with a base station before you can use it again.
Please complete the following steps to do this (the
distyNotruf NEO
must be registered with the base station):
- Connect the
distyNotruf NEO
with the voltage-supplied
charging lead, the red LED will then shine and an acoustic
signalwillringouttoconrmitisconnected
- After 5 seconds at the latest, press and hold the alarm button
for 10 seconds – the green LED will start to shine
- Release the alarm button before the LED switches off again
(within 5 seconds)
-
A tone can be heard and the red LED will start to shine
- Remove the
distyNotruf NEO
from the voltage-supplied
charging lead
- The
distyNotruf NEO
switches itself off
To reset your
distyNotruf NEO
to factory adjustment, use the
“ProgrammerApp” to do this.
EN EN
Technical data
DECT/GAP, EN 300 444 (Frequency range and transmission
power: compliant with standards of EU/EFTA/AUS)
Compatible with all consumer DECT/GAP base stations and
all professional DECT systems
Compatible with FRITZ!Box and Speedport Neo
Button for distress calls and operation
LED Power indicator (in two colours)
Microphone and speaker
Standby time: >120 hours | Speaking time: >4 hours
Interface for programming
USB cable, Type A — USB, Type C
System requirements: Windows 7/8/10
Lithium-Ion battery, capacity: 450 mAh
Operating temperature: -10°C to +40°C
Storage temperature: -10°C to +60°C
Weight approx. 46 g (incl. wristband)
Plastic housing, 56mm x 42mm x 14mm, Colour: anthrazite
Protection class: IP 65
Declaration of conformity
We, disty communications GmbH, declare that distyNotruf NEO
conforms to the basic requirements and other relevant terms of
the 2014/53/EU guidelines (Radio Equipment Directive; RED).
TheconformityisconrmedbytheCEsymbol.
The full declaration of conformity can be viewed on
our website: www.disty.de
Professionaluserswillndadditionalinformationin
the service section of our website www.disty.de.

36 Operating instructions
Mode d‘emploi
37
Safety information
Please observe the following safety information and check the
packagingcontentsbeforerstuse.
1. distyNotruf NEO is intended to be used for communication
as part of a DECT installation.
2. Please keep the operating instructions for future reference.
3. Use only a damp cloth for cleaning the device.
4. Do not use the device in extreme environmental conditions.
5. distyNotruf NEO
is spray-proof and can be used in the shower.
Do not submerge in water.
6. Never hold the device directly to your ear! The acoustic pressure
of the loud speaker could damage your hearing.
7. Only use the supplied mains adaptor for charging the device.
8. The device is powered with a lithium-ion battery. Fully charge
distyNotruf NEO at regular intervals.
9. Forcongurationuseonlythedescribedequipment.
10. Do not attempt to disassemble or repair the device yourself.
All maintenance and repairs must be carried out by well-trained
andqualiedpersonnel.
Further information and contacts are
available at: www.disty.de
Help & Contact: distynotruf@disty.de
EN
Table des matières
distyNotruf NEO 38
Mise en service 40
Recharger 40
Enregistrer et sauvegarder des numéros d’alarme 41
Mode de fonctionnement 42
Passer un appel direct 42
Conrmationdelachaînedemessages/alarme 42
Annulation d’un appel directe /alarme 43
Répondre aux appels 43
Avertissement de portée 43
Disposition de l’interface utilisateur 43
Dépannage 44
Variantes de porter 46
Trucs et astuces 48
Eteindre complètement l’appareil 48
Alarme de personnel 48
Congurationdel’appareil
sans «ProgrammerApp» (PC) 49
Réinitialiser/Retirer 51
Caractéristiques techniques 52
Déclaration de conformité 52
Consignes
de sécurité 53
FR

Toutes des félicitations!
Avec distyNotruf NEO, vous avez fait l’acquisition
d’un accessoire téléphonique DECT/GAP qui
vous utilisez très facile par simple pression sur
un bouton.
distyNotruf NEO est la connexion direct avec vos
personnes de conance
Vous déterminez à qui vous voulez parler directement en cas
d’urgence. Jusqu’à 5 numéros de téléphone peuvent être
mémoirer. Pour ce faire, distyNotruf NEO doit d’abord être
enregistré dans la station de base DECT de votre téléphone
(voir p. 40).
Dès que vous appuyez sur le bouton d’alarme, distyNotruf
NEO
compose automatiquement le premier des numéros de télé-
phone programmés. Vous pouvez parler directement dès que
ledestinataireaacceptél’appel.Ledestinatairedoitconrmer
l’acceptation de l’appel en appuyant sur la touche «#» de son
téléphone. Si cette confirmation ne s’est pas passer parce que le
destinataire n’est pas présent, est occupé ou que le répondeur
saute, distyNotruf NEO compose automatiquement le prochain
numéro enregistré jusqu’à ce que l’appel d’urgence soit répondu
personnellementetconrmé.
38
Mode d‘emploi Mode d‘emploi
39
distyNotruf NEO comme téléphone mains libres
Vous pouvez également utiliser distyNotruf NEO comme
téléphone. Tous les appels entrants peuvent être répondus en
appuyant sur un bouton. Ainsi, vous pouvez être contacté en
tout temps, de n’importe où dans votre maison. Vous pouvez
même utiliser distyNotruf NEO dans le jardin ou au sous-
sol.* distyNotruf NEO est protégé contre les jets d’eau et
peut également être utilisé sous la douche.
distyNotruf NEO simple
à porter comme
une montre-bracelet
Sur simple pression d’un
bouton vous communiquez
immédiatement en cas
d’indisposition ou anxiété,
problèmes de santé, vol,
chute, etc.
* jusqu‘à 50 mètres de la base dans les bâtiments
FRFR
Other manuals for Notruf Neo
2
Table of contents
Languages:
Other Disty Emergency Phone manuals
Popular Emergency Phone manuals by other brands

Talkaphone
Talkaphone VOIP-500E Quick installation guide

Nortek
Nortek Linear PERS-4200 installation instructions

Ocean Signal
Ocean Signal EPIRB2 user manual

Future Call LLC.
Future Call LLC. Emergency 911 user manual

GAI-Tronics
GAI-Tronics PHP400 Installation and user guide

ASCOM
ASCOM Care Phone GSM Programming and installation manual

Eldat
Eldat Easywave Fon Alarm operating instructions

Assistive Technology Services
Assistive Technology Services TOUCH N TALK FD Advanced user's guide

ANEP
ANEP LIGAN Connection instruction

Viking
Viking E-1600A-TP-EWP Technical practice

TeleCare
TeleCare TE-4000 user guide

switel
switel Powertel TF 52 operating instructions