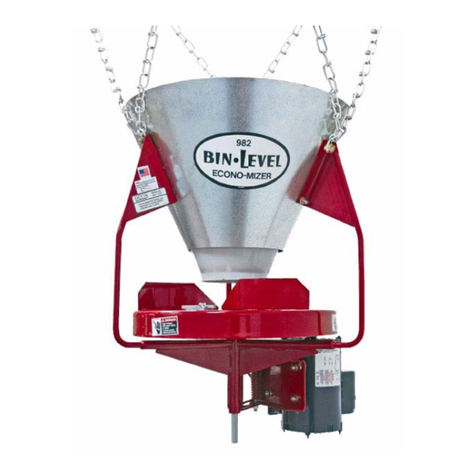
DMC Econo-Mizer 982 User manual

OWNER’S MANUAL
ECONO-MIZER
GRAIN SPREADERS
MODELS
982, 986 & 996
DAVID MANUFACTURING COMPANY
1600 12th Street NE, Mason City, Iowa 50401 USA

TABLE OF CONTENTS
!CAUTION! Maintenance and Service I
!CAUTION! Operation II
EC Declaration of Conformity
Decal Placement III
Electrical Wiring 1
Installation 2
Adjustment & Operation of Cone Hopper Baffle 3
Wiring Diagrams
Single Phase Control Circuit 4
Three Phase Control Circuit 5
Parts Listing 6 - 7
TroubleShooting 8
Warranty 9
○○○○○○○○○○○○○○○
○○○○○○○○○○○○○○○○○○○○○○○○○○○
○○○○○○○○○○○○○○○○○○○○○○○○○○○○○○
○○○○○○○○○○○○○○○○○○○○○○○○○○○○○○○○
○○○○○○○○○○○○○○○○○○○○○○○○○○○○○○○○○○○○
○○○○○○○○
○○○○○○○○○○○○○○
○○ ○○○○○○○○○○○○
○○○○○○○○○○○○○○○○○○○○○○○○○○○○○○○○
○○○○○○○○○○○○○○○○○○○○○○○○○○○○○○○
○○○○○○○○○○○○○○○○○○○○○○○○○○○○○○○○○○○○○

Maintenance and Service
It is essential in undertaking any maintenance or servicing of the Grain Spreader that a safe
system of work is strictly followed. Failure to do so may result in serious injury to the opera-
tor. Before carrying out any work on the Grain Spreader:
Stop the Grain Spreader and all other machines operating in the bin.
Ensure the isolator switch is locked into the “off” position, with the only key in your possession.
Due to the position of the Grain Spreader in a bin, access to it for maintenance may be hazardous.
If access to the Grain Spreader is required when the bin is completely empty, always lower the Grain
Spreader to the bin floor to perform maintenance and repair.
Caution needs to be exercised when using a ladder to perform service work in a partially filled grain bin.
The ladder can sink into the grain allowing it to fall. Secure the top of the ladder to the bin.
Notice of Noise and Dust Hazard: The Grain Spreader runs at noise levels below 70 db and should
not present any problems.
Decals indicating the possibility of dust are provided in the owners manual bag and should be installed per
the diagram shown on page III. Dust may be created as a normal part of the spreading function of the
Grain Spreader ,and although no person should be in the bin during the spreading operation, some
residual dust may remain in the air after the Spreader has been turned “OFF”. The level of dust will vary
depending on the condition of the grain. Operators should assess the risk to themselves and others, as
required in the EU under the Control of Substances Hazardous to Health Regulations.They should then
implement appropriate control measures to reduce the risks to health.
Before starting the Grain Spreader, ensure that there is no one remaining in the bin and that the bin
access door is locked closed.
I

Before operating, familiarize yourself with the machine. It will help you
operate your Grain Spreader more efficiently, with better quality
returns to you.
FOR SAFETY SAKE
1. Read and understand the owner’s manual
2. Keep all safety shields in place.
3. Prior to inspecting, servicing, lubricating or adjusting the Grain Spreader,
ensure the isolator switch is locked in the “OFF” position, with the only key
in your possession.
4. Before operating your Grain Spreader, familiarize yourself with the machine.
Know how to operate and adjust it. This will enable you to get maximum
efficiency from the equipment, plus better quality grain as a result.
5. All electrical wiring should be in accordance to BS7671:1992. Be sure
equipment and bins are properly grounded.
6. The 982, 986 and 996 Grain Spreaders are designed to distribute grain in
round bins. Contact DMC for recommendations on using these Spreaders
for other materials and conditions
OPERATION
II

EC DECLARATION OF CONFORMITY
David Manufacturing Company
1600 12th Street NE
Mason City, Iowa 50401
USA
Declares that:
Machine Name: Grain Spreader
Type/Model: Econo-Mizer 982/986/996
Machine description/uses:
The primary function of the Grain Spreader is to distribute grain as evenly as possible
across the diameter of a grain bin during the filling process.
Conforms to the EC Directive 89/392/EEC, (amended by Council Directive 91/368/EEC),
the Machinery Directive, and in particular, the Essential Health and Safety Requirements
that apply to it. Specifically to:
Schedule 1: General Points
Signed
Keith Braun
for David Manufacturing Company
3067004

THE DECALS ON THIS PAGE MUST BE DISPLAYED AS SHOWN
Replacements are available upon request. Write to the following address:
David Manufacturing Company, 1600 12th Street NE, Mason City, Iowa 50401 USA
Please note: 1. The decals on this page are not actual size.
2. Keep all decals wiped clean at all times.
3. All decals must be replaced if they are destroyed, missing,
painted over or can no longer be read.
104L0014
On Spreader Pan
1067021
On Spreader Support Arm
1067020
1067023
♦
♦
♦
♦
III

ELECTRICAL WIRING
The DMC Grain Spreader is shipped without wiring installed in the
machine. A qualified electrician should install wiring that complies with
standard BS-7671:1992.
Electrical power to the Stir-Ator should be supplied through a single
lockable switch. A magnetic “ON/OFF” switch that defaults to “OFF”
with a power interruption should be installed outside of the bin as the
start switch for the Grain Spreader. These items are not furnished by
DMC. Awiring diagram of a recommended example of the control
circuit is shown on pages 26 and 27.
1

INSTALLATION
Figure 1: Hanger Brackets and Chains
The hanger brackets should be positioned
equally spaced around the outer fill hole lip
of the bin. Do not tighten the bracket
hardware until the spreader has been
installed and leveled. Hang the spreader from
these brackets by hooking the two chains that
are attached to each of the spreader support
arms to two adjacent hanger brackets. When
properly hung, each set of chains will form a
“V” and will restrict random movement of the
spreader.
The spreader can be installed at various
heightsin the bin depending on the bin
diameter and roof angle. The spreader
should be installed as level as possible by
checking with a level and adjusting the
position of the hanger brackets and/or the
lengths of the chains.
Finish the installation by securely tightening
the hanger brackets.
Wiring: Refer to the Wiring Diagram and
Tables A & B on the next page.
ADJUSTMENT & OPERATION
Figure 2: Slide Gate Adjustment
The slide gates are provided in the pan to allow grain to be spread in the center of the bin. These are
usually open wider for smaller diameter bins.
Figure 3: Center Hopper Baffle Adjustment
It is important that the incoming grain be directed onto the center of the hopper baffle in order to disperse
the grain evenly in the hopper. This baffle functions as a flow control and can be adjusted by lifting it from
the spreader and placing the hairpin clip in one of the holes in the baffle post. The baffle needs to be
adjusted higher above the spreader pan for greater capacities and lower for lesser rates. Best spreading
results are obtained when the baffle is adjusted to maintain a cushion of grain in the hopper.
Item 4: Adjustment Slinger
982, 986 & 996 Econo-Mizers have slingers that can be adjusted to accommodate various sizes of bins
and grain densities. The slingers will throw grain farther when in the most advanced position (hole #1) and
will not throw as far when in the swept back position (hole #3). A guide line to use for adjusting is to use
the third hole for 18 foot diameter bins, the middle hole for 24 - 30 foot bins and the first hole for 33 foot and
larger bins.
2
Fig. 1
Fig. 3
Fig. 4 Fig. 2

Spreading Capacities
Econo-Mizer 982 986
Heavy Grain 18’ - 30’ 31’ - 48’
2500 BPH
Heavy Grain 18’ - 27’ 28’ - 42’
3500 BPH
Light Grain 18’ - 24’ 25’ - 36’
3500 BPH
ADJUSTMENT & OPERATION OF
CONE HOPPER BAFFLE
The cone hopper baffle is used to restrict the entering grain and slow it down enough to ensure
that the cone will always be full and overflowing with grain. The cone baffle should be adjusted
high enough above the spreading pan to allow the overflowing grain to flow between the hop-
per and the cone baffle and to not flow over the sides of the main hopper. Entering grain
should be directedonto the expanded metal restrictor on top of the cone baffle.
3
305B007(982,986)
306B1001(996)
ECONO-MIZER
CONE BAFFLE

4

5

MODELS 982, 986 & 996 ECONO-MIZER GRAIN SPREADERS
Routine Maintenance & Inspection
NOTE: It is easier and safer if this is done with the Spreader lowered to the bin floor.
Make sure all power to all bin machinery is “OFF”!
A. Check pan bearing for wear (item #14).
B. Check rubber drive wheel for wear (item #2)
C. Check pan for cracks & wear (item #8)
D. Check motor mount pivot bolts (item #30) for wear
E. Check motor wire & connections (item #12)
6

7
*
Not Provided by DMC.
*

Grain is high on
one side of bin.
a. Spreader is not hung level.
b. Grain is not hitting the center of the baffle
c. The baffle is too high causing the grain to slide off one side.
d. The flow of grain is not adequate to fill the center
hopper, see instructions for cone baffle hopper.
Grain is high at the
center of bin.
a. Slide gate is open too far.
b. Check to make sure spreader is running.
c. Grain is overflowing the main hopper - raise center baffle
or slow grain flow rate.
Grain is low at the
center of bin.
a. Slide gate is not open enough.
b. Slingers on pan are set too far out.
Grain forms “donut”
a few feet from wall.
a. Slingers on pan are set too far out (grain is hitting the wall
and bouncing back).
b. Open slide gate to fill center of bin.
c. Spreader model is not adequate for bin size.
Grain not getting
all the way to wall.
a. Spreader pan is turning the wrong direction: Pan should
turn clockwise when viewed from the top.
b. Rubber drive wheel is slipping - replace if badly worn.
c. Spreader is hanging too high in the center of the bin.
d. Spreader model is not adequate for bin size.
Spreader swings
when starting. a. Hanging chains are not installed correctly - they should
be equally spaced and positioned as in Figure 2 of
instructions.
Spreader does
not run. a. Rubber drive wheel may be slipping due to excessive
moisture or broken motor mount spring.
b. Motor overload may have tripped.
c. Blown fuse or circuit breaker.
d. Too much voltage drop. Motor may have failed.
TROUBLE SHOOTING
PROBLEM CORRECTION
a. Spreader pan is turning the wrong direction: Pan should
turn clockwise when viewed from the top.
Spreader pan slows
down when loaded.
8

WARRANTY
The Econo-Mizer Grain Spreader is guaranteed for one year from date of
purchase to be free of defects in materials or workmanship when properly
serviced and operated in accordance with the instructions. Warranted parts
willbe exchangedFOB Mason City,Iowa without chargeto theuser. Damage
resulting from negligence voids the warranty. Warranty does not include
labor, installation or the delivery of replacement parts.
Electric motors are covered by the warranties of the respective manufactur-
ers. Electric service centers are located in all regions. Consult with your
dealer.
The manufacturer reserves the right to make changes in specifications or
prices without incurring obligation on previously produced merchandise.
9

ECONO-MIZER
GRAIN SPREADER
OWNERS MANUAL
PrintedinUSA PNEG-1168
Rev 03/02
Print 01/01
This product conforms to the EC Directive 89/392/EEC (amended
by Council Directive 91/368/EEC), the Machinery Directive, and in
particular, the Essential Health and Safety Requirements that apply
to it, specifically, Schedule 1: General Points.
David Manufacturing Company
1600 12th Street NE
Mason City, Iowa 50401
USA
Phone: 641-424-7010
Fax: 877-362-8238
Other manuals for Econo-Mizer 982
2
This manual suits for next models
2
Table of contents
Other DMC Spreader manuals
Popular Spreader manuals by other brands
Gandy
Gandy 24H13 Parts and assembly manual
Metal-Fach
Metal-Fach N 267 OPERATING INSTRUCTIONS, PARTS CATALOGUE
SnowEx
SnowEx K1-131116 Owner's/operator's manual

Branick
Branick EF/HD Installation, Operation & Repair Parts Information
Jula
Jula Hard Head 709-197 User instructions

Master Gardner
Master Gardner S-50 Assembly manual
