DNIPRO M PM-125CS Guide

en The original safety and operation instructions for the polisher 3
pl
cs
lv
sk
hu
PM-125CS

1
2
4 5
8
9
11
6
3
7
10
+
-
5
6
А
В
1
2 4
3С
2
1
3
А
2
1
4
3
С
В
5
А
С
В
3
4
2
1
1
2
2 1
1
I
ON
I
OFF
0
1
0
А
ON
I
OFF
0
+
-
5
6
А В
15o
1
2
4
3
5
67
8
109

3
EU-PM0823001–0823001
en
en The original safety and operation instructions for the polisher
CONTENT
1. GENERAL SAFETY PRECAUTIONS WHEN USING POWER TOOLS............................. 4
2. POLISHING MACHINE SAFETY INSTRUCTIONS......................................................... 5
3. CONVENTIONAL SINGS .............................................................................................7
4. SCOPE OF SUPPLY.....................................................................................................7
5. PURPOSE AND APPEARANCE OF THE POWER TOOL ................................................7
6. TECHNICAL DATA ..................................................................................................... 8
7. PREPARATION FOR WORK........................................................................................ 9
8. WORK WITH THE POWER TOOL..............................................................................11
9. SERVICE....................................................................................................................11
10. STORAGE AND TRANSPORTATION .......................................................................... 12
11. DISPOSAL ................................................................................................................ 12
12. POSSIBLE FAULTS AND METHODS OF THEIR ELIMINATION ..................................... 12
14. DECLARATION EC DECLARATION CONFORMITY .................................................... 13

4EU-PM0823001–0823001
en
Dear Buyer!
Thank you for purchasing a power tool of
the "DNIPRO M" brand, which is charac-
terized by a progressive design and high
quality of execution. The power tool you
purchased belongs to a line that com-
bines modern design solutions and high
productivity with a long time of continu-
ous work. We hope that our products will
become your assistant for many years.
1. GENERAL SAFETY
PRECAUTIONS WHEN USING
POWER TOOLS
WARNING!
Warning. Read all safety warnings
and all instructions. Failure to fol-
low warnings and instructions may
result in electric shock or fire and/
or serious injuries.
Save all warnings and instructions for fu-
ture reference.
The term "power tool" in the warnings re-
fers to your mains-operated (corded) or
battery-operated (cordless) power tool.
Safety at the workplace
a) Keep your workplace well lighted and
clean. Clutter and poor lighting can lead
to accidents.
b) Do not use the power tool in an ex-
plosive environment, near flammable liq-
uids, gases or dust. Power tools generate
sparks that can ignite dust or fumes.
c) Do not allow children and strangers to
work with the power tool. Lack of atten-
tion can lead to loss of control over the
power tool.
Electrical safety
a) The plug of the power cord of the
power tool must match the outlet. Never
modify the plug. Do not use any adapter
plugs for grounded power tools. Use un-
modified plugs that fit the outlet. This re-
duces the risk of electric shock.
b) When working with power tools, do
not touch grounded surfaces: pipes, ra-
diators, electric stoves and refrigerators.
There is a high risk of electric shock if the
body is grounded.
c) Do not expose the power tool to rain
or moisture. If moisture gets into the
power tool, electric shock is possible.
d) Use electrical cords only for their in-
tended purpose. Never use the power
cord to carry, pull, or unplug the pow-
er tool. Keep cord away from heat, oil,
sharp edges and moving parts. A dam-
aged or tangled cord increases the risk
of electric shock.
e) When using power tools outdoors, use
extension cords that are suitable for outdoor
use. Using the appropriate wire in open ar-
eas reduces the risk of electric shock.
f) If the use of the power tool in a wet en-
vironment is unavoidable, use a residual
current protection device (RCD). The use
of RCD reduces the risk of electric shock.
Personal safety
a) Be careful and watch your actions
when working with power tools. Do not
use a power tool if you are tired or if you
have taken drugs, alcohol or medication
the day before. The slightest inattention
can lead to injuries.
b) Use personal protective equipment.
Always use eye protection. Protective
equipment such as a respirator, non-slip
footwear, helmet or hearing protection
used in appropriate conditions can re-
duce the risk of injury.
c) Prevent accidental starting of the
equipment. Before connecting to the
power source and/or battery, when lift-
ing or carrying the tool, make sure the
switch is in the off position. If you car-
ry the power tool with your finger on the
switch, or turn on the power while carry-
ing it, it may cause an accident.
d) Before turning on the power tool, re-
move the adjusting wedge or tool key.
An adjustment wedge or tool key left on
a working power tool can cause injury.
e) Don't be too tense. Always stand firmly
on your feet and keep your balance. In this
way, you will be able to better handle the
power tool in unexpected situations.
f) Dress appropriately. Do not wear loose
clothing or jewelry. Keep hair, clothing
and gloves away from moving parts.
Loose clothing, jewelry or long hair can

5
EU-PM0823001–0823001
en
2. POLISHING MACHINE SAFETY
INSTRUCTIONS
General safety precautions for
polishing operations
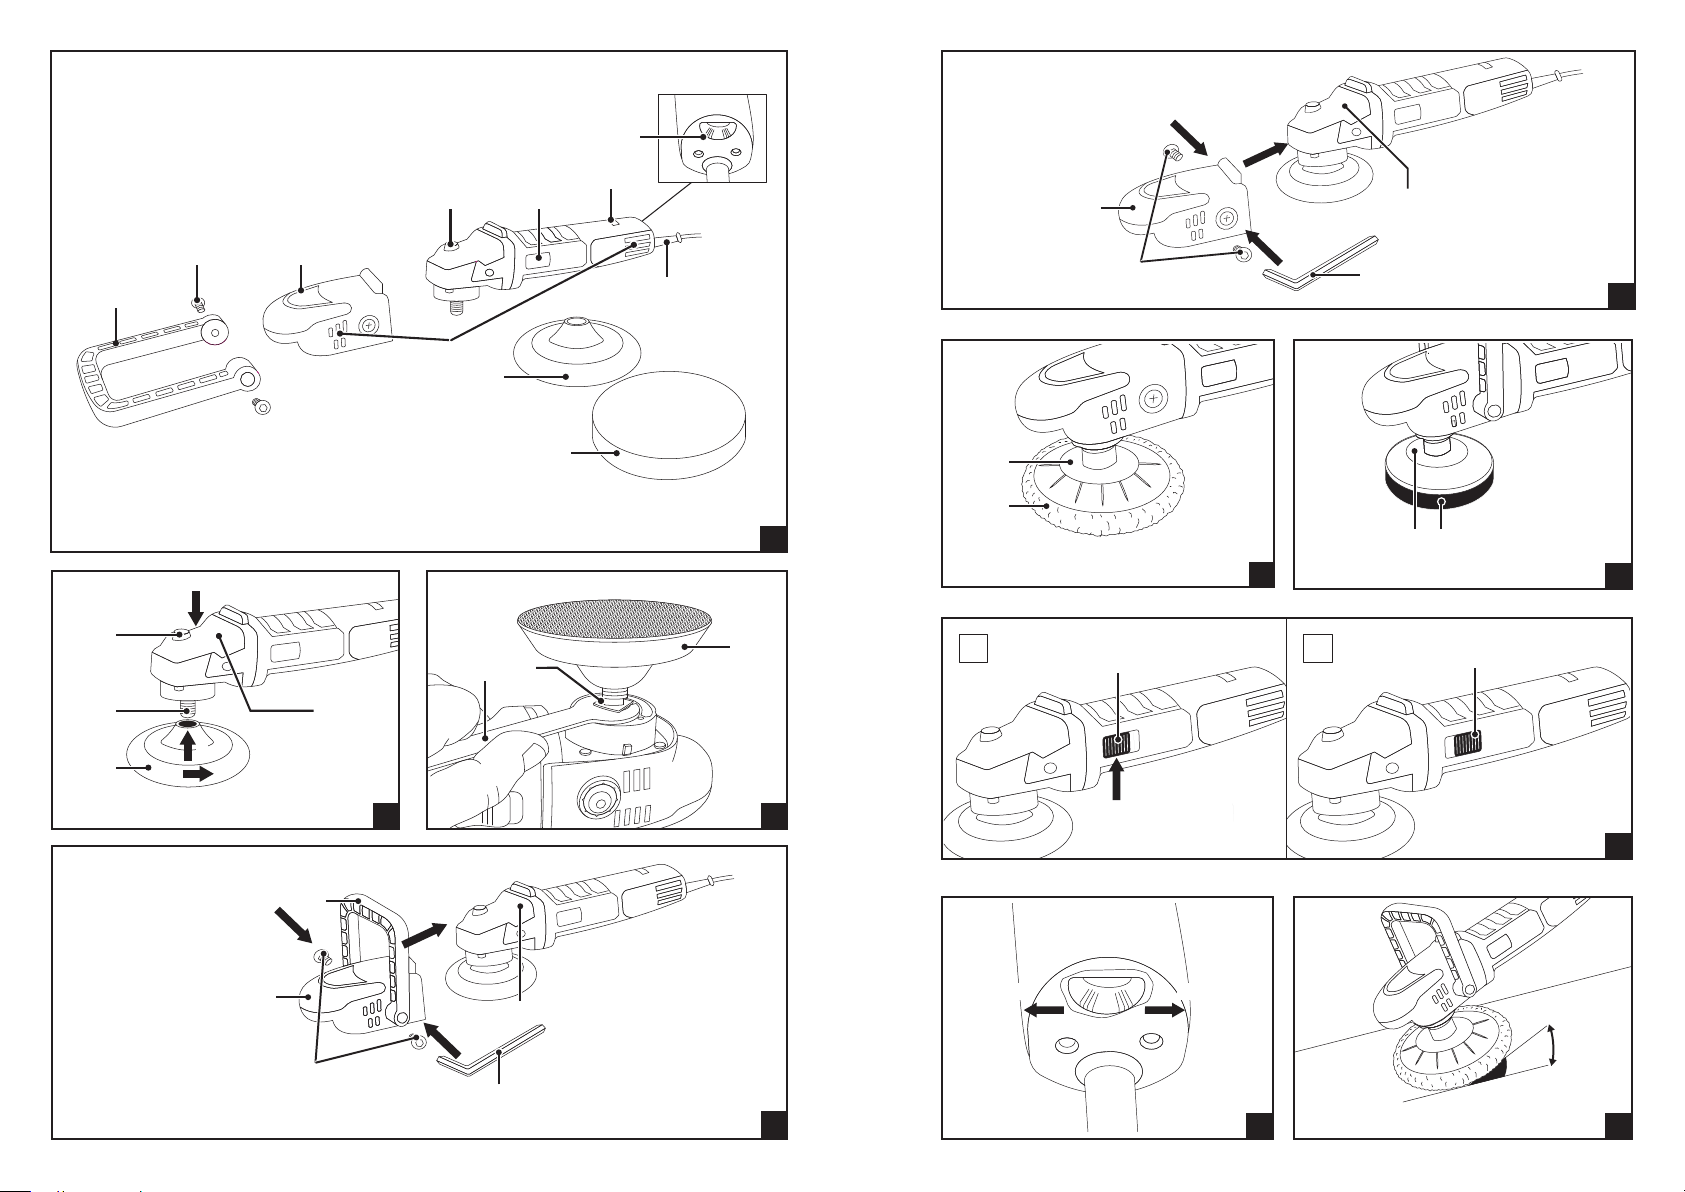
a) This power tool is designed to work as
a polishing tool. Read all safety warnings,
instructions, illustrations and specifica-
tions supplied with this power tool. Fail-
ure to follow all of the instructions below
could result in electric shock, fire, and/or
serious injury.
b) This power tool is not recommended
for operations such as sanding, sandpa-
per grinding, wire brushing or cutting.
Using the wrong power tool can be dan-
gerous and cause injury.
c) Do not use accessories not designed
or recommended by the power tool man-
ufacturer. The ability to connect acces-
sories to your power tool does not guar-
antee safe operation.
d) The rated speed of the accessory must
be at least equal to the maximum speed
marked on the power tool. The acces-
sory, which has a speed higher than the
nominal one, may break and scatter.
e) The outer diameter and thickness of
your accessories must correspond to the
rated power of your power tool. An im-
properly sized accessories cannot be
properly secured or controlled.
f) The threaded attachment of the acces-
sory must match the thread of the spindle
of the polishing machine. If the accesso-
ry is mounted with flanges, the accesso-
ry shaft hole must match the diameter of
the flange. Accessory that do not match
the power tool's mounting hardware will
cause you to lose balance, vibrate exces-
sively and may cause loss of control.
g) Do not use damaged accessories. Be-
fore each use, inspect accessories such
as the disc base for cracks, tears, or ex-
cessive wear. After a power tool or acces-
sory is dropped, inspect it for damage or
install an undamaged accessory. After in-
specting and installing the attachment,
the operator and bystanders must be at
a safe distance from the plane of rotation
of the attachment. The power tool must
be turned on at maximum speed without
be caught in moving parts.
g) If you have dust collectors and dust
collection devices, ensure they are con-
nected and used properly. You can re-
duce the danger by using a dust collector.
Use and maintenance of power tool
a) Do not apply force to the power tool.
Use the right power tool for your pur-
pose. With a power tool used as intend-
ed, the job can be done better and saf-
er and at the speed for which the tool is
designed.
b) Do not use a power tool with a faulty
power switch. A power tool with a faulty
switch is dangerous and should be re-
paired immediately.
c) Before making adjustments, changing
accessories or storing the power tool,
disconnect it from the power source
and/or battery. Such preventive safety
measures reduce the risk of accidentally
starting the power tool.
d) Keep the power tool that you are not
using in a place out of the reach of chil-
dren and do not allow people who are
unfamiliar with it and have not read this
manual to work with it. Power tools be-
come dangerous in the hands of an un-
trained user.
e) Maintain your power tool. Check the
absence of misalignment or jamming of
moving parts, broken parts and other de-
fects that may affect the operation of
the power tool. If it damaged, repair the
power tool before use. Most accidents
are caused by poorly maintained pow-
er tools.
f) Use the power tool, accessories, at-
tachments, etc. in accordance with this
manual and taking into account the work-
ing conditions and features of the work.
Improper use of power tools can lead to
dangerous situations.
Service
a) Power tool repairs should only be per-
formed by qualified repair personnel us-
ing identical replacement parts. In this
way, you will ensure reliable mainte-
nance of the power tool.

6EU-PM0823001–0823001
en
load for one minute. During this test time,
damaged accessories usually break.
h) Wear personal protective equipment.
Depending on the application, use a
face mask and safety glasses. If neces-
sary, wear a dust mask, hearing protec-
tion, protective gloves and an apron
capable of protecting against small abra-
sive fragments or workpiece fragments.
Eye protection must protect against de-
bris resulting from various operations. A
dust mask or respirator must filter par-
ticles generated as a result of work. Pro-
longed exposure to high-intensity noise
can cause hearing loss.
i) Bystanders must be at a safe dis-
tance from the work area. Persons in the
work area must wear personal protec-
tive equipment. Fragments of the work-
piece or broken accessories can fly off
and cause injuries outside the immediate
area of operation.
j) Route the power cord away from ro-
tating equipment. If you lose control, the
power cord may be cut or caught, and
your hand may be caught in rotating
equipment.
k) Do not put down the power tool un-
til the accessory has come to a complete
stop. Rotating accessories can catch on
the surface and take the power tool out
of your control.
l) Do not start the power tool while hold-
ing it with the accessory towards you.
Accidental contact with rotating equip-
ment can cause injury.
m) Clean the ventilation holes of the
power tool regularly. The motor fan will
draw dust into the body and excessive
accumulation of powdered metal can
cause an electrical hazard.
n) Do not use the power tool near flamma-
ble materials. They can ignite from sparks.
o) Do not use accessories that require liq-
uid coolers. The use of water or other liquid
coolants may cause injury or electric shock.
Further safety instructions for all
operations
Kickback is the sudden reaction to a
pinched or caught impeller, base disc,
brush or any other accessory. Pinching or
catching causes the rotating accessory
to stop quickly, which in turn leads to un-
controlled movement of the power tool
in the direction opposite to the rotation
of the accessory at the attachment point.
For example, if the workpiece pinches
the edge of a circle that enters the pinch
point, it can sink into the surface of the
material, causing the wheel to protrude
or push out. The circle can jump towards
or away from the operator, depending on
the direction of movement of the circle at
the pinch point. In these conditions, the
circles can also break.
Kickback is the result of improper use of
the power tool or improper conditions; it
can be avoided by taking proper precau-
tions as mentioned below.
a) Hold the power tool firmly and posi-
tion your body and hand so that you can
resist kickback forces. Always use the
assist handle, if provided, for maximum
control over kickback or torque response
when starting. The operator can control
the torque response or kickback force if
proper precautions are taken.
b) Never put your hand near the rotat-
ing accessory. The accessory may push
away from your hand.
c) Do not stand in the place where the
power tool falls when kickback. The kick-
back pushes the power tool in the direc-
tion opposite to the movement of the cir-
cle at the point of engagement.
d) Be especially careful when handling
corners, sharp edges, etc. Avoid bounc-
ing and catching on accessories. Cor-
ners, sharp edges, or ricochets tend to
bind rotating equipment and cause loss
of control or kickback.
Safety precautions for polishing
operations
а) Do not allow loose parts of the pol-
ishing attachment or its cords to rotate
freely. Braid or cut loose cords. Loose
cords and rotating cords can entangle
fingers or catch the workpiece.

7
EU-PM0823001–0823001
en
WARNING!
This manual cannot take into account
all cases that may arise in the real
conditions of operation of the polish-
ing machine. Therefore, it is necessary
to be extremely attentive and careful
when working with an electric tool.
3. CONVENTIONAL SINGS
General caution sign (risk to peo-
ple, explained by an additional sign
or text)
See instruction manual/brochure
Wear hearing protection
Wear eye protection
Wear a mask
Disconnect the power cable be-
fore performing maintenance and
repair work
Alternating current
Do not use during precipitation
IP Degree of protection against wa-
ter and dust
n0Idle speed
ØThe maximum diameter of the circle
МSpindle thread diameter
VNominal voltage
I/OTurning on/off the power tool
Spindle movement direction
Class of protection against electric
shock II
Mark of compliance with technical
regulations (Ukraine)
A special mark that certies that
the product meets the main re-
quirements of EU directives and
harmonized standards of the Euro-
pean Union
The only sign of circulation of
products on the market of mem-
ber states of the Eurasian Eco-
nomic Union
Special disposal (to prevent pos-
sible damage to the environment,
it is necessary to separate this
object from ordinary waste and
dispose of it in the safest way)
4. SCOPE OF SUPPLY
1Polisher 1 pc.
2Disc base 1 pc.
3Polishing circle 1 pc.
4D-shaped handle 1 pc.
5Hex key 1 pc.
6Spindle lock key 1 pc.
7Set of graphite brushes 1 pc.
8Fastening set 1 pc.
9Original safety and operating
instructions
1 pc.
10 Packaging 1 pc.
5. PURPOSE AND APPEARANCE
OF THE POWER TOOL
Purpose
Polisher PM-125CS is designed for polish-
ing glass, plastic, painted metal of cars,
motorcycles, ships, etc.
Appearance (Fig. 1)
1D-shaped handle
2Fixing screws of the handles
3Handle-cover
4Spindle retainer
5Power button
6Indicator
7Speed regulator
8Power cord
9Disc base
10 Polishing nozzle
11 Ventilation holes

8EU-PM0823001–0823001
en
WARNING!
LLC "DNIPRO M" is constantly working on improving its products and in this
regard reserves the right to make changes, both in the appearance, design
and equipment of the polishing machine, and in the content of the safety and
operation instructions, without notice consumers.
All possible changes will be aimed only at improving and modernizing the
power tool.
6. TECHNICAL DATA
Parameters Marking PM-125CS
Nominal voltage V230
Nominal frequency Hz 50
Capacity W750
Working capacity W850
Maximum power W1000
The maximum diameter of the polishing wheel mm 125
Number of speeds 6
Spindle length mm 17,5
The length of the network cable m3
Degree of protection against dust and water IP 20
Class of protection against electric shock II
Spindle thread diameter M14
Weight kg 1,65
Idle speed for each mark
1min-1 800
2min-1 1150
3min-1 1450
4min-1 1800
5min-1 2300
6min-1 2450
General values of noise and vibration levels according to the standard EN 60745–2–3
LpA – sound pressure level dB(A) 77,6
КpA – uncertainty of sound pressure level dB(A) 3
LWA – sound power level dB(A) 88,6
KWA – uncertainty of sound power level dB(A) 3
The total amount of vibration determined according to the standard EN 60745–2–3
ah, AG – equivalent value for polishing mode m/s25,99

9
EU-PM0823001–0823001
en
Parameters Marking PM-125CS
К – uncertainty ah, AG m/s21,5
Additional functions
Light indicator +
Power maintenance function +
Starting current limitation (soft start) +
Speed control +
Revolutions support +
Spindle lock +
Power button lock +
Motor overheating protection +
WARNING!
The parameters are specified for
a nominal voltage of 230 V/50 Hz.
With other voltage values, as well
as in the country-specific version of
the charger, other parameters are
possible.
Information on noise and vibration
Noise and vibration levels are determined
in accordance with EN 60745–2–3.
The declared overall vibration level has
been measured according to a standard
test method and can be used to compare
one power tool with another. The de-
clared overall vibration level can also be
used in preliminary assessments of vibra-
tion exposure.
WARNING!
Transmission of vibration and noise
emission during use of the power
tool may differ from the declared
values depending on how the pow-
er tool is used, especially on the
type of material being processed.
Use personal protective equipment
according to work conditions.
The declared level of noise and vibration
refers to the work for which the power
tool is intended.
7. PREPARATION FOR WORK
WARNING!
Before adjusting or checking the
operation of the polishing machine,
make sure that the power tool is
turned off and the power plug is re-
moved from the outlet.
WARNING!
Using the power tool for other op-
erations and purposes, excessive
overloading or continuous opera-
tion for more than 30 minutes may
cause the polishing machine to fail.
Use only discs and circles designed
for this power tool, the permissible
speed of which is higher than the
maximum speed of the spindle of
the polishing machine.
Unpack the power tool and perform an
external inspection of the scope of sup-
ply for external mechanical damage.
Installation/removal of the base
disc using the spindle lock (Fig. 2)
In the main part of the reducer body (4)
of the electric tool, a spindle lock (1) is
provided, which is used to block the ro-
tation of the spindle during installation or
removal of the base disk (3). Remove the
circles in the reverse order of their instal-
lation:

10 EU-PM0823001–0823001
en
–Press and hold the spindle lock (1) in the
direction (А).
–Screw the disk-base (3) onto the thread
of the spindle (2) in the direction (C) un-
til it stops, turning in the direction (B)
clockwise. Tighten securely by hand.
–Fix the polishing nozzle on the disc-
base.
Installation/removal of the base disc
using the spindle lock key (Fig. 3)
–Fix the spindle base (2) with a key (1).
–Screw the disk base (3) onto the spin-
dle thread clockwise. Tighten securely
by hand.
–Fix the polishing nozzle on the disc-
base.
–Installation of an additional D-shaped
handle and a cover handle (Fig. 4)
–Connect the handles (1) and (2).
–Put them on the reducer body (3) in the
direction (A).
–Insert two screws (5) in directions (C)
and (B) through the holes of the han-
dles.
–Adjust the comfortable position of the
D-shaped handle.
Securely tighten the screws with a
wrench (4).
In some cases, the use of an electric
tool is impossible due to limited work-
ing space, then it is possible to use it only
with a handle-cover.
Installation of the handle-cover
(Fig.5)
–Install the handle-cover (1) in direction
(A) on the reducer body (2).
–Insert two screws (4) through the holes
of the handle-cover in directions (C)
and (B).
–Securely tighten the screws with a
wrench (3).
WARNING!
Be sure to use the handles for better
control over the power tool while
working. Before using the polishing
machine, make sure that the han-
dles are securely locked.
Installation/removal of circles
WARNING!
Before adjusting or checking the
operation of the polishing machine,
make sure that the power tool is
turned off and the power plug is re-
moved from the outlet.
Before changing circles, remove the han-
dle-casing from the reducer body to al-
low access to the spindle lock, or lock the
spindle with a spindle lock key.
Installation of the "fur" polishing
circle (Fig. 6)
To install the “fur” polishing circle (1),
place the polishing circle on the disc
base (2), then tighten the ropes securely.
To remove the polishing circle, reverse
the installation procedure.
Installation of a polishing foam
circle (Fig. 7)
In some cases, it may be appropriate to
use a foam circle.
To install the foam circle (1), place it with
the pile side on the disk-base (2).
WARNING!
Use only those nozzles whose ex-
ternal diameter does not exceed
125 mm and which have a thread-
ed mounting hole with a diameter
of M14.
Do not use the shaft lock when the
spindle is rotating. The power tool
may be damaged. Wait for the spin-
dle to come to a complete stop and
only then can you put down the
switched-off power tool.
Regulating the speed of rotation
(Fig. 9)
With the help of the speed regulator, the
necessary number of revolutions is set,
which is chosen depending on the pro-
cessed materials. When working with a
polishing machine, you can smoothly ad-
just the spindle speed in the range from
800 to 2450 rpm by rotating the regula-
tor wheel.
Turn the regulator to positions 1 to 6 – to

11
EU-PM0823001–0823001
en
set a higher spindle speed (+) in direction
(A) and to set a lower speed (−) in direc-
tion (B).
8. WORK WITH THE POWER TOOL
It is recommended to work with the pow-
er tool at an ambient temperature of +5
°C to +35 °C.
Turning on/off the polishing
machine (Fig. 8)
WARNING!
The plug of the power tool must be
compatible with the outlet. Do not
modify the design of the plug un-
der any circumstances. Do not use
adapters for grounded power tool
plugs. Original plugs and corre-
sponding sockets reduce the risk of
electric shock.
Use the power cord only for its in-
tended purpose. Never use the
power cord to carry or unplug the
power tool. Keep the power cord
away from heat, grease, sharp edg-
es and moving parts. A damaged or
tangled power cord increases the
risk of electric shock.
Before connecting the polisher ma-
chine to the mains, make sure that
the slide switch is in the off posi-
tion (0).
–In order to turn on the polishing ma-
chine, you should move the switch le-
ver (1) to the "I" position.
–For continuous operation, move the
switch lever (1) to the "I" position and
press the front part of the switch (A) to
x its position.
–To turn off the polishing machine, press
the back of the switch (1), after which
the switch will move to the "0" posi-
tion.
–The power indicator (6) (Fig. 1) lights up
green when the power tool is connect-
ed to the network, red when the graph-
ite brushes are worn out.
Power support function
This system increases productivity and
improves the comfort of working with
power tools. As a result, the resistance of
the polishing machine to loads increases.
Starting current limitation (soft
start)
The starting current limiter is designed
to reduce the load on the electrical net-
work when the power tool is turned on.
This system restrains the strong start-
ing current that appears when the motor
is turned on and does not allow a sharp
gaining of revolutions.
Polishing operations
Use only special circles/nozzles that are
designed for polishing work.
Turn on the power tool and let it run with-
out load for about 20 seconds. For some
time, increased sparking of the brushes is
possible, as they are being rubbed.
Move the polisher machine slowly back
and forth while working. With this meth-
od, the treated surface heats up less, un-
evenness does not form on it.
Always hold the power tool rmly with
one hand on the body and the other
hand on the handle-cover or addition-
al D-shaped handle. The angle of inclina-
tion of the polishing circle to the surface
of the plane should not exceed 15° (Fig.
10). Touch the treated surface without ex-
cessive force.
After turning off the polisher machine,
wait for the attachment/circle to come to
a complete stop before placing the pow-
er tool on any surface.
9. SERVICE
WARNING!
Before adjusting or checking the
operation of the polishing machine,
make sure that the power tool is
turned off and the power plug is re-
moved from the outlet.
After each use, clean and inspect the pol-
isher machine as a whole: body, vents,
circles, discs, switches and controls. For
cleaning, use a brush with soft bristles or
a clean cloth.
Inspect the handle mounting screws and
check that they are properly tightened. If

12 EU-PM0823001–0823001
en
the screws are loose, tighten them again.
Unless otherwise expressly provided for
in this manual, the product must be ser-
viced only by the manufacturer (DNIPRO
M LLC), the DNIPRO-M authorised service
centre or the seller of the product.
Do not attempt to replace the power
cord and graphite brushes by yourself.
The use of non-original spare parts or in-
dependent intervention in the internal
structure may lead to the removal of the
power tool from the warranty.
The manufacturer is not responsible if
non-observance of the safety and operat-
ing instructions causes the polishing ma-
chine to malfunction or harm the health of
the user or third parties.
The term of warranty service is specied in
the warranty card issued at the time of sale.
10. STORAGE AND
TRANSPORTATION
It is recommended to store the power
tool in a dry, well-ventilated room inac-
cessible to children, protecting it from di-
rect sunlight, at a temperature from -5 °C
to +40 °C and a relative humidity of no
more than 80%.
If the power tool has been stored and
transported at a temperature lower than
that at which it is planned to be used, it
is necessary to make sure that there is no
condensation on it. In the event of con-
densation on the components and parts
of the electric tool, its operation or fur-
ther preparation for work is prohibited
until the condensate dries completely.
Keep the polishing machine, the original
safety and operating instructions, acces-
sories in the original or other packaging
to avoid damage to the power tool and
its components during transportation.
The service life of the power tool is 5
years from the date of sale.
11. DISPOSAL
Do not dispose of power tools with
household waste! Power tools that
have been decommissioned are
subject to separate collection and
disposal in accordance with envi-
ronmental legislation
12. POSSIBLE FAULTS AND METHODS OF THEIR ELIMINATION
Description of the
malfunction
A possible reason Elimination
Motor body heating Power tool overload Reduce the load on the power
tool. Increase the time period
for the power tool to cool
down.
Poor cooling Clean the ventilation holes.
Excessive vibration
during operation
Spindle damage Contact the manufacturer
(DNIPRO M LLC), the DNIPRO-M
service centre or the seller of
the product.
Worn or damaged base
disc
Replace the disc base.
Bearing wear Contact the manufacturer
(DNIPRO M LLC), the DNIPRO-M
service centre or the seller of
the product.

13
EU-PM0823001–0823001
en
Description of the
malfunction
A possible reason Elimination
The power tool does
not turn on
Damage to the power
cord or plug
Contact the manufacturer
(DNIPRO M LLC), the DNIPRO-M
service centre or the seller of
the product.
Defective power button
Sparks in the collector
area
Unprubbed brushes Allow the power tool to idle
for about a minute.
Sparks in the collector
area with the
formation of a circular
fire
Damaged brushes Contact the manufacturer
(DNIPRO M LLC), the DNIPRO-M
service centre or the seller of
the product.
Critical wear of brushes
14. DECLARATION EC
DECLARATION CONFORMITY
Type: POLISHER
Model: PM-125CS
The above product(s) correspond
to:
2006/42/ЕС Directive Machinery
2014/30/EU Electromagnetic Compati-
bility Directive
2011/65/EU RoHS Directive
The following harmonised standards
were applied:
EN ISO 12100:2010;
EN 60745–2–3:2011/A13:2015;
EN 61000–3–2:2014; EN 61000–3–3:2013;
EN IEC 55014–1:2017/A11:2020;
EN IEC 55014–2:1997/A2:2008.
Name and address of technical
documentation holder EU
authorized representative:
Dnipro-M stores sp. z o.o. (Dnipro-M
stores LLC)
Adama Branickiego Str., 21 lok. U3, 02-
972 Warsaw, Poland
Board Chairman:
Zviagintseva Tetiana
Date:
10.04.2023
Manufacturer: DNIPRO M LLC, І.Mazepy
Str., 10, Kyiv, 01010, Ukraine. Made in China
Importer and authorized representative
in EU: Dnipro-M stores sp. z o.o.
Adama Branickiego Str., 21, lok. U3, 02-
972 Warsaw, Poland.
WWW.DNIPRO-M.PL

14 EU-PM0823001–0823001
pl
pl Oryginalnainstrukcjabezpieczeństwaiobsługimaszynydo
polerowania
TREŚĆ
. 15
.......... 16
................................................................................... 18
................................................................................................... 19
............................................................... 19
.................................................................................................. 19
.................................................................................. 21
.............................................................................. 22
....................................................................................................................23
..........................................................................23
..............................................................................................................24
......................................24
................................................................................25

15
EU-PM0823001–0823001
pl
-
-
-
1. OGÓLNEŚRODKI
OSTROŻNOŚCIPODCZAS
KORZYSTANIAZ
ELEKTRONARZĘDZI
OSTRZEŻENIE!
-
-
-
-
Termin "elektronarzędzie" w ostrzeże-
niach odnosi się do elektronarzędzia za-
silanego sieciowo (przewodowego) lub
akumulatorowo (bezprzewodowego).
Bezpieczeństwo w miejscu pracy
Bałagan i słabe
oświetlenie mogą prowadzić do wypad-
ków.
-
Elektronarzędzia wytwarzają iskry, które
mogą spowodować zapłon pyłu lub opa-
rów.
-
Brak
uwagi może prowadzić do utraty kontro-
li nad elektronarzędziem.
Bezpieczeństwo elektryczne
-
-
-
Zmniejsza to ryzyko porażenia
prądem elektrycznym.
Istnieje wysokie ryzyko pora-
żenia prądem, jeśli ciało jest uziemione.
Przedosta-
nie się wilgoci do elektronarzędzia może
spowodować porażenie prądem.
-
-
-
-
Uszkodzony lub splątany przewód
zwiększa ryzyko porażenia prądem elek-
trycznym.
Używanie odpowiedniego przewodu na
otwartych przestrzeniach zmniejsza ry-
zyko porażenia prądem.
-
Zastosowanie wyłącznika różni-
cowoprądowego zmniejsza ryzyko pora-
żenia prądem elektrycznym.
Bezpieczeństwo osobiste
-
-
-
Najmniejsza nieuwaga może prowadzić
do obrażeń.
Sprzęt ochronny, taki jak maska odde-
chowa, obuwie antypoślizgowe, kask lub
ochrona słuchu, używany w odpowied-
nich warunkach może zmniejszyć ryzyko
obrażeń.

16 EU-PM0823001–0823001
pl
zmniejszają ryzyko przypadkowego uru-
chomienia elektronarzędzia.
-
Elektronarzędzia stają się nie-
bezpieczne w rękach nieprzeszkolonego
użytkownika.
-
-
-
Większość wypadków
spowodowana jest niewłaściwą konser-
wacją elektronarzędzi.
-
-
Niewłaściwe korzy-
stanie z elektronarzędzi może prowadzić
do niebezpiecznych sytuacji.
Usługa
-
Zapew-
ni to niezawodną konserwację elektrona-
rzędzia.
2. INSTRUKCJEBEZPIECZEŃSTWA
DOTYCZĄCEMASZYNYDO
POLEROWANIA
Ogólne środki ostrożności podczas
polerowania
-
-
-
-
Niezastosowanie się do poniższych
instrukcji może spowodować porażenie
prądem elektrycznym, pożar i/lub po-
ważne obrażenia ciała.
-
-
-
-
-
Przenoszenie elektronarzę-
dzia z palcem na wyłączniku lub włącza-
nie zasilania podczas przenoszenia może
spowodować wypadek.
Klin regulacyjny lub klucz
narzędziowy pozostawiony na pracują-
cym elektronarzędziu może spowodo-
wać obrażenia ciała.
-
W
ten sposób będziesz w stanie lepiej ob-
sługiwać elektronarzędzie w nieoczeki-
wanych sytuacjach.
-
-
Luźna odzież, biżuteria
lub długie włosy mogą zostać wciągnię-
te przez ruchome części.
Używając odpylacza można
zmniejszyć zagrożenie.
Użytkowanie i konserwacja
elektronarzędzi
-
-
Używając
elektronarzędzia zgodnie z jego przezna-
czeniem, można wykonać pracę lepiej,
bezpieczniej i z prędkością, do której na-
rzędzie zostało zaprojektowane.
-
Elektro-
narzędzie z uszkodzonym wyłącznikiem
jest niebezpieczne i powinno zostać na-
tychmiast naprawione.
-
Takie
zapobiegawcze środki bezpieczeństwa

17
EU-PM0823001–0823001
pl
Używanie nie-
właściwego elektronarzędzia może być
niebezpieczne i spowodować obrażenia.
-
Moż-
liwość podłączenia akcesoriów do elek-
tronarzędzia nie gwarantuje bezpiecznej
pracy.
-
Akcesorium pracujące z prędko-
ścią wyższą niż znamionowa może ulec
uszkodzeniu i rozsypać się.
-
so -
Nieprawidłowo
dobrane akcesoria nie mogą być odpo-
wiednio zabezpieczone lub kontrolowane.
-
-
Akcesoria, które nie pa-
sują do osprzętu montażowego elek-
tronarzędzia, mogą powodować utratę
równowagi, nadmierne wibracje i utratę
kontroli nad urządzeniem.
-
-
W
tym czasie uszkodzone akcesoria zwykle
ulegają uszkodzeniu.
-
-
-
-
-
-
Długotrwałe narażenie na
hałas o wysokim natężeniu może spowo-
dować utratę słuchu.
-
-
-
Fragmenty obrabianego
przedmiotu lub uszkodzone akcesoria
mogą odlecieć i spowodować obrażenia
poza bezpośrednim obszarem pracy.
W
przypadku utraty kontroli przewód zasi-
lający może zostać przecięty lub przy-
trzaśnięty, a ręka może zostać wciągnię-
ta przez obracający się sprzęt.
Obracające się akcesoria mogą zaczepić
się o powierzchnię i uniemożliwić stero-
wanie elektronarzędziem.
-
Przypadkowy kontakt z obraca-
jącym się sprzętem może spowodować
obrażenia.
-
Wentylator silni-
ka zasysa kurz do korpusu, a nadmierne
nagromadzenie sproszkowanego meta-
lu może spowodować zagrożenie elek-
tryczne.
Mogą się one
zapalić od iskier.
Użycie wody lub in-
nych płynów chłodzących może spowo-
dować obrażenia ciała lub porażenie
prądem.
Dalsze instrukcje bezpieczeństwa
dla wszystkich operacji

18 EU-PM0823001–0823001
pl
-
-
-
-
-
-
-
-
-
-
-
Ope-
rator może kontrolować moment obroto-
wy lub siłę odrzutu, jeśli zachowa odpo-
wiednie środki ostrożności.
-
Akcesorium może
odepchnąć się od dłoni.
-
Od-
rzut popycha elektronarzędzie w kierun-
ku przeciwnym do ruchu koła w punkcie
zaczepienia.
-
Należy unikać
odbijania się i zaczepiania o akcesoria.
Narożniki, ostre krawędzie lub rykoszety
mają tendencję do blokowania obraca-
jącego się sprzętu i powodowania utraty
kontroli lub odrzutu.
Środki ostrożności dotyczące
polerowania
-
-
-
Luźne i obracające się
linki mogą przytrzasnąć palce lub zaha-
czyć o obrabiany przedmiot.
OSTRZEŻENIE!
-
-
-
-
-
3. KONWENCJONALNEŚPIEWY
-
-
-
-
0
Ø
V
IO -

19
EU-PM0823001–0823001
pl
5. CELIWYGLĄDNARZĘDZIA
POWERTOOL
Cel
-
Wygląd (rys. 1)
1
2
3
4
5
6
7
8
9
10
11
OSTRZEŻENIE!
-
-
-
-
-
-
-
-
-
-
-
4. ZAKRESDOSTAWY
1
2
3
4
5
6
7
8
9
10
6. DANETECHNICZNE
V230
50
750
850
1000

20 EU-PM0823001–0823001
pl
125
6
3
20
1-1 800
2-1 1150
3-1 1450
4-1 1800
5-1 2300
6-1 2450
3
3
2
2
+
+
+
+
+
+
+
+
Table of contents
Languages:
Other DNIPRO M Sander manuals