Content list & Tools required
Contents list
Review instructions carefully before installation.
Installation should be completed by a suitably qualied person.
Please dispose of packaging in a responsible manner.
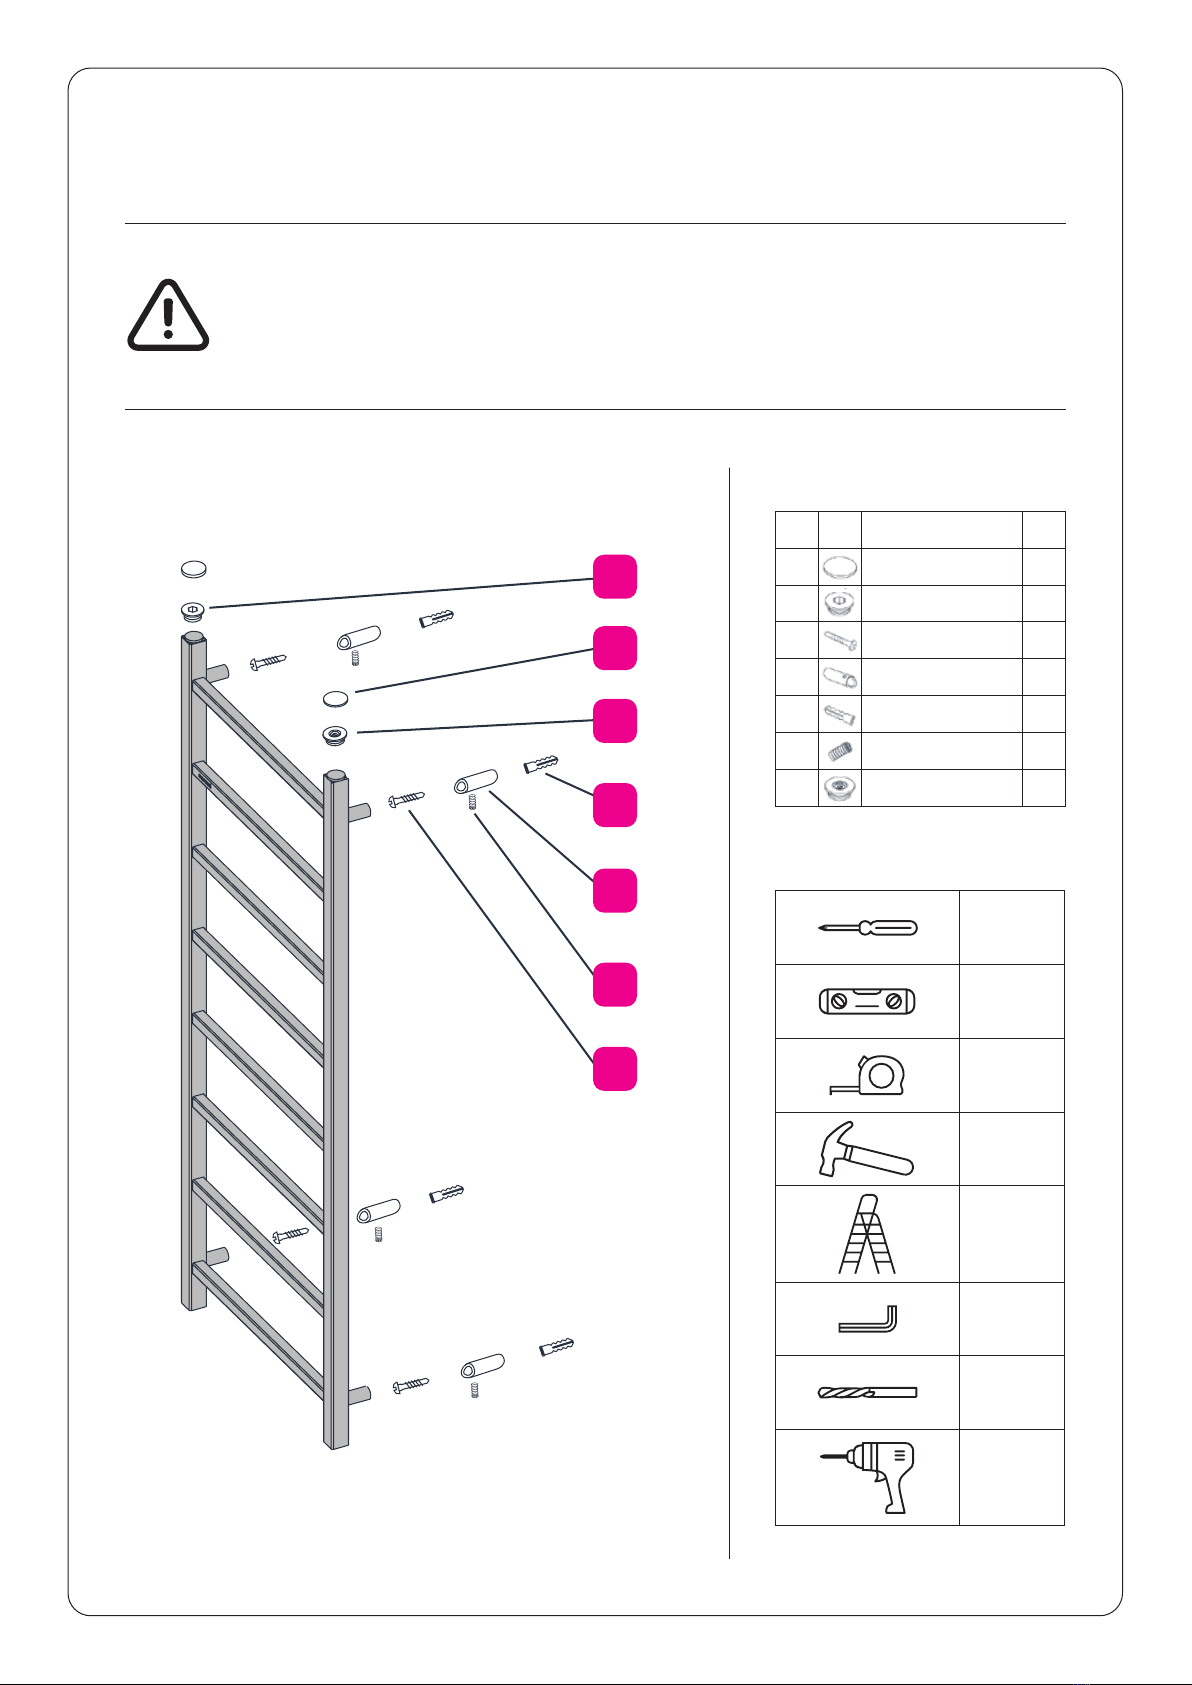
Ref Icon Description Qty
A Decorative Cap 2
B Blind Plug 1
C Wall Mounting Screw 4
DWall Mounting Bracket 4
E Wall plug 4
F Setscrew 4
G Air Vent 1
INSTALLATION GUIDE
E Installation information in this section
includes below products!
BIANCA,UNO,MALIBU
G CONTENT OF MOUNTING SET
J
INSTALLATION
1
2
1
2
1
3
2
4
1
Decorative Cap (x1) Blind Plug(x1) Wall Mounting
90°
C
Only for mirror finished products
I A B C
Screw (x12)
2
1
Wall Plug (x12) Air Vent (x1) Screw Cap
Holder (x12)
B
A
E G J
Screw cap (x12)
I
•
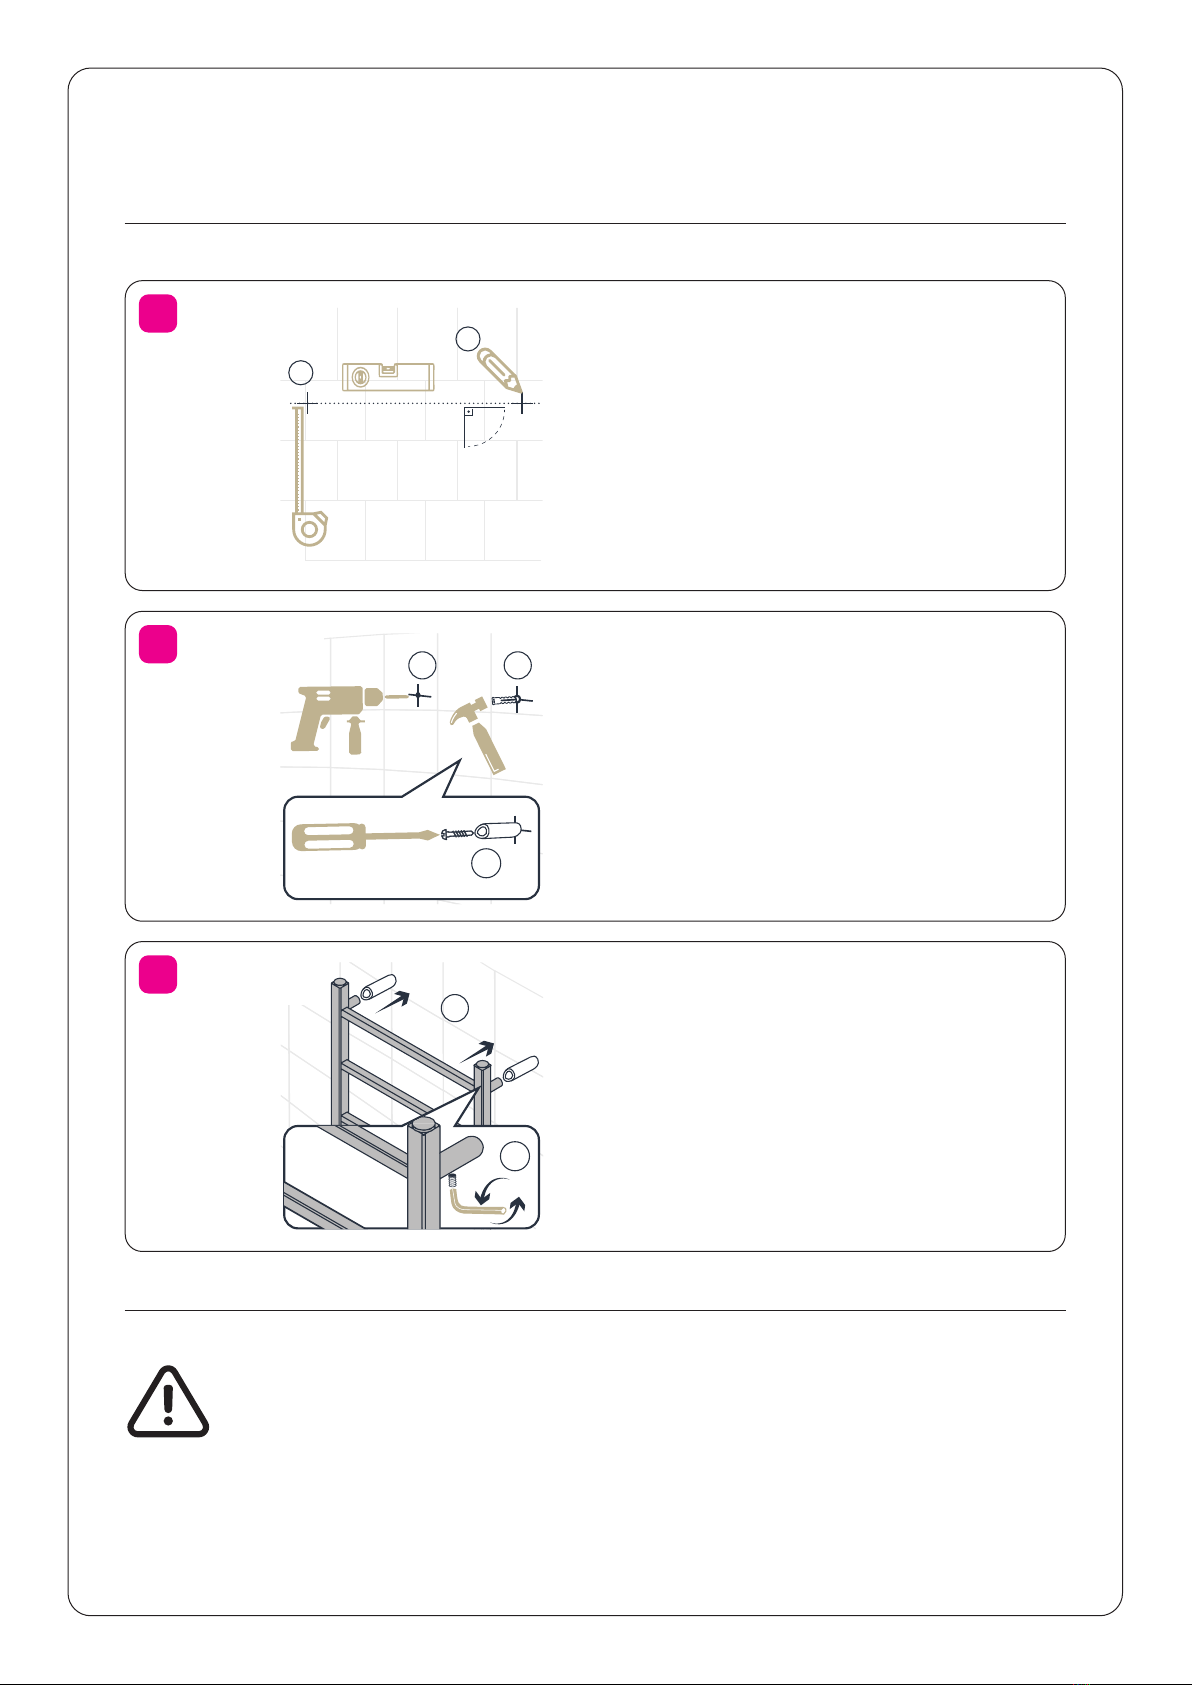
Place your radiator at least 12.5 cm above the floor.
1-
Adjust the height of your radiator by
using a metric ruler.
2-
Setthelocationofyourradiatoras
desired,alignwiththegroundby using
aspiritlevelandmarkthepositionof
the wall mounting brackets.
1-
Drill holes (Ø10 mm) into the spots
you have marked.
2-
Nail the wall plugs (E) in the holes
by using a hammer.
1-
Pass the wall mounting screws (C)
throughthe screw cap holders (J).
2-
Placeyourradiatoronthewall
and screw the mounting brackets all
thewayinto thewallwiththehelpof
a screwdriver.
1-
Attach the screw caps (I) to the
screw cap holders (J) on the wall
mounting brackets.
IMPORTANT NOTE
•
Provide insulation by wrapping PTFE tape on the treads before installing the valves.
•
Apply silicone seal fluid to all treaded parts containing o-rings.
•
Connect your radiator to the utilities after following all the installation steps in the manual.
•
After connecting to the utilities, do not forget to discharge the trapped air inside the radiator before commissioning.
05.10.2018 Rev:00
R.EYS.KK.00116
TOOLS REQUIRED FOR INSTALLATION
&
ELECTRIC DRILL &
DRILL BIT
STEP LADDER ALLEN KEY
(FOR HIGH PRODUCTS)
1-
Insert the diverter into the tube
where theoutlet valve is located
then push until it reaches the metal
sheet inside the tube.
2-
Screw the diverter onto the metal
sheet byusing anAllen Key(M10).
1-
Place your radiator into the wall
mounting brackets (D).
2-
Insertthe setscrews (F) int o the
slots on the mounting brackets (D),
adjust the distance between the wall
andyourra diator thentightenthe
setscrewsbyusinganAllenkey
(M3).
3
1-
Drill holes (Ø10 mm) into t he spots
you have marked.
2-
Nail the wall plugs (E) in the holes
by using a hammer.
3-
Screw the wall mounting brackets
allthe waytothe holeswith thehelp
of a screwdriver.
1-
Adjust the height of your radiator
by using a metric ruler.
2-
Set the location of your radiator
as desired, align with the ground by
using a spirit level and mark the
position of the wall mounting
brackets.
Wall Mounting
Screw (x4)
C
Setscrew (x4)
Decorative Cap (x6)
Only for mirror finished products
A
Wall Mounting
Bracket (x4)
D
Air Vent (x1)
Installation information in this section
includes below products!
ARES, NORTE, RAMSEY
INSTALLATION GUIDE
E Installation information in this section
includes below products!
BIANCA,UNO,MALIBU
G CONTENT OF MOUNTING SET
J
INSTALLATION
1
2
1
2
1
3
2
4
1
Decorative Cap (x1) Blind Plug(x1) Wall Mounting
90°
C
Only for mirror finished products
I A B C
Screw (x12)
2
1
Wall Plug (x12) Air Vent (x1) Screw Cap
Holder (x12)
B
A
E G J
Screw cap (x12)
I
•
Place your radiator at least 12.5 cm above the floor.
1-
Adjust the height of your radiator by
using ametric ruler.
2-
Setthelocationofyourradiatoras
desired,alignwiththe groundbyusing
aspiritlevelandmarkthepositionof
the wall mounting brackets.
1-
Drill holes (Ø10 mm) intothe spots
you have marked.
2-
Nail the wall plugs (E) in the holes
by using a hammer.
1-
Pass the wall mounting screws (C)
through the screw cap holders (J).
2-
Placeyour radiatoronthewall
and screw the mounting brackets all
thewayintothewallwiththe helpof
a screwdriver.
1-
Attach the screw caps (I) to the
screw cap holders (J) on the wall
mounting brackets.
IMPORTANT NOTE
•
Provide insulation by wrapping PTFE tape on the treads before installing the valves.
•
Apply silicone seal fluid to all treaded parts containing o-rings.
•
Connect your radiator to the utilities after following all the installation steps in the manual.
•
After connecting to the utilities, do not forget to discharge the trapped air inside the radiator before commissioning.
05.10.2018 Rev:00
R.EYS.KK.00116
TOOLS REQUIRED FOR INSTALLATION
&
ELECTRIC DRILL &
DRILL BIT
STEP LADDER ALLEN KEY
(FOR HIGH PRODUCTS)
1-
Insert the diverter into the tube
where the outletvalve is located
then push until it reaches the metal
sheet inside the tube.
2-
Screw the diverter onto the metal
sheet byusing an AllenKey (M10).
1-
Place your radiator into the wall
mounting brackets (D).
2-
Insertthe setscrews(F) into the
slots on the mounting brackets (D),
adjust the distance between the wall
andyourradiator thentightenthe
setscrewsby usinganAllenkey
(M3).
3
1-
Drill holes (Ø10 mm) into the spots
you have marked.
2-
Nail the wall plugs (E) in the holes
by using a hammer.
3-
Screw the wall mounting brackets
allthe waytotheholes withthe help
of a screwdriver.
1-
Adjust the height of your radiator
by using a metric ruler.
2-
Set the location of your radiator
as desired, align with the ground by
using a spirit level and mark the
position of the wall mounting
brackets.
Wall Mounting
Screw (x4)
C
Setscrew (x4)
Decorative Cap (x6)
Only for mirror finished products
A
Wall Mounting
Bracket (x4)
D
Air Vent (x1)
Installation information in this section
includes below products!
ARES, NORTE, RAMSEY
INSTALLATION GUIDE
E Installation information in this section
includes below products!
BIANCA,UNO,MALIBU
G CONTENT OF MOUNTING SET
J
INSTALLATION
1
2
1
2
1
3
2
4
1
Decorative Cap (x1) Blind Plug(x1) Wall Mounting
90°
C
Only for mirror finished products
I A B C
Screw (x12)
2
1
Wall Plug (x12) Air Vent (x1) Screw Cap
Holder (x12)
B
A
E G J
Screw cap (x12)
I
•
Place your radiator at least 12.5 cm above the floor.
1-
Adjust the height of your radiator by
using a metric ruler.
2-
Setthelocationofyourradiatoras
desired,alignwiththegroundby using
aspiritlevelandmarkthepositionof
the wall mounting brackets.
1-
Drill holes (Ø10 mm) into the spots
you have marked.
2-
Nail the wall plugs (E) in the holes
by using a hammer.
1-
Pass the wall mounting screws (C)
throughthe screw cap holders (J).
2-
Placeyourradiatoronthewall
and screw the mounting brackets all
thewayinto thewallwiththehelpof
a screwdriver.
1-
Attach the screw caps (I) to the
screw cap holders (J) on the wall
mounting brackets.
IMPORTANT NOTE
•
Provide insulation by wrapping PTFE tape on the treads before installing the valves.
•
Apply silicone seal fluid to all treaded parts containing o-rings.
•
Connect your radiator to the utilities after following all the installation steps in the manual.
•
After connecting to the utilities, do not forget to discharge the trapped air inside the radiator before commissioning.
05.10.2018 Rev:00
R.EYS.KK.00116
TOOLS REQUIRED FOR INSTALLATION
&
ELECTRIC DRILL &
DRILL BIT
STEP LADDER ALLEN KEY
(FOR HIGH PRODUCTS)
1-
Insert the diverter into the tube
where theoutlet valve is located
then push until it reaches the metal
sheet inside the tube.
2-
Screw the diverter onto the metal
sheet byusing anAllen Key(M10).
1-
Place your radiator into the wall
mounting brackets (D).
2-
Insertthe setscrews (F) int o the
slots on the mounting brackets (D),
adjust the distance between the wall
andyourra diator thentightenthe
setscrewsbyusinganAllenkey
(M3).
3
1-
Drill holes (Ø10 mm) into t he spots
you have marked.
2-
Nail the wall plugs (E) in the holes
by using a hammer.
3-
Screw the wall mounting brackets
allthe waytothe holeswith thehelp
of a screwdriver.
1-
Adjust the height of your radiator
by using a metric ruler.
2-
Set the location of your radiator
as desired, align with the ground by
using a spirit level and mark the
position of the wall mounting
brackets.
Wall Mounting
Screw (x4)
C
Setscrew (x4)
Decorative Cap (x6)
Only for mirror finished products
A
Wall Mounting
Bracket (x4)
D
Air Vent (x1)
Installation information in this section
includes below products!
ARES, NORTE, RAMSEY
INSTALLATION
90°
1 2 13
A
B
C
D
E
F
G
E
C
D
F
G
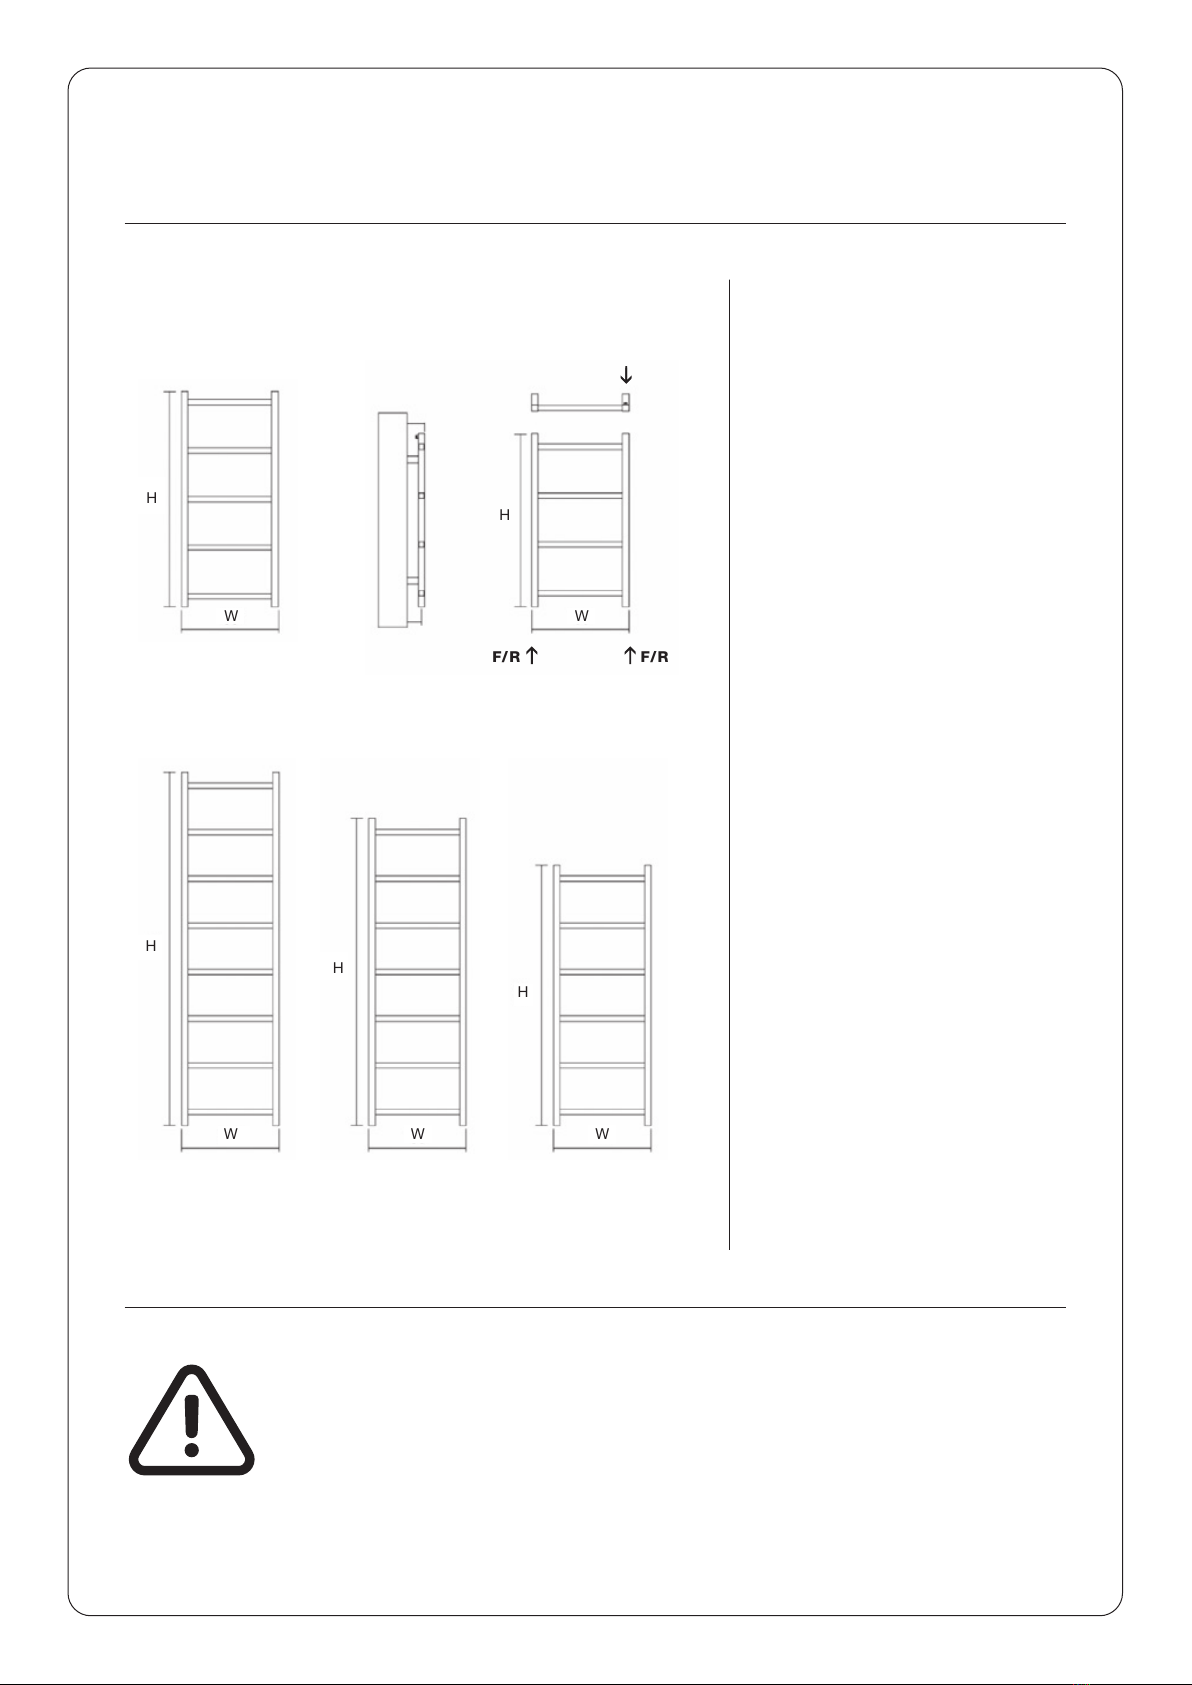
Installation information in this section includes below products!
ADONIS, BLIZZARD, BLUEBELL, CARISMA, CORVUS, DIVA, ELEGANCE,
ELITE, FALCON, GEMINI, HERA, JUPITER, KAYRA, LOFT, NEPTUN,
NIRVANA, OLYMPOS, SONYA, REFLECTION, TAURUS, TRENDY, TRUVA,
VOLGA, ZENITH, LARIS, SAMOS, SPIN, STEP, EYE, MIXOLOGY, OLIVIN
1 2 3
1- Adjust the height of your radiator by
using a metric ruler.
2- Set the location of your radiator as
desired, align with the ground by using
a spirit level and mark the position of
the wall mounting brackets.
1- Drill holes (Ø 10 mm) into the spots
you have marked.
2- Nail the wall plugs (E) in the holes by
using a hammer.
3- Screw the wall mounting brackets all
the way to the holes with the help of a
screwdriver.
1- Place your radiator into the wall
mounting brackets (D).
2- Insert the setscrews (F) into the slots
on the mounting brackets (D), adjust the
distance between the wall and your
radiator then tighten the setscrews by
using an Allen key (M3).
1
221
INSTALLATION
90°
Installation information in this section includes below products!
ASOS, DAPHNE, KEOPS, LARISSA, MERCURY, ORCA, RADO,
SIERRA, STORM, TERRA, VISTA, PORTO, MYRA, FAME,
WAVE, CHARM, BLAZE, FLAKE
1- Adjust the height of your radiator by
using a metric ruler.
2- Set the location of your radiator as
desired, align with the ground by using
a spirit level and mark the position of
the wall mounting brackets.
1- Drill holes (Ø 10 mm) into the spots
you have marked.
2- Nail the wall plugs (E) in the holes by
using a hammer.
3- Screw the wall mounting brackets all
the way to the holes with the help of a
screwdriver.
1- Place your radiator into the wall
mounting brackets (D).
2- Insert the setscrews (F) into the slots
on the mounting brackets (D), adjust the
distance between the wall and your
radiator then tighten the setscrews by
using an Allen key (M3).
3
12
1
2
3
2
A
www.hammamradiator.com.tr
IMPORTANT NOTE
∙ Place your radiator at least 12.5 cm above the floor.
∙ Provide insulation by wrapping PTFE tape on the treads before installing the valves.
∙ Apply silicone seal fluid to all treaded parts containing o-rings.
∙ Connect your radiator to the utilities after following all the installation steps in the manual.
∙ After connecting to the utilities, do not forget to discharge the trapped air inside the radiator before commissioning.
05.10.2018 Rev:00
R.EYS.KK.00115
INSTALLATION GUIDE
TOOLS REQUIRED FOR INSTALLATION
ELECTRIC DRILL &
DRILL BIT
STEP LADDER
(FOR HIGH PRODUCTS)
SPIRIT LEVEL
CORDLESS
SCREWDRIVER
(BIT PH2)
CROSS POINT
SCREWDRIVER
&METRIC RULER HAMMER ALLEN KEY
CONTENT OF MOUNTING SET
Blind Plug (x1)
Wall Mounting
Screw (x4)
Wall Mounting Bracket (x4)
Wall Plug (x4) Setscrew (x4)
A B
C D
E F
Air Vent (x1)
G
Decorative Cap (x2)
(Only for mirror finished products)
CONTENT OF MOUNTING SET
Decorative Cap (x2) Wall Mounting
Screw (x4)
Wall Mounting Bracket (x4)
Wall Plug (x4)
Setscrew (x4)
A C
D E
F G
Air Vent (x2)
(Only for mirror finished products)
&
SPECIAL CASES
* x3 pieces of Wall Mounting
Screw (C), Wall mounting
Bracket (D), Wall Plug (E) and
Setscrew (F) are included in the
installation set for Flake.
SPECIAL CASES
* Mounting elements, Decorative
Cap (A) and Blind Plug (B) are
not included in the installation
set for Spin, Step, Eye, Mixology
and Olivin.
*x3 pieces of Wall Mounting Screw (C),
Wall mounting Bracket (D), Wall
Plug (E) and Setscrew (F) are
included in the installation set for Step.
F
G
C
A
B
D
E
Tools required
Cross
Screwdriver
Spirit
Level
Steel Tape
Hammer
Step Ladder
(for high
products)
Allen Key
10mm
Masonry Bit
Electric Drill
& Cordless
Screwdriver