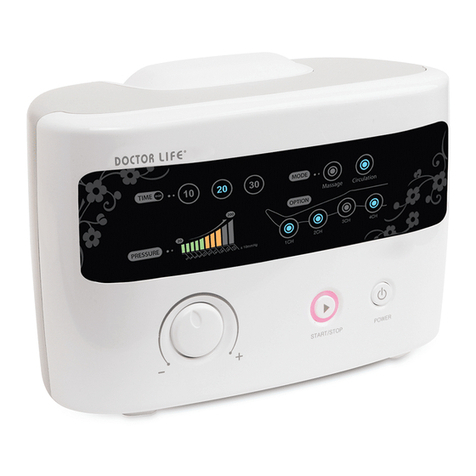
Doctor Life DL2002D User manual

CODE 28430
Many thanks for using our device.
Indication : This manual is for user's safety and preventing any
property-loss. Before using our device, please inevitably read this
manual carefully.

2
For safe using our device
● Before using our device, please precisely read the manual.
● Keep this manual near to the device for easily reading it.
● This manual presents the details to be kept by users for preventing any danger or
property-loss and for safe using the device.
Guidance of indications
warning
Death or serious wound can be happened if users don't follow
the instruction.
CAUTION
Wound or property-loss can be happened in case of disregarding
the instruction.
Instruction to be surely observed.
Instruction to be prohibited.
prohibition of disjointing
Don't disjoint the device.
PROHIBITION

3
SAFETY PRINCIPLES
1) Electrical safety (4)
2) Safety for Body (5)
3) Safe use and maintenance of a device (6)
4) Safe use of cuff (7)
5) Cleaning and others (8)
1. NAME OF PARTS-------------------------------------------------------------------------------------- 9
2. NAME AND EXPLANATION OF OPERATORS---------------------------------------------- 10
3. SPECIFICATIONS-------------------------------------------------------------------------------------10
4. HOW TO USE
1) Feature of a device-------------------------------------------------------------------------------- 11
2) Cautions for beginners--------------------------------------------------------------------------- 11
3) How to set pressure ------------------------------------------------------------------------------ 12
4) How to use a Timer-------------------------------------------------------------------------------- 12
5) How to set Move mode--------------------------------------------------------------------------- 13
6) How to connect air plug and air socket------------------------------------------------------- 13
7) How to connect four hose jacks and a cuff------------------------------------------------------- 14
8) How to use one leg cuffs------------------------------------------------------------------------- 14
9) How to use two leg cuffs------------------------------------------------------------------------- 14
10) How to use an arm cuff and a leg cuff simultaneously----------------------------------- 15
11) How to a waist cuff---------------------------------------------------------------------------------15
12) In the case that cuff is too small to be used------------------------------------------------- 15
13) How to start/stop the operation of device---------------------------------------------------- 16
14) How to change a fuse----------------------------------------------------------------------------- 16
5. BEFORE THINKING OF SOMETHING WRONG-------------------------------------------- 17
Indications for general home case users -----------------------------------------------------------18
Detail medical Indications-------------------------------------------------------------------------------18
6. WARRANTY CONDITIONS-------------------------------------------------------------------------19
CONTENTS

4
This device is for domestic using.
After checking your local voltage, please use a
device!
(Fire and electric shock possible)
Stop using the device in case of smelling during
using the device. In this case, put off the electric
power and pull out plug from socket. And then
inform it to service center. (Fire & electric shock
possible)
Pull out plug when not using or in case of lighting,
thunder.
주의
When insert or pull out plug, hold the plug itself
not cord.
Don't insert or pull out plug with wet hand.
(Electric shock possible)
Don't damage or bend or twist the power cord.
(Fire & electric shock possible)
1) Electrical Safety
금지
금지
금지
금지
PROHIBITION

5
Forbid child to use the device.
In case of blowing air into cuff with wearing cuff by
child, serious wound possible
경고
Don't use air hose to nose, mouth and ears.
(Injuring possible)
경고
Prohibit using the device in case of artificial-heart
etc.
경고
Prohibit using the device in case of vein cancer,
deep thrombophlebitis, phlebothrombosis patient.
(Blood vessel can be stopped up)
경고
Prohibit using the device to the patients of
artificial-joint, metal-inserting etc.
(Harmful to health such as aversion)
경고
If feel any abnormal symptom during using the
device, stop using it and consult to doctor.
PROHIBI
TION
Prohibit using the device to the patients of heart
disease, pretension, acute inflamed skin disease,
lung edema, acute vicious or malignant tumor,
erysipelas, circulatory disorders in the artenes,
fevering etc.
경고
Surgical operation patients don't use the device till
recovered perfectly (especially operation patients of
internal organs, nerve and brain)
(Bad effect possible)
경고
In case of drunken, don't use the device till getting rid of
the effect of alcohol.
Please wear cuff in at least thin clothing and close the
zipper of cuff perfectly. If not so, during operation user’s
skin can be hurt by a zipper as zipper going down.
경고
2) Safety for Body
금지

6
Use the device indoors of 0 ℃~40℃.
Keep the device under humidity of 60%.
(If not, trouble/fire possible)
Don't use the device in high humidity place.
(Bathroom/sauna etc.)
(Fire, electric shock possible)
경고
Don't use or keep the device near to heating
equipment or direct ray of light.
(Trouble, fire, transformation possible)
Forbidden from children's touch.
Disorder can be happened due to children's touch.
Keep the device horizontally. (In case of leaning,
trouble/disorder possible)
주의
In the case that you use a device in other country,
please check voltage of the country before using a
device. (If not so, fire, electric shock or break down
of a device possible)
3) Safe use and maintenance of a device
금지
금지
금지
금지

7
Don't use a cuff with accessories, watch etc. (Physical
damage of user’s skin and breakage of cuff possible)
Except testing, don't blow air into cuff under
the condition of not wearing cuff on body
(Damage, anti-endurance possible).
Don't keep cuff near to heating materials such as
stove, cigarettes etc.
(Leaking of air or fire possible)
Don't keep cuff near to dangerous keen
materials such as needle, scissors.
(Cuff can be damaged and disorder possible)
Don't use cuff to naked body.
In wearing thin underwear, use the cuff.
(Cuff's endurance can be weakened due to sweat,
cosmetics and sebum)
주의
Don't stain cuff by oil, benzene, alcohol,
gasoline etc.(Anti-endurance possible)
When blowing air into cuff, don't use other tool except
our machine.
(Damage of glove and bodily harm possible)
금지
금지
금지
금지
금지
금지
4) Safe use of cuff

8
When cleaning the device, don't use water, oil,
benzene, alcohol, gasoline, chemicals etc. (If not so,
the life of the cuff will be very shorten)
Use dry towel.
When cleaning the device, don't use water, oil,
benzene, alcohol, gasoline, chemicals etc. (If
not so, the life of the cuff will be very shorten)
Use little wet towel.
Don't fold or bend the hose.
주의
Users prohibit repairing, reproducing or
disjointing the device. (Fire, electric shock
possible)
Be careful not put clip, staplers, needle, metal or
food into the device.
(Short, heating generation possible)
If happened, inform it to concerned agent.
주의
금지
금지
5) Cleaning and Others

9
A MAIN BODY
ACCESSORIES
1. NAME OF PARTS
Arm cuff
(Separate)
One waist
cuff
Two leg
cuffs
1-line hose
for one cuff
2-line hose
for two cuffs
Hose plug
Hose jack
Cuff Jack
Pressure Gauge
Start/Stop
Move mode selector
Pressure knob
Timer
ON/OFF button
Handle
Air socket

10
MODEL
DL2002D
PLACE
Indoors
VOLTAGE
AC220V 50/60Hz
TIME RANGE
10, 30, 60, 90min
REGULAR FUSE
AC220V 3A 20mm
Glass Tube Fuse
PRESSURE
RANGE
10~180mmHg (±20mmHg)
POWER
CONSUMPTION
60W
DIMENSION
190 X 250 X 210mm
WEIGHT
3Kg (A main body), 7~8Kg (Package)
3. SPECIFICATIONS
2. NAME AND EXPLANATION OF OPERATORS
AIR SOCKET
Air comes out from
air socket
PRESSURE
GAUGE
Shows the set
pressure on LCD
MOVE INDICATOR
Indicates the set
move mode
START /STOP
BUTTON
Starts or stop the set
operation
TIMER
Sets the using time
MOVE SELECTOR
Selects 1 from 3 modes
according to patient’s
state.
PRESSURE KNOB
Sets and control to
the suitable pressure
for user’s therapy
ON/OFF BUTTON
Turn on and off power
of a device

11
1) Feature of a device
3 Move mode
There are 3 Move modes. (Mode A, Mode B, Mode A+B)
Pressure sensor
The pressure is kept regularly to the set point of pressure by the perception of pressure sensor
regardless of the size of user’s body.
Digital pressure gauge
User can check the correct pressure intensity easily by digital pressure gauge.
Digital Timer
User can set the use time correctly with Digital Timer.
One touch connection type of hose plug and air socket(Simple hose type)
It protects a hose plug not to fall out from air socket during operation.
As hose type is one body, user can connect hose to the air socket or cuff simply.
SAFETY SYSTEM
When the power gives out suddenly during the operation of device, it is very safe because
safety system discharges automatically air from cuff.
2) Cautions for beginners
Pressure setting
From the first use, if pressure is set too strong, it can give a burden to the body.
Beginners should use it by setting the pressure to 6 (60mmHg) in the beginning.
Fist, please use it at the low pressure and increase the pressure step by step.
Leg cuff
In using leg cuff(s), please apply with stretching the leg(s) definitely. If not so, user can feel pain
on knee.
Waist cuff
In using a waist cuff, please rap user’s abdomen and hip simultaneously with a waist cuff. If user
applies it to only abdomen, user can feel pain on abdomen.
Arm cuff
Please set the cuff to user’s arm with a fixing band for arm cuff not to drop during operation.
Air hose
Air hose should be applied differently according to cuff number.
Please use 1-line air hose in wearing one cuff.
Please use 2-line air hose in wearing two cuffs.
4. HOW TO USE

12
3) How to set pressure Pressure range: 10~180mmHg (Unit: 10mmHg) ±20mmHg
Suitable pressure setting is 60mmHg~120mmHg.
Please read the pressure to the indicated pressure X10mmHg.
EX) When the set pressure is 11, read the pressure to 11X10mmHg=110mmHg!
The pressure of cuff is perceived and reached automatically to the set pressure by pressure
sensor regardless of pressing time.
If user feel weak the pressure than the set pressure, please check whether air leaks from cuff or
not.
When air is leaking from the ripped cuff, the pressure sensor perceives the leaking and stay for
only 10 seconds and then skips to the next chamber automatically
4) How to use a timer
Timer setting: 10min., 20min., 30min, 40min
The suitable using time is 10 minutes.
To lower pressure
Pressure knob
The pressure is
weakened as turning
pressure knob to the
left. The set point of
pressure will be
indicated on LCD.
To increase pressure
The pressure gets
strong if turning
pressure knob to the
right.
(Max. 180mmHg)
Pressure
gauge
To shorten using time
To increase using time
If pressing ∨
button, using time
is shorten to
40→30→20→10min.
If pressing ∧
button, time is
increased to
10→20→30→40 min.

13
5) How to set move mode
There are three move modes.
We recommend suitable mode to mode A+B.
If pressing button, the move mode moves in order of mode A,
mode B, mode A+B.
Please select the suitable mode as referring to the below table.
MODE A
MODE B
MODE A+B
This mode repeats Mode A
and Mode B
alternatively.
To get better effect to
massage therapy of
muscles, etc.
To get better effect to the
circulation of lymph and
blood (for lymphoedemas)
We recommend this mode
which has two therapies at
one application.
Notice) during operation, if you change the move mode, the changed mode is applied after finishing
the movement of previous mode.
6) How to connect hose plug to air socket
As side picture, insert air plug to air
socket by fitting a lock projection on air
plug to lock hole above air socket.
Please put air plug to the end of air
socket. If not so, air can leak from air
socket.
Hose plug
Air socket
Lock
projection

14
7) How to connect 4 hose jacks to a cuff
Put 4 hose jacks to 4 caps of the same color on cuff!
The effect of therapy will drop if the order of putting is not right.
Please check definitely the order of pressurization is applied from foot→calf→knee→thigh in turn.
8) How to use one leg cuff
- As side picture, wear a leg cuff to user’s leg and put
1-line hose plug perfectly to air socket of a main body.
If not so, air can leak from air socket.
- You can just use 1-line hose in using only one cuff.
9) How to use two leg cuffs
- As side picture, wear two leg cuffs to user’s two legs and
put 2-line hose plug perfectly to air socket of a main body.
If not so, air can leak from air socket.
- You can just use 2-line hose in using two cuffs.

15
10) How to use an arm and a leg cuff simultaneously
- As side picture, wear an arm cuff and a leg cuff to each
user’s arm and leg and put 2-line hose plug perfectly to
air socket of a main body. If not so, air can leak from
air socket.
- You can just use 2-line hose in using two cuffs.
※Caution: In the case of the old, the weak or especially
a user having a weak heart, please use only one arm cuff.
As arm cuff is applied near to a heart, the compressible
therapy of two arm cuffs may give excessive burden to
the heart of user.
11) How to use a waist cuff
- As side picture, wear a waist cuff to user’s waist and put
1-line hose plug perfectly to air socket of a main body.
If not so, air can leak from air socket.
- You can just use 1-line hose in using only one cuff.
12) In the case that cuff is too small to use
- Separate purchase -
- If an arm or leg cuff is too small to user, user can select one of
extension zipper or cuff of XL size and in the case that a waist cuff is
too small, user can apply the waist cuff of XL size.
- To use the zipper, open the zipper of arm or leg cuff to the last
extremity and then connect an extension zipper in the middle of cuff as
running up the zippers.
Leg extension zipper
Arm extension zipper

16
13) How to start/stop the operation of device
Power up and set the pressure 60mmHg), Timer(10분), Move mode(A+B) and then press the
Start/Stop button to start the operation and press again Start/Stop button to stop operating a device.
(NOTICE)
If stop a device by pressing a power on/off button, as wind in each chamber keeps without
discharge from a cuff, user should stop a device with a timer knob.
14) How to change a fuse
In case of fuse-short, use the spare fuse keeping in AC jack at the back side. Open the AC jack cover
and use the spare fuse.

17
Operating condition
Checking points
No electric power
-Plug correctly inserted into outlet?
-Correct the voltage of product with your local
voltage?
-Fuse short?
Power on but not-operating
-Pull out power plug and reinsert it into outlet.
Noisy during operating
-Horizontally installed?
-Any material on the device?
No air in the hose
-There any bending place?
-Hose plug correctly inserted into the device?
When the pressurization stays for
only 10 seconds at any chamber
and skips to the next chamber,
It is evidence that the chamber is leaking. The
chamber should be repaired but user can user can
continue to use regardless of the trouble chamber
until the cuff is repaired. (Pressure sensor perceives
the leaking automatically and operation program
makes keep for only 10 sec on the trouble chamber
and skip to the next chamber.
5. BEFORE THINKING OF SOMETHING WRONG

18
DETAIL MEDICAL INDICAITO
Indications for home care
Lymph edema
Chronic disease by the venous cause
Fat dissolution
Rheumatoid arthritis
Improvement of intestines, dissolution Constipation
Benumbed feet and hands
Settlement of stress
Disease by interruption in blood circulation
Effect of exercise
The old and the weak, fatigue, bore dome, insomnia
Person who want to be elastic skin and a healthier body
Medical Indications
Acute edema (post-operative, post-burn)
Chronic edema by the venous cause
Chronic venous insufficiency venous stasis
Cellulite
Deep vein thrombosis (DVT)
From dependent, positioning
Inguinal lymphangiectomy
Lymph edema
Post-paralytic (post-stroke, spinal cord injury)
Post-mastectomy
Post-traumatic (post-cast, fracture,
amputation shoulder-hand syndrome)
Prophylaxis of venous thrombosis
Rheumatic edema
Sciatica
Spinal cord injury
Sprains
Varicosis
Venosclerosis

19
DISPOSAL
The product must not be disposed of along with other domestic waste. The users must dispose of this
equipment by bringing it to a specific recycling point for electric and electronic equipment. For further
information on recycling points contact the local authorities, the local recycling center or the shop where
the product was purchased. If the equipment is not disposed of correctly, fines or penalties may be
applied in accordance with the national legislation and regulations.
GIMA WARRANTY CONDITIONS
Congratulations for purchasing a GIMA product.
This product meets high qualitative standards both as regards the material and the production.
The warranty is valid for 12 months from the date of supply of GIMA.
During the period of validity of the warranty, GIMA will repair and/or replace free of charge all the defected
parts due to production reasons. Labor costs and personnel travelling expenses and packaging not
included.
All components subject to wear are not included in the warranty.
The repair or replacement performed during the warranty period shall not extend the warranty.
The warranty is void in the following cases: repairs performed by unauthorized personnel or with
non-original spare parts, defects caused by negligence or incorrect use.
GIMA cannot be held responsible for malfunctioning on electronic devices or software due to outside
agents such as: voltage changes, electro-magnetic fields, radio interferences, etc.
The warranty is void if the above regulations are not observed and if the serial code (if available) has
been removed, cancelled or changed.
The defected products must be returned only to the dealer the product was purchased from.
Products sent to GIMA will be rejected.
This manual suits for next models
1
Table of contents
Other Doctor Life Medical Equipment manuals
Popular Medical Equipment manuals by other brands

Boston Scientific
Boston Scientific EMBLEM S-ICD user manual

stemoscope
stemoscope STEMO300 instruction manual

Apollo Healthcare Technologies Limited
Apollo Healthcare Technologies Limited Apollo 5 Plus APHos2 user manual

ivWatch
ivWatch 400 user manual

GE
GE Senographe DS manual

Prizma
Prizma SALT FX Pro user manual