6
STEP 3. PREPARING THE COOLING UNIT
FOR THE ICE MAKER (Models with
ice makers)
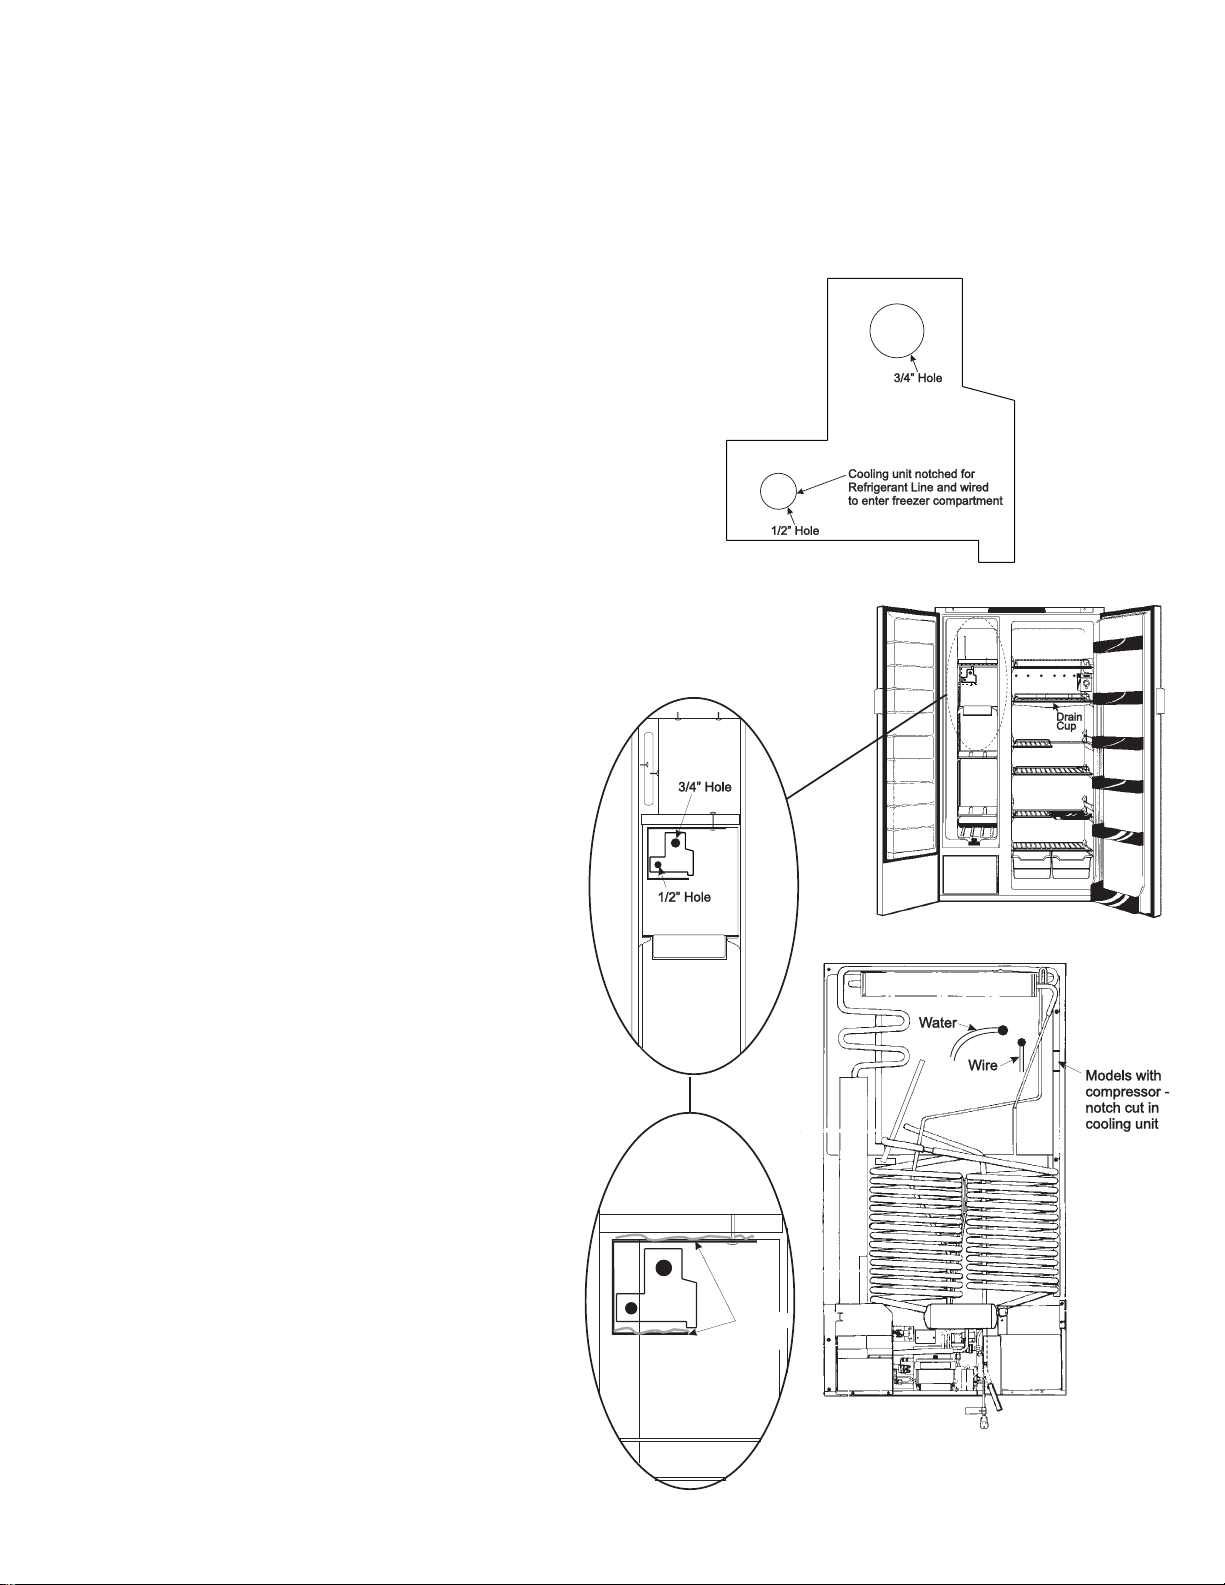
1. Modelswithcompressorassisticemaking,requirea
groovetobecutinthefoamblocktoallowapathforthe
refrigerantlineandwireharness. Thisgrooveneedsto
bepresentbeforethe cooling unit can be fitted intothe
cabinet. Models without the compressor should pro-
ceed to number 6.
2. Thecoolingunitframeismanufacturedwithanotchcut
intoit. Thisnotchiswheretherefrigerantlineandwire
harness will pass through once the foam block is cut
away. Useahacksawandmakethegrooveontheright
handsideofthefoamblock. Thegrooveshouldbethe
same dimensions as the notch in the frame. See FIG.
C5 & C7.
3. The cooling unit can be installed into the refrigerator.
See Section A, Category #1, Step 2, 1-5.
4. Beforetheshelvesandotherinteriorpartsareplacedinto
thecabinet,theopeningfortheicemakerwaterlinemust
bemadethroughthefoamblockofthecoolingunit. Look
at the defective cooling unit to determine the approxi-
mate location and angel to drill the hole in the new
cooling unit. The hole is drilled from the interior of the
cabinetoutthroughtherearoftherefrigerator. Usea3/
4” by 8” long drill bit to make the hole. Be careful no to
drillintoanyrefrigerant lines,causingaleak. SeeFIG.
C6.
5. Proceedto number8.
6. Models without compressor, the cooling unit can be
installed into the refrigerator. Before the shelves and
other interior parts are placed into the cabinet, the
openingfor the ice maker water lines andpower cords
mustbemadethroughthefoamblockofthecoolingunit.
Look at the defective cooling unit to determine the
approximatelocationandangeltodrilltheholeinthenew
coolingunit. Thetwoholesaredrilledfromtheinteriorof
thecabinetoutthroughtherearoftherefrigerator. Use
a1/2”and3/4”by8”longdrillbittomakethetwoholes.
Becarefulnottodrillintoantrefrigerantlines,causinga
leak. See FIG. C6.
7. Thewireharnessisroutedfromtheinsideofthefreezer
compartment through the 1/2” hole. Pull the wire
harness through the back wall of the freezer compart-
ment. Leave sufficient length of wires (about 8”) to
connect to the cycle. Follow the same path that was
usedbeforebythewireharnessandreconnectittothe
solenoidandpowercord.
8. Routethewaterlinefromthewatersolenoiduptherear
oftherefrigerator. Insertthefilltubefromtherearthrough
the3/4” hole. Use permagumto make an air tight seal
aroundthewireharnessandwaterfilltube. Sealboththe
outsideandinside. Ifthewaterlineisnotattachedtothe
filltubeitshouldbeconnectednow. Makesurethatthe
sameroutingisfollowedbetweenthewatersolenoidand
fill tube. If the water line has heat tape, be sure it is in
place. Usealuminumfoiltapetocoverandsealthewater
line and wire harness to the back of the cabinet. See
FIG.C7.
9. Spread a thin layer of thermomastic on top of the ice
makershelf. SeeFIG.C8.Plug thewireharnessto the
ice cycle. Install the cycle using the screws removed.
Makesure the end of thewater fill tube will allowwater
to enter the cycle inlet, and is free from touching the
sides or bottom. This will allow the water to drain
completelyout ofthefilltube andpreventfreezing.
10. Return to Section C, Category #3, Step 2, #3.
FIG. C5
FIG. C6
FIG. C7
FIG. C8
APPLY
THERMO
MASTIC
TO TOP