* After entering the limits fine tuning mode, the original preferred position will not be deleted; If there is no button
operation within 2 minutes, it will arrive within 2 minutes, and the motor will turn to prompt, and automatically exit
the route adjustment mode; When fine-tuning the limit, press and P1 for more than 2S to exit the mode.
* Press STOP for 2S,the motor moves to preferred position automatically.
2 Remove preferred position
Press P2 (1 jog and 1 beep), press STOP (1 jog
and 1 beep), STOP again(1 jog and make a long
noise), the preferred position is deleted.
3 Upper and Lower Limits Setting
2 Set lower limit
ĺ
DOWN DOWN STOP
+
1 Set upper limit
ĺ+
UP UP STOP
* If exit the limits setting status before you finish the limit setting, then the motor will take the previous limits if has;
After the limits have been set successfully, the motor will enter the user mode.
Press UP for 2S, operate the motor to desired upper
position, press and hold UP and STOP buttons
simultaneously for 2S (2 jogs and 3 beeps), upper limit
is set.
Press DOWN for 2S, operate the motor to desired
lower position, press and hold DOWN and STOP
buttons simultaneously for 2S (2 jogs and 3 beeps),
lower limit is set.
1 Add A Preferred Position
User mode
1 Set preferred position
P2
ĺ ĺ
3
STOP STOP P2
ĺ ĺ
3
STOP STOP
Check both upper and lower limits are set. Operate the
product to desired preferred position. Press P2 (1 jog
and 1 beep), press STOP(1 jog and 1 beep), STOP
again (2 jogs and 3 beeps), the preferred position is set.
* When in jog mode, press UP or DOWN once, the motor will be jog running, if press more than 2 second, the motor
will be continously running.
2 Jog Mode & Running Mode Switch
ĺ
DOWN STOPUP
+Press and hold UP and DOWN buttons simultaneously for 5S (1 jog),
press STOP (1 jog and make a long noise), switch to jog mode, If
motor jog twice and beep 3 times, switch to running mode.
3 Adjust Limits
1 Adjusting the upper limit
ĺĺ
DOWNUP
or
ĺ+
UP STOP
+
UP STOP
The new upper
limit position
Press and hold UP and STOP buttons for 5S (1 jog and make a long noise), operate the product to desired
new upper limit position, press and hold UP and STOP buttons for 2S(2 jogs and 3 beeps), the new upper
limit is programmed successfully.
2 Adjusting the lower limit
Press and hold DOWN and STOP buttons for 5S (1 jog and make a long noise), operate the product to
desired new lower limit position, press and hold DOWN and STOP buttons for 2S (2 jogs and 3 beeps), the
new lower limit is programmed successfully.
ĺĺ
DOWNUP
or
ĺ
+
DOWN STOP
+
DOWN STOP
The new lower
limit position
3 3
ĺĺ
3
P2(a) P2(a) P2(b)
4 Pair / Unpair Additional Emitter
• Repeat same procedure will unpair additional emitter.
Press P2 (1 jog and 1 beep) and P2 (1 jog and 1 beep) on existing
emitter, press P2 on new emitter to add (2 jogs and 3 beeps), new
emitter is paired to the motor.
Method one
Press P2 (1 jog and 1 beep) and P2 (1 jog and 1 beep) on existing
emitter, press STOP on new emitter for 2S to add (2 jogs and
3 beeps), new emitter is paired to the motor.
Method two
3 3
ĺĺ
P2(a) P2(a) STOP(b)
P1
ĺ
3
* (a) as existing emitter,(b) as new emitter to pair/unpair; Adding the emitter should be carried out when there is a
limits; All the setting of the motor will be kept after addiing the new emitter.
• Repeat same procedure will unpair additional emitter.
Press P1 button for 2S (1 jog), release button and make a long
noise, press STOP on new emitter for 2S to add (2 jogs and
3 beeps), new emitter is paired to the motor.
Press P2 (1 jog and 1 beep), UP (1 jog and 1 beep), UP again
(2 jogs and 1 beep), the motor running speed is accelerated .
Method three
STOP(b)
ĺĺ
3
P2 UP
5 Speed Regulation
UP
1 Acceleration setting
* If the motor no response, it has already been the Max. or Min speed.
ĺĺ Press P2 (1 jog and 1 beep), DOWN (1 jog and 1 beep), DOWN
again (2 jogs and 1 beep), the motor running speed is decelerated.
3
P2 DOWN DOWN
2 Deceleration setting
Quick Index
Settings Steps
Pairing
Switch Rotating Direction
Upper and Lower Limits Setting
Adjust Limits
P1 (hold down 2s)ĺStop (hold down 2s)
Up + Down (hold down 2s)
Set upper limit 8SKROGGRZQVĺ8S6WRSKROGGRZQV
Adjusting the upper limit 8S6WRSKROGGRZQVĺ8SRU'RZQĺ8S6WRSKROGGRZQV
Adjusting the lower limit 'RZQ6WRSKROGGRZQVĺ8SRU'RZQĺ'RZQ6WRSKROGGRZQV
Acceleration setting 3ĺUpĺUp
Deceleration setting 3ĺDownĺDown
Set lower limit 'RZQKROGGRZQVĺ'RZQ6WRSKROGGRZQV
3ĺStopĺStop
5
Add / Remove Preferred Position
4
3
2
1
Jog Mode & Running
Mode Switch
Pair / Unpair Additional Emitter
8S'RZQKROGGRZQVĺ6WRS
3Dĺ3Dĺ3E
3Dĺ3Dĺ6WRSEKROGGRZQV
P1 (hold down 2s)ĺStop (b) (hold down 2s)
6
7
8 Speed Regulation
Troubleshooting
Issues Possible causes Solution
The motor has no response emitter battery is low capacity Replace battery
Out of radio control range Try control within closer range
The emitter cann't control
single motor Multiple motors are paired to the
same channel.
Pair single motor with emitter correctly
Try to use multi-channel emitters to control multi-motor
projects, ensure each channel to control one single motor
The motor doesn't run or starts
too slowly or make loud noise
The motor stops during the
up and down running
Connections are incorrect. Check connections
Installation is improper or overload
The motor has reached the lower limit
The running time more than 6min
Adjust the new lower limit
Consult the sales for more information
Check installation or overload
Radio interference / shielding Check antenna on motor is intact and exposed. Check for
possible source of radio interference.
Power Failure Or Incorrect Connection Double check power and cable connections, follow wiring
instructions.
Battery in motor is depleted Recharge with compatible AC adaptor
Please read following points of attention carefully before setting.
Setting Notice
Important Safety Instructions To Be Read Prior To Operation.
Essential Settings
The steps in factory mode must be completed to ensure proper operation.
1. Don’t operate motors when low voltage alarm.
2. Operating:
᰷The valid interval of the emitter button is 10S, the emitter will quit the set after 10S.
The motor will run or beep for hint, please do the next step after the hint.
3. Set the limit position:
᰷After the upper / lower limit setting, and the upper / lower limit positin can’t at the same position.
After the limit setting, with power off and memory function.
Limit delete will clear all limit memory.
It will exit limit setting when program there is no operation for 2 minutes.
4. If the emitter lost, please set up again with the new emitter.
5. One motor can store maximum 10 channels; after fully stored, if pair new channels, only the last one will be
covered circularly.
Button Instructions
Functions of P1 button
1. Cycle Operation:3UHVV3EXWWRQRQFHDQGHYHU\SUHVVWKHPRWRUZLOOUXQXSZDUGĺVWRSĺGRZQZDUGFLUFXODU\
2. Pairing or Pair Additional Emitter:Press P1 button for 2S, motor jog once, release button and make a long noise, motor is
ready for pairing or pair additional emitter.
3. Radio Lock: Press and hold P1 button for 6S, the motor will jog twice, release button and beep twice, the motor enters radio
lock status, the motor won't receive any signal; press P1 button once to disable Radio Lock.
4. Switch Direction: Press and hold P1 button for 10S, the motor will jog 3 times, release button and beep 3 times, the running
direction of the motor has been changed.
5. Reset to Factory Mode: Press and hold P1 button for 14S, the motor will jog 4 times, release button and beep 4 times, the
motor has been reset to factory mode.At this point the motor will go into deep sleep. After entering deep sleep, the motor can't
be controlled. At this time, you need to press P1 button for 2S and then the motor turns to prompt to exit deep sleep.
*Dial lithium battery switch, 0 is off switch, 1 is turn on switch.
Back
3
0
3
Nkvjkwo"Egnn
5X
3
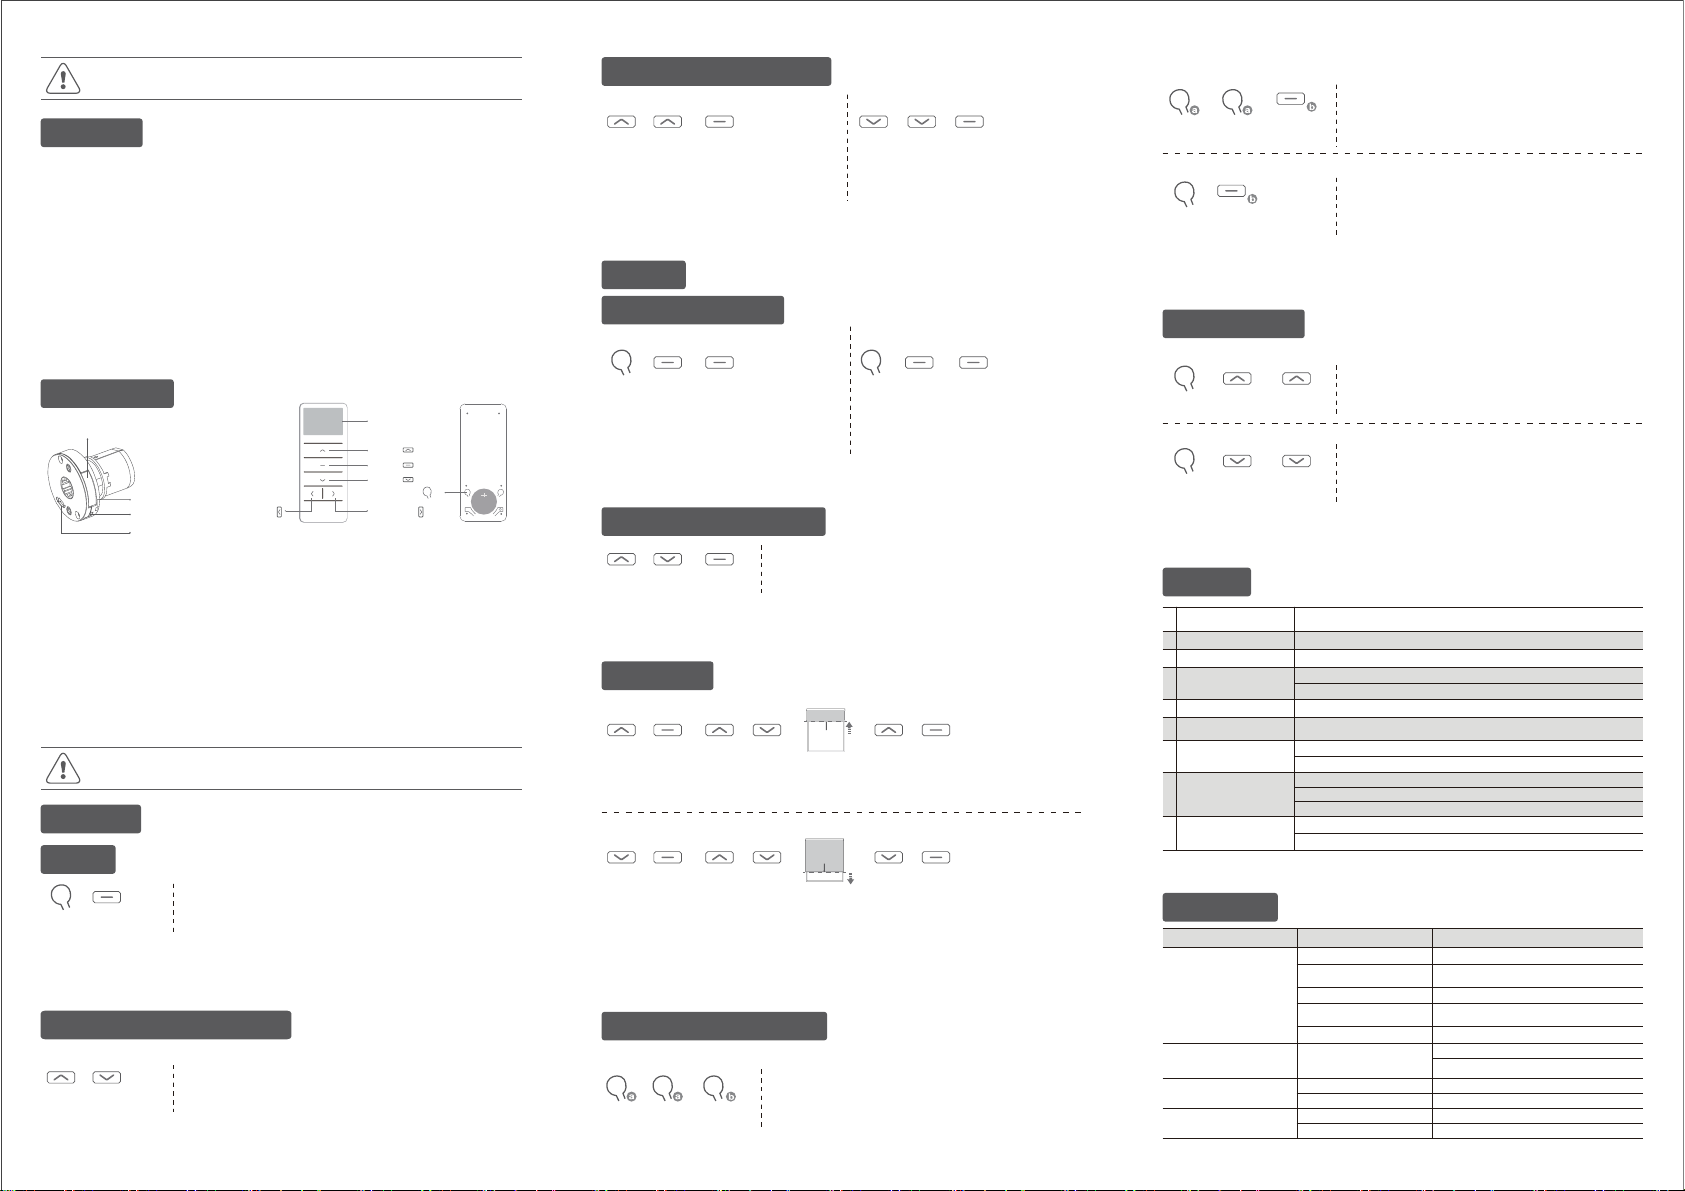
DD1803H Single-channel Timer Emitter
UP
LCD display
STOP
DOWN
Channel
selection“-”
(CH-)
Channel
selection“+”
(CH+)
P2
P1 button
Lithium Battery Switch
LED light
Micro-USB Port
* If within 10S, the motor doesn't receive STOP signal from the any emitter, it will exit the paring mode automatically.
Re-power on after power off, if the motor has saved the emitter, there is no rotation prompt, and the code matching
status is not automatically entered at this time.
1 Pairing
Factory mode
Press P1 button for 2S (1 jog ), release button and make a long noise,
Or turn the DIP switch to “0” and then to “1” (1 jog and make a long noise),
repower the motor, within 10S, press STOP for 2S (2 jogs and 3 beeps ),
the motor has been paired successfully.
STOP
* The operation is only valid when there is no limits. If the motor has already set the upper and lower limit, then you can
only switch direction by P1 button.
2 Switch Rotating Direction (Optional)
+
UP DOWN
If press UP, the motor runs downward, try below to switch direction
Press and hold UP and DOWN buttons simultaneously for 2S, motor
jog once, the direction has been switched successfully.
P1
ĺ
3
-5--4--3-


