manuals.online logo
Brands
  1. Home
  2. •
  3. Brands
  4. •
  5. Dover
  6. •
  7. Paint Sprayer
  8. •
  9. Dover Hydro Satellite 5823 User manual

Dover Hydro Satellite 5823 User manual

Package Should Contain:
1. Satellite dispenser
2. Product inlet tubing, 1/4" x 12"
3. Ceramic weight.
4. Footvalve
5. Metering tip kit
6. Instruction sheet.
3. Insert product inlet assembly into bottle and secure dispensing unit to bottle. Use velcro strap to further secure bottle
handle to dispensing unit.
4. Connect water supply hose of at least 3/8" ID to water inlet swivel.
(Minimum 25 PSI pressure, with water running, is required for proper operation.)
10092190
10/09
Hydro Systems 3798 Round Bottom Road, Cincinnati, OH 45244 Phone: (513) 271-8800 Fax: (513) 271-0160
protective clothing and eyewear when dispensing chemicals or other materials or when working in the vicinity of all chemicals, lling or
emptying equipment, or changing metering tips.
observe safety and handling instructions of the chemical manufacturer.
direct discharge away from you or other persons or into approved containers.
dispense cleaners and chemicals in accordance with manufacturer's instructions. Exercise CAUTION when maintaining your equipment.
reassemble equipment according to instruction procedures. Be sure all components are rmly screwed or latched into position.
equipment clean to maintain proper operation.
THANK YOU FOR YOUR INTEREST IN OUR PRODUCTS
WEAR
ALWAYS
KEEP
Please use this equipment carefully and observe all warnings andcautions.
***************************************************NOTE ********************************************
Problem Cause Solution
1. No discharge a. No water a. Open water supply
b. Valve not open b. Trigger not fully depressed
c. Eductor clogged c. Look for obstruction, remove if possible
d. Foamer/Sprayer pivot not d. Rotate to stops, top or bottom
in proper location
2. No concentrate draw a. Clogged foot strainer a. Clean or replace
b. Metering tip or eductor has scale b. Clean (descale)* or replace
build-up
c. Low water pressure c. Minimum 25 PSI (with water running)
required to operate unit properly
d. Switch in "OFF" position d. Switch to "ON" position
e. Air leak in chemical pick-up tube e. Put clamp on tube or replace tube if brittle
f. Clear plastic tip installed in inlet f. Replace with colored metering tip
pick-up stem
3. Excess concentrate draw a. Metering tip not in place a. Press correct tip firmly into barb on pick-up stem
4. Failure of unit to turn off a. Trigger lock is on a. Release trigger lock
TROUBLESHOOTING CHART:
FOAMER/SPRAYER
MODEL 5823 & 5824
CONTINUED ON NEXT PAGE....
2. Select metering tip using guide on
next page. Install metering tip into barb
incenterofcap.Cutproductinlettubeto
desired lentgh for selected bottle, slide
weightoverendoftube,insertfootvalve
into end of tube. NOTE: REMEMBER
TOCHECKFOOTVALVESTRAINERS
PERIODICALLY FOR CLOGGING:
CLEAN IF NECESSARY.
5. Install Foam or Spray Nozzle
tofrontofdispenser.Moveproduct
switchto"ON"todispenseproduct.
Switch to "OFF" to rinse. Rotate
front nozzle for jet rinse.
Installation and Operation:
1. Remove dispensing unit from box.
6. To remove Foam or Spray
Nozzle. Lift up on front. Snap other
Nozzle in place when not in use.
LIFT
ON
Metering Tip Selection:
The nal concentration of the dispensed solution is related to
both the size of the metering tip opening and the viscosity of
the liquid being siphoned. For water-thin products, the chart
at right can be used as a guideline. If product is noticeably
thickerthanwater,consulttheMeasurementofConcentration
Procedure below to achieve your desired water-to-product
ratio. Because dilution can vary with water temperature and
pressure, actual dilution achieved can only be ascertained
by using the Measurement of Concentration Procedure. The
clear, undrilled tip is provided to permit drilling to size not
listed should you need a dilution ratio that falls between
standard tip sizes.
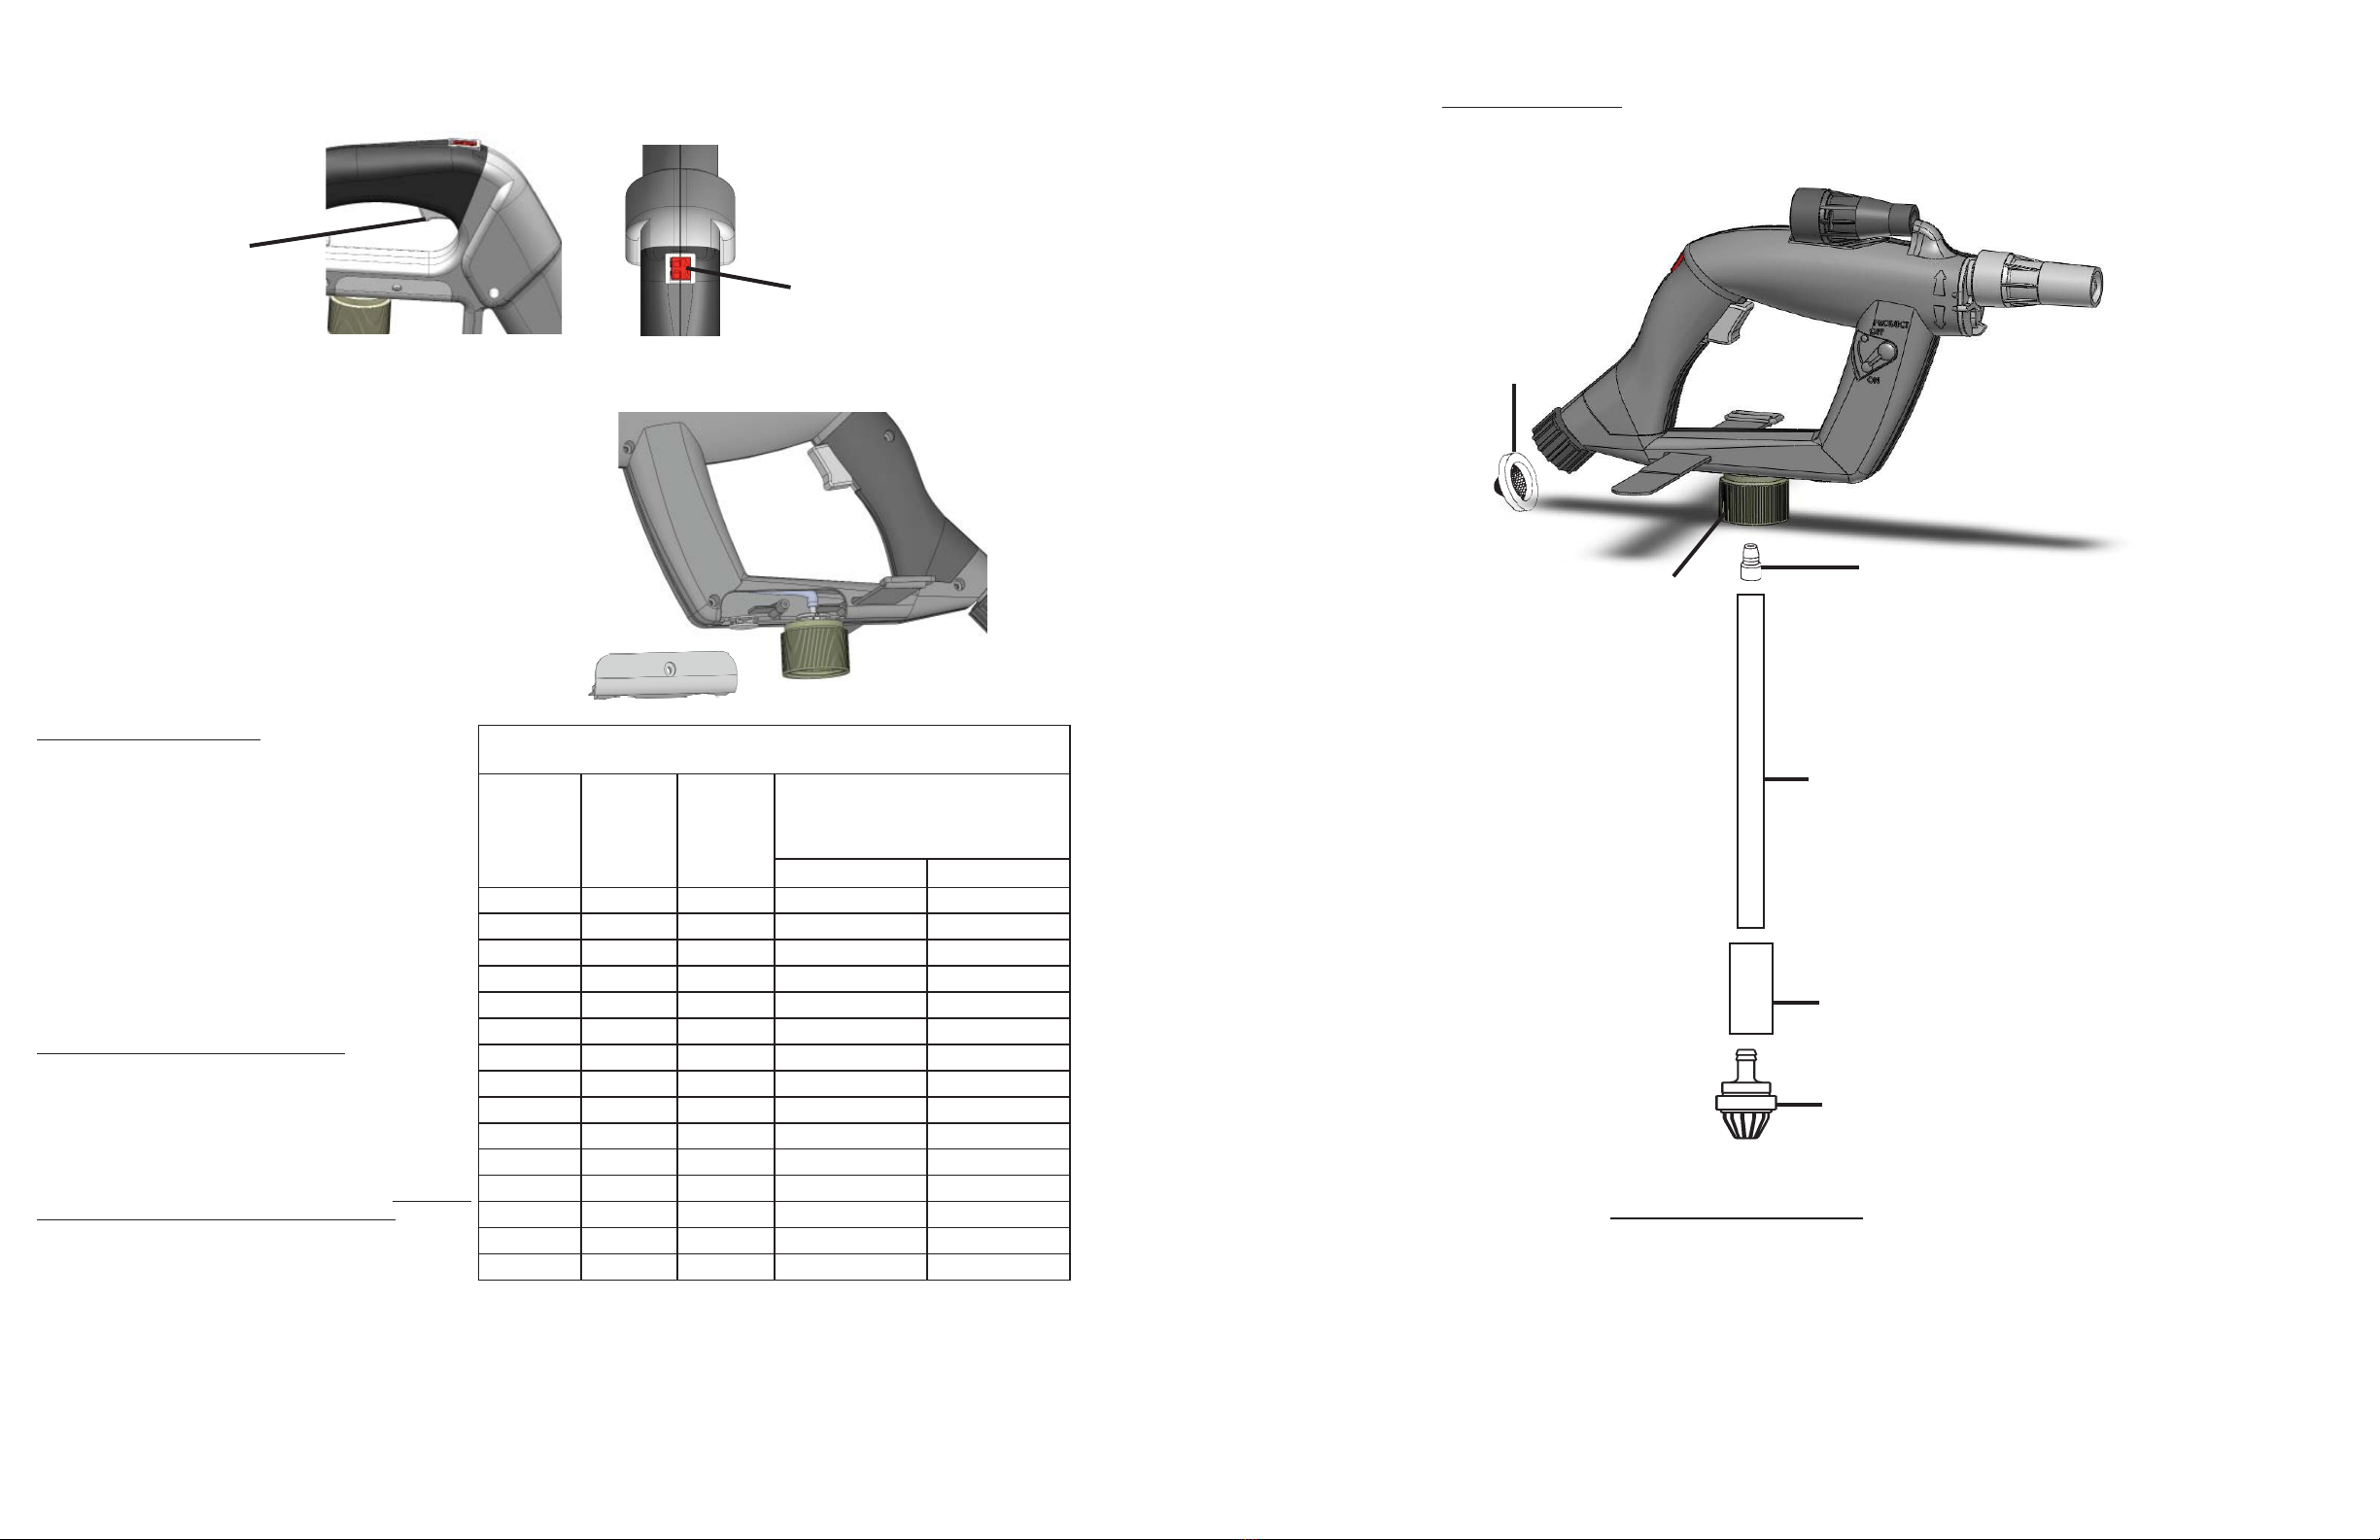
NOTE: Refer to parts diagram if unfamiliar with names of
system components.
Measurement of Concentration:
You can determine the dispensed water-to-product ratio for
anymeteringtip size andproduct viscosity. All that is required
is to operate the primed dispenser for a minute or so and note
twothings:theamountofdispensedsolution,andtheamount
of concentrate used in preparation of the solution dispensed.
The water-to-product ratio is then calculated as follows:
Dilution Ratio (X:1) where X = Amount of
Mixed Solution — Amount of Concentrate Drawn
Amount of Concentrate Drawn
Dilution Ratio, then, equals X parts water to one part concen-
trate (X:1). If the test does not yield the desired ratio, choose a
dierent tip and repeat the test. Alternative methods to this test are 1) pH (using litmus paper), and 2) titration. Contact your concentrate supplier
for further information on these alternative methods and the materials required to perform them.
Parts Diagram List:
1 238100 Strainer washer
2 10092189 Kit, cap replacement
3 690014 Metering tip kit
4 10027303 Pick-up tube, 12"
5 509900 Ceramic weight
6 10089410 Footvalve, Viton
* EPDM also available order 10076302
DescriptionPart No.Key
5
4
6
3
1
2
7. Depress trigger to begin dispensing desired concentrate solution; release trigger to stop flow of solution. To lock trigger
in "ON" position depress and hold trigger while sliding red lock button back then release trigger. To release lock push red
lock button up and slightly forward to stop flow of solution.
7. To disconnect, turn off water source. Make sure on/off valve is in OFF position. Disconnect water supply hose from unit.
TRIGGER
LOCKBUTTON
8. Bottle Conversion.
Your dispenser was delivered to fit an "F-Style" or
"Round Gallon" bottle. The cap can be converted from
one style to the other by removing the screw to the
cover,andrelocatingthecap.Replacethebuttoninsert
into the open hole. Then reinstall the cover and screw.
APPROXIMATE DILUTIONS
AT 40 PSI FOR WATER-THIN PRODUCTS (1.0 CP)
Tip
Color Orifice
Size Std. Drill
Number
Ratio
(per Eductor Flow)
2.5 GPM
Foamer Sprayer
No Tip .187 (3/16) 7:1 13:1
Grey .128 (30) 7.5:1 13:1
Black .098 (40) 8:1 13:1
Beige .070 (50) 8:1 15:1
Red .052 (55) 11:1 17:1
White .043 (57) 15:1 22:1
Blue .040 (60) 18:1 24:1
Tan .035 (65) 22:1 32:1
Green .028 (70) 32:1 46:1
Orange .025 (72) 45:1 57:1
Brown .023 (74) 49:1 64:1
Yellow .020 (76) 73:1 76:1
Aqua .018 (77) 82:1 87:1
Purple .014 (79) 140:1 140:1
Pink .010 (87) 280:1 280:1

This manual suits for next models

1

Popular Paint Sprayer manuals by other brands

Ryobi RAP200G How to get started

Ryobi

Ryobi RAP200G How to get started

Airless DP6825 operating instructions

Airless

Airless DP6825 operating instructions

Kooper Vaporoso 2409466 instruction manual

Kooper

Kooper Vaporoso 2409466 instruction manual

Retigo Gun 25 Operation manual

Retigo

Retigo Gun 25 Operation manual

Husqvarna HS2 Owner's/operator's manual

Husqvarna

Husqvarna HS2 Owner's/operator's manual

Maruyama MS074 Operator's manual

Maruyama

Maruyama MS074 Operator's manual

Huberth RP15000GL manual

Huberth

Huberth RP15000GL manual

Task Force Tips Masterstream Series Instructions for installation, safe operation and maintenance

Task Force Tips

Task Force Tips Masterstream Series Instructions for installation, safe operation and maintenance

Central Pneumatic 94605 Assembly and operation instructions

Central Pneumatic

Central Pneumatic 94605 Assembly and operation instructions

Central Pneumatic PAINT SPRAY GUN 30224 Assembly and operating instructions

Central Pneumatic

Central Pneumatic PAINT SPRAY GUN 30224 Assembly and operating instructions

FLORABEST 94531 Operation and safety notes

FLORABEST

FLORABEST 94531 Operation and safety notes

Hudson 2204 manual

Hudson

Hudson 2204 manual

GAMA ESH150-3PE Service manual

GAMA

GAMA ESH150-3PE Service manual

Foamit FI-10N Operation manual

Foamit

Foamit FI-10N Operation manual

R+M Suttner G&S ST-73 manual

R+M Suttner

R+M Suttner G&S ST-73 manual

Hudson Leader 60181 instructions

Hudson

Hudson Leader 60181 instructions

Black Ridge RF901AG instruction manual

Black Ridge

Black Ridge RF901AG instruction manual

EUROPRO MINIJET 80 user manual

EUROPRO

EUROPRO MINIJET 80 user manual

manuals.online logo
manuals.online logoBrands
  • About & Mission
  • Contact us
  • Privacy Policy
  • Terms and Conditions

Copyright 2025 Manuals.Online. All Rights Reserved.