manuals.online logo
Brands
  1. Home
  2. •
  3. Brands
  4. •
  5. Dowco
  6. •
  7. Boating Equipment
  8. •
  9. Dowco X24RC User manual

Dowco X24RC User manual

140298-00 | 06/18
Dowco Marine, Inc. | 1610 Frisco Drive, Lebanon MO 65536 | dowcomarine.com | (800) 404-5252
INSTALLATION INSTRUCTIONS
2019 G3 Full / Front Enclosure / Double Canopy
X24RC
PARTS LIST
TOOLS REQUIRED
1 Bow Canopy Frame (Figure 3)
1 Bow Canopy
1 Bow Canopy Boot
1 A Curtain
1 A Canopy with Zippers
1 A Canopy Boot
2 A Side Curtains (1 Port, 1 Starboard)
2 Bow Side Curtains (1 Port, 1 Starboard
2 A Extension Curtains (1 Port, 1 Starboard
1 Extended A Frame (Figure 4)
1 Extended A Canopy
1 Bow Curtain
1 Extended A Canopy Boot
Measuring Tape
Center Punch
Drill
⁄" Drill Bit
Pencil
Phillips Screwdriver
2 Sets SAE allen wrenches
WARNING
INDICATES POTENTIAL HAZARD
THAT COULD RESULT IN DEATH
OR INJURY
CAUTION
INDICATES POTENTIAL
HAZARD THAT COULD
RESULT IN BOAT DAMAGE
NOTE
INDICATES SPECIAL INFORMATION
TO MAKE MAINTENANCE EASIER
OR INSTRUCTIONS CLEARER
BOW HARDWARE PACKAGE
2 - "H" Brackets (1 ¼")
4 - ¼"-20 Barrel Nuts
2 - ¼"-20 Short Shoulder Bolts
2 - Deck Buttons w/ ¼"-20 x 1.5" Bolt
2 - ⁄ x 2" Bolts
2 - Lock Washers
2 - ⁄" Tri Wing Knob
2 - Plastic Shoulder Washers
8 - Self Drill Scews
AFT HARDWARE PACKAGE
2 "H" brackets (1 ¼")
4 ¼" - 20 Barrel Nuts
2 ¼" - 20 Short Shoulder Bolts
2 Deck Buttons w/ ¼" - 20 x 1.5" Bolt
2 ⁄" x 2 Bolts
2 Lock Washers
2 ⁄" Tri Wing Knob
4 Plastic Shoulder Washers
8 Self Drill Screws
140298-00 | 06/18
Dowco Marine, Inc. | 1610 Frisco Drive, Lebanon MO 65536 | dowcomarine.com | (800) 404-5252
STEP 1
Bracket location (A). Measure and place a mark on the top rail 102" forward from a main bracket. Button location (B). Measure and place a
mark on the top rail 26" forward from (A).
STEP 2
Center the brackets/buttons at each mark as shown in Figure 2. Transfer the centers of each hole at the bottom of the bracket on to the rail
using a center punch.
STEP 3
Using ⁄" drill bit, drill holes completely through the top rail.
STEP 4
Replace the brackets. Insert a 1 ¾" bolt from the top through the bracket and the rail. Place a barrel nut on each bolt and tighten (Figure 2).
STEP 5
Follow the same procedure for the other side.
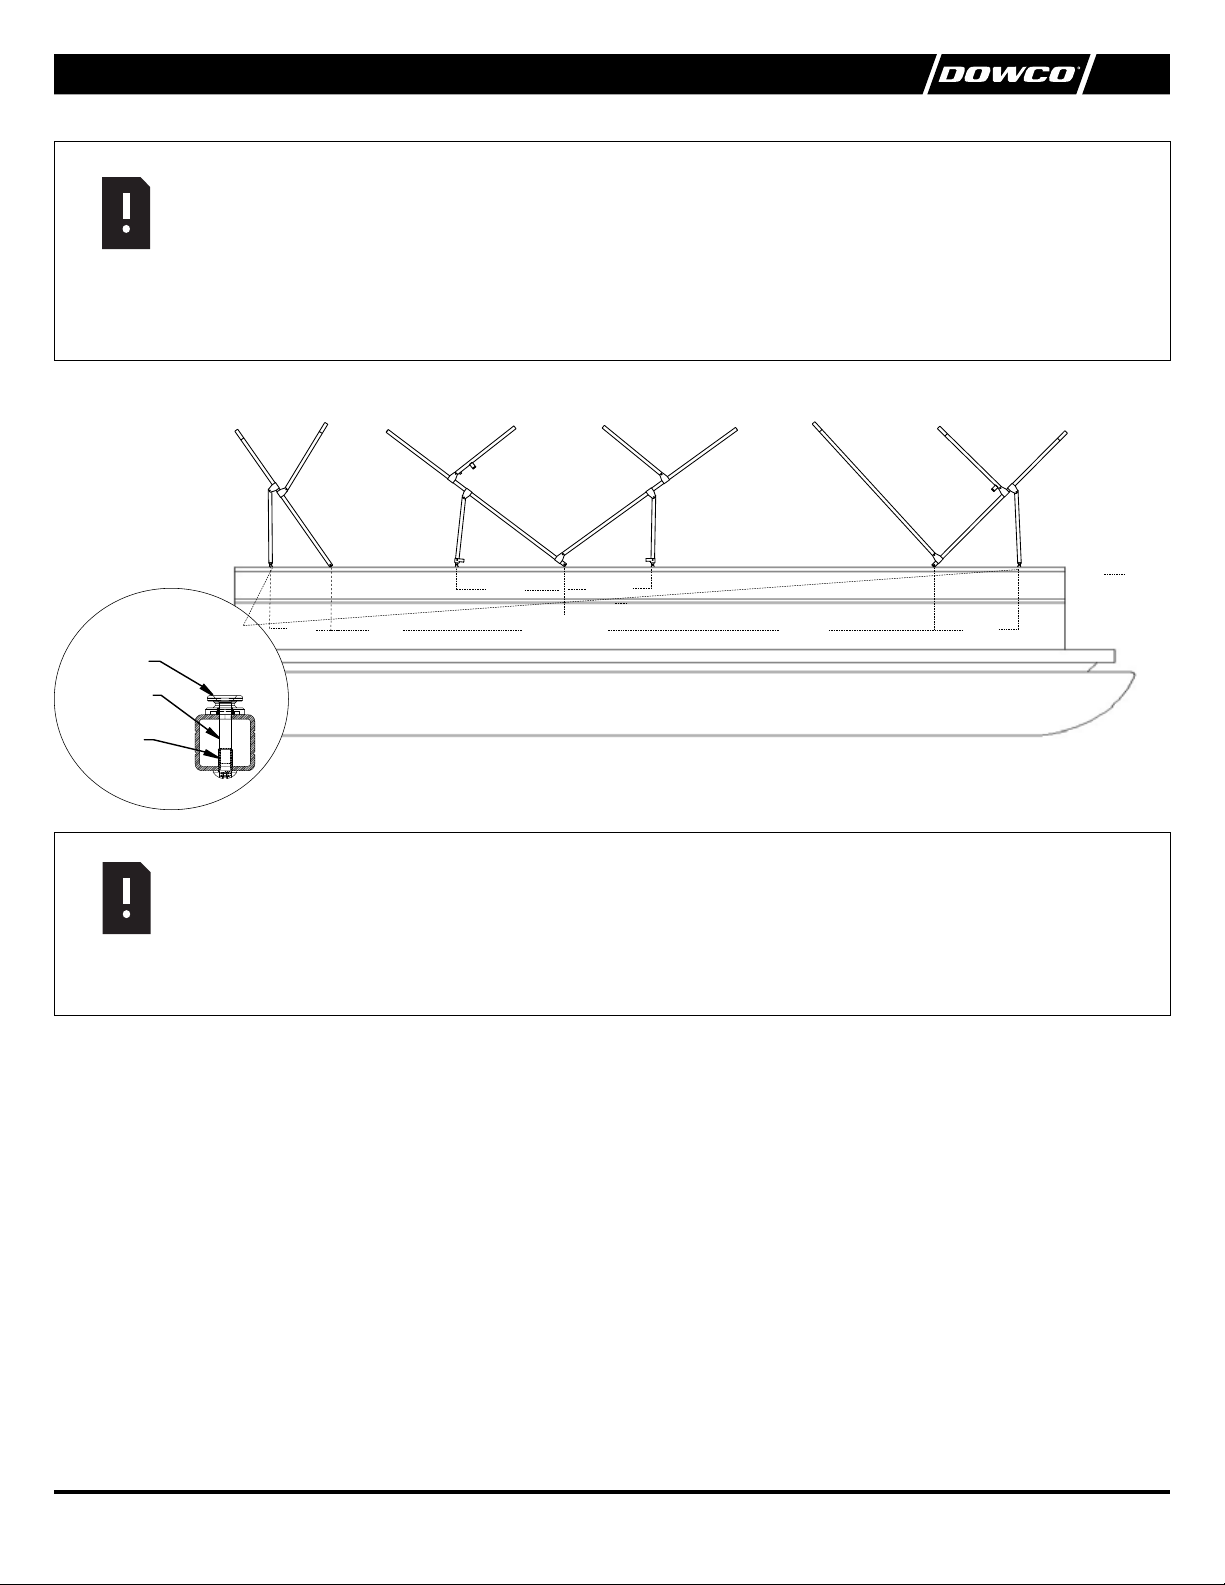
BRACKET LOCATIONS & ASSEMBLY (FIGURES 1 & 2)
NOTE:
This enclosure is designed to fit the 2013 G3 G3 X 24 RS Pontoon Boat that has the a canopy brackets in the following locations:
Main Bracket from back 122" Rear HDA 29.5" FWD HDA 20"
Measurements should be taken from the main bracket of the a canopy bracket as shown below for bow and extended a canopy brackets/hinges.
If the brackets are off more than 1-inch in either direction, the enclosure WILL NOT FIT.
All measurements are taken to the center of the brackets.
NOTE:
Your pontoon has been pre-assembled with an a canopy and a canopy frame from G3. The a canopy that is supplied with the pontoon is
not designed to be used with an enclosure. You must remove the standard a canopy and replace it with the a canopy that is supplied with the
purchase of your enclosure. Once the new canopy is installed, raise the entire unit to the "up" position. Make sure the a canopy is centered on the
frame between the port and starboard sides. This step is very critical, it will determine the final appearance of your completed enclosure.
FIG. 1
122”
TO BACK OF DECK
29.5” 20”
19 ”
116”
MAIN
AFT BOW
EXT. AFT
(NOT REPRESENTATIVE OF ACTUAL BOAT)
AB
31” 48”
BUTTON MOUNTING DETAIL
DECK BUTTON
1/4-20 x 1 1/2
CSINK FASTENER
1/4-20 x 3/4
BARREL NUT
140298-00 | 06/18
Dowco Marine, Inc. | 1610 Frisco Drive, Lebanon MO 65536 | dowcomarine.com | (800) 404-5252
STEP 1
Insert crown pieces (1) into side assemblies (2), making sure that the bend in the center of the mid-frame is to the top following the curve of
the frame.
STEP 2
Aer each side assembly has been inserted into each crown piece, secure each split with the provided ½" self drilling screws by drilling
tthrough the crown into the stakes of the side assemblies.
STEP 3
With two people take the bow frame assembly onto the boat and insert the main bow tube into the previously installed bow H bracket (A).
Using two provided ⁄"x2" bolts, lock washers and tri-wing knobs secure the frame to the rail (Figure 2).
STEP 4
Once the frame is secure raise the assembly up and latch the hold-down arm (4) to the deck buttons (B) (Figure 2).
STEP 5
Lay the secondary and aux bows toward the a of the boat. Zip the front pocket of the bow canopy to the main bow (5). Release the hold down
arms (4) and zip the bow canopy to the a canopy. Push up the aux bow and zip to pocket - push the secondary bow up and zip to pocket.
BOW CANOPY & BOW CANOPY FRAME ASSEMBLY (FIGURE 3)
DECK BUTTON DETAIL
CAUTION
TO PREVENT DAMAGE TO THE TOP RAIL, IT IS RECOMMENDED TO DRILL A PILOT HOLE FIRST.
SIDE ASSEMBLY
MAIN BOW
BOW
AFT
HOLD DOWN ARM
CROWN
AUXILLARY BOW
A
B
C
D
3
1
2
4
5
RAIL
SECONDARY BOW
FIG. 2
FIG. 3
140298-00 | 06/18
Dowco Marine, Inc. | 1610 Frisco Drive, Lebanon MO 65536 | dowcomarine.com | (800) 404-5252
STEP 6
Center the bow canopy at this time before securing the hold-down arm (4) to the pontoon. Place end of hold-down arm (4) into bracket (B).
STEP 7
Move to the installation of the extended a frame/canopy (Figure 4).
STEP 1
Insert crown piece (1) into the port leg (2) and starboard leg (3) making sure that the bend in the center of the crown is to the top following
the curve of the frame.
STEP 2
At this time, you can fix the frame at the split location by using the #8 self drilling screw provided.
STEP 3
With two people, the frame can now be attached to the boat and deployed.
STEP 4
Once the frame is up the extended a canopy can be installed on the frame.
1. Zip the pocket onto the bow first
2. Pull the extended a canopy zippers to the a canopy zippers and zip together
3. Center the extended a canopy
4. Engage the pusher arms
EXTENDED AFT CANOPY & EXT. AFT CANOPY FRAME ASSEMBLY FIGURE 4
STEP 1
Each curtain has a tag sewn in the upper le-hand corner of the flap. This will identify each curtain and give its location on the pontoon.
STEP 2
The curtain flaps will face the inside of the pontoon.
STEP 3
Zip all curtains to both canopy tops.
CURTAINS FIGURE 5
FIG. 4
CROWN PIECE
STARBOARD LEG
PORT LEG
2
3
1
140298-00 | 06/18
Dowco Marine, Inc. | 1610 Frisco Drive, Lebanon MO 65536 | dowcomarine.com | (800) 404-5252
STEP 1
Make sure all the curtains are zipped together.
STEP 2
Start with the a side curtains. Make sure the lower front corner of
both curtains hang the same distance from the door opening. Mark
the location of the nearest snap (A) on the aluminum rail and install
stud.
STEP 3
Find the last snap (B) on the same side. You may have to adjust the
curtain bottoms by pulling the curtains taut so they appear smooth
along the rail. You do not want the curtains to appear "wavy". Mark
and install the stud.
STEP 4
Find the first snap (C) on the same side. Install the remaining studs.
INSTALLING SCREW STUD FASTENERS FIGURE 5
CARE
WARNING
DO NOT TRAILER BOAT WITH ANY CANOPY TOP UP IN RADAR ARCH POSITION OR WITH THE ENCLOSURE ASSEMBLED!
PORT DOOR
DOOR
DOORSTARBOARD
TYPICAL OVERHEAD VIEW
B
B
A
A
C
C
AFT BOW
STEP 4
Zip all curtains together. NOTE: Leaving a zipper unzipped slightly may ease the starting of the adjacent zipper.
STEP 5
Leave the bottom of the curtains draped over the pontoon rails
STEP 6
Make sure the bottom of the curtains are hanging the same length on both sides of the pontoon. This is where centering both of the canopy
tops is very important. If the curtains are uneven, you may have to remove all the curtains and re-center one or both canopy tops.
AFT SIDE CURTAIN
(PORT)
AFT SIDE CURTAIN
(STARBOARD)
AFT CANOPY
BOW SIDE CURTAIN
(PORT)
BOW SIDE CURTAIN
(STARBOARD)
BOW CANOPY BOW CURTAIN(S)AFT CURTAIN)S)
EXTENDED AFT CANOPY
EXTENDED AFT
SIDE CURTAIN
(STARBOARD)
EXTENDED AFT
SIDE CURTAIN
(PORT)
FIG. 5

Other Dowco Boating Equipment manuals

Dowco X24RS User manual

Dowco

Dowco X24RS User manual

Dowco ALUMACRAFT BOAT COVERS WITH COVER-LIFT... User manual

Dowco

Dowco ALUMACRAFT BOAT COVERS WITH COVER-LIFT... User manual

Dowco FISHINI User manual

Dowco

Dowco FISHINI User manual

Dowco G3 X322RF User manual

Dowco

Dowco G3 X322RF User manual

Dowco V322 CC - 2019 User manual

Dowco

Dowco V322 CC - 2019 User manual

Dowco V324SE User manual

Dowco

Dowco V324SE User manual

Dowco 73582 Series User manual

Dowco

Dowco 73582 Series User manual

Popular Boating Equipment manuals by other brands

SLEIPNER MOTOR AS SIDE-POWER SX35 Instruction guide

SLEIPNER MOTOR AS

SLEIPNER MOTOR AS SIDE-POWER SX35 Instruction guide

EZ Dock Port MAX Series Owner's manual and installation instructions

EZ Dock

EZ Dock Port MAX Series Owner's manual and installation instructions

Malone MPG461GU instructions

Malone

Malone MPG461GU instructions

Regency Polaris MS5000 owner's manual

Regency

Regency Polaris MS5000 owner's manual

Sea Tel 4006-23 IN A 60" RADOME Installation and operation

Sea Tel

Sea Tel 4006-23 IN A 60" RADOME Installation and operation

Highfield PA420 installation guide

Highfield

Highfield PA420 installation guide

Big Air Vapor Tower quick guide

Big Air

Big Air Vapor Tower quick guide

Wichard NEXE 4.0V12 installation manual

Wichard

Wichard NEXE 4.0V12 installation manual

Taco Marine NEPTUNE PREMIUM Installation instruction guide

Taco Marine

Taco Marine NEPTUNE PREMIUM Installation instruction guide

Wipaire WIPLINE 7000 Service manual

Wipaire

Wipaire WIPLINE 7000 Service manual

ProNav Motion manual

ProNav

ProNav Motion manual

Lippert SureShade 2000 Series installation manual

Lippert

Lippert SureShade 2000 Series installation manual

ZF Marine ZF 360 Series instructions

ZF Marine

ZF Marine ZF 360 Series instructions

Lewmar CRW 400 product manual

Lewmar

Lewmar CRW 400 product manual

SKYLOTEC Jackpod Davit Instructions of use

SKYLOTEC

SKYLOTEC Jackpod Davit Instructions of use

Attwood 5091 installation instructions

Attwood

Attwood 5091 installation instructions

Lewmar S900 Owners installation, operation & servicing manual

Lewmar

Lewmar S900 Owners installation, operation & servicing manual

NVequipment SPRAYHOOD Assembly instructions

NVequipment

NVequipment SPRAYHOOD Assembly instructions

manuals.online logo
manuals.online logoBrands
  • About & Mission
  • Contact us
  • Privacy Policy
  • Terms and Conditions

Copyright 2025 Manuals.Online. All Rights Reserved.