Dr. Clark VariGamma 2.0 User manual

VariGamma 2.0
Dr. Clark Association Dr. Clark Zentrum
www.drclark.com, info@drclark.com

EN
2
Table of contents
1. Important: please read before using! 3
1.1 Purpose 3
1.2 Important safety precautions 3
1.2.1 Safe use of the VariGamma 2.0
3
1.2.2 Contraindications – When not to use the VariGamma 2.0
3
1.2.3 Possible side effects
3
2. Description of the device 4
2.1 Working parts 4
2.2 Icons 4
2.3 Technical data 4
3. App 4-6
4. Instructions 7
4.1 Operating the device 7
4.1.1 How to insert the VariGamma Module 2.0
7
4.1.2 Turning ON/OFF
7
4.1.3 Connecting the VariGamma 2.0 (gel pads/wrist bands)
7
4.1.4 Using Program Drivers/microSD Cards
8
4.1.4.1 Uploading/downloading a program 8
4.1.4.1.1 Upload program from Program Driver 8
4.1.4.1.2 Download program from VariGamma 2.0 to Program Driver 8
4.1.4.1.3 Download program from VariGamma 2.0 to APP 8
4.1.4.2 Updating firmware 8
4.1.4.2.1 Update firmware with microSD Card 8
4.1.4.2.2 Upload/update – Errors 8
4.1.5 Main Menu
9
4.1.6 Running programs and functional options
9
4.1.6.1 Program phases and steps 9
4.1.6.2 Pausing & stopping program or skipping steps 9
4.1.7 Customized user programs
10
4.1.7.1 Defining/setting custom programs (programming frequencies) 10-11
4.1.7.2 Options within custom programs (deleting, saving & moving between steps) 11
4.1.7.3 Settings for custom programs (altering, deleting, saving, running programs) 11
4.1.8 Run the last program (session)
12
4.1.9 Run program from library
12
4.2 Battery 13
4.2.1 Battery voltage indicator
13
4.2.2 Battery charging
14
5. Settings 14
6. Care and cleaning 14
7. Classification 14
8. Safety inspections 14
9. Warranty 15

The VariGamma 2.0
3
1. Important: please read before using!
1.1 Purpose
The VariGamma 2.0 is not a medical device. Do not use it for any medical purpose.
The device is a Bio-Frequency Generator and can generate a signal as described in the books of Dr. Hul-
da Clark. Note that the frequency applications according to Dr. Hulda Clark have not yet been sufficiently
confirmed by clinical studies to allow any medical claims for this purpose. We specifically do not and are
not allowed to claim any medical purposes or benefits for the use of the device.
1.2 Important safety precautions
Please carefully read the entire instruction manual before using the device.
1.2.1 Safe use of the VariGamma 2.0
• The VariGamma 2.0 should only be used with accessories specifically designed for it.
• Keep the VariGamma 2.0 away from water and other fluids.
• Never use the VariGamma 2.0 when the device does not seem to be working properly or is damaged.
• The VariGamma 2.0 should not be used at the same time as another high-frequency device such as a
cell phone. There can be interference between the electromagnetic fields of the other device and that
of the VariGamma 2.0. This could cause a stronger current.
• The electrodes should not be smaller than approx. 8 cm² (1¼ square inches). The use of smaller
electrodes can lead to skin burns. Larger electrodes (12 cm² or 2 square inches) are recommended.
• The device should not be used while operating machines or during activities that require increased
attention. Do not use while driving.
• Do not allow the VariGamma 2.0 to fall, do not handle inappropriately or subject to extreme
temperatures or high humidity (use only at temperatures between 10°C-40°C [50°F-104°F] and a
relative humidity of under 90%).
• Special attention is needed when the VariGamma 2.0 is used near children.
• Store the VariGamma 2.0 in the original carrying case to keep it clean and protect it from damage.
1.2.2 Contraindications – When not to use the VariZapper 2.0
• Users with electronic implants, e.g. pacemakers or pumps
• Users with irregular heart beats
• Users who are pregnant
• Users who suffer from seizures
• Users with skin disease in areas where electrodes are to be applied
• Users with malignancies in the area where the electrodes are to be applied
1.2.3 Possible side effects
Skin irritation may occur as a reaction to the electrodes, the electrode gel or the current itself. In the case
of lasting redness, burning, itching or blisters under the electrodes or in the area where the electrodes
were at the end of a session, consult with a physician before further use. A temporary mild redness of the
skin in the area of the electrode stimulation is normal, since circulation is improved by the stimulation. If
you are prone to skin irritations from using the VariGamma 2.0, try using larger electrodes, such as wrist
bands, larger gel electrodes, etc.
*To date, with many thousands of units in operation, no adverse reactions have been noted to us, we work very
hard to keep our customers safe and satisfied with our products, please make sure, you read the complete manual
before you begin to use the device.

4
The VariGamma 2.0
2. Description of the device
2.1 Working parts
1. Slot for Modules 2.0
2. Display
3. Turnwheel (also ON/OFF)
4. Directional buttons (left/right)
5. VariZapper Module 2.0
6. VariCharger Module 2.0
7. microSD Cards slot (PDs)
8. USB-C slot (charging)
2.2 Icons
+
2.3 Technical data
Dimensions: VariBase 2.0: 152x79x29 mm
VariModule 2.0: 51x38x11 mm
Weight: VariBase 2.0: 220 g
VariModule 2.0: 10 g
Output voltage: 5-15 Volt (with load up to 3 KΩ)
Frequency range Sine: 1-999’999 Hz (± 30 ppm)
Frequency range Square: 1-499’999 Hz (± 30 ppm) The maximum Frequency with
Square shape is technically limited to avoid the problem of
EMC emissions.
Rise and fall time with square shape: less than 700 ns (nanoseconds)
Wobble times: between 1-15 times in the Step – active time
Offset voltage (POS): shape all positive
Offset voltage (MIXED): average shape value 0
Power consumption: 25 mA when not running/50 mA when running
(all with default screen brightness [50%])
Voltage source: 9 V rechargeable battery (300 mAh)
Estimate duration of Battery: 5 hours in running mode (before recharging)
Recharging time of Battery: maximum 3 hours
3. App (only available for Android Smartphones at the moment)
The free Dr. Clark smartphone App (VariApp) can be downloaded and used for purchasing and storing
virtual Program Drivers (PD’s) at a lower cost than physical Program Drivers (microSD Cards). You can
download the programs onto your VariZapper 2.0 with NFC (Near Field Communication) technology and
store them on your device.
After the download, the VariApp needs to be associated with your VariBase 2.0 using an ID Code. After
the association and registration, you will be able to view the Program Driver Catalog of Dr. Clark and
purchase Programs using Credit Card, PayPal or Prepayment.
*
Wobble function:
The device generates a frequency oscillating between the lowest and highest frequencies defined by the
program, rather than a single, steady frequency.
*
Wobble function (repetion):
Defines how many times, within the Step – active time, the frequency oscillates between the
highest and lowest frequencies set.
EN
1
2
3
4
5
6
78
Play/Resume
Last Step
First Step
Pause
Forward
Back
Up
Down
Save
Delete
Main Menu
(“Home”)
Program Settings
VariZapper Module 2.0
Step – active time
Step – pause time
Lowest Frequency
Highest Frequency
Duty Cycle
Wave Shape
(sine or square)
Offset Type (posi-
tive or mixed)
Voltage
Wobble Function*
Wobble Function
(Number of times)*
Battery Level – Full
Battery Level –
3
/
4
Battery Level –
1
/
2
Battery Level –
1
/
4
Battery Level – <1h
Battery Warning
Countdown clock for current step Current Step Total Steps
Choose Step

3.1 Downloading the App and signing up
Find the Dr. Clark VariApp in the Play Store (Google APP Store, pre-installed on your Android Smart-
phone) and download it. When you open it, you see the welcome message (Fig. A).
A short tutorial explains how the App works.
Your are then asked to scan the QR Code (Quick Response Code) that you find on a small sticker
on your VariZapper 2.0 carrying case (Fig B). When you scan it, our VariApp is linked to your VariZapper
2.0.
Furthermore, the App asks you to provide your customer information (name, address, phone number
and e-mail address). This information is needed so we can issue proper invoices when you purchase
Programs in the App.
Finally, the App will ask to ALLOW the App to access the camera and phone when in use. Please click
“ALLOW” here, as these are needed to scan QR Codes and to transmit the orders to us. The only infor-
mation that will be transferred to us is your customer information and your purchases.
3.2 The PD Library
In the PD Library you can see all available Programs for your VariGamma 2.0 (Fig. C). Here you can
purchase any Programs that you might want, at a much lower price than physical Program Drivers.
Payments are accepted with credit card or PayPal. When you choose “invoice me!”, the office will have
to process your order and will issue a QR Code to download the Programs you paid for.
3.3 Using Codes
Click “Use code” to scan a QR Code. Make sure the code you want to read lies in the red square on
your screen (Fig. D). A QR code can contain one of three things:
1) Payment confirmed: This code is for one or more Programs that are paid for. When you read this
code, the paid Programs will upload into “My PDs” immediately.
2) VariCoins: VariCoins are store credits for the VariApp. You can spend VariCoins on any of the available
Programs.
3) Discount: Discounts can define a discount by amount or percentage, for one or several Programs.
Discounts have an expiration date.
When you scan a code, you will be asked if you want to activate the code right away. If you choose
“later”, you can then find the Discount in your Wallet. If you choose now, the Discount will be reflected in
the pricing in the Library.
The VariGamma 2.0
Fig. A
Fig. B
Fig. C Fig. D
5
Gamma

6
The VariGamma 2.0
3.4 My PDs
Under My PDs you can see the list of all your paid or uploaded Program Drivers (Fig. E). Uploaded
Programs could be from a person who has a VariGamma frequency generator, who has defined a
specific program for you and transferred it to your App.
3.5 Upload Programs to your VariGamma 2.0
To Upload the Program to your VariGamma 2.0:
1) Choose the Program you want to upload to your VariGamma 2.0 under “My PDs”.
2) Press “UPLOAD PD” in the App (Fig. F). A prompt to hold your phone over your VariGamma 2.0 unit
appears on the screen (Fig. G)
3) Wait for 3 seconds;
4) Hold the Phone over the Turnwheel of your VariGamma 2.0 when it is in the Main Menu screen (Fig.
H). The Program Driver is now uploaded, and both the App and the VariGamma 2.0 show a confirmation
on their screen.
Two things are important for a smooth upload of Programs, because the range of NFC is very small:
First, it is important that you hold the smartphone HORIZONTALLY directly over the Turnwheel of the
VariGamma 2.0. Secondly, make sure the center of the NFC antenna of your smartphone is right over the
VarGamma 2.0’s antenna. The center of the VariGamma 2.0’s antenna is the middle of the Turnwheel.
Most cell phones’ NFC antenna is towards the middle of the smartphone device. In some smartphones,
it is towards the top of the device. If you have trouble uploading Programs to your VariGamma 2.0, the
informaiton about the location of the NFC antenna on your smartphone is usually easily found through
a quick internet search such as “Samsung Galaxy 9 NFC antenna location”. See e.g. here for such a
search result:
https://forums.androidcentral.com/samsung-galaxy-s5/468435-where-nfc-located.html
Also, you can find a short video tutorial about uploading Programs to the VariGamma 2.0 on Youtube
here: www.youtu.be/xxxxxxxxx
EN
Fig. E Fig. F Fig. G Fig. H

4. Instructions
4.1 Operating the device
4.1.1 How to insert the VariGamma Module 2.0
The VariGamma Module 2.0 has to be inserted into the top of the VariBase 2.0 (Fig. 1). After inserting
the Module, turn on (see
4.1.2 Turning ON/OFF
) the device and the system will check if the Module is
compatible with the current VariBase 2.0 firmware:
1. If it is compatible, the VariGamma 2.0 is started.
2. If it is not compatible because it needs an update (Fig. 2), please see: 4.1.4.1.2 Update firmware with microSD Card
3. If there is a problem with the Module, the message in Fig. 3 will appear.
NOTE: Please dismount any Module when the device is not in use, otherwise the battery will discharge quickly.
4.1.2 Turning ON/OFF
To turn on the device, press the Turnwheel button (Fig. 4) at the center for about 5 seconds. As the
device turns on, the panel in Fig. 5 appears. Press the Turnwheel button for at least 5 seconds to turn
off the device.
Fig. 4 Fig. 5
4.1.3 Connecting the VariGamma 2.0 (gel pads/wrist bands)
The contact surface between the skin and the chosen electrodes must be at least 8 cm2(1¼ square
inches). The larger the contact surface, the better. Any electrodes may be used as long as they match
the specifications. Placement of the electrodes in the region of the upper body can increase the risk of
ventricular fibrillation. The VariGamma 2.0 is supplied with two options to connect the device to the
body:
Gel pads (Fig.6): Gel pads should not be placed in the following areas of the body:
close to the eyes, in the mouth, on the neck and head, near the heart or genitals,
except at direct order and under the supervision of a qualified, trained and
authorized specialist. Gel pads should only be used on undamaged and clean
skin surfaces. Gel pads may be used several times. When they no longer stick or
the gel layer is dirty or worn off, they should be replaced.
Wrist bands (Fig. 7): Soak the yellow parts, then squeeze them, so that they
remain moist. Then strap them around the wrists, one on each side. They can
also be used around the ankles. Pay special attention when using wrist bands to
be sure they are not so tight as to inhibit blood circulation.
1. Insert the cable jack into the VariGamma Module 2.0 on top.
2. Connect the black and red plugs to the electrodes and place them on the body.
3. Make sure there is good contact between the electrodes and the skin.
4. Select the program that you want to run and start it.
5. The device will check the connection of the electrodes.
If everything is OK, you will be asked to confirm and start the program.
6. In case of poor connection, the device will display the message in Fig. 8.
After re-checking connection, select one of the options. 7
The VariGamma 2.0
Fig. 1 Fig. 2 Fig. 3
Fig. 6
Fig. 7
Fig. 8

8
The VariGamma 2.0
The microSD Card should be put in the slot with the the PINS SHOWING UP (Fig. 9 and 10). The microSD
Cards have frequencies programmed on them which are put together according to Dr. Clark’s frequency
list for their specific purpose. This enables you to use the VariZapper 2.0 with very specific frequencies.
4.1.4.1 Uploading/downloading a program
The device automatically recognizes whether the microSD Card contains a frequency program or a
firmware update.
4.1.4.1.1 Upload program from Program Driver
IMPORTANT:
Insert the microSD Card only when the Main Menu Panel is displayed (Fig. 11).
Just after the Program Driver (PD) has been put into the slot, the PD will be uploaded automatically and
the message in Fig. 12 will appear, if the upload was successful. To select the uploaded PD press .
You will be able to see and select all the PDs stored on the device (Fig. 13).
4.1.4.1.2 Download program from VariGamma 2.0 to Program Driver
You can download a custom program that you have programmed with your VariGamma 2.0 onto a
Program Driver. This feature allows you to download the custom program to another VariBase (Zapper
or Gamma):
1) Go to Select a program.
2) Choose the program you want to download on an empty Program Driver
3) Select Send to Card
4) Confirm selection by choosing YES in the next step
5) Insert empty card into MiniSD Card slot and confirm by choosing
6) Wait for the confirmation
4.1.4.1.3 Download program from VariGamma 2.0 to APP
You can download a custom program that you have programmed with your VariGamma 2.0 to the
VariAPP. This feature allows you to also store all your custom programs on the VariAPP:
1) Go to Select a program.
2) Choose the program you want to download on o the VariAPP
3) Select Send to APP
4) Confirm selection with choosing YES in the next step
5) Follow instructions on the screen
6) Start APP and go into my PDs and choose the add icon
7) Hold Smartphone with NFC antenna over the wheel
6) Wait for the confirmation on the Smartphone then follow the instruction on the VariGamma 2.0
4.1.4.2 Updating firmware
The device automatically recognizes whether the microSD Card contains a frequency program or a
firmware update.
4.1.4.2.1 Update firmware with microSD Card
To update the firmware with a microSD Card:
1) First turn off your VariGamma 2.0
2) Insert the microSD card with the new firmware, then
3) turn on the device (press the Turnwheel for 5 seconds).
The software is now updated automatically. While the firmware loads, the Turnwheel is lit red. When the
upload is complete, the Turnwheel light turns green.
4) Remove the microSD card, before you restart your updated device.
4.1.4.2.1 Upload/update – Errors
If you try to upload a PD or update your VariGamma 2.0 with a microSD Card that has no information on
it, it will not be recognized and nothing will happen.
EN
Fig. 9 Fig. 10
Fig. 12 Fig. 13
4.1.4 Using Program Drivers/microSD Cards
Fig. 11

9
The VariGamma 2.0
4.1.5 Main Menu
After the welcome panel, the Main Menu panel will be displayed. Rotate the Turnwheel to select one of
the functions displayed and press the wheel to select a function.
You can choose from (Fig. 14):
• Run the last program that was used in the previous session;
• Select a program in the list of stored programs in the library (Normal Zapping: 7min zapping - 20min
pause - 7min zapping - 20min pause - 7min Zapping/32Khz/square wave/positive offset, Continuous
Zapping: 60min zapping/32Khz/square wave/positive offset, Zappicator: 10min zapping/1Khz/square
wave/positive offset)
• Settings (Language, Display and Sound)
4.1.6 Running programs and functional options
4.1.6.1 Program phases and steps
A program has a maximum of 30 steps. A step consists of an active working phase followed by a
passive pause phase of a minimum of 5 seconds without an output signal before moving to the next
step. Each step is defined by parameters such as Frequency, Wave form (SINE or SQUARE) and
Voltage, which are displayed during the active phase.
If a „Wobble“ function is set, there is an upper and a lower frequency, between which the generated
frequency oscillates. The continuously changing frequency values are then constantly adjusted on the
display while the program is running.
4.1.6.2 Pausing & stopping program or skipping steps
While the program is running, there are three icons on the bottom of the display:
• to pause the program
• to go back to Main Menu
• to skip a step
PAUSE: You can pause the program while it is running by selecting (Fig. 15). The wave graphic will
stop moving.
RESUME: You may start the program again by selecting (Fig. 16).
STOP: To stop the program press . A confirmation panel will appear (Fig. 17). Push the Turnwheel
button to choose:
• YES to stop program and go back to Main Menu
• NO to continue with the program running
SKIP STEP: Use the Turnwheel button to choose to skip the running step. A confirmation panel will
appear (Fig.17). Use the Turnwheel button to choose YES or NO:
• select YES to skip the step
• select NO to continue with the program running
Fig. 14
Fig. 15 Fig. 16 Fig. 17

The VariGamma 2.0
4.1.7 Customized user programs
With the VariGamma 2.0 you can program your own frequencies and put together full programs
between 1 and a maximum of 36 Steps that can be saved on the VariBase, VariAPP or Program Drivers
(MiniSD Cards) to be used at any time. Customizing allows you to program specific parameters such as:
running time, pause time, wave shape (sine/square), duty cycle, volt, offset voltage (positive/mix), wobb-
le, frequencies (low/high).
4.1.7.1 Defining/setting custom programs (programming frequencies)
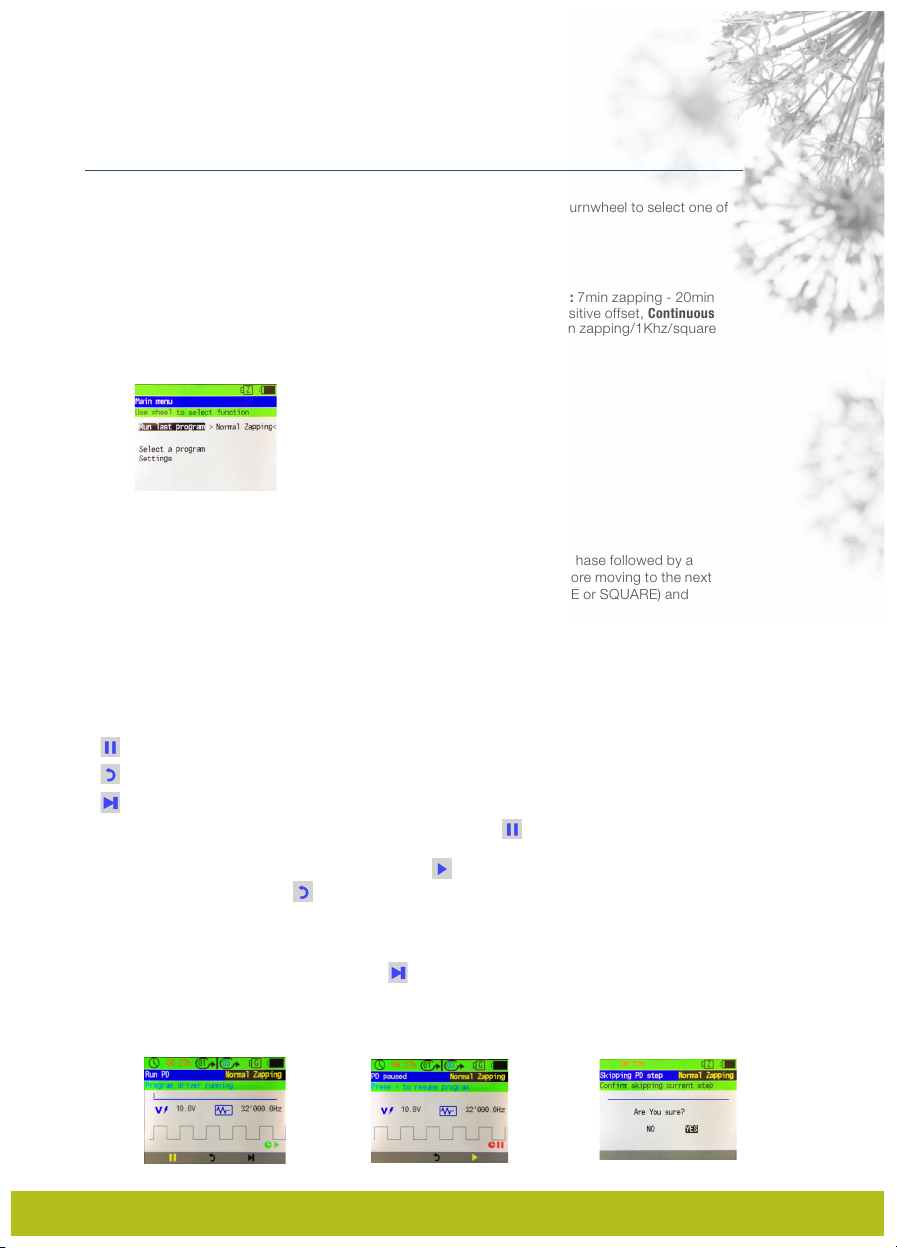
To start defining/programming the steps in a custom program choose Define a custom
program in the Main Menu (Fig. 17a). The following parameters are required to be defined:
1. PROGRAM NAME: by default the name of your custom program will start with USER001 and continue
in succession. If you do not want to change the name continue with . To change the Name, press the
turnwheel to activate the edit mode (Fig. 17b). Now press the right button on the VariBase to start editing
the first character (Fig. 17c). By turning the wheel you can change the character using letters and
numbers. Once you have chosen the first character press the right button again to move to the next
character on the right. You can use the buttons on the VariBase to move right and left and the wheel to
change the characters. Continue till you have your desired Name for the program. To confirm your Name
change press the turnwheel. Proceed to defining the first step of the program with .
2. DEFINE DATA OF STEP - PAGE 1/2 (Fig. 17d):Once you have confirmed the name of your program the
next page is the first step of your program. Here you define the parameters of the first step. NOTE: for each
Step you will have to fill in 2 pages of parameters (also see: Define Data of Step - Page2/2).
- Running time of your fequency; how long should the frequency be played for the first step. To
change press wheel and turn for 30 second increments. To confirm change press wheel again.
Range: 1 - 60mins.
-
Pause time of your fequency; how long should the pause be between the played frequency and the
next frequency to be played in the next step. To change press wheel and turn for 5 second increments. To
confirm change press wheel again. Range: 5secs. - 10mins.
- Wave shape; choose between a sine or square wave. To change press wheel and turn. To confirm
change press wheel again.
- Duty cycle; to change press wheel and turn. To confirm change press wheel again. We suggest to leave
this at the default value of 50% unless you are fully aware of the usage. Range: 15 - 85%.
- Voltage; define at what voltage the frequency should be generated. To change press wheel and turn. To
confirm change press wheel again. Range: 1 - 15V.
After making your changes proceed to the second page of Define data of step by moving forward with this
icon . You can also move backwards to edit the name of the program or return to the main menu with
this icon . If you decide to return none of the changes so far will be saved, meaning your custom
program will not be saved. You will have to confirm or unconfirm before moving on.
3. DEFINE DATA OF STEP - PAGE 2/2 (Fig. 17e):By completing the second page of a step you will be able
to save the step with . NOTE: for each Step you will have to fill in 2 pages of parameters (also see: Define Data
of Step - Page1/2).
- Offset type: choose between a positive offet (default) or mixed.
To change press wheel and turn. To confirm change press wheel again.
- Wobble (see explantion page 4); To enable press wheel and turn
right to change N (NO- default) to Y (YES). If you choose Y the following icon
will appear:
EN
10
Fig. 17a Fig. 17b Fig. 17c
Fig. 17d

11
The VariGamma 2.0
- Wobble repetion (see explantion page 4); press wheel to choose how many times you want the
wobble function repeated in the step. Press the wheel to confirm change. Range: 1 - 15.
- Frequency; This icon appears only when you choose not to enable the wobble funtion. Therefore
you only need to put in one frequency you wish to run in the step. Press the wheel to change the default
frequency of 100’000.0Hz. Use the right/left buttons to move between characters and turn the wheel to
change the nummeric value where is shown. Range: 1 - 999’999.9Hz.
- / Low-/High Frequency; If you activate the wobble function you will have to put in a lower
frequency and a higher frequency. The wobble function will play the frequencies between the lower and
higher frequencies. Range: 1 - 999’999.9Hz.
Once you have programmed the first step by completing the second page of the parameters of a step you
can save the step by choosing (Fig. 17e) and confirming or move to programming the next step with .
4.1.7.2 Options within custom programs (saving, deleting & moving between steps)
The options you have within programming a step will always be displayed at the bottom of the screen in
the grey field:
1. Saving: By completing the second page of a step you will be able to save the step with . This icon
and option will only appear when you are on the second page of a Step. After confirming the programming
will end. If you decide to continue programming steps do not save until you have programmed all the steps
you need. Once saved the program will appear in you library for futher options:4.1.7.3 Options for custom
programs (Running program, viewing/altering, transfering & deleting)
2. Deleting: The deleting option only appears when at least one step has been created and continuing with
programming. The delete icon will appear in the lower part of the screen. After confirming by pressing
the wheel step will be deleted. Whiles programming you can only delete one Step after the other. For
deletion of the complete program see: 4.1.7.3 Options for custom programs (Run program, view/alter,
transfering & deleting)
3. Moving between steps: You have the option to move/choose a step faster by using this icon which
allows you to choose the Step number you would like to move to. go to the icon and press the wheel to
activate, then rotate the wheel to choose the step you want. Confirm by pressing the wheel.
4.1.7.3 Options for custom programs (Run program, viewing/altering, transfering & deleting)
Once a program has be saved it will appear in the Program Driver (PD) library in the right half of the screen
under Select a program in the Main Menu. Use the VariBase buttons (right/left) to switch between screen
areas. If you select a custom program you will have the following options (Fig. 17f):
1. Run program: Select this option to run the program.
2a. View/alter program
(Fig. 17f):
Here the parameters of the custom program can be viewed or edited.
Edit by choosing the step you want to edit and then select the editing icon . See: 4.1.7.1 Defining/setting
custom programs (programming frequencies). After the desired change move to the second page of the step
and save changes. Editing is done seperately on each step.
2b. Adding a Step (Fig.17g): When in viewing/altering mode, a step can be added to the custom program
by selecting and following the steps here: 4.1.7.1 Defining/setting custom programs (programming
frequencies)
3. Transfering ( Send to APP & Send to Card)
(Fig. 17f):
You have the option to save your custom program
to your account on the VariAPP or to the empty Program Driver Card (mircoSD card). For instruction go to:
4.1.4.1.2 & 4.1.4.1.3 .
4. Deleting custom program
(Fig. 17f):
Choosing this option will delete the complete custom program from
the VariBase after confriming.
Fig. 17e Fig. 17f Fig. 17g

12
The VariGamma 2.0
EN
4.1.8 Run the last program (session)
In the Main Menu panel the first option available is “Run last program > -
ProgramName
-”. Choosing this
option, you will run the last used or uploaded program. Press the Turnwheel button to select it, the
device will ask to connect the device to the body and confirm with (Fig. 18) for the connection check
to start.
When the connection check is completed:
• Successful: if the connection check is successful select to run the program (Fig. 19).
The device will then show the running panel where you can follow the progress of the program (Fig. 20).
At the center of the panel is a progress bar, the voltage, the frequency and the wave type. At the top of
the display starting from the left are indicated the time remaining to finish the program, the step currently
running and the total number of steps. (Skipping steps see paragraph 4.1.6.2.)
• Poor connection: if the connection is not good the device will show a POOR CONNECTION Panel (Fig.
21). You can select to retry the connection check after checking the electrodes or select to
continue without connection check (Note: there is no connection control for the Zappicator Program).
When the program is completed, select to return to the Main Menu (Fig. 22).
4.1.9 Run program from library
From the Main Menu Panel you get to the program library by selecting „Select program“. Scroll with the
Turnwheel button and press to select.
The program menu lists all of the programs on the device. The screen is divided in three sections (Fig.
23):
• left section: list of the standard programs (Normal zapping, Continuous Zapping and Zappicator). To
navigate inside the list, rotate the Turnwheel. Press Turnwheel to make selection.
• right section: all the programs uploaded. Rotate the Turnwheel to get to the desired program. If there is
more than one screen (6) of programs, you can rotate down or up to the next screen OR
• get to the bottom section (icon bar), where you can navigate screens with the up and down arrows.
• To move between the left, right and bottom section: use the Direction buttons (left/right) on the device.
Those are the two buttons with the arrow left and right of the Turnwheel. You can not navigate between
the sections with the Turnwheel.
Fig. 18
Fig. 20 Fig. 21 Fig. 22
Fig. 23
Fig. 19

The VariGamma 2.0
Selecting a program opens the following panel (Fig. 24). Choose between “Run program” or “View
program details”.
To run the program, choose “Run program” rotating the Turnwheel and pressing it to select. Next you
will have to confirm the connection of the electrodes by selecting to start the connection check (Fig.
25; the Zappicator program starts immediately without connection check).
When the connection check is completed:
• Successful: if the connection check is successful select to run the program (Fig. 26). The device will
show the running panel where you can follow the progress of the program (Fig. 20). At the center of the
panel is a progress bar, the voltage, the frequency and the wave type. At the top of the display starting
from the left are indicated the time remaining to finish the program, the step currently running and the
total number of steps. (Skipping steps see paragraph 4.1.6.2.)
• Poor connection: if the connection is not good, the device will show a POOR CONNECTION Panel (Fig.
21).You can select to retry the connection check after checking the electrodes or select to
continue without connection check (Note: there is no connection control for the Zappicator Program).
When the program is completed, select to return to the Main Menu (Fig. 11).
Note: Within the Zappicator and Continuous Zapping programs, skipping steps will terminate the
program, due to the programs having only 1 step. The same holds true for any other 1-step program, or
when you are on the last step of a program. At the end of the program, select to go back to the Main
Menu.
To view the program details of a program choose “View program details” with the Turnwheel and press it
to select. The Program details of the chosen program will be shown (Fig. 27).
Here you will be able to see all the parameters of a program for each step: Step – active time, Step –
pause time, Wave shape, Duty cycle, Voltage 5-15 V, Offset POS or MIXED, Wobble YES or NO, Wobble
times, Minimum frequency, Maximum frequency.
To navigate and view each step rotate the Turnwheel to the symbols or to go back or forth
between the steps. Choose to go to the last step. Choose to go to the first step.
4.2 Battery
The VariGamma 2.0 is powered by a 9 V rechargeable block battery.
4.2.1 Battery voltage indicator
The battery status is indicated by the battery symbol on the top-right of the display.
The shorter the black bar in the battery icon, the lower the voltage.
• full bar 9.5-8.7 V
• ¾ bar 8.7-8.5 V
• half bar 8.5-8.2 V
• ¼ bar 8.2-8 V
• <8 V. Once the battery voltage has decreased to 8 V, there is usually enough power left to complete
the current program. Recharge the battery once the program has finished.
• 7.4 V or less icon. The active program will stop immediately. A battery alarm message to charge the
battery will appear, while the VariGamma 2.0 is shutting off. When the progress bar is at 100% the
device will shut off (Fig. 28). Recharge the battery! 13
Fig. 24 Fig. 25
Fig. 27
Fig. 28
Fig. 26

14
The VariGamma 2.0
4.2.2 Battery charging
To recharge the battery, disconnect the VariGamma Module 2.0 and connect the VariCharger Module
2.0 (Fig. 29). Attach the USB-C Charging Cable to the VariBase (Fig. 30) and connect it to a USB outlet
plug or a PC‘s USB port. The following image will be displayed (Fig. 31). Note that during the charging
phase ALL FUNCTIONS ARE DISABLED. A yellow LED light will light up on the VariCharger Module
2.0 while the device is being charged, the same LED light will blink when charging is completed (Fig.32).
The device will take a maximum of 3 hours to recharge completely. It is suggested to charge the device
only when neccessary (low battery), in order to maximize battery life.
5. Settings
Get to “Settings” from the Main Menu. Once you are in the Settings Menu, you have two choices (Fig. 33):
Language: Press the Turnwheel button to select “Language”. In the language Menu, choose your
language: English, German, French, Spanish or Italian (Fig. 34) and confirm/discard your choice.
Select to go back to the previous menu or to go back to the Main Menu.
Display and sound: Rotate the Turnwheel button to choose the menu Display/sound (Fig. 35). Select the
brightness or sound setting by pressing the Turnwheel button when on your choice. When the symbol
„<--->“ appears, you can rotate the Turnwheel button to change the value of the brightness or sound. By
pressing the Turnwheel button again, you confirm the change. Select to go back to settings or to
go back to the Main Menu.
6. Care and cleaning
The VariGamma 2.0 requires no special maintenance or cleaning materials. The device may be
cleaned with a soft, lint-free cloth. Make sure no moisture gets inside the device. If moisture
does enter the case, a technical inspection is required before the device is used again.
Do not use any alcoholic or abrasive fluids.
7. Classification
The VariGamma 2.0 is not a medical device. Do not use it for any medical purpose.
The device is a Bio-Frequency Generator and can generate a signal as described in the books of Dr. Hul-
da Clark. Note that the frequency applications according to Dr. Hulda Clark have not yet been sufficiently
confirmed by clinical studies to allow any medical claims for this purpose. We specifically do not and are
not allowed to claim any medical purposes or benefits for the use of the device.
8. Saftey inspections
When used commercially or in business, safety inspections of the VariGamma 2.0 must be made after 24
months. The safety inspections must include:
1. Verification of the existence of the instruction manual
2. Verification of the completeness of all fittings
3. Visual examination
• for mechanical damage
• of all cables and connections for damage
4. Functional Safety
• Inspection of the signals generated
• Verification of the frequency
These technical inspections may only be made by specifically trained persons and must be documented.
EN
Fig. 29 Fig. 32Fig. 31Fig. 30
Fig. 33 Fig. 34 Fig. 35

The VariGamma 2.0
15
9. Warranty
We offer a warranty on the VariGamma for 2 years from the purchase date. Excluded are the cable, electrodes and
batteries. We guarantee the device to be free of defects for 2 years from the purchase date, provided the product is used
for its intended purpose and handled according to this manual.
We offer no warranty for:
• not observing the instruction manual
• servicing errors
• inappropriate use or handling
• repair by unauthorized personnel
• force majeure, e.g. lightning
• transportation damages due to poorly packaged returns
• failure to carry out maintenance or safety inspections
• ordinary wear and tear
We are not responsible for damage caused by this device especially if due to gross negligence or intent, or any bodily
harm or loss of life due to any negligence or intent.
If this unit fails to operate properly under normal usage we will replace or repair (at our discretion) any defective parts for
free, as long as:
* The unit is received at our office within two years from its date of purchase.
* It was used under the guidelines outlined in this manual.
* The customer returns to us a copy of the original invoice with the unit (not necessary if the unit was purchased directly from
us and we are given the information to locate the sale in our system).
* The customer is responsible for the cost of shipping the unit to our office.
Name: _______________________________________________________________
Address: _____________________________________________________________
_____________________________________________________________________
City: ____________________________________ State: __________ ZIP: ________
E-mail: ______________________________________________________________
Phone: ______________________________________________________________
Describe the problem you encountered with the VariGamma 2.0: ________________
_____________________________________________________________________
_____________________________________________________________________
Date of Purchase: ______________________________________________________
Signature ____________________________________________________________
SIGN ABOVE AND SEND A COPY OF THIS PAGE WITH THE VARIGAMMA 2.0 TO US:
USA and international Europe
Dr. Clark Research Association Dr. Clark Zentrum Ltd
1019 Hard Rock Rd c/o S&H Productfulfilment BV
Somers, MT 59932 Logistic Boulevard 1
USA 4791VC Moerdijk
[email protected] Netherlands
+1-800-220 3741
Germany Switzerland
Dr. Clark Zentrum Dr. Clark Zentrum
Augsburger Strasse 16 Gersauerstrasse 76
86157 Augsburg 6440 Brunnen
Germany Switzerland
+49 2162 3649 481 +41 31 868 31 31
This manual suits for next models
1
Table of contents
Other Dr. Clark Personal Care Product manuals
Popular Personal Care Product manuals by other brands

Panasonic
Panasonic The Advanced RF Facial Device operating instructions

Sigma
Sigma Acnego5 user manual

Dr. Kern
Dr. Kern Tan Can 4000 Installation and user guide

TracPal
TracPal TracPal Product information and user instructions

Kinetec
Kinetec 3D-LITE CUT-4-CUSTOM Instructions for use

Tria
Tria AGE-DEFYING LASER SRL Instructions for use