Dr. Clark VariZapper 2.0 User manual

VariZapper 2.0
Dr. Clark Association Dr. Clark Zentrum
www.drclark.com, info@drclark.com
Anleitung_VariZapper2018_all language.indd 1 19.05.2018 03:10:14

The VariZapper 2.0
EN
2
Table of contents
1. Important: please read before using! 3
1.1 Purpose 3
1.2 Important safety precautions 3
1.2.1 Safe use of the VariZapper 2.0
3
1.2.2 Contraindications – When not to use the VariZapper 2.0
3
1.2.3 Possible side effects
3
2. Description of the device 4
2.1 Working parts 4
2.2 Icons 4
2.3 Technical data 4
3. App 4
4. Instructions 5
4.1 Operating the device 5
4.1.1 How to insert the VariZapper Module 2.0
5
4.1.2 Turning ON/OFF
5
4.1.3 Connecting the VariZapper 2.0 (gel pads/wrist bands)
5
4.1.4 Using Program Drivers/microSD Cards
6
4.1.4.1 Uploading a program/updating firmware 6
4.1.4.1.1 Upload program from Program Driver 6
4.1.4.1.2 Update firmware with microSD Card 6
4.1.4.1.3 Upload/update – Errors 6
4.1.5 Main Menu
7
4.1.6 Running programs and functional options
7
4.1.6.1 Program phases and steps 7
4.1.6.2 Pausing & stopping program or skipping steps 7
4.1.7 Run the last program (session)
8
4.1.8 Run program from library
9
4.2 Battery 9
4.2.1 Battery voltage indicator
9
4.2.2 Battery charging
10
5. Settings 10
6. Care and cleaning 10
7. Classification 10
8. Safety inspections 10
9. Repair Service 11
10. Warranty 11
Anleitung_VariZapper2018_all language.indd 2 19.05.2018 03:10:15

The VariZapper 2.0
3
1. Important: please read before using!
1.1 Purpose
The VariZapper 2.0 is not a medical device. Do not use it for any medical purpose.
The device is a Bio-Frequency Generator and can generate a signal as described in the books of Dr. Hul-
da Clark. Note that the frequency applications according to Dr. Hulda Clark have not yet been sufficiently
confirmed by clinical studies to allow any medical claims for this purpose. We specifically do not and are
not allowed to claim any medical purposes or benefits for the use of the device.
1.2 Important safety precautions
Please carefully read the entire instruction manual before using the device.
1.2.1 Safe use of the VariZapper 2.0
• The VariZapper 2.0 should only be used with accessories specifically designed for it.
• Keep the VariZapper 2.0 away from water and other fluids.
• Never use the VariZapper 2.0 when the device does not seem to be working properly or is damaged.
• The VariZapper 2.0 should not be used at the same time as another high-frequency device such as a
cell phone. There can be interference between the electromagnetic fields of the other device and that
of the VariZapper 2.0. This could cause a stronger current.
• The electrodes should not be smaller than approx. 8 cm² (1¼ square inches). The use of smaller
electrodes can lead to skin burns. Larger electrodes (12 cm² or 2 square inches) are recommended.
• The device should not be used while operating machines or during activities that require increased
attention. Do not use while driving.
• Do not allow the VariZapper 2.0 to fall, do not handle inappropriately or subject to extreme
temperatures or high humidity (use only at temperatures between 10°C-40°C [50°F-104°F] and a
relative humidity of under 90%).
• Special attention is needed when the VariZapper 2.0 is used near children.
• Store the VariZapper 2.0 in the original arrying case to keep it clean and protect it from damage.
1.2.2 Contraindications – When not to use the VariZapper 2.0
• Users with electronic implants, e.g. pacemakers or pumps
• Users with irregular heart beats
• Users who are pregnant
• Users who suffer from seizures
• Users with skin disease in areas where electrodes are to be applied
• Users with malignancies in the area where the electrodes are to be applied
1.2.3 Possible side effects
Skin irritation may occur as a reaction to the electrodes, the electrode gel or the current itself. In the case
of lasting redness, burning, itching or blisters under the electrodes or in the area where the electrodes
were at the end of a session, consult with a physician before further use. A temporary mild redness of the
skin in the area of the electrode stimulation is normal, since circulation is improved by the stimulation. If
you are prone to skin irritations from using the VariZapper 2.0, try using larger electrodes, such as wrist
bands, larger gel electrodes, etc.
Anleitung_VariZapper2018_all language.indd 3 19.05.2018 03:10:16

4
The VariZapper 2.0
2. Description of the device
2.1 Working parts
1. Slot for Modules 2.0
2. Display
3. Turnwheel (also ON/OFF)
4. Directional buttons (left/right)
5. VariZapper Module 2.0
6. VariCharger Module 2.0
7. microSD Cards slot (PDs)
8. USB-C slot (charging)
2.2 Icons
+
2.3 Technical data
Dimensions: VariBase 2.0: 152x79x29 mm
VariModule 2.0: 51x38x11 mm
Weight: VariBase 2.0: 220 g
VariModule 2.0: 10 g
Output voltage: 5-15 Volt (with load up to 3 KΩ)
Frequency range Sine: 1-999’999 Hz (± 30 ppm)
Frequency range Square: 1-499’999 Hz (± 30 ppm) The maximum Frequency with
Square shape is technically limited to avoid the problem of
EMC emissions.
Rise and fall time with square shape: less than 700 ns (nanoseconds)
Wobble times: between 1-15 times in the Step – active time
Offset voltage (POS): shape all positive
Offset voltage (MIXED): average shape value 0
Power consumption: 25 mA when not running/50 mA when running
(all with default screen brightness [50%])
Voltage source: 9 V rechargeable battery (300 mAh)
Estimate duration of Battery: 5 hours in running mode (before recharging)
Recharging time of Battery: maximum 3 hours
3. App
The free Dr. Clark smartphone App (VariApp) can be downloaded and used for purchasing and storing
virtual Program Drivers at a lower cost than physical Program Drivers (microSD Cards). You can down-
load the programs onto your VariZapper 2.0 with NFC technology and store them on your device.
After the download, the VariApp needs to be associated with your VariBase 2.0 using an ID Code. After
the association and registration, you will be able to view the Program Driver Catalog of Dr. Clark and
purchase Programs using Credit Card, PayPal or Prepayment.
*
Wobble function:
The device generates a frequency oscillating between the lowest and highest frequencies defined by the
program, rather than a single, steady frequency.
*
Wobble function (Number of times):
Defines how many times, within the Step – active time, the frequency oscillates
between the highest and lowest frequencies set.
EN
1
2
3
4
5
6
78
Play/Resume
Next Step
Previous Step
Last Step
First Step
Pause
Forward
Back
Up
Down
Save
Delete
Main Menu
(“Home”)
Program Settings
VariZapper Module 2.0
Step – active time
Step – pause time
Lowest Frequency
Highest Frequency
Duty Cycle
Wave Shape
(sine or square)
Offset Type (posi-
tive or mixed)
Voltage
Wobble Function*
Wobble Function
(Number of times)*
Battery Level – Full
Battery Level –
3
/
4
Battery Level –
1
/
2
Battery Level –
1
/
4
Battery Level – <1h
Battery Warning
Countdown clock for current step Current Step Total Steps
Anleitung_VariZapper2018_all language.indd 4 19.05.2018 03:10:21

3.1 Downloading the App and signing up
Find the Dr. Clark VariApp in the Play Store and download it. When you open it, you
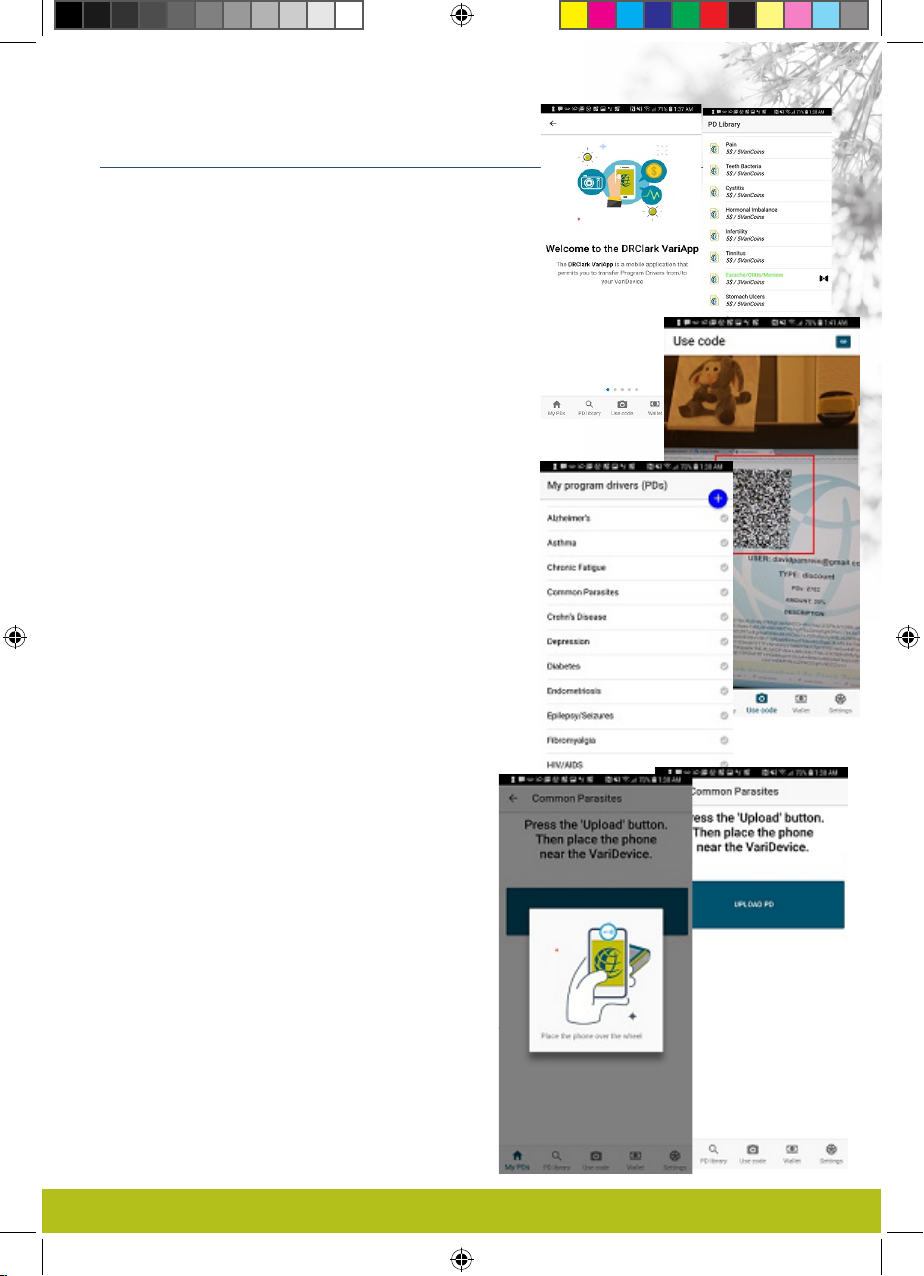
see the welcome message [Fig].
A short tutorial explains how the App works.
Your are then asked to scan the QR Code that you find on a small sticker on
your VariZapper 2.0 carrying case [Fig]. When you scan it, our VariApp is linked to
your VariZapper 2.0.
Furthermore, the App asks you to provide your customer information (name,
address, phone number and e-mail address). This information is needed so we
can issue proper invoices when you purchase Programs in the App.
Finally, the App will ask to ALLOW the App to access the camera and phone
when in use. Please click “ALLOW” here, as these are needed to scan QR Codes
and to transmit the orders to us. The only information that will be transferred to us
is your customer information and your purchases.
3.2 The PD Library
In the PD Library you can see all available Programs for your VariZapper 2.0 [Fig].
Here you can purchase any Programs that you might want, at a much lower price
than physical Program Drivers. Payments are accepted with credit card or PayPal.
When you choose “invoice me!”, the office will have to process your order and will
issue a QR Code to download the Programs you paid for.
3.3 Using Codes
Click “Use code” to scan a QR Code. Make sure the code you want to read lies in
the red square on your screen [Fig]. A QR code can contain one of three things:
1) Payment confirmed: This code is for one or more Programs that are paid for.
When you read this code, the paid Programs will upload into “My PDs” immediately.
2) VariCoins: VariCoins are store credits for the VariApp. You can spend VariCoins
on any of the available Programs.
3) Discount: Discounts can define a discount by amount or percentage, for one or
several Programs. Discounts have an expiration date.
When you scan a code, you will be asked if you want to activate the ode right away.
If you choose “later”, you can then find the Discount in your Wallet. If you choose
now, the Discount will be reflected in the pricing in the Library.
3.4 My PDs
Under My PDs you can see he list of all your paid or uploaded Program
Drivers [Fig]. Uploaded Programs could be from a person who has a
VariGamma frequency generator, who has defined pecific program for you
and transferred it to your App.
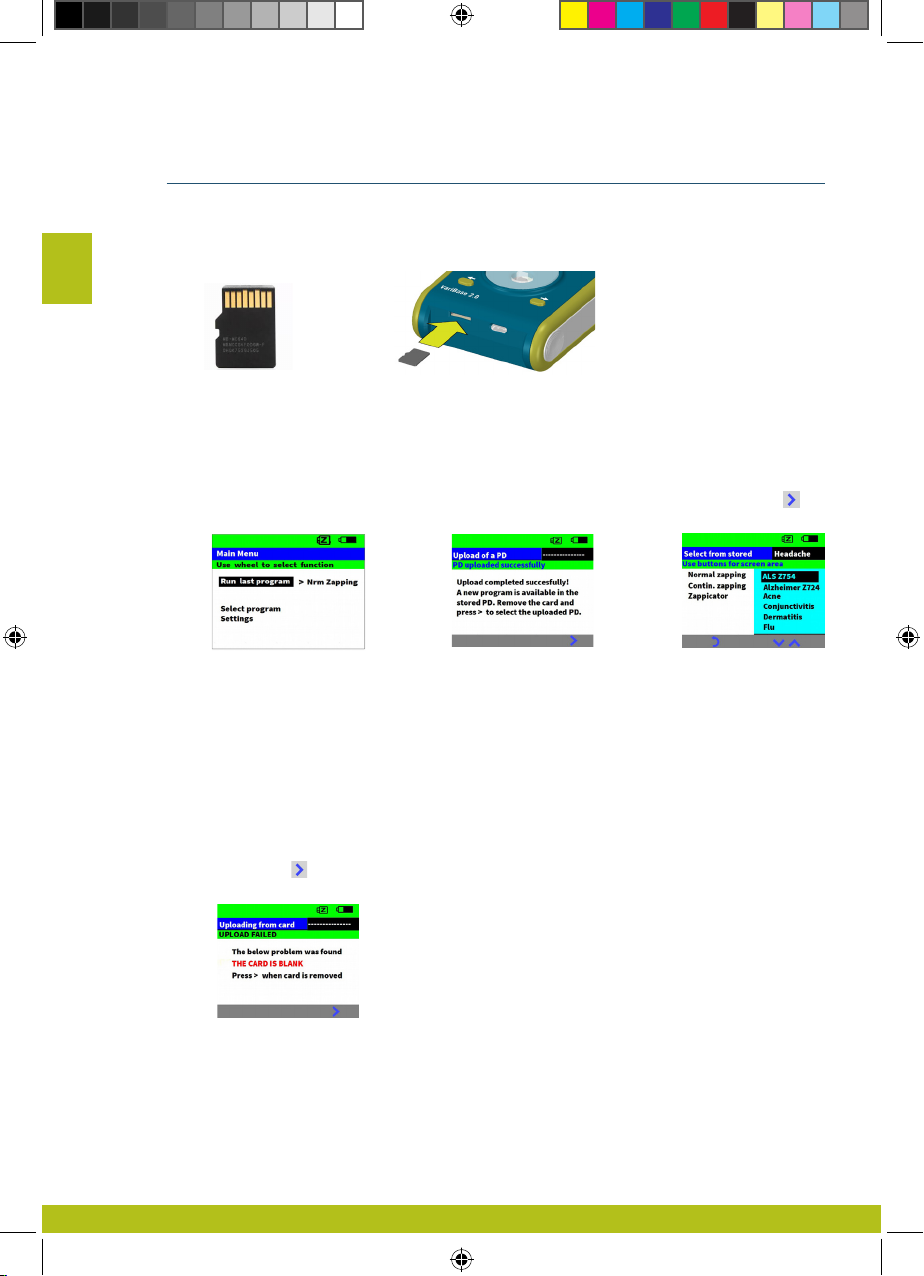
3.5 Upload Programs to your VariZapper 2.0
Pick the Program you want to upload to your VariZapper 2.0 under
“My PDs”. To Upload the Program to your Zapper:
1) Press “UPLOAD PD” in the App [Fig]. A prompt to hold your phone
over your VariZapper unit appears on the screen [Fig]
2) Wait for 3 seconds;
3) Hold the Phone over the Turnwheel of your VariZapper when it is in
home screen [Fig].
The Program Driver s now uploaded, and both the App and the Zapper
show a confirmation on their screen.
Two things are important for a smooth upload of Programs, because
the range of NFC is very small:
First, it is important that you hold the smartphone HORIZONTALLY
directly over the Turnwheel of the VariZapper.
Secondly, make sure the center of the NFC antenna of your smartphone is right
over the VariZapper’s antenna. The center of the VariZapper’s antenna is the middle
of the Turnwheel. Most cell phones’ NFC antenna is towards the middle of the
smartphone device. In some smartphones, it is towards the top of the device.
If you have trouble uploading Programs to your VariZapper, the informaiton about the
location of the NFC antenna on your smartphone i usually easily found through a
quick internet search such as “Samsung Galaxy 9 NFC antenna location”. See e.g.
here for such a search result:
https://forums.androidcentral.com/samsung-galaxy-s5/468435-where-nfc-located.html
Also, you can find a short video tutorial about uploading Programs to the VariZapper
on Youtube here:
www.youtu.be/xxxxxxxxx
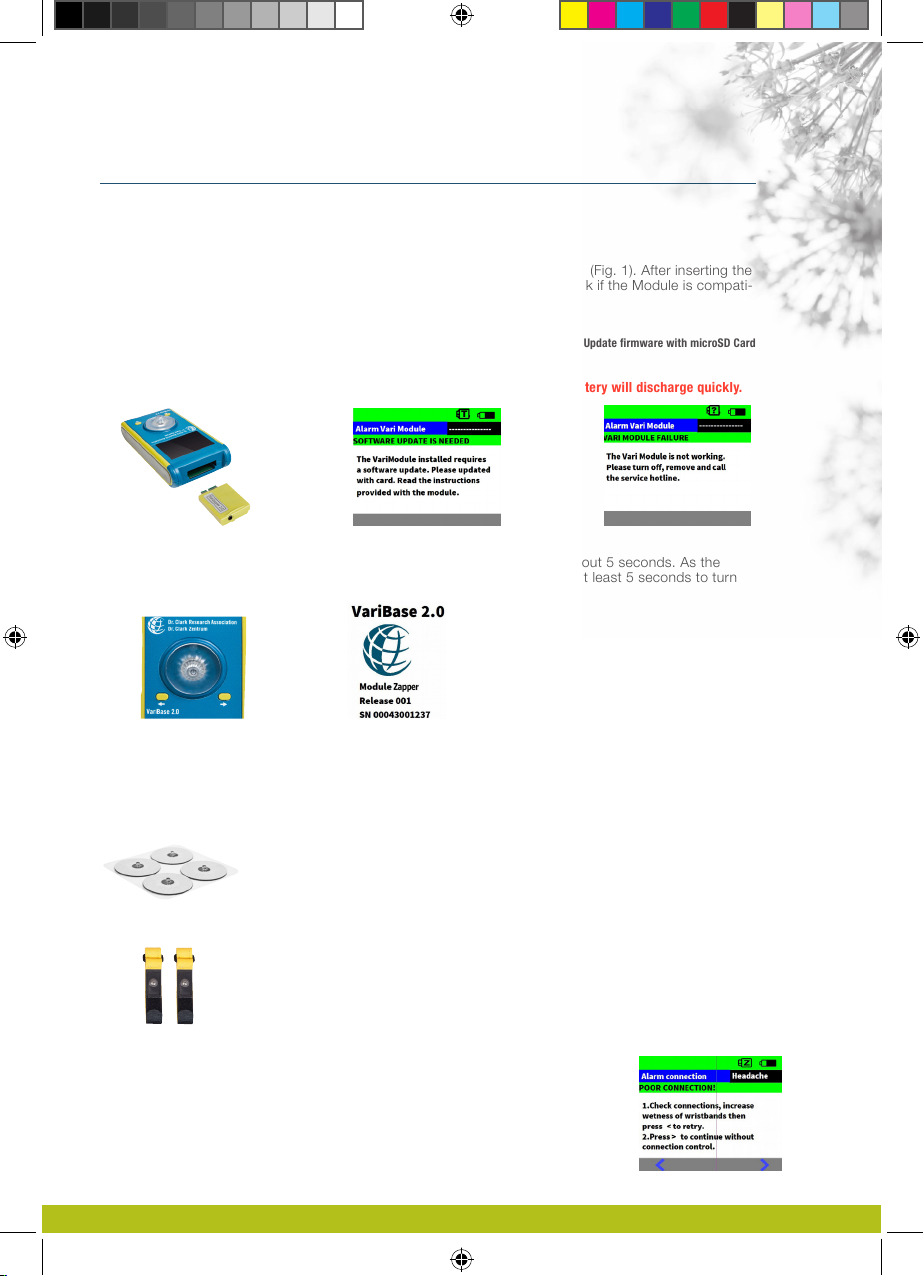
The VariZapper 2.0
Anleitung_VariZapper2018_all language.indd 5 19.05.2018 03:10:23

4. Instructions
4.1 Operating the device
4.1.1 How to insert the VariZapper Module 2.0
The VariZapper Module 2.0 has to be inserted into the top of the VariBase 2.0 (Fig. 1). After inserting the
Module, turn on (see
4.1.2 Turning ON/OFF
) the device and the system will check if the Module is compati-
ble with the current VariBase 2.0 firmware:
1. If it is compatible, the VariZapper 2.0 is started.
2. If it is not compatible because it needs an update (Fig. 2), please see: 4.1.4.1.2 Update firmware with microSD Card
3. If there is a problem with the Module, the message in Fig. 3 will appear.
NOTE: Please dismount any Module when the device is not in use, otherwise the battery will discharge quickly.
4.1.2 Turning ON/OFF
To turn on the device, press the Turnwheel button (Fig. 4) at the center for about 5 seconds. As the
device turns on, the panel in Fig. 5 appears. Press the Turnwheel button for at least 5 seconds to turn
off the device.
Fig. 4 Fig. 5
4.1.3 Connecting the VariZapper 2.0 (gel pads/wrist bands)
The contact surface between the skin and the chosen electrodes must be at least 8 cm2(1¼ square
inches). The larger the contact surface, the better. Any electrodes may be used as long as they match
the specifications. Placement of the electrodes in the region of the upper body can increase the risk of
ventricular fibrillation. The VariZapper 2.0 is supplied with two options to connect the device to the body:
Gel pads (Fig.6): Gel pads should not be placed in the following areas of the body:
close to the eyes, in the mouth, on the neck and head, near the heart or genitals,
except at direct order and under the supervision of a qualified, trained and
authorized specialist. Gel pads should only be used on undamaged and clean
skin surfaces. Gel pads may be used several times. When they no longer stick or
the gel layer is dirty or worn off, they should be replaced.
Wrist bands (Fig. 7): Soak the yellow parts, then squeeze them, so that they
remain moist. Then strap them around the wrists, one on each side. They can
also be used around the ankles. Pay special attention when using wrist bands to
be sure they are not so tight as to inhibit blood circulation.
1. Insert the cable jack into the VariZapper Module 2.0 on top.
2. Connect the black and red plugs to the electrodes and place them on the body.
3. Make sure there is good contact between the electrodes and the skin.
4. Select the program that you want to run and start it.
5. The device will check the connection of the electrodes.
If everything is OK, you will be asked to confirm and start the program.
6. In case of poor connection, the device will display the message in Fig. 8.
After re-checking connection, select one of the options. 5
The VariZapper 2.0
Fig. 1 Fig. 2 Fig. 3
Fig. 6
Fig. 7
Fig. 8
Anleitung_VariZapper2018_all language.indd 6 19.05.2018 03:10:27

6
The VariZapper 2.0
The microSD Card should be put in the slot with the the PINS SHOWING UP (Fig. 9 and 10). The microSD
Cards have frequencies programmed on them which are put together according to Dr. Clark’s frequency
list for their specific purpose. This enables you to use the VariZapper 2.0 with very specific frequencies.
4.1.4.1 Uploading a program/updating firmware
The device automatically recognizes whether the microSD Card contains a frequency program or a
firmware update.
4.1.4.1.1 Upload program from Program Driver
IMPORTANT:
Insert the microSD Card only when the Main Menu Panel is displayed (Fig. 11).
Just after the Program Driver (PD) has been put into the slot, the PD will be uploaded automatically and
the message in Fig. 12 will appear, if the upload was successful. To select the uploaded PD press .
You will be able to see and select all the PDs stored on the device (Fig. 13).
4.1.4.1.2 Update firmware with mircoSD Card
To update the firmware with a microSD Card:
1) First turn off your VariZapper 2.0
2) Insert the microSD card with the new firmware, then
3) turn on the device (press the Turnwheel for 5 seconds).
The software is now updated automatically. While the firmware loads, the Turnwheel is lit red. When the
upload is complete, the Turnwheel light turns green.
4) Remove the microSD card, before you restart your updated device.
4.1.4.1.3 Upload/update – Errors
If there is a problem with the upload of the PD, one of 3 different error messages comes up: THE CARD
IS BLANK (Fig. 14), THE CARD IS DAMAGED or NOT A SOFTWARE OR PD CARD. In this case remove
the card and select .
EN
Fig. 9 Fig. 10
Fig. 12 Fig. 13
Fig. 14
4.1.4 Using Program Drivers/microSD Cards
Fig. 11
Anleitung_VariZapper2018_all language.indd 7 19.05.2018 03:10:28

7
The VariZapper 2.0
4.1.5 Main Menu
After the welcome panel, the Main Menu panel will be displayed. Rotate the Turnwheel to select one of
the functions displayed and press the wheel to select a function.
You can choose from (Fig. 15):
• Run the last program that was used in the previous session;
• Select a program in the list of stored programs in the library (incl. Normal Zapping, Continuous
Zapping, Zappicator)
• Settings (Language, Display and Sound)
4.1.6 Running programs and functional options
4.1.6.1 Program phases and steps
A program has a maximum of 30 steps. A step consists of an active working phase followed by a
passive pause phase of a minimum of 5 seconds without an output signal before moving to the next
step. Each step is defined by parameters such as Frequency, Wave form (SINE or SQUARE) and
Voltage, which are displayed during the active phase.
If a „Wobble“ function is set, there is an upper and a lower frequency, between which the generated
frequency oscillates. The continuously changing frequency values are then constantly adjusted on the
display while the program is running.
4.1.6.2 Pausing & stopping program or skipping steps
While the program is running, there are three icons on the bottom of the display:
• to pause the program
• to go back to Main Menu
• to skip a step
PAUSE: You can pause the program while it is running by selecting (Fig. 16). The wave graphic will
stop moving.
RESUME: You may start the program again by selecting (Fig. 17).
STOP: To stop the program press . A confirmation panel will appear (Fig. 18). Push the Turnwheel
button to choose:
• YES to stop program and go back to Main Menu
• NO to continue with the program running
SKIP STEP: Use the Turnwheel button to choose to skip the running step. A confirmation panel will
appear (Fig.18). Use the Turnwheel button to choose YES or NO:
• select YES to skip the step
• select NO to continue with the program running
Fig. 15
Fig. 16 Fig. 17 Fig. 18
Anleitung_VariZapper2018_all language.indd 8 19.05.2018 03:10:29

8
The VariZapper 2.0
EN
4.1.7 Run the last program (session)
In the Main Menu panel the first option available is “Run last program > -
ProgramName
-”. Choosing this
option, you will run the last used or uploaded program. Press the Turnwheel button to select it, the
device will ask to connect the device to the body and confirm with (Fig. 19) for the connection check
to start.
When the connection check is completed:
• Successful: if the connection check is successful select to run the program (Fig. 20).
The device will then show the running panel where you can follow the progress of the program (Fig. 21).
At the center of the panel is a progress bar, the voltage, the frequency and the wave type. At the top of
the display starting from the left are indicated the time remaining to finish the program, the step currently
running and the total number of steps. (Skipping steps see paragraph 4.1.6.2.)
• Poor connection: if the connection is not good the device will show a POOR CONNECTION Panel (Fig.
22). You can select to retry the connection check after checking the electrodes or select to
continue without connection check (Note: there is no connection control for the Zappicator Program).
When the program is completed, select to return to the Main Menu (Fig. 23).
4.1.8 Run program from library
From the Main Menu Panel you get to the program library by selecting „Select program“. Scroll with the
Turnwheel button and press to select.
The program menu lists all of the programs on the device. The screen is divided in three sections (Fig.
24):
• left section: list of the standard programs (Normal zapping, Continuous Zapping and Zappicator). To
navigate inside the list, rotate the Turnwheel. Press Turnwheel to make selection.
• right section: all the programs uploaded. Rotate the Turnwheel to get to the desired program. If there is
more than one screen (6) of programs, you can rotate down or up to the next screen OR
• get to the bottom section (icon bar), where you can navigate screens with the up and down arrows.
• To move between the left, right and bottom section: use the Direction buttons (left/right) on the device.
Those are the two buttons with the arrow left and right of the Turnwheel. You can not navigate between
the sections with the Turnwheel.
Fig. 19
Fig. 21 Fig. 22 Fig. 23
Fig. 24
Fig. 20
Anleitung_VariZapper2018_all language.indd 9 19.05.2018 03:10:30

The VariZapper 2.0
Selecting a program opens the following panel (Fig. 25). Choose between “Run program” or “View
program details”.
To run the program, choose “Run program” rotating the Turnwheel and pressing it to select. Next you
will have to confirm the connection of the electrodes by selecting to start the connection check (Fig.
26; the Zappicator program starts immediately without connection check).
When the connection check ist completed:
• Successful: if the connection check is successful select to run the program (Fig. 27). The device will
show the running panel where you can follow the progress of the program (Fig. 21). At the center of the
panel is a progress bar, the voltage, the frequency and the wave type. At the top of the display starting
from the left are indicated the time remaining to finish the program, the step currently running and the
total number of steps. (Skipping steps see paragraph 4.1.6.2.)
• Poor connection: if the connection is not good, the device will show a POOR CONNECTION Panel (Fig.
22).You can select to retry the connection check after checking the electrodes or select to
continue without connection check (Note: there is no connection control for the Zappicator Program).
When the program is completed, select to return to the Main Menu (Fig. 23).
Note: Within the Zappicator and Continuous Zapping programs, skipping steps will terminate the
program, due to the programs having only 1 step. The same holds true for any other 1-step program, or
when you are on the last step of a program. At the end of the program, select to go back to the Main
Menu.
To view the program details of a program choose “View program details” with the Turnwheel and press it
to select. The Program details of the chosen program will be shown (Fig. 28).
Here you will be able to see all the parameters of a program for each step: Step – active time, Step –
pause time, Wave shape, Duty cycle, Voltage 5-15 V, Offset POS or MIXED, Wobble YES or NO, Wobble
times, Minimum frequency, Maximum frequency.
To navigate and view each step rotate the Turnwheel to the symbols or to go back or forth
between the steps. Choose to go to the last step. Choose to go to the first step.
4.2 Battery
The VariZapper 2.0 is powered by a 9 V rechargeable block battery.
4.2.1 Battery voltage indicator
The battery status is indicated by the battery symbol on the top-right of the display.
The shorter the black bar in the battery icon, the lower the voltage.
• full bar 9.5-8.7 V
• ¾ bar 8.7-8.5 V
• half bar 8.5-8.2 V
• ¼ bar 8.2-8 V
• <8 V. Once the battery voltage has decreased to 8 V, there is usually enough power left to complete
the current program. Recharge the battery once the program has finished.
• 7.4 V or less icon. The active program will stop immediately. A battery alarm message to charge the
battery will appear, while the VariZapper 2.0 is shutting off. When the progress bar is at 100% the device
will shut off (Fig. 29). Recharge the battery! 9
Fig. 25 Fig. 26
Fig. 28
Fig. 29
Fig. 27
Anleitung_VariZapper2018_all language.indd 10 19.05.2018 03:10:32

10
The VariZapper 2.0
4.2.2 Battery charging
To recharge the battery, disconnect the VariZapper Module 2.0 and connect the VariCharger Module 2.0
(Fig. 30). Attach the USB-C Charging Cable to the VariBase (Fig. 31) and connect it to a USB outlet plug
or a PC‘s USB port. The following image will be displayed (Fig. 32). Note that during the charging
phase ALL FUNCTIONS ARE DISABLED. A yellow LED light will light up on the VariCharger Module
2.0 while the device is being charged, the same LED light will blink when charging is completed (Fig.33).
The device will take a maximum of 3 hours to recharge completely. It is suggested to charge the device
only when neccessary (low battery), in order to maximize battery life.
5. Settings
Get to “Settings” from the Main Menu. Once you are in the Settings Menu, you have two choices (Fig. 34):
Language: Press the Turnwheel button to select “Language”. In the language Menu, choose your
language: English, German, French, Spanish or Italian (Fig. 35) and confirm/discard your choice.
Select to go back to the previous menu or to go back to the Main Menu.
Display and sound: Rotate the Turnwheel button to choose the menu Display/sound (Fig. 36). Select the
brightness or sound setting by pressing the Turnwheel button when on your choice. When the symbol
„<--->“ appears, you can rotate the Turnwheel button to change the value of the brightness or sound. By
pressing the Turnwheel button again, you confirm the change. Select to go back to settings or to
go back to the Main Menu.
6. Care and cleaning
The VariZapper 2.0 requires no special maintenance or cleaning materials. The device may be
cleaned with a soft, lint-free cloth. Make sure no moisture gets inside the device. If moisture
does enter the case, a technical inspection is required before the device is used again.
Do not use any alcoholic or abrasive fluids.
7. Classification
The VariZapper 2.0 is not a medical device. Do not use it for any medical purpose.
The device is a Bio-Frequency Generator and can generate a signal as described in the books of Dr. Hul-
da Clark. Note that the frequency applications according to Dr. Hulda Clark have not yet been sufficiently
confirmed by clinical studies to allow any medical claims for this purpose. We specifically do not and are
not allowed to claim any medical purposes or benefits for the use of the device.
8. Saftey inspections
When used commercially or in business, safety inspections of the VariZapper 2.0 must be made after 24
months. The safety inspections must include:
1. Verification of the existence of the instruction manual
2. Verification of the completeness of all fittings
3. Visual examination
• for mechanical damage
• of all cables and connections for damage
4. Functional Safety
• Inspection of the signals generated
• Verification of the frequency
These technical inspections may only be made by specifically trained persons and must be documented.
EN
Fig. 30 Fig. 33Fig. 32Fig. 31
Fig. 34 Fig. 35 Fig. 36
Anleitung_VariZapper2018_all language.indd 11 19.05.2018 03:10:34

The VariZapper 2.0
11
Warranty
We offer a warranty on the VariZapper for 2 years from the purchase date. Excluded are the cable, electrodes and
batteries. We guarantee the device to be free of defects for 2 years from the purchase date, provided the product is used
for its intended purpose and handled according to this manual.
We offer no warranty for:
• not observing the instruction manual
• servicing errors
• inappropriate use or handling
• repair by unauthorized personnel
• force majeure, e.g. lightning
• transportation damages due to poorly packaged returns
• failure to carry out maintenance or safety inspections
• ordinary wear and tear
We are not responsible for damage caused by this device especially if due to gross negligence or intent, or any bodily
harm or loss of life due to any negligence or intent.
If this unit fails to operate properly under normal usage we will replace or repair (at our discretion) any defective parts for
free, as long as:
* The unit is received at our office within two years from its date of purchase.
* It was used under the guidelines outlined in this manual.
* The customer returns to us a copy of the original invoice with the unit (not necessary if the unit was purchased directly from
us and we are given the information to locate the sale in our system).
* The customer is responsible for the cost of shipping the unit to our office.
Name: _______________________________________________________________
Address: _____________________________________________________________
_____________________________________________________________________
City: ____________________________________ State: __________ ZIP: ________
E-mail: ______________________________________________________________
Phone: ______________________________________________________________
Describe the problem you encountered with the VariZapper 2.0: ________________
_____________________________________________________________________
_____________________________________________________________________
Date of Purchase: ______________________________________________________
Signature ____________________________________________________________
SIGN ABOVE AND SEND A COPY OF THIS PAGE WITH THE VARIZAPPER 2.0 TO US:
USA and international Europe
Dr. Clark Research Association Dr. Clark Zentrum Ltd
1019 Hard Rock Rd c/o S&H Productfulfilment BV
Somers, MT 59932 Logistic Boulevard 1
USA 4791VC Moerdijk
Netherlands
Germany Switzerland
Dr. Clark Zentrum Dr. Clark Zentrum
Augsburger Strasse 16 Gersauerstrasse 76
86157 Augsburg 6440 Brunnen
Germany Switzerland
Anleitung_VariZapper2018_all language.indd 12 19.05.2018 03:10:35

VariZapper 2.0
Dr. Clark Association Dr. Clark Zentrum
www.drclark.com, info@drclark.com
Anleitung_VariZapper2018_all language.indd 13 19.05.2018 03:10:36

Der VariZapper 2.0
DE
2
Inhaltsverzeichnis
1. Wichtig: bitte vor dem Gebrauch lesen! 3
1.1 Zweck 3
1.2 Wichtige Sicherheitsvorkehrungen 3
1.2.1 Sicherer Gebrauch des VariZapper 2.0
3
1.2.2 Kontraindikationen – wann Sie den VariZapper 2.0 nicht verwenden sollten
3
1.2.3 Mögliche unerwünschte Wirkungen
3
2. Gerätebeschrieb 4
2.1 Bestandteile des VariZapper 2.0 4
2.2 Erklärung der Symbole 4
2.3 Technische Informationen 4
3. App 4
4. Anwendung 5
4.1 Bedienung des Geräts 5
4.1.1 Das VariZapper 2.0 Modul einstecken
5
4.1.2 Das Gerät ein- und ausschalten
5
4.1.3 Den VariZapper 2.0 verbinden (Gelelektroden/Handgelenkselektroden)
5
4.1.4 Programm Driver (microSD-Chipkarten) verwenden
6
4.1.4.1 Programme hochladen/Softwareupdate 6
4.1.4.1.1 Programm von Programm Driver (microSD-Chipkarte) hochladen 6
4.1.4.1.2 Softwareupdate mit microSD-Chipkarte 6
4.1.4.1.3 Fehlermeldungen beim Hochladen oder Softwareupdate 6
4.1.5 Hauptmenü
7
4.1.6 Programme ausführen und Funktions-Optionen
7
4.1.6.1 Programmphasen und Schritte 7
4.1.6.2 Programm pausieren oder stoppen oder Schritte überspringen 7
4.1.7 Das letzte Programm ausführen (vorherige Sitzung)
8
4.1.8 Ein Programm aus der Bibliothek ausführen
9
4.2 Batterie 9
4.2.1 Batteriespannungs-Anzeige
9
4.2.2 Die Batterie aufladen
10
5. Einstellungen 10
6. Pflege und Reinigung 10
7. Klassifikation 10
8. Sicherheitsüberprüfung 10
9. Reparaturen 11
10. Produktgarantie 11
Anleitung_VariZapper2018_all language.indd 14 19.05.2018 03:10:36

Der VariZapper 2.0
3
1. 1.Wichtig: bitte vor dem Gebrauch lesen!
1.1 Zweck
Der VariZapper 2.0 ist kein Medizinprodukt. Verwenden Sie ihn nicht für medizinische Zwecke.
Das Gerät ist ein Bio-Frequenz-Generator und kann ein Signal erzeugen, wie es in den Büchern von Dr.
Hulda Clark beschrieben ist. Beachten Sie, dass die Frequenzanwendungen nach Dr. Clark noch nicht
ausreichend durch klinische Studien bestätigt wurden, um medizinische Behauptungen in Anspruch zu
nehmen. Wir dürfen und werden ausdrücklich keine medizinischen Zwecke oder Vorteile für die Nutzung
des Geräts beanspruchen.
1.2 Wichtige Sicherheitsvorkehrungen
Bitte lesen Sie die ganze Gebrauchsanweisung sorgfältig durch, bevor Sie das Gerät verwenden.
1.2.1 Sicherer Gebrauch des VariZapper 2.0
• Der VariZapper 2.0 sollte nur mit Zubehör verwendet werden, welches speziell dafür ausgelegt ist.
• Halten Sie den VariZapper 2.0 fern von Wasser und anderen Flüssigkeiten.
• Versuchen Sie nie, den VariZapper 2.0 zu verwenden, wenn er beschädigt ist oder nicht korrekt zu
funktionieren scheint.
• Der VariZapper 2.0 sollte nicht gleichzeitig mit einem anderen Hochfrequenzgerät wie z.B. einem
Mobiltelefon angewendet werden. Dies kann zu Interferenzen zwischen den elektromagnetischen Feldern
der beiden Geräte führen. Dies könnte zu verstärkten elektrischen Strömen führen.
• Die verwendeten Elektroden sollten eine Fläche von nicht weniger als 8 cm² aufweisen. Kleinere
Elektroden könnten zu Verbrennungen führen. Grössere Elektroden (12 cm² oder mehr) werden emp-
fohlen.
• Das Gerät sollte nicht verwendet werden, wenn Sie Maschinen bedienen oder während Aktivitäten, die
eine erhöhte Aufmerksamkeit verlangen. Verwenden Sie das Gerät nicht während des Lenkens eines
Motorfahrzeugs.
• Verhindern Sie, dass der VariZapper 2.0 zu Boden fällt, gehen Sie damit nicht in unsachgemässer Weise
um, und setzen Sie ihn nicht extremen Temperaturen oder hoher Feuchtigkeit aus (Verwenden Sie das
Gerät bei Temperaturen von 10°-40°C und eine Luftfeuchtigkeit von unter 90%).
• Besondere Achtsamkeit ist gefordert, wenn der VariZapper 2.0 in der Nähe von Kindern verwendet wird.
• Bewahren Sie den VariZapper 2.0 im Original-Tragekoffer auf, um ihn sauber zu halten und Schäden zu
verhindern.
1.2.2 Kontraindikationen – wann Sie den VariZapper 2.0 nicht verwenden sollten
• AnwenderInnen mit elektronischen Implantaten wie z.B. Herzschrittmachern oder Pumpen.
• AnwenderInnen mit Herzrhythmusstörungen.
• Schwangere Anwenderinnen
• AnwenderInnen, die an epileptischen Anfällen leiden.
• AnwenderInnen mit Hautschädigungen im Bereich, wo die Elektroden angebracht werden sollen.
• AnwenderInnen mit Tumoren im Bereich, wo die Elektroden angebracht werden sollen.
1.2.3 Mögliche unerwünschte Wirkungen
Hautirritationen kommen vor als Reaktion auf die Elektroden, das Elektrodengel oder den elektrischen
Strom selbst. Falls Rötung, Brennen, Jucken oder Blasen unter den Elektroden auftreten oder am Ort, wo
die Elektroden während der Behandlung waren, konsultieren Sie vor dem weiteren Gebrauch des Geräts
einen Spezialisten. Eine vorübergehende Rötung im Bereich der Elektroden ist normal, da der Strom die
Durchblutung anregt. Falls Sie zu Hautreaktionen neigen beim Gebrauch des VariZapper 2.0, probieren Sie
es mit grösseren Elektroden, wie z.B. Handgelenksbändern, grösseren Gelelektroden etc.
Anleitung_VariZapper2018_all language.indd 15 19.05.2018 03:10:36

4
Der VariZapper 2.0
2. Gerätebeschrieb
2.1 Bestandteile des VariZapper 2.0
1. Steckplatz für Module 2.0
2. Bildschirm
3. Drehknopf (auch AN/AUS)
4. Richtungstasten (links/rechts)
5. VariZapper Modul 2.0
6. VariCharger Modul 2.0
7. microSD-Chipkarten Steckplatz
8. USB-C Steckplatz (Batterie laden)
2.2 Erklärung der Symbole
+
2.3 Technische Informationen
Grösse: VariBase 2.0: 152x79x29 mm
VariModul 2.0: 51x38x11 mm
Gewicht: VariBase 2.0: 220 g
VariModul 2.0: 10 g
Ausgangsspannung: 5-15 Volt (mit Last bis 3 KΩ)
Frequenzbereich Sinus: 1-999’999 Hz (± 30 ppm)
Frequenzbereich Rechteck: 1-499’999 Hz (± 30 ppm) Die Maximalfrequenz der
Rechteckwelle wird technisch beschränkt, um
Interferenzen im Hochfrequenzbereich zu vermeiden.
Anstiegszeit (Rise time) bei Rechteckwelle: <700 ns (Nanosekunden)
Anzahl Durchläufe Wobble-Funktion: 1-15 Male während der aktiven Phase des Schritts.
Offsetspannung (POS): Die Welle befindet sich ausschliesslich im positiven
Bereich.
Offsetspannung (MIXED): Die Welle oszilliert zwischen Plus und Minus, der Durch-
schnittswert beträgt null.
Energieverbrauch: 25 mA, wenn keine Anwendung stattfindet/50 mA während
des Betriebs (jeweils mit der voreingestellten Bildschirm-
helligkeit [50%]).
Spannungsquelle: 9 V aufladbare Batterie mit 300 mAh
Geschätzte Batterielaufzeit: 5 Stunden im Betrieb, bevor die Batterie wieder aufge-
laden werden muss.
Ladezeit der Batterie: maximal 3 Stunden
3. App
Die kostenlose Dr. Clark Smartphone App (VariApp) kann im Handy-Store heruntergeladen und dazu
verwendet werden, Frequenzprogramme zu erheblich tieferen Kosten als die physischen Programm
Driver (microSD-Chipkarten) herunterzuladen und zu speichern. Die Programme können dann mittels
NFC-Technologie auf den VariZapper 2.0 übertragen und dort in der Bibliothek gespeichert werden.
Nach dem Download muss die VariApp mit Ihrem Gerät verbunden werden mithilfe eines ID-Codes.
Nach dieser Paarung und der Registration können Sie die verfügbaren Programme im Programmkatalog
sehen und Programme mittels Kreditkarte, PayPal oder gegen Vorauszahlung kaufen.
*Wobble-Funktion: Anstelle einer einzigen, stabilen Frequenz generiert das Gerät eine Frequenz, die zwischen der unteren
und der oberen Frequenz oszilliert, wie sie vom aktivierten Programm bestimmt wird.
*Wobble-Funktion (Anzahl Durchläufe): Definiert, wie oft innerhalb der aktiven Phase des Programmschritts die Frequenz
zwischen der unteren und der oberen Frequenz oszilliert.
DE
1
2
3
4
5
6
78
Ausführen/fort-
setzen
Letzter Schritt
Erster Schritt
Pause
Vorwärts
Zurück
Nach oben
Nach unten
Speichern
Löschen
Haupmenü
(„nach Hause“)
VariZapper Modul 2.0
Schritt –
aktive Phase
untere Frequenz
obere Frequenz
Wellenform (Sinus
oder Rechteck)
Offset (positiv
oder Mischoffset)
Spannung
Wobble-Funktion*
Wobble-Funktion
(Anzahl Durchläufe)*
Batterieanzeige – voll
Batterieanzeige – ¾
Batterieanzeige – ½
Batterieanzeige – ¼
Batterieanzeige – <1h
Batteriewarnung
Countdown des laufenden Schritts Aktueller Schritt Schritte total
Nächster
Schritt Schritt –
Pausenzeit
Vorheriger
Schritt
Programmeinstel-
lungen
Tastverhältnis
(Duty Cycle)
Anleitung_VariZapper2018_all language.indd 16 19.05.2018 03:10:39

4. Anwendung
4.1 Bedienung des Geräts
4.1.1 Das VariZapper 2.0 Modul einstecken
Das VariZapper 2.0 Modul muss oben an der VariBase 2.0 in den Steckplatz eingeführt werden (Abb. 1).
Nach dem Einführen des Moduls schalten Sie das Gerät ein (vgl. 4.1.2 Das Gerät ein- und ausschalten). Das
System prüft nun, ob das Modul mit der aktuellen Software der VariBase 2.0 kompatibel ist:
1. Wenn sie kompatibel ist, wird der VariZapper 2.0 aufgestartet.
2. Wenn sie nicht kompatibel ist, weil ein Software-Update erforderlich ist (vgl. Abb. 2), siehe 4.1.4.1.2 Software-
update mit microSD-Chipkarte
3. Sollte es ein Problem mit dem Modul geben, erscheint die Meldung in Abb. 3.
HINWEIS: Bitte entfernen Sie alle Module, wenn das Gerät nicht benutzt wird, da sich die Batterie ansonsten schnell
entlädt.
4.1.2 Das Gerät ein- und ausschalten
Um das Gerät einzuschalten, drücken Sie den Drehknopf in der Mitte während ca. 5 Sekunden (Abb. 4).
Sowie das Gerät hochfährt, erscheint die Anzeige in Abb. 5. Drücken Sie den Drehknopf während mindes-
tens 5 Sekunden, um das Gerät auszuschalten.
4.1.3 Den VariZapper 2.0 verbinden (Gelelektroden/Handgelenkselektroden)
Die Kontaktfläche zwischen der Haut und den gewählten Elektroden sollte mindestens 8 cm²betragen. Je
grösser die Kontaktfläche, desto besser. Sie können beliebige Elektroden verwenden, solange sie den
Spezifikationen entsprechen. Platzierung der Elektroden im oberen Bereich des Körpers kann das Risiko
eines Herzflimmerns vergrössern. Der VariZapper 2.0 wird standardmässig mit 2 verschiedenen Elektroden
geliefert:
Gel-Elektroden (Abb. 6): Gelelektroden sollten an folgenden Stellen des Körpers
nicht angebracht werden, ausser unter direkter Aufsicht und auf Anweisung eines
qualifizierten und geschulten Spezialisten: in der Nähe der Augen, im Mund, am
Hals oder Kopf, in der Nähe des Herzens oder der Genitalien. Gelelektroden
sollten nur auf unbeschädigten, sauberen Hautflächen angebracht werden.
Gelelektroden können mehrmals verwendet werden. Wenn sie nicht mehr kleben,
oder die Gelschicht schmutzig oder beschädigt ist, sollten sie ersetzt werden.
Handgelenksbänder (Abb. 7): Nässen Sie den gelben Schaumstoff und drücken ihn
dann aus, damit er noch feucht ist. Binden Sie die Handgelenksbänder daraufhin
an den Handgelenken fest, eines auf jeder Seite. Sie können auch an den Fesseln
angebracht werden. Achten Sie darauf, dass die Bänder nicht so stark festgezurrt
werden, dass Sie den Blutfluss beeinträchtigen.
1. Stecken Sie das Kabel in die Buchse oben am VariZapper Modul 2.0 ein.
2. Verbinden Sie den roten und schwarzen Stecker mit den Elektroden und
platzieren Sie diese am Körper.
3. Stellen Sie sicher, dass ausreichender Kontakt besteht zwischen den Elektroden
und der Haut.
4. Wählen Sie das Programm, das Sie zappen wollen.
5. Das Gerät macht jetzt eine Verbindungs-Kontrolle. Wenn Kontakt besteht,
werden Sie aufgefordert, zu bestätigen und damit das Programm zu starten.
6. Ist der elektrische Kontakt schlecht, erscheint die Meldung in Abb. 8.
Nachdem Sie die Verbindung überprüft haben, wählen Sie eine der Optionen:
Kontaktkontrolle übergehen, oder erneut versuchen.
5
Der VariZapper 2.0
Abb. 1 Abb. 2 Abb. 3
Abb. 6
Abb. 7
Abb. 8
Abb. 4 Abb. 5
Anleitung_VariZapper2018_all language.indd 17 19.05.2018 03:10:42

6
Der VariZapper 2.0
Die microSD-Chipkarte muss in den dafür vorgesehen Steckplatz mit den Kontakten nach oben eingeführt
werden (Abb. 9 und 10). Die microSD-Chipkarten enthalten ein Frequenzprogramm, welches gemäss Dr.
Hulda Clarks Frequenzliste für ihren spezifischen Zweck zusammengestellt wurde. Auf diese Weise
können Sie Ihren VariZapper 2.0 sehr gezielt einsetzen.
4.1.4.1 Programme hochladen/Softwareupdate
Das Gerät erkennt automatisch, ob die microSD-Chipkarte ein Frequenzprogramm oder Software für
einen Software-Update enthält.
4.1.4.1.1 Programm von Programm Driver (microSD-Chipkarte) hochladen
WICHTIG: Stecken Sie die microSD-Chipkarte nur ein, wenn Sie im Hauptmenü sind (Abb. 11).
Gleich nachdem der Programm Driver (PD) eingesteckt wurde, wird das Programm automatisch
hochgeladen und die Mitteilung in Abb. 12 wird angezeigt, falls der Vorgang erfolgreich war. Um den
hochgeladenen PD anzuwählen, drücken Sie . Das bringt Sie in die Bibliothek, wo Sie alle
verfügbaren Programme sehen und anwählen können (Abb. 13).
4.1.4.1.2 Softwareupdate mit microSD-Chipkarte
Um das Gerät auf den neuesten Software-Stand zu bringen, gehen Sie wie folgt vor:
1. Schalten Sie das Gerät aus.
2. Stecken Sie die microSD-Chipkarte mit der neuen Software in den Steckplatz, dann
3. schalten Sie das Gerät ein, indem Sie wie gewohnt den Drehknopf etwa 5 Sekunden nach unten
drücken.
Die Software wird nun automatisch hochgeladen. Während des Hochladens leuchtet der Drehknopf rot.
Wenn der Upload fertig ist, schaltet das Licht auf grün um.
4. Entfernen sie die microSD-Chipkarte, bevor Sie das jetzt auf das neuesten Stand gebrachte Gerät
wie gewohnt einschalten.
4.1.4.1.3 Fehlermeldungen beim Hochladen oder Softwareupdate
Sollte es ein Problem beim Hochlanden des Programm Drivers geben, erscheint eine von 3
verschiedenen Fehlermeldungen: DIE KARTE IST LEER (Abb. 14), DIE KARTE IST BESCHÄDIGT, oder
KEINE SOFTWARE ODER PD KARTE. Entfernen Sie in diesen Fällen die microSD-Chipkarte und wählen
Sie .
DE
Abb. 9 Abb. 10
Abb. 12
Abb. 14
4.1.4 Programm Driver (microSD-Chipkarten) verwenden
Abb. 13
Abb. 11
Anleitung_VariZapper2018_all language.indd 18 19.05.2018 03:10:42

7
Der VariZapper 2.0
4.1.5 Hauptmenü
Nach dem Begrüssungsfenster wird das Hauptmenü angezeigt. Drehen Sie den Drehknopf, um eine der
hier angezeigten Funktionen zu wählen und drücken Sie das Rad, um eine Funktion auszuwählen.
Sie können wählen zwischen (Abb. 15):
• Führen Sie das letzte Programm aus, das in der vorherigen Sitzung verwendet wurde;
• Wählen Sie ein Programm aus der Liste der gespeicherten Programme in der Bibliothek (inkl.
Standardzappen, Dauerzappen, Zappikator);
• Einstellungen (Sprache, Display und Ton).
4.1.6 Programme ausführen und Funktions-Optionen
4.1.6.1 Programmphasen und -schritte
Ein Programm hat maximal 30 Schritte. Ein Schritt besteht aus einer aktiven Arbeitsphase, die von einer
Pausenphase von mindestens 5 Sekunden ohne Signal gefolgt wird, bevor zum nächsten Schritt
übergegangen wird. Jeder Schritt wird durch Parameter wie Frequenz, Wellenform (SINUS oder
RECHTECK) und Spannung definiert, welche während der aktiven Phase angezeigt werden.
Wenn eine „Wobble“ -Funktion eingestellt ist, gibt es eine obere und eine untere Frequenz, zwischen
denen die generierte Frequenz oszilliert. Die sich ständig ändernden Frequenzwerte werden dann auf
dem Bildschirm angezeigt, während das Programm läuft.
4.1.6.2 Programm pausieren oder stoppen oder Schritte überspringen
Während das Programm läuft, sehen Sie am unteren Rand des Displays 3 Symbole
• um das Programm anzuhalten;
• um zum Hauptmenü zurückzukehren;
• um einen Schritt zu überspringen.
PAUSE: Sie können das laufende Programm anhalten, indem Sie wählen (Abb. 16). Die Wellengrafik
bewegt sich dann nicht mehr.
FORTSETZEN: Sie können das Programm erneut starten, indem Sie auswählen (Abb. 17).
STOP: Um das Programm zu stoppen, drücken Sie . Ein Bestätigungsfenster erscheint (Abb. 18).
Verwenden Sie den Drehknopf, um zu wählen:
• JA, um das Programm zu beenden und zum Hauptmenü zurückzukehren;
• NEIN, um mit dem Programm fortzufahren.
SCHRITT ÜBERSPRINGEN: Wählen Sie mit dem Drehknopf an, um den aktuellen Schritt zu übersprin-
gen. Ein Bestätigungsfenster erscheint dann (Abb. 18). Verwenden Sie den Drehknopf, um zu wählen:
• Wählen Sie JA, um den Schritt zu überspringen
• Wählen Sie NEIN, um mit dem Programm fortzufahren
Abb. 15
Abb. 16 Abb. 17 Abb. 18
Anleitung_VariZapper2018_all language.indd 19 19.05.2018 03:10:43

8
Der VariZapper 2.0
DE
4.1.7 Das letzte Programm ausführen (vorherige Sitzung)
In der Hauptmenüleiste ist die erste verfügbare Option „Letztes Programm ausführen >
-Programmname-“. Wenn Sie diese Option wählen, führen Sie das zuletzt verwendete oder
hochgeladene Programm aus. Drücken Sie den Drehknopf, um sie auszuwählen; das Gerät fordert Sie
auf, das Gerät mit dem Körper zu verbinden (Abb. 19); bestätigen Sie mit , um den Verbindungstest
zu starten.
Wenn die Verbindungsprüfung abgeschlossen ist:
• Erfolgreich: War die Verbindungsprüfung erfolgreich, wählen Sie , um das Programm auszuführen
(Abb. 20).
Das Gerät zeigt dann die Anzeige an, auf der Sie den Fortschritt des Programms verfolgen können (Abb.
21). In der Mitte des Panels befindet sich ein Fortschrittsbalken, die Spannung, die Frequenz und der
Wellentyp. Oben auf dem Display werden von links beginnend die verbleibende Zeit bis zum Ende des
Programms, der aktuell ausgeführte Schritt und die Gesamtanzahl der Schritte angezeigt. (Schritte
überspringen vgl. Abschnitt 4.1.6.2.)
• Schlechte Verbindung: Wenn die Verbindung nicht gut ist, zeigt das Gerät POOR CONNECTION an
(Abb. 22). Sie können die Verbindungsprüfung nach Überprüfung der Elektroden mit wiederholen
oder mit ohne Verbindungsprüfung fortsetzen (Hinweis: für das Zappikator-Programm wird keine
Verbindungsprüfung durchgeführt). Wenn das Programm beendet ist, wählen Sie , um zum
Hauptmenü zurückzukehren (Abb. 23).
4.1.8 Ein Programm aus der Bibliothek ausführen
Über das Hauptmenü gelangen Sie durch Auswahl von „Programm auswählen“ in die Programmbiblio-
thek. Wählen Sie es mit dem Drehknopf aus und drücken Sie zur Auswahl.
Das Programmmenü listet alle Programme auf dem Gerät auf. Der Bildschirm ist in drei Abschnitte
unterteilt (Abb. 24):
• linker Bereich: Liste der Standardprogramme (Standardzappen, Dauerzappen und Zappikator). Um
innerhalb der Liste zu navigieren, drehen Sie den Drehknopf. Drücken Sie den Drehknopf, um eine
Auswahl zu treffen.
• rechter Abschnitt: Alle hochgeladenen Programme. Mit dem Drehknopf gelangen Sie zum gewünschten
Programm. Wenn es mehr als einen Bildschirm (6) von Programmen gibt, können Sie sich mit dem
Drehknopf zum nächsten Bildschirm drehen ODER
• gelangen Sie zum unteren Abschnitt (Symbolleiste), wo Sie mit den Auf- und Abwärtspfeilen durch die
Bildschirme navigieren können.
• Um zwischen dem linken, rechten und unteren Abschnitt zu wechseln: Verwenden Sie die Richtungsta-
sten (links/rechts) auf dem Gerät. Das sind die beiden Tasten mit dem Pfeil links und rechts vom
Drehknopf. Sie können nicht mit dem Drehknopf zwischen den Abschnitten navigieren.
Abb. 24
Abb. 19 Abb. 20
Abb. 21 Abb. 22 Abb. 23
Anleitung_VariZapper2018_all language.indd 20 19.05.2018 03:10:44
Table of contents
Languages:
Other Dr. Clark Personal Care Product manuals