Dr.Frei A-10 User manual

ANEROID BLOOD PRESSURE KIT
PROFESSIONAL
MODEL A-10
www. dr-frei.com
USER’S MANUAL


3
ANEROID BLOOD PRESSURE KIT PROFESSIONAL
Model A-10
User’s manual (4-14)
ИЗМЕРИТЕЛЬ АРТЕРИАЛЬНОГО ДАВЛЕНИЯ
ПРОФЕССИОНАЛЬНЫЙ
Модель A-10
Инструкция пользователя (15-26)
ВИМІРЮВАЧ АРТЕРІАЛЬНОГО ТИСКУ
ПРОФЕСІЙНИЙ
Модель A-10
Інструкція користувача (27-38)
ARTERINIO KRAUJOSPŪDŽIO
MATUOKLIS PROFESSIONAL
Modelis A-10
Vartotojo instrukcija (39-50)
ARTERIĀLĀ ASINSSPIEDIENA MĒRĪTĀJS
PROFESIONĀLAIS
Modelis A-10
Lietotāja instrukcija (51-62)
ARTERIAALNE VERERÕHUAPARAAT
PROFESSIONAALNE
Mudel A-10
Kasutusjuhend (63-73)
TENSIOMETRU ANEROID PROFESIONAL
Model A-10
Manual de utilizare (74-85)
АРТЕРИАЛДЫ ҚЫСЫМДЫ ӨЛШЕУІШ КӘСІБИ
А-10 моделі
Қолданушы ережелері (86-98)
RU
LT
UA
LV
EE
RO
MD
KZ
EN

4
CAUTION:
Please read all instructions before using this instrument to take your
blood pressure. Follow all CAUTIONS to avoid damaging the instru-
ment or hurting yourself. Talk to your doctor for information about
your blood pressure.
USER’S
MANUAL
ANEROID BLOOD
PRESSURE KIT
PROFESSIONAL
model
A-10
EN

5
TABLE OF CONTENTS
Unit Assembly 5
What is Blood Pressure 6
How to Take a Reading 7
Quick Reference Guide 11
Care and Maintenance 12
Warranty 13
Technical Specications 13
UNIT ASSEMBLY
Look at the drawing to help you put the unit together.
1. Attach the gauge to the tubing on the left.
2. Attach the ination bulb to the tubing on the right.

6
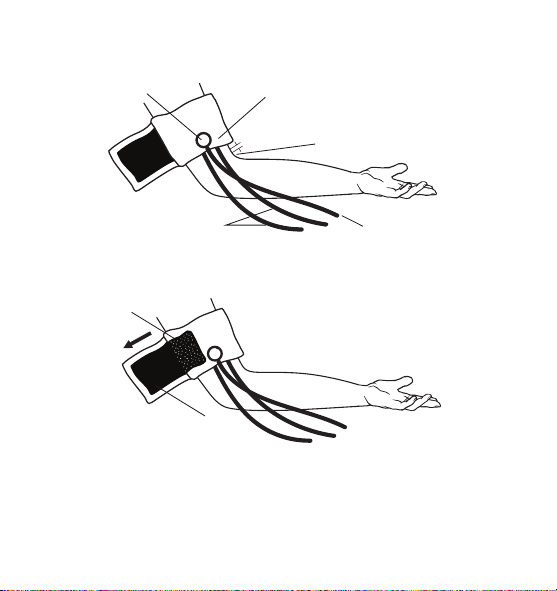
Note: Model A-10 cuff ts arm
circumference 25-42 cm.
For easy assembly follow
diagram.
Connect each component
securely to avoid injury and
instrument damage.
WHAT IS BLOOD PRESSURE?
Blood pressure is the force exerted on the walls of your blood vessels
as blood ows through them.
The heart is like a pump. When it contracts. or beats, it sends a surge
of blood through the blood vessels and pressure increases. This is
called systolic pressure.
When your heart relaxes between beats, your blood pressure
decreases. This is diastolic pressure. When a doctor takes your
blood pressure, he or she measures both your systolic and diastolic
pressures and records them as numbers. For example, if your blood
pressure reading is 126/76(126 over 76), your systolic is 126 and your
diastolic is 76. The numbers are calculated in millimeters of mercury
and recorded as 126/76 mmHg. Blood pressure varies during the
day. Factors inuencing your blood pressure include physical activity,
medications, and your emotional and physical condition. A single
measurement does not provide a true picture of your blood pressure.
You need to measure your blood pressure over a period of time.
IMPORTANT: CONSULT YOUR DOCTOR TO DETERMINE YOUR

7
NORMAL BLOOD PRESSURE. ONLY A DOCTOR IS QUALIFIED
TO DIAGNOSEAND TREAT HIGH BLOOD PRESSURE. PRACTICE
THE MEASUREMENT PROCEDURES FOR THIS INSTRUMENT
CAREFULLY. CHECK YOUR PROCEDURE WITH YOUR DOCTOR.
HOW TO TAKE A READING
1. Make sure you are seated with your feet at and your back and
arm supported. Rest your arm at heart level.
CAUTION: MAKE SURE ALL COMPONENTS ARE ASSEMBLED
CORRECTLY AND SECURELY. FAILURE TO DO SO MAY RESULT
IN INJURY OR AN INCORRECT READING.
Heart Contracts
(Pressure Increases)
Heart Relaxes
(Pressure Decreases)

8
2. Locate brachial artery by placing two ngers 2 cm above the bend
of the elbow on the inside of the arm.
3. Put your left arm through the cuff loop. Place the bottom edge of
the cuff approximately 1-2 cm above the elbow. Place the cuff so that
the air-pipes were over the brachial artery.
4. The cuff should be wrapped so that it ts snugly and stays in place.
You should be able to place one nger between the cuff and arm.
Fasten the cuff by folding the end of the cuff over the D-ring and
press the hook material rmly against the fuzzy pile material. Make
sure the cuff sits correctly.
5. Insert stethoscope ear-pieces into ears.
6. Put the chestpiece over the brachial artery under or 1-2 cm below
the cuff.
Elbow
Tendon

9
7. Rest your arm on a table. Relax your arm, and turn your palm
upward. Ensure the cuff is same level as heart.
8. Place the gauge in front of you. Hold the ination bulb in your right
hand. Close the air release valve attached to the ination bulb by
turning it clockwise.
9. To inate the cuff, rapidly squeeze the ination bulb. If you KNOW
your normal SYSTOLIC pressure, inate the cuff until the gauge
reaches approximately 30 mmHg ABOVE normal SYSTOLIC read-
ing. If you are unsure or do not know your normal SYSTOLIC reading
consult your doctor for the correct ination level.
Bottom Edge
Stethoscope
Elbow
Bladder TubesY-tubing
½ cm
Pile material
Sewn hook
material

10
CAUTION:
DO NOT INFLATE THE CUFF ABOVE
280 mmHg. YOU MAY INJURE YOUR-
SELF OR DAMAGE THE INSTRUMENT.
10. Slowly open the air release valve by
turning it counter-clock- wise. Release the
air at a rate of 2-4 mmHg per second.
11. Listen carefully for the appearance of sounds, watching the
gauge needle. When you hear the rst appearance of sound, it is
your SYSTOLIC blood pressure reading.
12. Continue to release the air at a rate of 2-4 mmHg per second.
When you no longer hear any sounds, that is your DIASTOLIC blood
pressure reading.
13. Turn the air release valve counter-clockwise to release the

11
remaining air. Record your measurement
in the record chart. You should record
reading early, (not to forget values).
Remove the stethoscope from your ears.
Remove the cuff.
NOTE: If you want to take another read-
ing, you can reinate up to twice. Wait at
least 5 minutes before measuring again, to avoid inaccurate readings
due to the engorged blood vessels.
QUICK REFERENCE GUIDE
BEFORE
1. MEASURE your blood pressure at the SAME TIME each day.
2. RELAX for at least 5 minutes before taking a measurement.
3. Remove tight tting clothing from your upper arm.

12
4. DO NOT eat, smoke or exercise for at least 30 minutes before
taking a measurement.
DURING
1. PLACE CUFF at the heart level.
2. STETHOSCOPE CHESTPIECE covers the BRACHIAL ARTERY.
3. INFLATE unit to proper level (30-40 mmHg above estimated sys-
tolic pressure).
4. DO NOT talk or move during a measurement.
5. DEFLATE unit at 2-4 mmHg per second.
AFTER
1. WAIT 5 minutes before taking another measurement.
CARE AND MAINTENANCE
To protect your unit from damage, please AVOID washing or moisten-
ing the cuff, dropping the gauge, or hitting the surface of the stetho-
scope. Your new blood pressure unit has been carefully checked to
assure reliability and accuracy prior to shipment and use.
However, as with any sensitive instrument subjected to repeated
use, we recommend that your blood pressure gauge be checked
periodically. When the cuff is fully deated, the gauge needle must
stay within the accuracy indicator zone. If the needle points outside
of the accuracy indicator zone, the gauge will give inaccurate read-
ings. In this case you have to bring the device to the nearest service
centre for calibration (address mentioned in warranty card).

13
WARRANTY
The blood-pressure monitor is guaranteed for 2 years from the date
of purchase. Warranty for the cuff and bulb is 1 year from the date
of purchase. The guarantee does not apply to damage caused by
improper handling, accidents, not following the operating instructions
or alterations made to the instrument by third parties.
The guarantee is only valid upon presentation of the guarantee card
lled out by the representative of the sales organization and its stamp
and safety of the packaging.
TECHNICAL SPECIFICATIONS OF MODEL A-10
Weight: 273 g
Size: 170 x 120 x 70 mm
Storage temperature: -20 °С to +70°С
Humidity: 100% relative humidity maxi-
mum at 25 °С
Operation temperature: 5 tо 40 °С
Measuring range: 20 to 300 mmHg
Measuring resolution: 2 mmHg

14
Accuracy: within ±3mmHg in 60-240
mmHg
within ±4mmHg in 20-60 and
240-300 mmHg
Air leakage: < 3 ±2 mmHg/sec.
ACCESSORIES:
1. Sphygmomanometer.
2. Cuff (oversized with arm circumference of 25-42 cm) with inlaid
latex bladder.
3. Bulb and valve.
4. Soft bag.
5. Packaging.
Technical alterations reserved!
Whole service life without cuff - 10 years
Whole service life of cuff - 2 years
CHECKING
The device is calibrated at manufacturing checking. During usage
and after repair it is recommended to check the device at least once
a year in specialised labs.

15
ВНИМАНИЕ:
Пожалуйста, внимательно прочтите настоящую инструкцию
перед использованием прибора для измерения артериального
давления. Соблюдайте все правила пользования во избежание
повреждений прибора и причинения вреда себе. Проконсульти-
руйтесь с врачом об уровне Вашего артериального давления.
ИНСТРУКЦИЯ
ПОЛЬЗОВАТЕЛЯ
ИЗМЕРИТЕЛЬ
АРТЕРИАЛЬНОГО ДАВЛЕНИЯ
ПРОФЕССИОНАЛЬНЫЙ
модель
A-10
RU

16
СОДЕРЖАНИЕ
Сборка прибора 16
Что такое артериальное давление 17
Как измерять давление 19
Краткое руководство 23
Уход 24
Гарантия 24
Технические характеристики 25
СБОРКА ПРИБОРА
Посмотрите на рисунок, чтобы собрать прибор.
1. Присоедините манометр к левой трубке.
2. Присоедините нагнетатель к правой трубке.

17
Примечание.
Размер манжеты - для
плеча окружностью 25-42
см. Для легкости сборки
используйте схему.
Зафиксируйте все части пра-
вильно во избежание получе-
ния травм и поломки прибора.
ЧТО ТАКОЕ АРТЕРИАЛЬНОЕ ДАВЛЕНИЕ?
Артериальное давление – это сила, с которой кровь давит на
стенки сосудов, двигаясь по ним. Сердце работает как насос.
Когда оно сокращается, прилив крови давит на стенки артерий
и создает максимальное давление. Это давление называется
«систолическим».
Когда сердце расслабляется в перерыве между сокращениями,
давление крови минимальное. Это давление называется «диа-
столическим».
Когда врач измеряет давление, он фиксирует цифровое значе-
ние систолического и диастолического давления. Например, если
Ваше давление 126/76, это значит, что Ваше систолическое дав-
ление 126, а диастолическое – 76. Значения измеряются в милли-
метрах ртутного столба и записываются как 126/76 мм рт. ст.
Артериальное давление изменяется в течение суток. Суще-
ствует много факторов, влияющих на артериальное давление:

18
физическая активность, физические нагрузки, эмоциональное
состояние, принимаемые лекарства. Единичное измерение не
отображает реальной картины артериального давления. Необ-
ходимо измерять артериальное давление через определенные
промежутки времени.
ВАЖНО: ПРОКОНСУЛЬТИРУЙТЕСЬ С ВРАЧОМ, ЧТОБЫ ОПРЕ-
ДЕЛИТЬ УРОВЕНЬ ДАВЛЕНИЯ, КОТОРЫЙ ЯВЛЯЕТСЯ НОР-
МАЛЬНЫМ ДЛЯ ВАС. ТОЛЬКО КВАЛИФИЦИРОВАННЫЙ ВРАЧ
МОЖЕТ ДИАГНОСТИРОВАТЬ И НАЗНАЧАТЬ ЛЕЧЕНИЕ ПРИ
ПОВЫШЕННОМ АРТЕРИАЛЬНОМ ДАВЛЕНИИ. ТЩАТЕЛЬНО
ОТРАБОТАЙТЕ ПРОЦЕДУРУ ИЗМЕРЕНИЯ АРТЕРИАЛЬНОГО
ДАВЛЕНИЯ ЭТИМ ПРИБОРОМ.
Сердце сокращается
(давление увеличивается)
Сердце расслабляется
(давление падает)

19
КАК ИЗМЕРЯТЬ ДАВЛЕНИЕ
1. Займите удобное положение, при котором Ваши ноги не скре-
щены, спина и рука имеют опору. Держите руку на уровне сердца.
ПРЕДУПРЕЖДЕНИЕ: во избежание повреждений и получения
неправильных результатов убедитесь, что все части прибора
соединены правильно и зафиксированы.
2. Найдите плечевую артерию, разместив два пальца на 2 санти-
метра выше внутреннего локтевого сгиба.
3. Вставьте левую руку в кольцо, созданное манжетой. Располо-
жите нижний край манжеты приблизительно на 1-2 сантиметра
выше локтевого сгиба таким образом, чтобы воздушные трубки
выходили над плечевой артерией.
Локоть
Локтевой сгиб

20
Нижний край
Стетоскоп
Локоть
Воздушные трубки Y-трубка
½ cm
4. Манжета должна плотно облегать руку. Между манжетой и
рукой должен проходить только один палец. Зафиксируйте
манжету, перегнув ее через металлическое кольцо и застегнув
липучку. Убедитесь, что манжета наложена правильно.
5. Вставьте оливы стетоскопа в ушные раковины.
6. Установите головку стетоскопа над артерией в области локте-
вой впадины под манжету или на 1-2 сантиметра ниже манжеты.
7. Положите руку на стол. Расслабьте руку и поверните ее ладонью
вверх. Убедитесь, что манжета расположена на уровне сердца.
Липучка
Липучка
Other manuals for A-10
1
Table of contents
Languages:
Other Dr.Frei Blood Pressure Monitor manuals

Dr.Frei
Dr.Frei A-30 User manual

Dr.Frei
Dr.Frei M-150S User manual

Dr.Frei
Dr.Frei M-100A User manual

Dr.Frei
Dr.Frei M-150S User manual

Dr.Frei
Dr.Frei A-20 User manual

Dr.Frei
Dr.Frei M-500A User manual

Dr.Frei
Dr.Frei A-40 User manual

Dr.Frei
Dr.Frei M-100A User manual

Dr.Frei
Dr.Frei M-200A User manual

Dr.Frei
Dr.Frei A-10 User manual