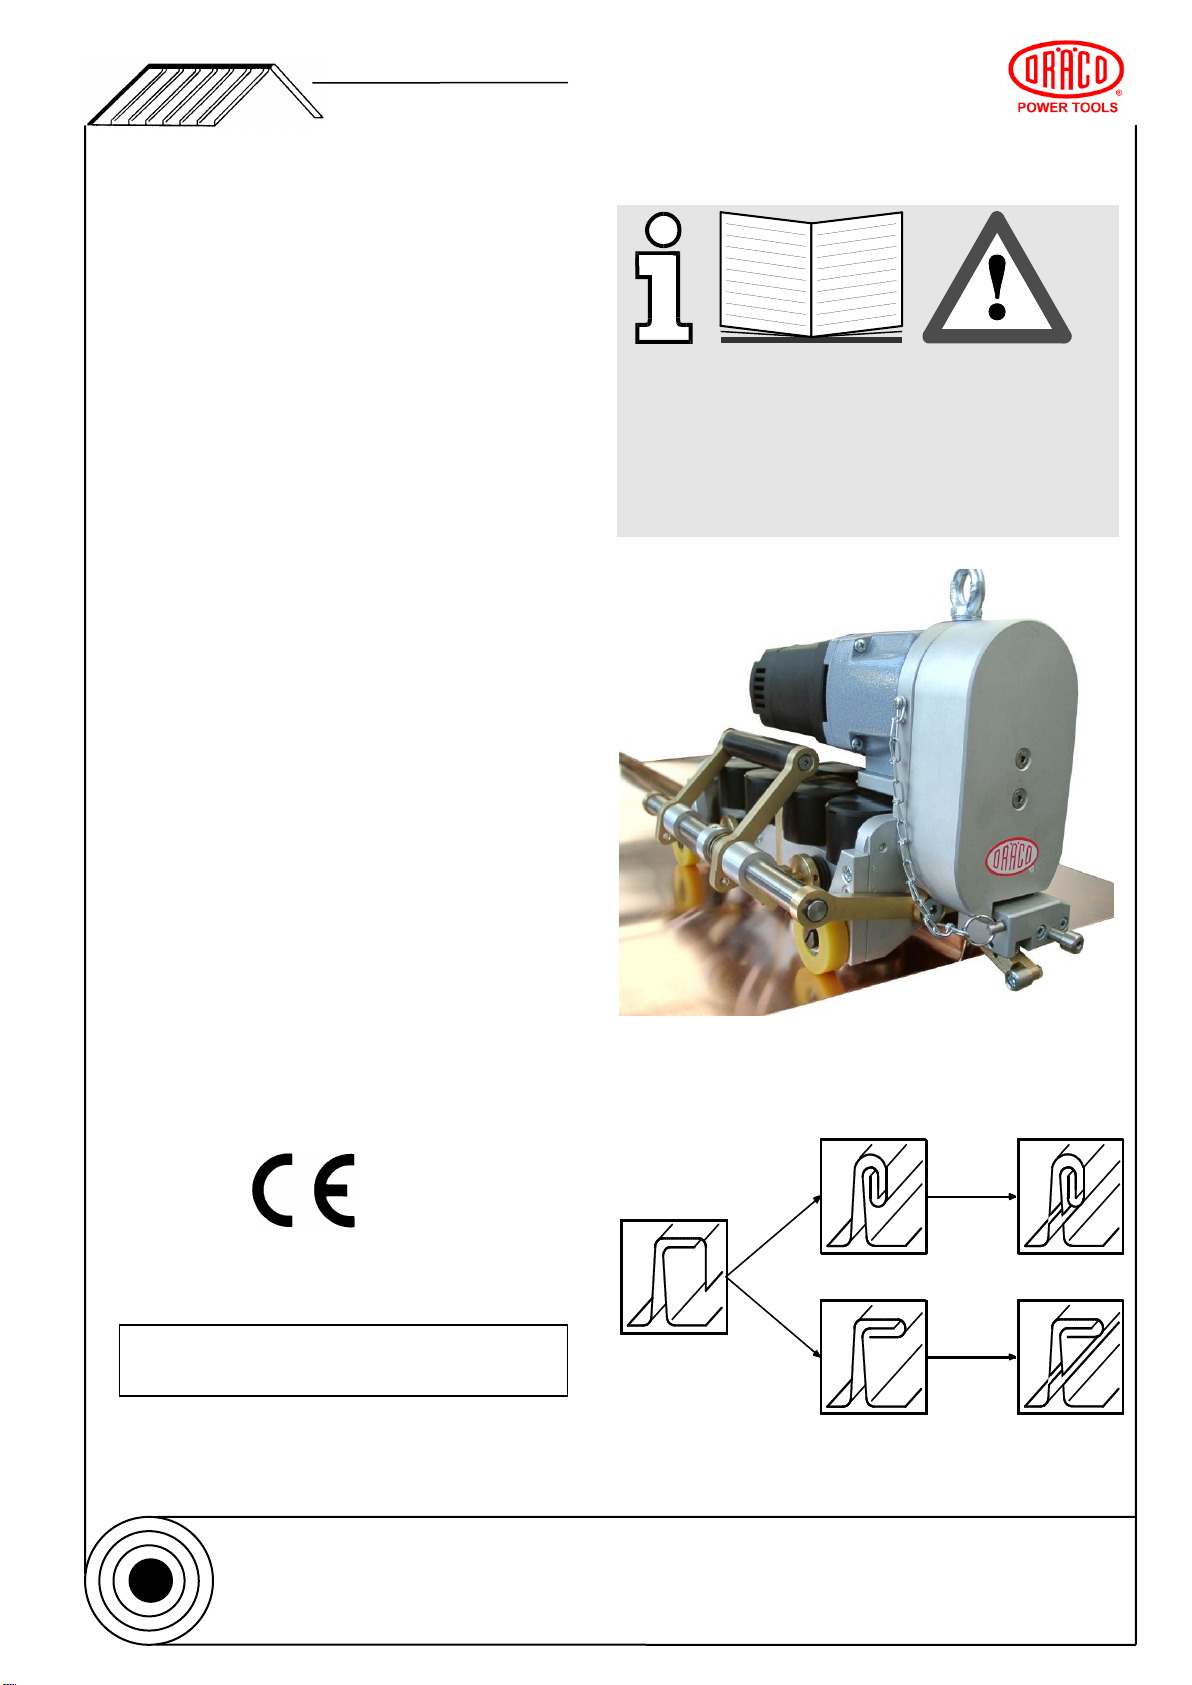
Draco K9-1 User manual

Instruction Manual
Automatic
Power Seamer
K9-1
(for Double Lock Standing Seam)
K9-1-WAD
(Complete version, for Single- and
Double Lock Standing Seam, Dual-
Safety Switch & Seam Cutting)
Please read this manual, before attempting to
operate this machine and observe all safety
regulations and signs.
Pic. K9-1-WAD
Mach.-No.: 04536
... the Roof- and Wall Program of
Max Draenert Apparatebau GmbH & Co.KG –Electric –Cordless –Pneumatic Tools –Machines
Factory 1
D-73777 Deizisau
P.O. Box 1120
Phone
+49-(0)7153-8217-0
Gutenbergstr. 15-17
D-73779 Deizisau
Fax
+49-(0)7153-8217-66
INTERNET http://www.dracotools.com
E-Mail: draenert@dracotools.com

2
Index Page
GENERAL INFORMATION 2
PICTOGRAM EXPLANATION 2
USERS REFERENCE 2
USERS OBLIGATION 2
SAFETY INDICATION
3
TECHNICAL DATA 4
FUNCTION 5
CONTENT 5
NORMAL EQUIPMENT 5
ACCESSORIES 5
REMOTE CONTROL K9-1-KF 5
OPERATION INSTRUCTIONS 6
ENVIRONMENT CONDITIONS 6
CHECKUP BEFORE OPERATING 6
WORKING WITH THE POWER SEAMER 7
(DOUBLE LOCK SEAM)
PREPARING THE PANELS 7
PREPARING SEAM TO INSERT THE SEAMER 7
PREPARING THE POWER SEAMER 7
VARIABLE PRESSURE ADJUSTMENT 7
WORKING CONSEQUENCE CLOSING THE SEAM 8
WORKING WITH ACCESSORIES 9
CHANGING ROLLS FOR STANDING SEAM 9
CUTTING ROLLS K9-1-AR 10
CLOSING LOCK HANDLE 11
CHANGING FORMING STATIONS K9-1 12
STAINLESS STEEL SEAMING 12
CLOSING BARREL CURVED PANELS 12
CUTTING ROLLS K9-1-AR 13
SPARE PARTS LIST CUTTING ROLLS K9-1-AR 14
5 STEPS TO RECYCLE OR REPAIR A PANEL
15
WINTERSET K9-1-WS 16
ASSEMBLING 16
DUAL SAFETY SWITCH K9-1-DF 17
FUNCTION
CHECK UP DUAL SAFETY SWITCH DF 17
WORKING INSTRUCTIONS DF 18
WORKING WITH THE REMOTE CONTROL
K9-1-KF
18
VARIABLE PRESSURRE ADJUSTMENT
K9-1-ASS 19
CONTROL BOX 20
SHORT DESCRIPTION START UP K9-1
21
SAFETY PRECAUTIONS attached
DECLARATION OF CONFORMITY attached
GENERAL INFORMATION
Please read the safety regulations carefully. These
should always be followed to reduce the risk of
personal injury. Read these instructions before
attempting to operate this product, it will help to
reduce any accidents.
PICTOGRAM EXPLANATIONS
In the operation manual all safety regulations
are mentioned with following Pictograms:
Information
Attention
Danger general
Danger specific
Signs Outdoors
Prohibition Signs
USERS REFERENCE
Power Seamer K9-1, K9-1-WAD, can be used to
close or to cut open seams only, please see
technical data and read the manual how to operate
the seamer.
USERS OBLIGATION
All Operators must educate themselves as to the
proper operation and uses of this equipment. The
Operation Manual must be kept with the machine at
all times.
... the Roof- and Wall Program of

3
WORKING ADVISE WITH SAFETY SWITCH
22
MAINTENANCE ADVICE 23
WARRANTY
24
When working at the wall or roof, ensure
that everything conforms to the local health
and safety regulations.
Before plugging in and using Seamer check plug and
cable also accessories if damaged.
Consider work area environment in rain or
snow, working on Metal Roofs is prohibited
after DIN18339.
Any damage on Seamer, send machine in to the
manufacturer for servicing.
DANGER / ACCIDENT
Check label for voltage, the electric mains
connection must correspondent.
Don’t expose the Seamer to rain or snow,
the Power Seamer can be used in damp
locations on account of water-protection
resistance after IP 54
The Seamer must be operated on a
grounded socket only, to guard against an
electric shock. Danger due to electric shock.
Guard against electrical shock.
Disconnect plug from socket, before
machine - adjustment or servicing and when
not in use. Injury –Danger.
Do not transport Seamer or Metal Box with
a lifting crane.
Operate Seamer only when located on top of
the panel. Injury.
Working overhead with the seamer is not
allowed.
Ensure that the forming stations are
positioned correctly, (numbers). Use Original
Forming Rolls only.
The Seamer must work freely without
force, do not push or pull and do not sit or
stand on top of the machine.
Danger, accident.
Before profiling check the rolls, for right
position, that they are located in the pin and
the screws tight.
The Operator must secure himself when
working with the machine.
Danger Accident.
Lifting eyes are provided to enable a safety
rope or cable to be fitted, especially when
working on vertical claddings or on a steep
... the Roof- and Wall Program of
Safetey Indicators for
Users and Operators

4
slope on top of the roof.
Technical Data
K9-1 Basic Version
Parameter
Figures
Standard
Machine Type
K9-1
K9-1 Stations (Forming sets)
4
Motor data
Voltage single phase
230 or 115
V~
Power
1150
W
Amps
6,3
A
Protection dampness
⚫
IP54
Weight without accessories
22
kg
Speed, variable
5,5 - 13
m/min
Metal Thicknes (Roll-form qualität)
Aluminium, Zinc, Copper
0,8 / 20
mm / gauge
280
N/mm²
Steel
0,7 / 21
mm / gauge
370
N/mm²
Stainless Steel
0,5 / 24
mm / gauge
400
N/mm²
Min. Radius
2or 1,2
m
Seam Height
25 - 60
mm
Panel width min.
140
mm
Recommended Material temperature min.
+ 10 / +40
°C / °F
Technical changes can be made without prior notice 01/20.
Technical Data Accessories
Technical Data of Winterset K9-1-WS see manual blower page 16.
Panel Confirguration
Control Measurements
A
B
C
Min. width of panel 140 mm
from 24 mm
from 25 mm
D
E
F
Up to 15 mm
Measurement D - (5 x s)*
* s = Material Thickness
... the Roof- and Wall Program of
* s = Material Thickness smax = 0,8 mm

5
FUNCTION
Power Seamer K9-1-WAD is a new combination of
DRÄCO patented functions all together, to close a
single-, or double lock seam, cutting rolls K9-1-AR
set, to cut the seam open for renovation or repair at
the roof or wall.
Seamer K9-1 or K9-1-WAD is a light weighted
machine at an advanced working speed between
5,5 - 13 meter per minute. A seam at the wall 90
degrees up or down can be handled without a
problem. All materials can be closed to a seam in a
clean transition, also at cross seams.
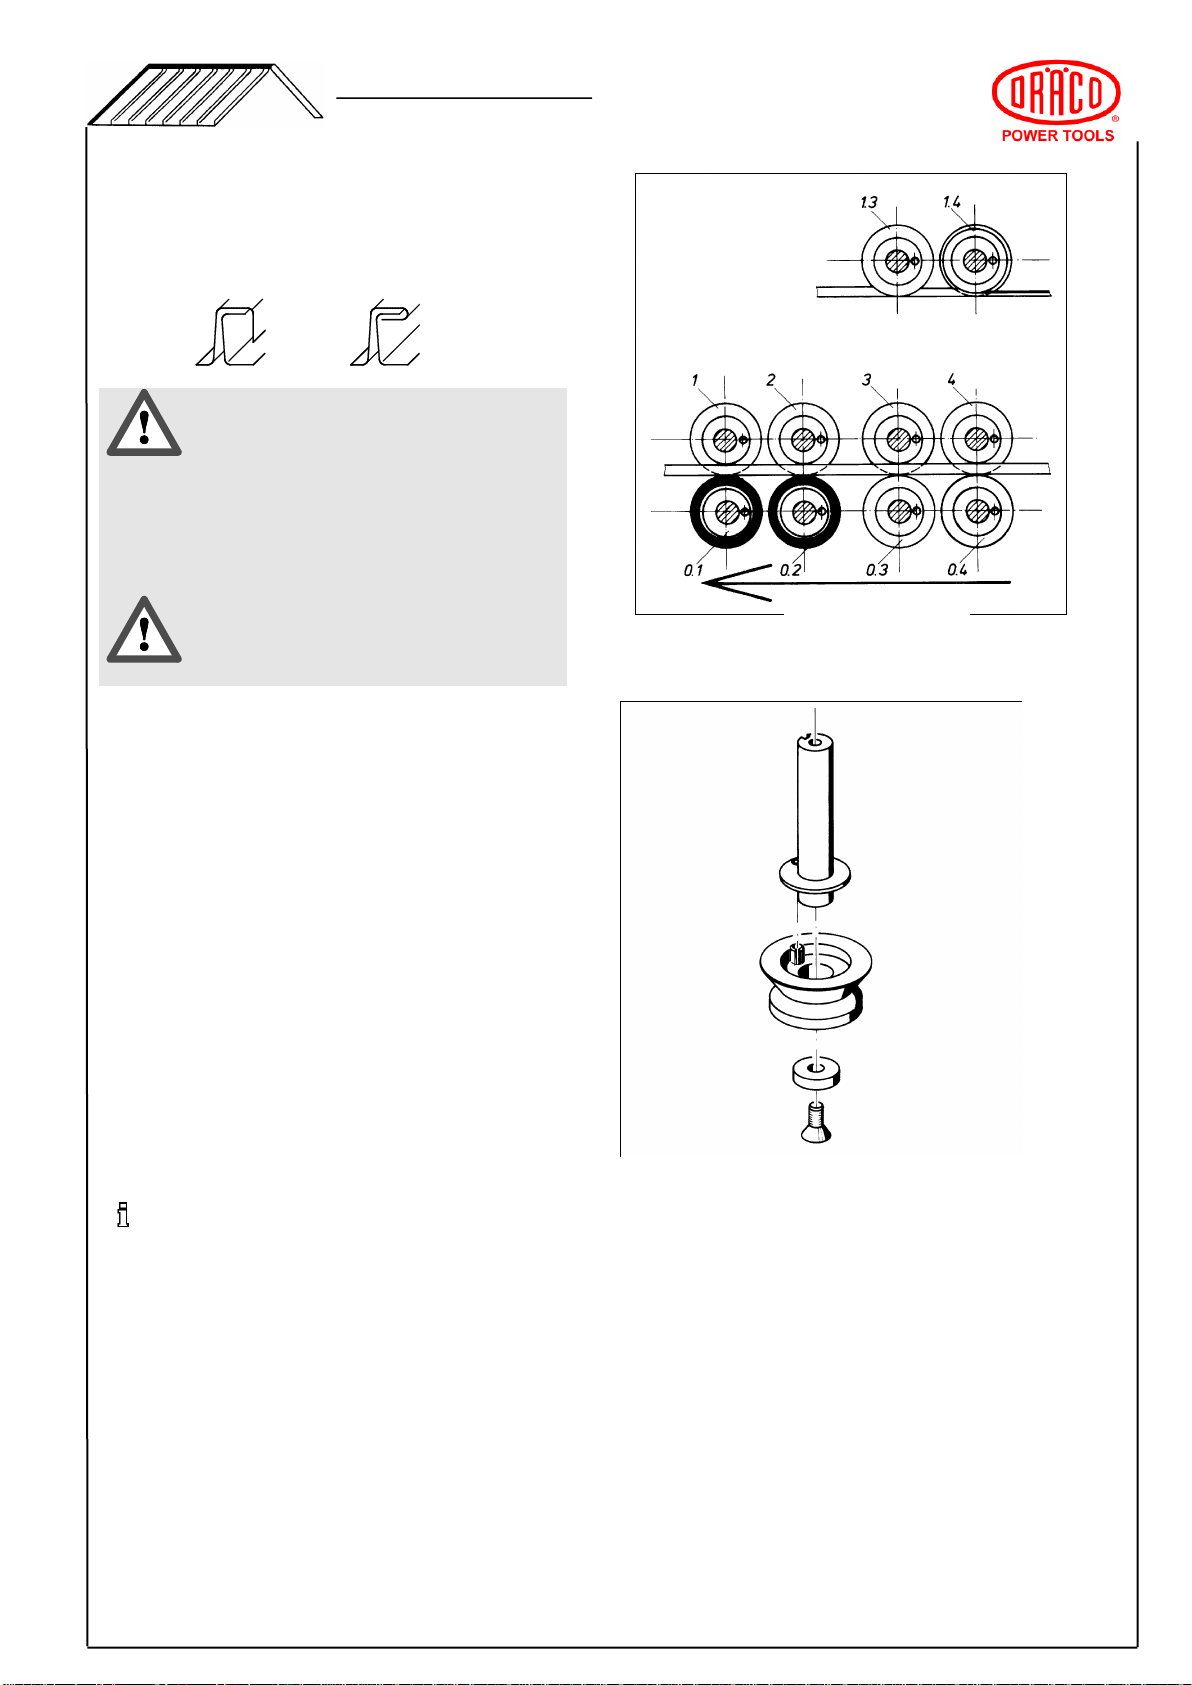
The high seam quality is achieved through 8 drive
rolls. Two rubber drive rolls work, without leaving
scratch marks on painted or coated sheets, up to 0,8
mm, and stainless steel 0,6 mm in thickness.
Four outrigger wheels can be adjusted for different
seam heights from 25 to 60 mm. The variable
pressure adjustment K9-1-ASS can be adjusted to
achieve an optimum closed seam.
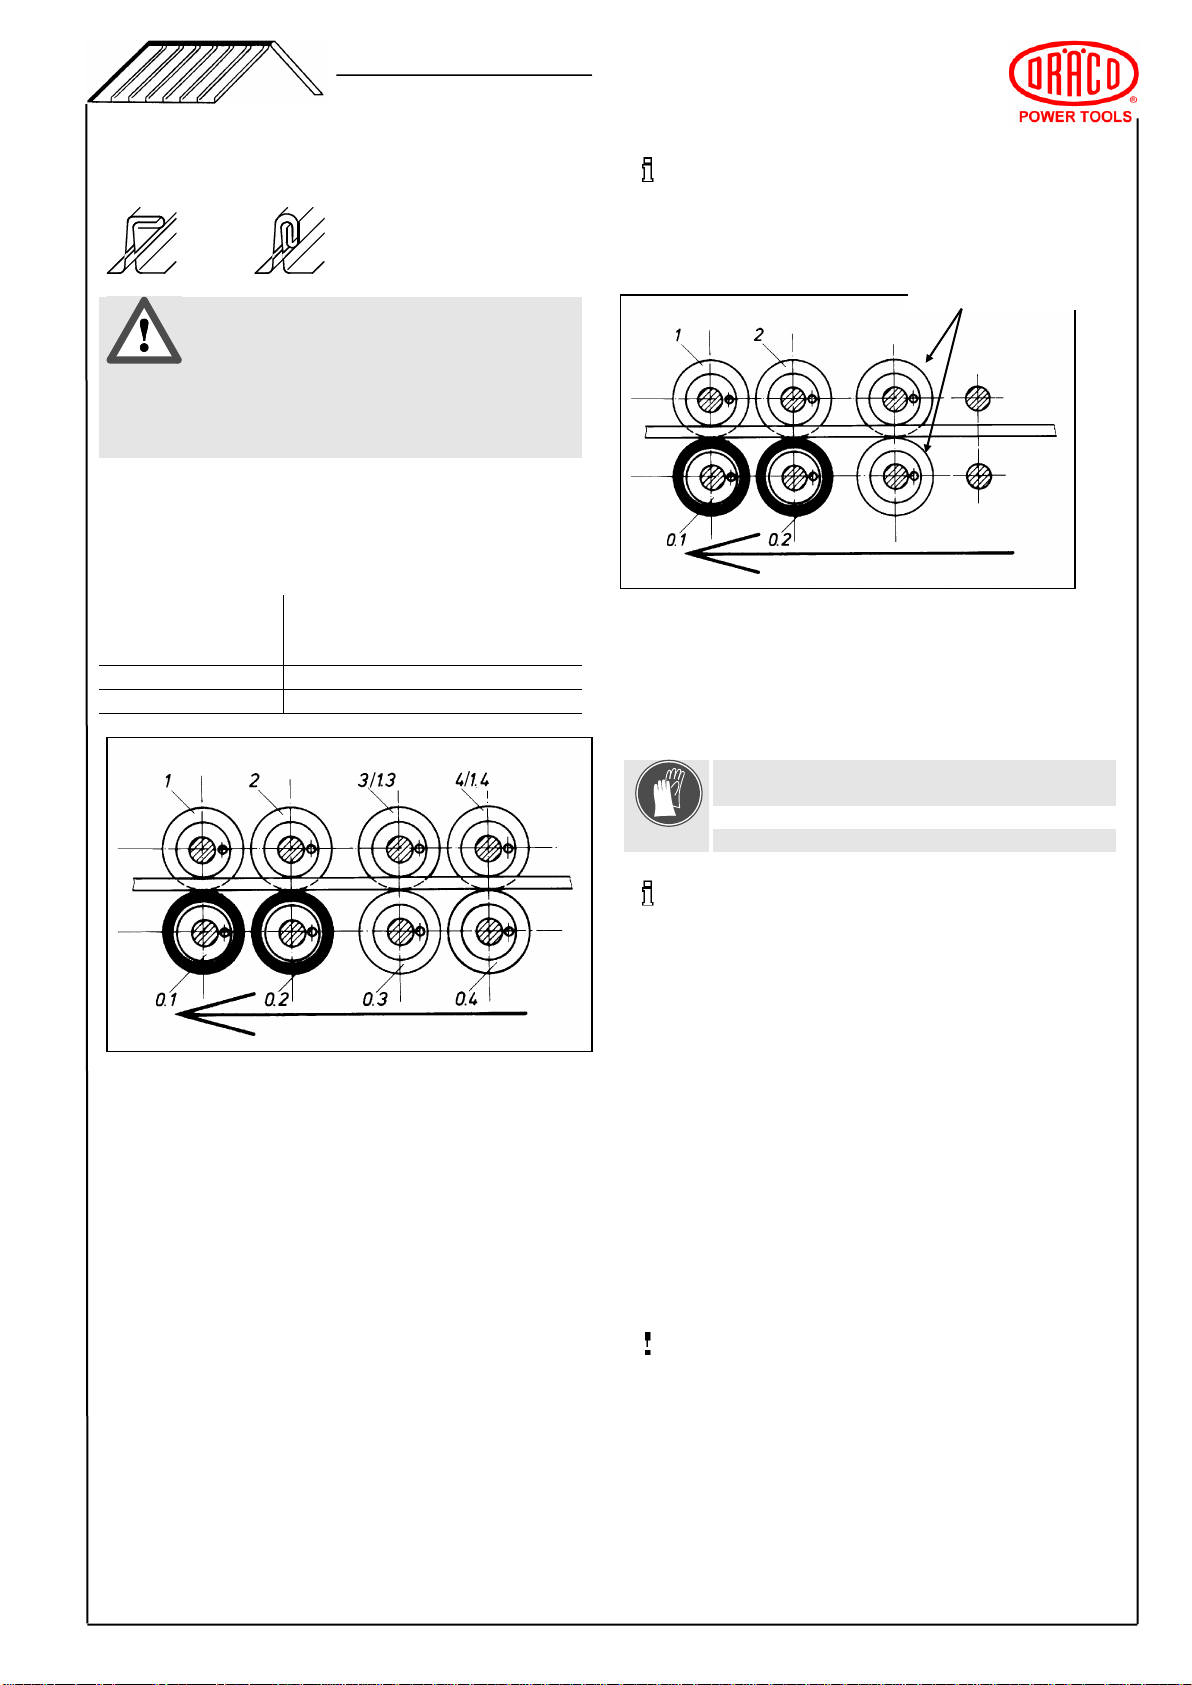
To close barrel curved roofs, a radius of 2 meter is
possible without any adjustment. A brass-washer
under forming stations No. 1 and No. 1.4 minimizes
the radius to 1,2 meter. Clean transition at the clips
and cross seams due to the spring washers and the
variable pressure adjustment K9-1-ASS.
Seamer K9-1 version closes the profiled panels to a
double lock seam. Multifunctional accessories are:
single lock forming rolls K9-1-WR, dual safety switch
K9-1-DF, set of cutting rolls K9-1-AR, winter set K9-
1-WS, remote control K9-1-KF.
For recycling or repairing a panel at the roof or wall,
the cutting rolls K9-1-AR can be mounted to the
seamer to cut open the single or double lock seam.
Lifting eyes are assembled to the seamer to enable
a safety rope or cable to be fitted, especially when
working on vertical claddings or on a steep slope on
top of the roof. Overhead working with the seamer is
not allowed.
Safety first on site, roof or wall is our endeavor, the
patented dual safety switch K9-1-DF prevents the
seamer to fall off the roof, stops automatically at the
end of a seam, gutter or ridge, wall or obstructions.
Winter Set K9-1-WS, attached to the seamer and
speed control in low working speed, (under + 10°C)
for trouble free seaming in cold temperatures. Ideal
for best results in seaming.
CONTENTS
Please check package for completeness.
BASIC EQUIPMENT:
◼1 Power Seamer K9- 1, for double lock seam
◼1 Manual
◼1 Transport box
◼1 Allen Key
◼2 Spare Screws
Assembled:
◼Variable Speed Control
◼Variable Pressure Adjustment System K9-1-ASS
◼Socket for Dual –Safety Switch K9-1-DF
◼Socket for Remote Control K9-1-KF with
FORWARD-STOP-REVERSE-Function
Accessories for K9-1
(Not included in Basic equipment)
◼Set Forming Rolls Single Seam K9-1-WR
◼Set Of Cutting Rolls K9-1-AR
◼Dual Safety Switch K9-1-DF
◼Remote Control K9-1-KF
◼Winter Set K9-1-WS
◼Hand Seamer K8 Single Lock
◼Hand Seamer K7 Double Lock
Remote Control Information (option)
The remote control for forward and reverse
operation
is ideal to close the single lock seam at the facade
or wall from the ground, comfortable.
Attention
A double lock seam can only be closed in forward
operation. Reverse operation of seamer a knot will
be between the single and double lock seam. To
avoid the knot, open the locking handle move
seamer about 30 cm backwards until the seamer is
stationed above the double lock seam, close the
locking handle again and switch to reverse
... the Roof- and Wall Program of

6
operation. Always safeguard the machine.
Operating Instructions
Starting up Seamer K9-1(-WAD)
◼Take Seamer K9-1(-WAD) out of the metal
case, lay machine level with the forming
stations to the ground.
When working on site, please follow the
safety regulations in your country, read
these instructions before attempting to
operate this machine.
◼Check Seamer, accessories, plug and cable
for damage once more.
Environment Conditions
Any damage observed send machine in for
servicing.
Working on top of the roof by rain and
snow is not allowed. Safety regulations
and accident prevention DIN 18339.
Noticeable examination outside.
Height adjustment
◼Check outrigger wheels for correct height
adjustment and screws tight.
Danger of accident
Forming rolls
◼Rubber and forming rolls must be free of
grease and oil. Check forming station numbers
for correct alignment.
The Power Seamer K9-1(-WAD) can be
used in damp locations due to water
protection resistance after IP 54. Do not
use in heavy rain or snow.
Function check
Switch must be positioned to “0“switch light
off.
Guard against electric shock!
Always work with the 4 outrigger wheels at
the side of the seamer
When working on vertical claddings, on a
steep slope at the end of the roof, secure a
safety rope to the lifting eyes to prevent
machine falling off the roof.
Accident prevention.
◼Operate seamer only on grounded
connections, socket, extension cable or cable
drum.
◼Switch machine to “1”, switch lights up, press
Start Button.
All 8 forming rolls must turn.
Check before operating the seamer
When a dual safety switch (K9-1-DF) is
assembled to the seamer, lift bottom feeler
up, put pin into hole no. 1 to lock feeler.
Before plugging the machine into the
electricity supply check plug and cable also
all accessories if damaged. Any damage
observed, please send machine in to the
manufacturer for servicing.
ATTENTION
Position no. 1 non operation
Position no. 2 in operation.
Check label for voltage, the electric mains
connection must correspondent.
◼Switch machine off
◼Wait until all forming rolls come to a stand still
Unplug cable
The seamer must be operated on a
grounded socket or extension cable only,
to guard against an electric shock.
DANGER
If there is no notice of defects, the Power
Seamer is ready to work according the
regulations.
Before servicing or adjusting the Seamer
unplug cable from socket.
INJURY
... the Roof- and Wall Program of

7
WORKING WITH the POWER SEAMER
Double Lock Seam
PREPARING THE SEAMER
Adjustment of outrigger wheels
Before working with the power seamer K9-1(-
WAD), please read chapter operation
instructions page 6.
Read the safety indications and pay
attention to.
The outrigger wheels can be adjusted to 3
different heights.
Number 1:
Number 2:
Number 3:
25 - 38 mm
38 - 50 mm
50 - 60 mm
The outrigger wheels stabilize the seamer when
working on top of the roof or at the wall. All 4 wheels
must be adjusted to the same height and there should
be clearance between the roll and the material.
Preparing the panels
◼Fit the clips to the first panel.
◼The next panel overcloak, over the undercloak
Overcloak Undercloak
Preparing seam to insert the seamer
Before inserting the K9-1(-WAD), to close the seam and
if not possible from the outside, close panel with hand
seamer K8 two times and one time with hand seamer
K7.
To avoid seamer to work itself out of the seam, close
long panels every 2 to 3 meter with the hand seamer
K8.
-
Fasten screws after adjustment
The outrigger wheels with the brackets are
marked with R (right) and L (left) and must
always be assembled to the marked side of
the machine.
.
Variable Pressure Adjustment
To achieve an optimum closed seam, adjustment
might be necessary for hard materials. (Trial run
check, sample)
Adjustment of pressure
Increase pressure: Turn both adjustment rings
regular clockwise to increase the pressure.
Decrease pressure: Turn both adjustment rings
anti –clockwise to decrease the pressure.
The pressure can be changed on both rings;
(see arrows) A sample panel should be closed to
check the seam.
Adjustment pressure rings should be turned
anti clockwise to “0” after non-operation, to
relieve the disk springs.
... the Roof- and Wall Program of
Height adjustment of out rigger wheels No. 1, 2, or 3
Unstable adjust supporting rolls
Ring for
pressure
adjustment
Moveable
locking handle,
folds up

8
WORKING CONSEQUENCE CLOSING THE SEAM
Dual safety switch K9-1-DF assembled to the seamer,
check the position of pin first before switching the
seamer to “on “.
If pin is in position 1 the machine will not switch
off automatically!
Pin in position 2 the dual safety switch is in operation.
Press locking handle down all the way, to
ensure that the handle does not open up
again.
Secure a safety rope to the lifting eyes.
Before working with the dual safety switch, check the
function of the switch.
Working direction variable up or down.
◼Seamer must be operated on a grounded socket
only.
◼To operate seamer switch to ”I” and push knob
2 (see page 20)
◼After switching the machine to on position the
power seamer will work automatically and close
the panel to a double lock seam.
◼Insert the seamer, locking handle open, with the four
forming rolls into the panel.
◼The first two forming rolls No. 1 and No. 2 must be set
under the single lock seam. See picture.
◼At the end of the ridge or eave switch machine
to “0” off.
◼Open locking handle.
◼Take seamer out of the panel.
Insert the rolls no. 1 and no. 2 at the beginning of the seam
If there is an obstruction, the rest of the panel has to
be closed with the single lock hand seamer K8 and
double lock seamer K7.
The locking handle must be positioned to the
forming side
If there is an obstruction, windows, chimneys,
vent pipes, move locking handle against the
spring and to the top. See picture previous
page.
Take seamer out of the panel, move locking
handle down, spring pushes pin into the
bracket, move handle to the top and take
seamer off.
Lock handle
... the Roof- and Wall Program of
0.1
0.2
0.3
0.4
1
2
1.3
1.4

9
WORKING WITH ACCESSORIES
Changing forming stations K9-1-WR for single lock
seam.
Before working with the power seamer
K9-1(-WAD) make sure you read the
operation instructions as well as safety
indications.
Read all of the safety regulations and
instructions carefully.
Disconnect plug from socket before
machine adjustment, servicing and also
when not in use. Injury - Danger.
Sequence of assembling forming stations
◼Loosen the allen screws, double lock
forming stations 1.3 and 1.4.
◼Take both rolls off the shaft.
◼Assemble single lock forming rolls 3 and 4
to the marked numbers at the side of the
seamer 3 and 4, turn the rolls until the pin
settles itself into the hole of the shaft.
◼Changing to double lock seam again, follow
instructions reverse as mentioned above.
◼Preparing the panels and the seamer read
chapter working with the Seamer.
Assembling forming stations to the shaft
Lay out panels one after one, fasten
clips, close the panel with the Seamer, or
single lock hand seamer K8, to achieve a
clean single or double lock seam.
... the Roof- and Wall Program of
Working Direction

10
Cutting Rolls K9-1-AR
To prevent waste jam in the seamer, no forming
stations to station 1.4 or 0.4. The machine works only
with 4 driving rolls and 2 cutting rolls.
Please read the operation instructions as
well es safety indications before working
with the power seamer K9-1(-WAD).
Read all the safety regulations and
instructions carefully. All instructions
have to be followed.
Changing seamer for seam cutting
Loosen the screws on the following forming
stations. See chart.
Rolls to be used
Changing to double or single lock, follow instructions
reverse as mentioned above. See chart.
Double lock
1 2 1.3 1.4
Single lock
1 2 3 4
⚫Working Sequence Cutting Double Lock- or
Single Lock Seam
Forming stations diagram
Seam cutting, a burr could be on both sides
of the panel.
Injury -Wear gloves
Working direction variable up or down or
opposite.
Open locking handle all the way.
Set seamer, with the first two rubber drive wheels into
the panel.
Cutting rolls must be stationed just before cutting the
seam if there is an obstruction, cut seam about 20 cm
by hand set machine in and switch machine to “on“
◼Take the rolls position 3/1.3, 4/1.4 and 0.3
0.4 off the shaft
◼Assemble cutting rolls 3 and 0.3 to the
marked numbers at the side of the seamer
3 and 0.3.
◼Turn both rolls until the pin settles itself into
the hole of the shaft.
The locking handle must be set to the side of
the seam.
◼Fasten cutting rolls with screws again.
... the Roof- and Wall Program of
Cutting rolls
3
0,3

11
Locking handle closed
◼Close locking handle until engaged.
◼Closed locking handle must be parallel to the panel.
◼If handle is not closed correctly, when working, it could
open back up.
◼For safety reason, always fasten rope to lifting eyes.
◼Operate seamer on grounded connections, extension
cables or cable drums, only.
◼Switch machine to “on“ and press “start”button.
The seamer cuts the seam open automatically.
◼At the end of the seam, switch machine off, or set back
switch no. 6 to stop. See page 20.
◼Open locking handle.
◼Take seamer out of panel.
If the seamer runs against an obstruction, the rest of the seam has
to be cut open by hand.
... the Roof- and Wall Program of

12
Change of Forming Stations K9-1(-WAD)
Forming station assembly on shaft
Standing Seam Forming Stations
(Option)
Double Seam Forming Stations
(standard)
Cutting Rolls
(option)
Closing Stainless Steel Panels
To close a single-or-double lock seam in stainless
steel panels, for example Uginox, to achieve an
optimum closed seam, pressure adjustment rings
have to be turned for high-pressure materials. See
page 7: pressure adjustment.
We recommend, when using seamer on site, check
seam-closure on a sample panel first.
Barrel Curved Roofs
For closing barrel curved roofs under the dimension
of 1,5 m radius insert one washer each under
forming station No. 1 and No. 1.4 (forming roll No. 4
Standing Seam). Due to the washers, it is possible
to close barrel curved roofs down to a radius of 1,2
m.
... the Roof- and Wall Program of
Pin must lock
into shaft
0.1
0.2
0.3
0.4
Take wheel
No. 1.4 out
and assemble
No. 4
0.1
0.2
1
2
0.1
0.2
0.3
0.4
1
2
1.3
1.4
Take No. 0.3 and
No. 1.3 ( 3 ) out of
seamer and
assemble No. 0.3
and No. 3
Forming rolls No.
0.4 and 1.4 (4)
must be taken out
totally
Brass Washer
1
2
Take wheel
No. 1.3 out
and assemble
No. 3

13
Cutting Rolls K9-1- AR Changing of cutting blades
Sequence of operation:
Changing cutting blades station 3 and 0.3.
To change cutting blades loosen 4 screws (pos. 10)
to take cutting blades off. If there are no chips
and not too blunt, they can be resharpened.
Assembling:
The resharpened or new cutting blades, insert into
cutting blade holders 3 and 0.3 and tighten these
with 4 screws.
Please make sure, that numbers 3 and 0.3 match the
cutting blades and cutting blade holders.
Cutting roll station 3
Cutting roll station 0.3
Pos.
Order no.
Item
Pieces
10
81238
Screw M5x12
8
20
K 906303
Cutting blade station 3
1
30
K 906301
Cutting blade holder station 3
1
40
K 906280
Brass insert
2
50
81265
Pin Ø 6x12
2
60
K 906304
Cutting blade station 0.3
1
70
K 906300
Cutting blade holder station 0.3
1
K 900080
Mounting Screw M6x12
1
... the Roof- and Wall Program of
Number 3
Number 0.3

14
Spare Parts List for cutting rolls K9-1-AR Set order No. BG91625-1
Pos.
Order no.
Item
Pieces
BG900299
Cutting roll station 3 complete
1
10
81238
Screw M5x12
4
20
K 906303
Cutting blade station 3
1
30
K 906301
Cutting blade holder station 3
1
40
K 906280
Brass insert
1
50
81265
Pin Ø 6x12
1
Pos.
Order no.
Item
Pieces
BG900300
Cutting roll station 0.3 complete
1
10
81238
Screw M5x12
4
40
K 906280
Brass insert
1
50
81265
Pin Ø 6x12
1
60
K 906304
Cutting blade station 0.3
1
70
K 906300
Cutting blade holder station 0.3
1
... the Roof- and Wall Program of
Number 0.3
Number 3

15
For recycling or repairing one panel in standing or double lock seam,
using cutting rolls K9-1-AR step 1-5
1.)
Cutting of two seams leaving an upstand
of 8 mm
2.)
Bend both sides up 24 mm, with a hand
bending tool.
3.)
Form a wider panel both sides overcloak,
U-U profil.
4.)
Fasten cleats, lay wider panel over
undercloak
5.)
Close to a single or double seam with
hand seamers K8 and K7 or with power
seamer K9-1(-WAD) working direction up
and down.
... the Roof- and Wall Program of

16
Winterset K9-1-WS (option)
Before switching hot air blower on, read
the instruction sheet about the winter set.
Disconnect plug from the socket if any
maintenance is necessary to the seamer or
blower.
The hot air blower can heat up to 650° C,
1202 ° F
DANGER OF FIRE!
Keep away from inflammable articles.
Seam and hot air blower, as well as
reflector can get very hot.
Do not touch.
Danger of burns.
Wear safety gloves at all times!
Optional accessory, winter set K9-1 WS is used when
outside temperatures are low. The hot air blower will
warm up the seam to achieve an optional closed
seam.
If a temperature of +10°C on top of the seam is
not reached, turn the electronic speed control to
a lower working speed, minimum 5,5 m/min.
Assembling Winter Set to Seamer K9-1
(-WAD)
Disassemble eye screw (1)
Blower bracket (2) assemble with eye screw (1)
and tighten.
Tighten worm screw (3)
Push reflector (6) from the bottom towards the
blower and tighten screw.
Feed hot air blower (4) from the top into the
bracket (2) and tighten 3 screws (5) equal,
finger tight.
The hot air blower winter set can be electronic
regulated up to + 650° C, 1202 ° F.
For technical data, Winter Set K9-1-WS see
instruction sheet hot air blower.
... the Roof- and Wall Program of

17
DUAL-Safety Switch K9-1-DF (option)
Safety first on site is our endeavour.
The patented Dual Safety Switch K9-1-DF is
constructed for safety, to stop the seamer
automatically at the ridge, eave or any other
obstructions on top of the roof or wall.
When working on vertical claddings, on a
steep slope or at the end of a roof, secure a
safety rope to the lifting eyes in front or
backside of the seamer to prevent machine
falling off the roof, even if the dual safety
switch is assembled.
Power Seamer K9-1 without a dual safety
switch K9-1-DF the item can be fitted in the
factory, afterwards.
Function
At the end of the ridge, eave or any other
obstructions the machine shuts off automatically
due two switches at the front and below the
seamer.
Check dual safety switch before working with
the machine:
◼Seam switch below, push to top.
◼Insert pin in hole no.1
◼Switch machine to “on” (pin in hole no.1)
all forming stations must turn.
Press front switch, seamer shuts “off “, all rolls
come to a standstill.
◼Seamer can be activated, switch machine
off and to on again. All forming station
must turn.
◼Take pin out of hole no. 1, and insert pin
in hole 2.
Seamer power shuts off. All rolls come to a
standstill.
◼Switch machine off to “0“.
... the Roof- and Wall Program of
Hole No.2
Front switch
Hole No. 1
Seam switch below

18
WORKING SEQUENCE - DUAL SAFETY SWITCH K9-1-DF
To activate the dual safety switch:
◼Take pin out of hole no. 1.
◼Insert pin in hole no. 2.
◼Set seamer on top of the seam.
Attention: The bottom seam switch must be placed on top of the seam.
◼Switch machine to “ON”, push START Button.
The seamer K9-1(-WAD), will close the seam to a single or double lock automatically.
Automatically the seamer stops at the end of the panel.
◼Switch to “0” STOP.
◼Open locking handle.
◼Take machine out of seam.
At the end or beginning close the remaining seam, with the single lock hand seamer K8 or to a double
lock hand seamer K7.
To set the seam switch out of order:
◼Take pin out of hole 2.
◼Push seam switch to the top.
◼Insert pin in hole 1, to lock the seam switch, the dual safety switch is out of order.
Attention: Check dual safety switch every time before working with the seamer.
Check the setting of the pin no.1 or 2.
WORKING WITH THE REMOTE CONTROL K9-1-KF
Seamer K9-1
with remote control K9–KF and cable
Using remote control, take off temporary plug (7, without
cable) first. Insert remote control cable into plug and tighten.
The control center shuts off the function of the seamer, when
the remote control cable is engaged. The variable speed
control knob no.5 is still in function and can be used for high
and low speed.
Reverse operation the dead man’s handle will be
automatically activated, the start button must be held for
operation permanently, because of safety reasons.
After removing remote control cable (2), insert
temporary plug (7) again, otherwise the seamer is out of
function.
... the Roof- and Wall Program of

19
POWER SEAMER K 9-1
Variable pressure adjustment K9-1-ASS
Service Tip: Pressure Adjustment
Depending on the hardness of the materials, the
pressure to the forming stations has to be increased
to achieve an optimum closed seam.
Pressure can be changed on both adjustment rings
regular.
Increase pressure:
Decrease pressure:
Turn both adjustment rings
clockwise
Turn both adjustment rings
anti-clockwise
After the adjustments are made, check seam closure
on a sample panel.
Seamer in non-operation, turn both rings anti-
clockwise to reduce pressure to the disk springs.
... das Dach- und Wandprogramm von
Loosen locking
handle before
adjusting the
pressure
Adjustment rings
with pin hole

20
ELECTRONIC SWITCH BOX
1. Main switch on –off
2. Start pushbutton
3. Socket for Dual Safety Switch K9-1-DF
4. Fuse
5. Variable speed knob
6. Switch for forward-stop-reverse
7. Socket for remote control K9-1 KF (+ temporary plug)
... the Roof- and Wall Program of
This manual suits for next models
1
Table of contents
Other Draco Industrial Equipment manuals
Popular Industrial Equipment manuals by other brands

AstroNova
AstroNova Trojanlabel Trojan T2-C Service guide

Martin
Martin DT2S Operator's manual

Toshiba
Toshiba GSC1000-C Operation manual

PCB Piezotronics
PCB Piezotronics J352C04 Installation and operating manual

Stahl
Stahl 9411/11 Series operating instructions

RAIMONDI
RAIMONDI BULLDOG ADV Use and maintenance manual