Dragon Touch DK01 User manual

USER MANUAL
Dragon Touch DK01 Mini Drone
V1.0
Please read this manual before operating your drone,
and keep it for further reference.
AGES
CONTENTS
77 - 95
01 - 19 20 - 38
58 - 76
39 - 57
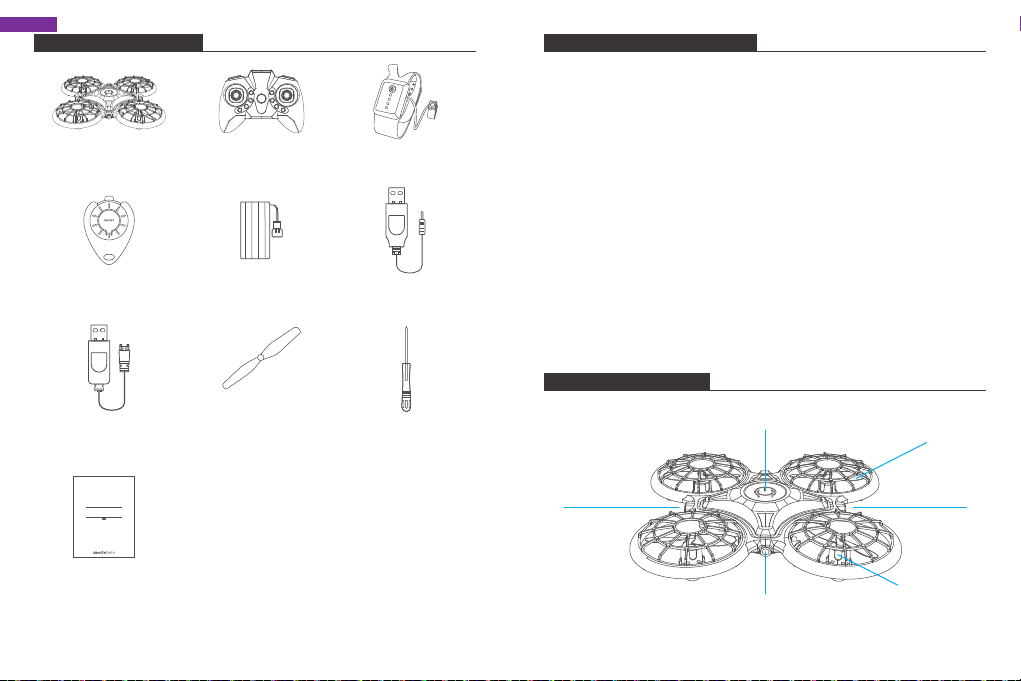
PACKAGE CONTENTS
DK01 Mini Drone × 1 Standard
Remote Control × 1
Battery × 2
Spare Propeller × 4 Screwdriver × 1
Gravity Sensor
Remote Control x 1
Water Droplet-shaped
Remote Control × 1
PRODUCT SPECIFICATIONS
PRODUCT FEATURES
USB Cable × 1
User Manual × 1
USB Cable × 1
USER MANUAL
DragonTouch DK01 Mini Drone
V1.0
Drone
Dimensions: 170mm x 170mm x 38mm
Battery capacity: 3.7V/500mAh
Charging time: 60 minutes
Flight time: 6 minutes
Remote distance: 60 meters
Gravity Sensor Remote Control
Battery capacity: 3.7V/150mAh
Charging time: 30 minutes
Usage time: 10 hours
Note:
• Remote control will automatically turn off after 1 minute of inactivity.
• When the remote control is under low-voltage protection mode (as shown by
the indicator light flashing slowly), please charge it before use.
Infrared sensor
Infrared sensor
Infrared sensor
Power on/off Propeller
Motor
Drone
English
1 2
GETTING STARTED
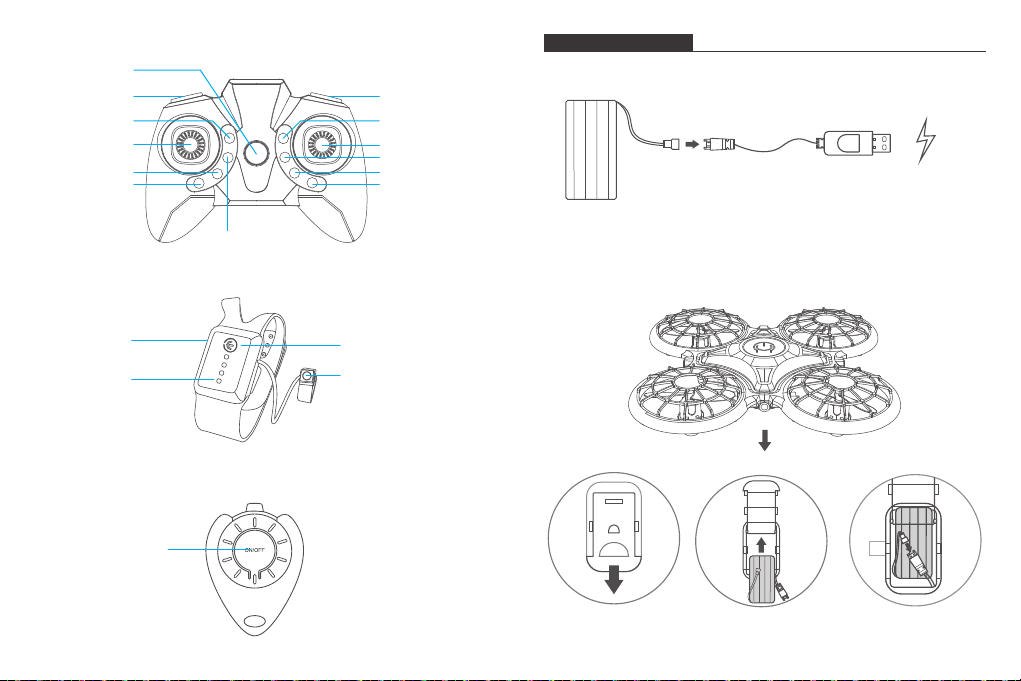
Charging and installing the battery
1. Charge the drone battery.
2. Install the drone battery when fully charged.
Standard Remote Control
Gravity Sensor Remote Control
Waterdrop Remote Control
Power switch
3D Flip
Forward fine-tuning
Right joystick
Leftward fine-tuning
Rightward fine-tuning
Backward fine-tuning
High/Low speed switch
Left joystick
One key landing
Long press to activate emergency stop
Headless mode
One key return
One key take-off/
Infrared
obstacle avoidance
Power on/off
Finger button
Charging port
LED indicator
One key take-off/
landing
5V/1A or 5V/2A
Charging: red LED Fully charged: green LED
3 4

3. Charge the gravity sensor remote control.
4. Wear the gravity sensor remote control on your palm when fully charged.
5. Purchase 3*AAA 1.5V batteries (not included) and install in the standard
remote control.
MADE IN CHINA
AAA 1.5V
AAA 1.5V
AAA 1.5V
Charging: red LED Fully charged: green LED
5V/1A or 5V/2A
Note: Ensure batteries are installed correctly. DO NOT use old batteries and new
batteries at the same time.
6. The battery of the waterdrop remote control is not rechargeable.
Note:
• For your safety, please use the original battery and USB cables provided.
• The battery life will be reduced when it is used in cold weather.
• Please avoid exposing the battery to sunlight, heat or high temperatures.
FLIGHT OPERATION
Note:
• For each flight, power on the drone first and then power on the remote.
• Please repeat the pairing procedure each time when the drone or remote is
restarted.
• Calibration is a must to avoid losing your drone.
• Flying in the open air and within the control range is highly recommended for
beginners.
FLIGHT WITH THE STANDARD REMOTE CONTROL
1. Power on and pair the remote with the drone
• Place the drone on a flat surface. Press and hold the Power button on the drone
to power on. The drone’s LEDs will start flashing.
• Press the Power button on the remote control to power on. Wait for a few
seconds and the pairing will be completed automatically, the LEDs on the drone
will change from white to colorful and solid on.
5 6
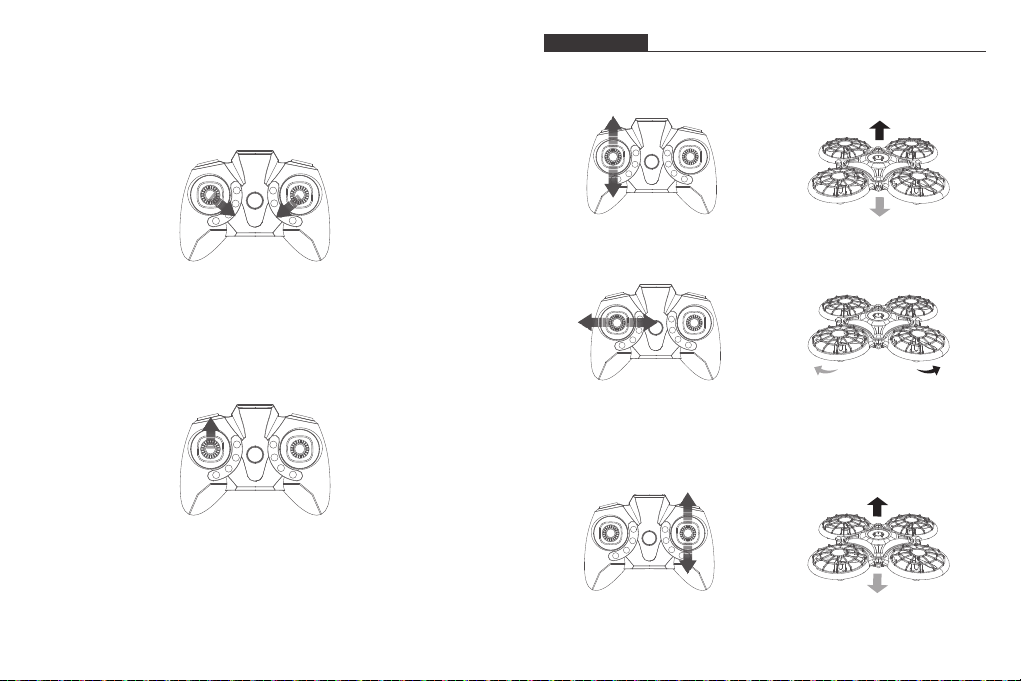
DIRECTIONS
Left joystick
Ascend and descend: Push the Left joystick forward and the drone will ascend;
pull it backward and the drone will descend.
Rotate left and rotate right: Pull the Left joystick leftward and the drone will rotate
to the left; pull it rightward and the drone will rotate to the right.
2. Calibrate
Simultaneously move the left joystick to the bottom right at a 45° angle and move
the right joystick to the bottom left at a 45° angle and hold for 3 seconds to
calibrate the drone. The LED lights on the drone will blink white for about
3 seconds. The calibration is complete when the colorful LED lights turn on, and
you will hear a beep from the remote control.
3. Flight instructions
Take-off
Option 1: After finishing the pairing, push the Left joystick forward to unlock.
The four propellers will then start rotating. Push the Left joystick forward again,
the drone will take off.
Option 2: After finishing the pairing, push the Left joystick forward to unlock.
The four propellers will then start rotating. Press the One key take-off button to
take off.
Right joystick
Forward and backward: Push the Right joystick forward and the drone will fly
forward; pull it backward and the drone will fly backward.
7 8

360° Flip
After flying the drone to an altitude of over 2 meters, press the Right joystick and
360° Flip button to activate 360° Flip function. Release once the flip is completed.
Move the Right joystick forward/backward/leftward/rightward to flip the drone
360° in the corresponding direction. Please note that this function cannot be
activated when the battery power of the drone is low.
Release the Right joystick and the 360° Flip button to exit the trimming mode.
Flight trimming
Trimming can be important in helping you control your drone.
If the drone drifts forward or backward during the flight, press and hold the 360°
Flip button, then gently move the Right joystick backward or forward to adjust.
If the drone drifts leftward or rightward during the flight, press and hold the 360°
Flip button, then gently move the Right joystick rightward or leftward to adjust.
Leftward and rightward: Pull the Right joystick leftward and the drone will fly
leftward; pull it rightward and the drone will fly rightward.
Release the Right joystick and the 360° Flip button to exit the trimming mode.
Speed switch
Low speed is the drone’s default setting. Press the Speed switch button once for
medium speed, indicated by two beeps from the remote. Press it again for high
speed, indicated by three beeps from the remote. A third press will return the
drone to low speed, indicated by one beep from the remote.
One key return
Press and hold the One key return button, the drone will fly backwards in the
reverse direction of its original flight path. Press and hold the button again to exit
this mode.
109
Headless mode
Press the Headless mode button to activate the function. The LEDs on the drone
will flash and users will hear a beeping sound from the remote. In this mode, the
drone will fly following the direction of the Right joystick regardless of the position
of your drone’s head or tail. Press the same button again to exit this mode.
Infrared obstacle avoidance
Press down the One key take-off/Infrared obstacle avoidance button to activate
the Infrared obstacle avoidance mode. The drone will fly in another direction
when it detects an obstacle. Press it down again to exit this mode.
Emergency stop
Press down and hold the One-key Landing button for 3 seconds, the drone will
stop flying and fall to the ground. To avoid any unpleasant accidents, please make
sure there is nobody under the drone when using emergency stop.
Altitude hold/Hover
This is one of the drone’s default settings. When you release the Left joystick after
the ascending/descending action, the drone will hover at its current flight altitude.
Proper trimming can help achieve a stable flight.
Landing
Option 1: Press down the One key landing button to land.
Option 2: During the flight, pull the Left joystick backward as far as possible to land
the drone, and hold it for 3 seconds until all the rotor blades stop rotating.
FLIGHT WITH THE GRAVITY SENSOR REMOTE CONTROL
1. Power on and pair the remote with the drone
Place the drone on a flat surface. Press and hold the Power button on the drone
to power on. The LEDs on it will start flashing.
Press and hold the Power button to power on the remote control. The LEDs on it
will start flashing and the remote will automatically pair with the drone. When the
pairing is completed, the LEDs on both the drone and remote will remain on.
2. Calibrate
Press the Power button on the drone. The LEDs on the drone will then start
flashing quickly. The calibration is complete when the LEDs on the drone remain
on constantly.
3. Flight instruction
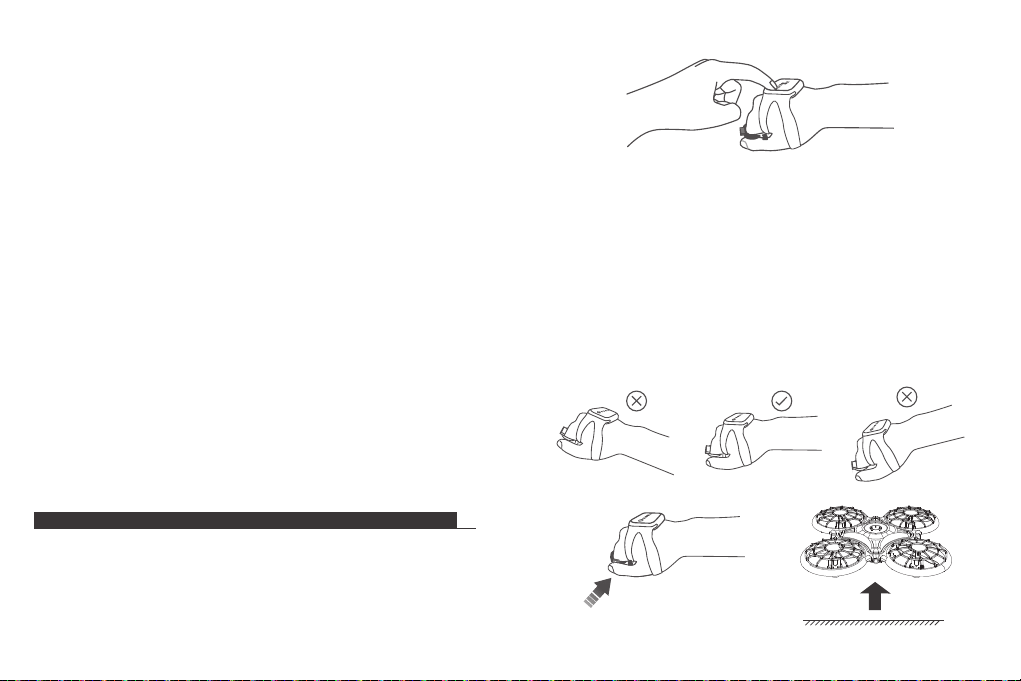
Take-off
Clench your fist, then make sure the remote is parallel with the surface on which
you are stood. Press the Finger button, then release it. The drone will take off
vertically to an altitude of 1.2 meters.
11 12
1.2m

Directions
Forward: Release the Finger button during the flight, then tilt your fist downward.
Backward: Release the Finger button during the flight, then tilt your fist upward.
Leftward: Release the Finger button during the flight, then lean your fist leftward.
Rightward: Release the Finger button during the flight, then lean your fist rightward.
Ascend: Press and hold the Finger button during the flight, then tilt your fist upward.
Descend: Press and hold the Finger button during the flight, then tilt your fist
downward.
Rotate left: Press and hold the Finger button during the flight, then lean your fist
leftward.
Rotate right: Press and hold the Finger button during the flight, then lean your fist
rightward.
360° Flip
Move your fist to make sure the remote is parallel with the surface on which you
are stood during the flight (as you were before take-off). Press the Finger button,
then release it. The LEDs on the drone will start flashing quickly. Then move your
fist forward/backward/leftward/rightward to flip the drone accordingly.
13 14

Infrared obstacle avoidance
Continuously press the Finger button 3 times to activate infrared obstacle
avoidance mode during the flight. The LEDs on the drone will flash 3 times, then
remain on constantly. The drone will fly in another direction when it detects an
obstacle. Continuously press the Finger button 3 times again to exit the mode.
Emergency stop
Press and hold the Power button on the remote for 2 seconds, the drone will stop
flying and fall to the ground. To avoid any unpleasant accidents, please make sure
there is nobody under the drone when using the emergency stop.
Landing
Move your fist to make sure the remote is parallel with the surface during the
flight. Release the Finger button, then press the Power button on the remote to
land.
FLIGHT WITH THE WATERDROP REMOTE CONTROL
Note: Please turn off the standard remote control and gravity sensor remote
control before using the waterdrop remote control.
1. Power on
Place the drone on a flat surface. Press and hold the Power button on the drone
to power on. The LEDs on it will start flashing. You do not need to power on and
pair the waterdrop remote control with the drone.
2. Calibrate
Press the Power button on the drone. The LEDs on the drone will start flashing
quickly. The calibration is complete when the LEDs flash slowly.
3. Flight instructions
Take-off
Option 1: Press the button on the waterdrop remote control to commence take-off.
Option 2: Place the drone in the palm of your hand with the head of the drone
facing forwards. Gently throw it into the air.
Note: Please make sure there is enough space while throwing the drone up.
We recommend this option only for skilled drone-users.
15 16
Other manuals for DK01
1
Table of contents
Languages:
Other Dragon Touch Drone manuals


 user manual")


