Dreadbox Hypnosis User manual


Quick Start Guide .......................................... 3
Signal Flow Schematic .................................. 4
Overview .......................................................5
Connections ................................................. 6
Mix, Save & Manage ...................................... 7
The Flanger - Chorus .................................... 8
The Delay ..................................................... 9
The Spring Reverb ....................................... 10
Warranty ..................................................... 11
Cautions ..................................................... 11

Power on your unit, wait for a couple of seconds until it
boots and then go through the factory presets by switching
between the A1-A7 Programs.
Set the Input level so that you can barely see the Spring
light blinking to the input signal.
Turn each effect on and off by simply pressing the
correspondent button. Mess up with each effects’ controls.
Change the settings of each effect by holding down
the effect’s button for at least 2 sec. The 3 buttons will start
to blink and you have to choose one.
Save your preset by pressing the SAVE button. When it
starts blinking, choose where you would like to store it, by
switching the Program knobs and then press SAVE.

Chorus-Flanger
R
Chorus-Flanger
L
INPUT R
INPUT L
MONO INPUT
SIGNAL
MONO OUTPUT
SIGNAL
OUTPUT R
OUTPUT L
Delay R
Delay L
Spring Reverb

SAVE
MIX
TIMETIME
DEPTH RATE
PRE-DELAY
DEPTH
DELAY REVERBCHO-FLA
OUTPUTINPUT
RATE
AMOUNT
LFOLFOLFOLFO
BYPASS
MODE WAVEWAVE
Reverb Tank
Background Light
when the unit is ON
Preset Banks
Blinking Level Peak
Indicator
Preset Numbers
Chorus Flanger
Controls
Delay Controls
Spring Reverb
Controls
Power Supply
Input
On/Off
Switch
6,4mm
Input Jacks
6,4mm
Output Jacks
Save Preset
Bypass
Effects On/Off
In & Out Levels

INSTRUMENT
INSTRUMENT
INSTRUMENT
INSTRUMENT
STEREO IN - STEREO OUT
INSTRUMENT
Warning! Use on your own responsibility.
High feedback levels may damage your
ears and speakers.
synthesizer
electric string instrument
microphone

INPUT LEVEL When an instrument / other signal gener-
ating device is inserted, the first thing you will need to do is to
set its Input Level. With the Output Level all the way down play
your most loud sound. The Input should be set so as the Peak
Level Indicator, which is placed inside the unit, barely blinks
here and there.
OUTPUT LEVEL With the Bypass button at the OFF stage
(LED is off) and following the above procedure, set the Output
Level at your desired amount.
BYPASS When the LED of the Bypass button is OFF, the unit
is at a bypass stage, meaning that no matter what you do with the
effect controls, no effect will be applied to your original sound.
When by pushing the Bypass button lights up, the effect is ON.
CHO-FLA When the button is lit, the Chorus-Flanger effect is
engaged.
DELAY When the button is lit, the Delay effect is engaged.
REVERB When the button is lit, the Spring Reverb effect is
engaged.
SAVE
A. Press the SAVE button once
B. The SAVE button is now blinking.
C. Choose your desired slot simply by turning the rotary switches.
(on the picture we will save a preset in B4)
D. Press the SAVE button again and you are done.
COPY
A. Choose the Preset you want to copy
B. Press the SAVE button once
C. The SAVE button is now blinking.
D. Choose your desired slot simply by turning the rotary switches.
E. Press the SAVE button again and you are done.
RECALL
Just set the rotary switches to your desired slot.
IMPORTANT! Recalling a preset occurs instantly and that can be used for
musical purposes, but if you do not care about where you save your
presets, and you have to jump more than 2 presets while performing,
unwanted results might occur.

Time will control the delay time in its whole
range - that is if depth knob is at 0%. As you add
depth, time knob will have a shorter effect. When
100% depth is there, time knob does nothing. Delay
time can be set from 2.5ms up to 50ms.
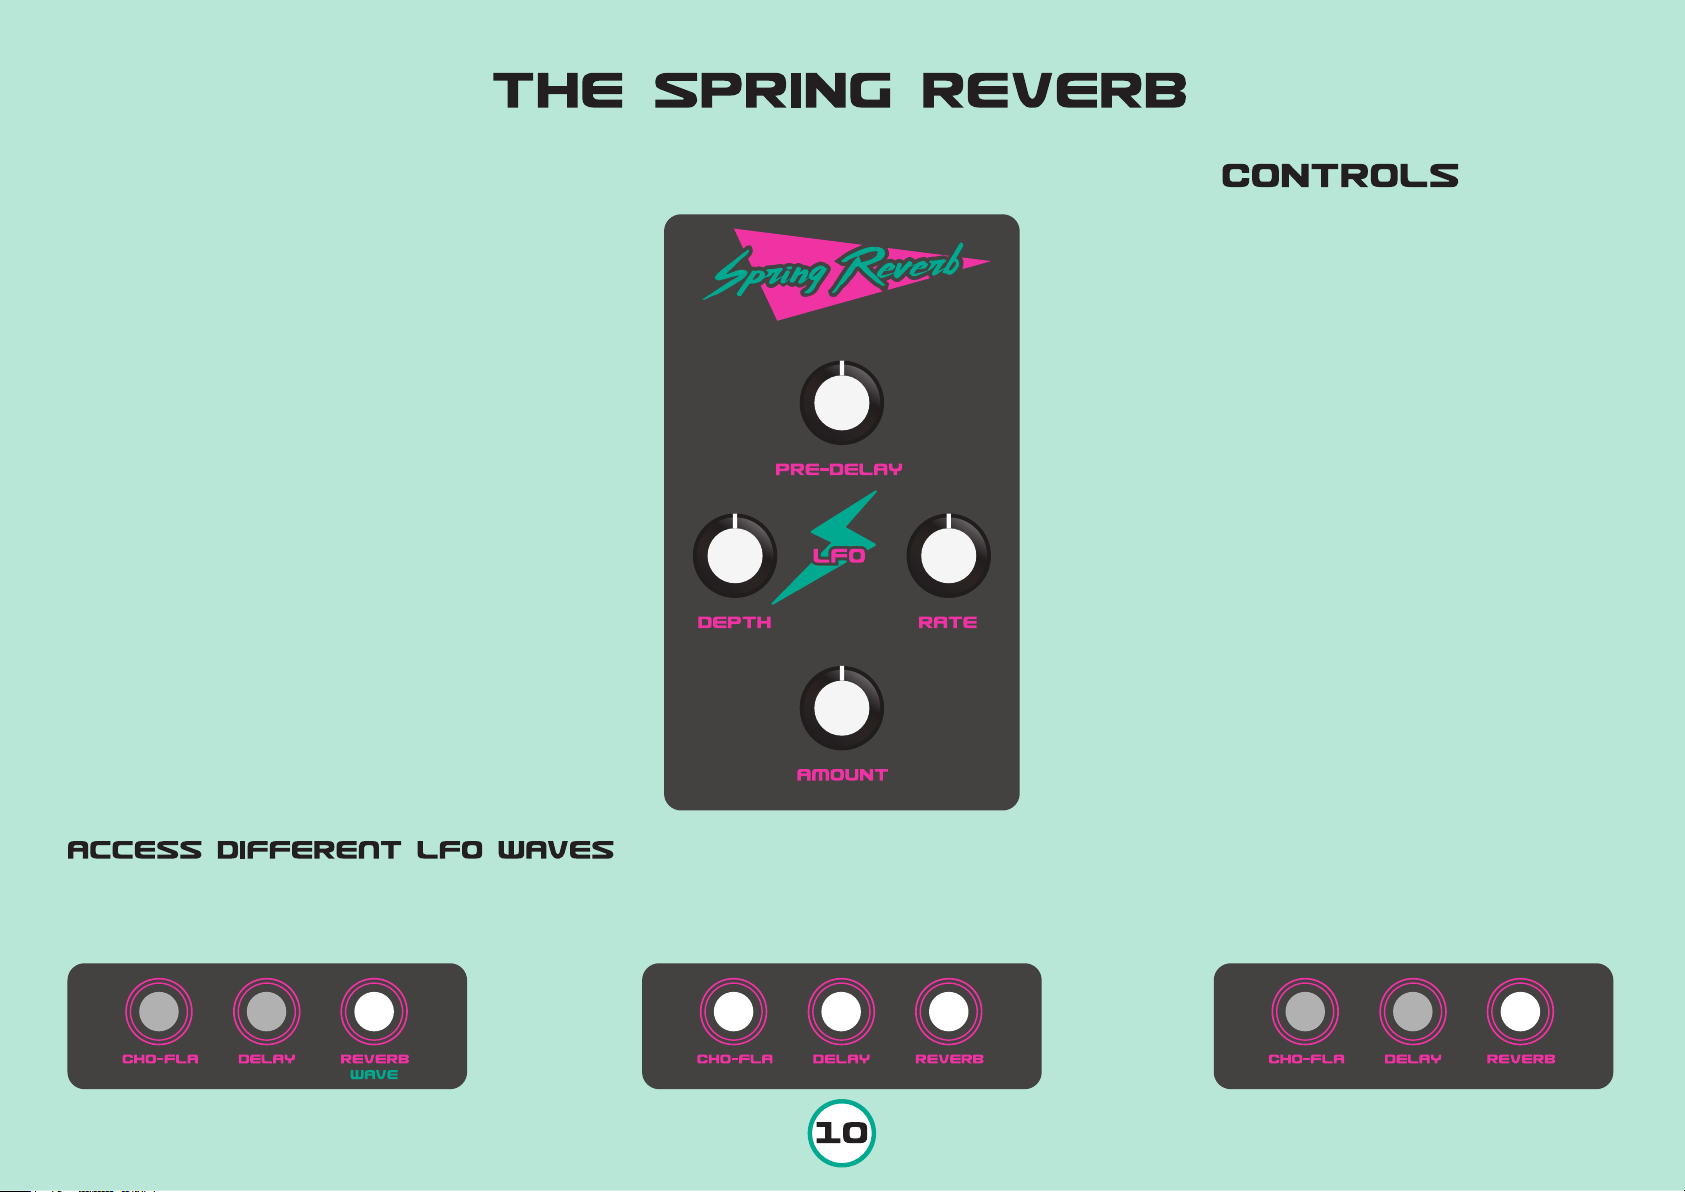
DEPTH this indicates the amount of LFO
applied to the Delay time. As you turn up the knob,
the time control will have a smaller range. And
when it’s at max, time control has no effect. In order
to access the “Comb” Filter, keep this control at 0%.
RATE sets the speed of the LFO, from 10Hz up
to 15sec. When on Stereo setup, each channel has
a reverse movement, which gives the feeling that
the LFO rate is half than the set one.
feedback this sets the delay feedback. Be
careful as some volume boost is taking place as
you go on high feedbacks , so take care not to peak
the next effects in the order.
Difference between Chorus and Flanger
Both Chorus and Flanger are actually the same
effect: A Delay that its time is modulated by an LFO.
To achieve the Flanger effect you will need Delay
times up to 10ms. When the Delay time is set
between 10ms and 30ms, then the effect you will
hear is the Chorus. Traditionally, a Flanger effect
needs its LFO Rate to be between 1 and15sec,
while a Chorus should be between 250ms and
2sec. Also, when you try to emulate the Flanger
effect you need a decent amount of Feedback.
Chorus doesn’t really care about Feedback, but
usually the best results can be achieved with a
pinch of Feedback.
So what happens without the LFO?
The above delay times can create the “Comb” Filter
effect if no LFO is applied to the delay time. But you
need to have a very high amount of Feedback.
Now, by knowing all the above, you can go through
the controls of Hypnosis Chorus-Flanger.
Press and hold the CHO-FLA button for 1 sec. The 3 buttons will start to blink.
Choose your desired LFO wave.
After you set the LFO wave, you will
get back to the previous state.
SINE TRIANGLE RANDOM

TIME sets the Delay time from about 40ms
up to 450ms
MIX sets the level of the Delayed signal
FEEDBACK sets the amount of repeats.
When at max, repeats are infinite.
FREEZE is a method to loop your current
delayed signal, meaning that if no repeats are
audible or active, freeze will have no effect when
pressed.
Freeze will actually do 2 simultaneous functions:
A. Feedback level is set to max
B. Any new incoming signal will not be delayed.
This will be active only while the button is
pressed. Mix and Time controls, can still be used
while holding down the Freeze button.
1 If you do not want to hold down the Freeze
button, while the Freeze button is pressed, deac-
tivate the Delay effect, by pushing the Delay
button. This will keep the Freeze function to be
active without holding it down. To abort the
Freeze function, just press the Delay button
once.
2 When on Stereo setup, the Delay effect is
always on Ping-Pong mode, which is cool but it
gives the feeling that the allowed delay times
40ms-450ms are the half (20ms-225ms).
3 By setting a high amount of Feedback on the
Chorus-Flanger effect and having a High Input
Level, the delayed signal can be easily peaked.
So we suggest you to always check with your
highest desirable settings. If that occurs just
lower your Input Level.
Press and hold the DELAY button for 1 sec. The 3 buttons will start to blink.
Choose your desired Delay Mode.
After you set the Delay mode, you will
get back to the previous state.
MODE CLEAN BBD TAPE

SINE SQUARE RANDOM
pre-delay sets the Initial Delay time
DEPTH sets the level of the modulation
applied to the initial Delay
RATE sets the speed of the LFO, from 10Hz
up to 15sec.
AMOUNT blends the Dry and Wet signal.
ATTENTION! THE SPRING REVERB IS MONO
When on Stereo setup, the Reverberated signal
will be applied to both Left and Right Outputs,
meaning that if you send a Stereo signal Input,
the Reverberated signal will blend both Left and
Right Inputs and send them to both Outputs. But
this will only happen for the Reverberated signal,
the Dry signal will always be Stereo.
TIP: As the Spring Reverb is a mechanical
device, it can still generate sound even without
the speakers on. Drive Hypnosis really hard and
turn the Reverb ON. In a quiet room you should
be able to hear the springs generating sound.
What is a Spring Reverb?
A Spring Reverb is the broadband resonance that
is generated when vibrating a metal coil, which is
held under tension. This effect is mechanical and
can be affected by its environment. If you touch
or hit the spring, sound will be generated.
Hypnosis has a short 3-spring reverb tank. You
must be careful on where and how you place the
unit, in order to avoid unwanted vibrations. For
example, if you place Hypnosis and the speaker
on the same surface, the tank will most likely
pick up the vibrations that come from the speak-
er, regenerate them, send them back to the
speaker and a circle will begin, resulting in an
unwanted (or wanted???) feedback.
Be really careful on how you treat Hypnosis so as
to have your springs working for years to come.
Press and hold the REVERB button for 1 sec. The 3 buttons will start to blink.
Choose your desired LFO wave.
After you set the Reverb mode, you
will get back to the previous state.

Dreadbox warrants this product to be free of defects in materials or
construction for one year from the date of purchase. Proof of
purchase is necessary when the warranty claim is made.
Malfunctions resulting from improper power supply voltages, back-
ward or faulty cable connection, abuse of the product or any other
causes determined by Dreadbox to be the fault of the user, are not
covered by this warranty (normal service rates will be applied).
All defective products will be replaced or repaired at the discretion of
Dreadbox. Products must be returned directly to Dreadbox with the
customer paying the shipping costs. Dreadbox implies and accepts
no responsibility for harm to a person or apparatus through the opera-
tion of this product.
The power supply included in the box, enclosure, screen-printing,
plexiglas window and the actual mechanism of the spring reverb, are
not covered by the warranty.
turer authorization, or for any other technical questions or concerns.
Do not use alcohol or any other kind of cleaning solutions, so as
to clean the enclosure and specifically the plexiglas window. Use
a slightly wet soft cloth for cleaning, if it is really needed.
Never store Hypnosis upside down or on its sides. Always place it
with its feet on a surface, as the spring reverb is placed on a dou-
ble-sided adhesive foam, which is necessary to minimize the
external vibrations.
When using Hypnosis on stage or in a room with very loud music
or noises , you should always make sure to place it to the most
vibration-free spot.
Feedback can be generated from the spring. Dreadbox will not be
held responsible if any damage occurs from issues caused by
Hypnosis.
Table of contents
Other Dreadbox Recording Equipment manuals