Your new chain saw sharpening attachment kit will fit on Dremel rotary tool
models 275, 285, 395, 398, 850 and 780. When attached to a Dremel rotary
tool, the Chain Saw Sharpening attachment will sharpen nearly all popular
sizes of chain if you follow these simple instructions.
ASSEMBLY OF CHAIN SAW SHARPENING ATTACHMENT
Because there are different sizes and types of chains used on different saws,
your new sharpener must be assembled to suit your particular chain. To do
this:
1. First determine the size and pitch of your saw chain. Refer to your chain
saw owner’s manual, your chain saw instruction manual or contact the chain
manufacturer for this information.
2. Refer to the chart below for the correct grinding stone.
3. When you have determined the correct grinding stone for your chain from
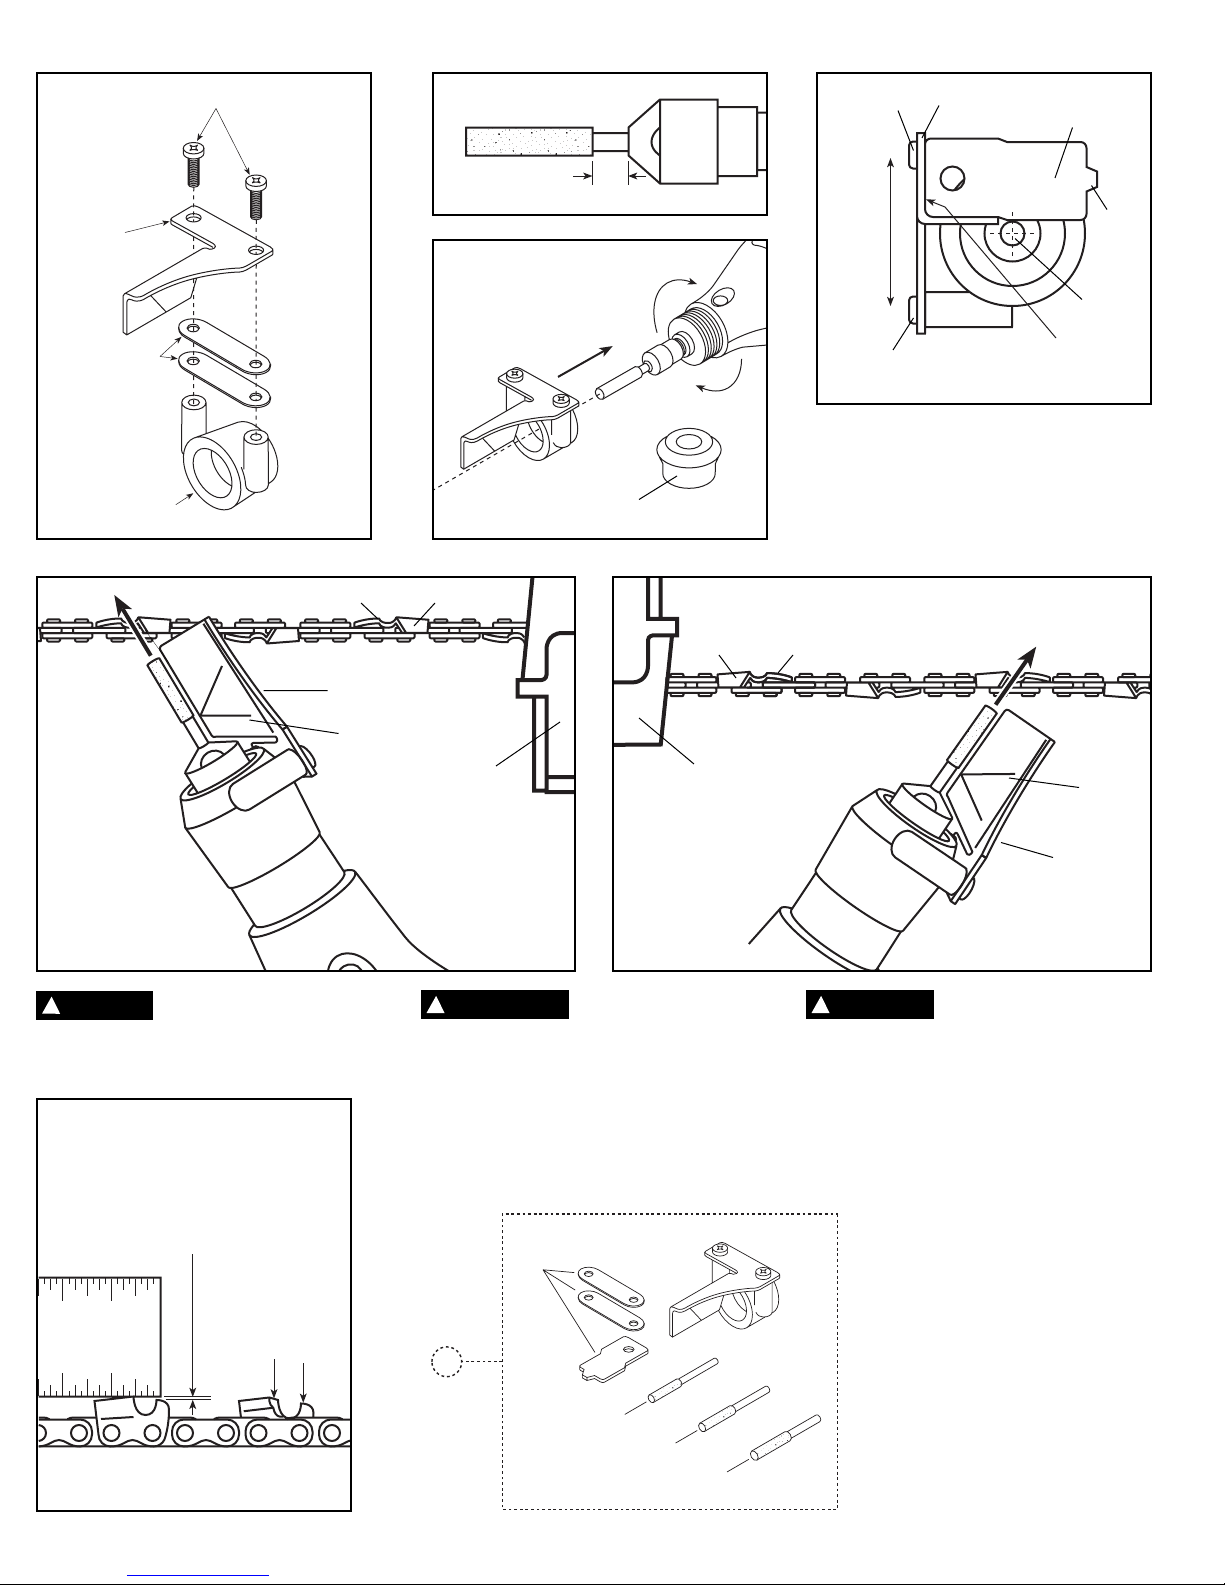
the chart, assemble attachment by screwing the guide (B) and appropriate
number of spacers (C) to the clamp (D) using the two screws (A), as shown
in figure 1.
• If using the 7/32" diameter (pink) grinding stone, assemble both spacers
between the guide and the clamp.
• If using the 3/16" diameter (orange) grinding stone, assemble with only one
spacer between the guide and the clamp.
• If using the 5/32" diameter (blue) grinding stone, no spacers are needed.
4. Securely mount the correct grinding stone in your tool with approximately
1/4" of the shank exposed between the chuck cap and the stone (Figure 2).
Use the rotary tool wrench to securely tighten the chuck cap.
5. Remove the housing cap from your rotary tool and screw on the chain saw
sharpening attachment (Figure 3).
6. Using the appropriate side of the gauge (E) (see above chart), check to see
if the guide (B) is properly positioned in respect to the grinding stone (F). The
gauge must be flush with the corner (G) of the guide while making contact with
the grinding stone (Figure 4).
If the guide is not properly positioned, use a screwdriver (the end of the gauge
has a screwdriver (H) on it) to loosen the two guide mounting screws (A)
enough so the guide can be moved (I). It has elongated holes to allow for
adjustment. Using the appropriate side of the gauge, adjust the guide so it is
properly positioned in respect to the grinding stone and tighten the screws.
SHARPENING THE CHAIN
1. Set your saw on a flat, solid surface so it will not slip while you are sharp-
ening the chain. The chain tension should be adjusted as specified in the
Chain Saw Owner’s Manual. If it is too loose, the teeth will move, resulting in
a poor sharpening job.
Sharpening will be best accomplished if done on the flat of the saw bar –
somewhere near the middle of the bar.
2. The saw should first be positioned so that you are looking at the side of the
chain bar with the motor to your right. Cutter teeth on the far side of the chain
are sharpened, from inside to outside, or away from you, as shown in Figure
5. The guide (B) should be laid flat on the tooth with the 30º index line (L) par-
allel with the chain. This index line should be aligned by eye with the chain.
Two or three light strokes are usually enough unless the cutters have been
damaged. Sharpen all cutters equal. Start with the cutter with the most visual
damage (i.e. nicks or gouges) and sharpen all cutters back equally. Do not
remove excessive material as this only shortens the life of the chain.
Note: Sharpen cutter teeth (J) only, not the depth gauge (K).
3. When all of the teeth on the top of the bar have been sharpened, advance
the chain using a glove or a rag to protect your hand, by pulling the chain
toward the end of the bar. Repeat until all the teeth on the far side of the chain
have been sharpened.
4. Turn the saw around so that you are looking at the side of the chain bar with
the motor to your left. Sharpen the cutter teeth on the far side of the chain,
from inside to outside, or away from you, as shown in Figure 6. The guide
should be laid flat on the tooth with the 30º index line parallel with the chain.
Repeat the process above to sharpen all of the cutter teeth on the far side of
the chain.
5. After your chain has been sharpened a number of times, you may find that
it does not cut as fast as you feel it should. Each cutter on your chain has a
depth gauge (K) just ahead of the cutting edge (J) that determines how big a
bite it can take. To check for proper depth of the cut, lay a metal straight edge
across the tops of the cutting edges, as shown in Figure 7, and check the
dimension indicated. This dimension should be approximately equal to the
thickness of the gauge furnished with your chain saw sharpening kit. If it is
not, file or grind the chain depth gauge until the clearance is approximately
equal to the thickness of the sharpening kit gauge. Be careful to maintain its
shape. Do not remove more material than necessary or you will overload your
saw. Also, be careful to keep this depth gauge setting uniform on all cutter
teeth or you will not be able to make a straight cut.
CODE NO. PART NO. DESCRIPTION
1 1453 Sharpening Attachment, Complete
2 990869 Gauge & 2 Spacers
3 453 5/32" Grinding Wheel, Blue
4 454 3/16" Grinding Wheel, Orange
5 455 7/32" Grinding Wheel, Pink
Fig. 2
1/4"
Fig. 1
D
C
B
A
Fig. 4
Side 1
HOUSING CAP
CAPUCHON DU BOÎTIER
TAPA DE LA CARCASA
E
B
H
A
A
I
F
G
Fig. 3
VIEW: looking down at the tip of the tool with guide
mounting screws to the left.
VUE vers la pointe de l’outil avec les vis de montage
du guide à gauche
VISTA: Mirando hacia abajo, hacia la punta de la her-
ramienta, con los tornillos de montaje de la guía ubi-
cados a la izquierda.
Fig. 5
30º
30º
Fig. 6
Fig. 7
ORDERING INFORMATION - refer to figure 8.
Fig. 8
CHECK THIS DIMENSION
CONTRÔLEZ CETTE COTE
COMPRUEBE ESTA DIMENSIÓN
30º
30º
Chain Saw Sharpening Attachment Kit
Owner’s Manual - Model 1453
Read and understand these instructions and the chain saw manual for complete details for sharpening and use of the chain saw. Failure to follow all
instructions and warnings may lead to injury.
WARNING
!
Disconnect electrical plug or
spark plug lead from the power
source. Accidental start up could cause serious per-
sonal injury.
Wear eye protection and dust
mask. Grinding action will cause
dust and sparks.
Teeth of chain must be sharpened
equally and evenly. Uneven teeth
can cause the saw to kickback and excessive wear to
the bar.
CHAIN SAW SHARPENING WARNINGS
WARNING
!
WARNING
!
WARNING
!
Disconnect electrical plug or
spark plug lead from the power
source. Accidental start up could cause serious per-
sonal injury.
Débranchez la prise ou le fil
de bougie. Tout démarrage
intempestif risque de causer des blessures corporelles
graves.
Desconecte de la fuente de ali-
mentación el enchufe eléctrico
o el hilo de conexión de la bujía. Un arranque acci-
dental podría causar lesiones personales graves.
WARNING
!
WRITE FOR CURRENT PRICES - NO C.O.D.'S
UNITED STATES
Dremel Service Center
4915 Twenty-First Street
Racine, WI 53406
Dremel Service Center
4631 E. Sunny Dunes
Palm Springs, CA 92264
OUTSIDE OF
CONTINENTAL UNITED STATES
See your local distributor or write
to: Dremel,
4915 Twenty-First Street,
Racine, WI 53406
Grinding Grinding Grinding
Chain Wheel Size Wheel Wheel Guide
Size / Pitch (Diameter) Color Catalog No. Gauge
1/4" PITCH 5/32" Blue 453 Side 1
3/8" PITCH 7/32" Pink 455 Side 1
3/8" PITCH LOW PROFILE (LP) 5/32" Blue 453 Side 1
.325" PITCH 3/16" Orange 454 Side 1
2610913947 5/01 PRINTED IN U.S.A.
SAW MOTOR
MOTEUR DE LA
TRONÇONNEUSE
MOTOR DE LA
SIERRA
JK
KJ
JK
SAW MOTOR
MOTEUR DE LA
TRONÇONNEUSE
MOTOR DE LA
SIERRA
B
L
B
L
ADVERTENCIA
!
AVERTISSEMENT
!


