Drive Bonsai OM-812 User manual

Oxygen Conserving Device
NOTE: Healthcare Equipment Providers shallprovide
the end user withinstructions for use and
instructionsfor determining gas cylinder contents.
OM-812
PRODUCT INFORMATION AND INSTRUCTIONS
NOTE: The gauge face may be different on actual unit.

TABLE OF CONTENTS
IMPORTANT INFORMATION TO RECORD
•
•
2
3
3
6
7
7
8
9
9
Important Information to Record............................................................
Symbol Definitions.................................................................................
Important Safeguards, Dangers, Warnings and Cautions....................
Introduction.............................................................................................
Intended Use..................................................................................
Contraindications...........................................................................
Important Parts.......................................................................................
Standard Product...................................................................................
Setting up Your Conserver.....................................................................
Assembly and Use.........................................................................
Setup.............................................................................................
Inspection Before Each Use..........................................................
Checking for Leaks.......................................................................
Operating Instructions............................................................................
10
10
11
11
12
13
Disassembly Instructions...................................................................
Caring for Your Conserver...................................................................
Troubleshooting....................................................................................
Oxygen Cylinder Duration....................................................................
Information for Home and Healthcare Providers..................................
Disinfection Between Patients......................................................
Disinfection Intervals.....................................................................
Maintenance..........................................................................................
Calibration.............................................................................................
Limited Warranty..................................................................................
Disposal Instructions............................................................................
Specifications........................................................................................
Technical Description............................................................................
Pneumatic Diagram...............................................................................
13
14
15
15
15
17
17
18
18
18
19
20
21
2
Home Care Provider's Name: __________________________
Notes: ______________________________________________
____________________________________________________
____________________________________________________
Physician's Phone Number: (______)______________________
Physician's Name: ____________________________________
Home Care Provider's Phone Number: (______)____________
During Exercise: _______________________________
At Rest: _____________________________________
Prescribed Oxygen Flow Setting:
Date You Received Your Unit: _________________________
Your Name: _______________________________________

SYMBOL DEFINITIONS
Prescription Only
No Smoking
Use no oil or grease
Keep away from open flame
Consult accompanying documents
Humidity Limit
Temperature Limits
Type B Applied Parts
Serial Number
Catalog Number
Manufacturer
Contains Natural
Rubber Latex
Date of
Manufacture
IMPORTANT SAFEGUARDS, DANGERS, WARNINGS AND CAUTIONS
Keep dry, protect the device
from moisture
cf
Consult Instructions for Use
Use No Oil (on gauge face)
Continuous flow
WARNING!
CAUTION!
NOTE!
DANGER!
Warning indicates a potentially
hazardous situation which, if not avoided,
will result in death or serious injury.
Caution indicates a potentially hazardous
situation which, if not avoided, may result
in property damage or minor injury or both.
Gives useful tips, recommendations and
information for efficient, trouble-free use.
Danger indicates an imminently hazardous
situation which, if not avoided, will result in
death or serious injury.
CE Marking
0086
of Conformity
EC REP
European
Representative
Read and understand this manual before operating your oxygen conserving regulator.Important safeguards are indicated
throughout this guide. Pay special attention to all safety information. Any serious incident that has occurred in relation to
the device should be reported to the manufacturer and the competent authority of the Member State in which the user
and/or patient is established.
3
NOTE: These symbols may be used in the
user manual and also on the device,
packaging and other material.

Avoid creation of any spark caused by any type of
friction, near oxygen equipment.
If you intend to smoke, you must always turn the
oxygen conserver off, remove the cannula and
leave the room where either the cannula or
oxygen conserver is located.
•
•
Oxygen makes it easier for a fire to start and spread.
Do not leave the nasal cannula onbed coverings or
chair cushions. If the oxygen conserver is turned on
but not in use,the oxygen will vigorously accelerate
the burningof any flammable material. Turn the
oxygen conserver offwhen not in use.
Oxygen will not burn; however, it does vigorously
accelerate theburning of any flammable material.
The use of oxygen requires a prescription
from a physician or other appropriately licensed
healthcare practitioner.
•
•
The oxygen delivery setting has been determined for
each patient individually with the configuration of
the equipment to be used, including accessories.
If you feel discomfort or are experiencing a medical
emergency, seek medical assistance immediately
to avoid harm.
Geriatric or any other patient unable to
communicate discomfort may require additional
monitoring to avoid harm.
Be sure to turn off the oxygen supply by setting
the flowcontrol knob to "OFF" when not in use.
Oxygen flow is only present when flow indicator is
clicked into place. No oxygen will flow if knob is set
between liter flow settings.
Wind or strong drafts can adversely affect accurate
delivery of oxygen therapy.
•
•
•
•
•
•
•
•
Use of this device at an altitude above 9,800 ft.or
outside temperature of104° F is expected to
adversely affect accurate delivery of oxygen
therapy.
•This device is not intended to be used during sleep
or by patients who breathe more than 40 breaths
per minute or consistently fail to trigger
equipment.
The settings of this device may not correspond with
continuous flow oxygen.
•
WARNING:Warning indicates a potentially
hazardous situation which, if not avoided, will
result in death or serious injury.
DANGER: Danger indicates an imminently
hazardous situation which, if not avoided,
will result in death or serious injury.
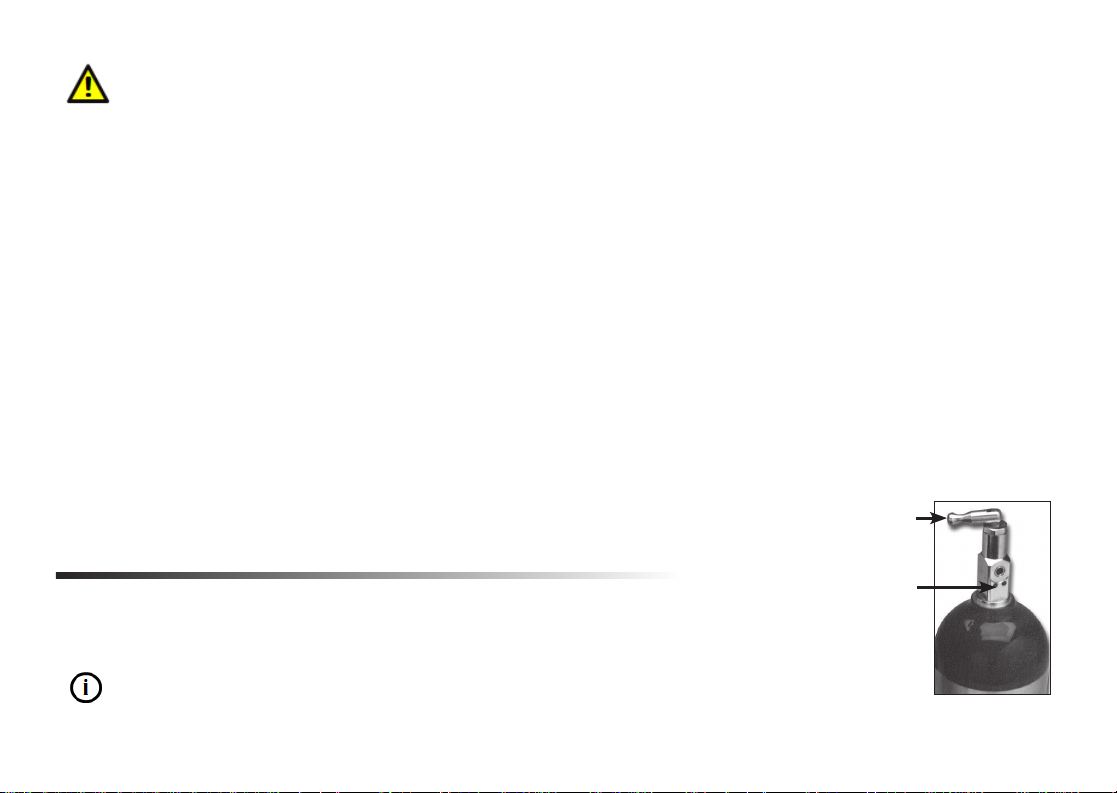
Never use oil, grease or petroleum-based products
on or near the system to avoidthe risk of fire and
burns. Wash and dry hands before operating oxygen
equipment. Use only water-based lotions orsalves.
Not suitable for use in the presence of flammable
anesthetic mixture with air, oxygen or nitrous
oxide.
Do not lubricate replaceable fittings, connections,
tubing or other accessories of the oxygen conserver
to avoid the risk of fire and burns.
Smoking during oxygen therapy is dangerous and is
likely to result in burns or death.Do not allow
smoking or open flames within the same room of
the oxygen conserver or any oxygen carrying
accessories.
Never use aerosol sprays near the equipment.
There is a risk of fire associated with oxygen
equipment and therapy.Do not use near sparks
oropen flames.
Under certain circumstance
-812
s, oxygen therapy can be
hazardous. Seek medical advice before using a
OM pneumatic oxygen conserver with built-in
regulator.
4

The conserver must:
Be used only after one or more settings have
been individually determined or prescribed for
you at your specific activity levels.
Be used with a specific combination of parts and
accessories (i.e. cannulas, tubing) that meet the
specifications of the conserver manufacturer,
and that were used while your settings were
determined.
Your prescribed settings should be periodically
reassessed by a physician or other appropriately
licensed healthcare practitioner for effectiveness of
therapy.
WARNING (Cont.)
Use only parts and accessories recommended by
the manufacturer to ensure proper function and to
avoid the risk of fire and burns.
It is unsafe to use accessories, detachable parts and
materials not described in the instructions for use,
interconnect this equipment with other equipment
not described in the instructions or modify the
equipment.
Cannula tubing can pose a strangulation risk and
tripping hazard. Locate tubing away from areas of
high foot traffic and keep children and pets away
from cannula tubing.
Always maintain a backup supply of oxygen (i.e.
compressed cylinders and regulator).
• •
•
•
•
•
•
•
•
Not intended for use with any humidification devices.
•
Do not use cannula tubing that is longer than 7 ft.
(2.13 m).
Not for use with an endotracheal tube or
tracheostomy.
•
Lint and dust can contaminate the oxygen path and
create a fire hazard. Keep all oxygen connections clean
and free from lint and dust.
Make sure the fill valve, if equipped, is clean and free
of dirt, debris, oil or other contaminants.
To reduce the risk of rapid oxygen recompression and
fire, open the cylinder valve slowly and completely so
the pressure gauge moves slowly as it indicates the
cylinder pressure.
Do not submerge the conserver in the disinfectant,
wipe disinfect only.
•
•
•
•
•
•
•
•
•
•
Close supervision is necessary when the nasal
cannula is used by impaired persons or near children.
WARNING (Cont.)
The proper placement of the nasal cannula in the nose
is critical to the consistent operation of this equipment.
Do not wet the area of the oxygen inlet connection,
the disinfectant residue may create a risk of fire.
Before using this unit, m
ake certain that your hands
arefree of oil, grease and other contaminants,
and that thecylinder is secure in an upright position.
•
Do not attempt to open or remove enclosure.
There are no user-serviceable internal components.
Choking Hazard - The 870 post seal washer may pose
a choking hazard. Small parts not for children under 3
years or any individuals who have a tendency to
place inedible objects in their mouths.
therapy equipment do not correspond with the
settings of the Pneumatic Oxygen Conserver.
r models or brands of oxygen
OM-
The settings of othe
812
5

Prevent water or any other liquid substances from entering the unit.
Prevent dust, lint or any small particles from entering the unit, as these may degrade performance or cause oxygen leaks.
Do not expose the unit to extreme temperatures or heat sources such as fireplaces and radiant heaters.
Do not use humidifier bottles.
provider for more information about carry bags.
INTRODUCTION
SAVE THESE INSTRUCTIONS
CAUTION: Caution indicates a potentially hazardous situation which, if not avoided, may result in property
damage or minor injury or both.
•
•
•
•
•
•
•
•
•
•
•
•
•
Post-Valve Cylinder
FIGURE A
Toggle
Parallel Holes
on the
Post Valve
This manual provides information necessary to operate the Bonsai pneumatic oxygen
conserver with built-in regulator. The Bonsai can be used with a CGA 870 post-valve
cylinder [see Fig. A] at home or away from home to provide your specific oxygen
requirements.
Switch to another oxygen
812
To help prevent possible damage to the unit and to maintain its cleanliness,keep the OM-812pneumatic oxygen
conserver in a carrying bag. Several bags are available for use with different cylinder sizes and configurations: contact
your Home Care
NOTE: The OM-812Pneumatic Oxygen Conserver will be referred to as the
Bonsai in the remainder of the guide.
Remember that in continuous flow mode, the Oxygen will beconsumed at a much faster rate.
812
Do not use if leaking or damaged.
Refer repairs to authorized service personnel.
Do not use the flow outlet for driving any medical equipment.
This product contains natural rubber latex (oxygen pressure gauge rubber guard) which may cause allergic reactions.
Oxygen supplied by this equipment is supplemental only and is not intended for life support applications.
The OM- should not be used to supply anything other than medical oxygen.
source before depleting the oxygen cylinder. The continuous flow function on the OM- pneumatic oxygen conserver
is factory preset at 2 LPM.
T
Ch
igh
eck
ten
ing
only
for le
by
ak
hand
sshou
. The
ld be
use
p
of
erforme
a tool
d
to
be
tigh
fore
ten
each u
the knob may dam
se.
age the unit.
6

•
• I talling the device by connecting to a portable oxygen cylinder post valve.
• Selecting prescribed oxygen setting on the selector dial.
• Attaching standard oxygen cannula and tubing to gas port and securing cannula to user.
• Monitoring the pressure gauge for remaining oxygen in cylinder.
• Disconnecting the device from the portable oxygen cylinder.
The patient is the intended operator.
•
This device is not to be used for life support applications.
This device is not intended for use by patients who breathe more than 40 breaths per minute.
•
This device is not to be used by patients who consistently fail to trigger the device.
•
The device is not for use while asleep.
tions that are frequently used include:
ns
Func
The Bonsai pneumatic oxygen conserver includes a combination of a low-pressure regulator and an oxygen conserver. It
is designed for use with a cylinder as an ambulatory oxygen system and is capable of delivering a specific amount of
supplemental oxygen at the optimal point in the breathing cycle. The Bonsai increases the efficiency in the delivery of
oxygen, maximizing the beneficial effects and eliminating unnecessary oxygen waste.
When we breathe, approximately one-third of the time is spent inhaling and two-thirds exhaling. As a result, oxygen
delivered by continuous flow is wasted during exhalation. By eliminating oxygen flow during exhalation, a two-thirds saving
is possible. Additionally, the oxygen available during the very first part of inhalation contributes most to meeting oxygen
needs. The Bonsai conserver takes advantage of these facts to provide maximum efficiency in the delivery of oxygen. This
device is designed to be an integral component of a lightweight, long-lasting supplemental ambulatory oxygen system.
CAUTION:Oxygen supplied by this equipment is supplemental only and is not intended for life support applications.
The Bonsai should not be used to supply anything other than medical oxygen.
PURPOSE:
FUNCTION:
USER QUALIFICATION:
Prior to beginning therapy, patients must be given instruction by qualified personnel in how to operate this unit.
INTENDED USE:
The Bonsai pneumatic oxygen conserver is intended for prescription use only, to be used as part of a portable
oxygen delivery system for patients that require supplemental oxygen in their home and for ambulatory use.
CONTRAINDICATIONS:
7

IMPORTANT PARTS
3. Selector Switch: Enables the user to select the desired setting, as well as “OFF” and
“cf”
(continuous flow). When not in use, the switch should be turned to the“OFF” position.
WARNING: Fire Hazard
Lint and dust can contaminate the oxygen path and
create a fire hazard. Keep all oxygen connections clean
and free from lint and dust.
1.Cylinder Attachment Knob: This is used to attach the unit to any CGA 870
post-valve cylinder
2. Oxygen Pressure Gauge: Enables the user to monitor the contents of the
compressed oxygen cylinder and is protected by a rubber guard. The gauge
displays maximum pressure of 4000 psi.
4.Cylinder Alignment Pins: When assembling the unit, these parallel pins must be
inserted into the holes on the CGA 870 post valve.
5.Seal Washer (Gasket, SEAL 100): Creates the interface between the post valve and the
Bonsai. Besides offering a rugged interface, it also surrounds the oxygen path in a ring of
stainless steel or brass.
WARNING: Use only a manufacturer-specified seal washer (gasket).
7.Oxygen Supply Outlet: Use this fitting to attach astandard cannula.
8.VentHole:Maintainsproperinternal pressure.Donotobstructwith
anyobject,suchasalabelortight-fittingcarryingbag(locateddirectly
behindthegauge).
6. cf Settings:Enable the user to switch from pulse mode (oxygen delivery on demand)
to continuous flow mode in the unlikely event of unit malfunction. The cf settings
are designed for emergency use only.
CAUTION: Remember that in continuous flow mode, the oxygen
will beconsumed at a much faster rate. Switch to another oxygen
source before depleting the oxygen cylinder. The continuous flow
functions on the Bonsai are factory preset at 2 LP
M
and 4 LPM
8
1
2
3
4
5
6
7
8

ORDER NUMBER DESCRIPTION
SETTING UP YOUR CONSERVER
Conditions in the home healthcare environment that can affect the performance of your device:
NON-PORTABLE USE:
WARNING: Fire Hazard
Before using this unit, m
ake certain that your hands are free of oil, grease and other contaminants, and that the
cylinder is secure in an upright position.
The Bonsai is designed to extend the life of portable oxygen supplies when away from the primary source. While the
conserver may be used with stationary oxygen sources, the unit should be used only while awake. The conserver is not
intended for use while asleep.
•Degraded sensors due to rough handling, extreme temperatures or humidity can affect the device's ability to dose
oxygen. To avoid this, operate the device within the rated environmental conditions listedin the Specifications section
of this guide, found on page 19.
STANDARD PRODUCT
OM-812Bonsai pneumatic oxygen conserving device for 870 Post Cylinder Valve
REPLACEMENT PARTS
ORDER NUMBER DESCRIPTION
SEAL-100 870 Post Seal Washer (Gasket)
• Lint and dust can contaminate the oxygen path and create a fire hazard. Keep all oxygen connections clean
and free from lint and dust.
9

ASSEMBLY AND USE
WARNING: Fire Hazard
• Secure the cylinder in an upright position.
•Inspect the unit to ensure the seal washer (gasket) is in good working condition and attached to the inlet nozzle.
Attaching the
Bonsai
conserver to
the cylinder
FIGURE C
Connection
View of
the Bonsai
conserver
WARNING: Fire Hazard
• Make certain that your hands are free of oil, grease and other contaminants.
STEP 4: While holding the unit in place, tighten the cylinder attachment
knob by turning clockwise [see Fig. B].
NOTE: Tighten only by hand. The use of a tool to tighten the
knob may damage the unit.
FIGURE B
• Inspect the valve of the cylinder and the Bonsai to ensure they are free of contaminants and damage.
If any indication of damage or contamination is detected, DO NOT use the equipment and contact your
Home Care Provider.
SETUP:
WARNING: Use ONLY a manufacturer-specified seal washer (gasket). An incorrect seal washer (gasket) may not
be oxygen compatible or may cause an oxygen leak, creating an increased fire risk. DO NOT use the device if
the manufacturer-specified seal washer (gasket) is missing.
STEP 1: Loosen the cylinder attachment knob.
STEP 2: Lower the Bonsai conserver over any post-valve cylinder with the
alignment pins toward the holes on the cylinder neck [see Fig. B].
STEP 3: Line up the two pins and the seal washer (gasket) with the
corresponding holes on the cylinder post valve.
NOTE: The cylinder attachment knob should be aligned with
the indentation on the post valve.
STEP 5: Attach a standard cannula (7 ft. [2.13 m] or less in length) to the oxygen supply outlet. See Figure E on pg. 12
for an illustration demonstrating the proper positioning of the nasal cannula.
10

If any of these conditions exist, DO NOT use the cylinder and contact your healthcare provider for a
replacement cylinder.
STEP 1: Examine the outside of the cylinder and regulator assembly fordebris, oils or grease and noticeable signs of
damage, dents or dings, corrosion, excessive heat or fire damage, pressure leak or any other sign of damage
that might cause a cylinder to be unacceptable or unsafe for use.
STEP 2: Check the flow selector knob to be sure it rotates and stops at each setting.
WARNING: Fire Hazard
Make sure the fill valve, if equipped, is clean and free of dirt, debris, oil or other contaminants.
•
•
If the needle remains in its position, there is no leak and the device is ready for use.
STEP 4:Ensure that the unit is set to the "OFF" position.
However, if the contents indicator shows a continuous decrease in pressure, there is a leak in the system.
In this event, contact your Home Care Provider.
CAUTION: Do not use a tool.
CAUTION: This should be performed before each use.
STEP 1:Close the valve on the oxygen cylinder by turning the valve clockwise.
STEP 2:Depressurize the conserver by inhaling several times using the nasal cannula.
The gauge indicator should drop to zero.
STEP 3:Check that all screwed unions and tube connections are tight.
If necessary, tighten them by hand.
STEP 5:Slowly open the valve on the oxygen cylinder by turning the valve counter clockwise until the needle in the gauge
indicator no longer moves.
STEP 6:Close the cylinder valve again by turning the valve clockwise.
STEP 7:Observe the needle in the gauge indicator for approximately one minute.
INSPECTION BEFORE EACH USE:
CHECKING FOR LEAKS:
11

OPERATING INSTRUCTIONS:
To reduce the risk of rapid oxygen recompression and fire, open the
cylinder valve slowly and completely so the
pressure gauge moves
slowly as it indicates the cylinder pressure.
WARNING: Fire Hazard
STEP
6
:
Properly position the cannula with the nasal prongs facing upward and insert the prongs
into nose. Wrap the cannula tubing over the ears and position in front of body
STEP 4:Select the setting on the conserver to the appropriate delivery setting
STEP 8: Remove the nasal cannula and turn the selector switch to the “OFF” position.
STEP 9: When not in use, store in a clean, dry location.
STEP
2
:
If a leak is present (see "Checking for Leaks" section on previous page), close the cylinder valve, check the seal
washer (gasket) and reinstall. If the leak persists, DO NOT USE THE EQUIPMENT. Contact your Home
Care Provider for repair or replacement.
STEP 5:
Ensure cannula is properly attached to the Bonsai.
(see Fig. E.)
CAUTION
: To help prevent possible damage to the unit and to maintain its
cleanliness, keep the Bonsai in a carrying bag. Several bags are available for use with
different cylinder sizes and configurations: contact your HomeCare provider for more
information about carry bags.
FIGURE D
FIGURE E
STEP 3:Check the oxygen pressure gauge to verify that the cylinder pressure is within the operating range.
(see example in Fig. D).
STEP
1: Make sure that
the Bonsai is
set
to the “OFF”
position before opening the cylinder valve.
The Bonsai will now start to deliver oxygen. The amount of oxygen delivered per pulse is
determined by the setting. A sound may be heard each time the unit delivers a pulse of oxygen.
Adequate saturation will be achieved because of the precise time in the breathing cycle in which
the pulse of oxygen is delivered.
STEP 7:When finished using the system, close the oxygen supply cylinder valve by turning
the valve clockwise and continue breathing through the nasal cannula until no further
oxygen is detected and the gauge reads “Refill”.
12

DISASSEMBLY INSTRUCTIONS:
CARING FOR YOUR CONSERVER
Do not expose the unit to water, such as when bathing or swimming.It is advisable to keep the system in its
carrying bag to afford a degree of protection. Clean the outside of the unit periodically with a clean, lint-free cloth.
To remove heavy soil, wipe unit using a lint-free cloth, dampened with clean water, then dry unit with clean, dry,
lint-free cloth. Pay special attention to the oxygen outlet to make sure it remains free of dust, etc.
WARNING: There are no user serviceable parts. Do not attempt to service the device while it is in use.
NOTE: Tools are not required and not to be used to remove the conserver from the post valve.
To remove the Bonsai from the oxygen cylinder:
The Bonsai should be kept clean and free from moisture and dust, as well as extreme temperature.Clean the
Bonsai once a week by wiping the outer surface, cylinder fill valve and oxygen outlet port with a clean, dry
cloth. Do not use oil or products containing oil.
STEP 1: Close the oxygen supply cylinder valve by turning the valve clockwise.
STEP 2: Deplete residual pressure in the conserver by continuing to breathe through the nasal cannula or by setting the
conserver to continuous flow mode until no further oxygen is detected and the gauge reads "Refill".
STEP 3: Remove the nasal cannula from the Bonsai and turn the selector switch to the "OFF" position.
STEP 4: While holding the unit in place, slowly loosen the cylinder attachment knob by turning counter-clockwise (see
figure B on page 10).
STEP 5: Pull the unit away from the cylinder post valve until the two alignment pins are out of the holes on the cylinder
post valve.
STEP 6: Lift the unit off of the cylinder post valve. Use caution while lifting the unit off of the post valve, as the
alignment pins can damage sealing surfaces on the post, increasing the chance of leakage.
STEP 7: Store in a clean, dry location.
13

TROUBLESHOOTING
PROBLEM PROBABLE CAUSE SOLUTION
NOTE: Do not attempt to open the unit. If the unit is opened or tampered with, the warranty is void.
Unit does not pulse.
No
oxygen
delivery.
Unit pulses or
flows
continuously.
Cylinder valve is closed.
Turn cylinder valve counter clockwise to open.
Cylinder is empty.
Check the oxygen gauge.Replace the cylinder,
if empty.
Oxygen cannula is blocked orkinked. Remove kinks. Clean or replace, if necessary.
Selector switch is set to the “OFF” position. Make sure the selector switch is setto the
appropriate delivery setting.
Unit is set to the “cf” position.
Turn the selector switch to theappropriate
delivery setting.
Unit was not set to “OFF” priorto opening
the cylinder valve. Turn the selector switch to “OFF,”wait a few
moments, then set at proper delivery setting.
Vent hole is obstructed.
Remove obstructions, such as labels or a tight-
fitting
carrying bag, and resume use as usual.
Fault in the unit.
Continue the therapy by setting the selector
switch to
“cf” (continuous flow). This setting
increases the oxygen consumption,
so you
should regularly check how much oxygen
you have left.
Non-functioning units are subject to warranty provisions and the manufacturer repair/return policy.
If necessary, call your Home Care Provider.
14

OXYGEN CYLINDER DURATION
INFORMATION FOR HOME AND HEALTHCARE PROVIDERS
Because the total delivery of oxygen via the Bonsai is related to breathing rates, it is user adaptive. Thetotal oxygen delivered
per minute will automatically adjust with user need, as expressed by increased or decreased breathing rates. For example,
at all settings, twice as much oxygen per minute will be delivered if one breathes twenty (20) times per minute as compared
with ten (10) times per minute. Please refer to the table below as a guide.
Drive Medical recommends that at least the following procedures be completed by an appropriately trained
individual (i.e., biomedical technician, equipment technician, respiratory therapist, nurse) between uses by
different patients.
STEP 1:Dispose of nasal cannula.
•
•
•
-
NOTE: Ensure that the oxygen inlet remains free of dust, etc.
DISINFECTION BETWEEN PATIENTS:
STEP 2: Cleaning Instructions:
Clean the exterior of the device with:
-a clean, lint-free cloth to remove surface dirt and soil.
a clean, lint-free cloth dampened with water to remove heavy soil.
a soft-bristled brush dampened with water to remove stubborn soil.
Dry the device with a clean, lint-free cloth.
-
15

NOTE: There is no portion of the gas pathways through the conserver that could be contaminated with
body fluids or expired gas under normal or single fault conditions.
WARNING: Do not wet the area of the oxygen inlet connection, the disinfectant residue may create a risk of fire.
Do not submerge the conserver in the disinfectant, wipe disinfect only.
NOTE: Ensure that the device remains visibly wet for ten minutes, with the solution reaching all crevices and
hard-to-reach areas.
STEP 6: Check the oxygen conserver for proper operation.
• Ensure cylinder attachment knob is easy to adjust.
• Ensure flow selector knob rotates and clicks into each setting.
• Attach device to cylinder.
• Ensure pressure gauge is working.
• Ensure flow is working.
• Set device to each setting, and verify that oxygen pulses.
If the device is operating properly, it is ready to be used by another patient. If the device is not operating properly, the
provider should return the device to Drive Medical for service.
STEP 4: Allow all parts to dry completely before checking for proper operation.
STEP 5: Replace all damaged or worn components (cylinder attachment knob, seal washer).
STEP 3:Disinfection Instructions:
- Saturate a clean, lint-free cloth with a suitable disinfecting agent (e.g., 1:5chlorine bleach [5.25%] and
water solution) and wipe the exterior of the device.
16

Before attaching the regulator to a cylinder:
MAINTENANCE
• Examine the seal washer and replace if it is damaged or contaminated with dirt, debris, oil or other
contaminants.
• Inspect the threads on the cylinder attachment knob, make sure that the knob turns freely through
its full range of adjustment.
To replace the SEAL 100 Seal Washer:
1. Remove the old seal washer by lifting the edge of the brass washer and removing the seal washer from the
oxygen inlet connection, discard old seal washer.
2. Wash and dry hands before handling the new seal washer.
3. Place the new seal washer over the oxygen inlet connection and press it against the body of the device to
seat the seal washer in place.
NOTE: The disinfection process can only be performed by an appropriately trained individual.
The oxygen conserver and regulator do not need maintenance through the expected service life of the product. The device has
an expected service life of 5 years, which is based on 1500 hours/year of use under normal operating and storage conditions.
DISINFECTION INTERVALS:
WARNING: Do not attempt to open or remove enclosure. There are no user-serviceable internal components.
PREVENTIVE MAINTENANCE:
17

LIMITED WARRANTY
DISPOSAL INSTRUCTIONS
The device should be destroyed or made unusable prior to disposal, example: remove the cylinder contents gauge.
The foregoing warranty is exclusive and in lieu of all other express warranties.Implied warranties, if any, including but not
limited to the implied warranties of merchantability and fitness for a particular purpose, shall not extend beyond the
duration of the express warranty provided herein.In no event shall Drive Medical be liable for loss of use or profit or other
collateral, special or consequential damages.
Drive Medical will not accept damages or charges for labor, parts or expenses incurred in making field repairs, except upon
written authorization prior to such action.
The equipment, including accessories and internal components, does not belong in your regular household waste. Such
equipment is manufactured from high-grade materials and can be recycled and reused. The plastic components should
be recycled as plastics.
The Bonsai has been carefully manufactured and inspected and is warranted to be free from defects in workmanship and
materials. Under this warranty, Drive Medical's obligation shall be limited to the replacement or repair ofany such units or
parts that prove, by Drive Medical's inspection, to be defective withintwo years from the dateof purchase. Any abuse,
operation other than the intended use of the product, negligence, accident or repair by other than authorized service
professionals shall immediately void this warranty. This warranty does not extend to spare parts or accessories.
CALIBRATION
No calibration is necessary through the expected service life of the product.
18
Dispose in accordance with local ordinances.

SPECIFICATIONS
Tolerance on measurements = +/- 15%
(including measurement uncertainty)
Continuous Flow Rate Settings
cf2=2 LPM +/- 0.4 LPM
cf4=4 +/- 0.4 LPM
Deviation of delivered oxygen per breath =
+/- (1 ml/breath + 10% of the set initial value
per breath)
Tested per ISO 80601-2-67:2014 Sec 201.12.1.101
19
All volumes and flows are expressed at STPD
(standard temperature and pressure, dry)

How the device functions:
NOTE: The components in the medical gas path and the nasal cannula are considered applied parts.
The Bonsai delivers a uniform oxygen pulse which ensures that,if you breathe faster, you will still receive the same
amount of oxygen
with each breath. The device is pneumatically powered using springs and mechanical components.A
pulse dose of oxygen is triggered by sensing a pressure drop at the beginning of inhalation and is timed to deliver the dose
within the first half of the inhalation. A setting of 1 produces the smallest dose,and a setting of7produces
the largestdose. The cf setting produces continuous flow of 2 liters per minute.The cf4 setting produces continuous flow
of 4 liters per minute.
Technical Description:
Principles of dosing, timing, triggering and settings:
The Bonsai includes a combination of a low-pressure regulator and an oxygen conserver. It is designed for use with a
cylinder as an ambulatory oxygen system and is capable of delivering a precise amount of supplemental oxygen at the
optimal point in the breathing cycle.The Bonsai greatly increases the efficiency in the delivery of oxygen, maximizing the
beneficial effects and eliminating unnecessary oxygen waste.The Bonsai is designed to sense the precise moment in the
patient's breathing cycle when it has to deliver the oxygen pulse. It accomplishes its intended purpose by providing
supplemental oxygen to a patient requiring nasaloxygen therapy in a manner that yields a high level of efficiency in the
consumption of the oxygen administered. The Bonsai's responsive and rapid oxygen delivery time increases the oxygen
concentration provided to the patient, thus increasing the ability to better maintain patient saturation levels.
20
Table of contents
Popular Oxygen Equipment manuals by other brands

Amtrol
Amtrol EXTROL AX-100(V Installation, operation & service instructions

TECHNO-GAZ
TECHNO-GAZ Master Flux Plus user manual

Allegro Industries
Allegro Industries 9806 user manual

Precision Medical
Precision Medical PM5900 user manual

Inogen
Inogen One G2 user manual

Nidek Medical
Nidek Medical OCSI user guide