ResMed MIRAGE LIBERTY 61848 User manual

Global leaders in sleep and respiratory medicine www.resmed.com
Mirage Liberty™
FULL FACE MASK
User Guide
English •Deutsch •Français •Italiano •Español •Português •Nederlands
61848/2 07 04
MIRAGE LIBERTY
USER
EUR 1
61848
61848 cover.qxp 3/04/2007 3:11 PM Page 1

ResMed Ltd (Manufacturer) 1 Elizabeth Macarthur Drive Bella Vista NSW 2153 Australia
ResMed Corp (US Designated Agent) 14040 Danielson Street Poway CA 92064-6857 USA
ResMed (UK) Ltd (EU Authorized Representative) 65 Milton Park Abingdon Oxfordshire OX14 4RX UK
ResMed Offices Australia, Austria, Brazil, Finland, France, Germany, Hong Kong, Japan, Malaysia, Netherlands,
New Zealand, Norway, Singapore, Spain, Sweden, Switzerland, UK, USA
(see www.resmed.com for contact details).
Mirage Liberty Full Face Mask
Protected by patents: EP 1314445, HK 1057714, US 6412487, US 6581594, US 6796308, US 6823865, US 7021311.
Other patents pending.
Protected by design registrations: AU 312036, AU 312037, AU 312038, AU 312039, AU 312040, AU 312971, AU
312972, AU 312973, AU 312974, AU 312975, AU 312976, AU 312977, AU 312978, AU 312979, AU 312980, AU
312981, AU 312982, AU 312983, AU 312984, AU 313118, AU 313120, AU 313121, AU 313122, AU 313123, AU
313124, AU 313125. Others pending.
Mirage and Mirage Liberty are trademarks of ResMed Ltd and Mirage is registered in U.S. Patent and Trademark
Office.Velcro is a registered trademark of Velcro Industries B.V. STERRAD and CIDEX are trademarks of Johnson &
Johnson. Alconox is a trademark of Alconox Ltd. Neodisher Medizyme is a trademark of Chemische
Fabrik Dr Weigert.
© 2007 ResMed Ltd.
61848 cover.qxp 3/04/2007 3:11 PM Page 2

AMask parts / Maskenteile / Composants du masque / Parti della maschera / Piezas de la
mascarilla / Peças da máscara / Maskeronderdelen
M
i
r
ag
e
L
i
b
e
r
t
y
™
Mask frame / Maskenrahmen /
Entourage rigide / Telaio della maschera /
Armazón de la mascarilla / Armação da
máscara / Maskerframe
Ports cap / Anschlusskappe / Bouchon
d'entrées / Coperchio delle prese /Tapón
de los puertos / Tampa das portas /
Poortafdichting
Valve / Ventil / Valve /
Valvola / Válvula /
Válvula / Klep
Exhaust vents / Luftauslassöffnungen /
Orifices de ventilation / Aperture per
l'esalazione / Orificios de ventilación /
Portas de exalação / Luchtopeningen
Upper straps / Obere Bänder / Sangles supérieures
/ Cinghie superiori / Correas superiores / Correias
superiores / Bovenste banden
Lower straps / Untere Bänder / Sangles
inférieures / Cinghie inferiori / Correas
inferiores / Correias inferiores / Onderste
banden
Lower clip / Unterer Clip / Clip
inférieur / Fermaglio inferiore /
Broche inferior / Clipe inferior /
Onderste klem
BFitting the mask / Anlegen der Maske / Mise en place du masque / Come indossare la maschera / Colocación de la mascarilla / Ajuste da máscara / Het masker opzetten
1
2
1 2 3 4 5
CDisassembling for cleaning / Auseinanderbau zu Reinigungszwecken / Démontage pour le nettoyage / Smontaggio per la pulizia / Desmontaje para la limpieza / Desmontagem para limpeza / Demontage voor reiniging
3 4 5 6 7
© 2007 ResMed Ltd.
© 2007 ResMed Ltd.
Inlet tube / Einlassschlauch / Tuyau d'entrée /
Tubo d'ingresso / Tubo de entrada /
Tubo de entrada / Inlaatslang
Swivel / Drehadapter / Pièce pivotante / Giunto rotante /
Pieza giratoria / Peça giratória / Draaibare kop
Nasal pillows / Nasenpolster /
Coussins narinaires / Cuscinetti nasali /
Almohadillas nasales / Almofadas
nasais / Neuskussentjes
Valve clip / Ventilclip / Clip de la
valve / Fermaglio della valvola /
Traba de la válvula / Clipe da
válvula / Klepklem
Right upper clip / Rechter oberer Clip / Clip
supérieur droit / Fermaglio superiore destro /
Broche superior derecho / Clipe superior
direito / Rechter bovenste klem
Lower clip / Unterer Clip / Clip
inférieur / Fermaglio inferiore / Broche
inferior / Clipe inferior / Onderste
klem
Headgear parts / Kopfbandteile / Composants du harnais / Parti del copricapo / Piezas del
arnés / Peças do arnês / Onderdelen hoofdband
Left upper clip / Linker oberer
Clip / Clip supérieur gauche /
Fermaglio superiore sinistro /
Broche superior izquierdo /
Clipe superior esquerdo /
Linker bovenste klem
Valve flap / Ventillasche /
Clapet de la valve / Aletta
della valvola / Aleta de la
válvula / Aba da válvula /
Klepflap
Valve hinge / Ventilgelenk
/ Charnière de la valve /
Cardine della valvola /
Bisagra de la válvula /
Articulação da válvula /
Klepscharnier
1 8
Cushion alignment guide / Anleitung zur Ausrichtung des
Maskenkissens / Repère d'alignement de la bulle / Guida di
allineamento del cuscinetto / Guía para alineación de la
almohadilla / Guia de alinhamento da almofada /
Kussen uitlijngeleider
© 2007 ResMed Ltd.
2
Mask cushion / Maskenkissen / Bulle du masque / Cuscinetto
della maschera /
Almohadilla bucal /
Almofada da máscara /
Maskerkussen
Elbow / Kniestück /
Coude / Gomito /
Codo / Cotovelo /
Bocht
61848 illo sheets.qxp 12/04/2007 8:47 AM Page 1

DReassembling the mask / Wiederzusammenbau der Maske / Remontage du masque / Riassemblaggio della maschera / Montaje de la mascarilla / Montagem da máscara / Het masker in elkaar zetten
1234
7 8
Mirage Liberty
Full Face Mask / Full Face Maske / Masque facial / Maschera oro-nasale / Mascarilla Facial /
Máscara Facial / Volgelaatsmasker
Illustrations Sheet / Illustrationsblatt /
Fiche d'illustrations / Foglio delle illustrazioni /
Hoja de figuras / Folheto de ilustrações / Illustratieblad
Note: For complete instructions, please read the text section
in conjunction with the illustrations on this sheet.
Hinweis: Vollständige Anweisungen finden Sie im
Textabschnitt und auf diesem Illustrationsblatt.
Remarque : pour les instructions complètes, veuillez lire le
texte du guide avec cette fiche d’illustrations.
Nota: Per istruzioni complete, leggere la sezione con il testo
insieme alle illustrazioni su questo foglio.
Nota: Para entender bien las instrucciones, lea el texto junto
con las figuras de esta hoja.
Nota: para obter instruções exaustivas, leia a secção de texto
em conjunto com as ilustrações constantes deste folheto.
NB: Raadpleeg voor de volledige instructies de
desbetreffende tekst samen met de illustraties op dit blad.
Component of: 61848/2
5
EReassembling the headgear / Wiederzusammenbau des Kopfbandes / Remontage du
harnais / Riassemblaggio del copricapo / Montaje del arnés / Montagem do arnês /
De hoofdband weer in elkaar zetten
1
© 2007 ResMed Ltd.
96
© 2007 ResMed Ltd.
2
61848 illo sheets.qxp 3/04/2007 3:22 PM Page 2

English
1
Mirage Liberty™
FULL FACE MASK
Thank you for choosing ResMed’s Mirage Liberty. The Mirage Liberty is a full
face mask that combines nasal pillows and a mouth cushion, creating a mask
that is both unobtrusive and easy to use without compromising seal, stability
and comfort.
The mask incorporates vent holes and a built-in valve so that you can continue
to breathe fresh air if the airflow to your mask is impeded for any reason.
Intended Use
The Mirage Liberty channels airflow noninvasively to a patient from a positive
airway pressure device such as a continuous positive airway pressure (CPAP)
or bilevel system.
The Mirage Liberty is to be used by adult patients (>30 kg) for whom positive
airway pressure has been prescribed.
The Mirage Liberty is intended for single-patient re-use in the home
environment and multipatient re-use in the hospital/institutional environment.
Before Using the Mask
WARNING
•The Mirage Liberty must be used under qualified supervision with
patients who are unable to remove the mask by themselves. The mask
may not be suitable for those predisposed to aspiration.
•The elbow and valve assembly have specific safety functions. They
allow you to breathe fresh air if the airflow from your flow generator
to your mask is impeded. The mask should not be worn if the valve is
damaged as it will not be able to perform its safety function. The valve
should be replaced if it is damaged, distorted or torn.
•The vent holes must be kept clear.
•Follow all precautions when using supplemental oxygen.
61848r2.book Page 1 Tuesday, April 3, 2007 2:59 PM

2
•Any supplemental oxygen flow must be turned off when the flow
generator is not operating, so that unused oxygen does not
accumulate within the flow generator enclosure and create a risk of
fire.
•At a fixed flow rate of supplemental oxygen flow, the inhaled oxygen
concentration will vary, depending on the pressure settings, patient
breathing pattern, mask, point of application and leak rate.
•The technical specifications of the mask and flow generator are
provided for your clinician to check that they are compatible. If used
outside specification or if used with incompatible devices, the seal and
comfort of the mask may not be effective, optimum therapy may not
be achieved, and leak, or variation in the rate of leak, may affect the
flow generator function.
•Discontinue using the Mirage Liberty if you have ANY adverse
reaction to the mask system, and consult your physician or sleep
therapist.
•Discontinue using the Mirage Liberty if you experience nasal irritation,
and consult your physician or sleep therapist.
•Refer to your flow generator manual for details on settings and
operational information.
Using the Mask
Select ‘Mir Full’ or ‘Full Face’ as the mask option when using the Mirage
Liberty with ResMed flow generators that have mask setting options.
Fitting the mask
The diagrams in section Aon the illustrations sheet show how the parts of the
mask fit together.
The diagrams in section Bshow the suggested sequence for obtaining the
best fit and comfort in using your mask. Please follow these instructions
carefully.
1Wash your face thoroughly before fitting the mask. It is recommended that
you do not apply moisturiser where the mask contacts your face as it can
affect the mask seal.
2Place the headgear on your head, like you would a cap, and pull the mask
forward onto your face (B-1). Make sure that the headgear fits evenly on the
top of your head.
3Fit the mask over your mouth. Insert the pillows so that they sit gently just
inside the entrance to your nostrils.
4Push the lower headgear clips into the slots on the mask frame until they
click into place (B-2).
61848r2.book Page 2 Tuesday, April 3, 2007 2:59 PM

3
English
5To tighten or loosen the headgear straps, peel the Velcro®tab off the
headgear and reposition it. Gently and evenly adjust the upper headgear
straps (B-3), then the lower straps (B-4). Alternate the adjustment of each
set of straps until they are comfortable and firm and so that the upper
headgear clips rest between your eye and your ear. The mask should gently
‘float’ on your face. Do not overtighten the headgear straps.
6Connect one end of the main air tubing to your flow generator and the other
end to the swivel.
7Connect the elbow to the mask frame, holding the sides of the elbow then
firmly pushing it onto the frame until it clicks into place (B-5). Rotate the
elbow to check that it rotates freely and does not separate from the frame.
8Turn your flow generator on.
9If you feel air leaks, you may need to adjust your headgear. Return to step 5
or check through the suggestions in “Optimising mask seal and comfort”
below.
Optimising mask seal and comfort
To receive effective therapy it is important to have the best seal possible
between your mask and your face. If you are experiencing leaks, please ensure
that you have followed the fitting instructions carefully. Carry out a quick check
after fitting your mask:
•Is the mouth cushion creased? Creases can allow air to leak out of the
mask.
•Have you cleaned your mask recently? Oils on the cushion and pillows can
affect the seal.
•Are the pillows correctly seated in your nostrils? Re-seat or adjust the
pillows to obtain a proper seal.
•Are your headgear straps overtightened? Try not to alter the upper headgear
straps once they have been tightened by your clinician.
•If you cannot establish a comfortable seal, do not overtighten the headgear.
Consult your clinician.
•Try another nasal pillow size.
If you cannot resolve any problems, look at the Troubleshooting section, or talk
to your clinician.
Removing the Mask
To remove the Mirage Liberty:
1Detach the elbow by squeezing the elbow on both sides (C-1).
2Unclip both of the lower headgear clips (C-2) and remove the mask.
61848r2.book Page 3 Tuesday, April 3, 2007 2:59 PM

4
Note: You can detach the elbow from the mask frame and leave the mask on
your face. You may prefer to do this when briefly stopping therapy, for
example to go to the bathroom.
Disassembling the Mask
See section C on the illustrations sheet.
1Unclip the upper headgear clips from the frame (C-3).
2Carefully pull the mouth cushion away from the frame (C-4).
3Push the two nasal pillows down through the mouth cushion (C-5).
4Remove the ports cap (C-6).
5Detach the inlet tube assembly from the elbow.
Note: The swivel does not need to be disconnected from the inlet tube.
6Detach the valve clip from the elbow (C-7).
7Peel the valve from the valve clip (C-8).
Note: Do not pull on the valve flap, as this may cause it to tear.
Cleaning the Mask in the Home
Notes:
•The mask and headgear can only be cleaned by handwashing.
•The headgear may be washed without removing the headgear clips.
•Do not soak any components of the mask.
WARNING
•Do not use aromatic-based solutions or scented oils (eg, eucalyptus or
essential oils), bleach, alcohol or products that smell strongly (eg,
citrus) to clean any of the mask components. Residual vapours from
these solutions can be inhaled if not rinsed thoroughly. They may also
damage the mask, causing cracks.
•Do not iron the headgear as the material is heat sensitive and will be
damaged.
Daily/After Each Use
To optimise the mask seal, facial oils should be removed from the cushion and
pillows before use.
Handwash the mask by gently rubbing in warm (30°C) water using mild soap
or diluted dishwashing detergent.
Clean the walls of the nasal pillows, including the space between the walls, of
any debris using a small brush.
Do not twist the valve during cleaning as this may damage or tear the valve
membrane or hinge. Take care when handling the valve.
61848r2.book Page 4 Tuesday, April 3, 2007 2:59 PM

5
English
If the vent requires cleaning, use a soft bristle brush.
Rinse all components well with drinking quality water and allow them to air dry
out of direct sunlight.
Weekly
Handwash the headgear by gently rubbing in warm (30°C) water using mild
soap or diluted dishwashing detergent. Rinse the headgear well and allow it to
air dry out of direct sunlight.
Cleaning the Mask between Patients
The Mirage Liberty should be disinfected or sterilised when used between
patients.
Detailed disinfection and sterilisation instructions are available from the
ResMed website, www.resmed.com/masks/sterilization, and must be
consulted before multipatient use.
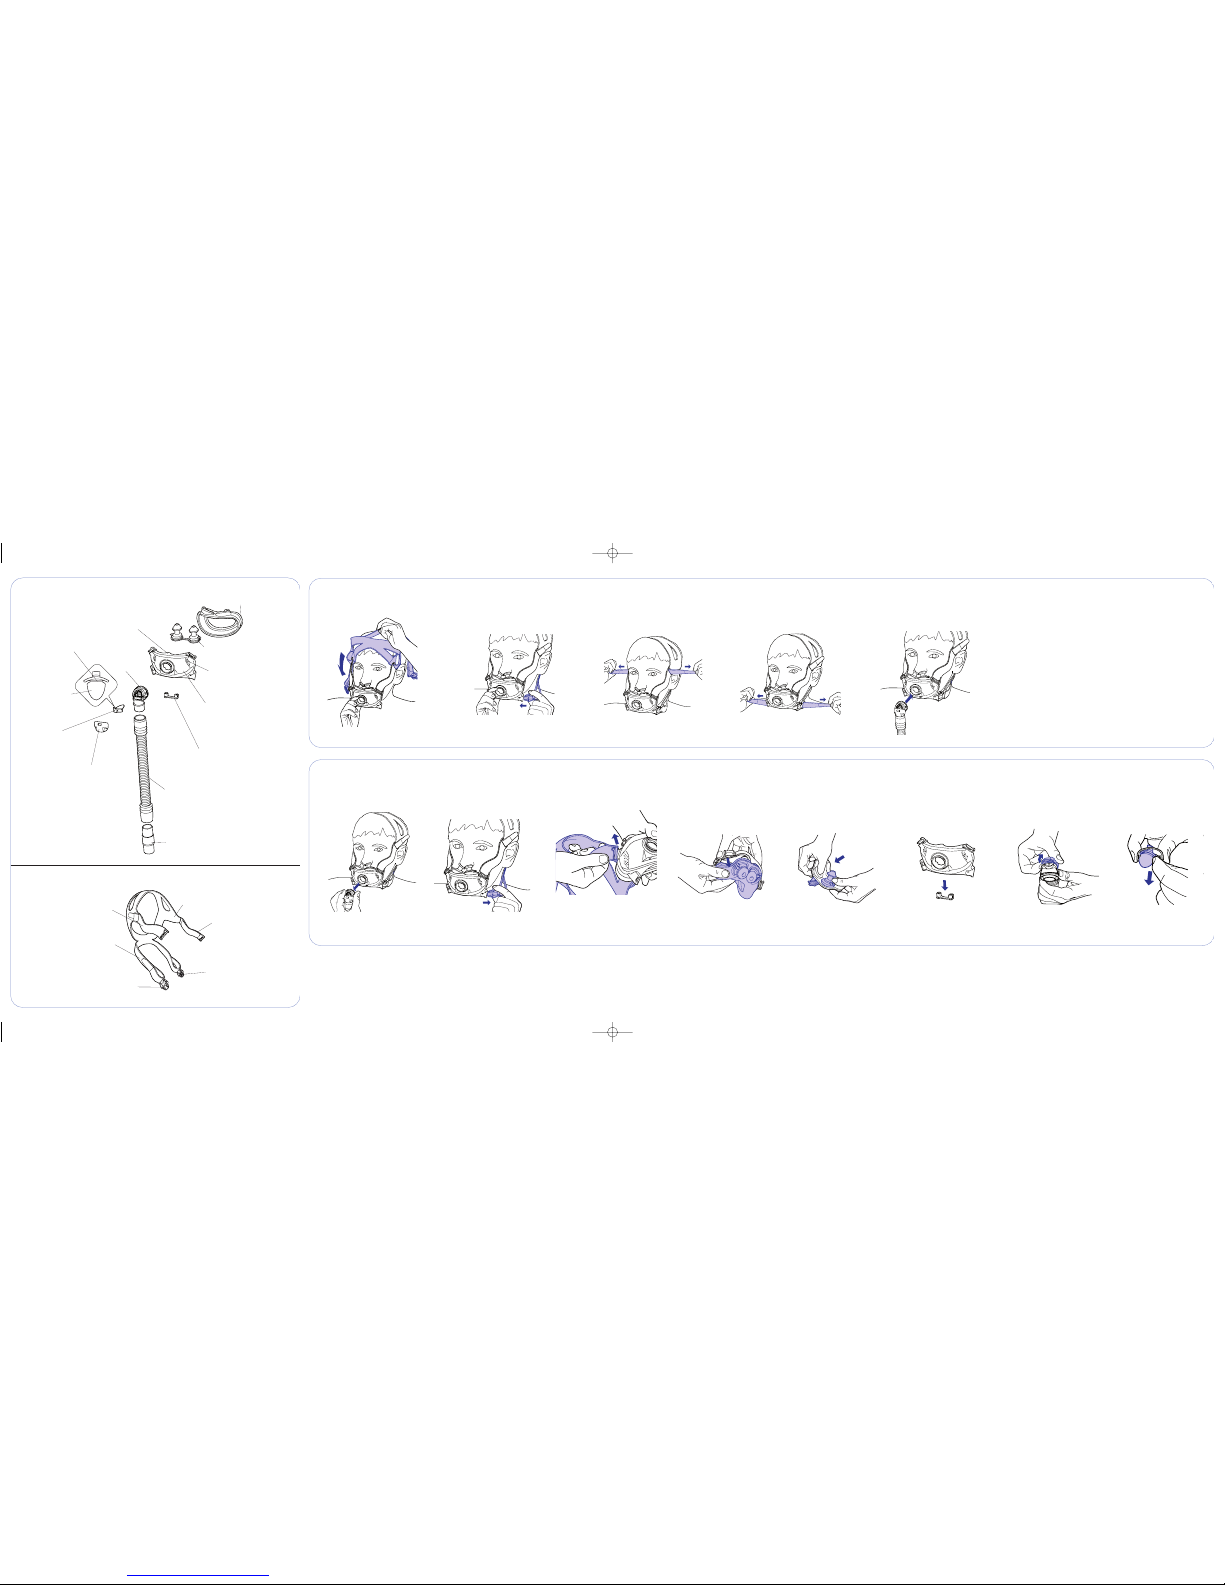
Reassembling the Mask
See section D on the illustrations sheet.
Before reassembling the mask, check that all components are clean and dry.
Check that the valve is not damaged, distorted or torn, and that none of the
other components are broken or cracked. Replace any parts that are damaged.
Flexible PVC contains elements that can be detrimental to the materials of the
mask. If flexible PVC tubing is used continuously, the attachment port should
be inspected for cracking. Replace any parts that are damaged.
Refer to “Ordering Information” for re-order numbers.
1Attach the nasal pillows to the mouth cushion:
aPush the nasal pillows through the holes in the mouth cushion (D-1).
bPull the nasal pillows up until the grooves at their base fully engage
around the mouth cushion holes (D-2).
cCheck that the tabs on each pillow fit into the corresponding notches on
the cushion (D-3). Check that the seal between the pillows and cushion
is complete.
2Attach the mouth cushion to the frame:
aPosition the cushion alignment guide between the two nasal pillows and
line up the triangle symbols on the bottom of the mask frame with
those on the mouth cushion.
bPress the mouth cushion into the groove in the frame (D-4).
cCheck that the mouth cushion is fully seated in the groove.
3Insert the ports cap (D-5).
4Clip the upper headgear clips onto the mask (D-6).
61848r2.book Page 5 Tuesday, April 3, 2007 2:59 PM

6
5Assemble the elbow assembly:
aPush the tab of the valve up through the slot in the valve clip (D-7).
Ensure that the valve locks into the slot.
bFeed the flap of the valve through the slot in the elbow (D-8).
cPress the valve clip onto the elbow until you hear both sides click into
place (D-9).
6Push the inlet tube assembly onto the elbow assembly.
Reassembling the Headgear
If taken apart, the headgear has five parts: headgear straps, left and right upper
headgear clips, and two lower clips.
1Attach the upper headgear clips to the mask frame (D-6). The mask
incorporates lock-out features to ensure that each upper clip attaches to the
correct side of the mask frame.
2Clip the lower headgear clips into the mask frame.
3Lay out the headgear straps, label side down. The label is on the outer side
of the headgear. The internal side is smooth, to be comfortable against your
face.
4Thread the top (short) straps through the upper headgear clips (E-1, E-2).
5Thread the bottom (long) straps through the lower clips (E-1, E-2).
6Check that the headgear is not twisted.
Storage
Ensure that the mask is thoroughly clean and dry before storing it for any
length of time. Store the mask in a cool dry place out of direct sunlight.
Disposal
The Mirage Liberty does not contain any hazardous substances and may be
disposed of with your normal household refuse.
61848r2.book Page 6 Tuesday, April 3, 2007 2:59 PM

7
English
Troubleshooting
Problem Possible reason Possible solution
Mask won’t seal properly or is
uncomfortable Mouth cushion or pillows may
be dirty. Clean mask according to
instructions in “Cleaning the
Mask in the Home”.
Mask may have been fitted
incorrectly. Carefully follow instructions in
“Fitting the mask”.
Mask is incorrectly adjusted. Check headgear is not over-
tightened.
Mouth cushion is wrong size. Talk to your clinician.
Mouth cushion is skewed in
mask frame. Check insertion of cushion.
Mouth cushion is misaligned or
creased on face. Ensure cushion is properly
aligned and that there are no
creases in it: undo headgear clip,
check cushion and reposition the
mask on your face.
Mask pillows are the wrong size. Try another size or talk to your
clinician.
Mask pillows are not correctly
seated in your nostrils. Re-seat pillows into nostrils.
Mask pillows are skewed in
cushion. Check insertion of pillows.
Mask is assembled incorrectly. Reassemble mask.
Mask is too noisy Vents are blocked or partially
blocked. Clean vents according to
instructions in “Cleaning the
Mask in the Home”.
Valve is misassembled. Reassemble valve.
Cushion is not properly inserted. Check insertion of cushion.
Mask is assembled incorrectly. Reassemble mask.
Valve is damaged, torn or
distorted. Replace valve.
Pillows are not inserted correctly
into cushion. Check insertion of pillows.
Mask is not sealing. Check and adjust mask as
necessary.
61848r2.book Page 7 Tuesday, April 3, 2007 2:59 PM

8
Technical Specifications
Note: The mask system does not contain latex, PVC or DEHP materials.
Pressure–Flow Curve
Note: As a result of manufacturing variations, the vent flow may vary from that
indicated in the graph.
Dead Space Information
Dead space is the empty volume of the mask up to the elbow.
The maximum dead space of the Mirage Liberty for all mask size combinations
is 151 mL.
Standards
CE designation in accordance with EC directive 93/42/EEC, class IIa.
ISO 14971, ISO 10993-1, ISO 17510-2, ISO 13485.
Therapy Pressure
4 to 20 cm H2O
Resistance
Drop in pressure measured (nominal)
at 50 L/min: 0.5 cm H2O
at 100 L/min: 1.6 cm H2O
Sound
The A-weighted sound power of the mask is 28 dBA.
Environmental Conditions
Operating temperature: +5°C to +40°C
Operating humidity: 10%–95% relative humidity non-condensing
Storage and transport temperature: -20°C to +60°C
Storage and transport humidity: 10%–95% relative humidity non-condensing
Vent Flow Rate (L/min)
Pressure
(cm H2O) Flow
(± 6.0 L/min)
422
832
12 41
16 48
20 54
0.0
10.0
20.0
30.0
40.0
50.0
60.0
70.0
2 4 6 8 10 12 14 16 18 20 22 24 26 28 30
Mask Pressure (cm H2O)
61848r2.book Page 8 Tuesday, April 3, 2007 2:59 PM

9
English
Mask sizes
(excludes inlet tube and headgear)
Symbols
System and Packaging
User Guide
size width (mm) height (mm) depth (mm)
small 110 92 95
large 110 100 100
Caution, consult accompanying documents
Lot number
Part number/Product code
No latex
Humidity limitation
Temperature limitation
Manufacturer
Indicates a warning or caution and alerts you to a possible injury or explains
special measures for the safe and effective use of the device.
LOT
REF
61848r2.book Page 9 Tuesday, April 3, 2007 2:59 PM

10
Ordering Information
Europe 1 – English, German, French, Italian, Spanish, Portuguese, Dutch.
Consumer Warranty
ResMed acknowledges all consumer rights granted under the EU Directive
1999/44/EG and the respective national laws within the EU for products sold
within the European Union.
Ref. Item
System
61302 Mirage Liberty Full Face Mask, Small – Europe 1
61303 Mirage Liberty Full Face Mask, Large – Europe 1
61306 Mirage Liberty Full Face Mask, Small – France
61307 Mirage Liberty Full Face Mask, Large – France
61308 Mirage Liberty Full Face Mask, Small – UK
61309 Mirage Liberty Full Face Mask, Large – UK
Replacement parts
61330 Mouth cushion, Small (1 pk)
61331 Mouth cushion, Large (1 pk)
61333 Nasal pillows, Small (1 pk)
61334 Nasal pillows, Medium (1 pk)
61335 Nasal pillows, Large (1 pk)
61337 Mask frame, Small (1 pk)
61338 Mask frame, Large (1 pk)
61340 Elbow assembly (elbow, valve and clip) (1 pk)
61342 Valve and clip (1 pk)
61343 Valve and clip (10 pk)
60926 Inlet tube and swivel (1 pk)
60927 Inlet tube and swivel (10 pk)
61348 Headgear assembly, Small (1 pk)
61349 Headgear assembly, Standard (1 pk)
61352 Upper clips (2 pk)
61353 Lower clips (2 pk)
16570 Ports cap (2 pk)
16571 Ports cap (10 pk)
60014 Swivel (10 pk)
61848r2.book Page 10 Tuesday, April 3, 2007 2:59 PM

Deutsch
11
Mirage Liberty™
FULL FACE MASKE
Vielen Dank, dass Sie sich für die Mirage Liberty Full Face Maske von ResMed
entschieden haben. Die Mirage Liberty ist eine Nasen-Mund-Maske, die
Nasenpolster und Mundkissen kombiniert und dadurch sowohl dezent als auch
anwenderfreundlich ist, ohne dass Sitz, Stabilität oder Komfort beeinträchtigt
werden.
Die Maske weist Luftauslassöffnungen und ein integriertes Sicherheitsventil
auf, so dass Sie auch dann weiter frische Luft einatmen können, wenn der
Luftfluss zu Ihrer Maske aus irgend einem Grund blockiert wird.
Verwendungszweck
Die Mirage Liberty führt dem Patienten auf nicht-invasive Weise einen
Luftfluss von einem PAP-Gerät wie z. B. einem CPAP- oder Bilevel-Gerät zu.
Die Mirage Liberty ist für Erwachsene Patienten (>30 kg) vorgesehen, denen
positiver Atemwegsdruck verschrieben wurde.
Die Mirage Liberty ist für den wiederholten Gebrauch durch nur einen
Patienten im häuslichen Umfeld sowie für den wiederholten Gebrauch durch
mehrere Patienten im Krankenhaus/Schlaflabor geeignet.
Vorabhinweise
WARNUNG
•Wird die Mirage Liberty bei Patienten verwendet, die nicht in der Lage
sind, die Maske selbst abzunehmen, ist die Überwachung durch
qualifiziertes Pflegepersonal erforderlich. Die Maske ist evtl. nicht für
Patienten geeignet, die unter Zuständen leiden, die zur Aspiration
prädisponieren.
61848r2.book Page 11 Tuesday, April 3, 2007 2:59 PM

12
•Kniestück und Sicherheitsventil üben bestimmte
Sicherheitsfunktionen aus. Sie ermöglichen Ihnen das Einatmen
frischer Luft, wenn der Luftfluss von Ihrem Atemtherapiegerät
blockiert wird. Die Maske darf nicht benutzt werden, wenn das
Sicherheitsventil beschädigt ist, da es ansonsten diese
Sicherheitsfunktion nicht ausüben kann. Ist das Sicherheitsventil
beschädigt, verzerrt oder gerissen, muss es ausgewechselt werden.
•Die Luftauslassöffnungen dürfen nicht blockiert sein.
•Bei der Verwendung von zusätzlichem Sauerstoff müssen alle
Sicherheitsmaßnahmen eingehalten werden.
•Wenn das Gerät außer Betrieb ist, muss die Sauerstoffzufuhr
abgeschaltet werden, um zu verhindern, dass sich nicht verwendeter
Sauerstoff im Gehäuse des Atemtherapiegerätes ansammelt, wo er
eine Feuergefahr darstellen könnte.
•Bei einer festgelegten Flussrate für zusätzlichen Sauerstoff ist die
Konzentration des inhalierten Sauerstoffs je nach Druckeinstellungen,
Patientenatemmuster, Maske, Zufuhrstelle und Leckagerate
unterschiedlich.
•Ihr Arzt kann anhand der technischen Daten der Maske und des
Atemtherapiegerätes deren Kompatibilität überprüfen. Werden die
technischen Daten der Maske nicht beachtet bzw. wird die Maske mit
inkompatiblen Atemtherapiegeräten verwendet, können Sitz, Komfort
und Therapie beeinträchtigt werden, und Leckagen bzw.
Leckagevariationen können die Funktion des Atemtherapiegerätes
beeinträchtigen.
•Wenn Sie IRGENDWELCHE allergischen Reaktionen auf das
Maskensystem haben, unterbrechen Sie die Behandlung mit der
Mirage Liberty und konsultieren Sie Ihren Arzt oder Schlaftherapeuten.
•Wenn es während der Behandlung mit der Mirage Liberty zu
Nasenreizungen kommt, unterbrechen Sie die Behandlung und
konsultieren Sie Ihren Arzt oder Schlaftherapeuten.
•Informationen über Einstellungen und Betrieb finden Sie in der
Bedienungsanleitung des Atemtherapiegerätes.
Verwendung der Maske
Wählen Sie „Mir Full“ oder „Full Face“ als Maskenoption aus, wenn Sie die
Mirage Liberty zusammen mit Atemtherapiegeräten von ResMed benutzen,
die über Maskenoptionen verfügen.
61848r2.book Page 12 Tuesday, April 3, 2007 2:59 PM

13
Deutsch
Anlegen der Maske
Die Abbildungen in Abschnitt Aauf der Illustrationsseite zeigen, wie die
Maskenteile zusammengebaut werden.
Die Abbildungen in Abschnitt Bzeigen die Reihenfolge des Zusammenbaus,
die für besten Sitz und Komfort der Maske sorgt. Wir bitten Sie, diese
Anweisungen genau zu befolgen.
1Waschen Sie vor dem Aufsetzen der Maske gründlich Ihr Gesicht. Wir
empfehlen, keine Feuchtigkeitscreme an den Stellen aufzutragen, an denen
Ihre Mirage Liberty mit Ihrem Gesicht in Berührung kommt, da dies die
Abdichtung beeinträchtigen kann.
2Setzen Sie das Kopfband wie eine Mütze auf den Kopf und ziehen Sie die
Maske nach vorne über das Gesicht (B-1). Achten Sie dabei darauf, dass das
Kopfband gleichmäßig auf der Kopfmitte aufliegt.
3Legen Sie die Maske über Ihren Mund und die Nasenpolster sanft an den
Eingängen Ihrer Nasenlöcher an.
4Drücken Sie die unteren Kopfbandclips in die Schlitze am Maskenrahmen,
bis sie mit einem Klicken einrasten (B-2).
5Mit Hilfe des Klettverschlusses, den Sie vom Kopfband abziehen müssen,
können Sie die Kopfbänder anziehen oder lockern. Ziehen Sie zuerst die
oberen (B-3), dann die unteren Kopfbänder vorsichtig und gleichmäßig an
(B-4). Gehen Sie beim Anziehen der Bänder abwechselnd vor, bis die Bänder
bequem und fest sitzen und die oberen Kopfbandclips zwischen Ihrem Auge
und Ihrem Ohr aufliegen. Die Maske sollte ganz leicht auf Ihrem Gesicht
aufliegen. Ziehen Sie die Kopfbänder nicht zu stramm.
6Schließen Sie ein Ende des Atemschlauches an Ihr Atemtherapiegerät und
das andere Ende am Drehadapter an.
7Schließen Sie das Kniestück am Maskenrahmen an, indem Sie es an den
Seiten festhalten und fest in den Rahmen drücken, bis es mit einem Klicken
einrastet (B-5). Drehen Sie das Kniestück, um sich zu vergewissern, dass es
sich frei drehen kann, ohne sich vom Maskenrahmen abzutrennen.
8Schalten Sie das Atemtherapiegerät ein.
9Wenn Sie einen Luftaustritt verspüren, müssen Sie evtl. den Sitz des
Kopfbandes korrigieren. Gehen Sie zu Schritt 5 zurück oder befolgen Sie
einen der Vorschläge in Abschnitt „Optimaler Maskensitz und Komfort“
unten.
61848r2.book Page 13 Tuesday, April 3, 2007 2:59 PM

14
Optimaler Maskensitz und Komfort
Ein möglichst guter Sitz der Maske auf Ihrem Gesicht ist für eine wirksame
Therapie sehr wichtig. Wenn Leckagen auftreten, sollten Sie sich
vergewissern, dass Sie die Anweisungen zum Anlegen der Maske sorgfältig
befolgt haben. Überprüfen Sie nach dem Anlegen der Maske kurz Folgendes:
•Weist das Maskenkissen Falten auf? Falten können Maskenleckagen
ermöglichen.
•Wann haben Sie Ihre Maske das letzte Mal gereinigt? Fette auf dem Kissen
und den Polstern können den Sitz beeinträchtigen.
•Sitzen die Polster richtig in Ihren Nasenlöchern? Korrigieren Sie anderenfalls
den Sitz der Polster, um eine gute Abdichtung zu erzielen.
•Sind die Kopfbänder zu fest angezogen? Nehmen Sie möglichst keine
Veränderungen an den oberen Kopfbändern vor, nachdem diese von Ihrem
Arzt angezogen wurden.
•Wenn Sie keinen angenehmen Sitz erreichen können, versuchen Sie, die
Kopfbänder nicht zu stramm anzuziehen. Setzen Sie sich mit Ihrem Arzt in
Verbindung.
•Probieren Sie eine andere Nasenpolstergröße aus.
Wenn Sie die Probleme nicht beheben können, schauen Sie im Abschnitt
„Fehlersuche“ nach oder wenden Sie sich an Ihren Arzt.
Abnehmen der Maske
Gehen Sie folgendermaßen vor:
1Nehmen Sie das Kniestück vom Maskenrahmen ab, indem Sie es an beiden
Seiten zusammendrücken (C-1).
2Öffnen Sie beide unteren Kopfbandclips (C-2) und nehmen Sie die Maske
ab.
Hinweis: Sie können das Kniestück vom Maskenrahmen abnehmen, ohne die
ganze Maske abnehmen zu müssen. Dies ist vor allem bei einer kurzen
Unterbrechung der Behandlung, um z. B. auf Toilette zu gehen, praktisch.
Auseinandernehmen der Maske
Siehe Abschnitt C des Illustrationsblattes.
1Nehmen Sie die oberen Kopfbandclips vom Maskenrahmen ab (C-3).
2Ziehen Sie dann vorsichtig das Mundkissen vom Maskenrahmen (C-4).
3Drücken Sie die beiden Nasenpolster nach unten durch das Mundkissen
(C-5).
4Entfernen Sie den Verschlussstöpsel (C-6).
61848r2.book Page 14 Tuesday, April 3, 2007 2:59 PM

15
Deutsch
5Nehmen Sie den Verbindungsschlauch vom Kniestück ab.
Hinweis: Der Drehadapter muss nicht vom Verbindungsschlauch
abgenommen werden.
6Nehmen Sie den Ventilclip vom Kniestück ab (C-7).
7Ziehen Sie das Sicherheitsventil vom Ventilclip ab (C-8).
Hinweis: Ziehen Sie nicht an der Ventillasche, da diese reißen könnte.
Reinigung der Maske zu Hause
Hinweise:
•Maske und Kopfband dürfen nur von Hand gewaschen werden.
•Zum Waschen des Kopfbandes müssen die Kopfbandclips nicht entfernt
werden.
•Weichen Sie keines der Maskenteile ein.
WARNUNG
•Verwenden Sie zur Reinigung der Maskenteile keine aromatischen
Lösungen oder Duftöle (z. B. Eukalyptus- oder ätherische Öle),
Bleichmittel, Alkohol oder stark riechende Produkte (z. B. Zitrus).
Andernfalls besteht die Gefahr, dass Sie die Restdämpfe von diesen
Lösungen einatmen, wenn Sie sie nicht gründlich ausspülen. Sie
können außerdem die Maske beschädigen und Risse verursachen.
•Das Kopfband darf nicht gebügelt werden, da das Material
hitzeempfindlich ist und beschädigt werden könnte.
Täglich/Nach jedem Gebrauch
Um einen optimalen Sitz der Maske zu erreichen, müssen Hautfette vor der
Verwendung vom Maskenkissen und von den Polstern entfernt werden.
Waschen Sie die Maske mit der Hand in einer warmen Seifenlauge (30 °C).
Verwenden Sie dazu eine milde Flüssigseife oder ein verdünntes
Geschirrspülmittel.
Reinigen Sie die Wände der Nasenpolster, einschließlich des Raumes
zwischen den Wänden, mit einer kleinen Bürste, um alle Ablagerungen zu
entfernen.
Verdrehen Sie während der Reinigung nicht das Sicherheitsventil, da dadurch
die Ventilmembran bzw. das Scharnier beschädigt werden oder reißen können.
Gehen Sie mit dem Sicherheitsventil äußerst vorsichtig um.
Verwenden Sie zur Reinigung des Ventils ggf. eine weiche Bürste.
Spülen Sie alle Maskenteile gründlich mit Trinkwasser ab und lassen Sie sie vor
direktem Sonnenlicht und Hitzeeinwirkung geschützt trocknen.
61848r2.book Page 15 Tuesday, April 3, 2007 2:59 PM

16
Wöchentlich
Waschen Sie das Kopfband mit der Hand in einer warmen Seifenlauge (30 °C).
Verwenden Sie dazu eine milde Flüssigseife oder ein verdünntes
Geschirrspülmittel. Spülen Sie das Kopfband gut ab und lassen Sie es vor
direktem Sonnenlicht und Hitzeeinwirkung geschützt an der Luft trocknen.
Reinigung der Maske zur Vorbereitung auf einen
neuen Patienten
Die Mirage Liberty muss für jeden neuen Patienten desinfiziert bzw. sterilisiert
werden.
Genaue Anweisungen dazu finden Sie auf der ResMed-Webseite unter
www.resmed.com/masks/sterilization. Bitte lesen Sie sich diese Anweisungen
vor dem Gebrauch durch mehrere Patienten sorgfältig durch.
Wiederzusammenbau der Maske
Siehe Abschnitt D des Illustrationsblattes.
Vergewissern Sie sich vor dem Wiederzusammenbau der Maske, dass alle
Teile sauber und trocken sind. Stellen Sie sicher, dass das Sicherheitsventil
nicht beschädigt, verzerrt oder gerissen ist und keines der anderen
Maskenteile Brüche oder Risse aufweist. Wechseln Sie alle beschädigten Teile
aus. Flexible PVC-Produkte enthalten Elemente, die das Material der Maske
beschädigen können. Wird fortlaufend ein flexibler PVC-Schlauch verwendet,
muss der Anschluss auf Risse untersucht werden. Wechseln Sie alle
beschädigten Teile aus.
Die Bestellnummern finden Sie im Abschnitt „Bestellinformationen“.
1Anbringen des Nasenpolsters am Mundkissen:
aDrücken Sie die Nasenpolster durch die Löcher im Mundkissen (D-1).
bZiehen Sie sie anschließend hoch, bis ihre Nut vollständig in den
Mundkissenlöchern einschnappt (D-2).
cVergewissern Sie sich, dass die Laschen der Nasenpolster richtig in den
entsprechenden Aussparungen im Kissen sitzen (D-3). Überprüfen Sie
die Abdichtung zwischen Nasenpolstern und Mundkissen.
2Anbringen des Mundkissens am Maskenrahmen:
aLegen Sie die Ausrichtungsmarkierungen des Mundkissens zwischen
die zwei Nasenpolster und richten Sie die dreieckigen Symbole unten
am Maskenrahmen mit den Symbolen am Mundkissen aus.
bDrücken Sie das Mundkissen in die Nut am Maskenrahmen (D-4).
cStellen Sie sicher, dass das Mundkissen fest in der Nut sitzt.
61848r2.book Page 16 Tuesday, April 3, 2007 2:59 PM
This manual suits for next models
1
Table of contents
Languages:
Other ResMed Oxygen Equipment manuals

ResMed
ResMed Astral Instruction sheet

ResMed
ResMed MIRAGE LIBERTY 61850/2 User manual

ResMed
ResMed Oxygen Equipment User manual

ResMed
ResMed Mirage Liberty User manual

ResMed
ResMed VPAP AUTO 25 User manual

ResMed
ResMed Quattro FX NV User manual

ResMed
ResMed Swift FX Nano User manual

ResMed
ResMed Mirage Quattro User manual

ResMed
ResMed ULTRAMIRAGE 608140/20611 User manual