CFMG-100CP hange Pad Indicator™ Fall/Mobility Monitor Seat Belt
SEAT BELT PLACEMENT
• Unscrew the one screw on either side of the wheelchair that holds the seat
in place.
• Attach the seat belt to the wheelchair by lining up the grommet holes on
the seat belt with the screw hole and re-insert screws through both the
seat belt and the wheelchair to hold the seat belt in place. Make sure the
screws are tightened.
• Adjust the seat belt to the desired length using the black buckle that holds
the adjustment strap in place.
• Place the monitor out of the reach of the resident. Suitable mounting
location is the back of the wheelchair, so that the resident cannot tamper
with the monitor.
TEST THE SYSTEM
•
active. The alert will sound whenever the seat belt is unbuckled.
• When the system is activated, press the“Reset”button on front of the
moni
reset setting to silent the alert.
tor to silence the alert, or use caregiver key, depending on your
Bed Sensor Pads
BED PAD PLACEMENT
• Place the pad under the resident’s shoulders to be
alerted when the resident sits up in the bed.
• Place the pad under the resident’s lower back/buttocks to
be alerted when the resident vacates the bed.
• Place the monitor out of reach of the resident. Suitable
mounting locations include: the back of headboard, the wall
or under the bed. Make sure the resident cannot tamper with
the monitor.
TEST THE SYSTEM
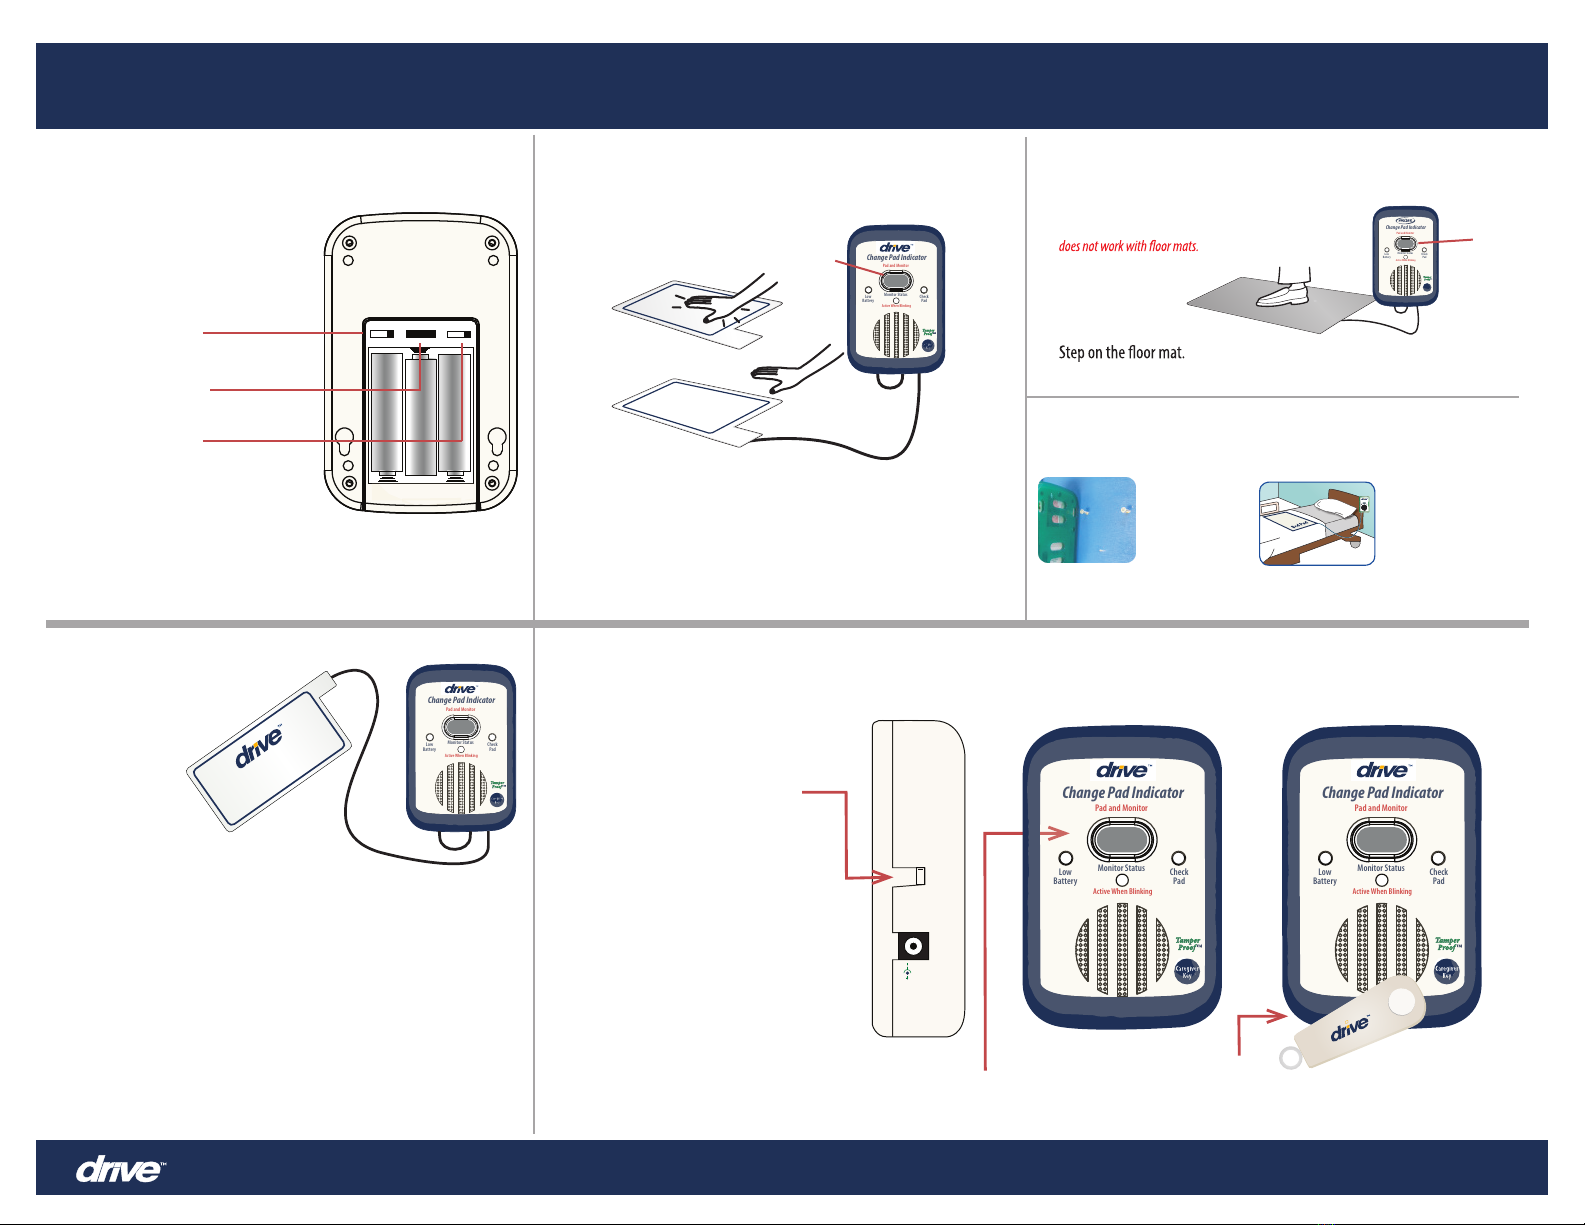
• Plug the pad into the monitor and apply pressure
to the pad to activate the system.The monitor will beep
twice when active.
• The alert will sound when pressure is released
from the pad. Press the “Reset”button on the front of the
moni
your reset setting to silent the alert.
tor to silence the alert, or use caregiver key, depending on
Chair Sensor Pads
WHEELCHAIR/CHAIR PAD PLACEMENT
• Center the pad on the chair seat.
• Place the monitor out of reach of the resident. Suitable mounting locations
include: the back or handle of the wheelchair. Make sure the resident
cannot tamper with the monitor.
TEST THE SYSTEM
• Plug the pad into the monitor and apply pressure to the pad to activate
the system. The monitor will beep twice when active.
• The alert will sound when pressure is released from the pad.
P
or use caregiver key, depending on your reset setting to silent the alert.
ress the“Reset”button on front of the monitor to silence the alert,
Floor Mats
FLOOR MAT PLACEMENT
• Place the Floor Mat in the desired location such as a critical doorway or
next to a bed.
• Place the monitor out of the reach of the resident.
TEST THE SYSTEM
•
The system will sound any time weight is on the Floor Mat.
• When the system is activated, press the“Reset”button on front of the
moni
setting to silent the alert.
tor to silence the alert, or use caregiver key, depending on your reset
Drive Medical Design & Manufacturing
99 Seaview Boulevard, Port Washington, NY 11050
www.drivemedical.com
Need Set-up Help? (866) 621-4933
CAUTION: This Change Pad Indicator Fall Monitor will indicate when a sensor pad’s warranty has expired only when used with Drive
Change Pad Indicator™ Timed Sensor Pads. Standard sensor pads will function normally with this monitor, but the Change Pad Indicator feature will
be disabled. Call 866-621-4933 for more information.
WARNING: Failure to comply with the warning may result in injury or death.This device is not suitable for all individuals. Other devices may be
required. This device is not a substitute for visual monitoring by a caregiver. The manufacturer does not claim that this device will stop elopement
and/or stop falls.This device is designed to augment caregivers’comprehensive resident mobility management program.Test this device before each
use. Read the instructions and Legal Disclaimer.
The Drive FMG-100CP Monitor is designed to be installed by the end user. As such, it is the entire responsibility of the buyer to insure that the system
is properly installed and tested. Further, the system isnot designed to replace good caregiving practices including, but not limited to:
A.) Direct patient supervision
fall prevention and elopement
C.) Testing of the system before each use
WHERE PERMISSIBLE, IT IS THE SELLER’S INTENT TO LIMIT ANY LIABILITY FOR SPECIAL, CONSEQUENTIAL OR INCIDENTAL ECONOMIC DAMAGESTO
REFUND OF THE PURCHASE PRICE OR REPLACEMENT OFTHE GOODS. SELLER DISCLAIMS ANY LIABILITY FOR COMPENSATORY OR OTHER DAMAGES
ARISING OUT OF THE USE OF THE GOODS.
WARNING: The manufacturer does not claim that this device will stop elopement and/or stop falls.This device is designed to augment caregivers’
comprehensive resident mobility management program.This product is to be used by a licensed caregiver only.
Limited Warranty: Seller warrants that the goods sold will be free from defects of workmanship and manufacturing, for a period of one year from
the date of sale. Other than this limited warranty, seller makes no express or implied warranties. Except for this limited warranty, NO EXPRESS OR
IMPLIED WARRANTIES ARE GIVEN AND NO AFFIRMATION OF SELLER, BY WORDS OR ACTION, WILL CONSTITUTE A WARRANTY. THE GOODS BEING
PURCHASED ARE BEING SOLD ON A“WITH ALL FAULTS”BASIS. THE ENTIRE RISK AS TO THE QUALITY AND PERFORMANCE OF THE GOODS IS WITH THE
BUYER. SHOULD THE GOODS PROVE DEFECTIVE FOLLOWING THEIR PURCHASE, THE BUYER, AND NOT THE MANUFACTURER, DISTRIBUTOR OR RETAILER,
ASSUMES THE ENTIRE COST OF ALL NECESSARY INSTALLATION, SERVICING OR REPAIRS.
Installation and Use Instructions
TECHNOLOGY PATENTED AND
PATENT PENDING
• Automatically tells caregivers when
to replace expired sensor pads
• Adjustable volume control
FMG-100CP
Change Pad Indicator™
Fall Monitor
PATENTED TECHNOLOGY
with included Caregiver KeyTM
FMG-100CP Rev.1