DSPPA DW2235 User manual

DW2235
User Manual
6.5” FIBER GLASS IN-CEILING
WIRELESS SPEAKERS

www.arylic.com
Wireless Spotify AirPlay Multi-Room Internet Radio

Table of Contents
1. Introduction......................................................................................................................................................................1
2. What's in the Box.............................................................................................................................................................1
3. Main Features .................................................................................................................................................................2
4. Specication ....................................................................................................................................................................3
5. Interface...........................................................................................................................................................................4
6. Installation .......................................................................................................................................................................5
7. How to Use......................................................................................................................................................................6
7.1 App Download ..........................................................................................................................................................6
7.2 Connection ...............................................................................................................................................................7
7.2.1 Option 1 - Connection via App.........................................................................................................................7
7.2.2 Option 2 - Connection via LAN .......................................................................................................................8
7.2.3 Option 3 - Bluetooth pair .................................................................................................................................8
7.3 App features ..............................................................................................................................................................9
7.3.1 Device Setting ..................................................................................................................................................9
7.3.2 To Play Local Storage Music ............................................................................................................................9
7.3.3 To Play Music From NAS................................................................................................................................10
7.3.4 To Play Line in Mode .....................................................................................................................................10
7.3.5 To Play Bluetooth Mode..................................................................................................................................10
7.4 Streaming Services ................................................................................................................................................. 11
7.4.1 Spotify.............................................................................................................................................................11
7.4.2 AirPlay ............................................................................................................................................................12
7.4.3 Qplay ..............................................................................................................................................................13
7.5 Multiroom and Multizone .........................................................................................................................................13
7.5.1 Add / Remove Device to Multiroom ................................................................................................................14
7.6 Left and right channel..............................................................................................................................................15
7.7 Preset ......................................................................................................................................................................15
7.8 Source mode change .............................................................................................................................................15
7.9 Restore factory setting.............................................................................................................................................16
7.10 Firmware Update...................................................................................................................................................16
8. Play on PC.....................................................................................................................................................................17
8.1 To Play Music from iTunes on Mac and Windows PC .............................................................................................17
8.2 To Play Music from Windows PC via Foobar2000...................................................................................................17
FAQ ...................................................................................................................................................................................19

1
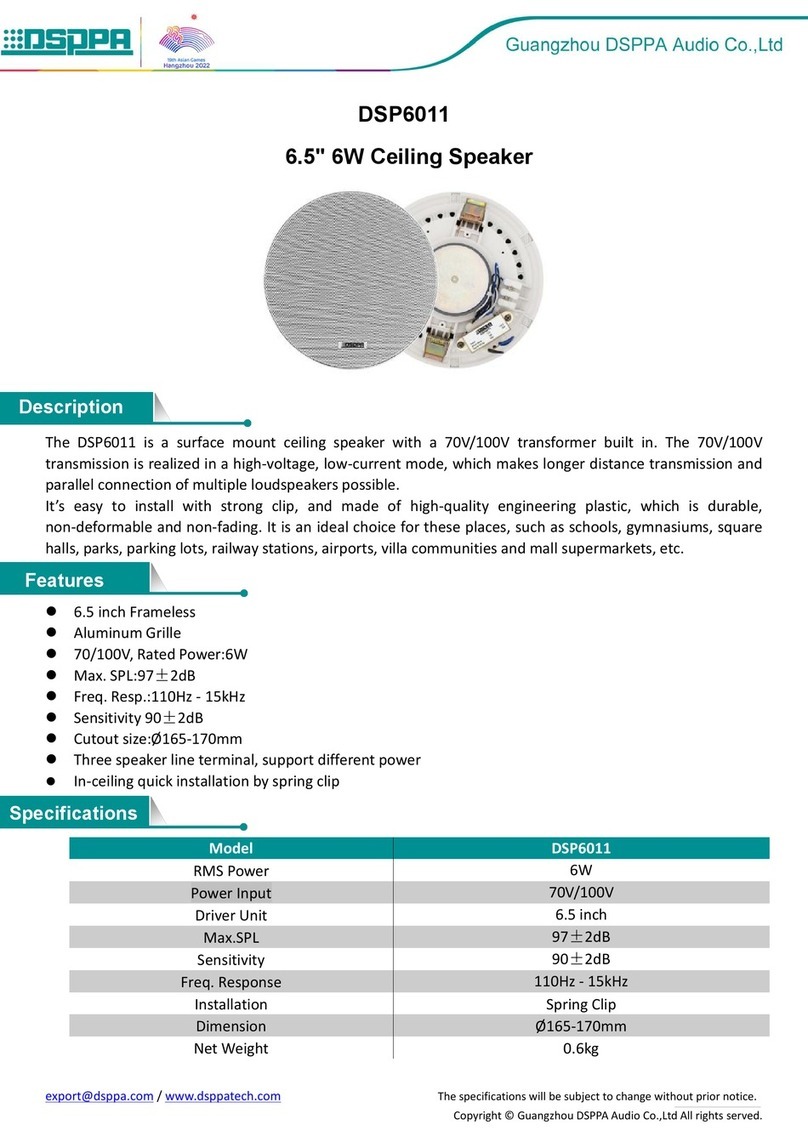
DW2235 is a 2-way 6.5” ceiling speaker with 35W WiFi and Bluetooth amplier built-in. You can stream
music from your smart device, NAS or streaming services such as Spotify, Tidal, Deezer, Qobuz, Amazon
Music and others by 4Stream APP, Airplay, Bluetooth or other DLNA apps. By adding multiple DW2235 to
your network you can setup a wireless multiroom whole house audio system, it will give you totally new and
great experience to play and enjoy your music.
Master speaker in stereo set and mono:
Master Speaker x1
Slave Speaker x1
Power Adapter x1
Phoenix connector x1
User Manual x1 Screw Driver x1 Phoenix connector x1
Slave speaker in stereo set:
1. Introduction
2. What's in the Box

2
3. Main Features
●6.5” Kevlar bass cone driver rubber overhang.
●1” aluminum dome driver EOS waveguide design.
● 35W LF @4ohm, 15W HF@8ohm full digital amplier.
●Can hook up a slave speaker to become stereo speakers.
●Streaming music via network without distance limitation or Bluetooth 5.0 up to 15 meters.
●Spotify connect, Airplay, Qplay, DLNA, UPnP streaming protocols supported.
●Support streaming source from online services, smart device, NAS, Bluetooth and Line in.
●Multiroom streaming enabled by multiple units connected in same network.
●All music sources can be restreamed in sync to other models from us.
●Spotify, Deezer, Tidal, Qobuz, Amazon Music, Napster, Pandor, Internet Radio, iHeartRadio, TuneIn,
QQMusic, lots of online streaming services integrated to use in the app.
●Free iOS and Android app available.
●Free global online update for new features.
●EQ adjustment via app or remote controller.

3
4. Specication
Master Speaker (Stereo set / Mono)
Connections
Power Supply 24V/4.16A
Audio Input AUX (3.5mm) Max 1V RMS input
Bluetooth 5.0 AAC FLAC
Audio Output Speaker out
Network WiFi 2.4G
LAN RJ45
Stereo / Mono Switch
Switch Stereo / Mono Output:
Stereo: Master speaker output Right channel,
Slave speaker output Left channel
Mono: Left + Right Channel for both speakers
Mode Button Change Source Mode: WiFi / BT / AUX in
Speaker
Bass 6.5 inch kevlar bass cone driver rubber overhang
Tweeter 1 inch aluminum dome driver EOS waveguide design
Sensitivity Bass: 86±3dB
Size 23cmx10.5cm (deep)
Amplier
Slave Speaker (Stereo set only)
Connections
Audio Input Speaker Out
Speaker
Bass 6.5 inch kevlar bass cone driver rubber overhang
Tweeter 1 inch aluminum dome driver EOS waveguide design
Sensitivity Bass: 86±3dB
Size 23cmx10.5cm (deep)

4
5. Interface
Master Speaker (Stereo set / Mono):
Slave Speaker (Stereo set):
1. Aux in: Connection to external audio source
2. Mode button: Short press to switch input source
Short press twice to reset WiFi/BT connection
Short press three times to do factory reset
Long press to turn o the device, press again to turn on
3. Stereo/Mono Switch: Switch between stereo or mono mode, if you connect the slave speaker, switch to stereo mode
4. DC in: For connection of power adaptor
5. Speaker connection: Phoenix speaker connector to connect slave speaker
6. LAN: Lan port for ethernet connection
1. Speaker connection: phoenix speaker
connector to connect master speaker
AUX in
1
5
1
6
2 3 4
Mode
Stereo/Mono 24V DC IN

5
6. Installation
Tools needed for installation
Quick installation guide
STEP 1 STEP 2
Speaker wire
●Pencil
●Drill
●Tape Measure
●Where is the best place to install the speakers
●Where do the speakers sound the best?
●Try to separate the speakers 6- 10 feet apart.
●When placing the speakers in the ceiling, try to install
themso that the fxed 150 angle woofer is pointed towards
the main listening area. (For LCR model only)
●Ifyou intend to paint the gills, try to do so before
installation.
Trace along the inclusive template. Cut along the
traced line using a drywall saw or rotary drill. A simple,
inexpensive drywall saw (about $10 at your local hardware
store) is the best choice for beginners. Caution: This is the
most important part ofthe entire installation. If you are not
certain whether any obstructions exist behind the desired
mounting area, you should start by cutting a small hole in
the center of your penciled mounting hole with a drywall
saw. Use a piece of sandpaper to sand down the cut out
edge for a smoother contour. (See Diagram 1 and Diagram 2)
Run the cable into the cut out location while leaving an
extra two feet to make the connection to the speaker
easier. Strip back approximately /2 inch of the speaker
cable insulation and twist the copper wires tightly for easy
insertion. On the back of the speaker, press down on
the gold-plated compression terminal to reveal the "eye"
and insert the speaker cable through the eye for secure
connection. Release the compres-sion terminal to lock
each cable securely.
Diagram 1:
Cutout tracing
Diagram 2:
Cut Out
To determine the length and the gauge of speaker wire,
you will need to - Measure the distance from the receiver/
amplier to the speakers.
● Measure the distance from the receiver/amplier to the
speakers.
●Always buy more than you think you would need.
●Equal wire lengths should always be used to maintain an
equal balance in sound volume.
●Sound quality is lost when using thin wire gauge over a
long distance.
18AWG minimum - for distances up to ........................ 10 ft
16AWG - from ...................................................... 10 to 50ft
14AWG - from .................................................... 50 to 100ft
●Wire cutter
●Philips-head
screwdriver
●Sandpaper
●Utility knife
●Safety eyewear
●Gloves

6
Download the 4 Stream application from App Store for iOS based devices and Google Play Store for Android based
devices.
The application supports English, Spanish, French, German, Italian, Portugese, Korean, Simplied Chinese, Traditional
Chinese and Japanese
4STREAM
7.1 APP Download
7. How to Use
STEP 3 STEP 4
Your in-ceiling speakers come from the factory with the tweeter
facing straight out from the bae. This will result in the overall
smoothest response. However, you can adjust the tweeter to
focus the sound at your listening location. In order to do this,
gently press on the grill (See Diagram 3). Caution: Do not touch
the tweeter dome while adjusting for your hearing preference.
(See Diagram 3)
Tighten the dog-ear brackets by simply turning the
screws on the speaker's front bae. Use a Phillips head
screwdriver to turn the screws slowly clockwise. The quick-
turn mounting system and frame will "sandwich" or clamp
around the wall to hold the speaker securely in place. (See
Diagram 4)
Diagram 3:
Adjust the tweeter here
Diagram 4:
Mounting Dog Ear
Tweeter Dog Ear
Closed
Closed
Loose
Loose

7
7.2 Connection
7.2.1 First time usage & BLE WiFi Setup
There is another way to setup Wi if the above
method has failed:
1) Hold the Mode button then plug in the power cable.
2) The LED light will start ashing, release the button and
wait till the LED ash slowly.
3) Make sure your mobile has connected to your home
network using 2.4G and your GPS and Bluetooth is on.
4) Open 4Stream APP, for Android device, the system will
ask for permission to use GPS data & File storage, please
click accept to continue.
This GPS permission is setup by Google for BLE usage,
once setup is nish you can go to system settings and
disable it, le storage permission is to let 4Stream access
your mp3 les store in your mobile.
5) 4Stream APP will list out all the device available for
setup, choose the one you want.
6) 4 Stream APP will then ask you to choose the network
you want the device to connect to, choose the one you
want to connect.
7) Now enter password for your network, if this is not the
network you want the device to connect, you can change it
to the desire one.
8) Once connection is nished, it will automatically check
for new updates.
9) Then you can change the name of the device. You can
select a preset one or enter your own.
10) After you dene the name of the device, you will see it
appears in the device list in 4stream app and now you can
start streaming music.
* If you change to another router, or the password of the connected
router has been changed, please long press POWER button for 5
secs in WiFi mode to reset the connection.
* Hold Mode button then plug in the power can force the device to
enter WiFi mode. If you have setup router connection before, the
device will auto connect to that router.
1. Hold the Mode button then plug in the power cable.
2. The LED light will start ashing, release the button and
wait till the LED ash slowly.
3. Goto your mobile WiFi settings and search for
SoundSystem_xxxx WiFi and connect.
4. Open 4Stream APP and you should see the
SoundSystem_xxxx list in the device list.
*Your mobile might ask if you want to stay using this WiFi
connection, click yes.
6. Click on the “+” icon on the top right corner to add
device. The app will prompt you to select the router
SSID you want your Up2stream device connect to (enter
password if required) and select continue.
7. Once connected, you can change the name of the
device. You can select a preset one or enter your own.
8. After you dene the name of the device, you will see it
appears in the device list in 4stream app and now you can
start streaming music.
* Attention for Android users Dierent brand
mobile phones may ask you to allow to use
SoundSystem WiFi network, please choose yes, if
not, you may not able to set up successfully.
It may also ask you to authorize other things, please
choose yes or it may aect your use.
8
7.2.2 Connection via LAN
7.2.3 Bluethooth
Plug in the wired cable to the RJ45 Ethernet, the device will show on the app in about 10 seconds.
(Note: The mobile phone and the device must be in the same network)
To use Bluetooth, please swtich to bluetooth via app or by remote controller, then nd bluetooth device SoundSystem_
XXXX from your phone bluetooth setting and pair it .

9
Rename: Change the device name.
Speaker info: Display device information like IP address, Mac address, SSID, rmware version, factory reset, etc.
Alarm Clock: Setup up to 4 dierent alarm clocks with music of your choice.
Preset Content: 10 Preset content buttons.
Sleep Timer: Countdown to turn o the device.
7.3 App Features
7.3.1 Device setting
7.3.2 To play local storage music
Click the “My Music” on the Application and choose the Music ready there.
NOTES: The iOS based devices have blocked the access to iTunes library.

10
7.3.3 To Play Music From NAS
7.3.5 To Play Bluetooth Mode
7.3.4 To Play Line in Mode
Please note that our system only support NAS with DLNA feature.
Connect the AUX cables to the TV or other audio sources.
Choose line in mode on the application or remote control.
Choose the Bluetooth mode on the application or remote control,
the LED will change to blue.
Open the Bluetooth on your mobile device.
Pair the device Bluetooth (SoundSystem) and play.

11
To use the online streaming services, iHeartRadio, Spotify, Tidal, Qobuz and Deezer may need to register account at the
service provider platform.
To use Spotify, you have to own spotify premium account.
You will nd the device in the device list on the Spotify application and choose the device you want to play.
NOTE: one Spotify account can only streaming to one device at a time.
7.4 Streaming Services
7.4.1 Spotify

12
The Device Supports AirPlay1, You can Choose the AirPlay and Play Music.
7.4.2 AirPlay

13
Our Devices Support QQ Music using the Qplay protocol, you have to turn on the Qplay in the QQ Music player setting
and then nd the device in the Qplay list.
7.4.3 Qplay
Users can group multiple rooms and zones on the application. For example, you can group devices 1, 2 and 3 to play the
same music in sync, or group devices 1 and 2 as zone A and devices 3 and 4 as zone B, and play dierent music in zones
A and B.
1Master
Slave
2
3
7.5 Multiroom and Multizone

14
In order to add device to multiroom function, click on the “+” mark of the device you want to be the master device.
A list of available devices will pop out and you can select the device you want to add as slave device. Click the Done
button when nished.
The gray tick icon represents the master device and green tick icon represent the slave device.
To remove device from multiroom function, click on the “+” mark again to bring up the device list, and unselect any slave
device you want to remove. Then click on the Done button to conrm.
If all the slave device is removed, multiroom function will disable.
7.5.1 Add / Remove Device to Multiroom

15
Method 1: Change on Application
Users can change play mode on the application, WiFi, Bluetooth, Line input. To change from Bluetooth/line input to WiFi,
only need choose the online streaming services such as Tidal, Qobuz or Spotify or cell phone local storage music or any
music via DLNA or UPnP streaming.
Method 2: Press the Mode Button
User can press the mode button once to switch source mode, WiFi, Bluetooth, Line input, USB.
There are 6 buttons on the remote control, users can preset play lists (Only the lists with speaker icon can preset) on
the application from 1~6 for example, then when you press button 1 on the remote, the preset list 1 will play.
(Users can Preset 10 Playlists on the Application, but the remote control can only save from 1-6).
Users can choose the right channel or left channel or stereo mode on the application, or choose left channel on device A
and choose right channel on device B, and group them together and play in sync to make stereo.
7.6 Left and Right Channel
7.7 Preset
7.8 Source mode Change

16
The application will notify you in app when there is a new reware version available. It's recommended to update reware
whenever available as this might not only correct bugs or improve security,but also can add new features or services.
Two methods to restore device to factory setting
Method 1: Quickly press the Mode button 3 times to restore factory settings.
Method 2: Go for "App setting - speaker info - restore factory setting"
7.9 Restore Factory Setting
7.10 Firmware Update

17
Our devices can stream audio sources from local storage, media library in Mac and Windows PC and online services from
iTunes. Users can easily play and switch music, control volume and choose the audio devices to group and upgroup the
audio devices.
Our Devices Support UPnP Protocol, With the Popular Foobar2000, You can Play Music from Windows PC to Our Devices.
Please follow the steps below:
1. Download the Foobar2000 and install it.
2. Refer to the doc how to add UPnP component at our website download column.
3. Refer the link below how to add UPnP Component http://wiki.hydrogenaud.io/index.php?title=Foobar2000:How_to_
install_a_component
4. Restart the Foobar2000, Then Check: Library> congure> output> device, you will see the PLAYER in device option
column.
5. Choose the Device to Play the Music.
There are Several Tools to Play Music from the PC
8.1 To Play Music From iTunes on Mac and Windows PC
8.2 To Play Music From Windows PC via Foobar2000
8. Play on PC
Table of contents
Other DSPPA Speakers manuals

DSPPA
DSPPA MAG6368 User manual

DSPPA
DSPPA MAG6364M User manual

DSPPA
DSPPA DSP406 User manual

DSPPA
DSPPA DSP406II User manual

DSPPA
DSPPA DSP168HD User manual

DSPPA
DSPPA DSP9901 User manual

DSPPA
DSPPA DSP154H User manual

DSPPA
DSPPA PoE6311 User manual

DSPPA
DSPPA MAG6463 User manual

DSPPA
DSPPA POE6463B User manual

DSPPA
DSPPA MAG6182II User manual

DSPPA
DSPPA FP-808 User manual

DSPPA
DSPPA IP Speaker User manual

DSPPA
DSPPA DSP8063B User manual

DSPPA
DSPPA Public Address Series User manual

DSPPA
DSPPA DSP8062 User manual

DSPPA
DSPPA DSP2612B User manual

DSPPA
DSPPA DSP406 User manual

DSPPA
DSPPA MP30W User manual

DSPPA
DSPPA DSP118 User manual