Dudek Techno User manual

Light harness with a pod
User’s manual
Please read this manual carefully before your first flight.

Congratulations!
Thank you for choosing the Techno harness. We ha e done our best to present you with a highest quality product,
fulfilling all safety requirements and offering maximum functionality. Please read this manual carefully before using the
harness for the first time. This will help you utilize all features of the Disco, thus maximizing comfort and fun factor of
each flight. We wish you a lot of safe and enjoyable airtime!
Contents
1. Safety 2
2. Description 2
3. Speedbar 3
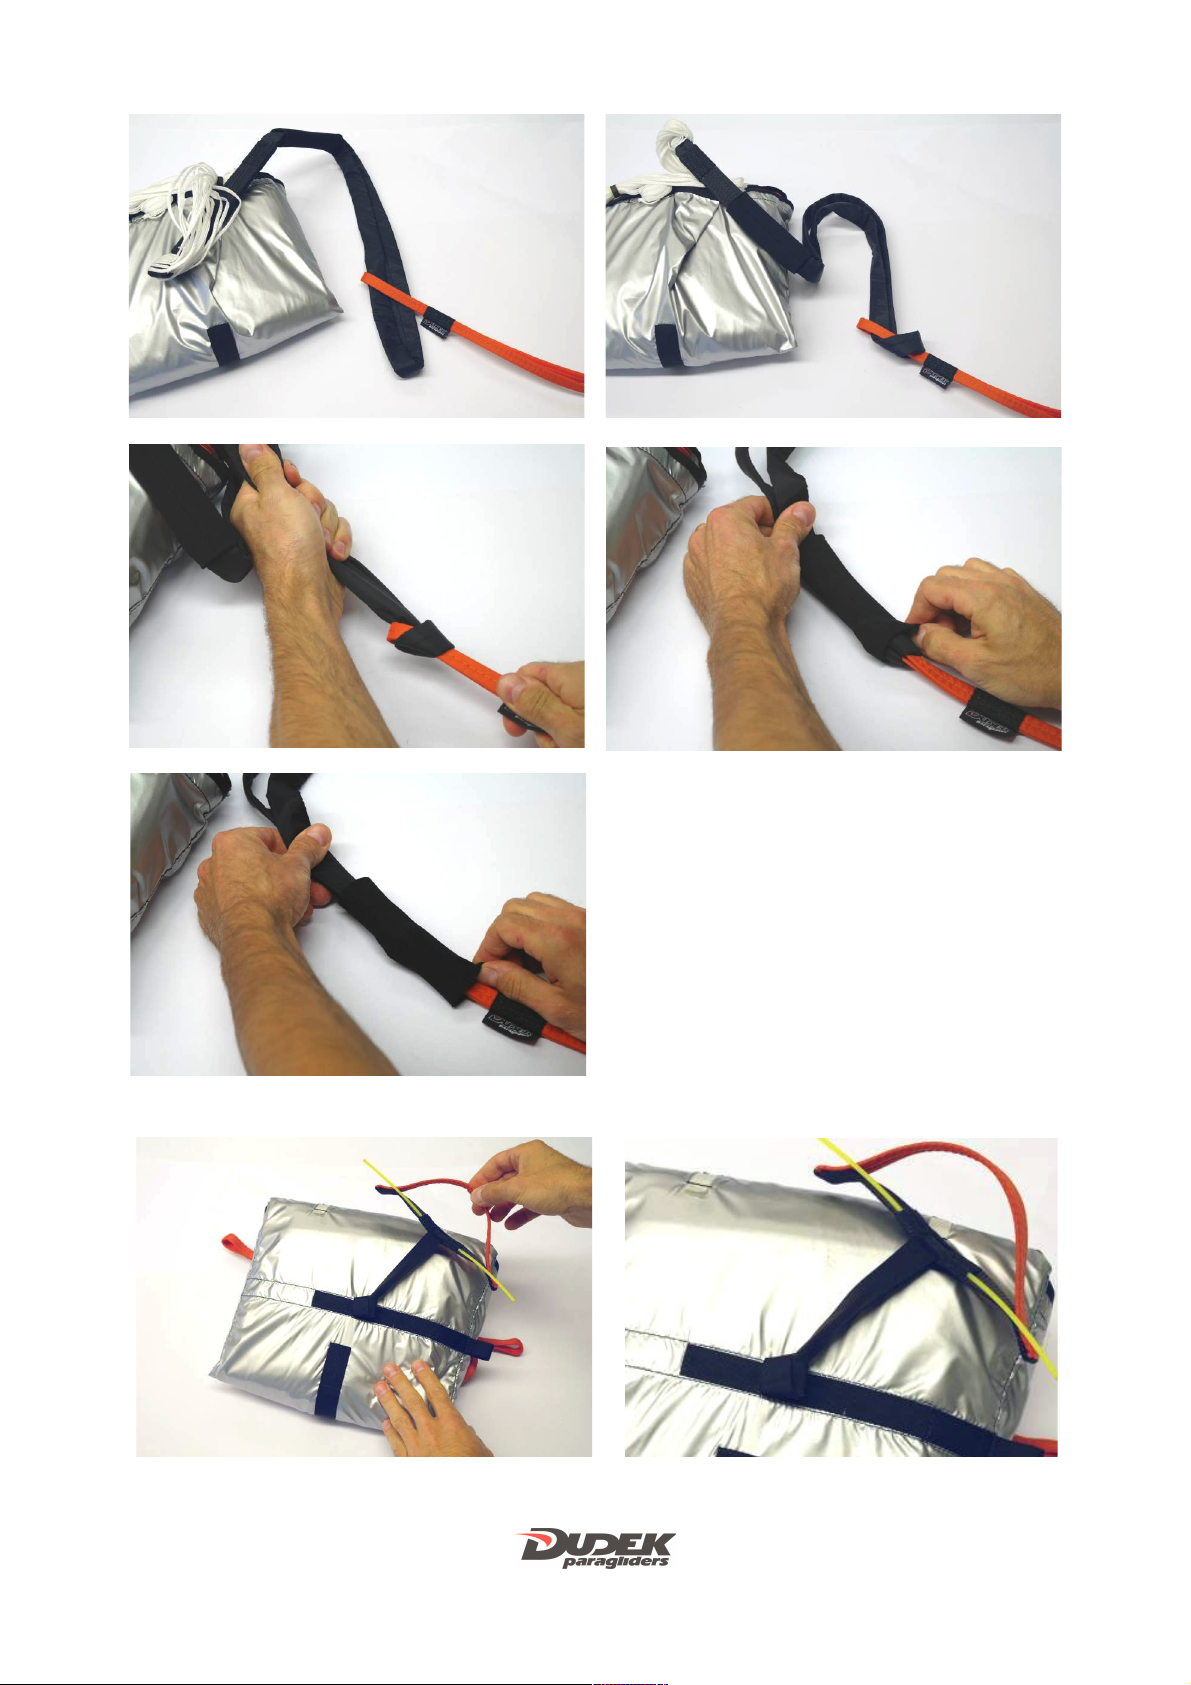
4. Rescue chute installation 3
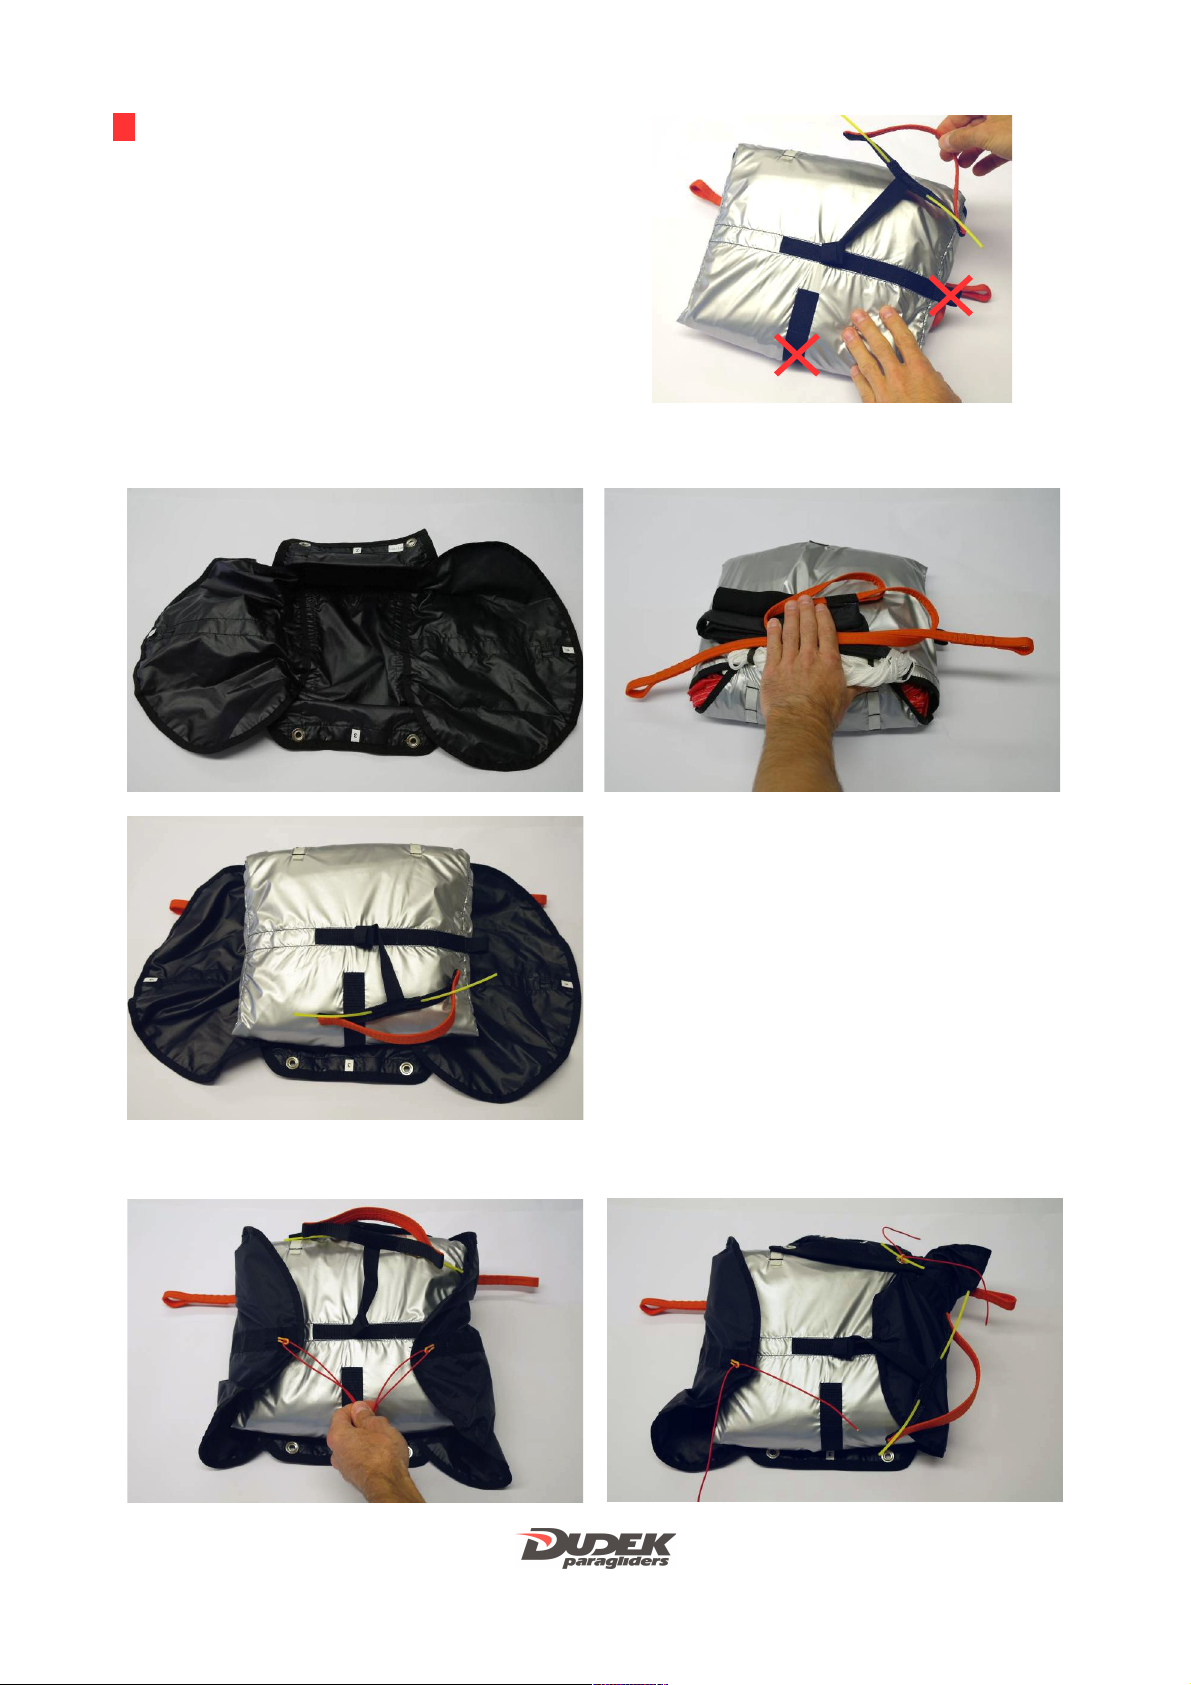
5. Frontcontainer installation 8
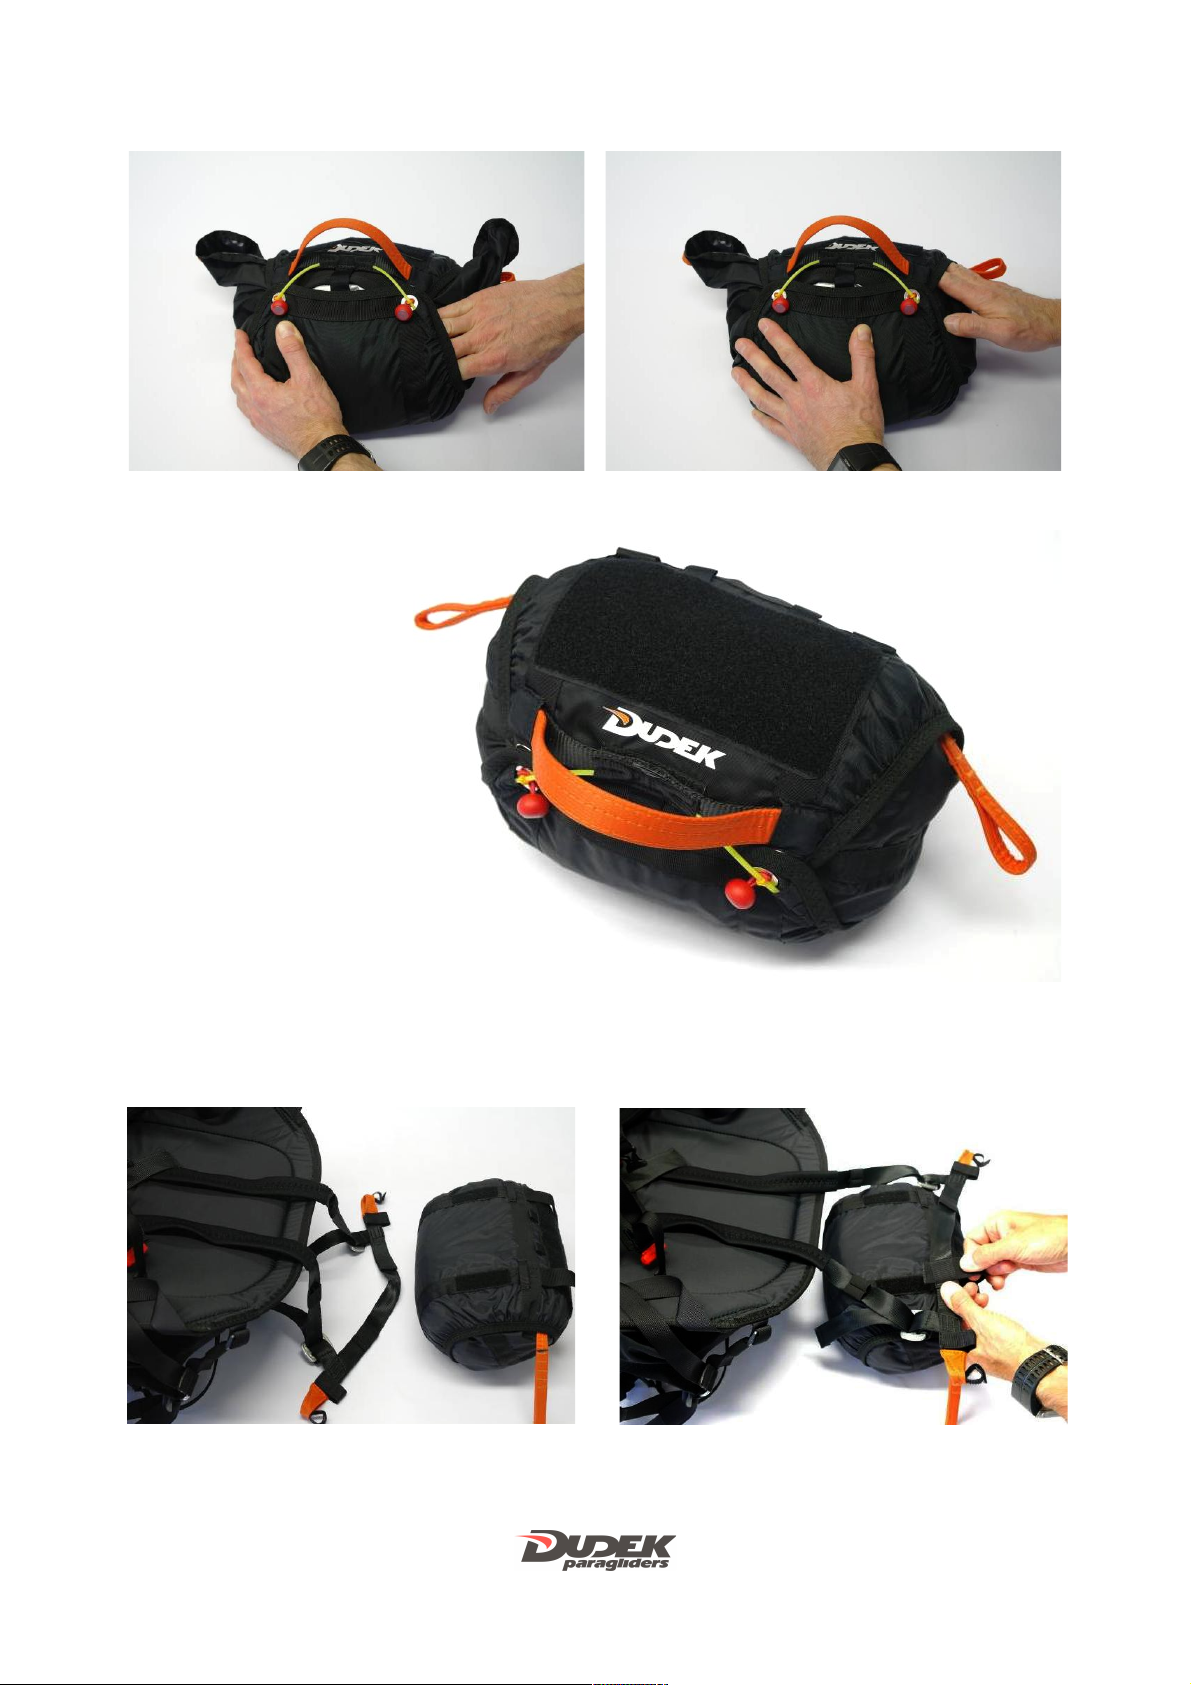
6. The pod 11
7. Harness/paraglider connection 13
8. Harness/tow connection 13
9. Straps adjustment 13
10. Pockets 15
11. impact pad 16
12. Before flight 16
13. Rescue chute installation 16
14. Landing 16
15. Waterlanding 16
16. Tandem flying 17
17. Cleaning and storage 17
18. Operation and repairs 17
19. Technical data 17
1. Safety
Paragliding is a potentially dangerous sport. When flying a paraglider you ha e to accept risks of injury and/or e en
death. Incompetent or improper use of the harness may add to those risks. In case of any doubts please ask your
dealer or manufacturer.
Dudek Paragliders do not bear any responsibility for damages or injuries resulting from paragliding
activities.
2. Description
Techno is a light harness with a pod. Due to light and durable materials of best quality it weighs just 3,5 kg in M size.
It is a perfect proposition for cross-country and bi ouac pilots. Small weight and dimensions make long treks on foot
easier. Reduced, elastic seat plate used in Techno harness is an intermediate solution between a "hammock" and
traditional, rigid seat plate harnesses. Comfortable back support and new, ergonomic seating present you with
maximum snugness during long flight hours. Large adjustment range make sure e ery single pilot will be able to find
his optimum. Redesigned strap scheme brings great stability and significantly reduces danger of launching with
unclipped leg/chest straps. Certified, 15 cm thick airfoam impact pad offers ery good protection of the pilot's spine.
The pod Integrated rescue chute container is located on the back, behind the impact pad. Release handle is fixed in
easily accessible area on the right side of the harness. There is an additional cache under seat plate. The Disco
features features easily replaceable, ball-bearing Duroll pulleys in order to impro e the speedsystem operation. The
Disco is capable of flying with a footrest, a ailable as option. Its four-point adjustment of its length allows for any
footrest inclination as well. The rescue chute is located in a frontcontainer. When the rescue chute is acti ated, the
pod opens automatically too. There is a ballast pocket under the seat plate. The harness features easily replaceable,
ball-bearing Duroll pulleys for better speedsystem operation.

3. Speedbar
Speedbar lines must be led through the pulleys (under the seatplate and on the back support). Then put it through the
slits in the pod and fix a stoper, accompanied by speedsystem clip. Connect the speedbar to the footrest with a rubber
band. Find the best length of the rubber, so that speedbar will be easily accessible in flight. In order to adjust the
whole system you ha e to sit in the harness while it is hanged by the paraglider’s risers. At full speedbar the pulleys
on the risers should touch. When necessary, adjust the lines later according to your experience in flight.
!
Do not adjust the speedsystem lines while in flight.
Speedsystem lines
Speedbar
Rubber connecting speedbar with
the footrest
4. Rescue chute installation
The Techno harness has a frontcontainer to hold the rescue chute.
It is fixed to the chest strap with a central, well- isible release handle.
Short -strap is integrated with the chest-strap and together clipped into
the main carabiners.
Connect the -strap to the rescue chute riser. Tighten up the connection and co er it with a neoprene part attached to
the frontcontainer.
! !
If the rescue chute riser is finished with a big loop, make sure that the connection is placed exactly in the
middle of the loop. fter tightening the loop must be evenly loaded, and the connection place must not
move.

1 2
3 4
5
Fix the container release handle to a loop in the middle of the rescue chute bag.

!
Do not fix the release handle to the loops
on the sides of the bag.
Put the rescue chute in the container.
1 2
3
Partially close the container (flaps #1 and #2) using the auxiliary lines and pins.
1 2

3
Fix the release handle, put in place the #3 flap and close the container with release handle pins (replacing the
auxiliaries). Put the ends of the pins into caches on the #3 flap.
1 2
3 4
5 6

Remo e the assist lines (put them under the pins first, so that container loops will not be damaged by friction).
1 2
Place the ends of the release handle in dedicated caches on the #2 flap.
1 2
3

Push the remaining parts if the #1 flap inside.
1 2
5. Frontcontainer installation
The frontcontainer is installed on the breast strap. It is fixed in two points only, as shown below.
1 2
1 2

3 4
4
5 6
6
7
After fixing the frontcontainer connect both ends of the -strap to the ends of the breast strap.
1 2

3 4
5
! !
If you are installing the rescue chute for the first time, it is necessary to run a test opening, to make sure the
container was correctly closed and to get familiar with required release force. In order to do that hang the harness, sit
in it, grab the release handle and pull it igorously away from the frontcontainer. When running this exercise it is not
recommended to throw the rescue away, as it will result in opening the canopy bag. Pack the chute into the
frontcontainer again.
The rescue chute must be periodically aired and repacked according to its manual. Recommended equipment for the
Techno harness are the Globe 120 or Globe 90 rescue chute, manufactured by Dudek Paragliders. Installation of
many other parachutes (including steered reser es) is possible, as long as they fit in the container.
! !
To avoid accidental opening of the rescue system, pins closing the container must be checked before each
flight!
The frontcontainer has a Velcro strap on its top to hold the instruments. If the instruments are placed at an
uncon enient angle, you can use an additional instrument panel (included). The panel has an elastic cache on the
underside (you can place e.g. auxiliary powerpack in it) and another pouch for a safety knife on the front.

6. The pod
The pod impro es aerodynamics of the harness and protects the pilot against cold. There is and adjustable
(length/angle) footrest and a speedbar within the pod. The pod is integrated with the harness and is not remo able.
The front of the pod automatically inflates after launch and can be easily
deflated when needed (e.g. for packing).

Adjustment of the pod’s length and the footrest angle is shown below.
The pod is closed in two places.

Pulling the release handle simultaneously opens both the frontcontainer and the pod. In this case the balls closing the
pod can get lost, so it’s worthwhile to carry the additional set along (it’s in the pod’s equipment). It can be also
purchased
7. Harness/paraglider connection
Techno harness is equipped with aluminium carabiners Dudek of 20 kN strength. Use them to connect the harness to
the risers. Another thing to connect before launch is the speedsystem of the harness with the speedsystem of the
risers. It is recommended to replace the main carabiners with new ones each 300 hrs airtime.
! !
Before launch check if the carabiners are closed and locked against accidental opening.
8. Harness/tow connection
The only safe way of attaching the tow line is a dedicated tow release. The Techno does not feature any additional
points to fix the tow release, therefore it is to be mounted directly on the harness’ carabiners or the canopy risers.
9. Straps adjustment
! !
Before adjusting the straps please install rescue chute and fill the back pocket as for normal flight. Watch
out for symmetry – left and right side should be adjusted the same. First, test flight should be done in
easy weather conditions, with necessary corrections to be applied afterwards.
Do not adjust the speedsystem lines in flight.
9.1 Shoulder straps
Thanks to adjustable shoulder straps the harness can accommodate pilots of almost any height. The straps should
stay on your shoulders rather tight, with just a little play. Too short straps will make difficult comfortable seating after
launch and can limit your mo ements in flight. A clip on the shoulder traps will make sure they stay in place during
launch and flight. Additionally, there is an alarm whistle fixed to the clip.
Buckles for adjusting
shoulder straps

9.2 Side straps
They determine the seat/backrest angle. Initial adjustment should be done before the first flight, with the harness
hanged from a ceiling. All settings are to be erified during first flight and can be further modified at any time. Bear in
mind that when the backrest is reclined too much, there is increased risk of getting a twist in case of a big deflation.
9.3 Leg straps
The leg straps are the most important safeguard against falling out of the harness. Their adjustment must allow for
both easy launching and proper seating in the air. Too short straps can make you uncomfortable and restrain your
starting run. Too long straps can make seating into harness impossible without using your hands. In the Techno
harness both leg straps are connected to the chest strap, significantly reducing risk of launching without leg straps
closed. Their length affects stability of the harness in flight as well. For increased comfort both of the leg straps are
co ered with soft neoprene.
Buckles for adjusting the leg straps
! !
In order to avoid falling out of the harness it is imperative to check before each launch if the chest and
legs straps are closed. Not closing the straps is extremely dangerous and is a known reason of fatal
accidents !
9.4 Chest strap
Chest strap controls distance between the carabiners. In the Techno harness that distance is fixed at 43 cm. The
chest strap does not ha e neither length adjustment nor buckles. It is to be clipped directly into main carabiners.

10. Pockets
The Techno has a spacious back pocket and two little ones on the sides of the pod. The back pocket can easily hold the
paraglider’s backpack, camelback and much more. There are openings in the upper part of the pocket (on both sides)
to lead out the drink pipe, antennas etc. Side pockets can be easily reached in flight.
Under the seat plate you can find a waterballast pocket. It can be used for other purposes as well.
Ballast pocket under the seat plate

11. Impact pad
The Techno is equipped with a certified, 15 cm thjck airfoam impact pad. Fixing the impact pad in place is shown
below.
12. Before flight
Before each flight a thorough check of the harness is required. For your own safety make sure that:
- - the harness is not damaged in any way
- rescue chute container is correctly closed and locked with pins
- rescue chute release handle is correctly set up and has the right shape (quite often it happens to be malformed in
transport, so it’s important to check if it’s not flattened and easy to grab)
- all leg and chest straps are closed
- shoulder and side straps remain correctly adjusted
- all pockets are closed with their zips co ered
- main carabiners are closed, locked and without any damage
- the speedbar is clipped to the paraglide.
13. Using the rescue chute
The rescue chute should be used in case of emergency, when you can’t reco er the paraglider from dangerous flight
state in any other way. Throwing the chute while in a fast spin is risky. If there is still some altitude to spare, first you
should try to slow down the spin or stop it altogether.
To use the chute grab the release handle, with fast and resolute mo e rip it from its elcro and throw it together with
the canopy bag as far as possible, to the outside of the spiral (if present). After opening deflate your paraglider with
its rear risers. Prepare for landing in a parachute style, keeping your legs together with slightly bent knees.
14. Landing
While on the final approach, assume upright position and get your legs ready for landing. Touchdown when still sitting
is unacceptable and ery dangerous, as e en despite the impact pad there is high risk of spine injury. Land always on
your feet, with a few steps to bleed off the speed if necessary. impact pad is NOT a landing aid and was not designed
as such.
15. Waterlanding
Water landing is potentially ery dangerous, with imminent risk of drowning. If you can’t a oid the waterlanding,
when ca. 10m o er the release both the legs and chest straps. In the last moment get out of the harness to a oid
getting tangled in suspension lines or other gear. The harness does not sink, so you can later grab it and use as a
lifebuoy.
! !
Water landing while still seated in the harness is extremely dangerous. The impact pad does not sink and
will always float, forcing your head under water and rendering breathing very hard or impossible. There
is very high risk of getting tangled in lines and drowning.

16. Tandem flying
The Techno harness was not designed - and remains unsuitable - for tandem operations.
17. Cleaning and storage
All materials for the harness ha e been carefully selected, keeping their quality and durability in mind. Your care and
maintenance of the harness will keep in good condition for a long time.
The harness is best cleaned with a wet sponge, possibly a bit of soap.
Do not use any detergents nor sol ents. If there is a lot of mud, use the brush first before wet cleaning.
In case of completely soaked harness (e.g. after water landing) dry it in a well aired place, away from direct sun
operation.
Soaked back impact pad must be taken out of the harness and dried with opened zip. If this will be not enough,
remo e the airfoam and dry it separately.
Soaked rescue chute always has to be completely remo ed from the harness, dried and packed again by a licensed
person.
In case of a long-time storage keep the harness either in the backpack or loose, in a well entilated room, away from
the sun. Unfortunately some discoloration of the harness’ parts is una oidable o er time and this is yet another
reason for not exposing it to the sun more than necessary.
18. Operation and repairs
Periodic control of the harness condition will keep it in safe operation for a long time. After each hard landing check
the back impact pad too, as the seams or zip quite often get ripped when absorbing impact and damaged impact pad
will be ineffecti e. If you notice damage to its co er, send it back to the producer for a repair or buy a new one.
Correspondingly, after each use of rescue chute thoroughly check entire harness for damages, paying particular
attention to the straps and seams.
Aluminium carabiners should be replaced each 5 years or 300 hours airtime. Scratched or damaged carabiners are not
ser iceable anymore and ha e to be replaced at once.
!
Using damaged harness is out of the question. In case of any doubts please contact your dealer or manufacturer
and/or send it to an authorized workshop for closer inspection.
19. Technical data
Size Suspension Seatplate Max. pilot Harness
height widht* weight weight **
(cm) (cm) (kg) (kg)
S 41 7/31 100 3,35
M 4 7/33 100 3,50
L 43 8/34 100 3,65
XL 44 9/35 100 3,80
* Seat width front/back
** Wright incl. impact pad, carabiners and the speedbar
Rozmiar Wysokość Głębokość
Size Back support Seatplate
height lenght
A B
(cm) (cm) A
S 64 46
M 67 48
L 70 49
XL 74 51
B

Impact pad Airfoam, 15 cm thick
Carabiners Dudek 20 kN
Buckles Finsterwalder, AustriAlpin
Textiles 5012 Cordura Ripstop 160 g/m2
Delino a 100 200 g/m2
Delino a 75 130g/m2
Dominico 41 g/m2
Lycra 210 g/m2
Straps Polyester 1780 daN
Polyamide 1200 daN
i
Since Dudek Paragliders products are subject to constant impro ements, some minor differences are possible between
the manual and actual product. Dudek Paragliders withholds its rights to introduce such changes without indi idual
notice.
Other manuals for Techno
1
Table of contents
Other Dudek Safety Equipment manuals
Popular Safety Equipment manuals by other brands

TEUFELBERGER
TEUFELBERGER TUTOR 11 MM HST User instructions

TEKRASPORT
TEKRASPORT TekraPod user manual

Bartec
Bartec ER 100ims Operation manual

Sinotec
Sinotec SINOrama Ergo II instruction manual

TEUFELBERGER
TEUFELBERGER EXPERT Manufacturer's information and instructions for use

Falltech
Falltech 7443 User instruction manual