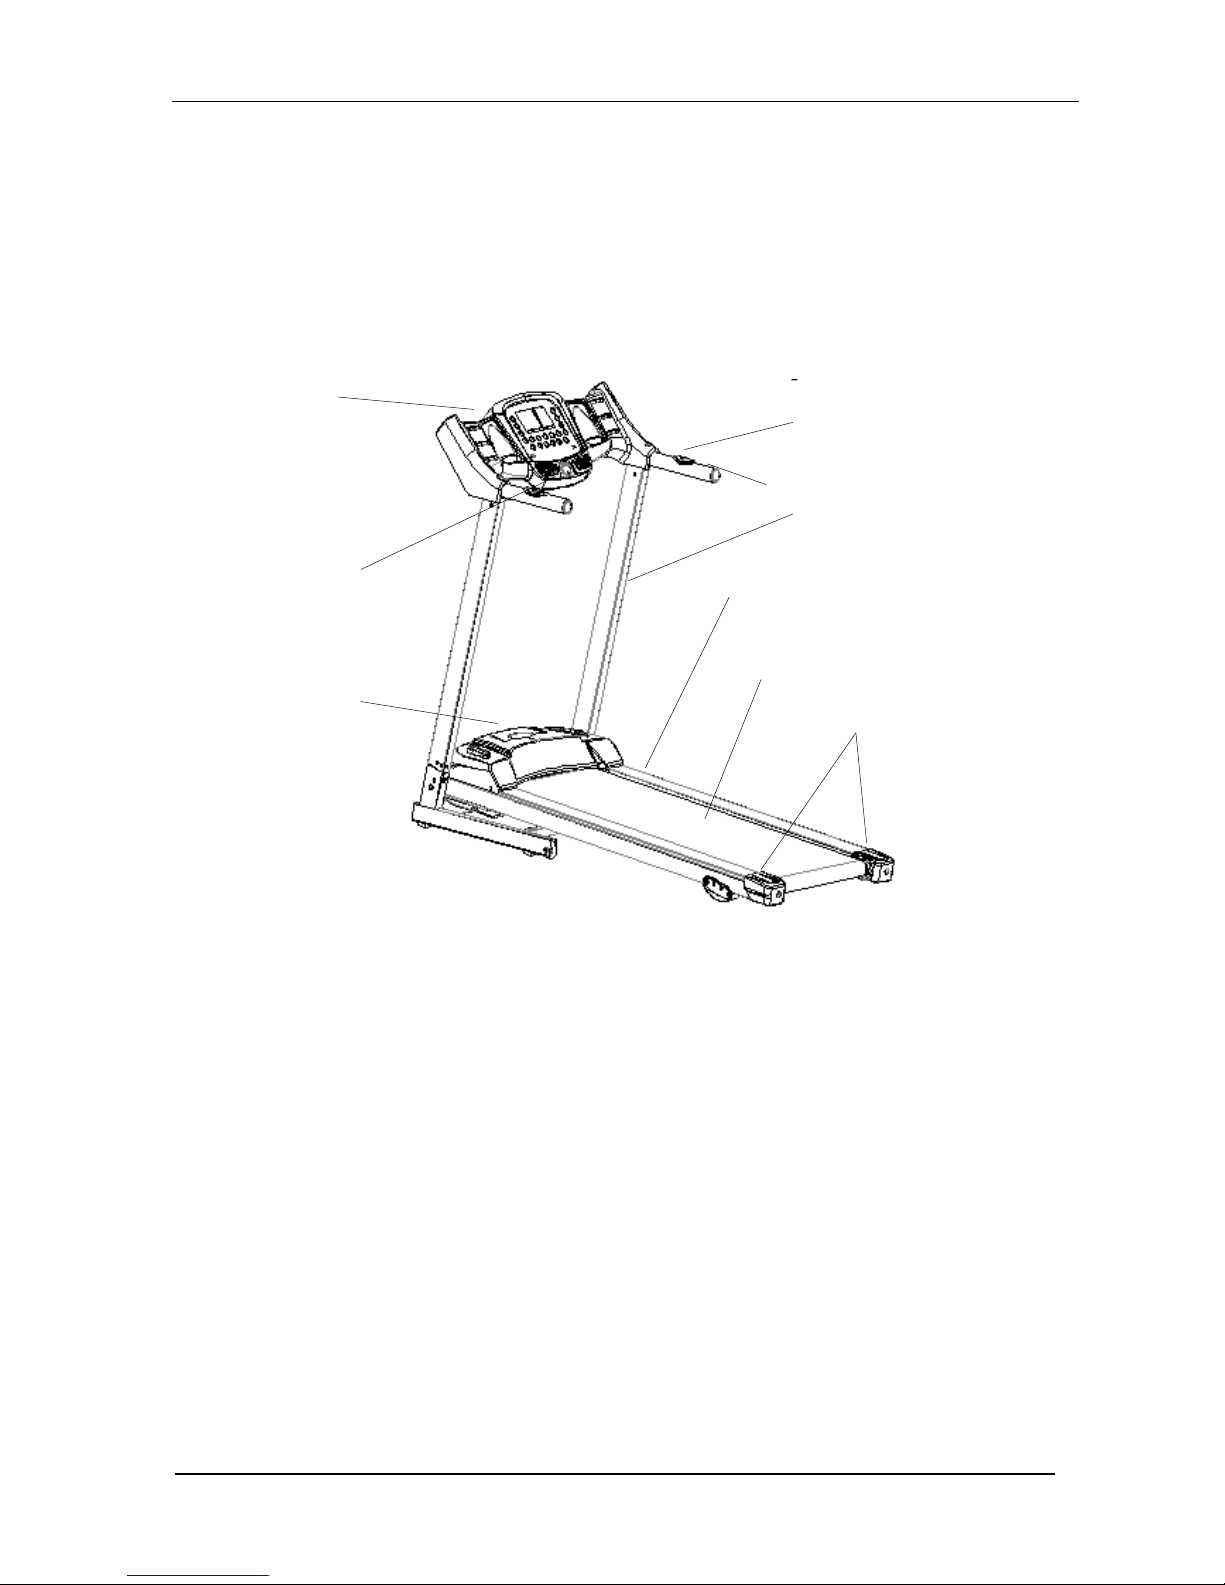
Durafit DFIHB001 Instruction Manual

DFIHB001 Durafit Sturdy Motorized Treadmill
Operating Instructions Manual
Special tips:
1. Before installation and operation, please read this operation manual carefully.
2. It is important your treadmill receives regular maintenance to prolong its useful
life. Failing to regularly maintain your treadmill may void your warranty.
3. Please save this manual for future reference.

- 1 -
Table of Contents
1Brief Description…………………………………………………………………2
2Main Technical Features……………………………………………………………2
3Tips for safety……………………………………………………………………3-4
4Installation…………………………………………………………………………4
5Use and Operation……………………………………………………………… 4-6
6Maintenance…………………………………………………………………… 6-8
7Guides for malfunction………………………………………………………… 8-9
8Warranty………………………………………………………………………… 9
9Error and self-inspection………………………………………………………… 9-10
10 Installation Sketch……………………………………………………………11-12

- 2 -
1. Brief Description
Diagram 1: DFIHB001 Durafit Sturdy Motorized Treadmill
2. Main Technical Features
This treadmill is for home use
Panel displays speed, time, distance, heart rate, calorie etc.
Display mode: 3 LED
Input voltage: 220V
Frequency: 50/60Hz
Input current: ≤8A
Temperature for working: 0∽40℃
Speed range: 1∽14km/h
Incline: 3 manual
Program: Time display range:0:00∽99:59(minute : second);
Distance display range:0.1~99.99kms
Machine size (L*W*H)::1545x710x1210(mm)
N/W:46KG
Safety key
Heart rate sensor
Meter accessories
Handle
Power switch
Pillar accessories
Running belt
Footplate
Running belt adjustor

- 3 -
1. Tips for Safety
3.1 Insert the power plug into the socket directly. Current load should be less than 10A. Do not use
an extension cord: do not attempt to disable the grounded plug by using improper adapters or in
any way modify the cord set.
3.2 Continuous Operating Time allowed is less than 90 minutes. The machine should be given a
rest of 1 hour after continuous. Max weight is less than 110kgs. The treadmill is intended for
in-home use only and not suitable for long time running.
3.3 Place your treadmill on the clean floor,not on the thick carpet, otherwise it will not be
convenient for ventilation, as heat generated by motor needs to be cleared. Also please don’t put the
treadmill in the moist place or outdoors to avoid breakdown due to water or heat.
3.4The treadmill should be placed in the convenient position for electric socket. Do not block the
rear of the treadmill. Provide a minimum of 1 metre clearance between the rear of the treadmill and
any fixed object.
3.5 Fresh users should grip the handrails when jogging and running until he/she is familiar with
the product. Please don’t stand on the running belt, when switching the power on. Please stand on
the footplates besides the treadmill and press the “start” button. Once the machine starts running at
the lowest speed, you can start running on the belt.
3.6While running, you should dress properly. Don’t dress too loosely as your clothes might get
entangled in the space beneath & beside the running belt . Please wear sport shoes with soft sole.
3.7Before taking down the protective cover of the treadmill, please ensure that the machine is
powered off.
3.8Don’t let children and non-users get close to the running treadmill to avoid unnecessary injury.
3.9Please make sure one end of the safe key has been placed in the appointed position and the
other one has been nipped to your clothes when you are running on the machine. This way, you can
pull the safe key for the machine’s sudden stop in case of any unavoidable accident. This will
significantly avoid injuries from running/walking accidents.
3.10 If you are enjoying other entertainment while running such as watching TV, reading, please
be particularly careful. These activities will distract your attention, which may make you lose your
balance.
3.11 Please pull the plug off from socket and keep the safe key in the socket, when the treadmill is
unused.
3.12 Please don’t put anything under treadmill and don’t let your children play near it after

- 4 -
folding.
3.13 To be on the safer side and avoid any oversight, please consult your doctor at first before
running, if you have one of the following diseases.
a) Cardiopathy, hypertension, sugar diabetes, respiratory disease, smoking, and other
chronic diseases, complication disease.
b) If you are over 35 years old and heavier than common weight.
c) Women in pregnant or in breasting period.
3.14 Please stop exercising immediately, take rest and consult your doctor if you’re feel giddy,
nauseous, or other symptoms.
3.15 Please drink adequate water after taking exercises on our treadmill for more than 20 minutes.
4. Installation: See “Installation sketch”
5. Use and Operation
5.1 Panel Keys and Function
(1)Prog
(2)speed-down
(3)speed-up
(6)safety key
(4)Mode
(5)start/stop

- 5 -
(1)“PROG”(could be pressed continuously to your expected mode)
Press the “PROG” key once again to enter “12 direct selected programs” there are 12
programs, “P1-P12”.
PROGRAM 1 PROGRAM 7
PROGRAM 2 PROGRAM 8
PROGRAM 3 PROGRAM 9
PROGRAM 4 PROGRAM 10
PROGRAM 5 PROGRAM 11
PROGRAM 6 PROGRAM 12
12 programmes
BLUE = SPEED

- 6 -
(2)“speed down”
Under running condition, press this key, speed can be speeded down to the exact speed you
need, to the first decimal.
(3)“speed up”
Under running condition, press this key, speed can be speeded up to the exact speed you need,
to the first decimal.
(4)“Mode
Under ready condition, press this key to initiate Target-Seeking mode。There are 3 modes of
Target-Seeking available in the treadmill:
•Time - The first way of countdown is calculated by time - you could adjust the
countdown time by pressing “speed+”or “speed-”
•Distance - if you press “mode”key again,then it goes to distance countdown ,we also
could press “speed+”or “speed-”to adjust the countdown distance
•Calories - Finally, you also could press the”mode”key again, it moves to calorie
countdown. You could press the “speed+”and “speed -”to adust your expected
calorie to start the final count down.
No matter which Target-Seeking mode is your choice, after you choose one mode, press the
“start/stop”key to start your running/walking in that mode.
(5)“start/off”
Under ready condition, press this key to start walking at the speed of 1.0km/h. If it is pressed
in running state, it will slow down then stop. During this stopping process, other keys are not
available. If it runs at speed less than 3km/h, then it stops immediately. If it is running faster than
3km/h, it will slow down and stop
(6)“safety key”
In case of emergency, pull this key to stop the machine.
5.2 Initial Startup Testing
Perform the below actions when you are using the treadmill for the first time.
1. Insert power plug into the socket. Turn the switch on the Treadmill frame to “1” position
2. Put the safe key in the right position to turn the circuit on. Press “on/off” and keep it running
without any load. Let the treadmill run without load at low speed for 1 minute. Test the condition of
running belt for consistent tightness (testing from low speed to high ones). After testing, press
“on/off”.
3. If everything is ok, then start to run.

- 7 -
5.3 Treadmill operating instructions
1. Insert power plug into the socket. Turn the switch on the Treadmill frame to “1” position. Place
the safe key in the appropriate slot. After a few seconds, panel will show that the machine is ready.
2. Clip the other end of safe key to your clothes, and stand on the footplate on both sides.
3. Press“start/stop” key, running belt moves at the lowest speed (1.0km/h). Speed windows will
display your running speed.
4. Start to run.
5. Press speed key to adjust speed -the speed window will display your speed .
6. To end your exercise safely, please first press “start/stop” key to halt the treadmill. Please don’t
leave the running belt until it stops slowly.
7. Turn off the power.
(Note: Our treadmill can test your heart rate via the heart rate sensor. The data is only for
reference.)
6. Maintenance
6.1 Ways to identify the degree of tightness of running belt and poly V-belt.
When the running belt skips it can be due to looseness in the Running Belt or the poly V-Belt
in motor. Please follow the below steps to identify which belt needs to be adjusted, and to take
corrective action:
a) Cut off power, Take the screw off the bolt on Motor Protection Cover in the front of the
treadmill.
b) Switch on the Treadmill and Increase the speed to be around 3km/h. Step on the running belt
with pressure and try your best to make the running belt stop.
c) If running belt stops, together with the front roll, but the motor still runs, then, it means the poly
V-belt needs to be adjusted.
d) If running belt stops, but front roll still runs, then it means the running belt needs to be adjusted.
6.2 Adjustment steps for poly V-belt
Cut off power firstly and take down the Motor Protection Cover.
a) Loosen the four screws for the motor, adjust them in a circuit clockwise, then screw down the
loose screws.
b) Keep the power on, and adjust the poly V-belt. Check if the belt is loose or not following the
point 6.1b above, if yes, please repeat the action same to point a) above.

- 8 -
6.3 Steps forAdjusting the Running Belt
a) Increase the speed to be 5.6km/h.
b) Turn the bolts at both right and left sides to be half a circuit or a circuit by the 8mm spanner.
( tighten or loosen based on belt grip –refer Diagrams 1 & 2)
c) After adjustment, if running belt still skips, please repeat the steps above.
Diagram 1: Tighten the running belt Diagram 2: loosen the running belt
6.4 Steps to adjust Running Belt Deflection
Under continuous usage, the running belt can start to be deflected towards one side or the
other. Then it needs to be adjusted. The steps are as follows:
a) Place the treadmill on a horizontal floor, Increase the running speed to be 5.6km/h.
b) If the running belt is deflected to the right, adjust the bolt on the right by turning it for half an
circle clockwise, then adjust the bolt on the left by turning it for half an circle counter
clockwise.(see diagram 3)
c) If the running belt is deflected to the left, adjust the bolt on the left by turning it for half an
circle clockwise, then adjust the bolt on the right by turning it for half an circle counter
clockwise.(see diagram 4
d) After the adjustment, the running belt still keeps deflecting , please repeat the steps above.
diagram 3: running belt deflected to right diagram 4: running belt deflected to left
Adjustment for right deflection Adjustment for left deflection
a) Running board lubrication
The treadmill is equipped with lubricated running board, which needs constant maintenance.
The friction between running board and running belt has a great effect on the treadmills’ e life. So
please lubricate your machine without fail for every 250kms or 6 months of usage, whichever
comes earlier. The steps are as follows:
a) Cut off the power
b) Wipe out the dust between running board and running belt with a clean cloth.
c) Daubing the Silicon oil on the running board and running belt equably.
d) While adding lubrication oil, please keep your clothes away from the machine for avoiding the
injury.

- 9 -
6.6 Cleaning
a) Please power off and pull the plug cap out before cleaning.
b) Wipe out the dust stuck on the surface and running board frequently.
c) Please clean the surface of frame and running belt with a soft cloth dipped in soap, don’t use
things like eradicator and naphtha.(After cleaning, please dry it before use)
d) Please take the Motor Protection Cover off every two months and use vacuum dust-collector to
suck the dust inside. The dust can cause the components of circuitry board to short circuit.
6.7 Folding & Storage
6.7.1 Folding & Unfolding
Please make sure that the plug cap has been pulled out before cleaning or maintenance. The
treadmill has a hydraulic system that greatly reduces the stress in lifting and lowering the
treadmill.
Once lifted, you will hear a light click sound and the hydraulic system locks the treadmill in
place. Now the treadmill can be moved around like a shopping cart using the wheels under the
frame. After placing the treadmill at the desired place, the user has to place his foot at the joint of
the Hydraulic system as a gentle kick and use his hands to gently push the treadmill down. This
unlocks the treadmill and slowly and automatically brings the Treadmill to the ground without any
assistance. The user can move away once the Hydraulic Lock is removed.
6.7.2 Storage
The treadmill should be deposited indoor in case of being damp. Water can’t be spattered and
nothing can be laid and inserted into the treadmill.Please keep the air a little humid in winter. And
please avoid any big static electricity, as it may disturb the operation of meters or even damage
them.

- 10 -
7. Troubleshooting Guidelines
7.1Analyzing and eliminating minor issues
Item.
Malfunction
Reasons
Solution
1
Treadmill can’t be started
The safety key isn’t in
the right position
Put the safe key in the right
position
The electrical switch is
placed to “0”
Turn the electrical switch to “1”
creepage switch is not
right
Replace creepage switch
2
Meter can’t display
The meter control line
and control panel are
unconnected
Pull the bolt out and open the
motor cover and reconnect it
Turn on the meter and reconnect
3
Heart rate can’t be displayed
The pole of heart rate
sensor is not wet enough
Wet the pole with water or liquor
for hard contact lenses
Disturbed by
electromagnetism
Stay away from
electromagnetism
4
Running belt runs faster or
slower than what has been
displayed
Unadjusted
Readjust it
5
Running belt slips
Running belt is not tight
enough
Please read point 3.3 Adjustment
steps for tightening running belt
for reference
6
Running belt is deflected
The running belt is
unadjusted.
Please read point 3.4 The steps
for adjusting the deflected
running belt for reference
7.2 If you still can’t solve the problems after taking the solutions above, we hope that you can
contact our Customer Care to resolve the issue through our Pan-India Service Network.
8. Warranty
We provide 1 Year Manufacturing Warranty for all parts, including the Motor for Manufacturing
Defects. Warranty does not cover any external accessories or damage caused to the product due to
improper installation by customer
8.1 Condition beyond Manufacturer’s warranty:
If the product you purchase has the problems as follows, the manufacturer’s warranty is not
effective:
a) Improper operating, negligence, accident
b) Unauthorized tampering of intricate circuit boards

- 11 -
c) Improper maintenance
9. Error and self-inspection
9.1 Error:Treadmill gives the following error code if anything wrong,please contact the
professional service people soon if it happens.

- 12 -

- 13 -
Table of contents
Other Durafit Treadmill manuals

Durafit
Durafit DFIHE002 User manual

Durafit
Durafit DFISA001 Instruction Manual

Durafit
Durafit Heavy-Hike GV-4602F Instruction Manual

Durafit
Durafit SPARK DFIHB003 Instruction Manual

Durafit
Durafit AGILE User manual

Durafit
Durafit Tiger User manual

Durafit
Durafit Beast Instruction Manual

Durafit
Durafit DFIHD001 User manual

Durafit
Durafit DFIHB002 User manual
Popular Treadmill manuals by other brands

Landice
Landice Executive owner's manual

Columbus Fitness
Columbus Fitness S800 user manual

NordicTrack
NordicTrack T 7.2 Treadmill Manual Del Usuario

Horizon Fitness
Horizon Fitness CT9.1 owner's manual

Reebok
Reebok TREADMILL RBTL09507.0 user manual

Horizon Fitness
Horizon Fitness ROJO ROJO T5 Assembly guide