Dustie DAC500 Plus User manual

Please read this operating manual,
Before start to use it.
બ֨҅ߎ䟗սӹஃયߎݱҁ۴ӆ
Version: 1710V2
ࣶӁଇࡆࡆӔԗ֘
Dustie Air Cleaner
DAC500 Plus

[Preparation prior to use]
Take out the product from its packing box and place it on a table or flat floor.The body of the
product should be at least 60cm or more away from the walls or other home furnishing to
promote air circulation.
Please operate according to the instructions on the yellow sticker. Push open the filter screen
covers on both sides in the upper part of the product. First remove the Pre Filter; turn the two
fixed knobs above the filter screen; take out the Molecular Filter and HEPA (please remove all
the plastic bags of the filters and have them recycled according to the regulations made by the
local government to avoid the wrong use by children); restore the filters to the original positions
in order; restore the cover.
Prevent children or people who do not understand this product from using it.
You can start to use the air cleaner and enjoy the fresh air.
Caution: Please remove all packing materials before use so as not to block the air inlet and
outlet.
Please read the operating manual carefully before use and keep it properly for future reference.
This manual is applicable to the DAC500 series. Please operate according to the instructions of the
purchased model.
When using electrical appliances, we should have basic safety knowledge to avoid fires, electric
shocks and other injuries.You are expected to follow the instructions below.
Use the product safely to avoid fires,
electric shocks and other injuries.
Do not use the product when it or its
wire or plug is damaged.
Do not use the product outdoors or
with the door and windows open.
Do not use the product when it does not
have a complete filter.
Do not lay the wire under a carpet or
close to a heat source.
When the filter replacement (cleaning)
indicator light is on, replace (or clean)
the filter to ensure high cleaning
performance.
If the wire is damaged, have it
repaired and replaced by the
manufacturer or an authorized
service center and maintenance
personnel to avoid dangers.
The product must be erect in
operation.
Keep foreign objects from entering or
blocking the air inlet or outlet,
otherwise the product will be
damaged.
Do not sit, stand or put items on
the product.
Do not use the product close to a moist
or easily wetted place, such as a
bathroom, a kitchen, a water tank or a
highly moist basement.
Do not use the product in a place
with any inflammable gas or steam.
Safety Instructions
1

Names and specifications of parts
CADR 505m3/h (*1)Model
Rated voltage
Power consumption
Particle purification
efficiency
Cumulate clean mass
Dimensions
Weight
CADR of particular
matters
Auto mode / fast clean mode
Air quality sensor
Intelligent mode
Dual sensor
Anion Yes
Remote controller Yes
220V~/50Hz
Applicable area 35-60m² (*5)
P4/F4 (*3)
DAC500 Plus
High efficiency level /12 (*4)
340(W)X388(D)X496(H) mm
8.2kg
40W
Product Mode of dust
collection
Dustie Air Cleaner Parallel double-inlet air filtration
Air cleaner body
Molecular filter
High efficiency
particulate air filter
* Note: Please plug the power
cord into the socket at the
bottom of the body
6
5
5 5
4
3
3 3
4 4
2
2 2
1
1
Pre filter
One power cord
Filter cover
*1: Section 6.6.1 of the implementation standard GB /T 188 01-201 5
*2: Section 5.6 of the implementation standard GB /T 188 01-201 5
*3: Formaldehyde filter according to F4 standard
*4: Section 5.5.2 of the implementation standard GB /T 188 01-201 5
*5: According to the relevant provisions of GB/T 188 01-2015, the applicable
area is equal to (0.07-0.12*CADR)
*6: The product complies with standards GB 4706.1 and GB 4706.45—2008
2

Operation instructions
Wind speed / Sleep mode /
Auto mode
Power / Cleaning mode
Timer / Anion / Light control
Intelligent mode
In operation, the product can switch among the following three intelligent modes freely.
Air quality indicators
When the product powers on, the dual air quality sensor will work for 3 minutes; then the air quality
detector will continuously collect the ambient air quality information automatically, and control the
indoor air quality at any moment.(Green air quality indicator: high air quality; yellow air quality
indicator: normal air quality; red air quality indicator: poor air quality)
Plug in the product
When plugged in, the air cleaner will give out the “B” sound; the green, orange and red air quality
indicator lights are lit and extinguished one by one in order; the gear indicator lights, from AUTO to
MAX, are lit and extinguished one by one in order; the air cleaner is in the standby state.
Wind speed selection
To change the mode or gear, rotate the wind speed knob to select it. The blue indicator light will be
lit together with the selected gear to indicate the selected current gear and the wind speed will
gently change to the selected gear.
Anion
In the operation of the product, press ( ) to turn on or off the anion.
Timer setup
Running time of the product can be set as 2 hours, 4 hours, 8 hours and 12 hours.
Press ( ). The air cleaner gives out the "B" sound; the (2H) indicator light is lit; the air cleaner is
set to power off after running for 2 hours. To select 4 hours, 8 hours or 12 hours, press ( )
again. If the timer indicator lights are not all lit, the timer is canceled.
Remote control
With the remote control, you can operate the air cleaner
freely.
For the sake of clean and comfortable air, it is suggested
to make the product operate at the Medium or High gear
for one hour before deciding to switch to the Mute gear
or not.
Cleaning
mode
Press this button. The product switches to the fast cleaning mode, operating at
the top speed, high speed and medium speed alternately with an interval of one
minute. 30 minutes later it will switch to the Auto mode and the automatic gear
indicator light will be lit at the same time.
Sleep mode In the Sleep mode, the air cleaner operates in the Mute gear; the indicator light
becomes dimmer and the air quality indicator light goes out.
Auto mode The dual air quality sensor in the product can switch to a proper wind speed
automatically in accordance with the result of sensing.
Power-off
In the operation of the air cleaner, press the ( ) button to turn it off. The air cleaner will give
out a long “B” sound before entering the standby mode.
Power-on
Press ( ). The power indicator light (blue) will be on; the product will get started and set in
Gear 2 ( ) and the wind speed indicator light (blue) will be lit.
3

Filter monitoring:
Pre Filter indicator light/ reset button
When the air cleaner is used for 1 months, the Pre Filter cleaning indicator light will keep blinking
to remind you to clean the Pre Filter. Pre Filter is washable. It can be cleaned with the vacuum
cleaner or washed with water (please put the Pre Filter into the body of the product after it is
washed and dried). When the cleaning is completed, press the Pre Filter indicator light for about 5
seconds with a sharp object. The indicator light no longer blinks and then it is extinguished. The
timer is reset.
Molecular Filter indicator light/ reset button
When the air cleaner is used for 3 months, the Molecular Filter replacement indicator light (red)
will keep blinking to remind you to replace the Molecular Filter. After the Molecular Filter is
replaced, press the replacement indicator light for about 5 seconds. The indicator light no longer
blinks and then it is extinguished. The timer is reset. Timer has been reset. There will be a prompt
upon the next setting time. Tips: It’s suggested the Molecular Filter should be replaced every 3 to
6 months according to the different use circumstances. (If the air cleaner is often used, it’s
suggested the Molecular Filter should be cleaned once a month in order to achieve the desired
filtration effect.)
Power button (indicator light)
Mode / wind speed gear knob
Anion button (indicator light)
Fast cleaning button
(indicator light)
Timer button
Air quality indicator
Timer indicator light
Filter replacement indicator light (reset button)
(Pre Filter /Molecular Filter /HEPA )
Light control (reset button)
1
1
2
2
6
6
8
8
7
7
3
3
4
4
5
5
Control panel
4

5
Light control:
In the power on mode, press ( ) reset button to set the air quality and the brightness of the blue
indicator light.Please note that the setting will be stored in the permanent memory.To be specific,
once the air cleaner is re-switched on after powering off, the brightness of the indicator light remains
the same as the last one.
Notes: There are four degrees of brightness: normal brightness - medium brightness (initial value) -
half brightness - (air quality indicator light) being extinguished + (blue indicator light) maintaining
half brightness.
High efficiency filter (HEPA) indicator light / reset button
When the air cleaner is used for 6 months, the HEPA replacement indicator light (red) will keep
blinking to remind you to replace the HEPA. After the HEPA is replaced, press and hold the
indicator light for about 5 seconds. The indicator light no longer blinks and then it is extinguished.
The timer is reset. Timer has been reset. There will be a prompt upon the next setting time. Tips:
It’s suggested the HEPA should be replaced every 6 to 12 months according to the different use
circumstances. (If the air cleaner is often used, it’s suggested the HEPA should be cleaned once a
month in order to achieve the desired filtration effect.)
[Product cleaning and maintenance]
Remove the filter covers,
clean them gently with the
little-brush sucker of a
vacuum cleaner or wet cloth
and assemble them again
when they are completely dry.
Wipe outer surfaces of
covers of the main body
gently with wet cloth. Keep
water from entering the air
inlet and outlet to avoid
impact on the motor or the
switch position.
Do not immerse the product into
water or wipe it with chemical
cleansers. Keep water from
entering the product.
Control panel / cleaning maintenance
Caution

6
Turn the knobs
on both sides
Keep and hold it for about 5 seconds Air quality
sensor
Tips
In order to better use the air cleaner,
please do not block the holes of the
odor sensor and the dust sensor on
the rear decoration strip on the body
of the air cleaner. Often clean the air
cleaner to keep it clean.
1
4
7
8
56
2
1
2
3
Pre Filter
Molecular
HEPA
1
2
Cleaning and replacing the filter
Stop and unplug
the product.
Turn the fixed knobs
Restore the filters in
order and restore the
cover.
Plug in the product and press ( )
button to turn on the air cleaner.
Press and hold the cleaning or
replacement indicator light for about
5 seconds. The indicator light no
longer blinks and then it is
extinguished. The timer is reset.
Timer has been reset. There will be
a prompt upon the next setting time.
Open the filter covers on
both sides: pull out the
filter covers on both sides
in the upper part of the
product.
Remove the Pre Filter and
the Molecular Filter (as
well as the plastic bags in
case the air cleaner is a
new one)
Slide the HEPA along the
slot and remove it by lifting
it outwards
Clean or replace the filter with
a vacuum cleaner
(Pre Filter can be washed
with water and dried before
use)

Common problem Troubleshooting
Common problems
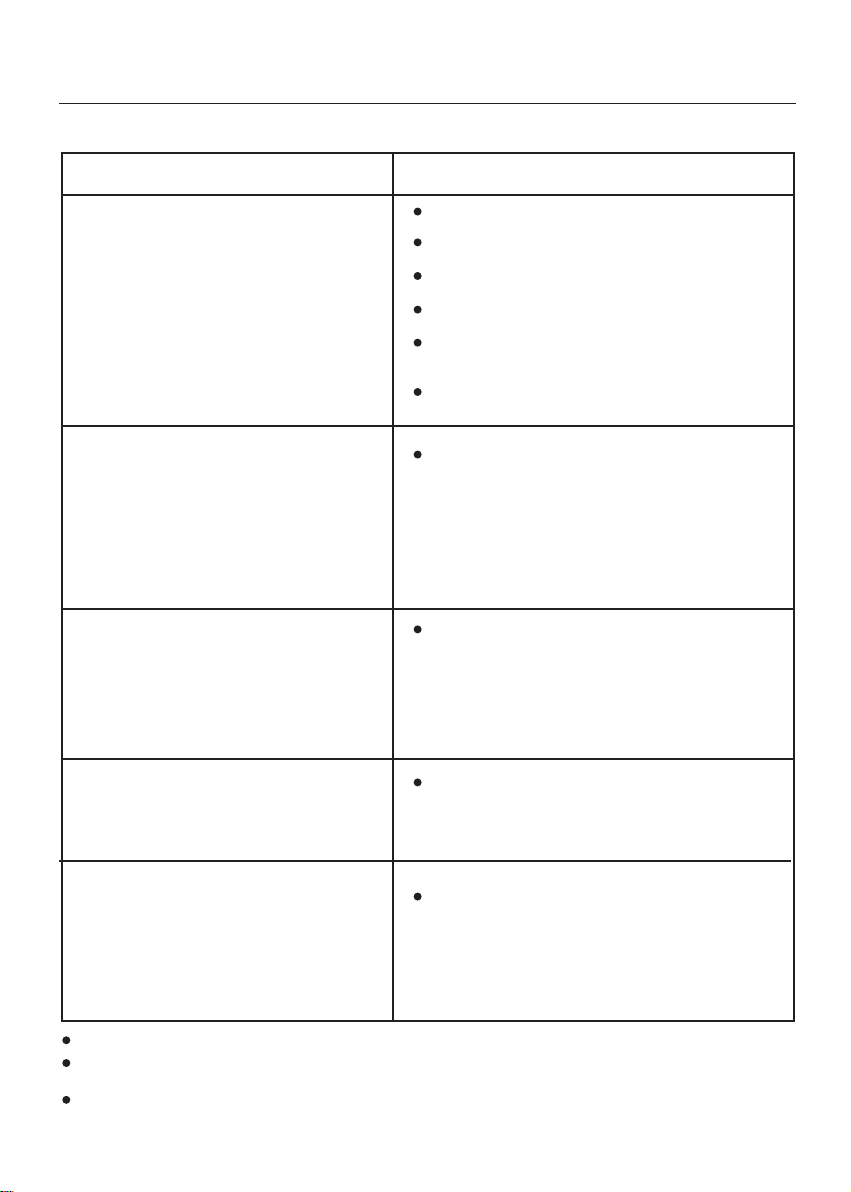
Why is there no air coming out of
the air cleaner?
Inspect whether the wire plug has been properly
inserted or not.
Inspect whether plastic bags of the filter have been
removed or not.
Inspect whether the filter has been properly assembled
or not.
Inspect whether the filter covers have been properly
assembled or not.
Check whether the outlet in the upper part of the air
cleaner is blocked. If it is blocked, it will affect the
operation of the air cleaner.
Inspect whether operation is set as the fixed-time mode
and the set time is up.
Why does the filter need to be
cleaned?
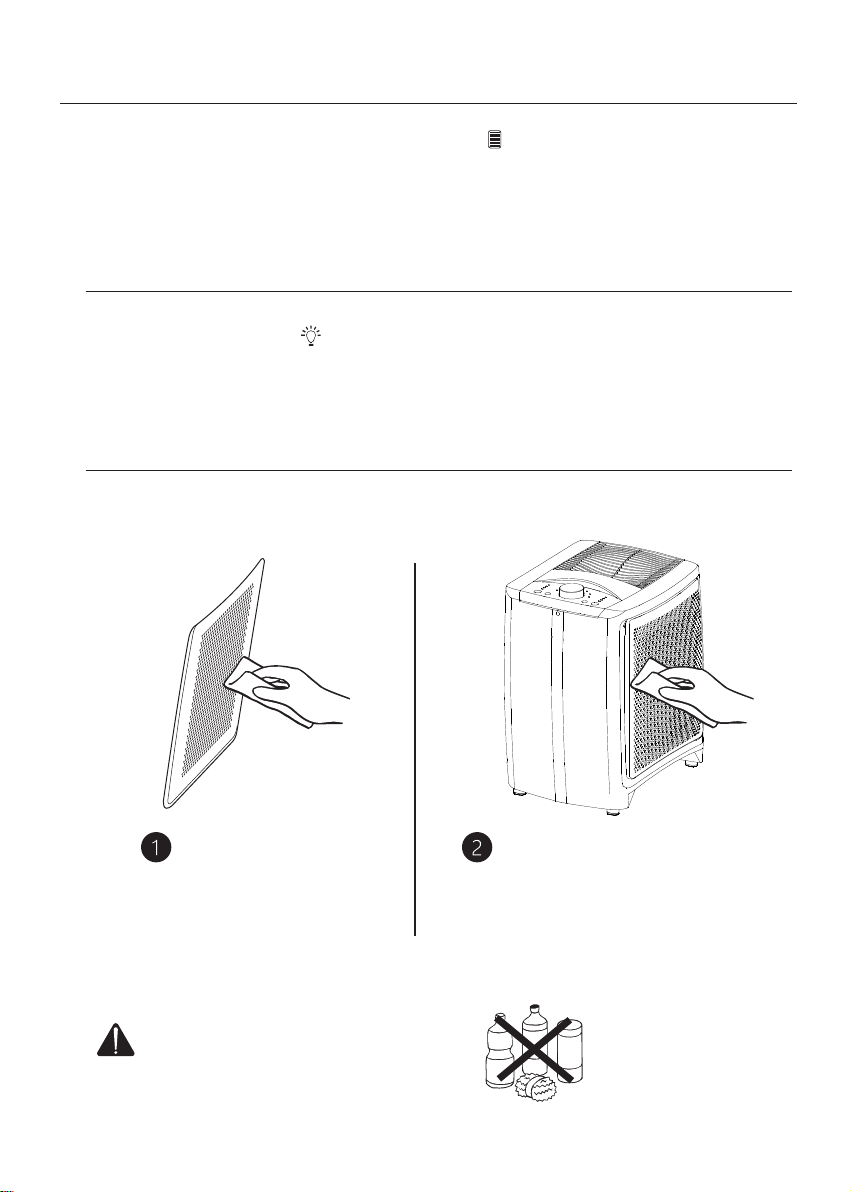
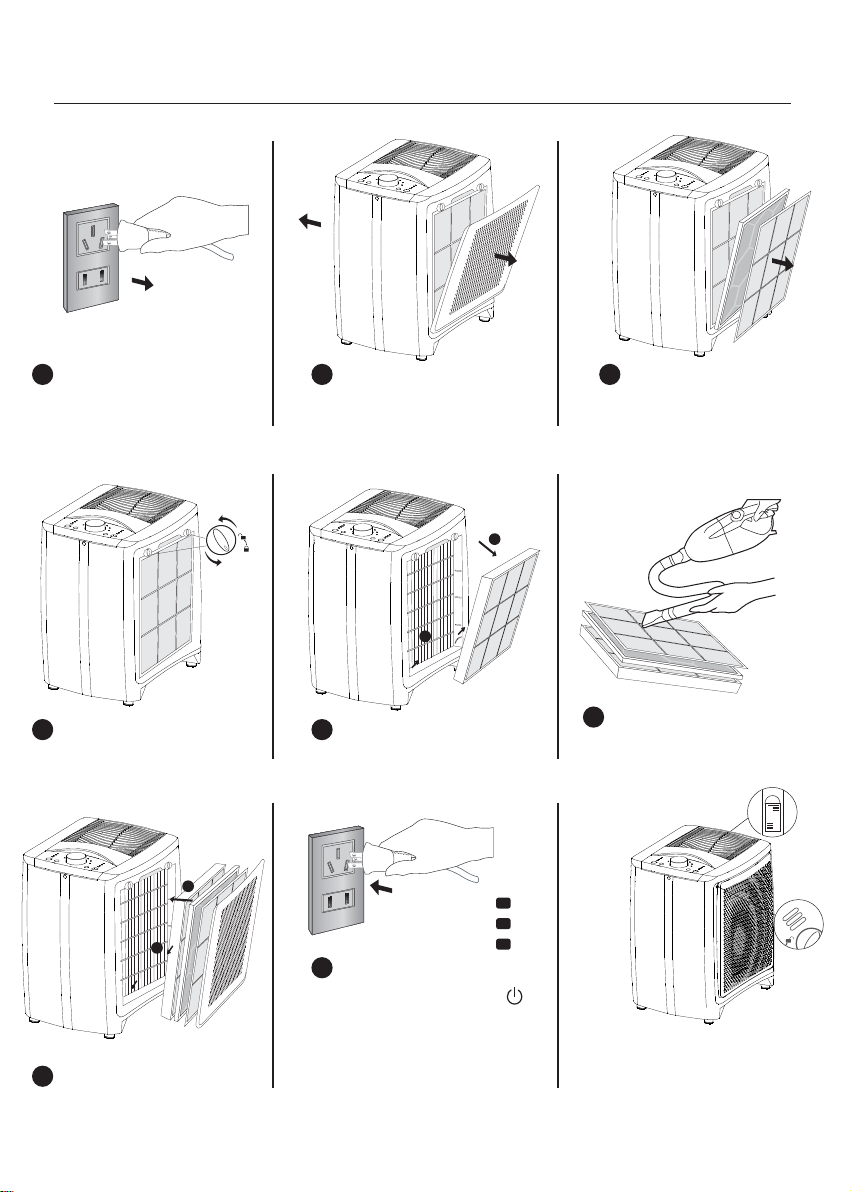
The filter is the core of the product, so regular cleaning
can not only improve its filtering performance but also
prolong its life. The DAC500 series air cleaners can be
externally cleaned after it is used for a period of time.
After cleaning the filter according to the instructions, put
it back into the air cleaner. Plug in the air cleaner. After
the cleaning of the Pre Filter, press and hold the
indicator light for 5 seconds to reset the timer.
How often should the HEPA be
replaced?
It depends on the service conditions. If the product is
used in a place with poor air quality or in a newly
decorated house, it is suggested to clean or replace the
filter more frequently. After cleaning the filter according
to the instructions, put it back into the air cleaner. Plug
in the air cleaner. Press and hold the corresponding
filter (reset botton) for 5 seconds to reset the timer.
How often should the Molecular
Filter be replaced?
The Molecular Filter should be replaced according to the
use environment. If the Molecular Filter needs to be
replaced in advance due to the sorptive saturation,
operate according to the instructions.
Why will the airflow be reduced
after the air cleaner is used for a
period of time?
If you need services or wan to purchase filters and other supplies, please call our customer service line 4009-21-3058.
Notes: The CCM of particular matters is obtained through the test with the specific smoke particles as the target pollutants in the
laboratory conditions and identified according to the specified evaluation interval.
Notes: The CCM of gaseous pollutants is obtained through the test with single gaseous pollutants as the target pollutants in the
laboratory conditions and identified according to the specified evaluation interval.
Make sure the air inlet and outlet are not plugged.
Remove all the plastic bags from the filters. Check the
condition of the filter and clean the filter if necessary. If
the filter is used for a period of time, consider replacing
it. Make sure the air inlet grille is at least 30 to 90
centimeters away from the walls.
7

؍Ҷ୍ݕ
҅ӹӕוٗҁ
رࡈӔԗ֘ђԕИՈӟйࠅவ۪ٵַ֪ߡЇ澞ߑѽ֚յא۪ҿѕ؟لص
ҸӣљЇӯйࡈڲ࣪澞
બ҉௰ૉ߶ݱҁߑ֘ЇސДҋڪי۸ڐ٘ҋࢡ֘ৠүՈЈӬଋࢡ֘,Ӈޔ
ࢡৠЇސД梂֡ؔޔՈӟӣࢡ֘Ճݼࢡ֘બر۱߄ଋࢡ֘⸾ܜஔ҉ࣁڢ
֪ݺڄઁ֛ݶହҲҩ୪ન҅ ٷ҉ࣁிپرଋࢡ֛֘ݹଋࢡ֘ѹЇࢡ
֘ৠ澞
ହҲҩ۪Љдઆߎфսы҅澞
ۓՕљڐ҅ࡈӔԗ֘цޏ௪ࡈ澞
ࡨ۞ ҅ӹબڐ۱߄ԕߕމљҲׇѻӟՍ澞
҅ӹબદূஃયߎݱҁપޢܶٷ״֑ґљ҈ޙեՀৰ澞
ߎપޢаଠй*')ӧબ҉۱бߑֺݱҁ澞
ڢ۩ћ֨҅֘սޞځӀו߂ׂߎ؍ҶٯજљହҲࢮࢳ澝ઇљՃҿѕѯ؞Շࣿ澞
֜࠴બସ،љЈܶ
҅֘սځࡨ۞؍ҶହҲ
ࢮࢳӠչѯ؞Ԯக澞
িݖף۪фսְٝޞબԓ
҅澞
બԓ֨י۪ڐկەӑЈ
҅澞
ஔளࢡ֘ুў؏וիөબԓ҅澞
બԓرি؍֪֨ࡅЈ۪ৱݎ
ࢽ࢛澞
݅ࢎࢡ֘ܶࢰщޞ
ؼ݅ࢎ৴ߕљґ
ࡈӔԗ֘ࢎӔݼߧ澞
࢛িְ݃ޞڷீ娸ଭԴ
۪ҿ݉ߓ߆ԇৠࢵՃғыմ
ғ݅љହҲԮக澞
ߎࡈӔԗ֘ڷீ҅澞
બԓએ࣒ѽҵ۪ஊܺӟ
Սײ࠴ѫ݃ѯӱࡈӔԗ֘澞
બԓֱ澝۪ݹ࣒ս֨ࡈ
Ӕԗ֘Їவ澞
બԓرߎфսழ䉸۪࢘ؠޣࡊ
䁆֪࢘ސ҅ײࢀ⨟۰ࡊ
ࠤଆՃЕ୍䉸֪࢘Ј澞
֨߄ޣࣆࡈѽ۪嘜ࡖהબԓ
҅ࡈӔԗ֘澞

ୂսդՃઁࠀ
5 53 3
4 42 21
9
CADR 505m3/h
ֺ՚
ௌؔԹ
ࢃ৴ԅࣤ
ۼ߶ӕ-(:Ф
ۼ߶ӕ-(:Ф
,߶ӕו䟤戆Ћଋࢡ֘
ۼ߶ӕ-(:Ф
߿݇-(:Ҽߚ
ଠவঈй)'*8
фսঅՠ-(澝-(ȍ
梂টӔԗݼ
মӔԗ
ؾت
୍
梂ট࣒)'*8
Ԉࠥڔڽବࢎࠥڔ
ࡈૅ۟ࡹ֘
ࠥڔ
Յ۟ࡹ֘
િ ߄
惤ݏ֘ ߄
220V~/50Hz
ଠவ 3Ss
P4/F4
DAC500 Plus
ݼ
340(W)X388(D)X496(H) mm
8.2kg
40W
фս தظࠥڔD[YZOKଇࡆࡈӔԗ֘ ٵՅࣲ࣒ଋࢡ
ࡈӔԗ֘ߎѽ
ݼࢡ֘
ӣࢡ֘
Ӭଋࢡ֘
ଋࢡ֘
࢛িߚ
ࡨબر࢛িݖҵ
ߑ֘ڂୂݖڇ

10
ݱҁܶح
ବࠥڔԈࠥڔ
࢛ࢎࠥڔ
ؔޞિࢰҰલ
ࠥڔ
֨ࡈӔԗ֘կԈИՕљӤ݅Іࠥڔ
Ԉࠥڔ
֨ࠥڔӔԗ֘љலࠈܶࢰщچӗࡈૅܶࢰࣂࢯ澞
ࢎࠥڔ
ࠥڔ
ࡈૅܶ
ପڐߑեՅࡈૅ۟ࡹ֘ٗҁӣ୕Фեࡈૅࠒࡹ֘رܴԈݶத࣪ࡈૅҒ
ێޞӶݏӄࡈૅ澞ࢰѩ௰ࢰ▲ࢰٛ
ݖ
ڢ୍ࠩޏݖЇ࢛ޞࡈӔԗ֘ՇӟȔ(ȕגࡈૅܶࢰࢰࠧ௰ࢰࢰ҉ࠩщࢯ
ࠈѹܶࢰ':;53'>҉ࠩщࢯࡈӔԗ֘ҵڭߑࣙہ澞
ڐկ࢛
ܷ▲Ј࢛ܶࢰࢰщࡈӔԗ֘رڐߑٷગؔйиࠈиࠈବܶࢰ
ࢰщ澞
惤ݏ
惤ݏ֘Ԇҵ҅ۓלײݱҁࡈӔԗ֘澞
Одݕ҈ӔଠࡈڏઑүИࠈشޞե
ӇଣܫީիӤ݅ӱலࠈ澞
Ҽߑ
֨ࡈӔԗ֘կԈИܷ ▲Ј୰ՕљҼߑӔԗ֘Շӟ ȕBȕ▲ גٷהйڭߑࣙہ澞
ବଣܫ
݅ࠥڔ۪ࠈѹՕޔବޔߛଣܫܶࢰசࠈѹଣܫثځщљܶ۱ଣܫڢӹࠈ
ѹବөѫثځ۱ଣࠈѹ߰ବՊ݅澞
િ
ߑ֘ࣙہЈܷՕڐկ۪Ҽિ澞
ؔޞગؔ
ࡈӔԗ֘ՕગؔؔޞҼߑӣӰО....شޞ澞
ܷ▲ЈӔԗ֘Շӟȕ(ȕג.ܶࢰщࡈӔԗ֘رޞગؔйشޞեҼߑ澞
ଣܫشޞ۪شޞ۪شޞՕӇܷ澞ؔޞܶࢰҶୂ࡚߄щөОՈࢃؔޞ澞
ܷЈ࠴୰ߑ֘ҵڽବࢎࠥڔљߢବବИବӣ୕ஜڲ࣪ٗҁ
ӣ୕եӤ݅ԈࠥڔٗҁԈࠈѹܶࢰգ࠵ࢵщ澞
Ӕԗ֘ӄՅࡈૅ۟ࡹ֘҉ҊࡹӱৈߧԈӤ݅ଠڢବ澞

ݏӲவߡ
1 2
6 87
3 4 5
11
ଋࢡ֘ࡹ
Ӭଋࢡ֘ܶࢰ୍ܷ୰
ڢߎࡈӔԗ֘মઋ҅З߃Ӭଋࢡ֘ࢎܶࢰرѫܴࢷݕۓࢎ澞
Ӭଋࢡ֘ОՕࡊՕ⩽ظ۪֘ࡊ؏બٴեҵߑ૯ঈސڔࢎଋࢡ֘澞ࢎ؏
ۨեબط࣒ܷࣙԹӬଋࢡ֘ܶࢰܶࢰЉӇࢷࣂࢯઋޞ୍֘ޏઋޞ澞
ӣࢡ֘ܶࢰ୍ܷ୰
ڢߎࡈӔԗ֘মઋ҅З߃ӣࢡ֘݅ܶࢰرѫܴࢷݕۓ݅澞
݅եબ
ܷԹ݅ܶࢰ୕
ܶࢰЉӇࢷࣂࢯઋޞ୍֘ޏઋޞ澞
࠴ޞ୍ٝޏગؔઋޞ
ঈЈࠩޞӱӇࠩݕ澞
Մەݕ҉ࣁ҅࣪ЉգڏઑЗ߃݅澞ٯ҅ৱЗ߃ե
ڏઑ⩽ظ֘ثӣࢡ֘ ▲ࠩࢎљଇӱࣲଋࢡݼߧ
࢛ܷ୰ܶࢰ
ڽବࢎܷ୰ܶࢰ
ࠥڔବࠈѹޔ
િܷ୰ܶࢰ
ؔޞܷ୰
ࡈૅܶࢰ
ؔ㩌ܶࢰ
1
2 6
8
73
4
5
݅ଋࢡ֘ܶࢰ୍ܷ୰
Ӭଋࢡ֘ӣࢡ֘ݼࢡ֘
ࢰҰલ୍ܷ୰

12
ࢰҰલ
֨ڐߑࣙہЈ୍ܷ୰Օગؔࡈૅ澝ܶࢰщچ澞ࡨ۞ગؔқОࡋСઓڸ澞ԯލ
Ӈڐߑё߄ܷЇࠩઓڸщچ澞
ࡨщچһӣО࠼щچ࠳ٯщچИщچӬқӗԡщچࡈૅܶࢰࢯܶࢰ
ܴӗԡщچ澞
ݼࢡ֘ܶࢰ୍ܷ୰
ڢߎࡈӔԗ֘মઋ҅З߃ݼࢡ֘݅ܶࢰرѫܴࢷݕۓ݅澞
݅եબܷԹ݅ܶࢰ୕ܶࢰЉӇࢷࣂࢯઋޞ୍֘ޏઋޞ澞࠴ޞ୍ٝޏગؔઋ
ޞঈЈࠩޞӱӇࠩݕ澞Մەݕ҉ࣁ҅࣪ڏઑЗ߃݅澞ٯ҅ৱЗ߃
եڏઑ⩽ظ֘ثݼࢡ֘▲ࠩࢎљଇӱࣲଋࢡݼߧ
ݏӲவߡࢎܔ
ߑѽࢎܔ
ଋࢡ֘ܜЈեՕљ⩽
ظ֘شࡃӳ⩽ףࢎ۪࢘
㝔٢ૹૹݳܭঈ؉؏Ҷٴ
եӇ֛澞
Ӕԗ֘ߎѽידબљ࢘㝔
٢ૹૹݳܭי澞্ЉՕљ
એࡊђӟՍࡶҵڧր
ଇ۪ڐҼѹ澞
্ЉՕرӔԗ֘䂫ҵࡊИ
ЉՕ҅ԗ؆ۅࢎӷݳܭߑ֘
ЉՕએࡊҵߑ֘澞

13
ࢎ݅ࢡ֘
۸ڐ٘Дҋଋࢡ֘
ଋࢡ֘ЇސДҋѹ
ڪיҋܞӟ
ҼࡈӔԗ֘
ٷܣЈݖף
ՈӟӬଋࢡ֘Ճӣࢡ֘
ޏߑଋࢡ֘ՈЈ⸾މ
ڐ֡ؔޔ
ԈДҋޔ
ܷѻ ࡈૅ
۟ځ֘
Մەݕ
Дҋ࢝ࠤէיЇݕ
եՈӟݼࢡ֘
љ⩽ظ֘ࢎ۪݅ޏଋࢡ֘
Ӭଋࢡ֘Օࡊٴե҅
҉پݹ֛ଋࢡ֘
ՃЇଋࢡ֘澞
ݖ֛ݖףܷܷ୰ڐկӔԗ
֘ࣀեܷѻࢎ۪݅ܶࢰ
୕
ܶࢰЉӇࢷࣂ
ࢯઋޞ୍֘ޏઋޞ澞
࠴ޞٝ
୍ޏગؔઋޞঈЈࠩޞӱӇ
ࠩݕ澞
Одױ҅ࡈӔԗ֘બ
ԓஊࡈն۟ځ֘ѹљՃߑ૯
եߚЇঞظѮ۟֘,ٯࢎٷ
ґܴࢎ澞
1
4
7
8
5 6
2
3
2TG(KNVGT
/QNGEWNCT
*'2#

14
ٯொ
ٯݻஞ ٯԽ֜
ґࡈҵՍչଋࢡեࡈݹՍ࡚߄ׇ澞
ՈЈଋࢡ֘И۱߄⸾މ澞
ࠒ߲ଋࢡ֘ࣙӑײ߄ڷࢎଋࢡ֘澞
ଋࢡ֘ײߧ҅▲࠼ޞબৰ݅ޏଋࢡ֘澞
ґࡈҵՍࠀߵ֚յאصОԻজ澞
ஜךصޞથ݅ݼࢡ֘;
ஜךصޞથ݅ӣࢡ֘;
ଋࢡ֘ީӔԗ֘߾ڶؔߊࢎଋࢡ֘ЉюՕљ
ݕଋࢡݼߧଐՕљڍଋࢡ֘҅خո澞
*')ӧଋࢡ֘҅▲࠼ޞљեՕ▲ࠩי
ୂࢎ澞બ҉ࣁપޢаܶࢎଋࢡ֘եݹ֛Ӕԗ
֘ӄݖЇݖףӬଋࢡ֘ࢎեܷѻӬଋࢡܷ֘
୰љ୍ޏગؔઋޞ澞
߿݇ۯ҅࣪ײߧ࣪ࡈսૅૻ۪ٛީ
йޏوғեڏઑૻைযࢎଋࢡ۪֘ީݕޝ
݅ޏଋࢡ֘બ҉ࣁપޢаܶࢎଋࢡ֘ե
ݹ֛Ӕԗ֘ӄݖЇݖףܷѻځଋࢡ୍ܷ֘
୰љ୍ޏગؔઋޞ澞
߿݇ۯ҅࣪ײߧ⩽չݕӹ݅ӣ
ଋࢡ֘બ҉ࣁપޢаܶݱҁ澞
બࠒ߲࢛িݖףީիଠڢݖױ澞
બࠒ߲Ӕԗ֘ଋࢡ֘⸾ީիܜஔ澞
બࠒ߲Ӕԗ֘ଋࢡ֘ީիݹ״ڢ澞
ଋࢡ֘ީիଠڢױ;
ީի߄࣒սׇѻӔԗ֘ЇސӟՍײߧӟՍׇ
ѻѫڧրӔԗ֘ҁ澞
ީի߄ગؔؔޞ৲ગؔޞٝӱ澞
ОэТӔԗ֘҅▲࠼ޞեфࣿ
ࡈࡶѫӗص;
ײ߆ԇ۪бଋࢡ֘ঈ৴ߕબ৻ৌுؚ߆ԇЋি澞
ࡨثй梂ট࣒))3߶ࡨީؘ֨ߚўЈљࣔؔࢹظ梂ট࣒О߶ࡑ࣒߯ࡹડڱӟ
ٷ҉ઁؔછџԚ߶ࡨ澞
ࡨثйࡈہࡑ࣒߯))3߶ࡨީؘ֨ߚўЈљԥ▲ࡈہࡑ࣒߯О߶ࡑ࣒߯ࡹડڱӟ
ٷ҉ઁؔછџԚ߶ࡨ澞
ОэТࡈӔԗ࡚֘߄ӟ;
ОэТࢎଋࢡ֘;

ஒ࣒ૅ
⸾މיד
૨ߡ
ি
ଇ
֡ؔুў
夊В
Ӭଋࢡ֘
ӣଋࢡ֘
ݼଋࢡ֘
梂ট࣒۟ࡹ֘
ࡈہ۟ࡹ֘
ૉঝ
ஒ࣒ૅՃҿԗ؆অ՚
ୠLead
(Pb)
ୂўդ
;TOZ4GSK 㿃3KXI[X_
(Hg)
斊Cadmium
(Cd)
ҹџ放
Hexavalent
chromium
(Cr(VI))
ך䇌৻
6UR_HXUSOTGZKJ
HOVNKT_RY
(PBB)
ך䇌и戅
6UR_HXUSOTGZKJ
JOVNKT_RKZNKXY
(PBDE)
8KYZXOIKJY[HYZGTIKYGTJOZYINKSOIGRY_SHURY
ગוդࡈӔԗ֘
Equipment name
ֺ՚ֺڔ*')6R[Y
:_VKJKYOMTGZOUT:_VK
○
○
○
○
○
○
○
○
○
○
○
○
○
○
○
○ ○ ○
○ ○○
○
○
○
○
○
○
○
○ ○ ○ ○ ○ ○
○ ○ ○ ○ ○
○ ○ ○ ○ ○ ○
○ ○ ○ ○ ○ ○
○ ○
○ ○ ○ ○ ○ ○
○
X
X
X○ ○
○
ࡨથٶஒОȔ࣪ґ҅ߊஒȕЉީфսૅґચߊஒͺЭЉީ؍Ҷ҅ߊஒػҿЉգйׂйࡈۅ؍Ҷ澝؍Ҷঈ֜প৲
ஒؔ҅ߊஒ澞фս֨ЉӇ҅ٷељڅڒޞબସ،֢؟څڒ֘фս֛ݶ澝Ӈӯࡣگ澝ઁؔהࣲ澞
࣪ґ҅ߊஒՀৰ߶જՈӐйфս࠳ٯٗҁ࣪چՃ࢘چঈߚў澞
фսߎѽЇ߶߶ں࣪ґܔ҅ߊஒОٶ֨થߊஒӄߎфսխ߄߄؞࣒ૅ֨࠳ٯ҅ߚўЈЉѫՇࣿ
יࡠ۪ՊЌ҅ߎфսЉѫث࣪ଭۨЕ୍ࡑ۪߯ثыѽ澝ીф٫ߛЕ୍݃؞澞
ߎࠀ҉݇90:ઁؔӲ澞
5߶થ߄؞࣒ૅ֨થୂў۱߄֮ૅߕމИխ֮֨-(:ઁؔஒࡌљЈ澞
>થ߄؞࣒ૅص֨થୂў߮▲֮ૅߕމИխӟ-(:ઁؔஒࡌ澞ҿИୠ6H澝㿃.M澝斊
)J澝ҹџ放)X</֮їًՃҿԗՠ࣒澞
થୂўюଠйୂӣֺ՚љؘஎфսОӕ澞
15
Table of contents
Other Dustie Air Cleaner manuals