DVA IV User manual

rif. 314
Addolcitore d’Acqua
Water Softener
Adoucisseur d’Eau
Wasserenthärtungseinheit
Depurador de Agua
Водоумягчитель
Zmiçkczacz Wody
iv
e

2Manuale d’istruzioni Addolcitore d’Acqua IV
IT INDICE
1. PREMESSE E INFORMAZIONI GENERALI
1.1 SCOPO DEL MANUALE
1.2 CONSERVAZIONE DEL MANUALE
1.3 IDENTIFICAZIONE DELL’APPARECCHIO
1.4 DICHIARAZIONE DI CONFORMITA’
1.5
NORME DI SICUREZZA IGIENICA E SPERIMENTAZIONE ICIM
1.6 CONSIGLI UTILI E AVVERTENZE
2. CONOSCERE L’APPARECCHIO
2.1 PRINCIPIO DI FUNZIONAMENTO
2.2 DESCRIZIONE DELL’APPARECCHIO
2.3 LA SCATOLA CONTIENE
2.4 CARATTERISTICHE TECNICHE
2.5 CARATTERISTICHE DELL’ACQUA D’ALIMENTO
2.6 PRESTAZIONI DEGLI ADDOLCITORI IN BASE ALLA
DUREZZA DELL’ACQUA
3. INSTALLAZIONE
3.1 IMBALLO
3.2 SCELTA DEL LUOGO PER L’INSTALLAZIONE
3.3 COLLEGAMENTO ALLA RETE IDRICA
3.3.1 Raccordi Rapidi
3.4 COLLEGAMENTO ALLA RETE DELLO SCARICO
4. MESSA IN FUNZIONE E ISTRUZIONI PER LA
RIGENERAZIONE
4.1 RISCIACQUO RESINE
4.2 RIGENERAZIONE PERIODICA
4.3 REGOLAZIONE DEL MISCELATORE
5. MANUTENZIONE PER L’INSTALLATORE
5.1 SOSTITUZIONE DELLE RESINE
5.2 CONSERVAZIONE DELLA RESINA E MESSA IN FUNZIONE
DOPO SOSTE PROLUNGATE
6. USO IMPROPRIO DELL’APPARECCHIO
7. SMALTIMENTO DELL’APPARECCHIO
UK INDEX
1. INTRODUCTION AND GENERAL INFORMATION
1.1 OBJECTIVE OF THE MANUAL
1.2 KEEPING THE MANUAL
1.3 EQUIPMENT IDENTIFICATION
1.4 DECLARATION OF COMPLIANCE
1.5 HYGIENIC SAFETY NORMS AND ICIM TESTING
1.6 RECOMMENDATIONS AND WARNINGS
2. ABOUT THE EQUIPMENT
2.1 HOW DOES IT WORK?
2.2 EQUIPMENT DESCRIPTION
2.3 THE PACKAGING CONTAINS
2.4 TECHNICAL FEATURES
2.5 CHARACTERISTICS OF FEED WATER
2.6 EQUIPMENT PERFORMANCE BASED ON WATER
HARDNESS
3. INSTALLATION
3.1 PACKAGING
3.2 CHOOSING THE PLACE OF INSTALLATION
3.3 CONNECTION TO THE WATER SYSTEM
3.3.1 QUICK JOINTS
3.4 CONNECTION TO THE DRAIN SYSTEM
4. ACTIVATION AND INSTRUCTIONS FOR THE
REGENERATION
4.1 RINSING RESINS
4.2 PERIODIC REGENERATION
4.3 MIXER CONTROL
5. MAINTENANCE FOR THE INSTALLER
5.1 CHANGING THE RESINS
5.2 RESIN PRESERVATION AND ACTIVATION AFTER A LONG
PERIOD OF INACTIVITY
6. IMPROPER USE OF THE EQUIPMENT
7. EQUIPMENT DISPOSAL
F INDEX
1. INTRODUCTION ET INFORMATIONS GÉNÉRALES
1.1 OBJECTIF DU LIVRET
1.2 CONSERVATION DU LIVRET
1.3 IDENTIFICATION DE L’APPAREIL
1.4 DÉCLARATION DE CONFORMATION
1.5 NORMES ICIM DE SÉCURITÉ SANITAIRE ET
EXPÉRIMENTALE
1.6 CONSEILS UTILES ET AVERTISSEMENTS
2. CONNAÎTRE L’APPAREIL
2.1 COMMENT FONCTIONNE-T-IL?
2.2 DESCRIPTION DE L’APPAREIL
2.3 L’EMBALLAGE CONTIENT
2.4 CARACTÉRISTIQUES TECHNIQUES
2.5 CARACTÉRISTIQUES DE L’EAU D’ALIMENTATION
2.6 PERFORMANCE DE L’ADOUCISSEUR SELON LA DURETÉ
DE L’EAU
3. INSTALLATION
3.1 EMBALLAGE
3.2 CHOISIR LE LIEU D’INSTALLATION
3.3 RACCORDEMENT AU RÉSEAU HYDRIQUE
3.3.1 RACCORDS RAPIDES
3.4 RACCORDEMENT AU RÉSEAU D’ÉVACUATION
4. MISE EN MARCHE ET INSTRUCTIONS POUR LA
RÉGÉNÉRATION
4.1 RINÇAGE DES RÉSINES
4.2 RÉGÉNÉRATION PÉRIODIQUE
4.3 RÉGULATION DU MIXER
5. MANUTENTION POUR L’INSTALLATEUR
5.1 CHANGER LES RÉSINES
5.2 CONSERVATION DES RÉSINES ET MISE EN MARCHE
APRÈS UNE PÉRIODE D’INACTIVITÉ
6. UTILISATION INCORRECTE DE L’APPAREIL
7. ÉLIMINATION DE L’APPAREIL
D INHALTSVERZEICHNIS
1. EINLEITUNG UND ALLGEIMENE INFORMATIONEN
1.1 ZIEL DES HANDBUCHES
1.2 AUFBEWAHRUNG DES HANDBUCHES
1.3 GERÄTESIDENTIFIKATION
1.4 KONFORMITÄTSERKLÄRUNG
1.5 ICIM-NORMEN FÜR HYGIENISCHE UND EXPERIMENTELLE
SICHERHEIT
1.6 EMPFEHLUNGEN UND HINWEISE
2. DAS GERÄT KENNENLERNEN
2.1 BETRIEBSPRINZIP
2.2 BESCHREIBUNG DES GERÄTES
2.3 PACKUNGSHINALT
2.4 TECHNISCHE MERKMALE
2.5 MERKMALE DES SPEISEWASSERS
2.6 ENTHÄRTERLEISTUNGEN JE NACH WASSERHÄRTEGRAD
3. AUFSTELLUNG
3.1 PACKUNG
3.2 WAHL DES AUFSTELLUNGSORTES
3.3 ANSCHLUSS AN DAS WASSERNETZ
3.3.1 SCHNELLANSCHLÜSSE
3.4 ANSCHLUSS AN DAS ABFLUSSNETZ
4. INBETRIEBSNAHME UND EINLEITUNGEN ZUR
REGENERATION
4.1 HARZE WASCHEN
4.2 PERIODISCHE REGENERATION
4.3 MISCHERREGELUNG
5. WARTUNG FÜR DEN INSTALLATEUR
5.1 TAUSCH DER HARZE
5.2 HARZAUFBEWAHRUNG UND INBETRIEBNAHME NACH
LÄNGERER NICHTBENUTZUNG

6. NICHTGEIGNTE NUTZUNG DES GERÄTES
7. ENTSORGUNG DES GERÄTES
E ÌNDICE
1. FINALIDAD DEL MANUAL
1.2 CONSERVACIÓN DEL MANUAL
1.3 IDENTIFICACIÓN DEL APARATO
1.4 DECLARACIÓN DE CONFORMIDAD
1.5 NORMAS DE SEGURIDAD HIGIÉNICA Y EXPERIMENTAL
ICIM
1.6 CONSEJOS UTILES Y ADVERTENCIAS
2. CONOCER EL APARATO
2.1 PRINCIPIO DE FUNCIONAMIENTO
2.2 DESCRIPCIÓN DEL APARATO
2.3 CONTENIDO DEL ENVASE
2.4 CARÁCTERISTICAS TÉCNICAS
2.5 CARÁCTERISTICAS DEL AGUA DE ALIMENTACIÓN
2.6 PRESTACIONES DE LOS DESCALCARIZADORES SEGÚN
LA DUREZA DEL AGUA
3. INSTALACIÓN
3.1 EMBALAJE
3.2 ELECCIÓN DEL LUGAR PARA LA INSTALACIÓN
3.3 CONEXIÓN A LA RED HÍDRICA
3.3.1 ENLACES RÁPIDOS
3.4 CONEXIÓN A LA RED DE DESAGÜE
4. PUESTA EN FUNCIONAMIENTO Y INSTRUCCIONES
PARA LA REGENERACIÓN
4.1 ENJUAGUE DE LAS RESINAS
4.2 REGENERACIÓN PERIÓDICA
4.3 REGULACIÓN DEL MEZCLADOR
5. MANUNTENCIÓN PARA EL INSTALADOR
5.1 SUSTITUCIÓN DE LAS RESINAS
5.2 CONSERVACIÓN DE LAS RESINAS Y PUESTA EN FUN-
CIONAMIENTO DESPUÉS DE PARADAS PROLONGADAS
6. USO INAPROPRIADO DEL APARATO
7. ELIMINACIÓN DEL APARATO
PY СОДЕРЖАНИЕ
1. ПРЕДПОСЫЛКИИОБЩАЯИНФОРМАЦИЯ
1.1 НАЗНАЧЕНИЕДАННОГОРУКОВОДСТВА
1.2 ХРАНЕНИЕРУКОВОДСТВАПОЭКСПЛУАТАЦИИ
1.3 ИДЕНТИФИКАЦИЯПРИБОРА
1.4 ДЕКЛАРАЦИЯОСООТВЕТСТВИИ
1.5 ГИГИЕНИЧЕСКИЕ И ЭКСПЕРИМЕНТАЛЬНЫЕ СТАНДАРТЫ
БЕЗОПАСНОСТИICIM
1.6 ПОЛЕЗНЫЕСОВЕТЫИПРЕДОСТЕРЕЖЕНИЯ
2. ЗНАКОМСТВОСАППАРАТОМ
2.1 ПРИНЦИПРАБОТЫПРИБОРА
2.2 ОПИСАНИЕПРИБОРА
2.3 СОДЕРЖИМОЕКОРОБКИ
2.4 ТЕХНИЧЕСКИЕДАННЫЕУСТРОЙСТВА
2.5 ХАРАКТЕРИСТИКАПОДАВАЕМОЙВОДЫ
2.6 ПРОИЗВОДИТЕЛЬНОСТЬУМЯГЧИТЕЛЯВЗАВИСИ-
МОСТИОТЖЕСТКОСТИВОДЫ
3. УСТАНОВКА
3.1 УПАКОВКА
3.2 ВЫБОРМЕСТАУСТАНОВКИ
3.3 ПОДКЛЮЧЕНИЕКВОДОПРОВОДНОЙСЕТИ
3.3.1БЫСТРЫЕСОЕДИНЕНИЯ
3.4 ПОДКЛЮЧЕНИЕКСЛИВНОЙСЕТИ
4. ВВОДВЭКСПЛУАТАЦИЮИИНСТРУКЦИЯПО
РЕГЕНЕРАЦИИВОДЫ
4.1 ПРОМЫВКАСМОЛЫ
4.2 ПЕРИОДИЧЕСКАЯРЕГЕНЕРАЦИЯ
4.3 РЕГУЛЯЦИЯСМЕСИТЕЛЯ
5ТЕХНИЧЕСКОЕОБСЛУЖИВАНИЕУСТАНОВКИ
5.1 ЗАМЕНАСМОЛЫ
5.2 ХРАНЕНИЕСМОЛЫИВВОДВЭКСПЛУАТАЦИЮПОСЛЕДЛИ-
ТЕЛЬНОГОСРОКАБЕЗДЕЙСТВИЯ
6. НЕПРАВИЛЬНОЕИНЕЦЕЛЕСООБРАЗНОЕИСПОЛЬЗОВА-
НИЕАППАРАТА
7. УТИЛИЗАЦИЯАППАРАТА
PL SPIS TREŚCI
1.
WSTĘP I UWAGI OGÓLNE
1.1 PRZEZNACZENIEINSTRUKCJIOBSŁUGI
1.2 PRZECHOWYWANIEINSTRUKCJIOBSŁUGI
1.3 IDENTYFIKACJAPRODUKTU
1.4 DEKLARACJAZGODNOŚCI
1.5 NORMY BEZPIECZEŃSTWA HIGIENICZNEGO I
BADAWCZEGOICIM
1.6 ZALECENIAIOSTRZEŻENIA
2. PREZENTACJA URZĄDZENIA
2.1 ZASADYDZIAŁANIA
2.2 OPISURZĄDZENIA
2.3 ZAWARTOŚĆOPAKOWANIA
2.4 DANETECHNICZNE
2.5 WYMOGI TECHNICZNE WODY DO ZASILANIA
URZĄDZENIA
2.6 POTENCJAŁ ZMIĘKCZACZA W STOSUNKU DO
TWARDOŚCIWODY
3. INSTALACJA
3.1 OPAKOWANIE
3.2 WYBÓRMIEJSCAINSTALACJI
3.3 PODŁĄCZENIEDOSIECIWODOCIĄGOWEJ
3.3.1 SZYBKOZŁĄCZA
3.4 PODŁĄCZENIEDOSIECIKANALIZACYJNEJ
4. URUCHOMIENIE I INSTRUKCJA REGENERACJI
4.1 PŁUKANIEŻYWIC
4.2 RUTYNOWAREGENERACJA
4.3 REGULACJAMIESZALNIKA
5. KONSERWACJA DLA INSTALATORA
5.1 WYMIANAŻYWIC
5.2 KONSERWACJA ŻYWIC ORAZ URUCHOMIENIE PO
DŁUGICHOKRESACHNIEUŻYWANIA
6. NIEWŁAŚCIWE UŻYCIE URZĄDZENIA
7. UTYLIZACJA URZĄDZENIA
FIG. 1
Instruction leaflet and warnings for water softeners IV 3

FIG. 2
LEGENDA (fig. 2):
ATUBO ENTRATA ACQUA
BTUBO USCITA ACQUA
CRUBINETTO ENTRATA ACQUA
DVALVOLA DI NON RITORNO
ETUBO DI SCARICO
FMANOPOLA TAPPO
GTAPPO BOMBOLA
IETICHETTA
LPOZZETTO DI SCARICO
LEGEND (fig. 2):
AWATER INLET PIPE
BWATER OUTLET PIPE
CWATER INLET TAP
DCHECK VALVE
EDRAIN PIPE
FCOVER HANDLE
GTANK LID
ILABEL
LFLOOR SINK
4Manuale d’istruzioni Addolcitore d’Acqua IV
FIG. 3
SCHEMA D’INSTALLAZIONE
EQUIPMENT ILLUSTRATION
SCHEMA D’INSTALLATION
INSTALLATIONSBEZEICHNUNG
ESQUEMA DE INSTALACIÓN
СХЕМА УСТАНОВКИ
SCHEMAT INSTALACJI
FIG. 4

FIG. 5
FASE LAVORO
SERVICE MODE
MODALITÉ DE TRAVAIL
BETRIEBSPHASE
FASE DE TRABAJO
ФАЗА РАБОТЫ
TRYB PRACY
FASE RISCIACQUO
RINSING MODE
MODALITÉ DE RINÇAGE
SPÜLUNGSPHASE
FASE DE ENJUAGUE
ФАЗА ПРОМЫВКИ
TRYB PŁUKANIA
FASE DEPRESSURIZZAZIONE
DEPRESSURIZATION MODE
MODALITÉ DE DÉPRESSURISATION ET DE RECHARGEMENT DU SEL
DRUCKABLASSPHASE
FASE DE DEPRESIÓN
ФАЗА РАЗГЕРМЕТИЗАЦИИ
TRYB DEKOMPRESJI
FASE CONTROCORRENTE
BACKWASH MODE
MODALITÉ CONTRE-COURANTE
GEGENSTROMSPHASE
FASE DE CONTRACORRIENTE
ФАЗА ПРОТИВОТЕЧЕНИЯ
TRYB PŁUKANIA PRZECIWPRĄDOWEGO
PULIZIA
CLEANING
NETTOYAGE
REINIGUNG
LIMPIEZA
ОЧИСТКА
CZYSZCZENIE
Instruction leaflet and warnings for water softeners IV 5
1
3
2
4
RIGENERAZIONE • REGENERATION • RÉGÉNÉRATION • REGENERIERUNG
REGENERACIÓN •
РЕГЕНЕРАЦИЯ
• REGENERACJI

6Manuale d’istruzioni Addolcitore d’Acqua IV
AVVERTENZE PER L’UTENTE
- Questa macchina non deve essere utilizzata da bambini o da
persone con ridotte capacità fisiche, mentali o sensoriali, o
prive di esperienza, almeno che esse non siano supervisionate
da persone responsabili della loro sicurezza, o abbiano ricevuto
istruzioni riguardo il corretto e sicuro utilizzo della macchina e i
pericoli che corrono.
- Non cercare di fare riparazioni da soli, si potrebbero causare
danni, rivolgersi al vostro installatore.
- Non toccare o utilizzare l’addolcitore con mani o piedi bagnati,
umidi o scalzi.
1. PREMESSE E INFORMAZIONI GENERALI
1.1 SCOPO DEL MANUALE
Questo libretto d’istruzioni è destinato a personale qualificato,
che sia a conoscenza delle normative di sicurezza igienica del
luogo di installazione.
Lo scopo del manuale è di fornire, sia all’installatore che all’uten-
te, tutte le informazioni utili e le avvertenze riguardanti:
LO STOCCAGGIO E LA CORRETTA CONSERVAZIONE DEL PRO-
DOTTO PRIMA DELL’UTILIZZO:
• il luogo e le condizioni ambientali
• la data di scadenza
PER L’INSTALLATORE
• le precauzioni per la sicurezza igienica
• la descrizione e le caratteristiche dell’apparecchio
• il luogo e la modalità di installazione
• la messa in funzione
• le procedure da adottare dopo periodi di inattività dell’apparec-
chio
• lo smaltimento
• la risoluzione di eventuali problemi
PER L’UTENTE
• le istruzioni per la rigenerazione periodica delle resine
• le avvertenze per la cura e la pulizia dell’apparecchio
• le avvertenze igieniche e sanitarie relative all’acqua prodotta
dall’apparecchio
Il libretto ha anche lo scopo di indicare le responsabilità dell’in-
stallatore e dell’utente ed evitare che venga fatto un uso impro-
prio dell’apparecchio, quindi vi consigliamo di leggere que-
sto manuale prima di installare o utilizzare l’addolcitore.
L’inosservanza delle seguenti disposizioni comporta la decadenza
di responsabilità del produttore, da eventuali danni cagionati a
persone, cose o animali e la decadenza di qualsiasi garanzia
sull’apparecchio.
1.2 CONSERVAZIONE DEL MANUALE
Il presente libretto costituisce parte integrante ed essenziale del
prodotto. Esso va conservato con cura dall’utente e dovrà
sempre accompagnare l’apparecchio, anche in caso di sua
cessione ad altro proprietario o utente.
1.3 IDENTIFICAZIONE DELL’APPARECCHIO
L’addolcitore è identificato dalle cifre in grassetto scritte in basso
a sinistra sull’etichetta (fig. 2, I) dell’addolcitore attaccata sulla
bombola, sull’imballo e nell’ultima pagina, sul retro di questo
libretto.
1.4 DICHIARAZIONE DI CONFORMITÀ
L’apparecchio è realizzato in conformità delle Regolamentazioni
Comunitarie e leggi nazionali applicabili nel momento della sua
immissione sul mercato.
La dichiarazione di conformità sottoscritta dal costruttore è sem-
pre a disposizione su richiesta e sul sito.
1.5
NORME DI SICUREZZA IGIENICA E SPERIMENTAZIONE ICIM
Questa apparecchiatura è stata sottoposta a sperimentazione
da parte di ICIM s.p.a. Istituto di Certificazione Italiano per la
Meccanica presso il proprio laboratorio accreditato, al fine di
certificare la conformità alle seguenti normative:
• Reg. n.1935/2004/CE prodotti e componenti a contatto
con alimenti secondo disposizioni MOCA.
• D.M. n.174/2004 prodotti e componenti utilizzati a contat-
to con acqua potabile.
Si rende NECESSARIO per le riparazioni e la manutenzione
ordinaria e straordinaria l’utilizzo di ricambi originali per ga-
rantire la sicurezza igienica e prestazionale.
1.6 CONSIGLI UTILI E AVVERTENZE
PER LO STOCCAGGIO:
• Immagazzinare l’addolcitore in un luogo asciutto
• la temperatura di stoccaggio deve essere compresa
tra 0 - 35 °C
• la durata di conservazione deve prevedere il suo utilizzo entro
24 Mesi
PER L’INSTALLATORE
Vi consigliamo di installare l’apparecchio dopo aver letto attenta-
mente le istruzioni del presente manuale e vi suggeriamo in caso
di difficoltà, di chiedere l’assistenza del vostro rivenditore i cui
dati sono riportati nell’ultima pagina, sul retro del libretto.
PER L’UTENTE
• Non cercare di fare riparazioni da soli, si potrebbero causare
danni, rivolgersi al vostro installatore.
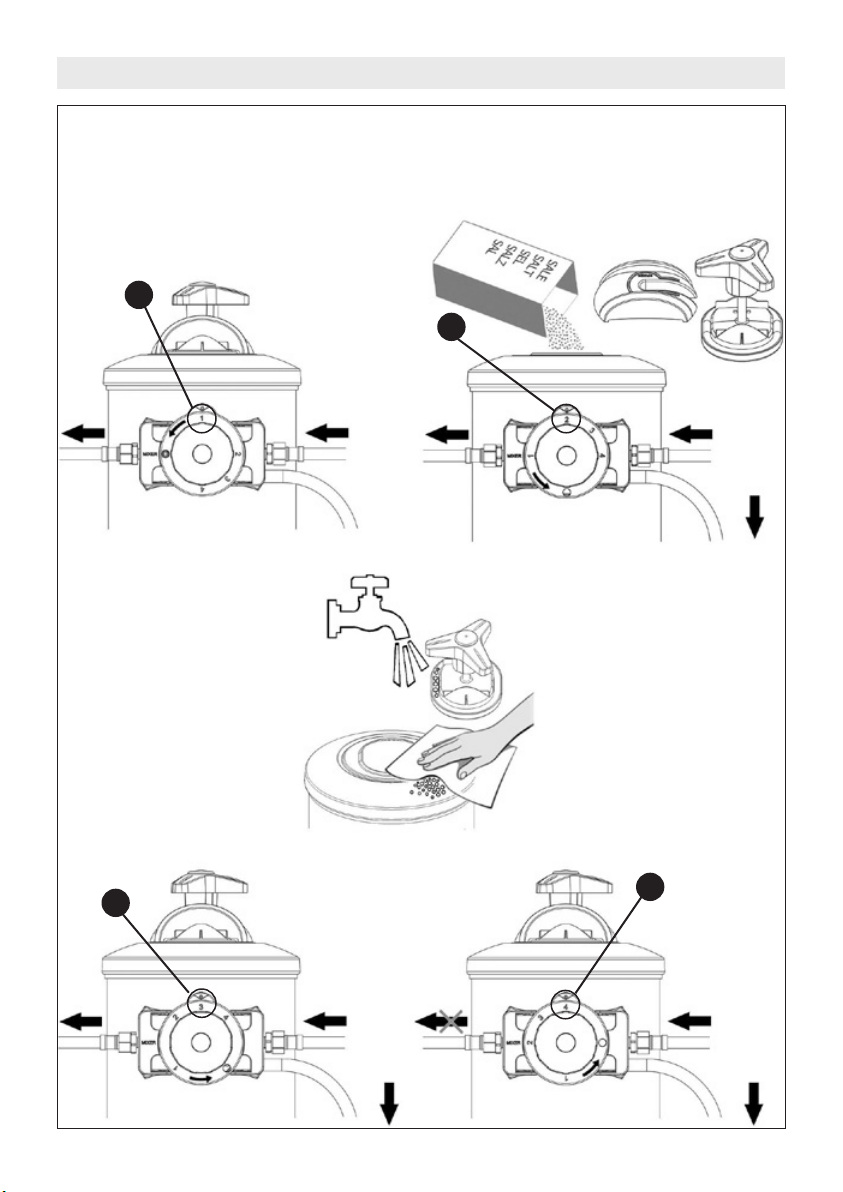
• Per la rigenerazione manuale e il rabbocco periodico del sa-
le leggere attentamente il capitolo “MESSA IN FUNZIONE E
ISTRUZIONI PER LA RIGENERAZIONE”.
• La pulizia dell’addolcitore è a cura dell’utente.
La ditta produttrice non è responsabile di eventuali danni
e/o infortuni che possano derivare dalla mancata osservan-
za di queste precauzioni.
2. CONOSCERE L’APPARECCHIO
2.1 PRINCIPIO DI FUNZIONAMENTO
Le resine cationiche inserite nella bombola dell’addolcitore, han-
no la proprietà di trasformare il carbonato di calcio (calcare), in
carbonato di sodio il quale è solubile in acqua alle temperature
normalmente presenti sia per le macchine da caffè che nei pro-
duttori di ghiaccio.
La cessione continua di ioni sodio da parte delle resine, indispen-
sabili per l’addolcimento dell’acqua potabile, tende ad esaurirsi
in proporzione alla portata e al consumo dell’acqua sino al loro
esaurimento e quindi è necessaria la loro rigenerazione che viene
effettuata per mezzo del passaggio di acqua e sale da cucina
attraverso le resine esaurite riportando le stesse allo stato attivo
d’origine.
Le resine riducono gradualmente, in funzione del numero di ri-
attivazioni, la loro funzione cationica e conseguentemente l’effi-
cienza, si consiglia la loro sostituzione dopo i sette anni di utilizzo.
2.2 DESCRIZIONE DELL’APPARECCHIO
I principali componenti dell’addolcitore sono:
• 1 valvola IV che garantisce all’utenza l’utilizzo dell’acqua anche
durante la rigenerazione delle resine
• 1 bombola contenente la resina adatta all’addolcimento
dell’acqua
• 1 tappo bombola (fig. 2, G)
ITALIANO
manuale d’istruzioni
Addolcitore d’Acqua IV

Manuale d’istruzioni Addolcitore d’Acqua IV 7
ITALIANO
manuale d’istruzioni
Addolcitore d’Acqua IV
2.3 LA SCATOLA CONTIENE
• 1 addolcitore completo serie IV
• 1 libretto d’istruzioni
• 1 tubo per lo scarico (fig. 2, E)
• 2 raccordi per l’allacciamento idrico (fig. 3)
2.4 CARATTERISTICHE TECNICHE
Pressione acqua d’alimento: . 0,1 ÷ 0,8 MPa (1 ÷ 8 bar)
Portata nominale a 4 bar. ... 800 l/h
Temperatura ambiente:..... 4°C - 35°C
Attacchi allacciamento idrico: 3/8”G; 3/4”G (fig. 3)
2.5 CARATTERISTICHE DELL’ACQUA D’ALIMENTO
L’acqua d’alimento deve:
• essere potabile e limpida (SDI 1)
• avere una temperatura compresa tra 6° e 25°C
• avere durezza inferiore a 900 ppm CaCO3(90°f)
2.6 PRESTAZIONI DEGLI ADDOLCITORI
IN BASE ALLA DUREZZA DELL’ACQUA
3. INSTALLAZIONE
3.1 IMBALLO
• Prima dell’installazione accertarsi che la macchina non presenti
anomalie o danni causati dal trasporto; nel dubbio rivolgersi al
rivenditore i cui dati sono riportati nell’ultima pagina, sul retro
del libretto;
• Conservare per qualche tempo la scatola dell’imballo avendo
cura di non lasciare pezzi dell’imballo pericolosi o piccoli alla
portata dei bambini
3.2 SCELTA DEL LUOGO PER L’INSTALLAZIONE
• Verificare se a monte del punto di installazione dell’apparec-
chio non sia già presente un qualunque sistema di trattamento.
• Verificare che il prelievo dell’acqua avvenga da una tubazione
dove scorre acqua potabile. Si consiglia di effettuare una verifi-
ca dei parametri chimico-fisici e durezza dell’acqua potabile in
ingresso prima della installazione.
• Installare l’apparecchio in un luogo vicino ad un pozzetto per
l’acqua di scarico prodotta durante la rigenerazione
• Installare l’apparecchio in un luogo asciutto e facilmente ac-
cessibile per le operazioni di manutenzione, rigenerazione e
pulizia; non installare la macchina in posti sporchi dove man-
chino i principi di igienicità o in cui sia difficile fare pulizia.
• Verificare che la temperatura dell’ambiente dove si installa la
macchina sia compresa tra 4°C e 35°C.
• Tenere lontano dai prodotti acidi o corrosivi.
• Non installare in ambienti in cui c’è un evidente violazione delle
norme di sicurezza elettrica o antinfortunistica.
• La pressione idrica non deve essere inferiore a 0.1 Mpa (1 bar)
o superiore a 0.8 Mpa (8 bar) (si consiglia almeno 3 o 4 bar).
• Nel caso la pressione superi gli 8 bar occorre installare un
riduttore di pressione.
• Il sale in sacchi o in scatole non deve essere conservato in zone
umide o a contatto con il pavimento, quindi posizionarlo per
esempio su un pallet in legno.
3.3 COLLEGAMENTO ALLA RETE IDRICA (fig. 2)
Il collegamento con la rete idrica deve essere fatto in ottemperan-
za con le norme vigenti, secondo le istruzioni del produttore e da
personale qualificato.
Durante l’istallazione oltre ad usare tubi, raccordi, valvole e com-
ponenti conformi al DM 174/2004 preservare la loro integrità
igienica nella confezione originale fino al momento del montag-
gio, è vietato usare materiali e componenti non idonei al contatto
con acqua potabile conservati in modo igienicamente inadeguato
in quanto potrebbero compromettere la qualità dell’acqua trattata
e l’apparecchiatura.
Controllare se siano presenti i tappi di sicurezza igienica
sulla entrata e uscita dell’apparecchiatura e rimuoverli solo
in fase di allaccio alla rete d’acqua potabile.
3.3.1 RACCORDI RAPIDI
Le connessioni dei tubi con la valvola sono realizzate con attacchi
rapidi.
Collegare i tubi d’entrata (fig. 2, A) e uscita (fig. 2, B) dell’acqua
ai raccordi in dotazione con l’addolcitore avvitandoli in modo
sicuro (fig. 1, A e B).
Per collegare il raccordo alla valvola occorre inserirlo fino in bat-
tuta (fig. 1, C), gli inserti metallici della connessione rapida impe-
discono al tubo di fuoriuscire.
Per scollegare un tubo occorre scaricare la pressione in bombola,
quindi premere l’anello nero che lo circonda in prossimità dell’in-
serimento, dopo di che sfilare il tubo (fig. 1, D).
Verificare che:
• I tubi d’entrata (fig. 2, A) e d’uscita (fig. 2, B) siano conformi
alle norme relative a “Tubi per acqua potabile”.
• Il tubo d’entrata (fig. 2, A) dell’acqua abbia un diametro interno
di almeno 7 mm.
• Tra la rete idrica e l’addolcitore deve essere installato, a cura
dell’utente, un rubinetto (fig. 2, C) che permetta di interrompe-
re il passaggio d’acqua in caso di necessità.
• Installare sul tubo d’uscita una valvola di non ritorno (fig. 2, D)
(DVGW, DIN 1988 T2), per preservare l’addolcitore da eventuali
ritorni di acqua calda che potrebbero danneggiarlo.
• Prevedere un rubinetto per il prelievo dell’acqua in uscita, per il
controllo della durezza.
Controllare che tutti i tubi siano liberi, non schiacciati e senza
strozzature.
3.4 COLLEGAMENTO ALLA RETE DELLO SCARICO
L’acqua che uscirà dallo scarico durante la rigenerazione, deve
essere convogliata attraverso il tubo flessibile (fig. 2, E)compreso
nella confezione nello scarico più vicino.
Nota: mantenere il tubo di scarico sospeso e non immerso
nell’acqua del pozzetto (fig. 2, L).
Al termine dell’installazione, prima di aprire il rubinetto
d’entrata (fig. 2, C), effettuare un risciacquo delle resine co-
me indicato nel capitolo “MESSA IN FUNZIONE E ISTRUZIONI
PER LA RIGENERAZIONE”.
20°f 30°f 40°f 50°f 60°f
11°d 16°d 22° d 28°d 33°d
200ppmCaCO3 300ppmCaCO3 400ppmCaCO3 500ppmCaCO3 600ppmCaCO3
IV8 400 8 5,6 1
IV12 500 10 8,4 1,5
IV16 600 12,5 11,2 2
IV20 900 19 14 2,5
1680 1120 840 672 560
2520 1680 1260 1008 840
3360 2240 1680 1344 1120
4200 2800 2100 1680 1400
LITRI D’ACQUA ADDOLCITI IN BASE ALLA DUREZZA
PESO
[kg]
RESINA
[l]
SALE/RIG.
[kg]
h
[mm]
MODELLO

8Manuale d’istruzioni Addolcitore d’Acqua IV
ITALIANO
manuale d’istruzioni
Addolcitore d’Acqua IV
4. MESSA IN FUNZIONE E
ISTRUZIONI PER LA RIGENERAZIONE
4.1 RISCIACQUO RESINE
Posizionare la manopola della valvola sul numero 4, fase di con-
trocorrente (fig. 5).
Aprire il rubinetto (fig. 2, C) dell’acqua d’entrata e lasciare scor-
rere il flusso dal tubo flessibile (fig. 2, E) fino a quando non sarà
visibilmente limpido. Riportare la monopola sul numero 1.
4.2 RIGENERAZIONE PERIODICA (fig. 5)
• Posizione 2 (FASE DI DEPRESSURIZZAZIONE)
1) Posizionare la manopola della valvola sul numero 2. Allentare
la manopola del tappo (fig. 2, F) ed attendere la depressuriz-
zazione.
2) Togliere il tappo e introdurre il sale nella quantità prescritta in
funzione del modello (vedere tabella paragrafo 2.6)
• Pulizia
Sciacquare il tappo e la sua guarnizione (fig. 5, pulizia) da even-
tuali residui di sale.
Pulire la parte superiore dell’addolcitore da eventuali residui di
sale e asciugare bene la bombola, anche sotto al coprisaldatura,
dall’eventuale acqua salata fuoriuscita.
La ditta produttrice non è responsabile della eventuale cor-
rosione dell’acciaio della bombola causata dalla mancata
osservanza di queste precauzioni.
3) Rimettere il tappo (fig. 2, G) avvitando la manopola del tappo
(fig. 2, F) in modo sicuro.
• Posizione 3 (FASE DI RISCIACQUO)
4) Porre la manopola della valvola sul numero 3.
5) Lasciare uscire l’acqua salata dal tubetto di scarico sino a
quando l’acqua diventerà dolce (40 minuti circa).
• Posizione 4 (FASE DI LAVAGGIO CONTROCORRENTE)
6) Posizionare la manopola sul numero 4, attendere circa 30
secondi (durante la fase di controcorrente l’addolcitore non
eroga acqua all’uscita).
• Posizione 1 (FASE DI LAVORO)
7) Riportare la manopola sul numero 1, fase lavoro.
ATTENZIONE: Durante la rigenerazione l’apparecchio col-
legato all’addolcitore è alimentato, ma con acqua non ad-
dolcita.
4.3 REGOLAZIONE DEL MISCELATORE
Il miscelatore (fig. 2, mixer) è costituito da una vite che svi-
tata gradualmente lascia un residuo di durezza nell’acqua in
uscita.
La miscelazione aumenta svitando la vite. Svolgere questa
operazione con cura e alla fine della regolazione occorre far
scorrere un po’ d’acqua ed effettuare il controllo della du-
rezza.
NB. Il valore della durezza dell’acqua utilizzata deve essere
periodicamente verificato dall’installatore.
5. MANUTENZIONE PER L’INSTALLATORE:
5.1 SOSTITUZIONE DELLE RESINE
La capacità di addolcimento delle resine cessa indicativamente
dopo circa 5-7 anni questo periodo può variare in funzione del-
le caratteristiche dell’acqua in ingresso e dal volume d’acqua
addolcita.
Dopo questo periodo di tempo, occorre valutare se è sufficiente
sostituire le resine o se conviene sostituire l’intero addolcitore.
Per la sostituzione delle resine occorre posizionare la manopola
sul numero 2 (fig. 4).
Attendere qualche secondo per la depressurizzazione della bom-
bola.
Quando l’acqua avrà smesso di uscire dallo scarico, traslare ver-
so l’esterno i due blocchi di plastica (fig. 4, A) e poi sarà possibile
staccare la valvola dalla bombola (fig. 4, B).
Portare la bombola in un luogo adeguato per la sostituzione delle
resine e il lavaggio interno della bombola stessa.
Aprire il tappo (fig. 2, G) e procedere alla sostituzione.
Non smaltire le resine nella fogna.
Le resine non sono biodegradabili e vanno smaltite come rifiuti
speciali non pericolosi (codice CER 190905).
Dopo aver sostituito le resine, pulire la guarnizione del tappo e il
coperchio della bombola da eventuali residui di resina.
Richiudere il tappo e riattaccare la valvola alla bombola.
Chiudere i blocchi e posizionare la manopola sul numero 4 (fig.
5).
Lasciare scorrere l’acqua dallo scarico finché il flusso non sarà
limpido.
Riportare la manopola sul numero 1.
5.2 CONSERVAZIONE DELLA RESINA E MESSA IN
FUNZIONE DOPO SOSTE PROLUNGATE
Qualora l’addolcitore non debba essere utilizzato per un periodo
di tempo superiore ai 30 giorni, occorre prima eseguire una dop-
pia rigenerazione e poi lasciare l’addolcitore con il tappo chiuso
(fig. 2, G).
L’inattività dell’apparecchio oltre i 12 mesi è una condizione da
evitare ed è vietato riattivare il sistema dopo tale periodo di non
utilizzo.
Dopo periodi di inattività di durata inferiore ai 12 mesi, è ne-
cessario effettuare un risciacquo delle resine e una rigenerazio-
ne manuale (vedi par. 4.1 e 4.2) prima della messa in servizio
dell’apparecchio.
6. USO IMPROPRIO DELL’APPARECCHIO
Questo apparecchio è stato progettato per l’addolcimento dell’ac-
qua potabile utilizzata per uso tecnologico e domestico.
L’apparecchio non deve essere utilizzato per altri scopi e non
deve essere modificato o manomesso per alcun motivo.
Ogni altro utilizzo diverso da quanto indicato dal presente manua-
le è da considerarsi improprio e quindi pericoloso.
Il costruttore non può essere considerato responsabile per even-
tuali danni derivanti da usi impropri, erronei ed irragionevoli.
• È vietato alimentare l’apparecchio con liquidi diversi da acqua
potabile.
• È vietato introdurre nella bombola prodotti diversi da cloruro di
sodio NaCl (sale da cucina).
7. SMALTIMENTO DELL’APPARECCHIO
Lo smaltimento di eventuale materiale di scarto deve essere fatto
secondo le normative vigenti.
L’addolcitore è costruito con materiali non pericolosi, la maggiore
parte sono polimeri e acciaio inossidabile, occorrerà quindi smal-
tirli secondo le normative vigenti.
Non smaltire le resine nella fogna.
Le resine non sono biodegradabili e vanno smaltite come rifiuti
speciali non pericolosi (codice CER 190905).

Instruction Manual Water Softener IV 9
ENGLISH
instruction manual
Water Softener IV
WARNINGS FOR THE USER
- This equipment must not be used by children or by people
with physical, mental or sensory impairments, or by people
lacking experience, unless they be supervised by someone
responsible for their safety, or they received instructions
regarding the correct and safe way to use the equipment
and were warned of the risks.
- Never try to repair the equipment by yourself: you may
cause damage. Ask your seller for assistance.
- Never touch or use the water softener with wet or damp
hands or feet, or barefoot.
1. INTRODUCTION AND GENERAL INFORMATION
1.1 OBJECTIVE OF THE MANUAL
This instruction manual is addressed to qualified personnel
who must have knowledge of the health and safety norms of
the place of installation.
The objective of this manual is to give useful information and
warnings, both to the installer and the user, regarding:
HOW TO STORAGE AND KEEP THE EQUIPMENT BEFORE
USE:
• Place and room conditions
• Expiry date
FOR THE INSTALLER
• Precautions for hygienic safety
• Equipment description and characteristics
• Place and mode of installation
• Activation
• Procedures to follow after a period of inactivity of the equip-
ment
• Equipment disposal
• Solutions to some problems
FOR THE USER
• Instructions for the periodic rinsing of the resins
• Instructions for the care and cleaning of the equipment
• Health and hygiene warnings concerning the water produ-
ced by the equipment
The manual also gives you the guidelines to avoid an improper
use of the equipment and it specifies the installer and the
user’s responsibilities, therefore we suggest reading throu-
gh this manual before installing or using the water softe-
ner. If the dispositions are not followed, the manufacturer will
decline responsibility for any damage caused to people, things
or animals, and will consider the guarantee null and void.
1.2 KEEPING THE MANUAL
This manual is an integral part of the product.
It must be kept with care by the user and it must accom-
pany the equipment, even in case of a propriety transfer.
1.3 EQUIPMENT IDENTIFICATION
The equipment is identified by the numbers written in bold
on the bottom left side of the label (fig. 2, I) on the softener’s
tank, on the package and on the back of this manual.
1.4 DECLARATION OF COMPLIANCE
This product complies with the Community Regulations and
national laws applicable at the moment of its entrance on the
market.
The declaration of compliance signed by the manufacturer is
available on request and online.
1.5 HYGIENIC SAFETY NORMS AND ICIM TESTING
This equipment has been tested by the ICIM Institute of Italian
Certificated for the Mechanic, licensed credited labora-tory,
certificated to the compliance with:
• Reg. n.1935/2004/CE products and componence contact
with elements according to the dispositions MOCA.
• D.M. n.174/2004 products and componence utilised in
contact with feed water..
It is NECESSARY to use original replacements for repairs and
maintenance, to guarantee hygienic safety.
1.6 RECOMMENDATIONS AND WARNINGS
FOR THE STORAGE:
• Storage the water softener in a dry place
• The temperature in the storage must be between 0 - 35 °C
• We recommend using the equipment within 24 months
FOR THE INSTALLER
We suggest installing the equipment after carefully reading
the instruction manual. Should complications arise, we sug-
gest asking your seller for assistance. The seller’s information
is written on the last page of this manual.
FOR THE USER
• Never try to repair the equipment by yourself: you may cau-
se damage. Ask your seller for assistance.
• For manual regeneration and regular salt refillings, read the
“ACTIVATION AND INSTRUCTIONS FOR REGENERATION”.
• Cleaning the water softener is part of the user’s duties.
The manufacturers are not responsible for any damage
or harm that may derive by not following these precau-
tions.
2. ABOUT THE EQUIPMENT
2.1 HOW DOES IT WORK?
The cationic resins in the softener’s tank transform calcium
carbonate in sodium carbonate, which is water-soluble at the
working temperatures of both coffee makers and ice makers
machines.
The transfer of sodium ions between the resins and water is
imperative to soften drinking water, but this process tends to
decline in proportion to the flow rate and the consumption
of water. For this reason, it is necessary to regenerate the
exhausted resins by making water and salt flow through them,
therefore returning them to their active state.
The resins gradually lose their cationic function, and conse-
quently their efficiency, with each regeneration. We recom-
mend replacing them after seven years of use.
2.2 EQUIPMENT DESCRIPTION
The main components of the water softener are:
• 1 IV valve that makes it possible to use water even during
resins regeneration
• 1 tank containing the resins for water softening
• 1 tank lid (fig. 2, G)
2.3 THE PACKAGING CONTAINS
• 1 complete water softener IV
• 1 instruction manual
• 1 drain pipe (fig. 2, E)
• 2 joints for the connection to the water system (fig. 3)
2.4 TECHNICAL FEATURES
Pressure of feed water:..... 0,1 ÷ 0,8 MPa (1 ÷ 8 bar)
Nominal flow rate at 4 bar: .. 800 l/h

10 Instruction Manual Water Softener IV
ENGLISH
instruction manual
Water Softener IV
Room temperature: ....... 4°C - 35°C
Joints for the connection to the water system:3/8”G; 3/4”G (fig. 3)
2.5 CHARACTERISTICS OF FEED WATER
Feed water must be:
• Drinkable and clean (SDI 1)
• Temperature must be between 6° and 25°C
• Hardness must be below 900 ppm CaCO3(90°f)
2.6 EQUIPMENT PERFORMANCE BASED ON WATER
HARDNESS
3. INSTALLATION
3.1 PACKAGING
• Before the installation, check that the equipment was not
damaged by the transport and does not show any anomaly.
If in doubt, ask your seller, whose information is written on
the back of this manual.
• Don’t throw the package away for some time, being careful
to keep any dangerous or small parts of the package away
from children.
3.2 CHOOSING THE PLACE OF INSTALLATION
• Ensure that any other water treatment machine is not pre-
sent upline of the place of installation.
• Ensure that feed water comes from a drinking water pipe.
We recommend checking the chemical and physical para-
meters of the drinking water as well as its hardness before
installation.
• Install the equipment near a floor sink, to dispose of the
waste water produced by the regeneration.
• Install the equipment in a dry place that can be easily ac-
cessible to maintain, regenerate and clean the equipment.
Do not install the equipment in dirty and unhygienic places,
or in any place difficult to clean.
• Ensure that room temperature in the place of installation is
between 4°C and 35°C.
• Keep away from corrosive or acid products.
• Do not install in places where electric safety norms or per-
sonal safety norms are openly disregarded.
• Hydric pressure must not be under 0.1 Mpa (1 bar) or over
0.8 Mpa (8 bar). (We recommend at least 3 or 4 bar)
• If hydric pressure is over 8 bar, it is necessary to install a
pressure regulator.
• Salt packages or boxes must not be kept in humid places
or in direct contact with the floor: keep it, for example, on a
wooden pallet.
3.3 CONNECTION TO THE WATER SYSTEM (fig. 2)
The connection of the equipment to the water system must
be done according to all applicable norms, following the in-
structions of the manufacturer and qualified personnel.
During the installation use pipes, hoses, valves and com-
ponents which comply with the applicable Italian norm on
hygienic safety, the Ministerial Decree 174/2004. They must
be kept in their sealed package until the moment of instal-
lation to preserve their hygienic safety. It is forbidden to use
components that are not suitable for drinking water contact,
or components whose hygienic safety was compromised, as
they could corrupt the quality of treated water and the equi-
pment itself.
Check if there are hygienic security taps on the entrance
and exit of the equipment. Remove them only during this
phase and not before.
3.3.1 QUICK JOINTS
The pipes are connected to the valve by quick joints.
Connect the water inlet (fig. 2, A) and outlet (fig. 2, B) pipes
to the joints in the package, tightening them safely (fig. 1, A
and B).
To connect the joint to the valve it is necessary to insert it all
the way in (fig. 1, C). The metal inserts of the quick joint will
prevent the pipe from disconnection.
To disconnect the pipe it is necessary to depressurize the
tank, then press on the black ring that surrounds the pipe next
to the insertion, and extract the pipe (fig. 1, D).
Ensure that:
• The water inlet and outlet pipes (fig. 2, A and B) comply with
the norms on drinking water pipes.
• The water inlet pipe (fig. 2, A) has an internal diameter of at
least 7 mm.
• A water inlet tap (fig. 2, C) must be installed by the user
between the water system and the water softener, to ensure
that water flow can be interrupted in case of necessity.
• Install on the water outlet a check valve (fig. 2, D) (DVGW,
DIN 1988 T2) to protect the water softener from a reverse
flow of hot water that could cause damage.
• Install a tap to take a sample of the outlet water, to test its
hardness.
All pipes must be free, not crushed or constricted.
3.4 CONNECTION TO THE DRAIN SYSTEM
Waste water resulting from the regeneration is funnelled into
the floor sink by the flexible pipe (fig. 2, E) included in the
package.
Warning: keep the drain pipe suspended over and not
immersed in the water of the sink (fig. 2, L).
At the end of the installation, before opening the water
inlet tap (fig. 2, C), rinse the resins as explained in the
chapter “ACTIVATION AND INSTRUCTIONS FOR THE RE-
GENERATION”.
4. ACTIVATION AND INSTRUCTIONS
FOR THE REGENERATION
4.1 RINSING THE RESINS
Turn the valve handle on number 4, backwash mode (fig. 5).
Open the water inlet tap (fig. 2,C) and let the water flow throu-
20°f 30°f 40°f 50°f 60°f
11°d 16°d 22° d 28°d 33°d
200ppmCaCO3 300ppmCaCO3 400ppmCaCO3 500ppmCaCO3 600ppmCaCO3
IV8 400 8 5,6 1
IV12 500 10 8,4 1,5
IV16 600 12,5 11,2 2
IV20 900 19 14 2,5
1680 1120 840 672 560
2520 1680 1260 1008 840
3360 2240 1680 1344 1120
4200 2800 2100 1680 1400
LITRES OF WATER SOFTENED, BASED ON HARDNESS
WEIGHT
[kg]
RESIN
[l]
SALT/RIG.
[kg]
h
[mm]
MODEL

Instruction Manual Water Softener IV 11
ENGLISH
instruction manual
Water Softener IV
gh the flexible pipe (fig. 2, E) until it is clean.
Turn the handle back on number 1.
4.2 PERIODIC REGENERATION (fig. 5)
• Position 2 (DEPRESSURIZATION MODE)
1) Turn the valve handle on number 2. Loosen the cover han-
dle (fig. 2, F) and wait until depressurization.
2) Remove the lid (fig. 2, G) and add the required quantity of
salt according to the model (see the table at paragraph 2.6)
• Cleaning
Clean the lid and the seal (fig. 5, cleaning) from any salt re-
sidue.
Clean the upper part of the water softener from any salt resi-
due and clean the tank and under the cover of the weld joint
of any leaked salt water.
The manufacturer does not take responsibility for the
corrosion of the tank caused by the failure to follow the-
se instructions.
3) Put the lid back on (fig. 2, G) and tighten the cover handle
(fig. 2, F) safely.
• Position 3 (RINSING MODE)
4) Turn the valve handle on number 3.
5) Let the salt water come out from the drain pipe until the
water is fresh (around 40 minutes)
• Position 4 (BACKWASH CLEANING MODE)
6) Turn the valve handle on number 4 and wait for 30 se-
conds (during the backwash mode, the water softener does
not supply water)
• Position 1 (SERVICE MODE)
7) Put the valve handle back on number 1, service mode.
WARNING: during the regeneration, the machine con-
nected to the water softener is supplied with non-softe-
ned water.
4.3 MIXER CONTROL
The mixer (fig. 2, mixer) is composed of a screw. By gradually
loosening the screw, the equipment leaves a residue of hard-
ness in the exiting water.
The more you loosen the screw, the more hardness it leaves.
This operation must be performed with care. At the end of the
operation, it is necessary to check the hardness levels.
Attention: the hardness levels in the water must be periodical-
ly checked by the installer.
5. MAINTENANCE FOR THE INSTALLER:
5.1 CHANGING THE RESINS
The resins’ softening capacity ends after 5-7 years. This pe-
riod can change based on the characteristic of the feed water
and the quantity of softened water.
After this period of time, the user needs to decide if it is enou-
gh to change the resins or if it is better to change the water
softener itself.
To change the resins it is necessary to turn the valve handle
on number 2 (fig. 4). Wait a few seconds until tank depres-
surization.
When water stops coming out of the drain, move the plastic
blocks outwards (fig. 4, A). It will then be possible to detach
the valve from the tank (fig. 4, B)
Bring the tank to an appropriate place to change the resins
and clean the interior of the tank.
Open the lid (fig. 2, G) and change the resins.
Do not throw the resins in the sewers.
The resins are not biodegradable and must be considered a
non-hazardous waste (EU code CER 190905).
After changing the resins, clean the lid seal and the upper part
of the softener from any resin residue.
Close the lid and attach the valve to the tank.
Close the blocks and turn the handle on number 4 (fig. 5).
Let the water flow from the drain pipe until it is clean.
Turn the handle back on number 1.
5.2 RESIN PRESERVATION AND ACTIVATION AFTER
A LONG PERIOD OF INACTIVITY
If the water softener is not to be used for more than 30 days,
it is necessary to do a double regeneration first and then leave
the water softener with the lid (fig. 2, G) closed.
We suggest avoiding a period of inactivity longer than 12
months. It is forbidden to reactivate the system after this pe-
riod of inactivity.
If the period of inactivity is shorter than 12 months, it is ne-
cessary to rinse the resins and do a manual regeneration
(paragraph 4.1 and 4.2) before reactivating the equipment.
6. IMPROPER USE OF THE EQUIPMENT
This equipment has been created to soften drinking water for
domestic and technological use. The equipment must not be
used for any other purpose and it must not be modified or
tampered with in any way.
Any other use than the one specified in this manual is impro-
per and therefore dangerous.
The manufacturer cannot be considered responsible for any
damage caused by improper, mistaken or illogical use of the
equipment.
• It is forbidden to feed the equipment with any liquid other
than drinking water.
• It is forbidden to introduce in the tank any products other
than salt (NaCl).
7. EQUIPMENT DISPOSAL
Any waste must be disposed of according to the applicable
norms.
The water softener was built with non-hazardous materials
like polymers and stainless steel, and they must be disposed
of according to the applicable norms.
Do not throw the resins in the sewer.
The resins are not biodegradable. They are classified as
non-hazardous waste, and must be disposed of accordingly
(EU code CER 190905).

12 Livret d’instruction Adoucisseur d’eau IV
AVERTISSEMENTS POUR L’UTILISATEUR
- Cet appareil ne doit pas être utilisé par des enfants ou par
des personnes avec des capacités physiques, mentales ou
sensorielles réduites, ou qui n’ont pas d’expérience, sauf s’ils
sont sous la supervision de personnes responsables pour leur
sécurité, ou s’ils ont reçu des instructions sur comme utiliser
l’appareil correctement et en sécurité, et sur les risques qu’ils
courent.
- Ne pas tenter de réparer l’appareil seuls: on pourrait causer
des dommages. Demandez assistance à votre installateur.
- Ne pas toucher l’adoucisseur avec les mains ou les pieds
baignés, humides, ou pieds nus.
1. INTRODUCTION ET INFORMATIONS GÉNÉRALES
1.1 OBJECTIF DU MANUEL
Ce livret d’instruction s’adresse à personnel qualifié, qui connaît
les règles d’hygiène et sécurité du lieu d’installation.
L’objectif du livret est de donner à l’installateur et à l’utilisateur
des informations utiles et des avertissements regardants:
LO STOCKAGE ET LA CONSERVATION DE L’APPAREIL AVANT
L’UTILISATION::
• Le lieu et les conditions de l’environnement
• La date d’expiration
POUR L’INSTALLATEUR
• Précautions pour l’hygiène et la sécurité
• Description de l’appareil et ses caractéristiques
• Lieu et modalité d’installation
• Mise en marche
• Procédures à suivre après une période d’inactivité de l’appareil
• Traitement de l’appareil
• Résolution de certains problèmes
POUR L’UTILISATEUR
• Instructions pour le rinçage périodique des résines
• Instructions pour le soin et le nettoyage de l’appareil
• Les avertissements hygiéniques et sanitaires concernants l’eau
produite par l’appareil
Le livret a aussi l’objectif d’indiquer les responsabilités de l’in-
stallateur et de l’utilisateur, et d’éviter que l’appareil soit utilisé
en manière incorrecte, donc on vous conseille de lire ce livret
avant d’installer ou d’utiliser l’adoucisseur. Le manque d’ob-
servation des dispositions suivantes comporte l’annulation de
la responsabilité du producteur pour des dommages causés à
personnes, objets ou animaux, et aussi l’annulation de la garantie
de l’appareil.
1.2 CONSERVATION DU LIVRET
Le livret est une partie indispensable du produit.
Il faut le conserver avec soin et il doit toujours accompagner
l’appareil, même dans le cas de cession de l’appareil à un
autre propriétaire ou utilisateur.
1.3 IDENTIFICATION DE L’APPAREIL
L’adoucisseur est identifié par les chiffres en gras écrites en
bas à gauche sur l’étiquette (fig. 2, I) collée sur la bouteille de
l’adoucisseur, sur l’emballage et sur la dernière page sur le dos
de ce livret.
1.4 DÉCLARATION DE CONFORMATION
L’appareil est conforme avec les Règlements Communautaires
et les lois nationales italiennes applicables au moment de son
entrée sur le marché.
La déclaration de conformation signée par le producteur est
toujours à disposition sur demande et sur le site.
1.5 NORMES ICIM DE SÉCURITÉ SANITAIRE ET EXPÉRIMENTALE
Ce dispositif a été testé par ICIM S.p.A. - Istituto di
Certificazione Italiano per la Meccanica - au sein de son la-
boratoire accrédité afin de certifier la conformité aux normes
suivantes:
• Reg. n. 1935/2004/CE: matériaux et objets destinés à
entrer en contact avec des denrées alimentaires.
• D.M. n. 174/2004: produits et composants destinés à
entrer en contact avec l’eau potable.
Il est nécessaire d’utiliser des pièces de rechange originales
pour les réparations et la manutention périodique et extraor-
di-naire, afin de garantir la sécurité hygiénique.
1.6 CONSEILS UTILES ET AVERTISSEMENTS
POUR LE STOCKAGE:
• Stocker l’adoucisseur dans un lieu sec
• La température dans le lieu de stockage doit être comprise
entre 0 - 35 °C
• L’appareil doit être utilisé entre 24 mois
POUR L’INSTALLATEUR
On vous conseille d’installer l’appareil après avoir lu attentive-
ment les instructions dans ce livret. En cas de difficulté, on vous
conseille de demander l’assistance de votre vendeur, les don-
nées de qui se trouvent sur la dernière page sur le dos de ce
livret.
POUR L’UTILISATEUR
• Ne pas tenter de réparer l’appareil seuls: on pourrait causer
des dommages. Demandez assistance à votre installateur.
• Pour la régénération manuelle et le rechargement périodique
du sel, lire attentivement le chapitre “MISE EN MARCHE ET
INSTRUCTIONS POUR LA RÉGÉNÉRATION”
• Le nettoyage de l’adoucisseur est soin de l’utilisateur.
Le producteur n’est pas responsable pour les dommages
ou/et les accidents causés par le manque d’observation de
ces précautions.
2. CONNAÎTRE L’APPAREIL
2.1 COMMENT FONCTIONNE-T-IL?
Les résines cationiques qui se trouvent dans la bouteille de l’a-
doucisseur ont la propriété de transformer le carbonate de cal-
cium (calcaire) en carbonate de sodium. Ceci est soluble dans
l’eau à des températures présentes normalement et dans les
machines à café et dans les distributeurs de glaçons.
La cession continue de ions sodium de la part des résines est
indispensable pour l’adoucissement de l’eau potable, mais ce
procès tends à s’épuiser en proportion du débit et de la con-
sommation d’eau. Donc, il faut régénérer les résines en faisant
passer eau et sel à travers les résines épuisées, en les reportant
à l’état actif.
Les résines réduisent graduellement leur fonction cationique et
donc leur rendement en fonction du nombre de réactivations. On
conseille de les changer après sept ans d’utilisation.
2.2 DESCRIPTION DE L’APPAREIL
Les pièces principales de l’adoucisseur sont:
• 1 valve IV qui permet d’utiliser l’eau même pendant la rég-
énération des résines
• 1 bouteille qui contient les résines pour l’adoucissement de
l’eau
• 1 couvercle de la bouteille (fig. 2, G)
FRANÇAIS
Livret d’instruction
Adoucisseur d’Eau IV

Livret d’instruction Adoucisseur d’eau IV 13
FRANÇAIS
Livret d’instruction
Adoucisseur d’Eau IV
2.3 L’EMBALLAGE CONTIENT
• 1 adoucisseur complet série IV
• 1 livret d’instructions
• 1 tuyau d’évacuation (fig. 2, E)
• 2 raccords rapides pour le raccordement hydrique (fig. 3)
2.4 CARACTÉRISTIQUES TECHNIQUES
Pression de l’eau d’alimentation:..... 0,1 ÷ 0,8 MPa (1 ÷ 8 bar)
Débit nominal à 4 bar: ............ 800 l/h
Température ambiante:............ 4°C - 35°C
Joints pour le raccordement hydrique: 3/8”G; 3/4”G (fig. 3)
2.5 CARACTÉRISTIQUES DE L’EAU D’ALIMENTATION
L’eau d’alimentation doit:
• Être potable et limpide (SDI 1)
• Avoir une température comprise entre 6° et 25°C
• Avoir une dureté sous 900 ppm CaCO3(90°f)
2.6 PERFORMANCE DE L’ADOUCISSEUR
SELON LA DURETÉ DE L’EAU
3. INSTALLATION
3.1 EMBALLAGE
• Avant d’installer l’appareil, vérifier qu’il ne présente pas des
anomalies ou des dommages causés par le transport. Si vous
êtes incertains, contactez le vendeur, les donnés de qui vous
trouverez sur la dernière page, sur le dos de ce livret.
• Conserver l’emballage pour quelque temps, faisant attention à
laisser des pièces petits ou dangereux de l’emballage hors de
la portée des enfants.
3.2 CHOISIR LE LIEU D’INSTALLATIONE
• Vérifier qu’en amont du point d’installation de l’appareil il n’y
ait déjà un autre système de traitement.
• Vérifier que l’eau soit prélevée d’un tuyau pour l’eau potable.
On conseille de vérifier les paramètres chimiques-physiques et
la dureté de l’eau potable en entrée avant de l’installation.
• Installer l’appareil près d’un siphon de sol pour la canalisation
des eaux usées produites pendant la régénération.
• Installer l’appareil dans un lieu sec et facilement accessible
pour les opérations de manutention, régénération et nettoyage:
ne pas installer l’appareil dans des lieux sales où les principes
d’hygiène ne sont pas respectés, ou où il est difficiles de net-
toyer.
• Vérifier que la température de l’environnement d’installation
soit comprise entre 4° et 35°C.
• Gardez loin de produits acides ou corrosifs.
• Ne pas installer dans des lieux où les mesures de sécurité él-
ectrique et pour la prévention des accidents du travail ne soient
pas respectés.
• La pression de l’eau ne doit pas être inférieure à 0,1 Mpa (1
bar) ou supérieure à 0.8 Mpa (8 bar) (on conseille au moins 3
ou 4 bar).
• Dans le cas où la pression dépasse 8 bar, il faut installer un
réducteur de pression.
• Les sacs ou les boîtes de sel ne doivent pas être conser-
vés dans des lieux humides ou à contact direct avec le sol.
Positionnés-les, par exemple, sur des palettes en bois.
3.3 RACCORDEMENT AU RÉSEAU HYDRIQUE (fig. 2)
Le raccordement au réseau hydrique doit être fait en respectant
tous les normes applicables, selon les instructions du producteur,
et par personnel qualifié.
Pendant l’installation il faut utiliser des tuyaux, joints, valves et
pièces qui respectent la norme italienne applicable sur la sécurité
hygiénique, le Décret Ministériel 174/2004. Laissez-les dans leur
emballage jusqu’au moment de l’installation, pour préserver leur
intégrité hygiénique. Il est interdit d’utiliser des matériaux et de
pièces qui ne sont pas adaptes au contact avec l’eau potable ou
conservés en manière non-hygiénique: ils pourraient compromet-
tre la qualité de l’eau traité et l’appareil.
Contrôler s’il y a des bouchons des sécurité sur l’entrée et
la sortie de l’appareil. Les enlever seulement pendant le
raccordement au réseau hydrique.
3.3.1 RACCORDS RAPIDES
Les tuyaux sont reliés avec la valve par des raccords rapides.
Reliez les tuyaux d’entrée (fig. 2, A) et de sortie (fig. 2, B) de l’eau
aux raccords rapides en dotation (fig.1, A et B), en les vissant
sûrement.
Pour relier le raccord à la valve il faut l’insérer complètement
jusqu’à la fin (fig. 1, C). Les pièces métalliques des raccords
rapides empêchent au tuyau de se détacher.
Pour débrancher le tuyau il faut dépressuriser la bouteille, puis
presser l’anneau noir qui l’entoure près du raccordement, et
enfin enlever le tuyau (fig. 1, D)
Vérifiez que:
• Les tuyaux d’entrée (fig. 2, A) et de sortie (fig. 2, B) respectent
les normes sur les tuyaux pour l’eau potable.
• Le tuyau d’entrée (fig. 2, A) ait un diamètre interne d’au moins
7 mm.
• Entre le réseau hydrique et l’adoucisseur il faut installer un
robinet (fig. 2, C) qui permet d’interrompre le passage d’eau en
cas de nécessité.
• Installer sur le tuyau de sortie de l’eau un clapet anti-retour (fig.
2, D) (DVGW, DIN 1988 T2), pour protéger l’adoucisseur des
retours d’eau chaude qui le pourraient endommager.
• Installer un robinet pour le prélèvement d’eau de sortie pour
contrôler sa dureté.
Contrôler que tous les tuyaux ne soient pas écrasés ou étranglés.
3.4 RACCORDEMENT AU RÉSEAU D’ÉVACUATION
L’eau qui sort de l’appareil pendant la régénération doit être
canalisée dans un tuyau flexible (fig. 2, E), compris dans l’embal-
lage, dans le siphon plus proche.
Avertissement: placer le tuyau suspendu au-dessus de l’eau
du siphon, pas immergé. (fig. 2, L)
Une fois l’installation complétée, avant d’ouvrir le robinet
d’entrée (fig. 2, C), rincer les résines selon les instructions
20°f 30°f 40°f 50°f 60°f
11°d 16°d 22° d 28°d 33°d
200ppmCaCO3 300ppmCaCO3 400ppmCaCO3 500ppmCaCO3 600ppmCaCO3
IV8 400 8 5,6 1
IV12 500 10 8,4 1,5
IV16 600 12,5 11,2 2
IV20 900 19 14 2,5
1680 1120 840 672 560
2520 1680 1260 1008 840
3360 2240 1680 1344 1120
4200 2800 2100 1680 1400
LITRES D’EAU ADOUCIE SELON LA DURETÉ
POIDS
[kg]
RÉSINES
[l]
SEL/RIG.
[kg]
h
[mm]
MODÈLE

14 Livret d’instruction Adoucisseur d’eau IV
FRANÇAIS
Livret d’instruction
Adoucisseur d’Eau IV
du chapitre “MISE EN MARCHE ET INSTRUCTIONS POUR LA
RÉGÉNÉRATION”.
4. MISE EN MARCHE ET INSTRUCTIONS
POUR LA RÉGÉNÉRATION
4.1 RINÇAGE DES RÉSINES
Tourner le bouton de la valve sur le numéro 4, modalité con-
tre-courante (fig. 5).
Ouvrir le robinet (fig. 2, C) d’entrée de l’eau et laisser écouler
l’eau à travers le tuyau flexible (fig. 2, E) jusqu’à ce qu’elle sera
limpide.
Retourner le bouton sur le numéro 1.
4.2 RÉGÉNÉRATION PÉRIODIQUE (fig. 5)
• Position 2 (MODALITÉ DE DÉPRESSURISATION)
1) Placer le bouton de la valve sur le numéro 2. Desserrer le
poignée-couvercle (fig. 2, F) et attendre la fin du procès de
dépressurisation.
2) Enlever le couvercle et recharger le sel respectant la quantité
indiquée selon le modèle (voir le tableau au paragraphe 2.6)
• Nettoyage
Rincer le couvercle et son joint (fig. 5, nettoyage) des résidus
de sel.
Nettoyer la partie supérieure de l’adoucisseur des résidus de sel
et essuyer la bouteille et sous le couvre-soudure de l’éventuelle
eau salée débordée.
Le producteur n’est pas responsable pour une éventuelle
corrosion de l’acier de la bouteille causée par le manque de
suivre ces précautions.
3) Replacer le couvercle (fig. 2, G) et visser le poignée-couvercle
(fig. 2, F) sûrement.
• Position 3 (RINÇAGE)
4) Placer le bouton de la valve sur le numéro 3.
5) Laisser que l’eau salée sort du tuyau d’évacuation jusqu’à ce
qu’elle sera douce (environs 40 minutes).
• Position 4 (MODALITÉ DE NETTOYAGE CONTRE-COURANT)
6) Tourner le bouton de la valve sur le numéro 4 et attendre
environs 30 secondes. (Pendant la modalité de nettoyage
contre-courant, l’adoucisseur ne fournit pas d’eau)
• Position 1 (MODALITÉ DE TRAVAIL)
7) Remettre le bouton de la valve sur le numéro 1, modalité de
travail.
ATTENTION: pendant la régénération, l’appareil connecté à
l’adoucisseur est alimenté avec de l’eau pas adoucie.
4.3 RÉGULATION DU MIXER
Le mixer (fig. 2, mixer) se compose d’une vis. En dévissant gra-
duellement la vis, l’appareil laisse un résidu de dureté dans l’eau
de sortie.
Plus la vis est dévissée, plus la dureté de l’eau augmente. Il est
important de réaliser cette opération avec attention. À régulation
terminée, il faut vérifier la dureté de l’eau de sortie.
Attention: les niveaux de dureté de l’eau doivent être vérifiés
périodiquement par l’installateur.
5. MANUTENTION POUR L’INSTALLATEUR
5.1 CHANGER LES RÉSINES
La capacité d’adoucissement des résines termine après environ
5-7 ans. Cette période peut changer selon les caractéristiques de
l’eau d’alimentation et selon la quantité d’eau adoucie.
Après cette période, il faut étudier s’il est suffisant de changer les
résines ou s’il vaut mieux de changer l’adoucisseur.
Pour changer les résines il faut tourner le bouton de la valve sur
le numéro 2 (fig. 4).
Attendre quelque seconde jusqu’à la fin du procès de dépressur-
isation de la bouteille.
Quand l’eau cesse de sortir du tuyau d’évacuation, tourner vers
l’extérieur les blocs en plastique (fig. 4, A). Il est maintenant pos-
sible de détacher la valve de la bouteille (fig. 4, B).
Emmener la bouteille dans un lieu approprié pour changer les
résines et rincer la partie interne de la bouteille.
Ouvrir le couvercle (fig. 2, G) et changer les résines.
Ne pas jeter les résines épuisées dans l’égout.
Les résines ne sont pas biodégradables et il faut les considérer
un déchet non-dangereux (code européen CER 190905).
Après avoir changé les résines, nettoyer le joint du couvercle et
la partie supérieure de la bouteille d’éventuels résidus de résine.
Fermer le couvercle et rattacher la valve à la bouteille.
Fermer les blocs et tourner le bouton de la valve sur le numéro
4 (fig. 5).
Laisser couler l’eau du tuyau d’évacuation jusqu’à ce qu’elle
sera limpide.
Retourner le bouton de la valve sur le numéro 1.
5.2 CONSERVATION DES RÉSINES ET MISE EN MARCHE
APRÈS UNE PÉRIODE D’INACTIVITÉ
Si l’adoucisseur ne doit pas être utilisé pour une période de
temps qui dépasse 30 jours, il faut d’abord faire une double
régénération et puis laisser l’adoucisseur avec le couvercle fermé
(fig. 2, G).
Laisser l’appareil inactif pour plus de 12 mois est une condition à
éviter et il est défendu de réactiver l’appareil après telle période
d’inactivité.
Pour les périodes d’inactivité inférieures à 12 mois, il faut rincer
les résines et faire un régénération manuelle (voir par. 4.1 et 4.2)
avant de la mise en marche.
6. UTILISATION INCORRECTE DE L’APPAREIL
Cet appareil a été conçu pour adoucir l’eau potable utilisée à but
technologique ou domestique. L’appareil ne doit pas être utilisé
pour d’autres buts et il ne doit pas être modifié ou trafiqué.
Tout autre utilisation différente de celle indiquée dans ce livret est
considérée incorrecte et dangereuse.
Le producteur ne peut pas être considéré responsable pour les
dommages dérivés par une utilisation incorrecte de l’appareil.
• Il est défendu d’alimenter l’appareil avec des liquides différents
de l’eau potable.
• Il est défendu d’introduire dans la bouteille des produits dif-
férents du sel (NaCl).
7. ÉLIMINATION DE L’APPAREIL
L’élimination des déchets doit être faite respectant les normes
applicables.
L’adoucisseur est bâti avec des matériaux non dangereux: il s’a-
git pour la majorité de polymères et acier inoxydable, il faudra
donc les éliminer en respectant les normes applicables.
Ne pas jeter les résines dans l’égout.
Les résines ne sont pas biodégradables et il faut les considérer
un déchet non-dangereux (code européen CER 190905).

Benutzerhandbuch Wasserenthärter IV 15
DEUTSCH
Benutzerhandbuch
Wasserenthärter IV
WARNUNGEN FÜR DEN BENUTZER
- Dieses Gerät soll nicht von Kindern oder von Personen mit ein-
geschränkten Bewegungs-, Geistes- und Erkennungsfähigkeiten,
oder ohne Erfahrung, benutzt werden. Außer wenn sie von
Personen beaufsichtigt werden, die verantwortlich für ihre
Sicherheit sind oder die über die Anweisungen und die korrekte
und sichere Nutzung des Gerätes und über die dadurch laufenden
Gefahren belehrt wurden.
- Eigene Reparaturen sind ausgeschlossen, da Schäden entstehen
könnten. Nur durch qualifiziertes Personal können Reparaturen
durchgeführt werden.
- Nicht mit nassen oder feuchten Händen oder Füssen, und auch
nicht ohne Schuhe berühren
1. EINLEITUNG UND ALLGEIMENE INFORMATIONEN
1.1 ZIEL DES HANDBUCHES
Dieses Handbuch wendet sich an qualifiziertes Personal, das alle
am Aufstellungsort geltenden hygienischen Sicherheitsvorschriften
kennt.
Ziel des Handbuches ist sowohl dem Installateur als auch dem
Benutzer alle nützlichen Informationen und Hinweisen mitzuteilen,
die DIE LAGERUNG UND DIE KORREKTE AUFBEWAHRUNG DES
GERÄTES VOR DER BENUTZUNG betreffen:
• Ort und Umgebungsbedingungen
• Ablauftermin
FÜR DEN INSTALLATEUR
• Maßnahmen für die hygienische Sichereit
• Beschreibung und Merkmale des Gerätes
• Ort und Aufstellungsart
• Inbetriebnahme
• Verfahren nach längerer Nichtbenutzung
• Entsorgung
• Lösung eventueller Probleme
FÜR DEN BENUTZER
• Einleitungen zur periodischen Regeneration der Harze
• Hinweise für die Pflege und Reingung des Gerätes
• Hygienische und danitäre Hinweise bezüglich des vom Gerät gene-
rierten Wassers
Das Handbuch hat auch das Ziel die Verantwortung des Installateurs
und des Benutzers zu weisen und damit eine ungeeignete Nutzung
des Gerätes zu vermeiden. Deshalb ist es empfohlen, das
Handbuch vor der Installation oder Nutzung des Gerätes dur-
chzulesen.
Die Herstellerfirma übernimmt keinerlei Haftung für entstehende
Schäden und/oder Unfälle mit Personen/Dingen/Tieren, die dur-
ch Nichtbeachtung dieser Anweisungen entstehen könnten. Die
Nichtbeachtung macht auch die Garantie ungültig.
1.2 AUFBEWAHRUNG DES HANDBUCHES
Dieses Handbuch ist integrierender Teil des Gerätes.
Der Benutzer soll das Handbuch gut aufbewahren und es soll
immer bei dem Gerät sein, auch wenn das Gerät einem anderen
Eigentümer oder Benutzer überlassen wird.
1.3 GERÄTEIDENTIFIKATION
Der Wasserenthärter ist durch die fettgedruckten Ziffern unten links
der Etikette (Abb. 2, I) des Wasserenthärters. Die Etikette befindet
sich auf der Flasche, auf der Packung und auf der Rückseite dieses
Handbuches.
1.4 KONFORMITÄTSERKLÄRUNG
Das Gerät wurde gemäß den EG-Regelungen und anwendbaren
nationalen Richtlinien hergestellt, die zu Markteintritt galten.
Die vom Hersteller unterschriebene Konformitätserklärung steht
immer auf Anfrage und auf der Webseite der Herstellerfirma zur
Verfügung.
1.5 ICIM-NORMEN FÜR HYGIENISCHE
UND EXPERIMENTELLE SICHERHEIT
Diese Ausrüstung wurde von ICIM s.p.a. (Istituto di Certificazione
Italiano per la Meccanica) in seinem akkreditierten Labor getestet,
um die Konformität der folgenden Vorschriften zu bescheinigen:
• Verordnung (EG) Nr. 1935/2004 über Materialien und
Gegenstände, die dazu bestimmt sind, mit Lebensmitteln in
Berührung zu kommen.
• Ministerialerlass 174/2004 Materialien und Gegenstände, die in
Kontakt mit Trinkwasser verwendet werden.
Für Reparaturen sowie routinemäßige und außerordentl-
iche Wartungsarbeiten ist die Verwendung von Original-
Ersatzteilen ERFORDERLICH, um die hygienische Sicherheit und
Leistungszuverlässigkeit zu gewährleisten.
1.6 EMPFEHLUNGEN UND HINWEISE
FÜR DIE LAGERUNG:
• Lagern Sie das Gerät an einem trockenen Ort
• Die Temperatur des Lagers soll zwischen 0 - 35 °C liegen
• Bei einer Lagerung soll eine Nutzung binnen 24 Monaten vorge-
sehen sein
FÜR DEN INSTALLATEUR
Wir bitten Sie, den Apparat erst in Betrieb zu nehmen, nachdem
Sie die Anweisungen des vorliegenden Handbuches aufmerksam
gelesen haben. Außerdem möchten wir Ihnen empfehlen, bei Fragen
Ihren Händler einzubeziehen, dessen Kontaktdaten auf der Rückseite
des Handbuches zu finden sind.
FÜR DEN BENUTZER
• Eigene Reparaturen sind ausgeschlossen, da Schäden entstehen
könnten. Nur durch qualifiziertes Personal können Reparaturen
durchgeführt werden.
• Für die manuelle Regeneration und die periodische Auffüllung des
Salzes lesen Sie sorgfältig das Kapitel “INBETRIEBNAHME UND
EINLEITUNGEN ZUR REGENERATION”.
• Der Benutzer soll das Gerät selbst reinigen.
Die Herstellerfirma übernimmt keinerlei Haftung für anfallende
Schäden und/oder für Unfälle, die durch Nichtbeachtung dieser
Anweisungen entstehen.
2. DAS GERÄT KENNENLERNEN
2.1 BETRIEBSPRINZIP
Die kationischen Harze in der Wasserenthärterflasche wandeln
Kalziumcarbonat (Kalk) in Natriumcarbonat um, das bei normalen
Temperaturen von sowohl im Wasser von Kaffeemaschinen als auch
von Eis-Hersteller Maschinen lösbar ist.
Die dauerhafte Natriumionenfreisetzung der Harze – die
für die Trinkwasserenthärtung unerlässlich ist – wird durch
Wasserdurchflussmenge und -Verbrauch bestimmt, bis sie aufge-
braucht sind. Deshalb ist eine Regeneration notwendig, die durch
das Durchfließen von Wasser und Kochsalz durch die aufgebrauchten
Harze werden diese in ihr aktives Originalstadium zurückgesetzt.
Die Harze reduzieren graduell, abhängig von der
Reaktivierungsmenge, ihre kationische Funktion und entspre-
chend ihre Effizienz. Es ist empfohlen, die Harze nach sieben
Verbrauchsjahren zu tauschen.
2.2 BESCHREIBUNG DES GERÄTES
Die Hauptbestandteile des Gerätes sind:
• 1 IV Ventil, das dem Benutzer die Benutzung des Wassers auch
während der Harzeregeneration gewährleistet,

16 Benutzerhandbuch Wasserenthärter IV
DEUTSCH
Benutzerhandbuch
Wasserenthärter IV
• 1 Flasche die die Enthärtung geeigneten Harze beinhaltet
• 1 Flaschendeckel (Abb. 2, G)
2.3 PACKUNGSHINALT
• 1 Wasserenthärter Serie IV
• 1 Handbuch
• 1 Abflussrohr (Abb. 2, E)
• 2 Verbindungen für den Wasseranschluss (Abb. 3)
2.4 TECHNISCHE MERKMALE
Druck des Speisewassers: ......... 0,1 ÷ 0,8 MPa (1 ÷ 8 bar)
Nenndurchflussmenge zu 4 bar: ..... 800 l/h
Raumtemperatur: ............... 4°C - 35°C
Anschlüsse für die Wasserzufuhr: .... 3/8”G; 3/4”G (Abb. 3)
2.5 MERKMALE DES SPEISEWASSERS
Das Speisewasser soll:
• klar und Trinkwasser sein (SDI 1)
• eine Temperatur zwischen 6° und 25° C haben
• eine Härte unter 900 ppm CaCO3(90°f) haben
2.6 ENTHÄRTERLEISTUNGEN JE NACH
WASSERHÄRTEGRAD
3. AUFSTELLUNG
3.1 PACKUNG
• Vor der Aufstellung überprüfen Sie bitte, dass das Gerät keine
Schäden oder Mangel aufweist. Im Zweifelsfall sollten eventuell
beim Transport entstandene Schäden dem Händler mitgeteilt wer-
den. Seine Kontaktdaten befinden sich auf der Rückseite dieses
Handbuches.
• Die Packung gut aufbewahren und die kleinen und gefährlichen
Teile weit weg von Kindern aufzubewahren.
3.2 WAHL DES AUFSTELLUNGSORTES
• Überprüfen Sie, dass nicht bereits ein anderes
Wasserbehandlungssystem vorhanden ist.
• Überprüfen Sie, dass die Wasserentnahme aus einem Schlauch
kommt, wo Trinkwasser fließt. Vor der Aufstellung ist eine Analyse
der chemisch-physikalischen Parameter und der Härte des
Eingangstrinkwassers empfohlen.
• Stellen Sie das Gerät in der Nähe eines Pumpensumpfes auf,
damit das während der Regeneration entstandene Abwasser
abfließen kann.
• Stellen Sie das Gerät in einer trockenen und leicht zugäng-
lichen Lage auf, um die Wartungs-, Regenerations- und
Reinigungsarbeiten zu ermöglichen. Das Gerät darf nicht an einem
unsauberen oder schwer zu reinigenden Ort aufgestellt werden,
wo hygienische Grundsätze fehlen.
• Überprüfen Sie, dass die Umgebungstemperatur, wo das Gerät
aufgestellt ist, zwischen 4° C und 35° C liegt.
• Das Gerät darf nicht in der Nähe von säurehaltigen und/oder korro-
dierenden Substanzen aufgestellt werden;
• Stellen Sie das Gerät nicht in eine Umgebung, wo die elektrischen
Sicherheitsbestimmungen sowie die Sicherheit bei der Arbeit nicht
gemäß der festgelegten Richtlinien gegeben sind.
• Vergewissern Sie sich, dass der Wasserdruck nicht unter 0,1 Mpa
(1 bar) oder über 0,8 Mpa (8 bar) ist (es ist mindestens 3 oder 4
bar empfohlen).
• Falls der Wasserdruck über 8 bar ist, ist es empfohlen, ein
Druckminderer einzubauen.
• Aufbewahren Sie das Salz in Säcken bzw. in Schachteln nicht in
feuchten Orten oder auf dem Boden; nutzen Sie beispielsweise
eine Holzpalette.
3.3 ANSCHLUSS AN DAS WASSERNETZ (Abb. 2)
Der Anschluss an das Wassernetz muss gemäß den geltenden
Richtlinien, Herstelleranweisungen und vom qualifizierten Personal
erfolgen.
Während der Aufstellung benutzen Sie nur Rohre, Verbindungen,
Ventile und Bauelemente, die gemäß DM 174/2004 und heben ihren
hygienischen Integrität in der Packung bis zur Aufstellung auf. Es
ist verboten, unpassend hygienisch aufbewahrte Materialien und
Komponenten zu benutzen, die nicht für den Kontakt mit dem
Trinkwasser geeignet sind. Diese könnten die Qualität des behandel-
ten Wassers und des Gerätes beeinträchtigen.
Überprüfen Sie, ob die hygienischen Sicherheitsdeckel am
Eingang und am Ausgang des Gerätes vorhanden sind und en-
tfernen Sie sie nur während der Phase des Anschlusses zum
Trinkwassernetz.
3.3.1 SCHNELLANSCHLÜSSE
Die Schlauchanschlüsse an dem Ventil sind mit Quickverschlüssen
realisiert.
Die mit dem Enthärter gelieferten Verbindungen mit den
Wasserringangs- (Abb. 2, A) und Ausgangsrohren (Abb. 2, B) ver-
binden und sicher verschrauben (Abb. 1, A und B).
Um die Verbindung an das Ventil anzuschließen, ist es notwendig sie
bis zur Anschlag einzustecken (Abb. 1, C). Die Metalleinsätze des
Schnellanschlusses vermeiden eine Schlauchaustritt.
Um einen Schlauch zu trennen, ist es notwendig, den Druck in der
Flasche abzusetzen. Drücken Sie dann den schwarzen Ring, der
neben dem Einsatz ist und ziehen Sie den Schlauch ab (Abb. 1, D).
Überprüfen Sie dass:
• Die Eingangs- (Abb. 2, A) und Ausgangsrohre (Abb. 2, B) gemäß
den „Trinkwasserschläuche Richtlinien“ sind;
• das Wassereingangsrohr (Abb. 2, A) einen inneren Durchmesser
von mindestens 7 mm hat;
• zwischen dem Wassernetz und dem Enthärter einen vom Benutzer
installierten Hahn (Abb. 2, C) vorhanden ist. Dies ermöglicht, den
Wasserdurchfluss zu unterbrechen, falls notwendig.
• Eventuelle Rückläufe von heißem Wasser können den Enthärter
beschädigen. Deshalb ist es empfehlenswert, ein Rückschlagventil
(DVGW, DIN 1988 T2) am Ausgangsrohr (Abb. 2 D) des Enthärters
einzubauen.
• Installieren Sie einen Hahn zur Ausgangswasserentnahme, um die
Härte zu kontrollieren.
Die Anschlussschläuche sollen frei sein und dürfen nicht gequetscht
werden und/oder zu enge Abklemmungen bilden.
20°f 30°f 40°f 50°f 60°f
11°d 16°d 22° d 28°d 33°d
200ppmCaCO3 300ppmCaCO3 400ppmCaCO3 500ppmCaCO3 600ppmCaCO3
IV8 400 8 5,6 1
IV12 500 10 8,4 1,5
IV16 600 12,5 11,2 2
IV20 900 19 14 2,5
1680 1120 840 672 560
2520 1680 1260 1008 840
3360 2240 1680 1344 1120
4200 2800 2100 1680 1400
ENTHÄRTETE LITER VON WASSER NACH DEM HÄRTE
GEWICHT
[kg]
HARZ
[l]
SALZ/RIG.
[kg]
h
[mm]
MODELL

Benutzerhandbuch Wasserenthärter IV 17
DEUTSCH
Benutzerhandbuch
Wasserenthärter IV
3.4 ANSCHLUSS AN DAS ABFLUSSNETZ
Das während der Regeneration abfließende Wasser muss durch ein
Plastikrohr (in der Lieferung enthalten) (Abb. 2, E) in den nächsten
Abfluss geleitet werden.
Anmerkung: Halten Sie das Abflussrohr aufgehängt und nicht
eingetaucht im Wasser des Pumpensumpfes (Abb. 2, L).
Am Ende der Aufstellung, vor dem Öffnen des Eingangshahns
(Abb. 2, C), führen Sie das Programm zum Harzwäsche durch,
wie beschrieben in der Abschnitt “INBETRIEBSNAHME UND
EINLEITUNGEN ZUR REGENERATION”.
4. INBETRIEBSNAHME UND EINLEITUNGEN
ZUR REGENERATION
4.1 HARZE WASCHEN
Stellen Sie den Ventilgriff auf 4, Gegenstrom Phase (Abb. 5).
Wassereingangshahn öffnen (Abb. 2, C) und den Fluss durch den
Plastikschlauch (Abb. 2, E) durchfließen lassen bis er sichtbar klar
ist. Stellen Sie den Ventilgriff auf 1 wieder.
4.2 PERIODISCHE REGENERATION (Abb. 5)
• Position 2 (DRUCKABLASSPHASE)
1) Stellen Sie den Ventilgriff auf 2. Lockern Sie den Deckelgriffknopf
(Abb. 2, F) und warten auf den Druckablass.
2) Deckel aufmachen und füllen Sie die Flasche mit Salz nach dem
Enthärtersmodell (siehe Tabelle in dem Abschnitt 2.6).
• Reinigung
Eventuelle Salzresten auf dem Deckel und Dichtung abspülen (Abb.
5, Reinigung).
Reinigen Sie den oberen Teil von eventuellen Salzresten und trocken
Sie die Flasche gründlich, auch unter der Schweißabdeckung von
dem eventuell abgeflossenen gesalzenen Wasser.
Die Herstellfirma übernimmt keinerlei Haftung für eine even-
tuelle Stahlkorrosion der Flasche, die durch Nichtbeachtung
dieser Anweisungen entsteht.
3) Bei dem sicher Verschrauben des Deckelgriffknopfes (Abb. 2, F)
Deckel (Abb. 2, G) wieder zu machen.
• Position 3 (SPÜLUNGSPHASE)
4) Stellen Sie den Ventilgriff auf 3.
5) Das gesalzene Wasser durch das Abflussrohr fließen lassen, bis
es süß geworden ist (ca. 40 Minuten).
• Position 4 (GEGENSTROMSPHASE)
6) Stellen Sie den Ventilgriff auf 4. Warten Sie ca. 30 Sekunden
(während der Gegenstromphase liefert der Enthärter kein Wasser
am Ausgang).
• Position 1 (BETRIEBSPHASE)
7) Stellen Sie den Ventilgriff auf 1 zurück, Arbeitsphase.
ACHTUNG: Während der Regeneration ist das am Enthärter ver-
bundene Gerät betrieben, aber nicht mit enthärtetem Wasser.
4.3 MISCHERREGELUNG
Der Mischer (Abb. 2, Mixer) beinhaltet eine Schraube, die wenn
graduell gelöst wird, überlässt Härtereste in dem Ausgangswasser.
Beim Lösen der Schraube erhöht sich die Mischung. Führen Sie
diese Operation sorgfältig durch. Am Ende der Regulierung etwas
Wasser fließen lassen und überprüfen Sie die Wasserhärte.
N.B. Der Wert der Wasserhärte muss regelmäßig vom Installateur
überprüft werden.
5. WARTUNG FÜR DEN INSTALLATEUR:
5.1 TAUSCH DER HARZE
Die Enthärtungsfähigkeit der Harze endet ca. nach 5-7 Jahren. Dieser
Zeitraum variiert abhängig von den Eingangswassermerkmalen und
von der enthärteten Wassermenge.
Nach diesem Zeitraum ist es zu überprüfen, ob es reicht, die Harze
zu tauschen oder ob es sich lohnt, das ganze Gerät zu wechseln.
Um die Harze zu tauschen, stellen Sie den Ventilgriff auf 2 (Abb. 4).
Warten Sie einigen Sekunden zum Druckablass der Flasche.
Sobald das Wasser durch den Abfluss nicht mehr abfließt, verschie-
ben Sie die zwei Plastikblöcke (Abb. 4, A) nach außen und dann ist
es möglich, den Ventil von der Flasche abzuziehen (Abb. 4, B).
Bringen Sie die Flasche an einem Ort, der für den Tausch der Harze
und die innere Reinigung der Flasche geeignet ist.
Deckel aufmachen (Abb. 2, G) und Harze tauschen.
Entsorgen Sie die Harze nicht in den Abwasserkanal.
Die Harze sind nicht biologisch abbaubar und müssen als nicht
gefährliche Sonderabfälle entsorgt werden (CER Kodex 190905).
Nachdem die Harze ausgetauscht worden sind, spülen Sie die
Deckeldichtung und den Flaschendeckel von eventuellen Harzeresten
ab.
Deckel wieder zu machen und stecken Sie den Ventil an der Flasche
wieder.
Blöcke zu machen und der Ventilgriff auf 4 stellen (Abb. 5).
Wasser vom Abflussrohr fließen lassen, bis der Fluss klar ist.
Stellen Sie den Ventilgriff auf 1.
5.2 HARZAUFBEWAHRUNG UND INBETRIEBNAHME
NACH LÄNGERER NICHTBENUTZUNG
Falls der Enthärter für mehr als 30 Tage nicht benutzt wird, ist es
vorher notwendig eine Doppelregeneration durchzuführen und der
Enthärter mit verschlossenem Deckel zu lassen (Abb. 2, G).
Eine Nichtbenutzung des Gerätes für mehr als 12 Monate ist zu
vermeiden und es ist verboten, das Gerät wieder nach so einem
Nichtbenutzungszeitraum zu benutzen.
Nach Nichtbenutzungszeiträume von weniger als 12 Monate ist es
notwendig, die Harze zu waschen und eine manuelle Regeneration
(siehe Abschnitte 4.1 und 4.2) durchzuführen, bevor das Gerät wie-
der zu benutzen.
6. NICHTGEEIGNTE NUTZUNG DES GERÄTES
Dieses Gerät ist nur für die Enthärtung des Trinkwasser für den
Haushalt und andere technologische Anwendungen gedacht. Jede
andere Nutzung ist ausgeschlossen und in keinem Fall darf modifi-
ziert und gefälscht werden.
Jede andere Nutzung als die in diesem Handbuch beschriebene ist
ungeeignet und daher gefährlich.
Der Hersteller haftet nicht für Schäden entstanden durch eine unpas-
sende, fälschliche und unvernünftige Nutzung.
• Es ist verboten, das Gerät mit anderen Flüssigkeiten zu betreiben
als mit Trinkwasser.
• Es ist verboten, die Flasche mit anderen Produkte zu füllen als mit
NaCl (Kochsalz).
7. ENTSORGUNG DES GERÄTES
Die Entsorgung eventuellen Abfalles muss gemäß den geltenden
Richtlinien durchgeführt werden.
Der Enthärter ist mit ungefährlichen Materialien, meistens Polymer,
Edelstahl, elektrische und elektronische Teile, herstellt. Es ist de-
shalb notwendig sie gemäß den geltenden Richtlinien zu entsorgen.
Entsorgen Sie die Harze nicht in den Abwasserkanal.
Die Harze sind nicht biologisch abbaubar und müssen als nicht
gefährliche Sonderabfälle entsorgt werden (CER Kodex 190905).

18 Manual de instrucciones para Depurador de Agua IV
ADVETENCIAS PARA EL USUARIO
- Este aparato no debe ser utilizado por niños y personas
con reducidas capacidades físicas, mentales, sensoriales
o sin experiencia, a menos de que sean supervisadas por
personas responsables de sus seguridad o instruidas sobre
el correcto y seguro uso del aparato y los peligros que
curren.
- no haga reparaciones, siempre pregunte a su instalador
para no provocar daños al aparato
- no tocar y no utilizar el aparato con manos y pies mojados,
humedos o descalzos.
1. INFORMACIONES GENERALES
1.1 FINALIDAD DEL MANUAL
Este manual de instrucciones debe ser destinado a personal
cualificado y que conozca perfectamente las normativas de
seguridad vigentes en el lugar de la instalación.
La finalidad del manual es la de proveer, al mismo tiempo
para el instalador y para el usuario, todas las informaciones
útiles y las advertencias sobre:
EL ALMACENAMIENTO Y LA CORRECTA CONSERVACIÓN
DEL PRODUCTO ANTES DE SU USO:
• el lugar y las condiciones ambientales;
• la fecha de caducidad
PARA EL INSTALADOR
• las precauciones para la seguridad e higiene
• la descripción y las carácteristicas del aparato
• el lugar y la manera de instalación
• la puesta en funcionamiento
• los procedimientos después de los periódos de inactividad
del aparato
• la eliminación del aparato
• las soluciones para los problemas
PARA EL USUARIO
• las instrucciones para la regeneración periódica de las resi-
nas
• las advertencias para los cuidados y la limpieza del aparato
• las advertencias para el higiene sobre el agua producto por
el aparato
El manual, también, tiene la finalidad de indicar la responsa-
bilidad del instalador y del usuario y evitar un uso impropio del
aparato, por tanto os aconsejamos leer este manual antes
de la instalar o utilizar el descalcarizador.
El incumplimiento de las siguientes instrucciones implica la
falta de responsabilidad del productor por cada daño contra
personas, objetos y animales y la falta de cualquiera garantía
sobre el aparato.
1.2 CONSERVACIÓN DEL MANUAL
El presente manual de instrucciones constituye parte inte-
grante del producto.
Debe ser conservado con cuidado por el usuario, tam-
bién el caso de que sea vendido a otro usuario.
1.3 INDENTIFICACIÓN DEL APARATO
El descalcificador está identificado por los numeros en negrita
escritos bajo a la izquierda, sobre la tarjeta (fig.2, I) del de-
scalcificador que está sobre la bombona, sobre el envase y en
la última página de este manual.
1.4 DECLARACIÓN DE CONFORMIDAD
El aparato está realizado según las Regulamentaciones
Comunitarias y las leyes nacionales aplicables en el momento
de su introducción en el mercado.
La declaración de conformidad subscrita por el constructor
está siempre a disposición a pedido y sobre el sitio web.
1.5 NORMAS DE SEGURIDAD HIGIÉNICA Y EXPERIMENTAL ICIM
Este equipo ha sido sometido a experimentación por parte de
ICIM s.p.a. Istituto di Certificazione Italiano per la Meccanica
(Instituto Italiano de Certificación para la Mecánica) en su
laboratorio acreditado, para certificar la conformidad a las
siguientes normativas:
• Reg. (Reglamento) n.° 1935/2004/CE productos y compo-
nentes en contacto con alimentos MOCA.
• D.M (Decreto Ministerial) n.° 174/2004 productos y com-
ponentes utilizados en contacto con agua potable.
Usar repuestos originales es NECESARIO para las reparacio-
nes y el mantenimiento ordinario y extraordinario para garanti-
zar la seguridad higiénica y de las prestaciones.
1.6 CONSEJOS UTILES Y ADVERTENCIAS
POR EL ALMACENAMIENTO:
• almacenar el descalcarizador en un lugar seco
• la temperatura de almacenamiento debe ser entre 0 y 35 °C
• el tiempo de conservación debe prever su uso dentro de 24
meses
PARA EL INSTALADOR
Os aconsejamos instalar el aparato después de haber leido
atentamente el manual y os aconsejamos preguntar por la
asistencia de vuestro vendedor; buscará los datos en la última
página, al reverso del manual.
PARA EL USUARIO
• no haga reparaciones, siempre pregunte a su instalador
para no provocar daños al aparato
• para la regeneración manual y el llenado periódico de la sal,
leer atentamente el parráfo “Puesta en servicio y instruccio-
nes para la regeneración”.
• la limpieza del aparato debe ser efectuada por el usua-
rio
La empresa productora no se hace responsable de even-
tuales daños y/o accidentes que puedan derivarse del
nocumplimiento de estas precauciones.
2. CONOCER EL APARATO
2.1 PRINCIPIO DE FUNCIONAMIENTO
Las resinas catiónicas insertadas el la bombona del descalca-
rizador pueden transformar el carbonato de calcio (caliza) en
carbonato de sodio, que es soluble en el agua con las tempe-
raturas normalmente presentes ambos en las máquinas de
café y en los productores de hielo. La emisión de los iones de
sodio por las resinas, indispensables por la descalcarización
del agua, termina según el caudal y el consumo de agua ha-
sta sus terminación; entonces es necesaria sus regeneración,
que está efectuada por medio del paso del agua y de la sal
a través de las resinas terminadas, llevando las mismas en
su estado activo de origén. Las resinas, según el numero de
reactivaciones, reducen sus funciones catiónicas y entoces
sus eficiencia; os aconsejamos sus sustitución depués de
siete años de uso.
2.2 DESCRIPCIÓN DEL APARATO
Los principales componentes del aparato son:
• 1 válvula IV que garantiza el uso del agua también durante
de la regeneración de las resinas
• 1 bombona que contiene las resinas aptas para la descalca-
ESPAÑOL
manual de instrucciones
Depurador de Agua IV

ESPAÑOL
Manual de instrucciones
Depurador de Agua IV
Manual de instrucciones para Depurador de Agua IV 19
rización del agua
• 1 tapón de la bombona (fig. 2,G)
2.3 CONTENIDO DEL ENVASE
• un descalcarizador completo serie IV
• un manual de instrucciones
• conexión para el desagüe (fig. 2, E)
• dos enlaces para la conexión hídrica) (fig. 3)
2.4 CARÁCTERISTICAS TÉCNICAS
Presión agua de alimentación:... 0,1 ÷ 0,8 MPa (1 ÷ 8 bar)
Caudal nominal en 4 bar: ...... 1000 l/h
Temperatura del ambiente: ..... 4°C - 35°C
Enganches para el enlace hídrico: 3/8”G; 3/4”G (fig. 3)
2.5 CARÁCTERISTICAS DEL AGUA DE ALIMENTACIÓN
El agua de alimentación debe ser:
• potable y limpia (SDI 1)
• tener una temperatura entre 6° y 25° C
• tener dureza inferior a 900 ppm CaCO3(90°f)
2.6 PRESTACIONES DE LOS DESCALCARIZADORES
SEGÚN LA DUREZA DEL AGUA
3. INSTALACIÓN
3.1 EMBALAJE
• Antes de la instalación, asegurarse que no hagan daños
causados por el transporte; en este caso, pregunte al ven-
dedor (referencias el la última pagina de este manual);
• Conservar el envase del aparato, cuidando que partes peli-
grosas no sean al alcance de los niños.
3.2 ELECCIÓN DEL LUGAR PARA LA INSTALACIÓN
• Verificar que arriba del lugar de instalación no sea presente
un cualquier sistema de tratamiento
• Verificar que el agua sea sacado por un tubo desde un
lugar donde sea agua potable. Os aconsejamos verificar los
parametros químicos – físicos y la dureza del agua potable
en entrada antes de la instalación
• Instalar el aparato en un lugar cerca de un desagüe para
descargar el agua producida durante de la regeneración
• Instalar el aparato en un lugar no humedo y de fácil acceso
para las operaciones de manunteción y de limpieza. No in-
stalar el aparato en lugares sucios o donde faltan los princi-
pios de higiene o sean dificiles las operaciones de limpieza
• Asegurarse que la temperatura del lugar sea comprendida
entre 4°C y 35°C
• no instalar el descalcarizador si se encuentra cerca de su-
stancias y humos ácidos o corrosivos
• no instalar en lugares donde hagan violaciones de las nor-
mas de seguridad eléctrica
• la presión hídrica no sea inferior a 0,1 Mpa (1 bar) o supe-
rior a 0,8 Mpa (8 bar) (aconsejamos 3 - 4 bar)
• si la presión es superior a 8 bar, se necesita instalar un
riductor de presión
• la sal no debe ser conservada en lugares humedos on en
contacto con el piso; por ejemplo, conservarla sobre palé de
madera.
3.3 CONEXIÓN A LA RED HÍDRICA (fig. 2)
La conexión a la red hídrica debe ser efectuada según las
normativas vigentes, según las instrucciones del productor y
por personal cualificado.
Durante de la instalación, además de utilizar tubos, enla-
ces, válvulas y componentes en conformidad con la Potestad
Reglamentaria italiana 174/2004 y conservar su integridad
en el envase original hasta el momento del montaje, està
prohibido usar materiales no idóneos en contacto con el agua
potable, conservados de manera adecuada porqué podrian
comprometer la calidad del agua tratada y el mismo aparato.
Verificar si están presentes los tapones de seguridad de
higiene sobre la entrada y la salida del aparato y remo-
verlos solamente en el momento de conexión a la red de
agua potable.
3.3.1 ENLACES RÁPIDOS
Las conexiones de los tubos son realizadas por enlaces rápid-
os.
Conectar los tubos de entrada (fig. 2, A) y salida (fig. 2,B) del
agua con el descalcarizador enroscándolos de modo seguro
(fig. 1, A, B).
Insertar el tubo en la juntura y empujar hasta que no está en
contacto (fig. 1, C). Las aplicaciones metálicas de la conexión
rápida impiden al tubo escapar.
Para desconectar el tubo, simplemente descargar la presión ,
entonces comprimir el anillo negro que rodea el tubo cerca de
la inserción , después extraer el tubo (fig. 1, D).
Asegurarse que:
• los tubos de entrada (fig. 2,A) y de salida (fig. 2,B), sigan las
normativas de los tubos para agua potable
• el tubo de entrada (fig. 2, A) tenga un diametro interior de 7
mm al menos
• entre la red hídrica y el descalcarizador, tiene que ser insta-
lado por el usuario un grifo (fig. 2, C) que permita interrum-
pir el pasaje de agua en caso de necesidad
• instalar sobre el tubo de salida una válvula de retención (fig.
2, D) (DVGW, DIN 1988 T2) para preservar el descalcifica-
dor contra cada retorno de agua calida que podría causar
daños.
• Considerar un grifo para sacar el agua de salida , para el
control de la dureza.
Asegurarse que todas las conexiones sean libres y no aplasta-
das, sin estrangulamientos.
3.4 CONEXIÓN A LA RED DE DESAGÜE
El agua de salida creada por la regeneración debe eliminarse
encauzándola a través del
tubo flexible (fig, 2,E) incluido en el envase, hacia el desagüe
más cercano.
20°f 30°f 40°f 50°f 60°f
11°d 16°d 22° d 28°d 33°d
200ppmCaCO3 300ppmCaCO3 400ppmCaCO3 500ppmCaCO3 600ppmCaCO3
IV8 400 8 5,6 1
IV12 500 10 8,4 1,5
IV16 600 12,5 11,2 2
IV20 900 19 14 2,5
1680 1120 840 672 560
2520 1680 1260 1008 840
3360 2240 1680 1344 1120
4200 2800 2100 1680 1400
LITROS DE AGUA ABLANDADA EN BASE A LA DUREZA
PESO
[kg]
RESINA
[l]
SALE/RIG.
[kg]
h
[mm]
MODELO

Atención: mantener el tubo suspendido y no sumergido
en el agua del desagüe (fig. 2, L).
Al final de la instalaciòn, antes de abrir los grifos de en-
trada (fig. 2, C), efectuar un enjuage de las resinas, como
está indicado en el cápitulo “Puesta en funcionamiento y
instrucciones para la regeneración”.
4. PUESTA EN FUNCIONAMIENTO Y
INSTRUCCIONES PARA LA REGENERACIÓN
4.1 ENJUAGUE DE LAS RESINAS
Posicionar la empuñadura de la válvula en el n. 4, fase de
contra corriente (fig. 5).
Abrir el grifo (fig. 2, C) del agua de entrada y dejar que corra
el flujo en el tubo (fig. 2, E) hasta que sea limpio.
Poner de nuevo la empuñadura en el número 1.
4.2 REGENERACIÓN PERIÓDICA (fig. 5)
• Posición 2 (FASE DE DEPRESIÓN)
1) Posicionar la empuñadura de la válvula en el número 2.
Aflojar la empuñadura del tapón y esperar la depresión
(fig. 2, F)
2) Quitar el tapón e introducir la sal según la cantidad prescri-
ta en función del modelo (véase tabla párrafo 2.6)
• Limpieza
Enjugar el tapón y su juntura (fig.5, limpieza) desde algunos
residuos de sal.
Limpiar la parte superior del descalcarizador y secar la bom-
bona, también la tapa de la saldadura, desde cualquiera sali-
da de agua salada.
La empresa productora no se hace responsable de even-
tuales daños y/o accidentes que puedan derivarse desde
la corrosión del acero de la bombona, provocada por la
falta de observancia de estas precauciones.
3) Poner de nuevo la tapa (fig. 2, G) enroscando la
empuñadura tapón de modo seguro (fig. 2, F).
• Posición 3 (FASE DE ENGUAJE)
4) Poner la empuñadura de la válvula en el número 3.
5) Dejar que salga el agua salada del tubo de descarga hasta
que el agua se vuelva blanda (40 minutos aprox.).
• Posición 4 (FASE DE CONTRACORRIENTE)
6) Posicionar la empuñadura en el número 4, esperar aprox.
30 segundos (durante la fase de contra corriente el
descalcarizador no suministra agua a la salida).
• Posición 1 (FASE DE TRABAJO)
7) Poner de nuevo la empuñadura en el número 1, fase de
trabajo
¡Atención!: durante de la regeneración, el aparato es
alimentado pero con agua no ablandada
4.3 REGULACIÓN DEL MEZCLADOR
El mezclador (fig. 2, mixer) está constituido por un tornillo que
si se desenrosca gradualmente deja un residuo de dureza
en el agua en salida. La mezcla aumenta desenroscando el
tornillo. Hacer esta operación con cuidado y, al final de la
regulación, dejar correr un poco de agua y efectuar el control
de la dureza.
NB: el valor de la dureza del agua utilizado tiene que ser pe-
riódicamente verificado por el instalador.
5. MANUNTENCIÓN PARA EL INSTALADOR:
5.1 SUSTITUCIÓN DE LAS RESINAS
La capacidad de ablandamiento de las resinas termina más
o menos cada 5-7 años; este periódo puede variar en fun-
ción de las carácteristicas del agua en entrada y del volumen
de agua ablandada. Después de este periódo de tiempo, se
necesita valutar si es suficiente sustituir las resinas o si se ne-
cesita sustituir todo el aparato. Para la sustitución de las resi-
nas, se necesita posicionar la empuñadura sobre el número 2
(fig. 4). Esperar algunos segundos para la desprezurización de
la bombona. Cuando el agua dejará subir desde el desagüe,
transferir hasta el esterior los dos bloqueos de plástico (fig. 4,
A), después será posible sacar la válvula desde la bombona.
(fig 4, B).
Llevar la bombona en un lugar adecuado para la sustitución
de las resinas y el lavado de la misma bombona. Abrir al
tapón (fig. 2, G) y proceder con la sustitución.
No elimine las resinas en la alcantarilla. Las resinas no son
biodegradables y se deben eliminar como basura especial no
peligrosa (código CER 190905). Después de la sustitución de
las resinas, limpiar la juntura del tapón y la tapa de la bombo-
na desde eventuales residuos de resinas.
Encerrar los bloqueos y posicionar la empuñadura sobre el
número 4 (fig. 5). Dejar correr el agua desde el desagüe hasta
que se vuelva limpia. Poner de nuevo la empuñadura en el
número 1.
5.2 CONSERVACIÓN DE LAS RESINAS Y PUESTA EN
FUNCIONAMIENTO DESPUÉS DE PARADAS PROLONGADAS
Si el descalcarizador no debe ser utilizado por un periódo de
tiempo superior a 30 días, primero se necesita hacer una
doble regeneración y después dejar el descalcarizador con el
tapón cerrado (fig. 2, G). Os aconsejamos evitar la inactividad
del aparato por más de 12 meses; está prohibido activar de
nuevo el sistema después de este periódo.
Después de periódos de inactividad inferiores a 12 meses, se
necesita efectuar un enguaje de las resinas y una regenera-
ción manual (vease párrafos 4.1 y 4.2) antes de la puesta en
funcionamiento del aparato.
6. USO INAPROPRIADO DEL APARATO
Este aparato ha sido proyectado para el ablandamiento del
agua potable por uso tecnológico y doméstico. El aparato no
debe ser utilizado por otros usos y no debe ser modificado
para nada. Cualquier otro uso se considerará impropio y por
tanto irracional. El constructor no se hace responsable de
eventuales daños que puedan derivarse de uso impropio o
irracional.
• Está prohibido alimentar el aparato con líquidos distintos
desde el agua potable
• Está prohibido introducir en la bombona productos distintos
de la sal NaCl (sal de cocina)
7. ELIMINACIÓN DEL APARATO
La eliminación de cualquier material residuo tiene que ser
efectuada según las normativas vigentes.
El descalcarizador está construido por materiales no peligro-
sos, la mayoría son polimeros y acero inoxidable; entonces es
necesario eliminarlos según las normativas vigentes.
No elimine los residuos en la alcantarilla.
Las resinas no son biodegradables y deben ser eliminadas
como basura especial no peligrosa. (código CER 190905)
20 Manual de instrucciones para Depurador de Agua IV
ESPAÑOL
manual de instrucciones
Depurador de Agua IV
This manual suits for next models
4
Table of contents
Languages:
Other DVA Water Dispenser manuals
Popular Water Dispenser manuals by other brands

Runxin
Runxin RL-R150 Programming manual

Atlas Filtri
Atlas Filtri AQUARIUS CS16H-1017 user manual

Watts
Watts OneFlow OF744-10 Installation, operation and maintenance manual

3M
3M GT 1000 Owner's manual & installation guide

DS Services of America
DS Services of America Pure Water Dispenser 300m Series How to Clean

KYOWA
KYOWA KW-1500 instruction manual