manuals.online logo
Brands
  1. Home
  2. •
  3. Brands
  4. •
  5. Dwyer Instruments
  6. •
  7. Control Unit
  8. •
  9. Dwyer Instruments DP3 Series Installation and operating instructions

Dwyer Instruments DP3 Series Installation and operating instructions

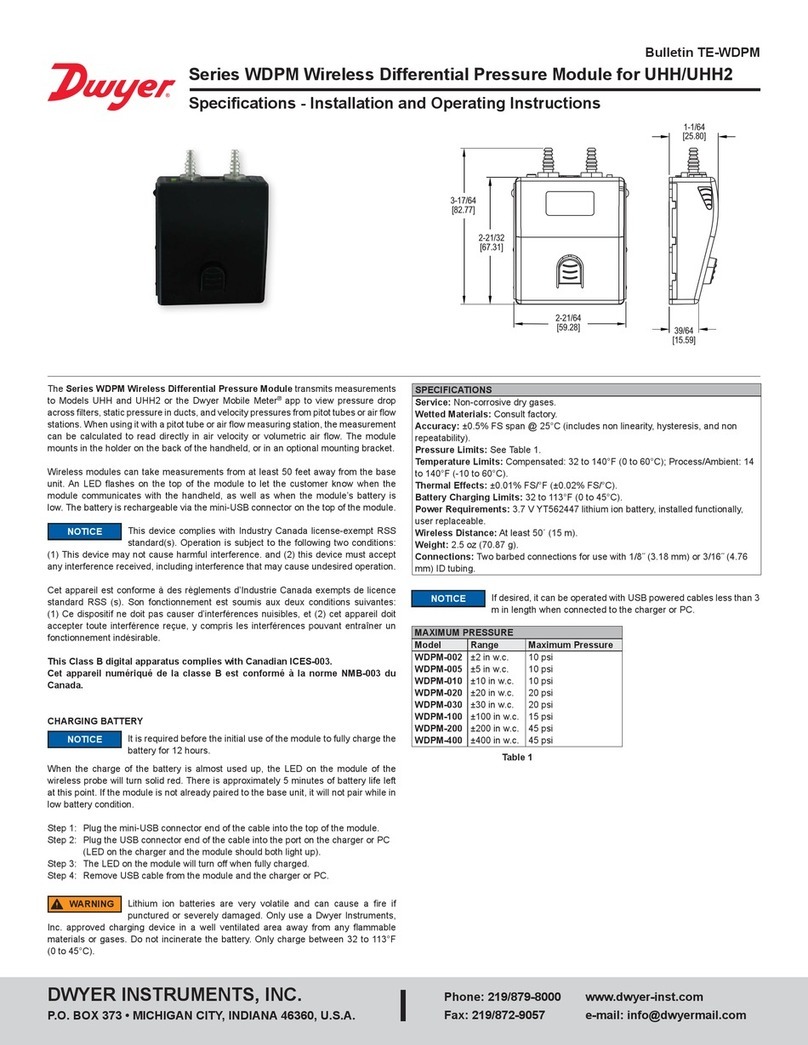
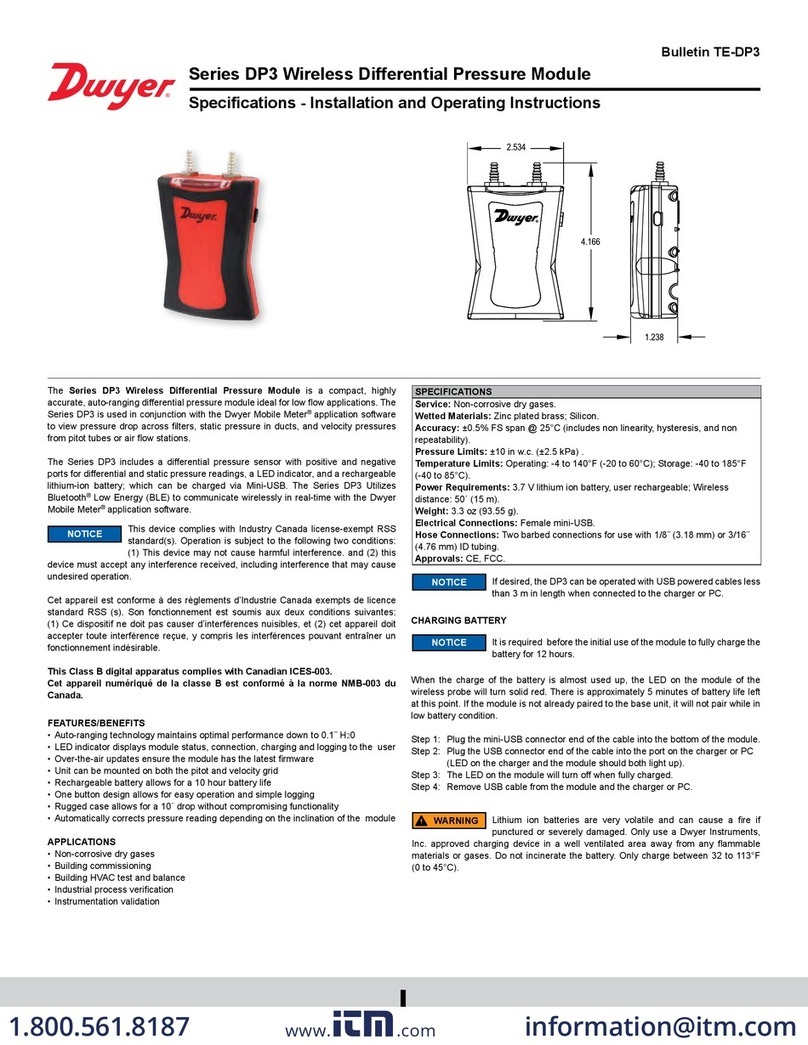
Series DP3 Wireless Differential Pressure Module
Specications - Installation and Operating Instructions
Bulletin TE-DP3
The Series DP3 Wireless Differential Pressure Module is a compact, highly
accurate, auto-ranging differential pressure module ideal for low ow applications. The
Series DP3 is used in conjunction with the Dwyer Mobile Meter®application software
to view pressure drop across lters, static pressure in ducts, and velocity pressures
from pitot tubes or air ow stations.
The Series DP3 includes a differential pressure sensor with positive and negative
ports for differential and static pressure readings, a LED indicator, and a rechargeable
lithium-ion battery; which can be charged via Mini-USB. The Series DP3 Utilizes
Bluetooth®Low Energy (BLE) to communicate wirelessly in real-time with the Dwyer
Mobile Meter® application software.
FEATURES/BENEFITS
• Auto-ranging technology maintains optimal performance down to 0.1˝ H20
• LED indicator displays module status, connection, charging and logging to the user
• Over-the-air updates ensure the module has the latest rmware
• Unit can be mounted on both the pitot and velocity grid
• Rechargeable battery allows for a 10 hour battery life
• One button design allows for easy operation and simple logging
• Rugged case allows for a 10´ drop without compromising functionality
• Automatically corrects pressure reading depending on the inclination of the module
APPLICATIONS
• Non-corrosive dry gases
• Building commissioning
• Building HVAC test and balance
• Industrial process verication
• Instrumentation validation
SPECIFICATIONS
Service: Non-corrosive dry gases.
Wetted Materials: Zinc plated brass; Silicon.
Accuracy: ±0.5% FS span @ 25°C (includes non linearity, hysteresis, and non
repeatability).
Pressure Limits: ±10 in w.c. (±2.5 kPa) .
Temperature Limits: Operating: -4 to 140°F (-20 to 60°C); Storage: -40 to 185°F
(-40 to 85°C).
Power Requirements: 3.7 V lithium ion battery, user rechargeable; Wireless
distance: 50´ (15 m).
Weight: 3.3 oz (93.55 g).
Electrical Connections: Female mini-USB.
Hose Connections: Two barbed connections for use with 1/8˝ (3.18 mm) or 3/16˝
(4.76 mm) ID tubing.
Approvals: CE, FCC.
2.534
4.166
1.238
This device complies with Industry Canada license-exempt RSS
standard(s). Operation is subject to the following two conditions:
(1) This device may not cause harmful interference. and (2) this
device must accept any interference received, including interference that may cause
undesired operation.
Cet appareil est conforme à des règlements d’Industrie Canada exempts de licence
standard RSS (s). Son fonctionnement est soumis aux deux conditions suivantes:
(1) Ce dispositif ne doit pas causer d’interférences nuisibles, et (2) cet appareil doit
accepter toute interférence reçue, y compris les interférences pouvant entraîner un
fonctionnement indésirable.
This Class B digital apparatus complies with Canadian ICES-003.
Cet appareil numériqué de la classe B est conformé à la norme NMB-003 du
Canada.
CHARGING BATTERY
When the charge of the battery is almost used up, the LED on the module of the
wireless probe will turn solid red. There is approximately 5 minutes of battery life left
at this point. If the module is not already paired to the base unit, it will not pair while in
low battery condition.
Step 1: Plug the mini-USB connector end of the cable into the bottom of the module.
Step 2: Plug the USB connector end of the cable into the port on the charger or PC
(LED on the charger and the module should both light up).
Step 3: The LED on the module will turn off when fully charged.
Step 4: Remove USB cable from the module and the charger or PC.
NOTICE
If desired, the DP3 can be operated with USB powered cables less
than 3 m in length when connected to the charger or PC.
It is required before the initial use of the module to fully charge the
battery for 12 hours.
NOTICE
NOTICE
Lithium ion batteries are very volatile and can cause a re if
punctured or severely damaged. Only use a Dwyer Instruments,
Inc. approved charging device in a well ventilated area away from any ammable
materials or gases. Do not incinerate the battery. Only charge between 32 to 113°F
(0 to 45°C).
WARNING
DWYER INSTRUMENTS, INC.
P.O. BOX 373 • MICHIGAN CITY, INDIANA 46360, U.S.A.
Phone: 219-879-8000
Fax: 219-872-9057
www.dwyer-inst.com
e-mail: [email protected]
Printed in U.S.A. 9/20 FR# 444099-10 Rev. 1©Copyright 2020 Dwyer Instruments, Inc.
DWYER INSTRUMENTS, INC.
P.O. BOX 373 • MICHIGAN CITY, INDIANA 46360, U.S.A.
Phone: 219-879-8000
Fax: 219-872-9057
www.dwyer-inst.com
e-mail: [email protected]
Bluetooth® is a registered trademark of Bluetooth SIG, Inc.
CONNECTING THE DP3
For the latest instructions, please refer to the “Help” button in the Options menu in the
Mobile Meter® app.
1. Verify that the UHH4 or newer universal handheld device, or a smart device with
the Dwyer Mobile Meter®app has Bluetooth® technology turned on. Open the
Mobile Meter® app by clicking on the icon.
2. Press “Without Bridge”.
3. The next screen will display a message that reads “Searching For Probes”. When
the DP3 is turned on and discovered by Mobile Meter®the
name of the probe will appear on the screen. Click the checkbox next to the desired
probe.
4. Use the back button or navigation arrow to go back to the Probes List page.
MAINTENANCE/REPAIR
Upon nal installation of the Series DP3, no routine maintenance is required. The
Series DP3 is not eld serviceable and is not possible to repair the unit. Field repair
should not be attempted and may void warranty.
WARRANTY/RETURN
Refer to “Terms and Conditions of Sale” in our catalog and on our website. Contact
customer service to receive a Return Goods Authorization number before shipping the
product back for repair. Be sure to include a brief description of the problem plus any
additional application notes.
If a module does not appear, power the module down, then power
it back on.
NOTICE
LED INDICATER
State Color Timing
Battery is Charging Green Solid On
Low Battery Red Solid On
Low Power State All Off Solid Off
Probe Initializing Amber Blinking (mostly on with a
short time off)
Waiting to Communicate with Handheld Amber Blinking (mostly off with a
short time on)
Communicating with Handheld Green Blinking
This symbol indicates waste electrical products should not be disposed
of with household waste. Please recycle where facilities exist. Check with
your Local Authority or retailer for recycling advice.
USA: California Proposition 65
WARNING: Cancer and Reproductive Harm - www.P65Warnings.ca.gov

This manual suits for next models

2

Other Dwyer Instruments Control Unit manuals

Dwyer Instruments DP3 Series User manual

Dwyer Instruments

Dwyer Instruments DP3 Series User manual

Dwyer Instruments DP3 Series User manual

Dwyer Instruments

Dwyer Instruments DP3 Series User manual

Dwyer Instruments WDPM Series Installation and operating instructions

Dwyer Instruments

Dwyer Instruments WDPM Series Installation and operating instructions

Dwyer Instruments W.E. Anderson WE35 Series Installation and operating instructions

Dwyer Instruments

Dwyer Instruments W.E. Anderson WE35 Series Installation and operating instructions

Dwyer Instruments LOVE CONTROLS 32A Series User manual

Dwyer Instruments

Dwyer Instruments LOVE CONTROLS 32A Series User manual

Dwyer Instruments Love Controls 1600 Series User manual

Dwyer Instruments

Dwyer Instruments Love Controls 1600 Series User manual

Popular Control Unit manuals by other brands

Lexicon NUVERB TDM - REV 1 manual

Lexicon

Lexicon NUVERB TDM - REV 1 manual

Infineon AIROC CYW20829B0-P4TAI100 manual

Infineon

Infineon AIROC CYW20829B0-P4TAI100 manual

Honeywell BSM Installation and setup guide

Honeywell

Honeywell BSM Installation and setup guide

Quectel EG91 Series Hardware design

Quectel

Quectel EG91 Series Hardware design

VIA Technologies SOM-3000-STK quick start guide

VIA Technologies

VIA Technologies SOM-3000-STK quick start guide

Studor Mini-Vent installation instructions

Studor

Studor Mini-Vent installation instructions

Challenger SMART FORCE ASFRM instructions

Challenger

Challenger SMART FORCE ASFRM instructions

Nibco LD-7000 Series Installation, operation & maintenance instructions

Nibco

Nibco LD-7000 Series Installation, operation & maintenance instructions

Allen-Bradley FLEX I/O PROFIBUS 1794-APBDPV1 user manual

Allen-Bradley

Allen-Bradley FLEX I/O PROFIBUS 1794-APBDPV1 user manual

TiSUN MULTIPLEX user guide

TiSUN

TiSUN MULTIPLEX user guide

Zennio MAXinBOX FC Technical documentation

Zennio

Zennio MAXinBOX FC Technical documentation

TJERNLUND UC1 UNIVERSAL CONTROL (VERSION X.06) ADDENDUM 8505017 REV B... manual

TJERNLUND

TJERNLUND UC1 UNIVERSAL CONTROL (VERSION X.06) ADDENDUM 8505017 REV B... manual

SBS Technologies VP7 Hardware user manual

SBS Technologies

SBS Technologies VP7 Hardware user manual

Watts FEBCO 860 Small Series Installation maintenance repair manual

Watts

Watts FEBCO 860 Small Series Installation maintenance repair manual

Lamtec ETAMATIC quick reference

Lamtec

Lamtec ETAMATIC quick reference

Bticino KW8013 User and installation manual

Bticino

Bticino KW8013 User and installation manual

Edwards Signaling AdaptaBeacon 104 Series Installation instructions manual

Edwards Signaling

Edwards Signaling AdaptaBeacon 104 Series Installation instructions manual

CORNING MobileAccess1000 Installation and configuration guide

CORNING

CORNING MobileAccess1000 Installation and configuration guide

manuals.online logo
manuals.online logoBrands
  • About & Mission
  • Contact us
  • Privacy Policy
  • Terms and Conditions

Copyright 2025 Manuals.Online. All Rights Reserved.