dynarex Home Care Bed User manual

Reorder No. 10404
Reorder No. 10405
Home Care Bed
Full Electric Bed
with Emergency Hand Crank
Manufactured for:
Dynarex Corporation
10 Glenshaw Street
Orangeburg, NY 10962
USA • www.dynarex.com
Made in China
SYMBOL GLOSSARY
For an explanation of symbols
used in Dynarex packaging, visit
dynarex.com/symbols.php

GENERAL WARNINGS
Notices in this manual apply to hazards or unsafe practices which could result in personal injury and/or
property damage.
To ensure user safety in operating this Home Care Bed, all warnings, safety information and
instructions must be followed. Failure to do so may result in serious bodily injury or damage to the bed.
Once assembled for operational use, if any part of the bed is not working properly, call a qualified
technician to examine and repair it.
Routine cleaning and electrical inspection should be performed by the user.
All repair and maintenance on the bed should be performed by a qualified technician. After any
adjustments, repair or service and BEFORE use, make sure all attaching hardware is tightened securely.
Note to Technicians: Do not service the bed without first reading and understanding this.
If you are unable to understand the warnings, cautions or the instructions, contact an
authorized customer service sales rep or dealer before using this equipment, otherwise injury
or property damage may result.
We recommend that two (2) people perform the installation.
Inspect all parts for shipping damage before assembly and use. In case of damage to any part of the
bed's components, do not use that part. Contact the shipping carrier immediately for instructions on
reporting concealed shipping damage.
Assembly - Ensure that the head and foot deck sections are securely locked to each other and the head
and foot boards are secured to the deck BEFORE use.
After assembly, test to make sure that all of the bed sections are properly and securely installed and
operate correctly BEFORE use.
Keep all body parts including fingers and arms away when mechanism is moving. There are many
pinch points which could cause personal injury and/or damage to the bed.
Do not expose the bed to excessive heat or moisture
Make sure the bed is plugged into a properly grounded 110 volt outlet.
This bed is intended for home use only. It is NOT for nursing home facilities or hospital use and was not
designed to meet nursing home facility or hospital standards.
Ensure that the pendant and power cords are routed and secured properly so that the cords do not
become entangled, pinched and/or severed during operation of the electric bed or inhibit maneuvering
around the bed. NEVER operate the bed if these cords are damaged.
Ensure all cables and cords are routed in a way that they will not become entangled, pinched, or
run-over.
Be sure to check that all cords are not pinched, stretched or in any way stressed. Never wind cords
around the bed or other objects to compensate for excess cord length. Never allow cords to fall under
the casters.
Keep all moving parts and all drive shafts free of obstructions during operation of the bed. (i.e.
blankets/sheets, heating blankets/pads, tubing, wiring, etc. and other types of products using electric
cords which may get tangled around the bed, legs or optional side rails).
Never operate the bed if it has a damaged cord or plug. If the bed is not working properly call a
qualified technician.
Unplug the power cord from wall BEFORE performing any maintenance on the bed.
DO NOT force connectors into the junction, otherwise injury or damage may occur.
Keep all cords away from heated or hot surfaces. i.e. radiators, heating pads, portable gas heaters.
Do not open assemblies such as the motor, hand control unit, junction box or electrical control box.
There are no user serviceable parts inside these components. Only trained service personnel are
qualified to repair these parts. If uncertified individuals perform any work on these beds, the
warranty is voided.
When using liquids in or around the bed, caution should be taken to ensure that liquids of any kind are
not spilled. If a liquid is spilled in or around the electric bed, unplug the bed immediately before
cleaning. Clean up the spill and let the bed or area dry thoroughly before using the electric controls
again.
When the bed is not used for an extended period, UNPLUG the cord from the wall outlet.
When disassembling the bed, make sure all parts are in the lowest position.
Do not press multiple buttons at the same time. Allow a slight pause between functions. If different
buttons are pressed too quickly or multiple buttons are pressed at the same time, the bed may not
operate as desired.
DO NOT attempt to operate bed controls prior to completion of assembly as damage to bed
components may occur.
Close supervision is necessary when this product is used by or near children or physically challenged
individuals.
NEVER PERMIT ANYONE TO BE UNDER THE BED OR IN BETWEEN THE RAISED BED FRAME
COMPONENTS AT ANY TIME.
Total Weight capacity 600 lb. excluding additional weight from Rails, Mattress and other accessories.
Suggested patient weight capacity 550 lb.
Never permit more than one person on/in the bed at any time.
Body weight should be evenly distributed over the surface of the bed. Do not lay, sit or lean in such a
way that the patient's entire body weight is placed only on the raised head or foot sections of the bed.
This includes when repositioning or transferring in or out of bed
Ensure the mattress is centered on the frame. This will minimize the risk of the occupant becoming
trapped between the mattress and any bed rail being used.
To prevent casters from moving whenever the bed is stationary, ensure the bed caster locks are
properly engaged.
ALWAYS lock the caster locks when transferring into or out of the bed. Inspect the caster locks
BEFORE using the bed to ensure the locks function adequately.
Even with casters properly locked, some floor surfaces will allow the bed to move under some
conditions. Use of the bed on such floor surfaces must be evaluated by the care provider.
The bed is not designed to be used as a patient transport. When transporting a patient, use an
approved patient transport, otherwise injury or damage may result.
When operating or moving the bed, always ensure that the individual in the bed is properly positioned
within the bed.
DO NOT allow extremities to extend beyond the sides or between the bed rails when performing these
functions.
Keep the bed a minimum of 12 inches (30.48 cm) away from any wall.
Be sure that the bed is free and clear of all obstructions for full range of motion. Damage to the unit and
wall will occur if the bed contacts the wall, chair rail or other obstruction while in motion.
Improper use of some bed accessories (patient restraints, side rails, trapeze devices, etc.) can cause
patient injury or death. Consult a health care professional or the accessory manufacturer for proper use
instructions.
If using optional bed side rails, check to ensure they are properly and securely installed BEFORE using
the bed.
Individuals that cannot prevent themselves from rolling/climbing out of the bed may require alternative
safe means of restraint.
Optional side rails are NOT intended to be used as a restraint and may be used only if they are
necessary to treat a resident's medical symptoms, which are documented in the resident's medical
record. A physician or healthcare professional should be consulted for an alternative means of safe
restraint.
Replacement mattresses and bed rails with dimensions different than the original equipment supplied or
approved may not be interchangeable. Variations in bed side rail design, and thickness, size or density
of the mattress could lead to entrapment. Use ONLY authorized replacement parts and accessories.
Side rails do not fall within any weight limitations. Side rails can be deformed or broken if excessive side
pressure is exerted.
Do not use side rails as a push handle when moving the bed.
Ensure that ignition sources are minimized near combustible/explosive gases and materials.
Do not use near explosive gases. May be a fire hazard when used with oxygen administering
equipment other than nasal or masked type.
Use ONLY mask or nasal type oxygen administering equipment around the bed. The use of any other
type of oxygen administering equipment can result in a fire hazard.
When using nasal or masked type administering equipment, oxygen or air tubing must be routed and
secured properly to ensure that tubing does not become entangled and eventually severed during
normal operation of the bed.
2

GENERAL WARNINGS
Notices in this manual apply to hazards or unsafe practices which could result in personal injury and/or
property damage.
To ensure user safety in operating this Home Care Bed, all warnings, safety information and
instructions must be followed. Failure to do so may result in serious bodily injury or damage to the bed.
Once assembled for operational use, if any part of the bed is not working properly, call a qualified
technician to examine and repair it.
Routine cleaning and electrical inspection should be performed by the user.
All repair and maintenance on the bed should be performed by a qualified technician. After any
adjustments, repair or service and BEFORE use, make sure all attaching hardware is tightened securely.
Note to Technicians: Do not service the bed without first reading and understanding this.
If you are unable to understand the warnings, cautions or the instructions, contact an
authorized customer service sales rep or dealer before using this equipment, otherwise injury
or property damage may result.
We recommend that two (2) people perform the installation.
Inspect all parts for shipping damage before assembly and use. In case of damage to any part of the
bed's components, do not use that part. Contact the shipping carrier immediately for instructions on
reporting concealed shipping damage.
Assembly - Ensure that the head and foot deck sections are securely locked to each other and the head
and foot boards are secured to the deck BEFORE use.
After assembly, test to make sure that all of the bed sections are properly and securely installed and
operate correctly BEFORE use.
Keep all body parts including fingers and arms away when mechanism is moving. There are many
pinch points which could cause personal injury and/or damage to the bed.
Do not expose the bed to excessive heat or moisture
Make sure the bed is plugged into a properly grounded 110 volt outlet.
This bed is intended for home use only. It is NOT for nursing home facilities or hospital use and was not
designed to meet nursing home facility or hospital standards.
Ensure that the pendant and power cords are routed and secured properly so that the cords do not
become entangled, pinched and/or severed during operation of the electric bed or inhibit maneuvering
around the bed. NEVER operate the bed if these cords are damaged.
Ensure all cables and cords are routed in a way that they will not become entangled, pinched, or
run-over.
Be sure to check that all cords are not pinched, stretched or in any way stressed. Never wind cords
around the bed or other objects to compensate for excess cord length. Never allow cords to fall under
the casters.
Keep all moving parts and all drive shafts free of obstructions during operation of the bed. (i.e.
blankets/sheets, heating blankets/pads, tubing, wiring, etc. and other types of products using electric
cords which may get tangled around the bed, legs or optional side rails).
Never operate the bed if it has a damaged cord or plug. If the bed is not working properly call a
qualified technician.
Unplug the power cord from wall BEFORE performing any maintenance on the bed.
DO NOT force connectors into the junction, otherwise injury or damage may occur.
Keep all cords away from heated or hot surfaces. i.e. radiators, heating pads, portable gas heaters.
Do not open assemblies such as the motor, hand control unit, junction box or electrical control box.
There are no user serviceable parts inside these components. Only trained service personnel are
qualified to repair these parts. If uncertified individuals perform any work on these beds, the
warranty is voided.
When using liquids in or around the bed, caution should be taken to ensure that liquids of any kind are
not spilled. If a liquid is spilled in or around the electric bed, unplug the bed immediately before
cleaning. Clean up the spill and let the bed or area dry thoroughly before using the electric controls
again.
When the bed is not used for an extended period, UNPLUG the cord from the wall outlet.
When disassembling the bed, make sure all parts are in the lowest position.
Do not press multiple buttons at the same time. Allow a slight pause between functions. If different
buttons are pressed too quickly or multiple buttons are pressed at the same time, the bed may not
operate as desired.
DO NOT attempt to operate bed controls prior to completion of assembly as damage to bed
components may occur.
Close supervision is necessary when this product is used by or near children or physically challenged
individuals.
NEVER PERMIT ANYONE TO BE UNDER THE BED OR IN BETWEEN THE RAISED BED FRAME
COMPONENTS AT ANY TIME.
Total Weight capacity 600 lb. excluding additional weight from Rails, Mattress and other accessories.
Suggested patient weight capacity 550 lb.
Never permit more than one person on/in the bed at any time.
Body weight should be evenly distributed over the surface of the bed. Do not lay, sit or lean in such a
way that the patient's entire body weight is placed only on the raised head or foot sections of the bed.
This includes when repositioning or transferring in or out of bed
Ensure the mattress is centered on the frame. This will minimize the risk of the occupant becoming
trapped between the mattress and any bed rail being used.
To prevent casters from moving whenever the bed is stationary, ensure the bed caster locks are
properly engaged.
ALWAYS lock the caster locks when transferring into or out of the bed. Inspect the caster locks
BEFORE using the bed to ensure the locks function adequately.
Even with casters properly locked, some floor surfaces will allow the bed to move under some
conditions. Use of the bed on such floor surfaces must be evaluated by the care provider.
The bed is not designed to be used as a patient transport. When transporting a patient, use an
approved patient transport, otherwise injury or damage may result.
When operating or moving the bed, always ensure that the individual in the bed is properly positioned
within the bed.
DO NOT allow extremities to extend beyond the sides or between the bed rails when performing these
functions.
Keep the bed a minimum of 12 inches (30.48 cm) away from any wall.
Be sure that the bed is free and clear of all obstructions for full range of motion. Damage to the unit and
wall will occur if the bed contacts the wall, chair rail or other obstruction while in motion.
Improper use of some bed accessories (patient restraints, side rails, trapeze devices, etc.) can cause
patient injury or death. Consult a health care professional or the accessory manufacturer for proper use
instructions.
If using optional bed side rails, check to ensure they are properly and securely installed BEFORE using
the bed.
Individuals that cannot prevent themselves from rolling/climbing out of the bed may require alternative
safe means of restraint.
Optional side rails are NOT intended to be used as a restraint and may be used only if they are
necessary to treat a resident's medical symptoms, which are documented in the resident's medical
record. A physician or healthcare professional should be consulted for an alternative means of safe
restraint.
Replacement mattresses and bed rails with dimensions different than the original equipment supplied or
approved may not be interchangeable. Variations in bed side rail design, and thickness, size or density
of the mattress could lead to entrapment. Use ONLY authorized replacement parts and accessories.
Side rails do not fall within any weight limitations. Side rails can be deformed or broken if excessive side
pressure is exerted.
Do not use side rails as a push handle when moving the bed.
Ensure that ignition sources are minimized near combustible/explosive gases and materials.
Do not use near explosive gases. May be a fire hazard when used with oxygen administering
equipment other than nasal or masked type.
Use ONLY mask or nasal type oxygen administering equipment around the bed. The use of any other
type of oxygen administering equipment can result in a fire hazard.
When using nasal or masked type administering equipment, oxygen or air tubing must be routed and
secured properly to ensure that tubing does not become entangled and eventually severed during
normal operation of the bed.
3

GENERAL WARNINGS
Notices in this manual apply to hazards or unsafe practices which could result in personal injury and/or
property damage.
To ensure user safety in operating this Home Care Bed, all warnings, safety information and
instructions must be followed. Failure to do so may result in serious bodily injury or damage to the bed.
Once assembled for operational use, if any part of the bed is not working properly, call a qualified
technician to examine and repair it.
Routine cleaning and electrical inspection should be performed by the user.
All repair and maintenance on the bed should be performed by a qualified technician. After any
adjustments, repair or service and BEFORE use, make sure all attaching hardware is tightened securely.
Note to Technicians: Do not service the bed without first reading and understanding this.
If you are unable to understand the warnings, cautions or the instructions, contact an
authorized customer service sales rep or dealer before using this equipment, otherwise injury
or property damage may result.
We recommend that two (2) people perform the installation.
Inspect all parts for shipping damage before assembly and use. In case of damage to any part of the
bed's components, do not use that part. Contact the shipping carrier immediately for instructions on
reporting concealed shipping damage.
Assembly - Ensure that the head and foot deck sections are securely locked to each other and the head
and foot boards are secured to the deck BEFORE use.
After assembly, test to make sure that all of the bed sections are properly and securely installed and
operate correctly BEFORE use.
Keep all body parts including fingers and arms away when mechanism is moving. There are many
pinch points which could cause personal injury and/or damage to the bed.
Do not expose the bed to excessive heat or moisture
Make sure the bed is plugged into a properly grounded 110 volt outlet.
This bed is intended for home use only. It is NOT for nursing home facilities or hospital use and was not
designed to meet nursing home facility or hospital standards.
Ensure that the pendant and power cords are routed and secured properly so that the cords do not
become entangled, pinched and/or severed during operation of the electric bed or inhibit maneuvering
around the bed. NEVER operate the bed if these cords are damaged.
Ensure all cables and cords are routed in a way that they will not become entangled, pinched, or
run-over.
Be sure to check that all cords are not pinched, stretched or in any way stressed. Never wind cords
around the bed or other objects to compensate for excess cord length. Never allow cords to fall under
the casters.
Keep all moving parts and all drive shafts free of obstructions during operation of the bed. (i.e.
blankets/sheets, heating blankets/pads, tubing, wiring, etc. and other types of products using electric
cords which may get tangled around the bed, legs or optional side rails).
Never operate the bed if it has a damaged cord or plug. If the bed is not working properly call a
qualified technician.
Unplug the power cord from wall BEFORE performing any maintenance on the bed.
DO NOT force connectors into the junction, otherwise injury or damage may occur.
Keep all cords away from heated or hot surfaces. i.e. radiators, heating pads, portable gas heaters.
Do not open assemblies such as the motor, hand control unit, junction box or electrical control box.
There are no user serviceable parts inside these components. Only trained service personnel are
qualified to repair these parts. If uncertified individuals perform any work on these beds, the
warranty is voided.
When using liquids in or around the bed, caution should be taken to ensure that liquids of any kind are
not spilled. If a liquid is spilled in or around the electric bed, unplug the bed immediately before
cleaning. Clean up the spill and let the bed or area dry thoroughly before using the electric controls
again.
When the bed is not used for an extended period, UNPLUG the cord from the wall outlet.
When disassembling the bed, make sure all parts are in the lowest position.
Do not press multiple buttons at the same time. Allow a slight pause between functions. If different
buttons are pressed too quickly or multiple buttons are pressed at the same time, the bed may not
operate as desired.
DO NOT attempt to operate bed controls prior to completion of assembly as damage to bed
components may occur.
Close supervision is necessary when this product is used by or near children or physically challenged
individuals.
NEVER PERMIT ANYONE TO BE UNDER THE BED OR IN BETWEEN THE RAISED BED FRAME
COMPONENTS AT ANY TIME.
Total Weight capacity 600 lb. excluding additional weight from Rails, Mattress and other accessories.
Suggested patient weight capacity 550 lb.
Never permit more than one person on/in the bed at any time.
Body weight should be evenly distributed over the surface of the bed. Do not lay, sit or lean in such a
way that the patient's entire body weight is placed only on the raised head or foot sections of the bed.
This includes when repositioning or transferring in or out of bed
Ensure the mattress is centered on the frame. This will minimize the risk of the occupant becoming
trapped between the mattress and any bed rail being used.
To prevent casters from moving whenever the bed is stationary, ensure the bed caster locks are
properly engaged.
ALWAYS lock the caster locks when transferring into or out of the bed. Inspect the caster locks
BEFORE using the bed to ensure the locks function adequately.
Even with casters properly locked, some floor surfaces will allow the bed to move under some
conditions. Use of the bed on such floor surfaces must be evaluated by the care provider.
The bed is not designed to be used as a patient transport. When transporting a patient, use an
approved patient transport, otherwise injury or damage may result.
When operating or moving the bed, always ensure that the individual in the bed is properly positioned
within the bed.
DO NOT allow extremities to extend beyond the sides or between the bed rails when performing these
functions.
Keep the bed a minimum of 12 inches (30.48 cm) away from any wall.
Be sure that the bed is free and clear of all obstructions for full range of motion. Damage to the unit and
wall will occur if the bed contacts the wall, chair rail or other obstruction while in motion.
Improper use of some bed accessories (patient restraints, side rails, trapeze devices, etc.) can cause
patient injury or death. Consult a health care professional or the accessory manufacturer for proper use
instructions.
If using optional bed side rails, check to ensure they are properly and securely installed BEFORE using
the bed.
Individuals that cannot prevent themselves from rolling/climbing out of the bed may require alternative
safe means of restraint.
Optional side rails are NOT intended to be used as a restraint and may be used only if they are
necessary to treat a resident's medical symptoms, which are documented in the resident's medical
record. A physician or healthcare professional should be consulted for an alternative means of safe
restraint.
Replacement mattresses and bed rails with dimensions different than the original equipment supplied or
approved may not be interchangeable. Variations in bed side rail design, and thickness, size or density
of the mattress could lead to entrapment. Use ONLY authorized replacement parts and accessories.
Side rails do not fall within any weight limitations. Side rails can be deformed or broken if excessive side
pressure is exerted.
Do not use side rails as a push handle when moving the bed.
Ensure that ignition sources are minimized near combustible/explosive gases and materials.
Do not use near explosive gases. May be a fire hazard when used with oxygen administering
equipment other than nasal or masked type.
Use ONLY mask or nasal type oxygen administering equipment around the bed. The use of any other
type of oxygen administering equipment can result in a fire hazard.
When using nasal or masked type administering equipment, oxygen or air tubing must be routed and
secured properly to ensure that tubing does not become entangled and eventually severed during
normal operation of the bed.
4

BED ASSEMBLY
5
UNPACKING THE BED
1. Join the head and foot section. Remove the head deck section of the bed from the packaging and
place it on its side to your RIGHT with the center mounting latches on your LEFT.
2. Remove foot deck section of the bed from the packaging and place it on its side to your LEFT with
the center mounting rivets facing on your RIGHT.
3. The head and foot end sections of the bed should now be on their side at a 130° angle to one
another.
4. Hook the TOP center mounting latch on the HEAD deck section with the TOP center mounting rivet
on the FOOT deck section.
5. With one (1) person holding the TOP of the bed together, have the other person hook the BOTTOM
center mounting latch on the HEAD end section with the BOTTOM center mounting rivet on the
FOOT end section.
NOTE: It may be necessary to grasp the center support of the foot end section of the bed so that the
BOTTOM center rivet can be maneuvered into the BOTTOM center mounting latch. It may be
necessary to slightly lift the head OR foot end sections of the bed to secure the center rivets into the
center mounting latches.
Foot Deck Section Center Support
Mounting
Latch
Mounting
Rivet
Head Deck
Section
130º Angle

BED ASSEMBLY
6
6. After the head and foot end sections of the bed are connected, push the decks into a horizontal
(straight) position while still on their sides.
7. Attach the boards. Raise the headboard and footboard ¼ inch (6 mm). This can be done by
inserting the manual crank into the receptacle on the headboard and footboard and turning the crank
clockwise until the bed end is at the correct height.
8. Attach the headboard by placing the headboard as close to the head deck section of the bed. With
one hand, lift the head deck section so that the rivets on the deck are in line with the corner locks. Tilt
the headboard back slightly to allow the rivets to slide into the corner plates. Once the rivets are
engaged in the corner plates, return the headboard to its full upright position. This will lock the
headboard in place.

BED ASSEMBLY
7
11. Install the casters by carefully lifting the headboard (approximately 5 inches) from the floor and
inserting the shaft of the caster assembly into the caster socket at the bottom of the leg.
12. Repeat step 11 with the footboard.
9. Repeat step 8 with the footboard.
10. Insert a clevis pin through the hole between the two rivets to lock the platform and the head frame
together. Secure the pin with an R-clip. Repeat the procedure on all 4 corners of the bed.
13. Install the Frame Support Bracket. Remove the zipties holding the frame support bracket assembly.

BED ASSEMBLY
8
14. Attach the center vertical support bracket to the bed using the nut and bolt supplied. Place a washer
between the support bracket and the bed.
15. Connect the 2 diagonal support brackets (one from the head deck and one from the foot deck) to the
center Vertical Support Bracket using the nut, washers and bolt supplied.
16. Repeat steps 13 through 15 on the other side of the bed.
➊

9
BED ASSEMBLY
17. Install the drive shaft. Depress push button on the inner shaft and slide the inner shaft to the
desired position for the type of bed being used. Ensure that the push button is fully engaged through
the proper positioning hole. Connect the drive shaft to the bed by attaching either end of the drive
shaft to the head end gear box.
18. Connect the other end to the Hi/Lo motor output shaft.
19. Connect the gearbox output shaft on the footboard to the Hi/Lo motor output shaft using the
spring-loaded coupler. Release the spring-loaded coupler by pushing inwards and turning it
clockwise. The coupler will release and engage the gearbox output shaft. Ensure that the pins on
the footboard gearbox are fully engaged in the corresponding groves in the coupler.

10
BED ASSEMBLY
20. Install head drive shaft. Align the one end of the head extension shaft with the drive tube on the
motor, secure the extension shaft to the tube with a cotter pin.
21. Connect the other end of the extension shaft with the pivot bracket on the head deck.
22. Turn the bed so it is upright and securely standing on all 4 wheels. Test the function to ensure
proper operation.
Pivot
bracket
11
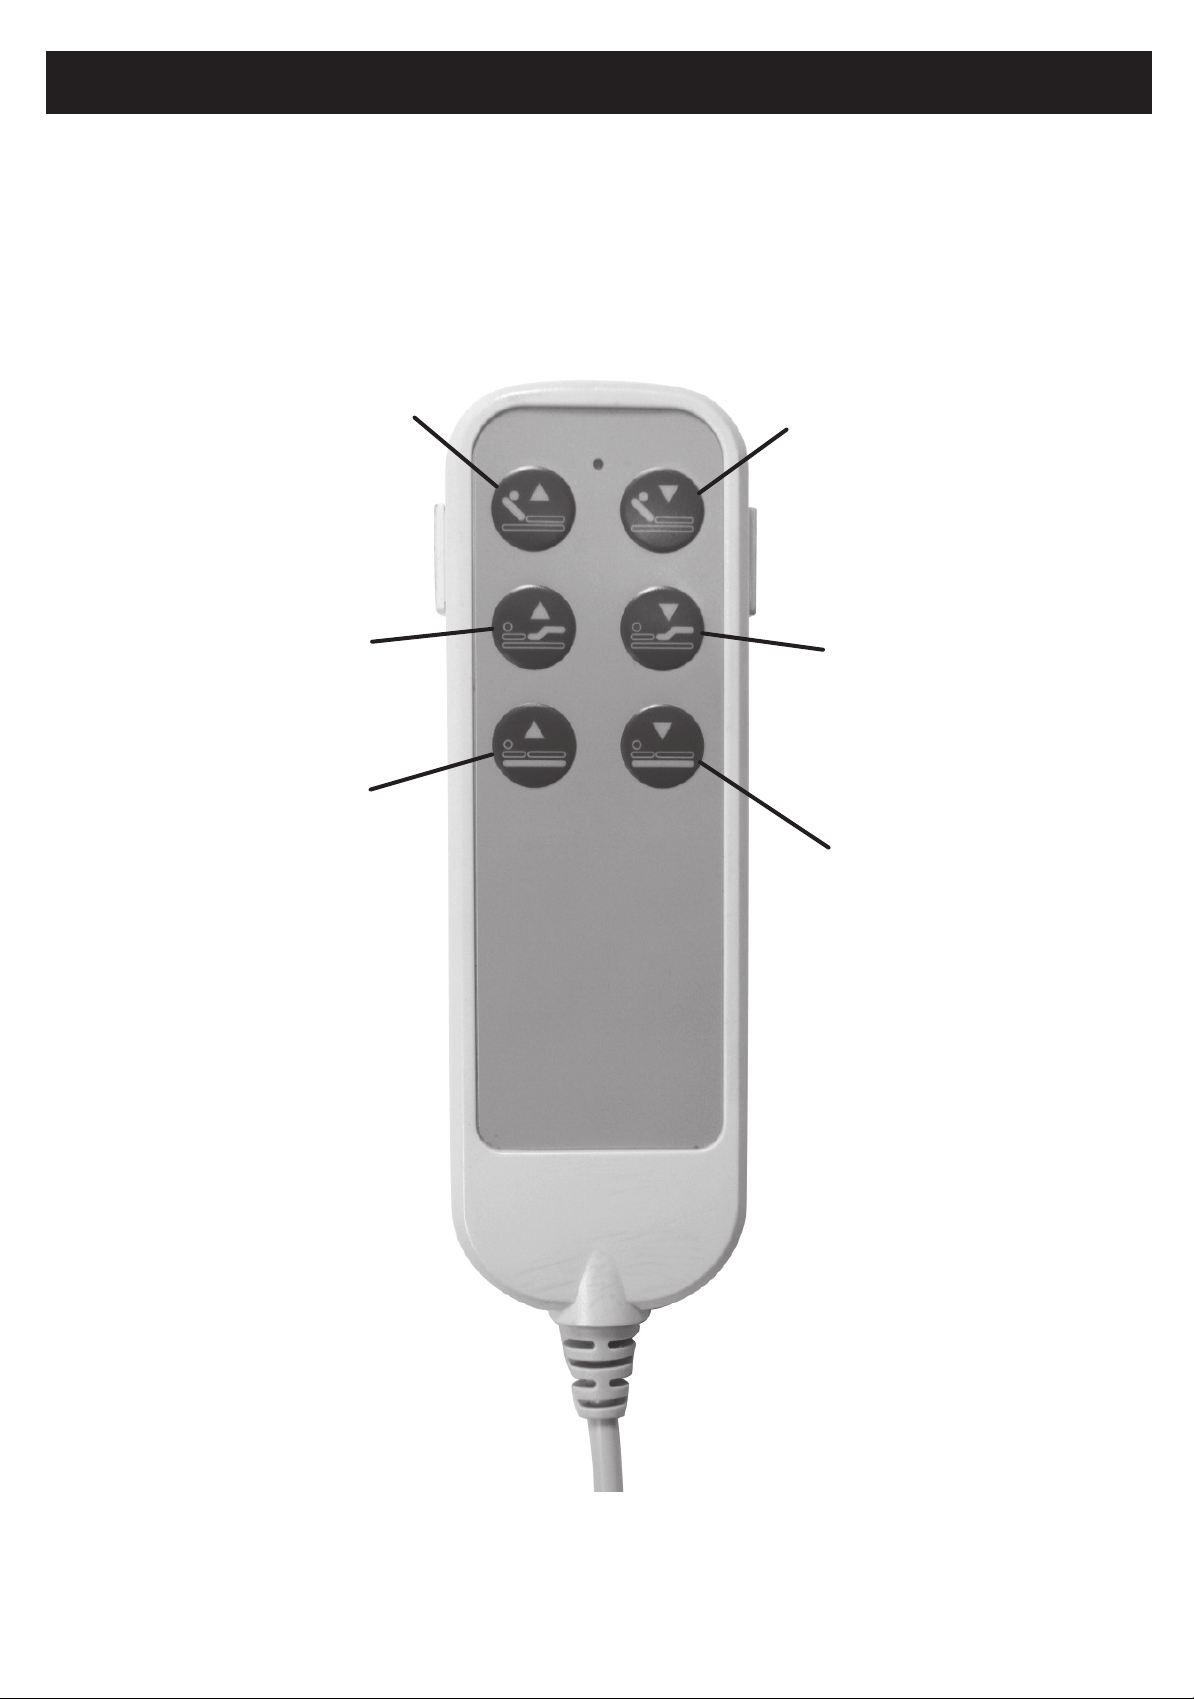
BED ASSEMBLY
23. Test all the functions of the bed to ensure the bed operates properly. If any problems arise recheck
all electrical connections and mechanical hookups.
Depress button
“HEAD UP” as shown
on pendant control.
This will raise the head
portion of the bed
ON LY.
Depress button
“FOOT UP” as shown
on pendant control. This
will raise the foot portion
of the bed ONLY.
Depress button
“BED UP” as shown on
pendant control. This
will raise the entire
height of the bed.
Depress button
“BED DOWN” as
shown on pendant
control. This will
lower the entire
height of the bed.
Depress button
“FOOT DOWN” as
shown on pendant
control. This will
lower the foot portion
of the bed ONLY.
Depress button “HEAD
DOWN” as shown on
pendant control. This
will lower the head
portion of the bed
ON LY.

12
MAINTENANCE AND SAFETY CHECKS
Safety checks are recommended between patient placements.
An annual safety check is recommended.
Cleaning and Electric Inspection may be performed by the user. Mechanical Maintenance Inspection
should be performed by an authorized technician.
Cleaning
1. Unplug power cord before cleaning or performing maintenance on the electric bed.
2. Wipe down the entire bed and frame with a disinfectant and allow to dry completely before using
the bed.
3. Do not pressure wash.
4. Periodically raise the head and foot sections of the bed and remove any dust from the frame.
5. Periodically remove the mattress and clean the mattress deck.
Electrical Inspection
1. Inspect all electrical bed components for damage or excessive wear (i.e. cracked, frayed or broken
housings, or worn components).
2. Check pendant and power cords for chafing, cuts or excessive wear.
3. Check all bed functions:
Head/Foot & Bed raises and lowers properly.
4. Make sure all plugs are fully inserted and free of damage. If damaged contact an authorized
technician for repair.
Mechanical Maintenance Inspection
1. Lubricating:
a. Lightly grease all actuator screw threads with white lithium grease.
b. Lubricate all caster roller and swivel bearings with light machine oil.
2. Check all bolts and tighten as needed.
3. Check joints between sleeping surface sections for loose fasteners.
4. Inspect all bed components for damage or excessive wear.
5. Visually examine all welds for cracks.
6. Inspect the deck components for bending or damage.
7. Check mounting hardware for bending or excessive wear.
8. Inspect all bolts and fasteners for proper functioning (do not over tighten bolts at pivot points).
9. If applicable, check casters to ensure they lock and roll properly.

13
TROUBLESHOOTING GUIDE
IF USE OF THE ABOVE TROUBLESHOOTING GUIDE DOES NOT CORRECT THE PROBLEM,
CONTACT THE AUTHORIZED DEALER.
SYMPTOM POSSIBLE CAUSE ACTION (See steps for isolating problems)
No Power Unit is not connected to A/C power Check plug to receptacle
No Power Cut/damaged/pinched power cord Check Power Cord for damage
No Power Loose plug for pendant Check pendant connection to control box
No Power Cut/damaged/pinched pendant cord Inspect pendant cord for damage
No Power Actuator plug not connected Check actuator connection to control box
Inspect actuator cord for damage.

14
MAINTENANCE SCHEDULE
Maintenance should be performed at least once every 3 months.
This form may be copied and used as a procedural guide and facility documentation.
Serial # ___________________________________
Date Inspection Maintenance Cleaning Initials Notes

15
MAINTENANCE SCHEDULE
Maintenance should be performed at least once every 3 months.
This form may be copied and used as a procedural guide and facility documentation.
Serial # ___________________________________
Date Inspection Maintenance Cleaning Initials Notes

16
LIMITED LIFETIME WARRANTY
Your Dynarex Bed is warrantied to be free of defects in materials and workmanship for five (5) years on
structural steel, one (1) year on mechanical
parts/components, from original date of purchase, for use by the original purchaser. This item was built
to exacting standards and carefully inspected prior to shipment. This Limited Lifetime Warranty is an
expression of our confidence in the materials and workmanship of our products and our assurance to
the
consumer of dependable service.
The Warranty shall not apply under the following conditions:
• Problems arising from normal wear
• Problems arising from failure to adhere to the product instructions
• Problems arising from misuse, negligence, accident or improper operation, maintenance or storage
• Problems arising from modifications or unauthorized repairs, parts or attachments
• Products where the serial number has been removed or defaced
• Problems with non-durable components, such as rubber accessories, casters, and grips, which are
subject to normal wear and need periodic replacement
Dynarex shall not be liable for any consequential or incidental damages whatsoever. Dynarex shall
repair or replace defective products at its option. The foregoing warranty is exclusive and in lieu of other
express warranties, if any, including the implied warranties of merchantability and fitness of a particular
purpose. The remedy for any violation of the implied warranty shall be limited to repair or replacement
of the defective product pursuant to the terms contained herein.
If you have a question about your Dynarex device or this warranty, please contact an authorized
Dynarex dealer.
R201027
This manual suits for next models
2
Table of contents
Other dynarex Personal Care Product manuals


