dynarex Resp-O2 User manual
Reorder Nos. 10820
10821
Manufactured for:
Dynarex Corporation
10 Glenshaw Street
Orangeburg, NY 10962
USA • www.dynarex.com
Made in Taiwan
CAUTION: Federal (USA) law prohibits this
device to sale by or on the order of a physician.
Reorder No. 32300-32301
SYMBOL GLOSSARY
For an explanation of symbols
used in Dynarex packaging, visit
dynarex.com/symbols.php
R210222
Suction Units
Vacuum Levels up to
560 mmHg

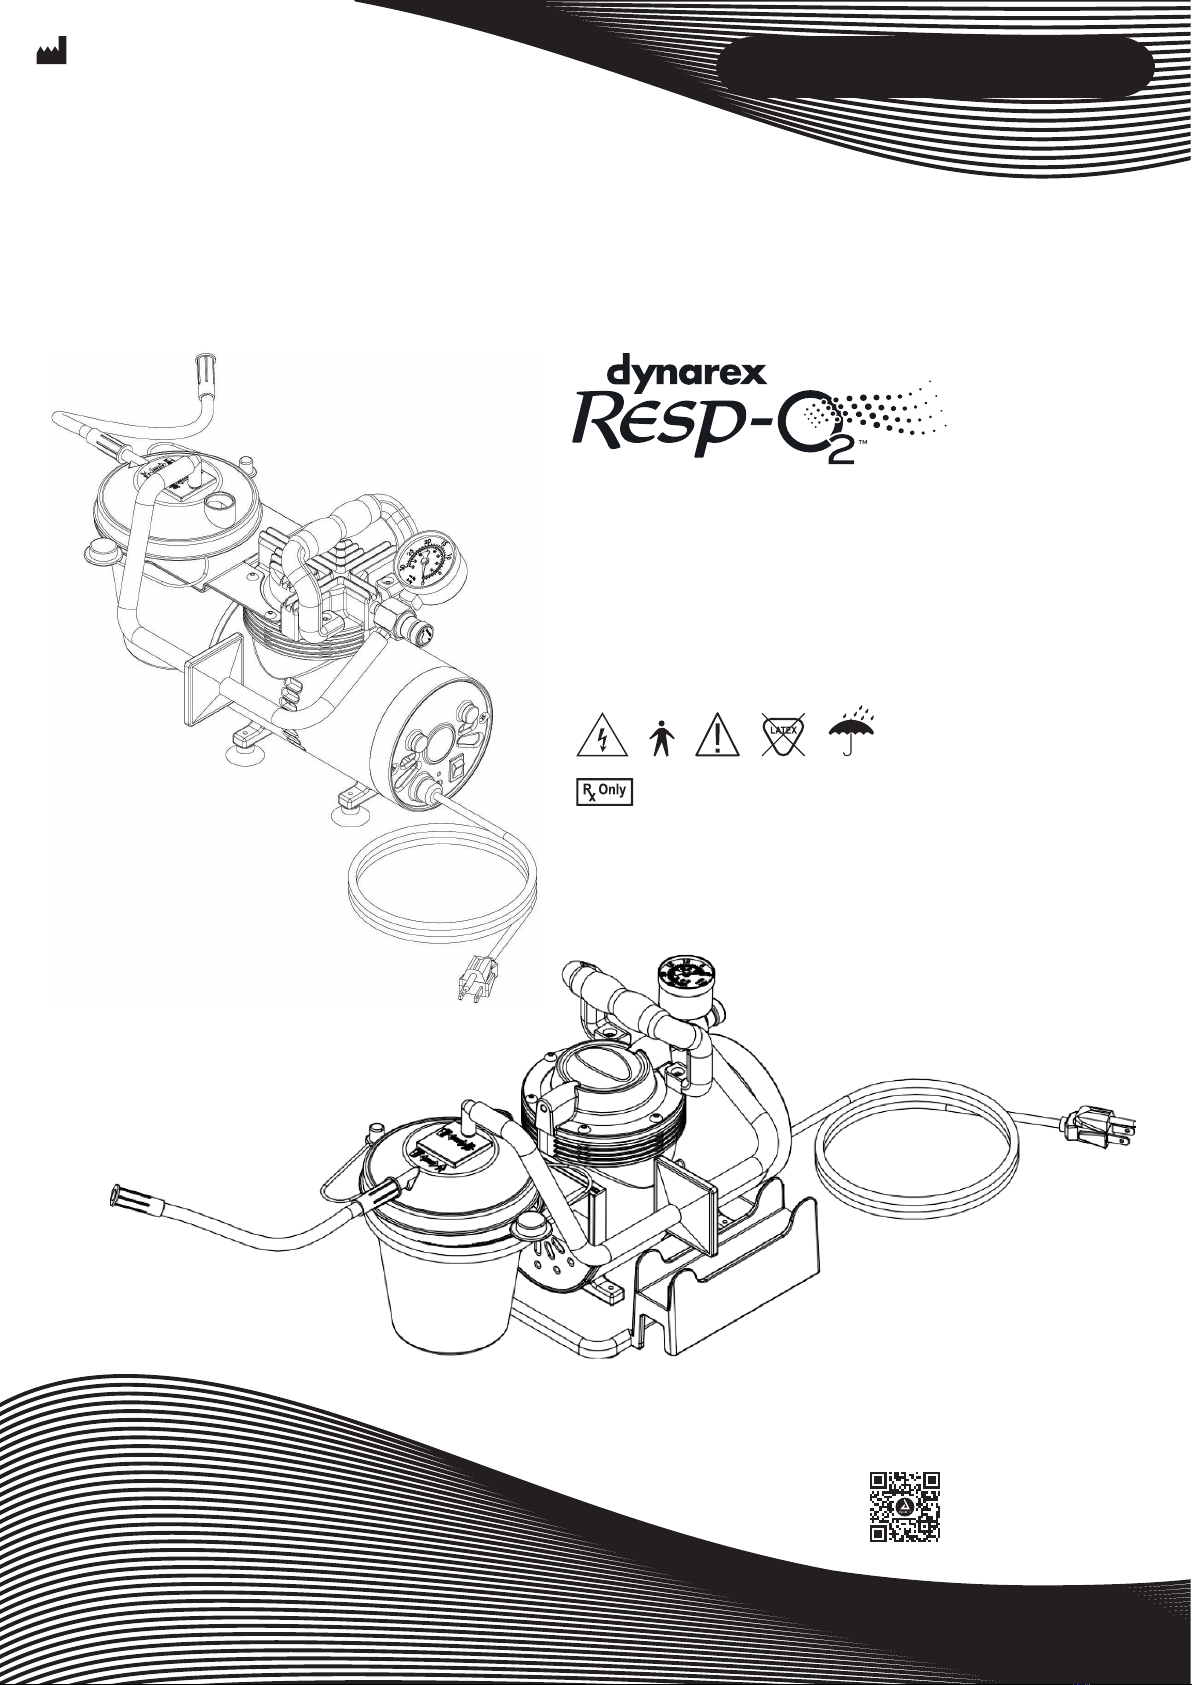
Suction Unit • Vacuum Levels up to 560 mmHg (Reorder No. 32300-32301)
1
Connection Tubing
Patient Tubing Connector
Vacuum Gauge
Vacuum Adjust Knob
Power Cord
Bacteria Filter
Base (32301 only)
Cord Caddy (32301 only)
Suction Canister Holder
800 cc Suction Canister
WARNINGS
• Read this manual completely and become familiar with all
the operating parts.
• Close supervision is required especially when the device is
being used on or near children or persons with disabilities.
• Use the device only for its intended use as described
within this guide.
• Proper operation of this device is necessary to avoid
tissue damage, personal injury or even death. This device
should not be used unless the operator has been trained
and/or instructed by a physician or another qualied
health care professional.
• This unit is a vacuum suction device designed for
the collection of non-ammable uid materials in
medical applications only. Improper use during medical
applications can cause personal injury, harm or death.
• All suctioning should be done in strict accordance to
procedures that have been established by a licensed
medical professional.
• Inspect the tubing and Suction Canister for leaks and
cracks before each use.
• Keep the unit and power cord away from heated surfaces
and sources. Never operate this product if the power cord
or plug are damaged.
• Do not submerge the device in water as this will result in
severe damage. Do not use near any liquid source.
• DO NOT DISASSEMBLE THIS DEVICE. Incorrect
disassembly or any attempted repair to the device can
result in an electrical shock hazard. If service is required,
return your device to an authorized service center.
Opening or tampering with the unit in any way will void
the warranty and may cause electrical shock hazard.
Suction Unit • Vacuum Levels up to 560 mmHg (Reorder No. 32300-32301)
2
1. Connect either end of the 6" silicone tubing to the top of
Suction Canister connector, then connect the other end
to the bacteria lter. Use the other 6" silicone tube to
connect the bacteria lter to the Suction Unit (Figure 6).
2. The patient tubing connects to Suction Canister (Figure 1).
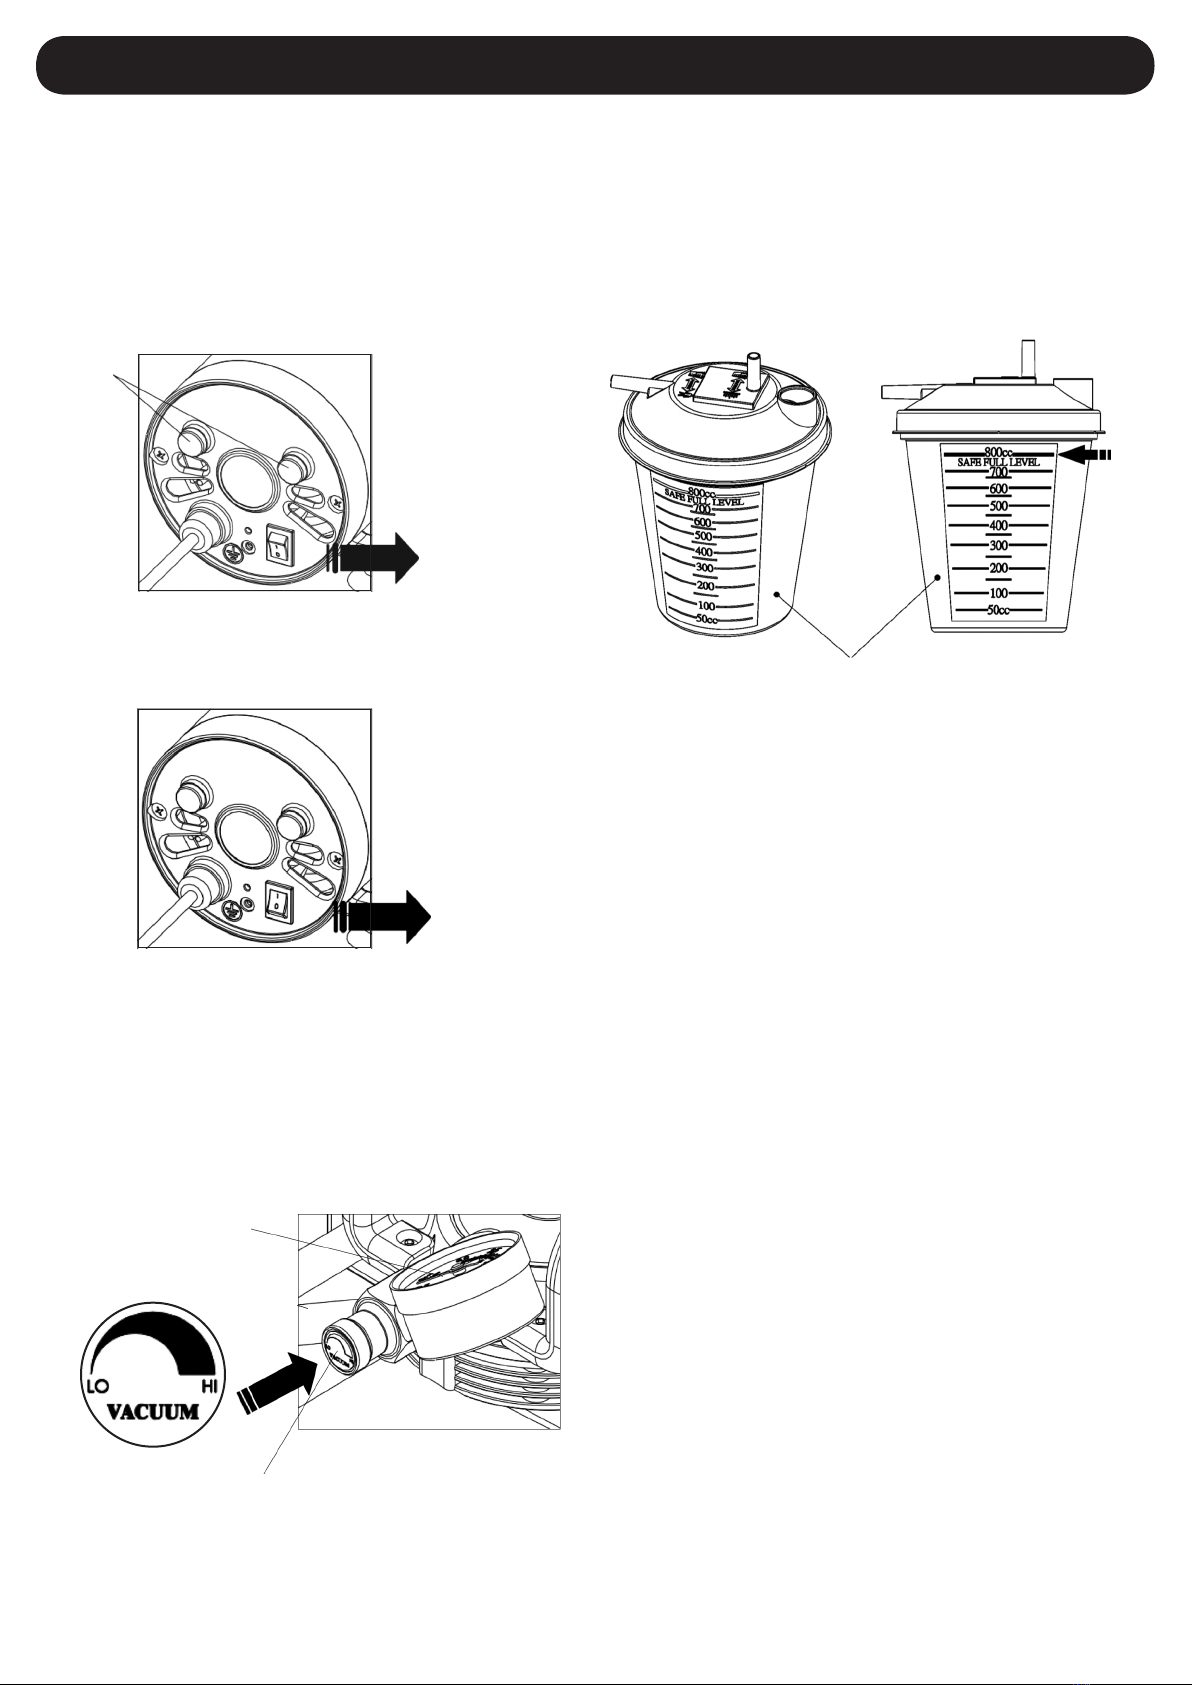
3. Make sure the power switch located on the side of the
unit is in the “Off” position before connecting the unit to a
power source (Figure 2).
5. Adjust the suction level from 0 to 560 mmHg by turning
the vacuum adjustment knob clockwise to increase
and counterclockwise to decrease (Figure 4). It is
recommended to test the pressure before using the
device on a patient. Simply block the end of the patient
hose or block the Suction Canister lid intake and allow
the gauge to reach a stable vacuum reading.
4. Turn the power switch to the “I” position, to start the device
(Figure 3).
6. It is recommended to test the connections for any leaks
prior to being used on a patient.
7. Place the tubing to the appropriate location and start to
gently suction.
8. When the Suction Canister reaches a safe, full level
(800 cc), the suctioning will stop automatically. The
oat shut-off, located under the lid, will activate to avoid
over-lling (Figure 5).
CAUTION:
1. Whentheautomaticoatshut-offisactivated,
contents in the Suction Canisters should be
disposed of. Further suctioning could cause
damagetothevacuumpump.
2. Shoulduidbeaspiratedbackintotheunit,callan
authorizedservicetechniciantoinspectthevacuum
pumpasitmayhavebeendamaged.
9. Turn the power switch to “O” position to turn off the
suction motor.
10. Remove the lid and dispose the waste liquid from
Suction Canister.
Vacuum Gauge
Vacuum Adjust Knob
Suction Canister
Safe
Full
Level
Fuse
Power switch
“Off” position
Power switch
“On” position

Suction Unit • Vacuum Levels up to 560 mmHg (Reorder No. 32300-32301)
3
Bacteria Filter Change:
1. The bacteria lter should be replaced every two months.
If overow occurs, change the lter immediately.
2. Disconnect the lter from pressure adjustment knob
tubing and the Suction Canister lid tubing (Figure 6).
3. Replace with a new bacteria lter and connect each tube
as described. Use only Dynarex-approved lters. Do
not substitute any other material for the bacteria lter.
Improper substitution may lead to contamination or poor
device performance.
Fuse Change:
1. Using a screwdriver, turn to the left and pull the fuse
housing out.
2. Remove the old fuse and replace with the same fuse
type.
3. Replace the fuse housing, push in and turn to the right.
Fuse specication: Miniature Glass Fuse 5×20 mm,
Fast Blow (Quick Acting), F2A/250V.
Your Suction Unit contains no user-serviceable parts. If
you believe the device is not working properly, please take
a few moments to check for these possible causes before
contacting your authorized distributor.
The motor has a thermal overload protector. If the motor
over-heats, the overload protector will shut the device off.
When this occurs, turn the ON/OFF switch OFF and allow
the motor to cool down for approximately 5 minutes. If the
device fails to start after 5 minutes, wait an additional 5
minutes before attempting to restart. If the motor still will
not start, inspect the fuses. If the device still will not start,
call a licensed medical equipment technician for further
instruction.
PROBLEM
Unit does not
turn on
Motor runs,
no vacuum
Low vacuum
ACTION
1. Check power source and connection
2. Ensure that the wall outlet is live
3. Check power cord is not damage
1. Verify tubing is securely connected
2. Check for tubing leaks or kinks
3. Ensure oat shut-off is not activated
4. Check the bottle for leaks or cracks
1. Use vacuum adjustment knob to
increase vacuum pressure level
2. Check the system for leaks
Suction Canister Lid
Tubing
Pressure
Adjusting
Valve
Tubing
Bacteria Filter

Suction Unit • Vacuum Levels up to 560 mmHg (Reorder No. 32300-32301)
4
Maximum Vacuum 560 ± 3% mmHg
Flow Range > 40 LPM
SoundLevel <58 dBA
Electrical Requirements AC 115 V 60Hz
Power Consumption 70 watts
Bacteria Filter Pore Size 0.45 microns
Suction Canister Capacity 800 ml (cc)
Operating Temperature 32° ~ 104°F (0° ~ 40°C)
Operating Humidity 95% RH
Operating Atmospheric Pressure 10.2 ~ 15.4 psig (70 ~ 106 kpa)
Storage Temperature 14° ~ 158°F ( -10° ~ 70°C)
Storage Humidity 0 ~ 95%
Storage Atmospheric Pressure 7.3 ~ 15.4psig (50 ~ 106 kpa)
FuseSpecication Miniature Glass Fuse 5x20mm,
Fast Blow (Quick Acting), F2A/250 V

Suction Unit • Vacuum Levels up to 560 mmHg (Reorder No. 32300-32301)
5
Your Dynarex Product is warrantied to be free of defects in
materials and workmanship for two (2) years from original
date of purchase, for the original purchaser. This item was
built to exacting standards and carefully inspected prior to
shipment. This Warranty is an expression of our condence
in the materials and workmanship of our products and our
assurance to the consumer of years of dependable service.
The Warranty shall not apply under the following conditions:
• Problems arising from normal wear
• Problems arising from failure to adhere to the product
instructions
• Problems arising from misuse, negligence, accident or
improper operation, maintenance or storage
• Problems arising from modications or unauthorized
repairs, parts or attachments
• Products where the serial number has been removed or
defaced
• Problems with non-durable components, such as rubber
accessories, casters, and grips, which are subject to
normal wear and need periodic replacement
Dynarex shall not be liable for any consequential or
incidental damages whatsoever. Dynarex shall repair or
replace defective products at its option. The foregoing
warranty is exclusive and in lieu of other express warranties,
if any, including the implied warranties of merchantability
and tness of a particular purpose. The remedy for any
violation of the implied warranty shall be limited to repair or
replacement of the defective product pursuant to the terms
contained herein.
If you have a question about your Dynarex device or this
warranty, please contact an authorized Dynarex dealer.
Other manuals for Resp-O2
5
Table of contents
Other dynarex Respiratory Product manuals


