e-Joe Gadis User manual

GADIS USER MANUAL
48V 500W OR 48V 350W
Please, read before operating your new e-JOE electric bicycle

2
INTRODUCTION
Congratulations on the purchase of your new e-JOE electric bicycle! We want to make you happy and believe your new e-
bike will bring you lots of fun.
We ask that you, please, read this manual thoroughly, paying particular attention to the safety warnings before you start
riding your bicycle.
Please, observe traffic regulations and do not lend your bicycle to anyone unfamiliar with it. It can only be legally used on
the road by a person aged 14 years and older. e-JOE bikes are not designed for use by children. If you decide to use a child
carrier, a child must be wearing a helmet and seated by the carrier manual.
We strongly advise wearing a bicycle helmet at all times when using your e-bike. If you are unfamiliar with cycling, we
suggest taking a cycling proficiency course before using your bicycle.
Remember that this manual makes no representations about the safe use of bicycles under all conditions. There are risks
associated with the use of any bike which cannot be predicted or avoided, and which are the sole responsibility of the rider.
Before you ride your bike for the first time, please, make sure it is correctly assembled. You can do this either by taking it to
your nearest bicycle shop or by inspecting it yourself if you are proficient in bicycle mechanics. You must make sure you
have the pedals, saddle, handlebar, and other items correctly fitted.
Test your brakes every time before using the bicycle and remember the bicycle will not stop as quickly in wet or icy
conditions as it would on a dry road.
Frequently check your tire pressure. The required tire pressure level is indicated on the side of each tire. Low tire pressure
will result in damage to the tires and will massively reduce your speed and range.
NEVER drink alcohol and ride your electric bike. The use of alcohol significantly reduces reflexes and limits your ability to
ride safely. Even a small amount of alcohol limits your ability to be safe on the road.
Please, note that small details or components may variate as we continuously update our product throughout the year. This
does not affect basic installation and assembly.
e-JOE cares for the environment and encourages its customers to dispose of e-JOE products per local regulations. When
you need to dispose of a lithium-ion battery, please, either dispose of the unwanted battery through an approved recycler or
send it back to us and we will make sure it is properly recycled.
Happy cycling!
YOUR FRIENDS AT E-JOE BIKE

3
OPENING YOUR BICYCLE
GADIS electric bicycle is shipped 95% assembled in a box that contains the following items:
●Main body of the electric bike consisting of:
○Frame
○Front wheel with a front suspension fork
○Rear wheel
○Tires & tubes installed and partially inflated
○Drivetrain
○Brake and shifter systems
○Handlebar subassembly (connected to the main body by the brake/shifter cables and electrical wires)
•Electric System consisting of:
oBattery (inside the frame)
oHub motor
oLCD Power Assist Display and thumb throttle
oPedal Assist Sensor
oController
oWire harnesses
●Seat (or saddle) attached to the pedestal stem
●Fenders with supports
●Front and rear LED lights
●Chain guard
●Kickstand
●Rear rack
●Pedals (2)
●Battery charger (in a separate box)
●Battery keys (2)
After unpacking, please, do not discard the box and protective material until you test the bike and make sure it is in good
working condition. Should you discover missing items, concealed loss or damage, report it to your dealer immediately.

STRUCTURE OF YOUR E-BIKE

SIZING

MAIN SPECIFICATIONS*
BIKE
Weight (with battery)
55 lbs.
Max Capacity
300 lbs.
Dimension
66” x 28” x 44”
Max Speed
20 mph
Full Charge Distance
up to 45 miles (depending on terrain and rider’s weight)
Climbing Grade
≤ 10%
Pedal Assist System
Stealthy Swipe Side Thumb Throttle Control & 5 Level Pedal Assist
Frame
7020 Aluminum Alloy (Step-Thru Design)
Tires
26” x 1.75” Kenda Puncture Resistant / 26” x 2.2” Innova Puncture-Resistant tire
Seat
Selle Royal / Velo Plush Comfort Saddle
Brakes
Front/Rear: TEKTRO 160 Rotor Disc Brakes
Gearing
7-speed Shimano Acera (or Shimano Tourney) Derailleur with Rapid Shifter
Accessories
LCD Display, Fenders, Rear Rack, Front/Rear LED Lights
MOTOR
Description
Rear brushless geared hub motor
Max Riding Noise
60 dB
Power
350 Watt Rated / 500 Watt Rated
Rated Efficiency
80%
BATTERY
Type
18650-Cells Lithium Ion
Voltage
48V 11Ah or 48V 18Ah
Capacity
528 Wh or 864 Wh
CHARGER
Input Voltage
110-240
Charging Time
4-6 hr.
How to Charge
Direct charge: Connect plug with the plug receptacle
* Specifications may vary depending on the year of production

2
ASSEMBLY
GADIS electric bicycle is shipped 98% assembled. In order to fully assemble the bike and prepare it for the first use, follow
these simple steps:
Step 1: Packing Material
Remove all packing and protective material and put aside. Do not discard the box or any shipping material until you test the
bike and make certain it is in good working order.
Step 2: Handlebar
Stand the main body of the electric bike on the kickstand. Insert the stem of the handlebar subassembly into the steering
column that is at the front of the main body frame.
Make sure that the fork that holds the front wheel is pointing forward; orient the handlebar accordingly. Insert the stem all the
way and tighten from the top using a big hex wrench.
Step 3: Wire Harness
The earlier bike editions do not require connecting the wires after
unpacking. However, if you have purchased the latest edition of the bike
(2018), it is necessary to connect the main wire harness with the bike
components. To connect the electric wires, first, stand in the front of the
bike and locate the main wire harness with the green e-JOE logo.
Connect the wires by matching the colors AND aligning the arrows: LCD
display (●green prongs), thumb throttle (●orange prongs), brake levers
(●red prongs). Please, see a picture on the right for reference.
Double-check the wires and make sure they are securely connected, the
arrows are aligned, and the colors are not visible.
Step 4: Brakes
Test the brake by lifting the front of the electric bike and setting the wheel
in motion by turning it and apply the brake at the handlebar to stop it. If
you could not set the wheel in free motion, or could not stop it when
applying the brake you need to readjust by increasing or decreasing the
clearance between the brake pads and wheel.
Brake Precautions:
●Don’t brake too strongly or suddenly, as it will make it easier for you to lose balance and fall down.
●Remember which wheel is controlled by which brake.
●Incline your body backward to reduce the influence of inertia.
●Adjust the brakes properly, if damages exist, such as brake pads that are ground flat, please, service appropriately.
●Check whether the braking power cut-off and brake function are in good condition.
3
Step 5: Installing the Seat and Pedals
Insert the stem of the seat into the seat column of the main body frame; use the built-in the lever to tighten the stem. Be sure
not to exceed the safety mark on the stem when finding the appropriate seat height. If used inappropriately, serious
damage/injury may be caused to the rider.
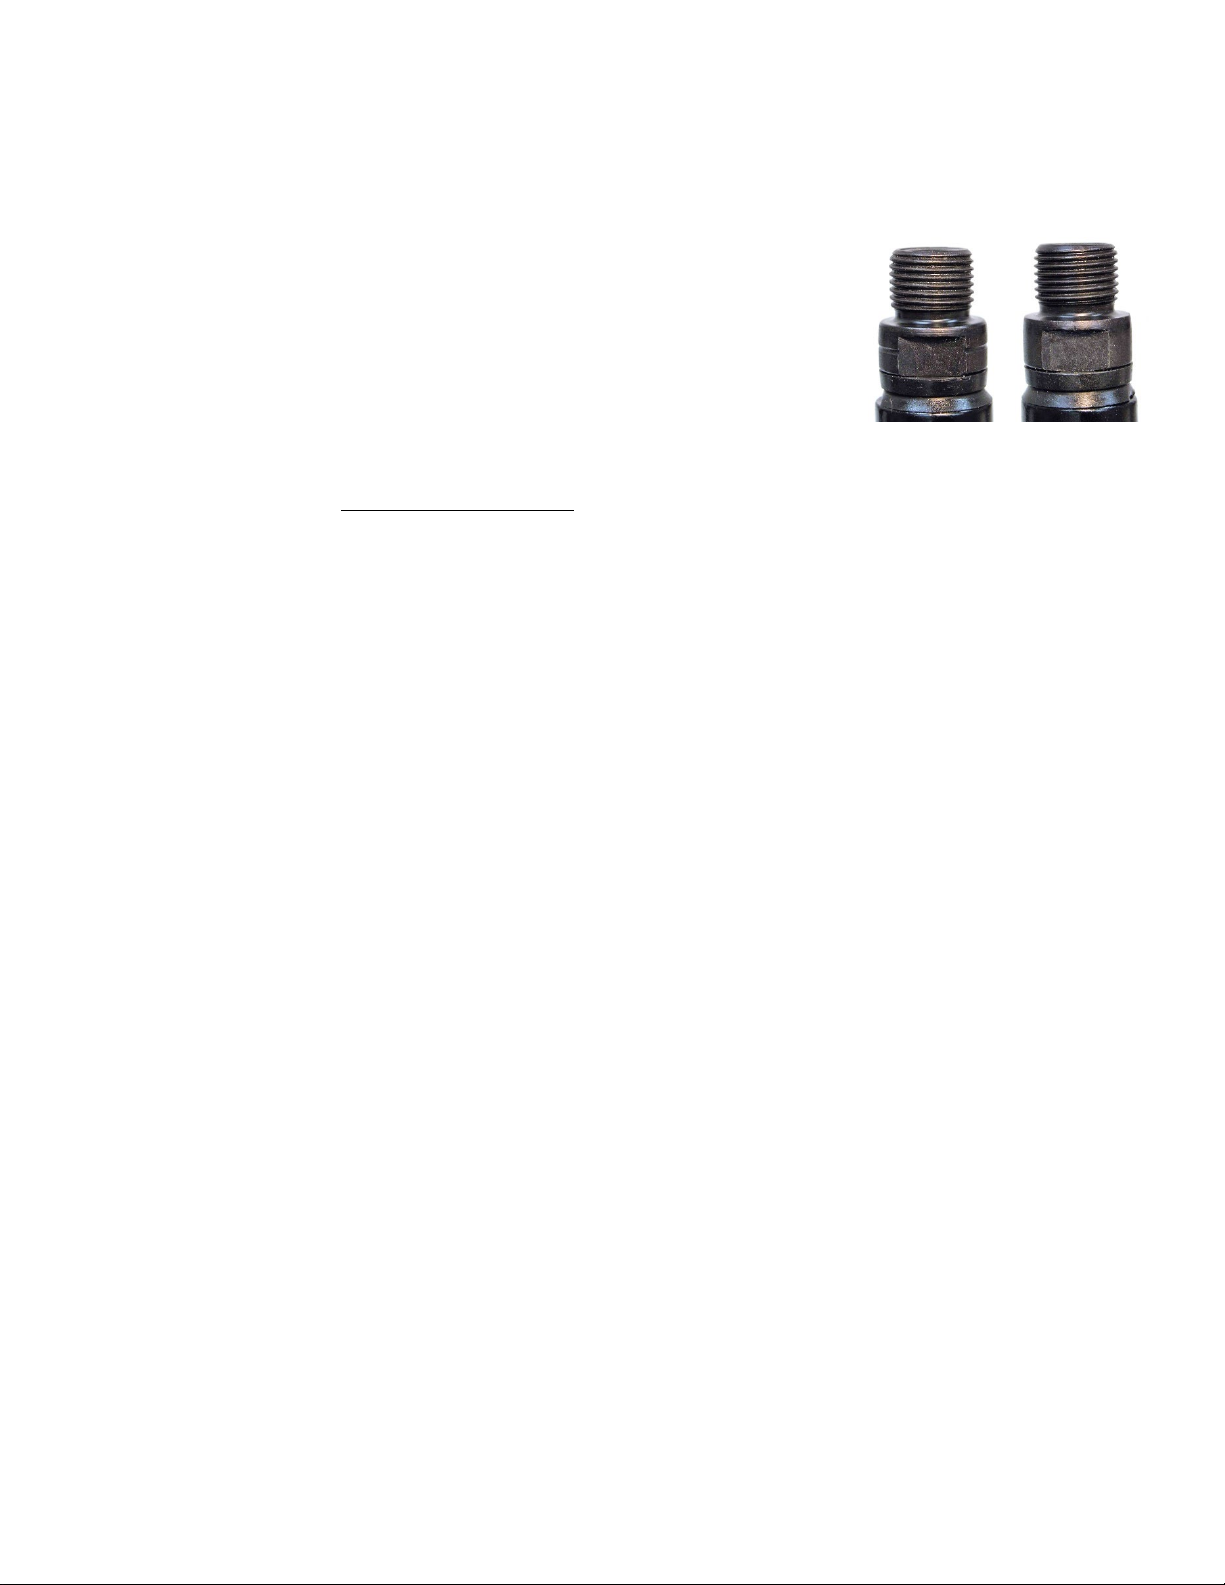
To attach pedals, begin by identifying the right and left pedals. Look for “L” and “R”
markings on the axles, wrench flats or stickers. If no “L” and “R” markings are seen, use
pedal thread direction to identify pedals. Left threaded pedals (threads sloping upward to
the left) go to the left crank. Right threaded pedals (threads sloping upward to the right)
go to the right crank. See image if in doubt (Left: left-hand threads on the left pedal. Right:
right-hand threads on the right pedal).
Be sure to grease the pedal threads before installation. Choose the appropriate pedal and start it into the correct crank arm
by hand turning the pedal axle toward the front of the bike (both pedals thread in this direction). If it will not start, do not force
it - you are probably trying to install the left pedal on the right side or vice versa. Thread both pedals into the crank arms as
far as you can by hand. Then fully tighten them with a wrench so they do not loosen from pedal pressure. Be careful to
not overtighten the pedals as it may cause difficulties with their removal in the future.
Inflate the tires to proper pressure.
Step 6: Inserting and Removing the Battery
Make sure that the battery is properly seated against its housing connector base. Insert the lock key into the slot on the
battery. Turn the key to remove/lock the battery. To see the battery levels use the charge indicator on the handlebar when all
lights are lit up.
NOTE: The keys provided are ONLY used to lock and unlock the battery. Turning the key DOES NOT act as an ignition for
the battery or motor. Please, keep in mind that e-JOE does not carry copies of the keys. It is recommended to store one key
in a safe location in case the first key is misplaced or lost.
Battery Precautions:
●Do not touch the two poles of the battery with your hands when the battery is removed for charging. The two battery
poles should not be touched with any other metal or other material that conducts electricity.
●While charging, put the battery in a secure place where children cannot reach it.
●Do not use any other charger other than the one that came with your electric bike. If you need another charger,
contact your local dealer or e-JOE Bicycle.
●Do not attempt to open or repair your charger, the electronics contain high pressure circuits, so do not dismantle by
yourself without a professional.
●Avoid any contact with water while charging; prevent liquids, metal, and metal fillings from permeating the charger,
and be careful to not drop or hit the charger which could damage its components.
●Do not put anything on top of the charger while charging; it must be well ventilated to allow the heat that is generated
to dissipate.
●Stop charging the battery immediately if you notice a peculiar smell or the charger gets too hot to touch.
●To prevent premature failure of your battery and for battery warranty to remain in effect, it is RECOMMENDED to
charge and discharge your battery at least once per month. Do NOT use your battery in a very low state.
●It is normal that the distance range will reduce as a result of low temperatures.
●Never dispose of batteries in fire because they may explode.

4
GENERAL OPERATING INSTRUCTIONS
Before You Ride for the First Time:
●Check that the handlebar and handlebar stem are properly tightened.
●Check all other nuts and bolts and fixings are properly tightened, paying particular attention to the motor fixings,
kickstand, yoke, and steering head bearings.
●Check that the brakes and brake levers are functioning properly.
●Check that tire pressures are 60 psi/ 4.1 bar and that tires are not damaged.
●Remove the plastic tabs from the head and tail lights to activate the batteries. Check that reflectors and lights are
functioning properly.
●Make sure the battery is fully charged.
●Load battery into bicycle and turn on by pressing the ON/OFF button on the LCD display.
During Riding: Instructions and Tips
●Once the bike is powered ON, the rider can begin the ride. To activate the pedal assist system and throttle, increase
PAS level to 1. Do not power ON until you are ready to go.
○Squeezing the hand brake will automatically cut the power to the motor.
●To get the furthest distance, it is recommended to pedal the bicycle with the Pedal Assist System ON.
●When riding down hills, do not turn off power, otherwise, the controller and motor will be easily damaged.
●When riding your e-bike and when the battery power is low, it is recommended to pedal your e-bike as much as
possible and get the battery charged up as soon as you get to an electrical outlet.
●Turn off the power and remove the key while parking. If you decide to push your bike for any reason, make sure to
turn the power off so you don’t automatically turn the throttle on and make the electrical bicycle start suddenly and
cause an accident.
●To help get the best distance out of your electric bike, refrain from unnecessary braking and coast as much as
possible.
It’s important for your safety and performance to understand how things work on your bicycle and make absolutely certain all
parts are correctly assembled. We urge you to consult your dealer before the first use and have your dealer check your work
before you ride the bike. If you have even the slightest doubt about your knowledge or bike’s assembly, talk to your dealer.
5
LCD OPERATING INSTRUCTIONS
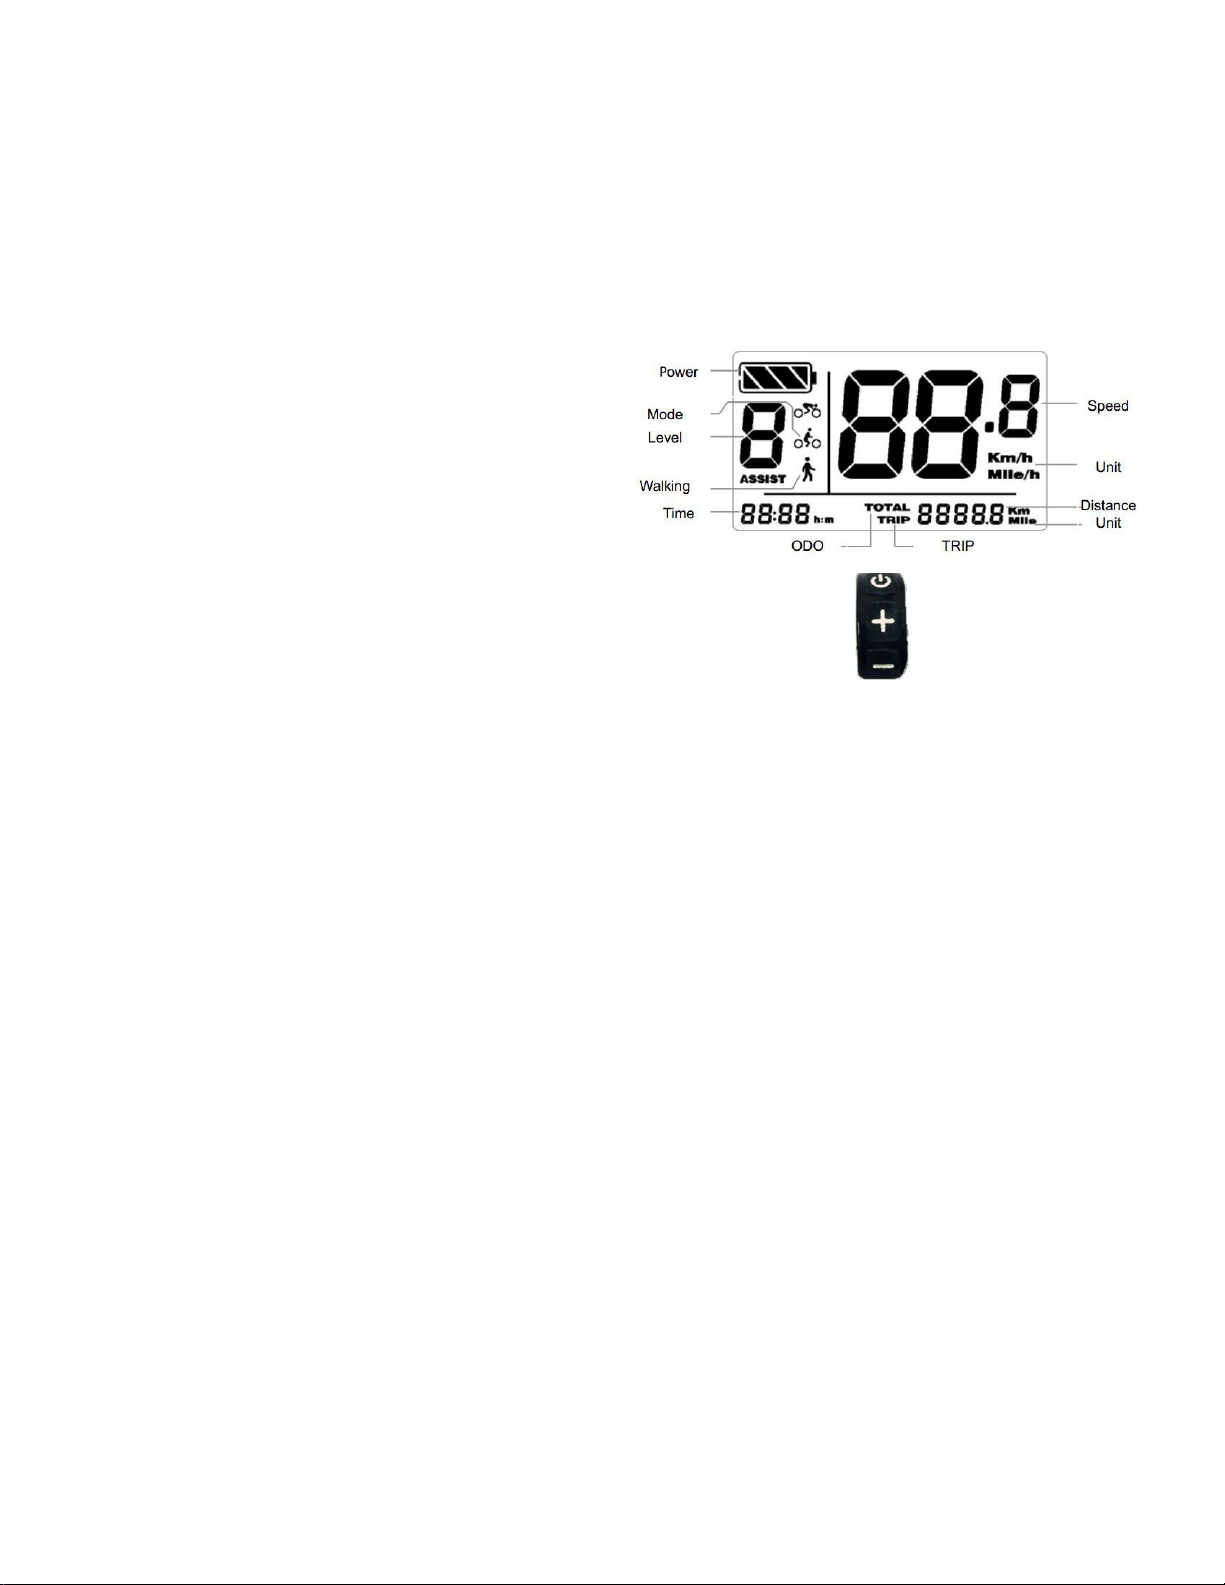
Depending on the year of production, there are three types of the multifunctional LCD power assist display installed on GADIS.
1) Settings of the display #1 contain the following:
●Display
○Battery capacity (power)
○PAS Level & Mode
○Speed, Time, Distance
○Error Code
●General Settings
○Km/miles system
○Speed limit
○Backlight
●Advanced Settings
○Wheel diameter
○Automatic power off
○Level amount
NOTE: General settings can be directly set by users. Advanced settings should NOT be altered once entered, as they affect
the system as a whole. Please DO NOT make changes to the advanced settings.
Setting Up Your LCD Display:
●Power
○Hold [mode] button for 5 seconds for both ON and OFF
●General Settings:
○Hold [up] and [down] for 3 seconds; LCD will enter general settings
○Display Unit
■Press [up] and [down] to choose a display unit
■Press [mode] to save and continue
○Speed Limit
■Range is 15 km/h - 40 km/h (9 mph - 25 mph)
■Press [up] and [down] to change limit
■NOTE: When RPM reaches or exceeds set speed limit, motor power will decline. For safe riding,
we suggest a speed limit of 25 km/h (15 mph)
■Press [mode] to save and continue
○Backlight
■Press [up] and [down] to change the brightness
■The range is from 1-6
■Press [mode] to save and continue
○Time/Quit from General Settings
■Press [up] and [down] to change the hour
■Press [mode] to enter minute settings, use [up] and [down] buttons to change the minute
■Press [mode] to save and quit from general settings
●To put all new settings into effect, please restart your LCD Display

6
Other LCD Functions:
●Trip Clearance: Press [mode] and [down] buttons simultaneously to clear trip distance
●Distance Display: Short press [up] to switch between ride distance and total distance
●Error Codes
○04: Throttle no homing
○05: Throttle Abnormality
○06: Low Voltage Protection
○07: Overvoltage Protection
○08: Hail Sensor Abnormality
○09: Phase Line Abnormality
○10: Controller Overheat
○11: Temperature Sensor in Controller Abnormality
○12: Current Sensor Abnormality
○21: Speed Sensor Abnormality
○22: Communication Abnormality in BMS
■NOTE: The display will return to normal only after a problem is fixed, and the bike will not turn on
before fixing the problem
2) LCD #2 displays the following information: battery capacity, distance, distance unit, speed unit, push/cruise control,
error code, and power level. The display is equipped with a special 3-button unit: UP, DOWN, MODE. This operating button
suits both L/R hand.
ON/OFF
Long press MODE to turn the display on and supply power to the controller. To turn off the display, press and hold MODE to
shut off the power. If the bike is not used for more than 10 minutes, the display will turn off automatically.
Battery Indicator
When the battery is fully changed, the icon will show five full bars on the top left corner of the display. When the battery in low
on charge, the last bar will start flashing. Charge the battery as soon as possible.
Speed (including real time, max and average speed)
When the bike starts riding, the display will automatically show the current speed. Hold UP and the
display will show the MAX speed during this ride. Hold UP again and the display will show the AVG
speed during this ride. Hold UP again and the display will turn to the current speed display.
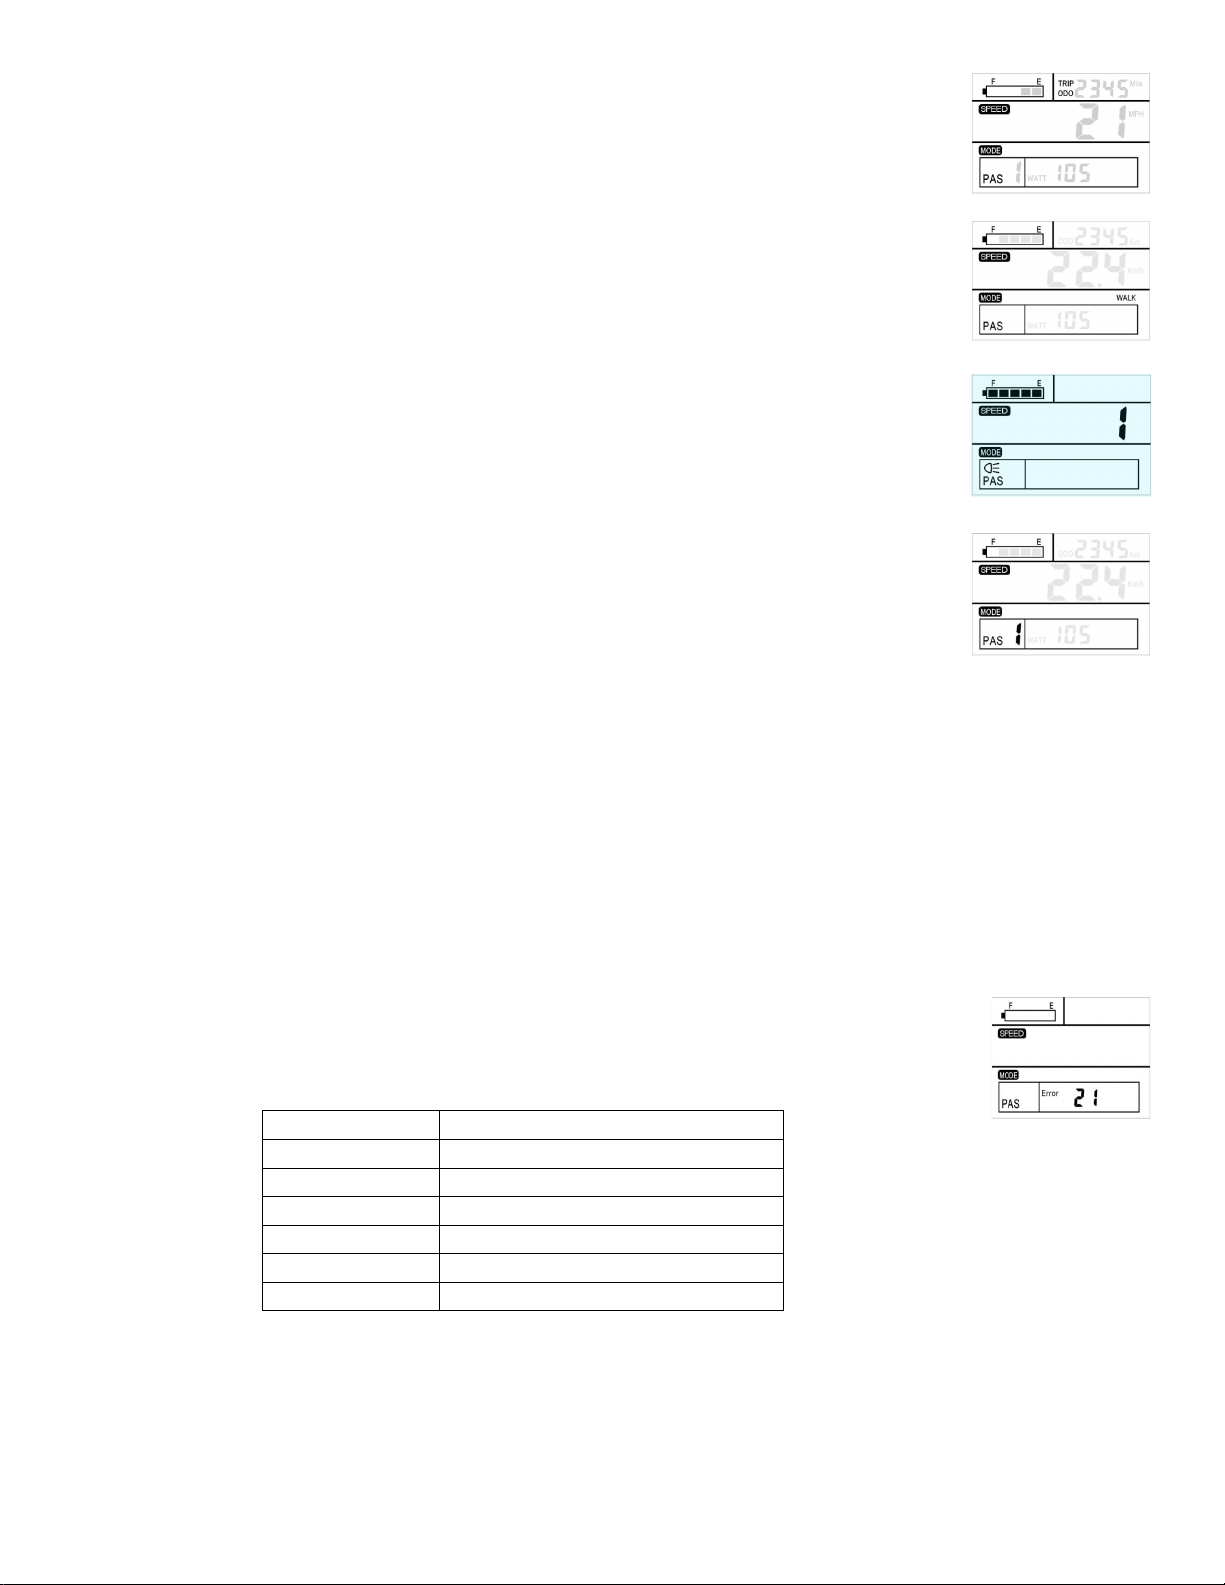
7
Distance and Current Ride Time
Press MODE to switch between riding distance and total distance. This function is convenient for users
to check the riding distance (TRIP) and the total distance (ODO).
Walk Assist
Press and hold DOWN to start walk assist mode. The bike will keep moving at an even speed of 6km/h.
Release the button to exit walk assist mode.
IMPORTANT! Walk assist can only be used when pushing the bike when walking next to it. Do not
start this function when riding!
Backlight
Hold UP button for 3 seconds to turn on the backlight, when the surrounding light is not enough or it is
in the evening. Repeat the action to turn the backlight off. The backlight brightness can be adjusted in
the advanced settings.
PAS Level
The default pedal assist level of the display is 0. Short press UP or DOWN to change the output power
of motor from 1 to 5, 1 is the lowest power, 5 is the highest. It is recommended to start riding the bike
at level 0. For safety, when the bike is not in use, remember to switch to level 0 to deactivate the
PAS/Thumb throttle in order to avoid a hazardous situation.
Settings
When the display is turned on, hold both UP and DOWN for 2.5 seconds at the same time to enter the settings.
The first setting parameter is a wheel diameter. The default setting for GADIS is 26 inch. Do not change this setting. After the
confirmation of the wheel size, short press MODE to reserve it and enter into the max speed setting. The max speed should
be set in accordance with the local regulations. The default max speed is 25 km/h. Short press MODE to continue to the third
setting parameter, backlight brightness. Press UP or DOWN to modify the backlight brightness. Choose from level 1 to level
3. Level 1 is the minimum brightness. Level 3 is the maximum brightness. Press MODE to reserve it and enter into the speed
unit setting (Metric system/British system). Press UP or DOWN to choose the display unit (MPH or Km/H). The distance unit
will change accordingly with the speed unit. To quit the settings state, hold MODE for 3 seconds to confirm the input, save
the current setting and exit.
Error Code
If there is something wrong with the electronic control system, the display will show the error code
automatically. The following is the definition of the error code. The error interface can be exited only when
the fault is excluded.
Error Code
Definition
21
Abnormal Current
22
Throttle Fault
23
Motor Phase Problem
24
Motor Hall Defect
25
Brakes Failed
30
Abnormal Communication
FAQ
Why does not the display turn on?
Check the connections between the display and the controller. Make sure the battery is charged.
How can I handle the error code of the display?
DO NOT attempt to open and/or repair the bike components. Doing so will void the warranty and can result in a safety
hazard. Visit your local e-JOE Bike Dealer, or call our technical support +1-855-888-1891.

8
3) Settings of the display #3 contain the following:
LCD #3 has four buttons, including ON/OFF, SET, UP, and DOWN. It provides a wide range of functions and indicators to fit
the users’ needs. The indicated contents are as below.:
1. Riding mode selection: Shows current riding mode
2. Current: Represents the discharging current of the controller currently, each segment is 2A.
3. Speed: Displays current speed.
4. Backlight indicator: With the power on, click the ON/OFF and turn on the backlight.
5. KM/H&MPH: Select KM/H or MPH as the current display unit.
6. Display information: 6.1 SET: the user enters the setup interface; the SET icon will be in 1Hz flicker.
6.2 PAS: displays the current output power
6.3 Error: Displays the current error code.
7. Riding information display:
7.1 ODO: The ODO records the driving mileage from using the accumulated value; cannot be cleared.
7.2 TIME: Displays the time when the speed of a single ride when higher than 1KM/H.
7.3 TRIP:Display shows the user's single riding mileage
7.4 TRIP2: Displays the last ride mileage for 30 seconds after power on, then automatically clears
7.4 TOGO:This feature is not available by default.
8. 6KM/H Walk-Assist: Hold the DOWN for 2 seconds to get in 6km work.
9. Battery information display: 9.1 Electricity percentage: This feature is not available by default.
9.2 Voltage: Displays the current battery voltage of how many volts.
9.3 Cycle time: This feature is not available by default.
9.4 Electric quantity display: Displays current electric quantity.
Settings: Click SET for 2 seconds to enter the general setting interface.
SET1: Reset trip distance to 0.
SET2: Max speed limited setting.
SET3: Wheel diameter setting.
SET4: KM/H&MPH
SET5: throttle binning (n: normal
throttle
,
y: throttle classifying
)
SET6: throttle speed limit (n: normal
throttle
,
y: throttle 6KM
)
SET7: Slow start setting
(Range
:
0-3
)
SET8: Current limiting setting
(
Range
:
3A-30A
)

9
The error code is corresponding with the fault definition
Error code
Definition
9
Communication display receiving error
21
Current error
22
Throttle error (Start detection)
23
Motor no phase position
24
Hall error
25
Brake error (Start detection)
MAINTENANCE
Like any other mean of transportation, electric bicycle and its components are subject to wear and tear. The rate of wear
depends on care and maintenance and the way of use (mileage, terrain, weather conditions, etc.). The use of a bicycle in
competitive events, aggressive riding, riding on severe terrain/climates, riding with heavy loads, commercial activities and
other types of non-standard use can dramatically shorten the life of the bicycle and its components. Be sure to use your
bicycle for its intended purpose only and to follow any assembly and maintenance instructions.
●IMPORTANT! Do not attempt to open the casings of the battery, motor, or controller; it could be dangerous and will
void any warranties by doing so. If you experience a problem, please contact our service department or your local
retailer.
●Wheel spokes should be adjusted every 300 miles of riding.
●Handlebar and saddle posts should never be raised beyond the maximum indicated by the safety lines around the
tubes.
●Your bike has a rear derailleur that will automatically tension your chain. However, if the chain becomes loose or
frequently comes off the front cog, you can easily adjust the chain tension by loosening the rear axle nuts slightly
and adjusting the tension bolts. Make sure that the chain runs freely and retighten the axle nuts.
●Disc brake calipers, rotors, and brake pads get extremely hot after use. Do not touch these parts after a ride and be
sure to allow some time for the brake system to cool down before attempting the service.
●Leaving a bicycle standing in the open and/or not using it for longer periods of time (more than 3 months) may be
subject to increased wear through weathering and deterioration. You should have your bicycle and its components
checked periodically by your dealer for indicators of stress and/or potential failure, including cracks, corrosion,
deformation, dents, paint peeling, and any other indicators of potential problems, inappropriate use or abuse. These
checks are important to ensure all components function safely and reliably and to help prevent any accidents or
injuries to the rider.
WATER
•Your electric bicycle is rain and splash resistant. Please use caution; do not operate your bicycle under very
bad/heavy weather conditions.
●The electric components, such as the motor, battery, and controller, MUST NOT be submerged in water.
●To prevent rust or corrosion, dry off bicycle and components after riding in wet weather and store bike and battery
in a dry location.
●To avoid electric shock and damage to your product, do not charge the device while it is wet or in an area where it
could get wet. Do not handle bicycle, scooter, charger or cords with wet hands while charging.

10
WARRANTY
STANDARD LIMITED WARRANTY
e-JOE warrants every new e-JOE electric bicycle to be free from manufacturer defects in material and/or workmanship for the
period of ONE (1) year provided that the product is used in a standard and controlled manner, and maintained according to
its owner’s manual.
The warranty applies to the person or entity that originally purchased the product from e-JOE or its authorized dealers in the
United States and Canada (not transferable to a subsequent purchaser). The warranty period commences upon the date of
original purchase. A proof of purchase from an authorized e-JOE dealer and photo/video evidence of the defect are required
to receive the warranty support.
WHAT IS COVERED BY THIS WARRANTY?
e-JOE Bikes warrants every new e-JOE product against defects in material and/or workmanship as follows:
LIMITED ONE (1) YEAR COMPONENTS WARRANTY
e-JOE electric bicycle: frame, suspension fork, stem, handlebar, headset, LCD display, seat post, saddle, brake levers,
cables, bottom bracket, crankset, pedals, chain, rims, wheel hub, freewheel, cassette, derailleur, calipers, shifter, brake
discs/rotors, brake/shifter cables, motor, throttle, controller, wiring harness, kickstand, grips, head and tail lights, rear rack,
fenders, reflectors, and hardware;
LIMITED ONE (1) YEAR LITHIUM-ION BATTERY WARRANTY
Lithium-ion batteries are warranted to be free from manufacturer defects in materials and/or workmanship for ONE (1) year
period from the date of original purchase. The battery warranty does not include damage from power surges, use of improper
charger, improper maintenance, misuse, normal wear or water damage.
LIMITED 30 DAYS FULL REPLACEMENT WARRANTY
If an e-JOE product is not working properly because of a major manufacturer defect within the first 30 days of original
purchase, e-JOE Bike will repair or replace any defective product at its sole option and expense upon determining whether
the damage, failure, or loss is due to a major manufacturer defect. e-JOE will first issue replacement parts for a reasonable
number of tries (as determined by e-JOE). If the product does not function properly after the parts replacement attempts, e-
JOE will send a full replacement bicycle or scooter upon receipt and inspection of the original product and replacement parts.
e-JOE reserves the right to charge 10% of the product price in case the original product is returned in a bad manner, with the
insufficient protective material, not in accordance with the instructions provided by e-JOE, or shows signs of excessive use,
neglect, dirt, dust. A full replacement product will be issued only after such fee is paid in full.
LIMITED 7 DAYS SHIPPING DAMAGES COVERAGE
e-JOE will repair or replace the parts damaged during shipping at its sole option provided that such damage is documented
on the bill of lading or delivery receipt and reported to the dealer or e-JOE within the first 7 days after delivery. It is the
customer’s responsibility to inspect the box and the product at the time of delivery, take pictures of any damage and keep all
packaging and paperwork until the damage claim process is complete.

11
WHAT IS NOT COVERED BY THIS WARRANTY?
•e-JOE product without presented proof of purchase from an authorized e-JOE dealer AND photo/video evidence of
the defect;
•e-JOE product purchased from an unauthorized e-JOE dealer;
•e-JOE product with an expired warranty period;
•e-JOE product transferred to a subsequent purchaser or owner;
•normal wear and tear (scrapes, scratches etc.);
•consumables (components that are subject to short life and periodic replacement due to their functions including, but
not limited to tires, tubes, brake pads, spokes, alkaline batteries, saddle covering, paint, mineral oil, and other
lubricants);
•assembly or tune-up fees;
•costs associated with inspection, labor, packaging material, shipping of warranted products;
•damage or defects resulting from failure to follow instructions in the owner’s manual, improper assembly, use of
incompatible and non-original parts, improper maintenance, storage, and transportation, alterations, modifications,
acts of God, accidents, misuse, neglect, abuse, water damage, operator’s error, commercial activities, extreme or
excessive riding, and other types of non-standard use;
•damage or defects resulting from an attempted repair unless performed by an authorized e-JOE Dealer with e-JOE’s
knowledge and approval;
•damage or defects caused by flood, lightning, earthquake, war, vandalism, theft, brownouts or sags (damage due to
low voltage disturbances).
HOW TO OBTAIN WARRANTY SUPPORT?
STEP 1
Make sure to have the following available: original bill of sale with unexpired warranty period (proof of purchase), photo/video
evidence of the defective part or product, and main product information (such as model, serial number, battery voltage, motor
wattage).
STEP 2
Read the respective manual and FAQs for troubleshooting and repair instructions. If the solution is not found, contact the
authorized e-JOE Bike dealer (seller) from whom you purchased your product and report an issue. As your number one
resource, the dealer shall evaluate the problem, provide instructions for troubleshooting and make attempts at resolving it.
STEP 3
If the issue is deemed as manufacture defect in materials and/or workmanship, fill out the warranty claim form
(https://ejoebike.net/warranty/). e-JOE shall repair or replace parts that are found by e-JOE to be defective and covered by
the limited warranty.
If within the warranty period, identical materials are unavailable at the time of repair or replacement, e-JOE reserves the right
to substitute materials of equal or better quality. Replacement products may be new or reconditioned. All products that are
replaced will become the property of e-JOE and must be returned upon request. Any item repaired or replaced under these
terms will be covered by the limited warranty for the remainder of the original warranty period.
Terms of warranty published on https://ejoebike.net/warranty/ are considered current and controlling when a warranty claim
is made. In no event shall e-JOE Bikes be responsible for any direct, indirect or consequential damages, including without
limitation, damages for personal injury, property damage, or economic losses, whether based on contract, warranty,
negligence, or product liability in connection with their products.
e-JOE reserves the right to refuse any warranty claim.

12
SIMPLE TROUBLESHOOTING
PROBLEM
SOLUTIONS
A. Top speed too slow
1. Fully recharge battery
B. Power on but motor not working
1. Reinstall battery/ Replace fuse
C. Driving shorter distance per recharge
1. Check tire pressures
2. Recharge completely or have charger re-inspected
3. Replace battery
D. The power and the indicator lights are all on, with throttle
or pedal assist, but the e-bike doesn’t work
1. Controller needs to be replaced, or
2. Motor needs to be replaced
E. The power and the indicator lights are all on; bike works
with throttle, but not with pedal assist.
1. Controller needs to be replaced, or
2. Pedal assist module needs to be replaced, or
3. Motor needs to be replaced
F. The power and the indicator lights are all on, bike works
with pedal assist, but not with throttle
1. Controller needs to be replaced, or
2. Throttle needs to be replaced, or
3. Motor needs to be replaced
G. The power is on, and the throttle is down, but the bike
doesn’t work.
1. Check battery to see if it needs to be charged, or
2. Fuse needs to be replaced, or
3. Controller needs to be replaced, or
4. Motor needs to be replaced
H. The switch is turned on, and the bike takes off without
using the throttle.
1. Check if the throttle is stuck in the on position
2. Lubricate or replace throttle if it is faulty
I. After stopping, the bike doesn’t start when the throttle is
twisted
1. Check whether the brake handles are fully released
2. Check D., E., and F. above
J. You connect the power to the charger, but the indicator
light does not come on.
1. Check whether there is electricity to the charger
2. If you have a voltage meter, you can check to see if the
charger produces the correct current
K. You plug in the charger to the bike and the outlet, and
the green light comes on instead of the red light. This
means it isn’t charging.
1. Check to see if the batteries are fully charged
2. Check whether the charger is plugged in properly to both
the battery and the outlet
3. Check the voltage of the charger and battery
4. If “zero” voltage on the charger, then it needs to be
replaced
5. If “zero” voltage from the battery, then check the fuse.
If all the above mentioned situations are normal, then there is another problem.
Please, call your local dealer or our service department for more assistance.

13
CONTACT US
We hope you enjoy your new e-JOE bike!
If you have any questions/comments/concerns or would like to share your
e-JOE bike experience, please contact us at:
Telephone: 855-888-1891
Email: sales@ejoebike.com
Website: www.ejoebike.net
Follow us on Facebook and Instagram!
www.facebook.com/ejoebike
@ejoebike
Table of contents
Other e-Joe Bicycle manuals


