Wowitoys LARK PRO H4822 User manual

LARK PRO H4822
User Manual • Uživatelský manuál •
Užívateľský manuál • Használati utasítás •
Benutzerhandbuch

2
The product user guide contains product features, how to use, and the
operating procedure. Read the user manual carefully to get the best
experience and avoid unnecessary damage. Keep this manual for future
reference. If you have any questions or comments about the device, please
contact the customer line.
✉www.alza.co.uk/kontakt
✆+44 (0)203 514 4411
Importer
Alza.cz a.s., Jankovcova 1522/53, Holešovice, 170 00 Praha 7,
www.alza.cz
Disclaimer & Warnings
Please read this Disclaimer & Warning and Safety Guidelines carefully before
using our product. This product is not recommended for people under the
age of 14. By using this product, you hereby agree to this disclaimer and
signify that you have read it fully. You agree that you are responsible for
your own conduct and any damages caused while using this product, and its
consequences. Youagree to use this product only for purposes that are
proper and in accordance with local regulations, terms and all applicable
polices and guidelines WOWITOYS may make available.
When using this product, please be sure to strictly abide by the specification
requirements and safety guidelines stated in this document. Any personal
injury property damage, legal disputes and all other adverse events caused
by the violation of the safety instructions or due to any other factor, will not
be WOWITOYS'sresponsibility.
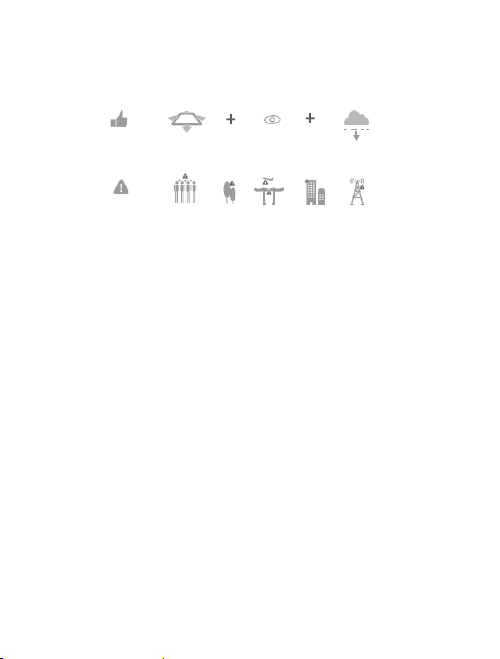
•The drone is designed for 14+

3
•Adult supervision is always advisable with any from of flying toy
Always ensure your flight area is free of all obstacles before taking off,
and ensure the drone is always flown in excess of 1.5 meters from
yourself and others
•Remove all batteries from the drone and controller when not in use
•Never overcharge
•Never leave to charge unattended
•Never touch the drones motors during or after as they can get hot
•Never touch the blades when they are in rotating
•If the drone becomes damaged, stop using it immediately
•Do not dispose of any parts of the drone or controller in the normal
rubbish,all parts should be taken to your local recycling centre
•The battery in the drone should never be exposed to any form of high
temperature or disposed of in a fire
Safety Guidelines
Check before Use
•This product is not a toy, but it is a high precision drone that integrates
various electronic stability and control mechanisms.
Please be sure to setup this drone carefully and correctly to ensure safe,
accident-free operation.
•Please be sure that the batteries of the drone and transmitter are clean,
undamaged and have enough power.
•Please be sure that all the propellers are undamaged and are installed in
the right orientation.
•Please do a thorough check of the product before each use.
Check for firmness of the parts, any signs of cracks and wear of the
propeller, battery power and effectiveness of the product until the issue
has been taken care for.

4
Safe flight Environment
•Make sure the surrounding area is free of all people, pets or other
obstacles before you start to fly your drone
•Your drone is designed for indoor or outdoor use. However, it is not
recommended to fly the drone inside if there is limited space, or outside
if there is any wind.
•Keep a safe playing distance between you and the drone at all times.
Use of Battery
•Please ensure batteries are fitted in the correct orientation as shown in
the instruction manual.
•Avoid short circuits by fiting the batteries incorrectly, and do not crush or
squeeze the batteries as this could carry the risk of an explosion.
•Do not mix new and old batteries as this can lead to a poor performance
of the product.
•Dispose used batteries carefully.
•Please keep dead batteries away from heat and fire.
•If the device is not going to be used for an extended period of time,
remove batteries to prevent potential damage from battery leakage.
•It is recommended to only use the USB charging cable that comes with
the drone to charge the battery.
•Don't connect the battery directly to wall outlets or car cigarette-lighter
sockets.
Fly in Open Areas
Maintain Line
of Sight
Fly Below 164
feet (50 m)

5
•Don't attempt to disassemble or modify the battery in anyway.
•Don't use the battery if it gives of an odor, generates heat, becomes
discolored or deformed, or appears abnormal in any way.If the battery is
in use or being charged, remove it from the device or charger
immediately and discontinue use.
Controller functions
Speed- select button
picture
LED
power switch
combat button
trim
one key start
one key stop
headless mode
normal mode
speed- select
button
flip button
combat button
video
calibration
4xAAA batteries
(not included)
throttle
left stick
right stick

6
•Always use alkaline batteries
•Never mix old and new batteries
1. Unscrew the battery cover and insert 4xAAA batteries (not included),
making sure you insert them following the correct polarity as shown
Drone’s details
It is crucial that all the propellers are installed in the correct position
(Pay attention to the letter A or B printed underneath each propeller.)
2. Re-attach the battery cover
Propeller A
(Clockwise)
Propeller A
(Clockwise)
Propeller B
(Counter Clockwise)
Propeller B
(Counter Clockwise)
Head
Insert the battery
into the drone

7
Charging the Drone Battery
1. Remove the battery from the drone and insert the charging wire into
the battery charging slot.
2. Connect the USB charger (square socket) to a computer, the USB
indicator will glow red.
3. The red light will go out when the battery is fully charged.
WARNING
Do not leave the battery unattended while charging.
Only use the supplied battery or plug charger.
Assembly of Drone Function Module
The drone contains a total of three modules, the basic module / battle
module / camera module.
When the drone is equipped with the basic module, the drone has only
basic functions and is suitable for users to practice flying.
USB Adapter
(5V/0.5-2.0A)
Computer USB Port

8
When the drone is equipped with the battle module, the drone will have
the battle function, which is suitable for 2 or more people to compete with
each other.
When the drone is equipped with the camera module, the drone can
perform functions such as photography / video / FPV flying etc.
Firstly, point the module connector upwards, align it with the interface
under the nose of the drone, and slide it into the middle of the bottom
section of the drone until a crisp "snap" is heard to indicate the success of
assembly. Press and hold the release button of the module at the bottom of
the drone, and gently slide outward to remove the module.
Assembly of Protective Rings
Insert the protective ring diagonally into the side of the motor base and
get it connected with the buckle.
Note 1: The drone must be equipped with protective rings during flight,
safety first. It can also protect the safety of the drone propellers and

9
the motors.
Note 2: After the flight is completed, the external temperature of the
motor will reach 60 degrees, do not directly touch the motor with hands
to avoid burns.
Replacement of Drone Cover
Pairing the Drone to the Controller
1. Turn on the remote control
Since the upper cover and the
rack is tightly matched without
screws, find the gap between
the upper shell and the rack
from where the upper cover
can be disassembled
by hand or a knife, and then
the upper shell can be removed
for replacement.
power switch

10
The direction of control when the drone is paired
2. Connect the battery to the drone and turn on the drone. The lights on
the drone will flash.
3. Place the drone down on a flat surface, and make sure that the head
of the drone is facing the front and the tail facing the rear (player).
4. Push the left throttle up once and controller will beep once.
5. Pull the left throttle down once and controller will beep once. Pairing
is completed once the drone lights and controller lights stop flashing.

11
Flying the Drone
Taking Off
Method 1:
Press the one key start button, the propellers will rotate without taking off.
Push up the left lever to take off.
Method 2:
Push the left lever up until the propellers rotate without taking off and then
push up the throttle left stick again to take off.
Landing
Method 1:
Press the one key stop button, the drone will land by itself.
Method 2:
Push the throttle left lever down until the drone lands.
Landing method 1
Take off method 1
Take Off/Landing
Method 2

12
Altitude & rotate:
Trimming
If the drone sways in an unprompted direction, use the trim buttons to
correct the flight:
1- Forward trim
2- Backward trim
3- Left trim
4- Right trim
Ascend
Descend
Use the left lever to
control the altitude and
rotation during flight.
Left
Right
Backward
Forward
Use the right lever to
control forward,
backward, left and right
movement during flight.

13
Features
1. Speed Modes
Select between 3 speed modes:
40% speed - controller makes 1 beep
60% speed - controller makes 2 beeps
100% speed - controller makes 3 beeps
2. 360 Flips
Perform 360 flips by pressing the “flip” button and immediately after
press the right lever in the desired direction.
Note: The flip button only has function for drone equipped with
the basic module or the battle module, the camera module does not
have this function.
3. Headless Mode / Normal Mode
Headless mode: To activate headless mode, press “headless” button
and the drone will fly in the desired selected direction, regardless of the
direction the drone is facing.
Normal mode: Press and hold this button for 2-3 seconds to enter the
altitude hold mode of flight, that is to exit the optical flow mode of flight.
Then press and hold for 2-3 seconds to re-enter the optical flow mode.
4. Combat Function
This drone is a battle drone, press the combat button during flight to
shoot other battle drones. one beep sound will be heard from the

14
controller and also the front blue lights will blink once from the drone,
that means an infrared bullet is launched once.
Shot chance and performance:
When the battle drone get 1st shot, it will sway for 2-3 seconds; get
2nd shot, it will contra rotate for 2-3 seconds; get 3rd shot, it will vertically
flip left once and flip right once; get 4th shot, it will spiral down to
the ground, game over. After 2-3 seconds, this battle drone could fly
up again to have a new battle.
Note: The combat function button only has function after the battle
module is installed. This button will be non-functional for the basic
module and the camera module.
5. LED
Press the LED button to turn off/on the lights.
6. Calibrating the Gyro
Press this button to calibrate the gyro. The indicator lights on
the drone will blink and turn solid which means calibration is
completed.
7. Photography
Press once the photography button, the Lights on the drone will blink
once.
Note: The photography button will have function only after the

15
camera module is installed. This button is non-functional for the
basic module and the battle module.
8. Recording a Video
Press once the video button, the lights on the drone will blink
twice. Press it again to stop recording, the lights will blink twice again.
Finding the Photo and Video Files
• The photos and videos are stored in the smart phone.
• Make sure the smart phone is connected to the camera signal
successfully before taking the photos and videos.
Note: The video function button will have function only after the
camera module is installed. This button is non-functional for the
basic module and the battle module.
9. Emergency Stop
Only stop motors mid-flight in an emergency situation,
Doing so to reduce the risk of damage or injury.
Press the above two buttons on the controller at the same time,
the motors will stop spinning immediately.
Resetting the Drone
When the flight of the drone is unstable or deviated from the left and

16
right after taking-off, correct the gyroscope and the flight will be more
stable after the correction.
Method 1
1. Turn on the drone and controller, place the drone on flat ground
(it is very important), then push the left lever of the controller up and
down once to pair with the drone.
2. Then push both left and right lever of the controller to the lower left
corner (7 o'clock direction). This will reset the drone to its original
factory settings and will be ready to fly again.
Method 2
Press this button to calibrate the gyro. The indicator lights on the
drone will blink and turn solid which means calibration is completed.

17
Trouble Shooting
ATTENTIONS
1. Do turn off the power of the drone after flying!
2. Pay more attention to the altitude of the drone when flying, in order to
avoid crashes caused by collision on obstacles.
problem
possible cause
solution
The indicator lights of the
drone are flashing and do not
respond to the controller.
The controller is not synced
to the drone.
Insufficient battery power.
Perform pairing according
to the instructions
Charge the battery.
The propellers spin, but the
drone cannot take-off.
Insufficient battery power.
The propellers are installed
in wrong direction.
The propellers are distorted.
Charge the battery.
Install the propellers in
right direction.
Replace the propellers.
The drone sways sharply.
The propellers are distorted.
Replace the propellers.
The drone flies out of balance.
The propellers are distorted.
The motor is not working
properly.
Replace the propellers.
Replace the motor.
The drone is out of control
after crashing.
Six-axis acceleration sensor
has lost its balance after
crashing.
Restart and re-calibrate
the drone.
The drone rotates upwards
when pushing up the throttle
lever or the drone sways
The motor doesn't work
properly
Replace the motor

18
3. When the power of the controller or the drone is insufficient, the remote
control distance will be affected.
4. If the drone power is insufficient, it will be difficult to fly the drone or
even get the drone taking off.
5. If the drone is damaged or deformed, please repair it in time. If the
propeller is broken or damaged, do not fly, otherwise it may cause injury.
6. Remove the battery from the controller when it is not in use for a long
time. Avoid damage to this product caused by battery leakage.
7. Never allow the drone to crash or crash badly from high altitude, which
can damage the drone or shorten its service life.
Specification
Drone
Item no.:
H4822
Weight:
101 g
Battery:
Li-po, 3.7v 1000mAh
Max Flight Time:
7-8 mins
Charging time:
150 mins
Hovering:
Enabled
Operating Temperature Range
0° to 40°C
Dimensions
180x170x45 mm
Transmitter
Operating Frequency:
2,4GHz
Max transmission distance:
40m
Battery:
1.5v AAA
Operating Temperature
0°C to 40°C

19
Inserting the SD Card
Insert the Micro-SD card (not included) to the slot in right direction. If the SD
card was inserted upside down, it will get stuck, and the camera will not
work.
To download your photo and video files:
Fitting the Phone Holder
picture
video
•Remove the SD card from the drone and plug it into the card
reader (not included).
•Plug this into your computer to access the files.

20
1. Position the phone holder to the middle of the remote controller.
2. Use the screws which are behind the phone holder to adjust the tightness
between the holder and the controller.
3. Pull out the holder and place the phone in the holder.
Replacing the Motor
Warning: After the flight is completed, the external temperature of the
motor will be too high. DO NOT directly touch the motor with hands to
avoid burns. At this time, it is not suitable to replace the motor.
Thanks to the modular design of the drone, the motor can also be
replaced independently.
Table of contents
Languages:
Other Wowitoys Drone manuals