COPYRIGHT © 2019 e-TINT MAN-1020 | REV.20190415
cTRL®Mg1 • Owner’s manual
This e-Tint® powered goggle meets MIL-PRF-32432A. Please follow these care and usage instructions to ensure optimal performance from your eyewear.
GLOSSARY OF TERMS ACTIVATE: Turn on; tint | DEACTIVATE: Turn off; clear
The CTRL®MG1 electronic-tinting goggle changes instantly between two levels of tint (on or off) by either a quick press of the button or automatically
via the built-in light sensor. These tint levels are fixed and cannot be changed by the user. The goggle comes pre-programmed with a standard setting
for automatic mode. You can adjust the light sensitivity if you determine that it does not automatically turn on or off to your liking (see “Adjust Light
Sensitivity” below).
TO OPERATE IN MANUAL MODE:
Quickly press and release the button to activate or deactivate the tint of the goggle.
TO OPERATE IN HANDS-FREE (AUTOMATIC) MODE:
The CTRL®MG1 goggle can automatically tint in the presence of an activating light. To switch the system to automatic mode, simply press and hold
the button for approximately three (3) seconds. The lens will flash to indicate it has been switched into automatic mode. Release the button. The goggle
is now set for hands free (automatic) use.
TO EXIT HANDS-FREE (AUTO) MODE, AND ENTER MANUAL MODE:
Press the button once to go back to manual mode. Note: The lens will turn clear upon exiting automatic mode.
TO ADJUST LIGHT SENSITIVITY:
First, switch the goggle to automatic mode. Choose an ambient area of light that would be similar to where you would prefer the goggle to activate. Stand
in your desired lighting condition. Press & hold the button for about four (4) seconds. After four seconds, the lens will flash to indicate the system has
re-calibrated its sensor to your desired setting. Light that is as bright as, or brighter than, your selected ambient lighting will now trigger the sensor. The
electronics will store this custom setting until it is re-adjusted or reset to its factory setting. NOTE: Be sure to keep the area around the light sensor
clear and open to the light source. If your finger is covering the light sensor during the adjustment, the goggle will stay activated most of the time and
only switch when it is very dark. Do NOT attempt to change the light sensitivity when moving.
FOR A FACTORY RESET:
A factory reset can be performed in either manual or automatic mode. Press and hold the button for approximately six (6) seconds. The lens will cycle
through (2) sets of flashing. After the second set of flashing, the goggle will be restored to its original factory settings.
CHARGING: Connect the supplied USB cable to goggle and charge with the e-Tint®charging pack, wall adapter, or computer. The lens will tint when
charging and turn off when fully charged. A completely depleted battery will take up to two (2) hours to fully charge. Directions for use of the charging
pack are included with the charger.
CHARGING STORAGE: If the goggle will be stored for a prolonged period of time, we recommend to fully charge the battery every 2-3 months or
charge in ‘storage mode’ with the e-Tint® charging pack. Doing so will prolong and protect the capacity of the goggle battery. Directions for use of the
charging pack are included with the charger.
WARNING! IF GOGGLE, USB CABLE, OR CHARGER HAVE BEEN EXPOSED TO EXCESSIVE SWEAT OR MOISTURE, ALLOW UNIT TO DRY (APPROX. 8
HRS.) BEFORE CHARGING. DO NOT STORE GOGGLE CONNECTED TO A CHARGING SOURCE FOR AN EXTENDED PERIOD OF TIME (UNLESS IT IS
CONNECTED TO THE E-TINT®CHARGER IN STORAGE MODE).
Directions of use
®
12
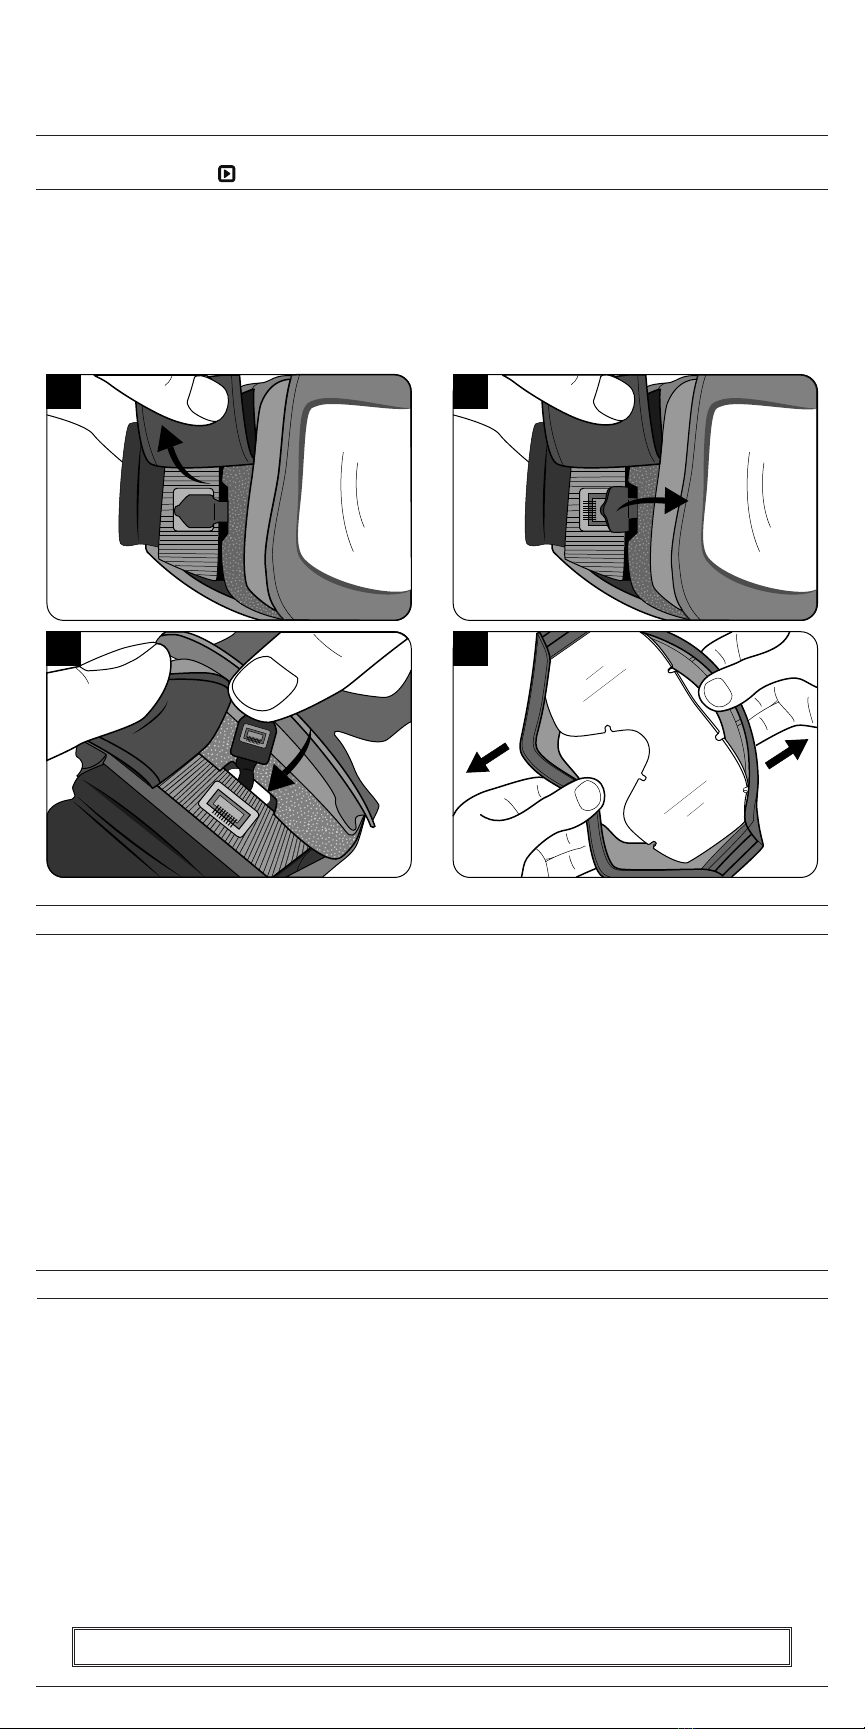
FOLLOW THESE INSTRUCTIONS TO INSTALL YOUR PRESCRIPTION (Rx)* CARRIER AND Rx CONNECTOR INTO THE CTRL®MG1 GOGGLE.
*Prescription (Rx) must be prepared by a licensed optician.
1. Switch the goggle into the “off” or clear state.
2. Insert the Rx Carrier into the Rx Connector by aligning the rectangular post at the center of the Rx Carrier with the rectangular hole on the Rx Connector.
Gently push Rx Carrier down until it snaps securely into place
(Diagram 1).
3. Insert the Rx Carrier into the goggle frame by first fitting the keyhole notches over the posts at the nose bridge
(Diagram 2).
Be sure the soft bumper
pad faces toward the lens, away from the face.
Prescription (Rx) carrier
®
USB PORT
ACTIVATION BUTTON
• Press button to tint ON and OFF
• Press & hold button 3 seconds for hands-free (auto) mode
• Adjust the light sensitivity (see instructions below)
LIGHT SENSOR
INTERCHANGEABLE LENS
ADJUSTABLE HEAD STRAP
WARNING! DO NOT USE tinted lenses in the dark. DO NOT USE if lenses are scratched. IT IS YOUR RESPONSIBILITY TO DETERMINE THE SUIT-
ABILITY OF THIS PRODUCT FOR ITS INTENDED USE. IF AT ANY TIME YOUR GOGGLE IS NOT PERFORMING PROPERLY, DISCONTINUE USE OF THE
EYEWEAR AT ONCE. NOT RECOMMENDED FOR USE OR STORAGE IN TEMPERATURES BELOW -10°C (14°f) OR ABOVE 45°C (113°F).