Solos Wearables Solos User manual

USER GUIDE
Android

2 CONTENTS
CONTENTS
3 UNIT SETUP
APPLICATION SETUP
13 RIDE & RUN
15 ACTIVITIES
16 PROFILE, STATS & SETTINGS
GROUP COMMUNICATION
22 VOICE CONTROL
25 NAVIGATION
26 GHOST MODE
27 TROUBLESHOOTING

Charge the unit by plugging the micro-USB cable into the USB slot
• The LED will flash green when the unit is charging
• The LED will be solid green when the unit is fully charged
• Your SOLOS unit will be charged regardless of whether or not it is powered on
when the USB cable is plugged in
Switch on the unit by briefly pressing the main power button
• The green LED will illuminate to indicate it has powered on
• Your SOLOS will also say “Hello” to confirm it has been powered on
Button Control
Connecting in-ear headphones
• Using the same USB slot, you can connect the in-ear headphones to your Solos unit
Double tap functionality
• During activity, double tap the right temple area of your Solos to activate (or deactivate)
microphones for group-chat communication
3 UNIT SETUP
SOLOS DEVICE
LED INDICATOR
USB SLOT
POWER On: Single press
O: Hold for >5 seconds
Advance HUD screens
Volume adjustment
Pause / Resume
Answer call / Hang up
IN WORKOUT
IN CALL
N/A

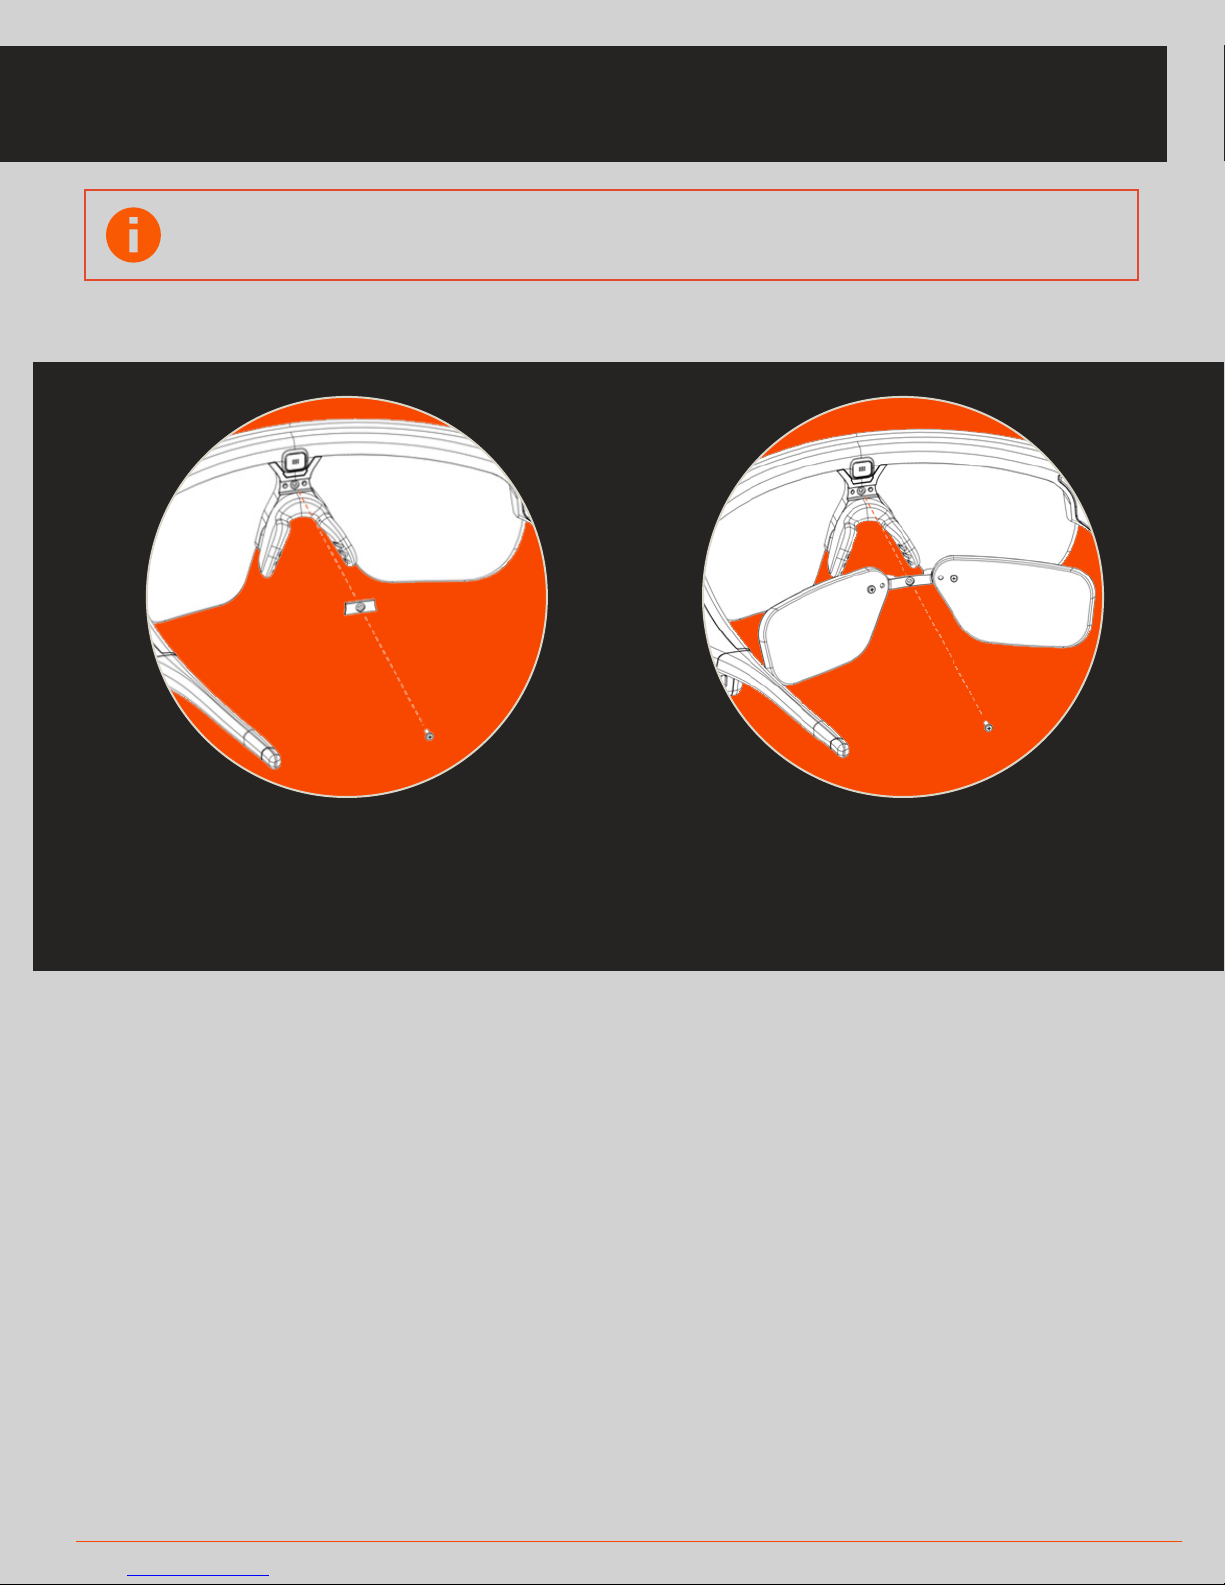
1. Adjust the vertical height of the display
so that it’s in a desirable position based on
your preference. A good starting point is
with the main hinge rotated completely
down, as shown in the darker image.
2. Adjust the secondary tilt of the display
so that you can see the full image. If the
display shows upside down or you can’t
see it then the tilt is incorrect. Often,
this can be fine tuned by adjusting the
spread of the nose bridge and moving
the unit up and down your nose until
you find the optimum position.
3. Adjust the left/right alignment by slid-
ing the optical module using the thumb
catch under the pod. Even if you can see
the image, it’s important to explore this
travel since the display contrast will im-
prove when positioned properly.
4 UNIT SETUP
FITTING THE DISPLAY & ADJUSTING THE NOSEPIECE
To adjust the display, follow these steps:
To adjust the nosepiece, follow these steps:
It’s important to fit SOLOS so that it’s comfortable and you can see all
of the display clearly.
To make the nosepiece narrower,
pinch the rubber nose pads from the
outer sides closer together.
To make the nosepiece wider, expand
the rubber nose pads outward.
This is the neutral position.

1. Remove the thin bar located above the
nosepiece using a Phillips head
screwdriver
2. Position your prescription insert where
the thin bar was and use the same screw
to fasten the insert to your Solos headset
5 UNIT SETUP
CHANGING AND PROTECTING THE LENS
To attach a prescription lens, follow these steps:
Using Protective Lens Sleeve
*Note: This protective sleeve is not meant to prevent
damage to the headset under extreme forces or abuse
• Un-Velcro the flap to open the sleeve
• Slip the headset into the sleeve and close the
flap over the front of the Solos lens
• It should fit over the Solos optics module
Swapping interchangeable lens
To remove a lens from the headset:
• Detach the sides from the headset frame then
• Twist the lens either counter-clockwise or
clockwise to detach from the nose frame
To insert a lens:
• Insert both sides of the lens
into their proper areas on the
headset frame
• Align the lens with the nose
frame, then snap into place
Note: You will need to get your custom prescription lenses cut at an
optician before using with Solos

6 APPLICATION SETUP
• The first time you use the app, the app will take you through setup
• Begin by signing in, or by creating a new account
• The app will advise you of the password requirements
SETUP: SIGN IN OR CREATE AN ACCOUNT

7 APPLICATION SETUP
SETUP: PROFILE
• Create your profile by importing from Facebook, or enter your details manually

8 APPLICATION SETUP
• Ensure Bluetooth is enabled (the system will prompt you) and that your
SOLOS unit is switched on
• The app will search for nearby SOLOS headsets
• Select your SOLOS headset to begin pairing. (One of the screens will display your
headset name)
• Accept the pairing request on both the phone and on the headset
(by pressing the main button)
• The app will confirm when the connection is made.
SETUP: CONNECT HEADSET

9 APPLICATION SETUP
• Select the sport you wish to configure first to use SOLOS
Note: You can always switch sport later and the system will take you
through setup for that sport.
SETUP: SELECT SPORT

10 APPLICATION SETUP
• The app will automatically search for nearby BLE or ANT+ sensors
• Click on your sensors to connect them
• Any connected sensors will automatically reconnect from this point
• Note: Your headset must be connected for the system to connect to
ANT+ sensors
• Some sensors broadcast over both ANT+ and BLE, you only need to
connect to one instance of the sensor
SETUP: CONNECT SENSORS

11 APPLICATION SETUP
• You can log into your accounts with Strava, MapMyFitness and Training Peaks
to share your activity data automatically to those account(s)
• Click on any of the platforms to login and enter your credentials
SETUP: SHARING LOGIN

12 APPLICATION SETUP
• The app will inform you that you can use a connected Wear OS 2.0 smartwatch
with SOLOS
• You have finished setup!
SETUP: FINISH SETUP

13 RIDE & RUN
a b c d
e
f
g
h
i
a
b
c
d
Main Menu button
Tap to access menu list
eList icon
Use to access Navigation and other features
fMetric List
Long press on a metric and scroll sideways to
switch to metric of your choice
g
Quick Settings
Tap to configure easy-access settings options
hStart Button
Tap to begin a new activity
i
Select Workout button
Tap to switch between running and cycling mode
Group Communication icon
Tap to access this feature
Warnings icon
Tap to see any warnings related to your
sensor setup and other items of interest
Sensors icon
Tap to see the status of your BLE and
ANT+ sensors
RIDE & RUN SCREEN
This is the centre of the application and allows you to start a new activity.

14 RIDE & RUN
• When you start an activity, you will see live metric updates on the Ride/Run
screen
• The activity will automatically be locked to prevent accidental ending of
the activity. Long press the lock icon to unlock the pause and finish options
• When you press finish, you will see the End of Ride/Run screen:
* You can rename the activity, categorise the activity and enter a description
* You will see a summary of your key metrics
* You can share your activity
* Press ‘Save Ride/Run’ to progress to the Activities screen (see page 15)
RIDE & RUN SCREEN: DURING & AFTER ACTIVITY

15 ACTIVITIES
ACTIVITIES SCREEN
• When you have completed your activity, you will be taken to the Activities screen
and will be presented with your activity details
• You can also access the Activities section of the app from the main menu at any
time to see your activity data
• You can click on any row item to expand it and see a graphical view
• At the top you can select the Target Averages tab to view your performance
against your preset targets
• The Activities data will be represented in either metric or imperial format
depending on your setting (see page 17 for Settings)

16 PROFILE, STATS & SETTINGS
• In the Profile section of the app you can access your profile information as well as
seeing a summary of your metrics for the past week
• Inside the Profile screen you can also access the Stats screen, where you can see
detailed cumulative metrics for multiple time periods
• In Ride mode, you can configure your bikes (used to calculate accurate calories
consumption)
PROFILE & STATS

17 PROFILE, STATS & SETTINGS
• In Settings you can control various elements of your experience:
* Enable/Disable GPS usage
* Manage the connection to your SOLOS headset and sensors
• Control your ride/run settings (such as which metrics you want to see during your
activity, setting targets to meet and the frequency at which the display updates)
* Go to ‘Active Metrics’ to enable/disable various metric formats on the
headset during your activity
• Control your voice settings (managing voice updates during the activity)
* You can configure the frequency of voice updates
* You can also configure your audio experience for target metrics
• Managing your sharing platforms
• Setting the system to use metric or imperial measures
• Navigation settings
SETTINGS

18 PROFILE, STATS & SETTINGS
• In Settings > Devices you can:
* Rename the headset by tapping on the headset name
* Control your headset volume
* Adjust the headset brightness levels or set to auto
* Set the sleep setting duration
• Firmware Updates
* Your headset contains two unique firmware files that are updated independently.
* You will be notified if an update is available for either one.
* We recommend always running the latest firmware.
*
Updates for firmware and Ant+ bridge can arrive at separate times or together, you can update in any order
SETTINGS: HEADSET SETTINGS
Manage Headset Manage Headset

19 PROFILE, STATS & SETTINGS
• In Settings > Ride/Run settings you can:
* Choose how you would like to display your metrics on your Solos headset,
either in a single or multiple view
* Control the display update frequency of the screens
* Set your preered lap mode
* Select which active metrics you want to see during your activities
SETTINGS: RIDE & RUN HEADSET SCREENS
Run Settings Active Metrics Run Settings

Note: Group Communication requires your phone to have a data
connection to the cloud (mobile data or Wi-Fi)
20 GROUP COMMUNICATION
• Group Communication allows up to ten users to simultaneously connect to a
group chat session and speak in real-time
• When you enter the Group Chat screen you will see your list of available groups
• You can manage your groups by pressing the settings icon on the top right hand
corner
• When you select a group, the app will connect to that group automatically (two
or more users need to be in the group to hear any audio)
• You can press the main SOLOS headset button or double-tap the right side of
your unit to enable/disable your microphones (to mute/unmute your channel)
GROUP COMMUNICATION
Other manuals for Solos
1
Table of contents
Other Solos Wearables Smart Glasses manuals