CREATED ON: August 23, 2021
Instruction Manual
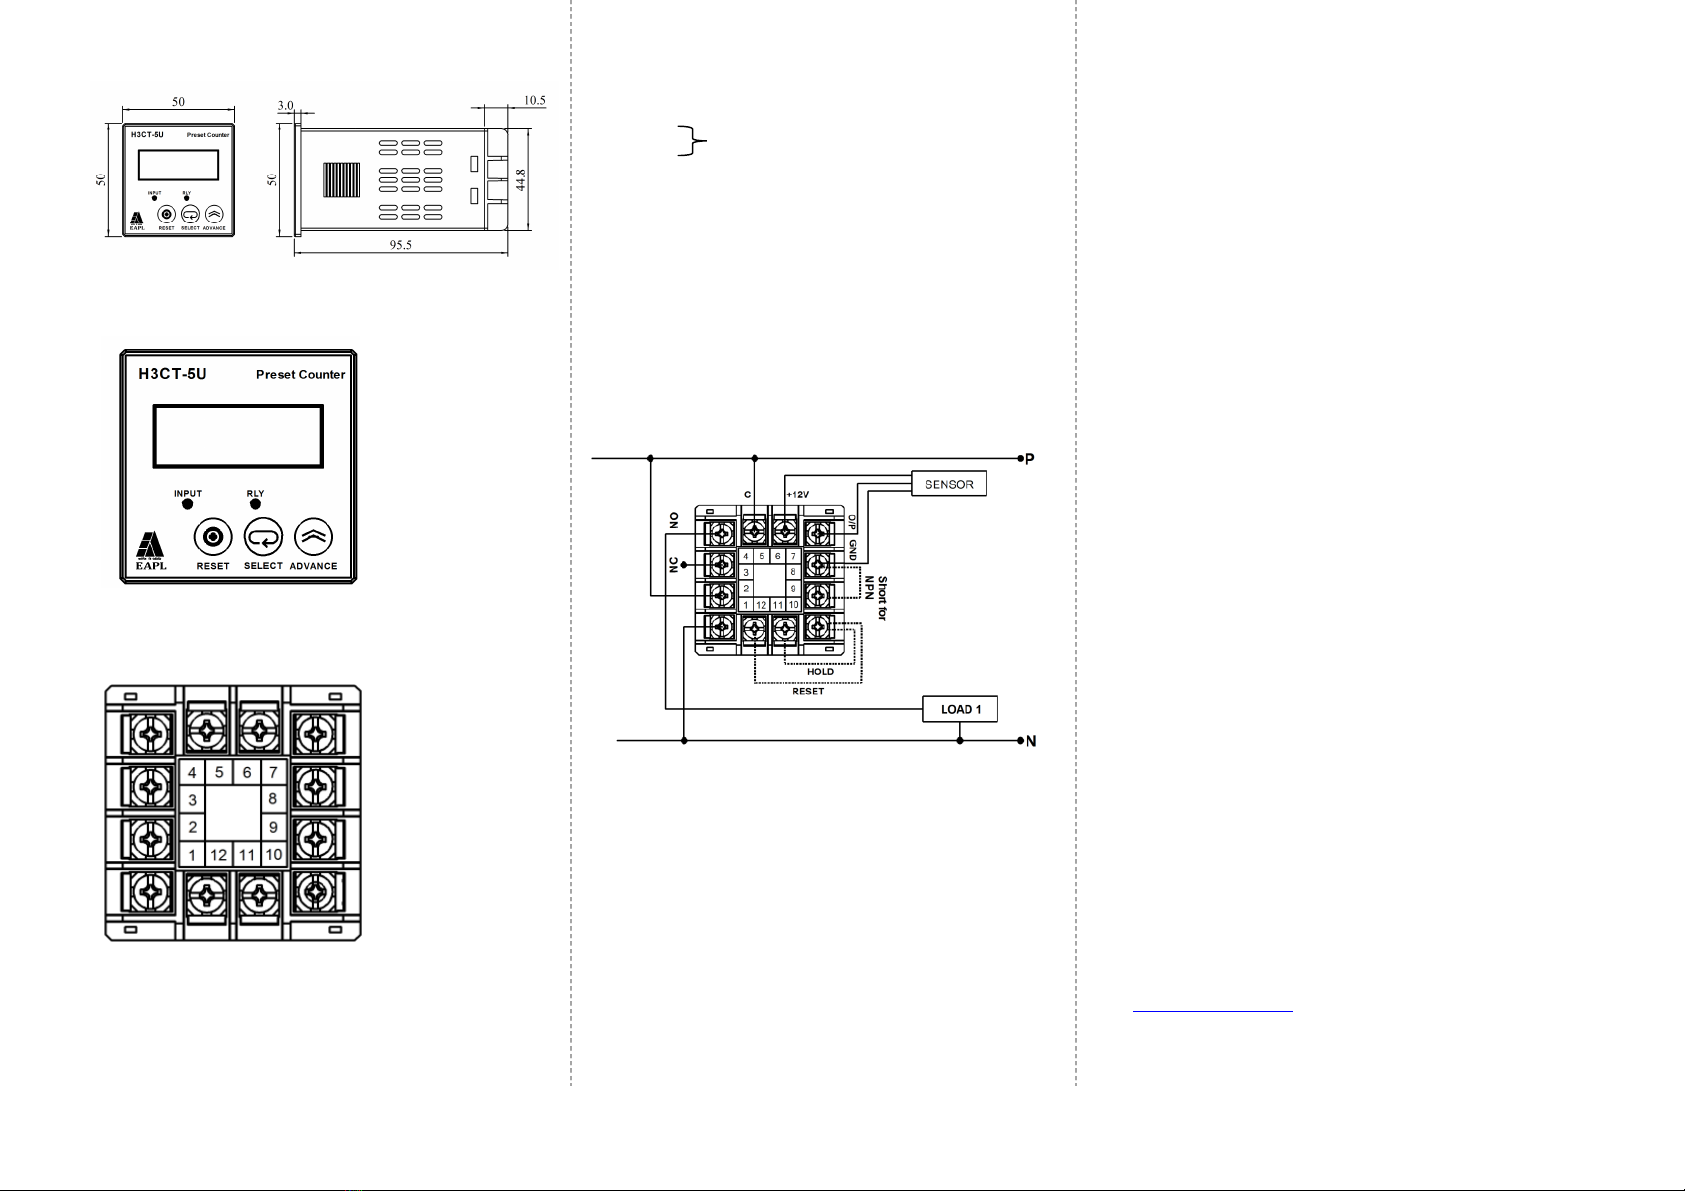
H3CT-5U V2.0
Preset Production Counter
EAPL
Introduction
H3CT- 5U V2.0 is an Up Counter with hold mode.
Apply rated voltage to source terminals and connect the sensor
input, display shows “00000” and starts counting the input pulses.
Once process value reaches set value 1C/O relay contacts
changes over to O and remain in this state till the power is
interrupted or reset signal is applied.
HOL MO E: Continues counting after resumption of interrupted
Power.
RESTART MO E: Counting starts from the beginning after the
Resumption of interrupted power.
Box Accessories
One (1) H3CT-5U V2.0
One (1) Instruction Manual
Function Up Counter with hold mode
Rated supply Voltage 85V to 270V AC/DC
Rated frequency 50/60Hz± 5% for AC only
Power consumption AC Approx. 8VA.
DC Approx. 5W.
Control Output
RLY 1 - 1 C/ O
Rated for 5A @ 250 VAC/ 30VDC( O)
3A @ 250VAC / 30VDC ( C)
Display 5 digit 7 segment LED,0.30”
Count speed 100Hz max.(min I/P pulse width 5msec)
Range 0 to 99,999 counts
Resetting time 250msec minimum
Recovery Time 2 Sec minimum
Ambient temperature
Operation : -10°C to +55°C
Storage : -25°C to +80°C
Humidity MAX 95% RH @ 40ºC
Service life (under no load) 10
6
operations minimum
Electrical life (under full load) 10
5
operations minimum
Insulation resistance >100M ohm @ 500V DC
Dielectric strength
a) 2.5KV AC, 50Hz for 1 minute.
(Between current carrying& non-
current carrying parts)
b) 1.5KV AC, 50Hz for 1 minute.
(Between contacts & control circuit)
c) 750V AC, 50Hz for 1 minute.
(Between non-continuous relay
contacts)
Electrical connection Screw type terminals with self lifting
clamps
Dimension 48 x 48 x 95.5mm (W x H x D)
Sensor type Proximity P / P P and Limit Switch.
Technical Specification:
Safety Precautions
Read and follow all the safety precautions and instructions
before installing and working with the equipment.
!
ANGER
HAZAR OF ELECTRIC SHOCK, EXPLOSION OR ARC
FLASH
• Apply appropriate personal protective equipment(PPE) and
follow safety work practices
• Only qualified electrical workers should install this equipment.
Such work should be performed only after reading this entire
set of instructions.
• If the equipment is not used in the manner specified by the
manufacturer, the protection provided by the equipment
may be impaired.
• EVER work alone.
• The successful operation of this equipment depends upon
proper handling, installation and operation. eglecting
fundamental installation requirements may lead to personal
injury as well as damage to electrical equipment or other
property.
• EVER bypass external fusing.
Failure to follow these instructions will result in death or serious
injury.
• EAPL is not responsible for any consequential damages arising
out of use of our products, though the technology is cautiously
chosen and implemented like any other well designed good
electric device.
Tools and Fasteners
Kindly use star – type screw driver for tightening the screws.
NOTE: Installation should include a disconnecting device, like
switch or circuit breaker, with clear O /OFF markings, to turn-
off the auxiliary supply (control power).The disconnecting
device should be within the reach of the equipment and the
operator.
OD RH Y 610002 REV 02/23-08-2021 Page 1 of 2