manuals.online logo
Brands
  1. Home
  2. •
  3. Brands
  4. •
  5. Earthworks
  6. •
  7. Microphone System
  8. •
  9. Earthworks PianoMic PM40 User manual

Earthworks PianoMic PM40 User manual

Congratulations on your purchase of the innovative Earthworks PianoMic™ System.
We know you will be thrilled with the results you achieve using the PianoMic™ Sys-
tem for both live performance and recording.
Items Enclosed with your New Earthworks PianoMic™ System:
PianoMic™ System Model PM40
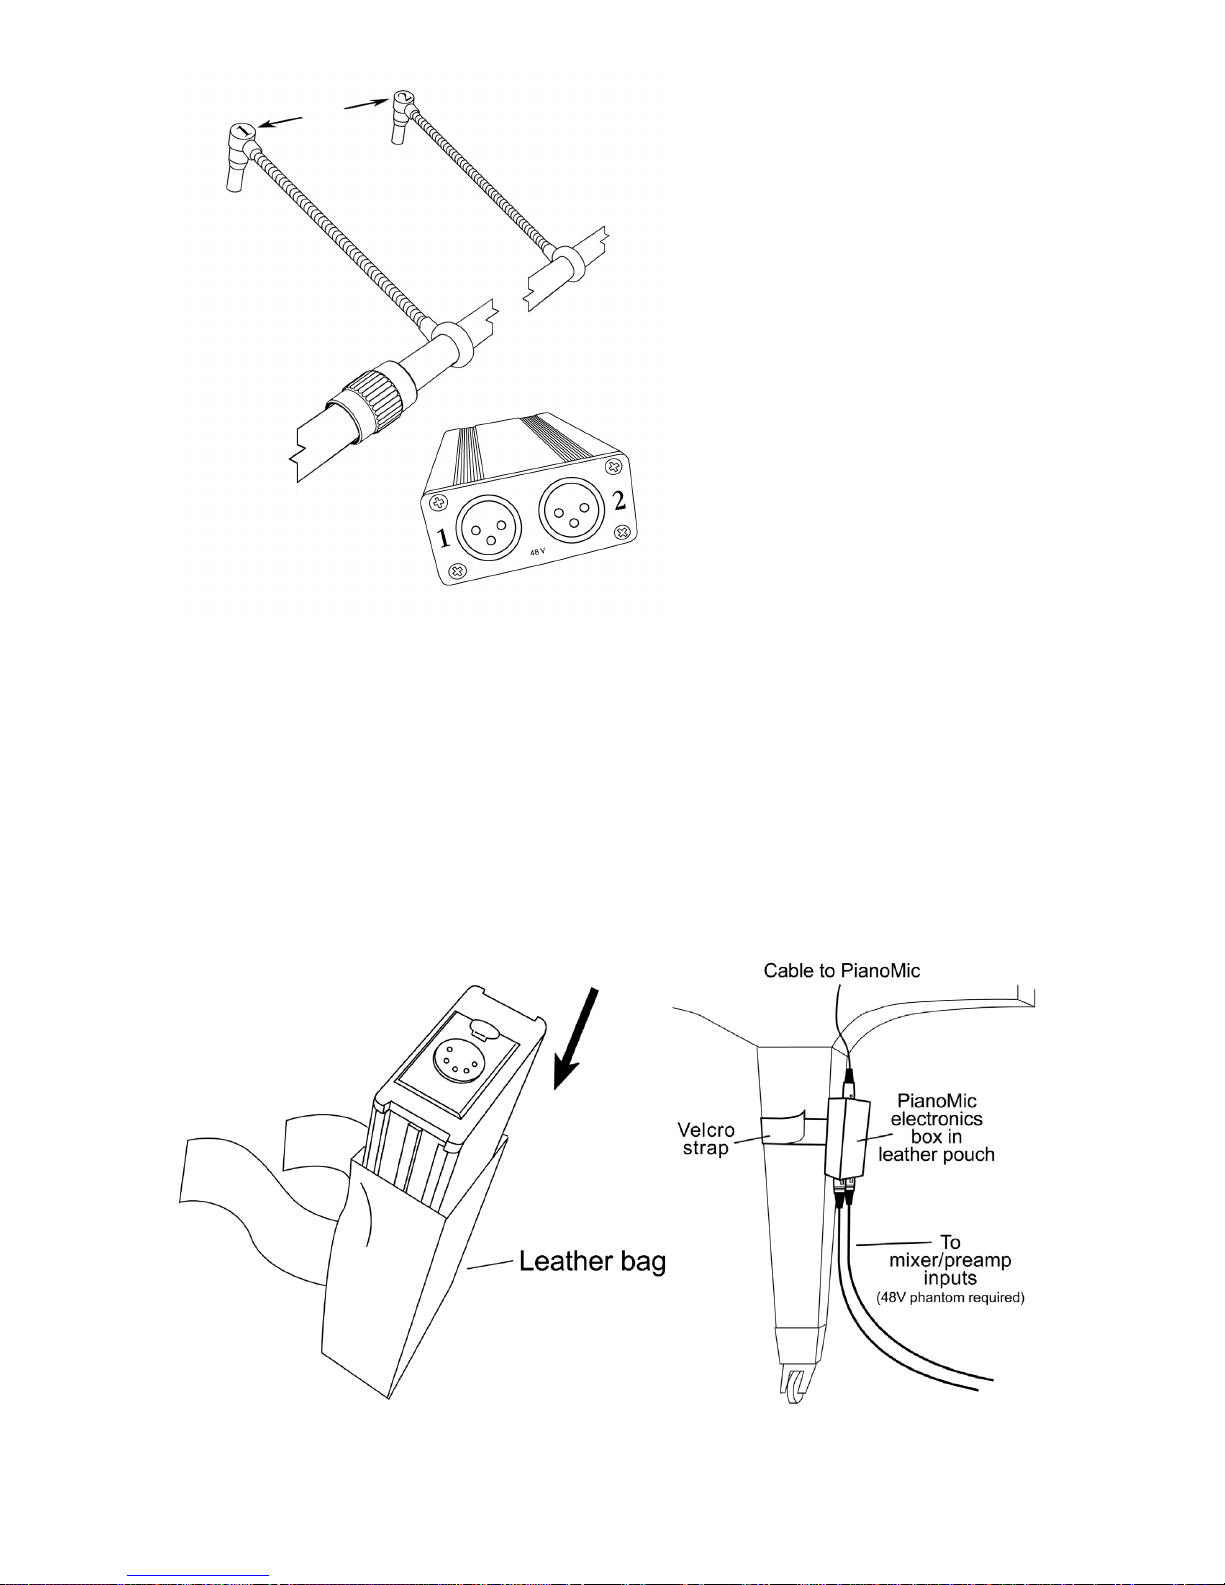
1 – PianoMic™ telescoping bar with attached microphone heads
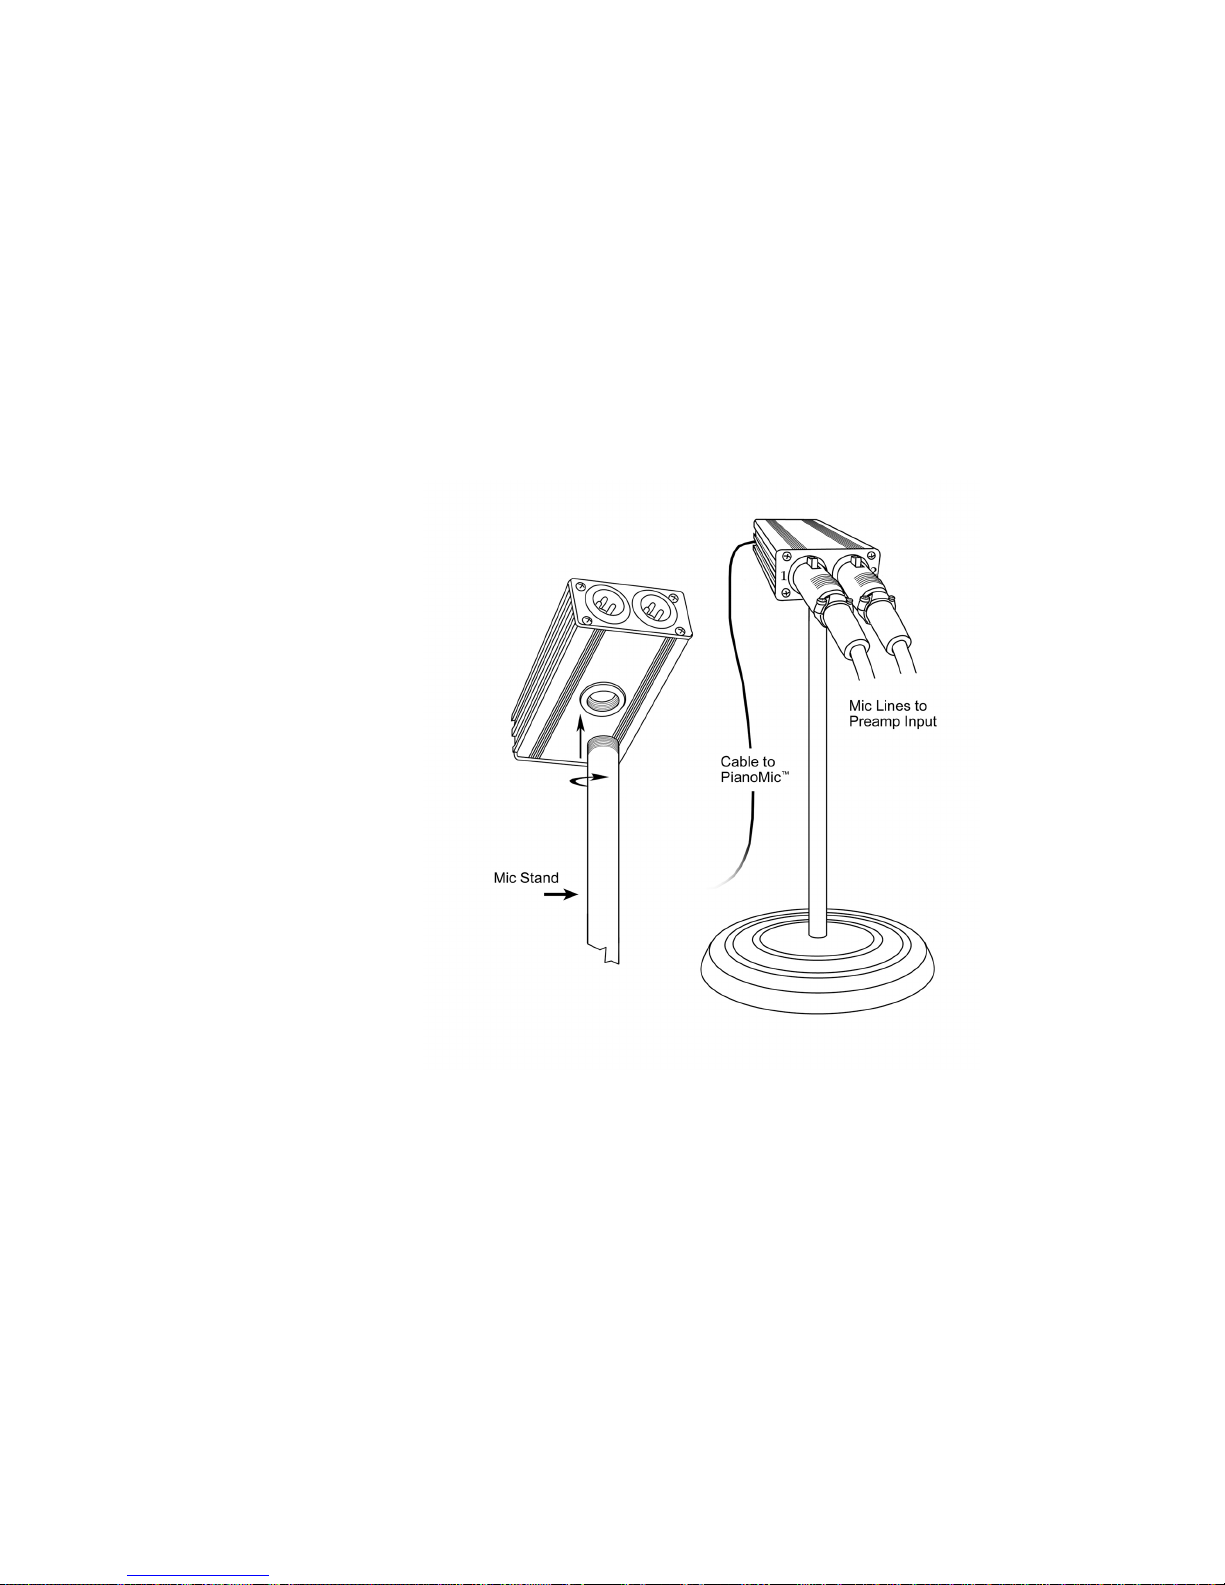
1 – Microphone electronics box
1 – Leather pouch for electronics box
1 – Mic stand mounting bracket for electronics box
2 – Ears for the mounting bracket
2 – Screws for the ears & bracket
4 – Felt pads with adhesive backing
1 - User’s Manual for PianoMic™ System
1 – Carrying case
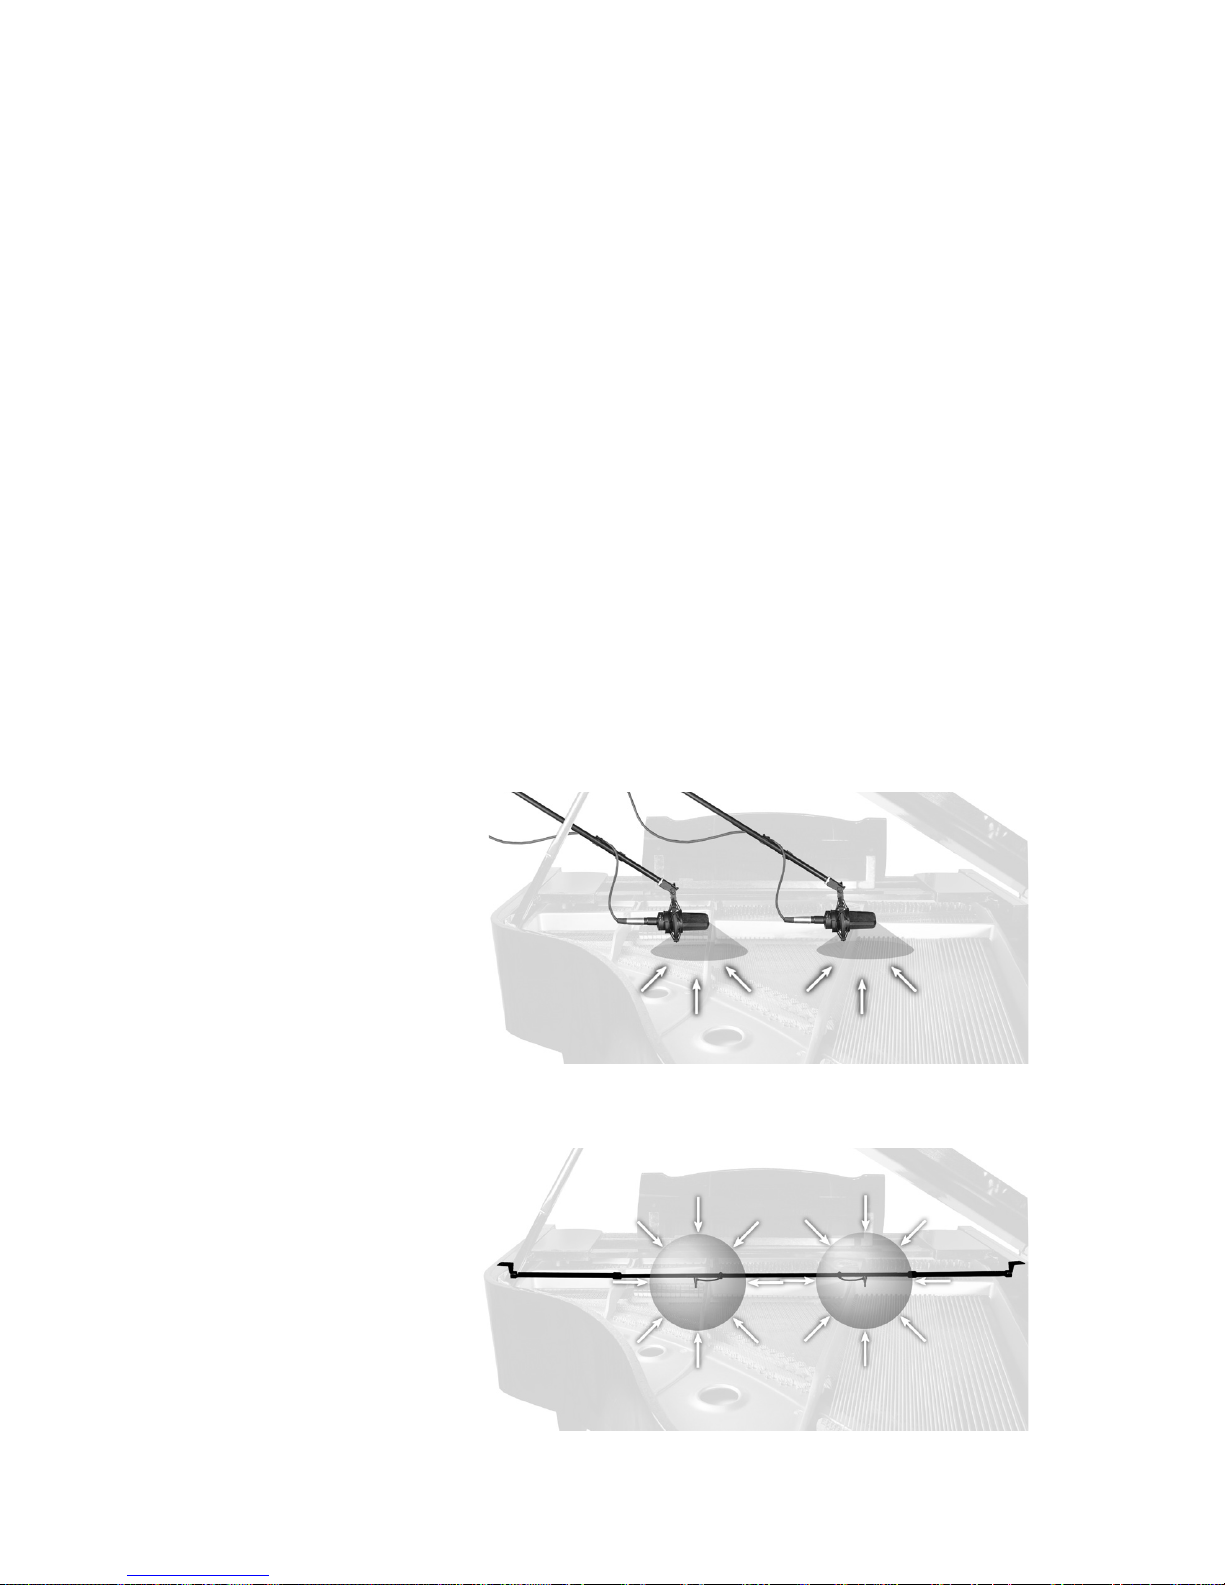
USING THE PIANOMIC™ SYSTEM
The majority of those who purchase the PianoMic™ System have experience in
miking pianos with conventional microphones, and may nd the close-miking tech-
niques described in this Manual to be unconventional. Please keep in mind that the
PianoMic™ System uses a number of new technologies and that the PianoMic™
microphones work and perform much differently than conventional microphones.
The typical practices for piano miking using conventional microphones will most
likely not apply when using the PianoMic™ System. With the PianoMic™ System
the rules for miking pianos have changed.
Conventional miking practices suggest that a piano must be miked from outside
to achieve a good sound, and that a good piano sound cannot be achieved with
closely placed microphones inside the piano, especially with the lid closed. When
you listen to the incredible results achieved using the PianoMic™ System (at full-
stick, half-stick or lid closed), you will realize how unique and ground-breaking
it actually is. As the PianoMic™ System changes many of the conventional rules
and methods of miking pianos; we strongly suggest that you start by following our
guidelines rst. Afterwards, if you want to experiment, you can take it from there.
The Earthworks PianoMic™ System incorporates a number of proprietary
technologies that allow this method of close-miking pianos to achieve results
that have previously not been possible. This improved performance has been
accomplished by using specially designed High Denition Microphones cre-
ated specically to work inside a piano. These carefully matched Random In-
cidence omni microphones have extremely fast impulse response, very short
diaphragm settling time, extended frequency response (4Hz to 40kHz), near
perfect polar response, high current Class A ampliers and the ability to handle
sound pressure levels up to 148dB SPL.
EVEN IF YOU DON’T LIKE READING MANUALS PLEASE READ
THIS SECTION BEFORE INSTALLING THE PIANOMIC™ SYSTEM
1
Version 5, July 7, 2011
The PianoMic™ System provides the following benets:
• Excellent overall piano sound with uniform level from all strings
• Superb sound with the piano lid up or down
• Tremendous gain before feedback
• Minimal leakage from other instruments surrounding the piano
(with piano lid closed)
• Microphones are not visible from outside the piano
People are astonished when they hear the exceptional sound quality of the
PianoMic™ System with the piano lid closed. Conventional microphones per-
form poorly in a closed piano as there is no single dominant direction from which
sound arrives at the microphone. Every string is a sound source. The sound board
is a large and complex sound source. In addition, sounds are reected off the pia-
no sides, the sound board and the piano lid multiple times with little attenuation.
Sounds inside a piano are randomly arriving from every possible direction at
similar levels, all at the same time. This is a classic example of a “diffuse sound
eld” which is dened as a conned area where there are multiple sound sources
and multiple reections arriving at the microphone from every angle at similar
levels simultaneously. A microphone that is placed in such a diffuse sound eld
has to pickup all of the sound with a proper tonal balance. For optimum results,
this task requires a High Denition Random-Incidence Microphone.
Conventional microphones
(i.e. virtually every micro-
phone used for recording
and live sound) are “Free
Field” microphones, de-
signed to accurately pick
up sounds in front of the
microphone (direct sound)
(See Figure 1).
Random-incidence micro-
phones are designed to re-
spond uniformly to sounds
arriving simultaneously
from all angles, rather than
to the sound coming from
a primary source that is in
front of the microphone.
Random-incidence micro-
phones have exceptional
accuracy and tonal balance
in a diffuse sound eld,
where sound arrives from
all directions randomly and
simultaneously.
Figure 2. Random Incidence Microphones Inside a Piano
Figure 1. Conventional “Free Field”Microphones Inside a Piano
2
Any recording or live sound engineer will tell you that conventional microphones do
a poor job inside a piano with the lid closed. Sound engineers were amazed when
they heard the exceptional sound quality of the PianoMic™ System used inside a
piano with the lid open and at half-stick. But they were absolutely oored upon hear-
ing the fantastic performance with the lid closed.
When using a PianoMic™ System for live performance you will achieve the most
gain before feedback with the piano lid fully closed. You will also have the least
amount of leakage from sounds outside the piano with the piano lid closed.
We know you will be more than pleased with the performance of the PianoMic™
System for both recording and live sound applications.
SETTING UP THE PIANOMIC™
The PianoMic™ System is quick and easy to install. Once you have initially set up
the PianoMic™ System you will be able to do it from that point on in just a few
minutes. Here are some helpful guidelines:
CAUTION – the microphone heads and goosenecks are permanently attached
to the center section of the PianoMic™ telescoping tube and cannot be moved,
or removed. The distance between the two goosenecks is xed at 16 inches (one-
third of the width of a piano keyboard).
1. Check that all items are included with your PianoMic™ System by using the list
of “Items Enclosed” on the rst page of this manual.
2. Remove the PianoMic™ telescop-
ing bar from the case and loosen the two
clutches on either side of the two micro-
phone goosenecks (See Figure 3). When
adjusting the clutches, be sure to hold the
larger diameter tube section with one hand
while rotating the clutch with the other
hand as indicated in gure 3. However,
do not loosen the clutches all the way; just
enough so the bar can be extended and still
have a little friction. This will make it eas-
ier to adjust the length of the bar from both
ends once it is placed inside the piano.
3. Extend both sides of the bar so that it is wider than the piano.
4. Notice that on each end of the PianoMic™ bar there are support brackets that
will be placed on the upper edge of the piano case sides. These support brackets
have rounded edges and are covered with a soft coating to avoid scratching the
piano. The support brackets are thin enough to allow the piano lid to be completely
closed with the PianoMic™ System inside the piano. If you desire a more snug t
with the lid closed or if vibration becomes an issue, install one of the enclosed felt
pads on the support brackets as shown in Figure 4. If this is not a snug t, you can
place additional felt pads on top of the support arms as well.
Figure 3. Loosening the Clutches
3
5. The PianoMic™ can be placed inside
the piano with the microphone heads ei-
ther facing the dampers (Figure 5) or
facing away from the dampers (Figure
6). For optimum results, the PianoMic™
System should be placed in the piano
with the microphone heads placed two
to three inches away from the dampers.
How you place the PianoMic™ System
will depend upon the piano, its size and
how it is made. This will govern whether the microphone heads can be faced toward
or faced away from the dampers. It is best to position the PianoMic™ System so that
the support bracket does not have to rest on the curved part of the piano case.
6. Notice that one end of the PianoMic™ has a multi-connector shielded cable com-
ing out of the tube below the support arm (Figure 7). It doesn’t matter which side of
the piano the cable exits. The main objective is to place the PianoMic™ in the piano
so that the microphone heads can be easily placed 2 to 3 inches in front of the damp-
ers. The cable is long enough to easily reach the opposite side of the piano should
you decide to locate the electronics box on the opposite side of the piano from where
the cable comes out of the PianoMic™. You will need to position the cable so it does
not lie on top of the support arm. The combined thickness of the support arm with
the cable on top if it would exceed the size of the opening between the piano case
and the lid. Therefore when the lid is closed it would pinch and deform the cable. To
avoid this, place the cable to one side of the support arm. You may also position
the cable so it comes out the open area of the piano as illustrated in Figure 7.
Figure 4. Support Arms and Installing Felt Pads
Figure 5 Figure 6
Figure 7. Positioning the PianoMic Cable
PianoMic multi-conductor
shielded cable that connects to
electronics box via 5-pin XLR.
Figure 5. Facing the Mic Heads Towards the Dampers Figure 6. Facing the Mic Heads Away From the Dampers
4
7. Once you have determined which placement will provide you with the ability
to have the microphone heads two to three inches in front of the dampers, you
are ready to place the PianoMic™ System inside the piano. With the bar fully ex-
tended and the clutch adjusted where there is still a little friction, place the support
bracket on the edge of the piano case opposite you. Then push on the bar until the
PianoMic™ is the correct length to allow the support bracket to easily rest on the
edge of the piano case nearest to you.
8. With the PianoMic™ in place, you will need to determine if you want the
microphones to favor the high strings, low strings or neither. The center sec-
tion of the PianoMic™ can slide up to eight inches in either direction in order
to favor the high or low strings, if desired. This positioning is illustrated in
Figures 8 and 9.
9. Once you have positioned the PianoMic™ center section, tighten both clutches
to insure that the PianoMic™ bar stays in place.
10. With the PianoMic™ in place, you
can move the ex arms attached to the
microphone heads several inches to the
left or to the right to achieve your de-
sired placement (See Figure 10).
11. The ex arms also allow you to ad-
just the height of the microphone heads
as shown in Figure 11.
12. With the PianoMic™ placed inside
the piano and the microphones properly
positioned you are ready to connect the
PianoMic™ cable to the electronics box
Figure 10. Adjustable ex arms for the Microphones Figure 11. Adjusting the Microphone Height
Figure 12. Top
and Bottom of
Electronics Box
Figure 8. Favoring the High Strings Figure 9. Favoring the Low Strings
5
via a 5-pin XLR connector. The
bottom of the electronics box has
two XLR-3 connectors that will
connect the microphone outputs to
the preamp inputs of your mixer.
13. Notice that the top of each
microphone head has a number.
These numbers correspond to
the numbers on the bottom of the
electronics box. Depending upon
how the PianoMic™ is placed in
the piano the high strings will be
indicated by either the number 1
or number 2. Once the PianoM-
ic™ has been placed, identify the
microphone numbers on the mic
heads for both the high and low
strings and remember that they correspond to the numbers on the bottom of the
electronics box. This will allow you to correctly identify the microphone signals
for high and low strings that are connected to the preamps of your mixer. Re-
member that the PianoMic™ requires 48-volt phantom power.
14. There are two ways to mount the electronics box: (1) in a leather pouch
strapped to the leg of the piano, or (2) attached to a short microphone stand.
The PianoMic™ System comes equipped to install the electronics box in
either of these two ways.
Figure 13. Corresponding
Numbers on Microphone
Heads and Outputs of
Electronics Box.
Figures 14. Placing the Electronics Box in the Pouch.
14. 15.
Figures 15. Attaching the Pouch to the Piano Leg.
6
7
Pouch Attached to Piano Leg
The enclosed leather pouch has Velcro straps that allow it to be attached to the leg
of a piano. The pouch is open at the top and the bottom has a strap to prevent the
electronics box from falling out of the bottom. There is an opening at the bottom
of the pouch to conveniently attach the two standard XLR-3 microphone cables
that go to your mixer preamp inputs (See Figures 14 and 15).
Electronics Box Attached to Mic Stand Bracket
The electronics box has a threaded insert in the bottom of the box that will
mate with the threads on a standard microphone stand. By this method, the
electronics box can be mounted to a short mic stand to keep it above oor level,
if desired (see Figure 16).
Now you should be ready to use the PianoMic™ System and achieve some
impressive sonic results for recording or live performances.
If you have any questions after reading and following the directions in this manual,
please contact Earthworks directly using the contact information on the back page
of the manual.
Figure 16. Mounting
Electronics Box on
Microphone Stand
Adapter Bar
Earthworks: the New Science in Microphones
David Blackmer, the brilliant engineer who invented the technologies of dbx, is
also the inventor and founder of Earthworks. In the last few years of his life, David
developed a number of revolutionary technologies that dramatically improve the
quality and performance of microphones. In short, Earthworks High Denition
MicrophonesTM will pick up sounds and details that other microphones cannot.
These dramatic improvements are in the areas of impulse response, diaphragm
settling time and improved polar pattern technologies. Those who have heard
Earthworks High Denition MicrophonesTM say that they hear more attack, more
subtle detail and a more pristine quality in the sound than with any other micro-
phones regardless of price. Since David’s death in 2002 the Earthworks engineers
have continued to develop new innovations in microphone design such as the
PianoMic™ System.
FIFTEEN-YEAR WARRANTY
All Earthworks products (excluding accessories) carry a fteen-year limited warranty (parts
and labor). If you have any problems with your Earthworks products, please contact our war-
ranty/repair department by email at: [email protected] or by telephone at
(603) 654-6427, Ext. 19.
SPECIFICATIONS
Frequency Response: 9Hz – 40kHz
Polar Pattern: Omni directional (random-incidence)
Sensitivity: 15mV/Pa (-36 dBV/Pa)
Power Requirements: 48V Phantom, 10mA
Peak Acoustic Input: 148 db SPL
Output: XLR3 (Pin 2+)
Min. Output Load: 600 ohms between pins 2 and 3
Maximum Output Level: +30 dBV (peak)
Noise: 22 dBA
Mic Gooseneck Length: 4.75”
Dimensions: 64” fully extended, 46” fully collapsed
Product Weight: Mic Assembly: 0.75lb (350g),
External Electronics Box: 1.5lb (700g)
PianoMic™ Polar Response
Earthworks, Inc.
37 Wilton Rd.
Milford, NH 03055
603-654-6427, ext. 14
www.earthworksaudio.com
Made in U.S.A.
8
Made in U.S.A.
Earthworks, Inc. • 37 Wilton Rd. • Milford, NH 03055
603-654-6427, ext. 14 • www.earthworksaudio.com
email: [email protected] • Printed in U.S.A.

Other Earthworks Microphone System manuals

Earthworks CMK4 CloseMic Kit User manual

Earthworks

Earthworks CMK4 CloseMic Kit User manual

Earthworks FlexWand FW430 User manual

Earthworks

Earthworks FlexWand FW430 User manual

Earthworks PM40T Operator's manual

Earthworks

Earthworks PM40T Operator's manual

Earthworks PM40T User manual

Earthworks

Earthworks PM40T User manual

Earthworks PM40T User manual

Earthworks

Earthworks PM40T User manual

Earthworks PM40T User manual

Earthworks

Earthworks PM40T User manual

Earthworks SR25 User manual

Earthworks

Earthworks SR25 User manual

Earthworks FlexWand FW730 User manual

Earthworks

Earthworks FlexWand FW730 User manual

Earthworks DP25C User manual

Earthworks

Earthworks DP25C User manual

Earthworks FlexWand FW730 User manual

Earthworks

Earthworks FlexWand FW730 User manual

Popular Microphone System manuals by other brands

Knoll WHD3 installation instructions

Knoll

Knoll WHD3 installation instructions

Sony DWZ-B50GB quick start guide

Sony

Sony DWZ-B50GB quick start guide

Qtx UH5 user manual

Qtx

Qtx UH5 user manual

Audio Technica ATW-R5220 user manual

Audio Technica

Audio Technica ATW-R5220 user manual

Audio Technica 1600 Series Installation and operation guide

Audio Technica

Audio Technica 1600 Series Installation and operation guide

Sanjin SKW-101 manual

Sanjin

Sanjin SKW-101 manual

Chiayo SDR-5216 Operation manual

Chiayo

Chiayo SDR-5216 Operation manual

Shure KSM11 user guide

Shure

Shure KSM11 user guide

Beringer UltraLink ULM200M manual

Beringer

Beringer UltraLink ULM200M manual

KAM KWM1900 instruction manual

KAM

KAM KWM1900 instruction manual

Gotting HG G-7335xZA Series Device description

Gotting

Gotting HG G-7335xZA Series Device description

Anchor UHF-7000 user manual

Anchor

Anchor UHF-7000 user manual

Sennheiser Esfera SPB 8000 instruction manual

Sennheiser

Sennheiser Esfera SPB 8000 instruction manual

Eaton Roadranger Fuller UltraShift F-406-ASW... installation guide

Eaton

Eaton Roadranger Fuller UltraShift F-406-ASW... installation guide

Sony DWA-01D Brochure & specs

Sony

Sony DWA-01D Brochure & specs

JTS US-8216D Series instruction manual

JTS

JTS US-8216D Series instruction manual

Sony UWP-X5 operating instructions

Sony

Sony UWP-X5 operating instructions

Peavey PCX-U302 operating guide

Peavey

Peavey PCX-U302 operating guide

manuals.online logo
manuals.online logoBrands
  • About & Mission
  • Contact us
  • Privacy Policy
  • Terms and Conditions

Copyright 2025 Manuals.Online. All Rights Reserved.