EAT E-Flat User manual

European Audio Team
INSTRUCTIONS FOR USE
E.A.T. E-Flat

2
Dear Music over,
Welcome!
Congratulations on your purchase of our E.A.T. E-Flat turntable. Your E.A.T. E-Flat was
handcrafted by our skilled technicians here at the European Audio Team. It has been rigorously
tested and is ready and waiting for your enjoyment.
Please take the time to read this manual carefully to ensure that you obtain the ultimate
performance from your E.A.T. E-Flat. The tips contained within will ensure that your E-Flat’s
condition will remain like new for many years to come!
Please contact your dealer, should you require further assistance in setting up and maintaining
your new turntable.
Important:
Your turntable was shipped partially disassembled in order to avoid damage to sensitive parts.
Please check immediately to make sure that neither the packaging nor the device was damaged
in transit.
If damaged, please do not operate and contact your dealer.
Please do your part to help protect the environment:
Disposal of packaging material
E.A.T. packaging is carefully designed to protect your component from damage in transit
and you are strongly urged to keep the original packaging in order to safely ship or
otherwise transport your turntable in the future.
However, the packaging materials were chosen to be environmentally friendly, so if you
must discard the packaging, please recycle.
Disposal of old equipment
If you’re disposing of old electronic equipment, please use a local waste facility
designated for that purpose.
Throughout the manual, this symbol will alert you to potential hazards for the user or the unit,
and how to avoid possible misuse.
!

3
Contents
Product illustrations and key 4-5
Setup
1. Protective covers, sub-platter and drive belt installation 6
2. Platter installation 7
3. Tonearm assembly 8
a) Tonearm installation 9
b) Cartridge installation 10
c) Vertical Tracking Force setting (VTF) 10
d) Tonearm output connection 11
e) Vertical Tracking Angle setting (VTA) 11
f) Anti-skating assembly and adjustment 12
4. eveling the turntable 14
5. Using the record clamp, starting the motor, changing the speed 15
Technical specifications 16
Troubleshooting, warranty, service 17
Packaging 18
4
5
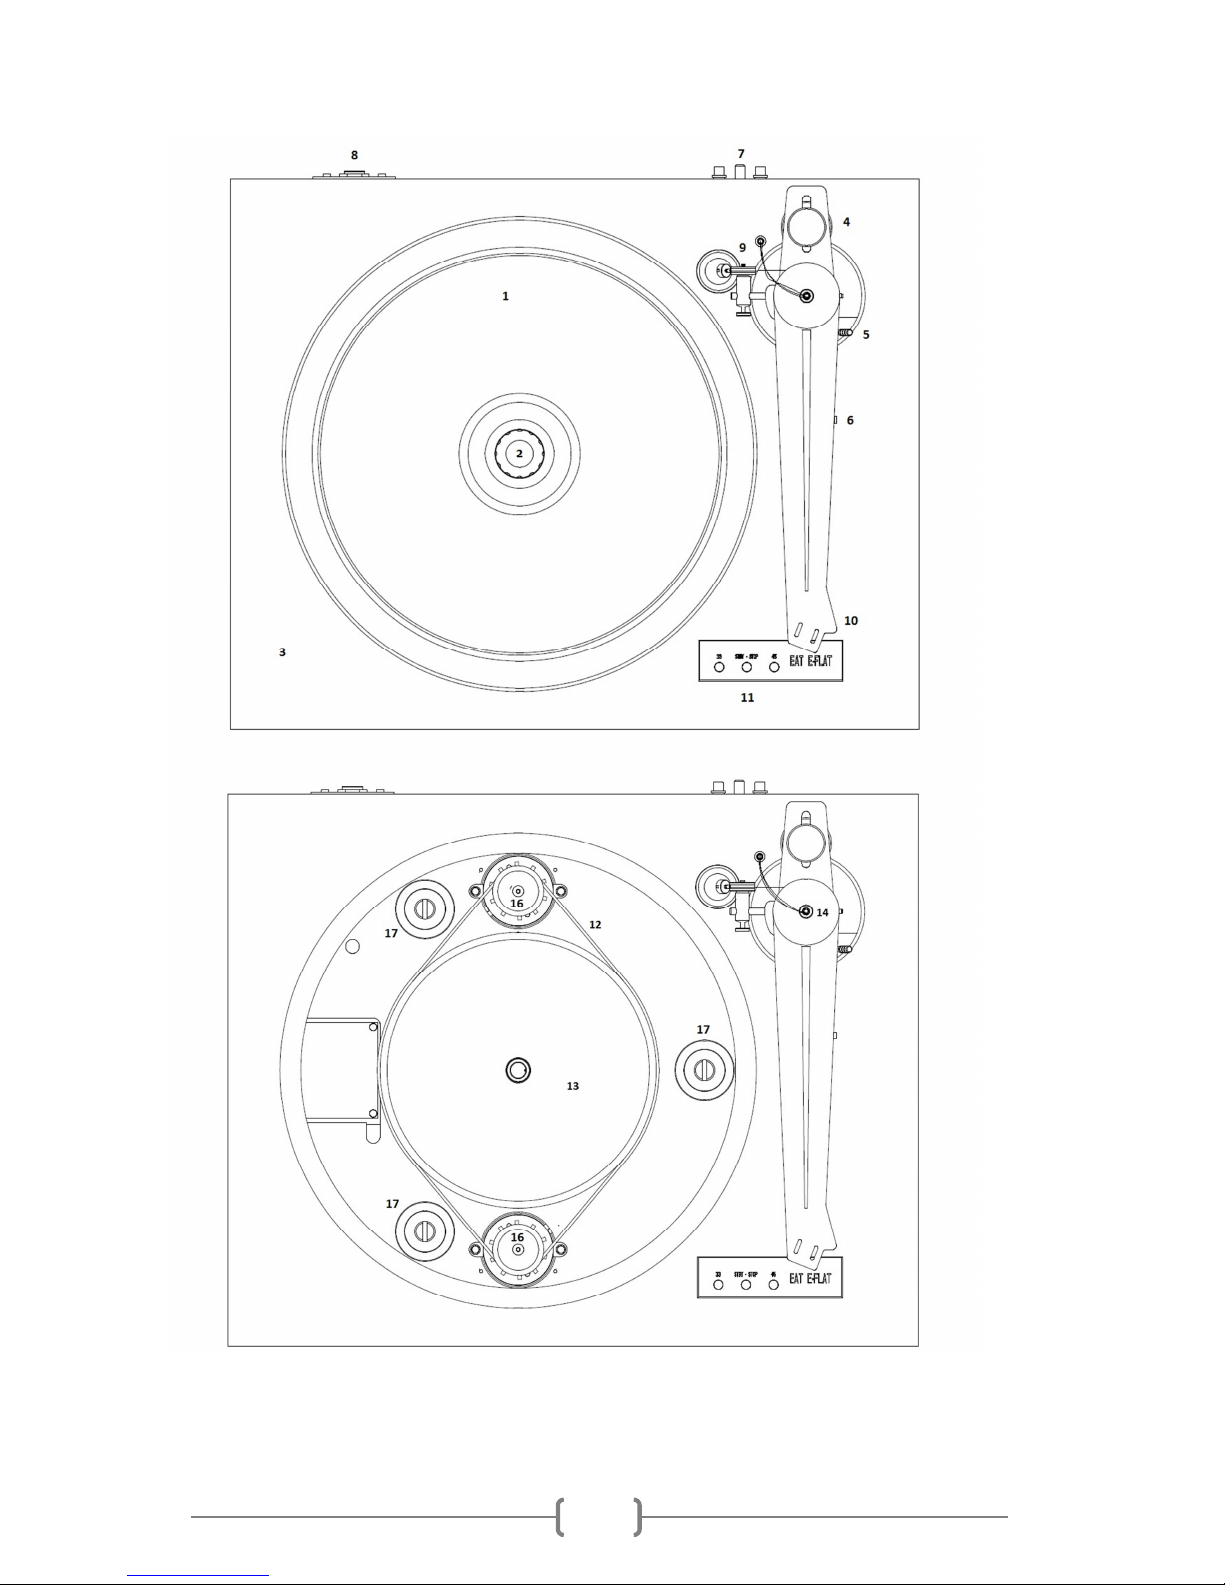
KEY: CONTRO S, FEATURES AND CONNECTIONS
1. Platter with bonded vinyl mat
2. Record clamp
3. Chassis
4. Tonearm counterweight
5. Tonearm lift lever
6. Tonearm rest
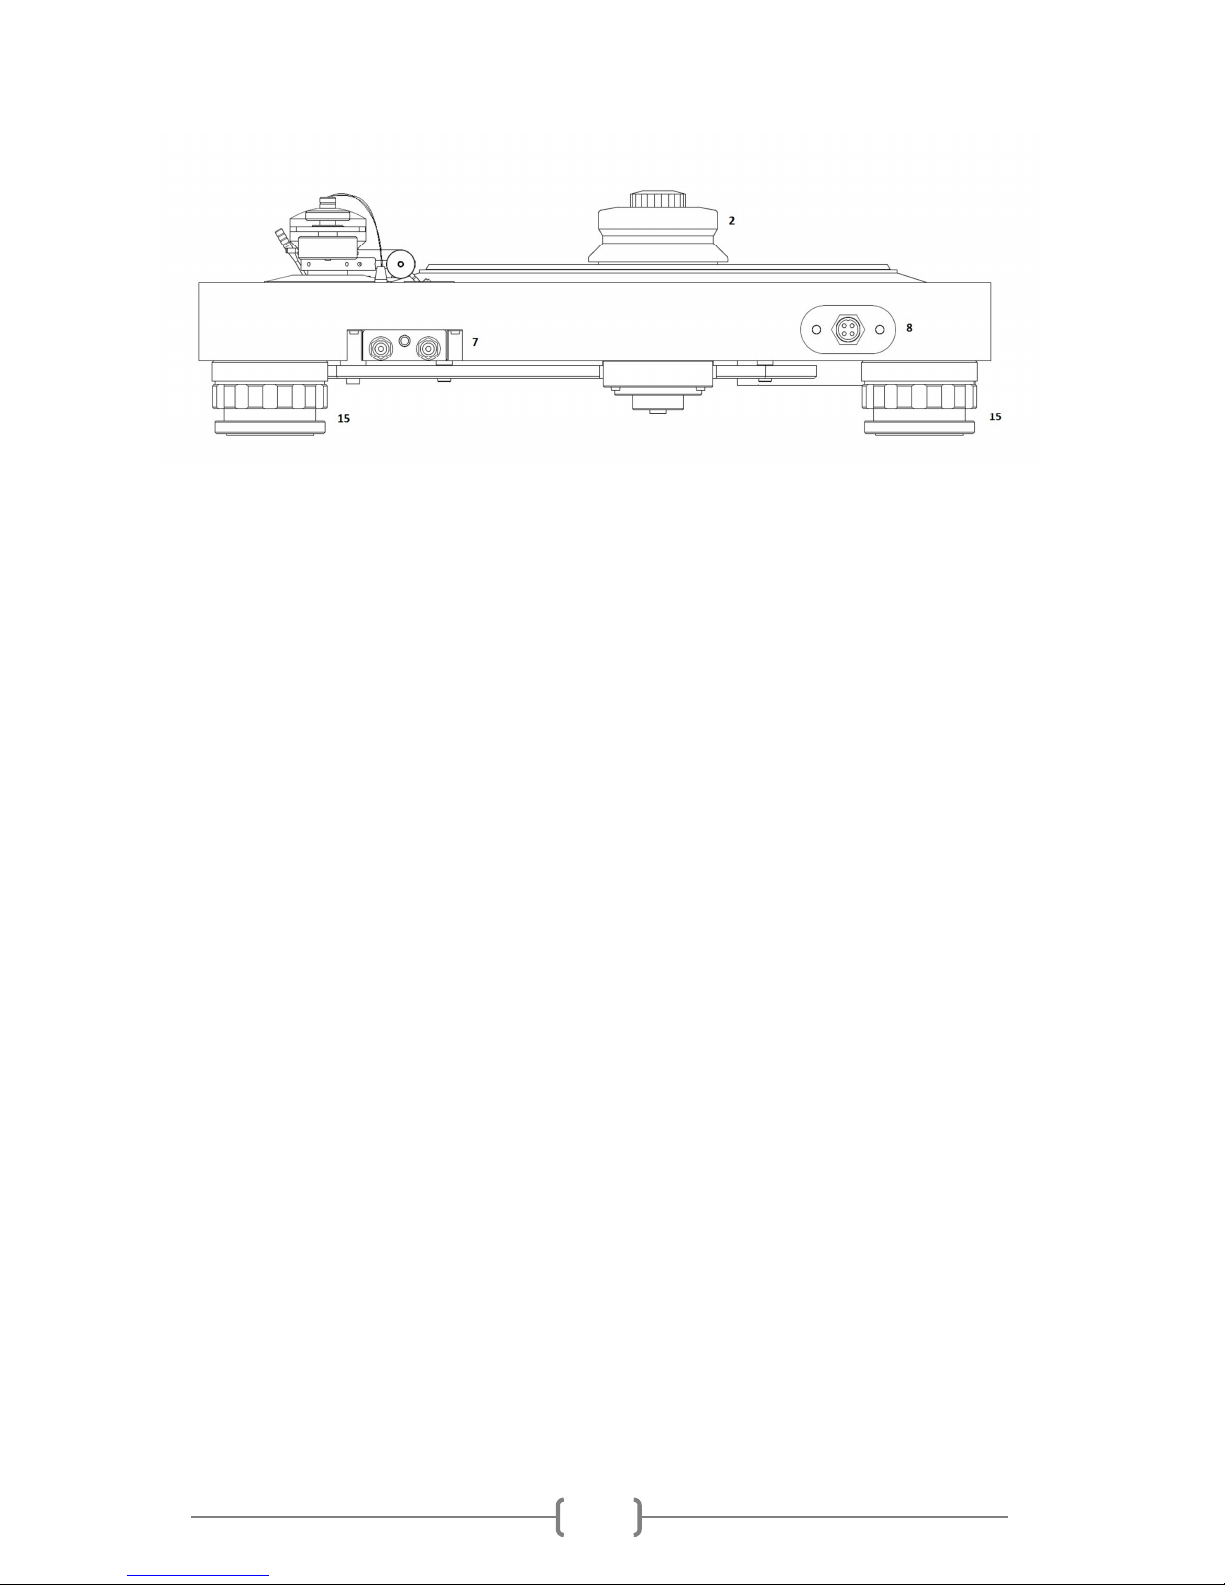
7. RCA output
8. Power supply connector
9. Anti-skating mechanism
10. Headshell with finger lift
11. Speed control panel
12. Drive belt
13. Sub-platter
14. Tonearm connector
15. Damped adjustable feet
16. Motor with motor pulley
17. Sub-chassis damping

6
SETUP
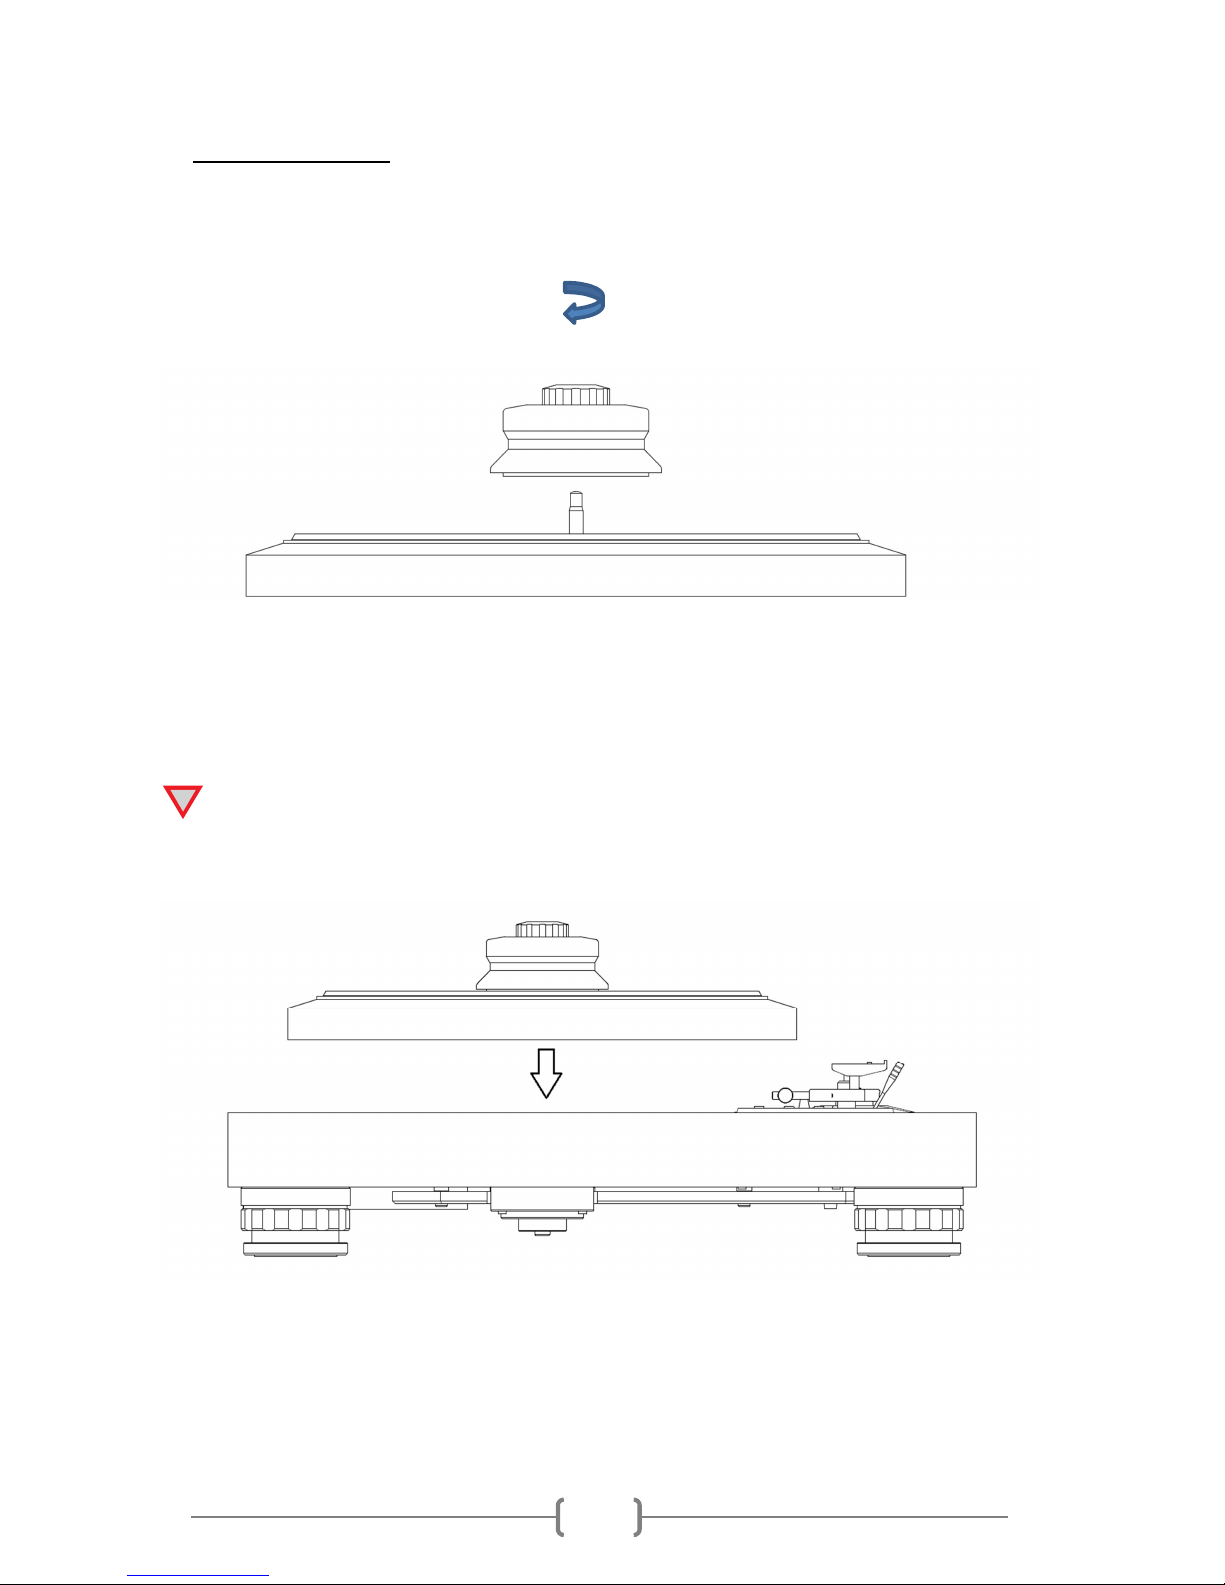
1. Protective covers, sub-platter and drive belt installation
The main bearing shaft ( 8) and housing in the sub-platter ( 3) are protected by special plastic
covers. These covers shield against dust and dirt and keep the bearing shaft and housing
sufficiently lubricated. If necessary, lubricate the shaft with grease from the enclosed
accessories. Maximum amount is 0.5 ml. Use the scale on the supplied syringe to measure the
desired quantity and distribute the lubricant evenly.
Remove the protective covers from the main bearing shaft ( 8) and from the sub-platter ( 3).
Install the sub-platter and the drive belt ( 2) as shown in the following illustrations.
7
2. Platter installation
Tha platter ( ) has a threaded shaft for the record clamp (2). To install the platter on the sub-
platter, first screw the record clamp onto the platter.
Once you have screwed the record clamp onto the platter, double-check to make sure that the
clamp is holding the platter securely. Then grasp the record clamp and use it to carefully lower
and center the platter on the sub-platter.
DO NOT PUT GREASE OR UBICRANT BETWEEN SUB-P ATTER AND MAIN P ATTER
!
8
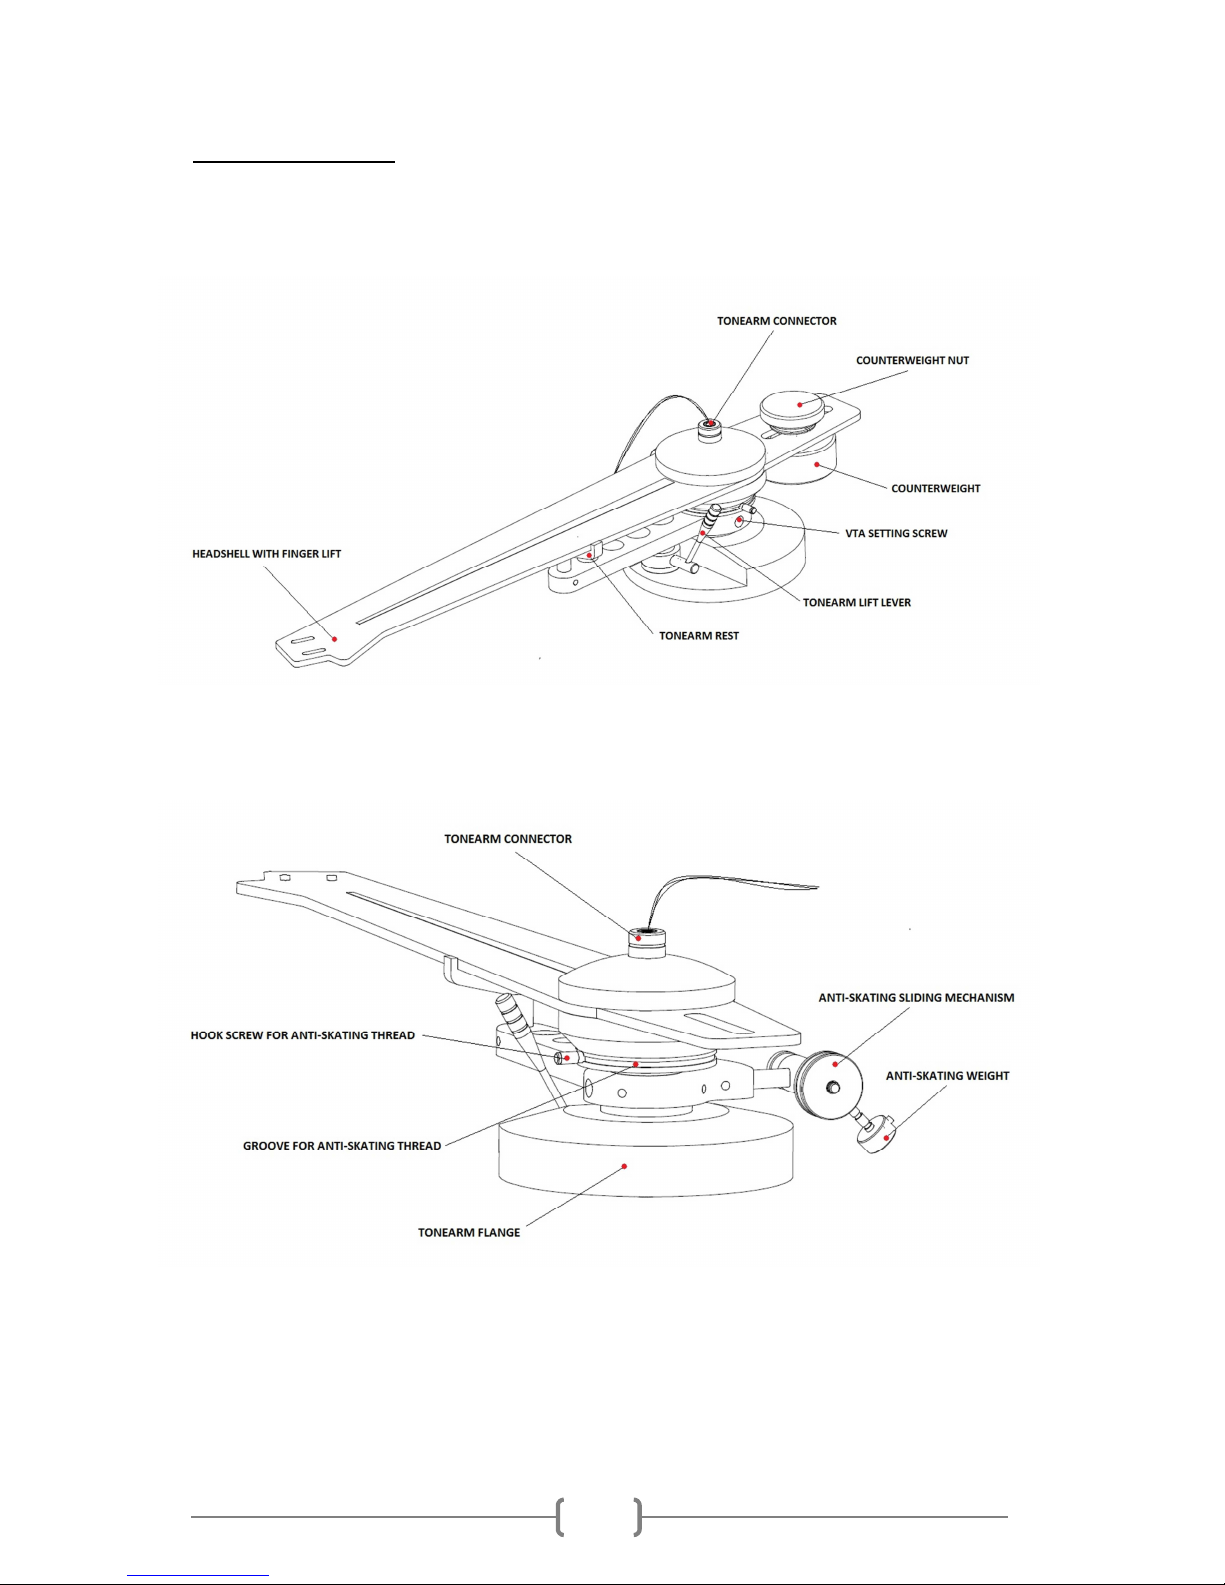
3. Tonearm assembly
See the next steps to set up your tonearm.

9
a) Tonearm installation
Carefully remove the tonearm from separate packaging and install it on the turntable as shown
in the following illustrations.
Screw the tonearm connector on the top of the tonearm. Take care about correct position of
connector’s pins.

10
b) Cartridge installation
Install the cartridge into the aluminium headshell, using the appropriate hardware included
with your cartridge.
Connect the cartridge as indicated below:
•White left channel +
•Red right channel R+
•Green right channel R-
•Blue left channel -
For correct cartridge alignment, use the two-point cartridge alignment protractor provided with
your E-Flat accessories. If unfamiliar with two-point setup, please refer to your dealer.
c) Vertical Tracking Force setting (VTF)
Before setting the Vertical Tracking Force, confirm the exact weight of your cartridge.
oosen the locking nut and set correct VTF as shown in the following illustration.
Pushing carefully, move the counterweight in the counterweight groove as shown in the
illustration below. Place the stylus pressure gauge (not supplied) onto the platter. To set the
required VTF, lower the tonearm lift lever as indicated in the illustration and place the tip of the
stylus on the pressure gauge.
As viewed from the headshell, moving the counterweight closer toward the tonearm increases
the VTF, moving away from the tonearm reduces the VTF. Move the counterweight
appropriately until the VTF shown on the pressure gauge matches your cartridge’s
recommended vertical tracking force specifications. Tighten the locking nut.
Other manuals for E-Flat
1
Table of contents
Other EAT Turntable manuals


