ECHODIA OTOWIN User manual


Instructions for use
&
Technical description
Please read these instructions carefully before using your new device!
This manual is an integral part of the device and must be kept until it is
destroyed.
This equipment has been designed and manufactured for use in otologic
diagnosis. Use is restricted to professionals who have undergone appropriate
training.
If you have a problem or do not understand this manual, please contact
your distributor (see stamp on the last page) or contact Électronique du
Mazet at :
Tel: (33) 4 71 65 02 16 - Fax: (33) 4 71 65 06 55
A brand of

OTOWIN User Guide
ECH001XN161-A4 - 07/2022
2
Table of contents
1Information and safety....................................................................................................................................................4
1.1 About this manual....................................................................................................................................................4
1.2 Presentation of the device........................................................................................................................................4
1.2.1
Intended use...............................................................................................................................................4
1.2.2
Target population.......................................................................................................................................5
1.2.3
Expected performance ...............................................................................................................................5
1.2.4
Contraindications.......................................................................................................................................5
1.2.5
Side effects.................................................................................................................................................5
1.2.6
Units of measurement:...............................................................................................................................5
1.2.7
Accessories ................................................................................................................................................5
1.3 Warnings..................................................................................................................................................................6
1.4 Potential risks ..........................................................................................................................................................7
1.4.1
Stopping the appliance during operation....................................................................................................7
1.4.2
Special case of use .....................................................................................................................................7
1.5 Installation of the appliance.....................................................................................................................................7
1.5.1
Charging the device ...................................................................................................................................7
1.6 Symbols used...........................................................................................................................................................7
1.7 Nameplate label.......................................................................................................................................................9
1.8 Confidentiality of patient data .................................................................................................................................9
1.9 Cybersecurity.........................................................................................................................................................10
1.9.1
Good practices for computer security ......................................................................................................10
1.9.2
Technical Information..............................................................................................................................10
2General information on the use of OTOWIN.............................................................................................................11
2.1 Handling the device...............................................................................................................................................11
2.1.1
Powering up / starting up.........................................................................................................................11
2.1.2
Touch screen calibration..........................................................................................................................11
2.1.3
Password..................................................................................................................................................11
2.1.4
Home screen ............................................................................................................................................12
2.1.5
Switching off the device ..........................................................................................................................12
2.2 General configurations ..........................................................................................................................................13
2.2.1
Audiometry setup.....................................................................................................................................14
2.2.1
Operator management..............................................................................................................................14
2.2.2
Calibration ...............................................................................................................................................15
2.2.3
Selection of the headphones connected to the jack..................................................................................15
3Introduction and test setup...........................................................................................................................................16
3.1 Material..................................................................................................................................................................16
3.1.1
Patient setup.............................................................................................................................................17
4Measure in ambulatory mode.......................................................................................................................................18
4.1 Patient management...............................................................................................................................................18
4.1.1
Creating a patient.....................................................................................................................................18
4.1.2
Patient follow-up......................................................................................................................................19
4.2 Audiometry............................................................................................................................................................19
4.2.1
Patient mode ............................................................................................................................................20
4.2.2
Automatic doctor mode............................................................................................................................20
4.2.3
Manual doctor mode ................................................................................................................................21
4.2.4
Weber test ................................................................................................................................................21
4.2.5
Consultation of the measure.....................................................................................................................22
5The use of the software OTOWIN...............................................................................................................................23
5.1 Minimum system requirements .............................................................................................................................23
5.2 Installation.............................................................................................................................................................23
5.2.1
Installing the application..........................................................................................................................23
5.2.1
USB drivers..............................................................................................................................................24
5.3 Patient management...............................................................................................................................................25
5.3.1
Creating a new patient .............................................................................................................................25

OTOWIN User Guide
ECH001XN161-A4 - 07/2022
3
TABLE OF CONTENTS
TABLE OF CONTENTS
5.3.2
Importing a patient...................................................................................................................................26
5.3.3
Deleting a patient.....................................................................................................................................27
5.4 Configuration.........................................................................................................................................................28
5.4.1
Database...................................................................................................................................................28
5.4.2
Medical
software......................................................................................................................................29
5.4.3
Operator...................................................................................................................................................29
5.4.4
Stimulation...............................................................................................................................................29
5.4.5
Automatic mode.......................................................................................................................................30
5.4.6
Audiometric
indices
.................................................................................................................................30
5.4.7
Printing ....................................................................................................................................................30
5.4.8
About us...................................................................................................................................................31
5.5 Update ...................................................................................................................................................................31
5.5.1
Update of the device OTOWIN..............................................................................................................32
5.6 Audiometry on the OTOWIN software................................................................................................................32
5.7 Operation on OTOWIN .......................................................................................................................................34
5.7.1
Opening a measure...................................................................................................................................34
5.7.2
Description of the consultation window ..................................................................................................35
5.8 Using the keyboard................................................................................................................................................36
5.9 Using the microphone............................................................................................................................................36
6Maintenance and servicing...........................................................................................................................................37
6.1 Periodic checks......................................................................................................................................................37
6.2 Cleaning.................................................................................................................................................................37
6.2.1
Device case ..............................................................................................................................................37
6.2.2
Accessories ..............................................................................................................................................38
6.3 Malfunction ...........................................................................................................................................................38
6.3.1
Possible malfunctions ..............................................................................................................................38
6.3.2
After-sales service and warranty..............................................................................................................39
6.4 Transport and storage ............................................................................................................................................40
6.5 Disposal.................................................................................................................................................................40
7Technical specifications ................................................................................................................................................41
7.1 General technical data of the device......................................................................................................................41
7.1.1
Test parameters:.......................................................................................................................................42
7.2 Standards/Certifications.........................................................................................................................................43
7.2.1
EMC compliance table.............................................................................................................................43
7.2.2
CE declaration..........................................................................................................................................45
7.3 Manufacturer .........................................................................................................................................................45

OTOWIN User Guide
ECH001XN161-A4 - 07/2022
4
Chapter 1
Information and safety
1.1
About this manual
This user and maintenance manual is published to facilitate the handling of your OTOWIN device from the initial
acceptance phase, through commissioning, to the successive stages of use and maintenance.
If you have any difficulty in understanding this manual, contact your dealer/distributor or the manufacturer, Élec-
tronique du Mazet.
This document must be kept in a safe place, protected from atmospheric agents, where it cannot be damaged.
This document guarantees that the devices and their documentation are technically up-to-date at the time of marketing.
However, we reserve the right to make changes to the device and its documentation without any obligation to update
these documents.
In the case of transfer of the device to a third party, it is obligatory to inform Électronique du Mazet of the details of
the new owner of the device. It is imperative to provide the new owner with all documents, accessories and packaging
relating to the appliance.
Only personnel who have been informed of the contents of this document may use the equipment. Failure to comply
with any of the instructions contained in this document will release Électronique du Mazet and its distributors from the
consequences of accidents or damage to personnel or third parties (including patients).
1.2
Presentation of the device
Our range of audiology medical devices is designed for the screening, documentation, monitoring and diagnosis of
hearing function. It is intended for use by otolaryngologists, audiologists and healthcare professionals in the workplace
and in schools.
Audiometry is a behavioural test for the rapid assessment of hearing ability. Using an acoustic stimulator, the subject
is presented with sounds, words or sentences at different sound intensities. The subject reports his or her perception to
the operator who, depending on the test used, can detect a drop in hearing acuity, determine an absolute threshold of
perception or an intelligibility threshold.
1.2.1
Intended use
The OTOWIN is designed for use in occupational medicine to screen and monitor employees. It integrates air and
bone conduction tone audiometry. Its dedicated interface and its compatibility with several patient management software
packages make it the ideal tool for occupational health services. It is compatible with various acoustic, air or bone stim-
ulators which can be included at the time of purchase or upgraded at a later date.
The OTOWIN is designed to perform the following audiological tests:
Audiometry:
- Air conduction (AC)
- Bone conduction (BC)

OTOWIN User Guide
ECH001XN161-A4 - 07/2022
5
Chapter 1. Information and safety 1.2 Presentation of the device
1.2.2
Target population
Ages: The device can be used on any type of patient with the ability to respond to the presence or absence of an
acoustic stimulus (>5 years)
Patient types: male / female / child
Consultation framework: Occupational medicine / ENT diagnosis
1.2.3
Expected performance
The devices are designed to perform audiological tests according to ISO 60645 standards:
Families
Otological diagnoses
Standards
Audiometry:
- Air conduction (AC)
- Bone conduction (BC)
IEC 60645-1 :2017 - Type 3
1.2.4
Contraindications
We recommend not to diagnose (or to take precautions when diagnosing) patients with injured skin, open wounds or
acoustic hypersensitivity
The contraindications are not exhaustive and we advise the user to seek advice in case of doubt.
1.2.5
Side effects
No side effects identified to date
1.2.6
Units of measurement:
For all these devices, the units of measurement are expressed in the units of the international system:
Basic size
Unit
Name
Symbol
Frequency
Hertz
Hz
Intensity (Decibel)
Sound pressure level
Hearing level
dB SPL
dB HL
1.2.7
Accessories
This device is delivered with the following accessories as standard:
- Mini-USB cable 2m
The device is in contact with the patient through applied parts, some of which can be supplied by Electronique du
Mazet. These accessories can be single use or reusable.
The use of accessories not recommended by the manufacturer does not engage his responsibility
List of compatible accessories:
Name
ref
Manufacturer
DD45 headset
301765
Radioear
DD65 headset
301475
Radioear
DD450 headset
302427
Radioear
Insert Earphones
040070
Electronique du Mazet
Bone vibrator B71
040060
Electronique du Mazet
Patient response switch
040084
Electronique du Mazet
Mini-USB cable 2m
300618
Lindy
USB power adapter (EU)
301526
CUI
USB power adapter (USA)
040048
CUI
USB power adapter (UK)
040047
CUI
OTOWIN User Guide
ECH001XN161-A4 - 07/2022
6
Chapter 1. Information and safety 1.3 Warnings
Foam earplug ER3-14A 13mm (50 pcs)
40116
3M
Foam earplug ER3-14B 10mm (50 pcs)
40117
3M
1.3
Warnings
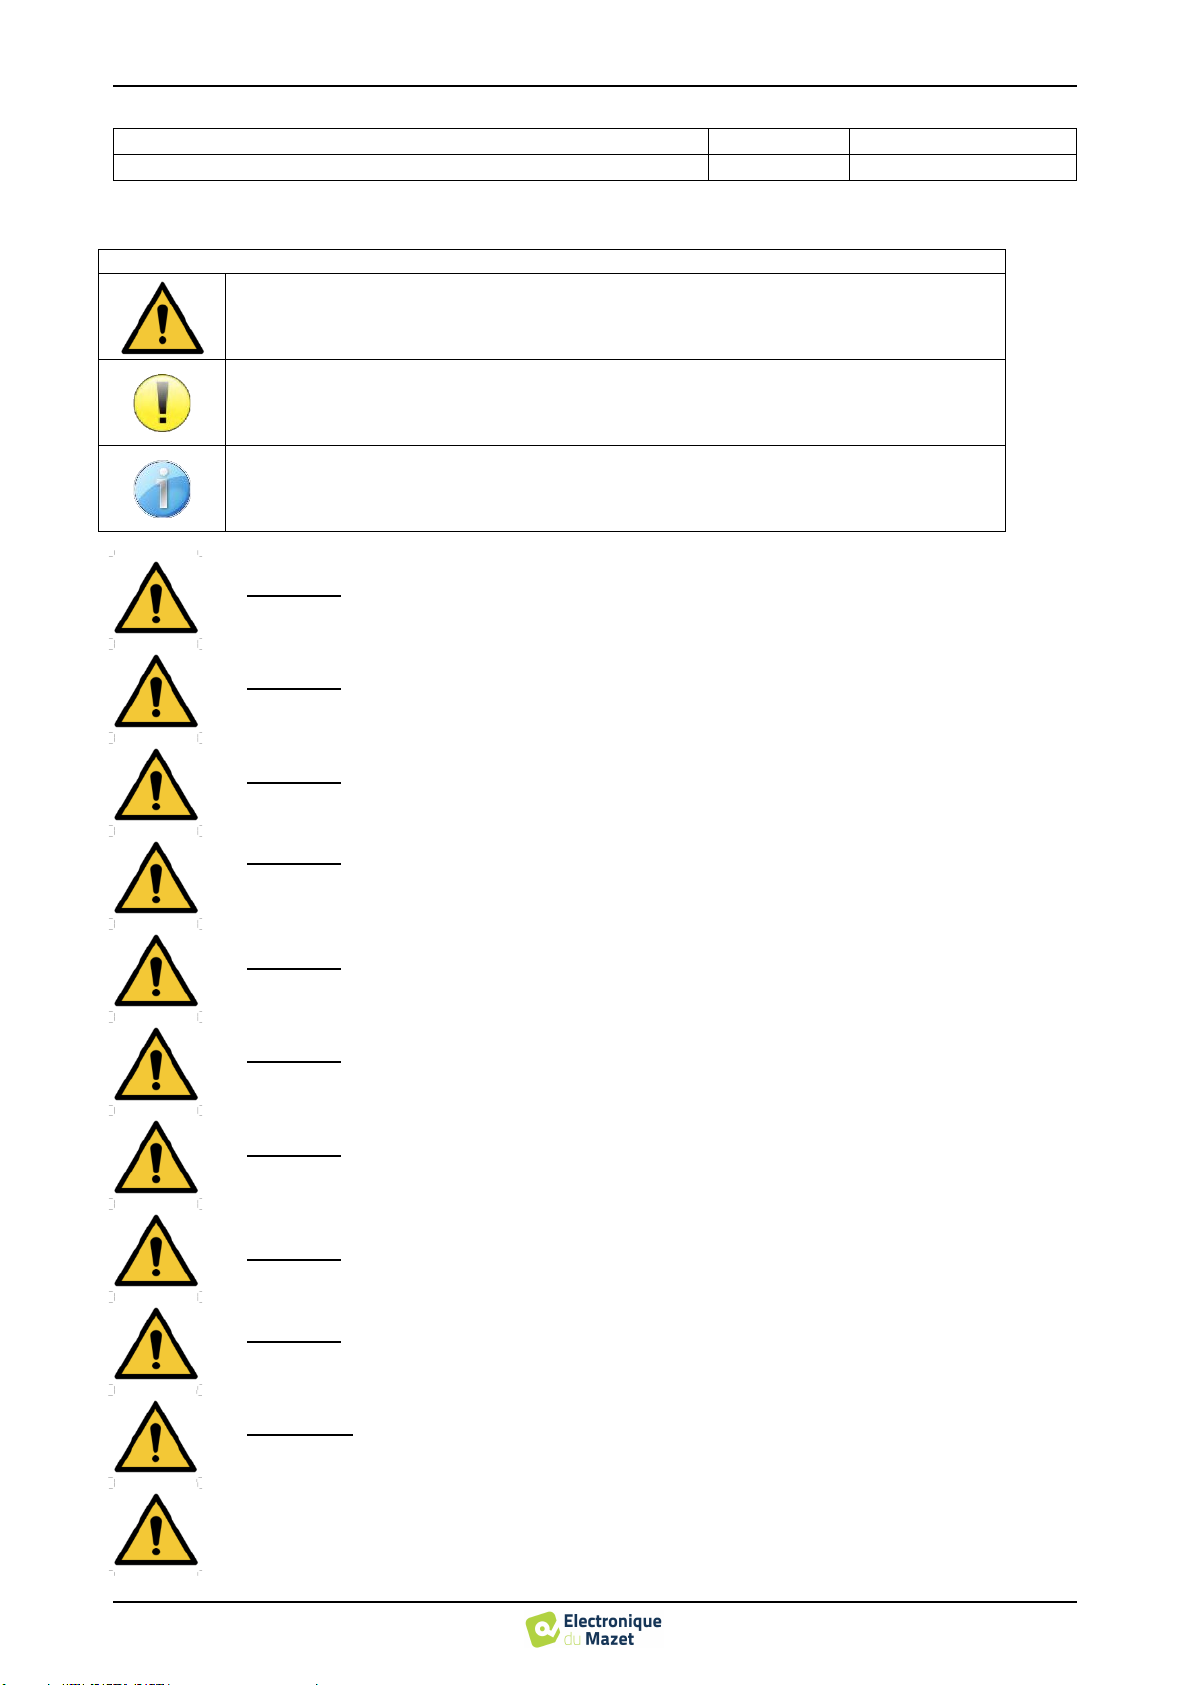
In this manual the warnings and information given have the following meaning:
The caution label indicates conditions or procedures that may put the patient and/or user at
risk.
The warning label indicates conditions or procedures that could cause the equipment to mal-
function.
The information label refers to notices or information that are not related to any risk of acci-
dents or malfunction of the appliance.
CAUTION: The device must be handled by a qualified operator (hospital staff, doctor, etc.). The
patient must not come into contact with the device other than through the accessories.
CAUTION: The device must be connected to a computer with a certified medical power supply
(double insulation according to ISO 60601-1)
CAUTION: No modifications to the device are permitted. It is strictly forbidden to open the hous-
ing of the device.
CAUTION: This equipment complies with applicable electromagnetic compatibility standards. If
you experience interference or other problems with another device, contact Électronique du Mazet
or the distributor for advice on how to avoid or minimize the problem.
CAUTION: Operation in close proximity (e.g., 1 m) to shortwave or microwave therapy EM equip-
ment may cause instabilities in the output power of the STIMULATOR
CAUTION: The appliance must be used with the accessories determined by the manufacturer to be
compatible with the appliance (see 1.2.7).
CAUTION: The device must not be accessible to the patient.
It should not be placed in contact with the patient.
CAUTION: the computer must never be located in a space accessible to the patient
CAUTION: Be sure to follow the maintenance instructions listed in the 6.Maintenance and servic-
ing
CAUTION: The battery can only be replaced by Électronique du Mazet technicians or their distrib-
utors.
The device collects data. It is the responsibility of the practitioner to apply and comply with the Eu-
ropean Parliament's General Data Protection Regulation 2016/679. When returning to the After Sales
Service, the practitioner must delete the data so that it is not disclosed.

OTOWIN User Guide
ECH001XN161-A4 - 07/2022
7
Chapter 1. Information and safety 1.4 Potential risks
1.4
Potential risks
Old or poor-quality application parts can impair the quality of contact with the patient and cause discomfort. Make
sure you change them regularly.
Microbes or viruses can be transmitted from one patient to another via the applied parts. Make sure that the hygiene
conditions recommended by the manufacturer of the applied part are observed.
If water enters the unit, it may not function properly. In this case, unplug the unit and disconnect the cables. In any
case, avoid the presence of water in the vicinity of the device.
1.4.1
Stopping the appliance during operation
If the device is switched off during treatment,
In stand-alone mode: the measurement in progress will stop; the continuous saving of the measured data avoids losing
the measurements made up to that point.
-When connected to the computer (without battery): the current measurement will be lost.
1.4.2
Special case of use
No specific cases identified. See section1.2.4 for contraindications
1.5
Installation of the appliance
If you have any doubts about the integrity of the device and its proper functioning, contact Électronique du Mazet or
your distributor.
If the device was stored in a cold place and there was a risk of condensation, let the device rest for at least 2 hours at
room temperature before turning it on.
Before using the appliance for the first time, it is advisable to clean it and its accessories, see 6.Maintenance and
servicing
1.5.1
Charging the device
The device is delivered with a USB cable. You can choose between two ways of charging your device, via a computer
or via the USB power adapter (see 1.2.7). Once plugged in, the charge starts automatically and an electrical plug logo is
displayed in the title bar. This logo appears in grey when the OTOWIN is charging and in green when the battery is fully
charged.
The battery of the device is charged before shipment; however, it is recommended to charge it before the first use (we
advise you to charge for 12 hours before the first use).
When using the solution of connecting the device to a computer via the USB cable, charging will be slower than via
a USB power adapter (see 1.2.7).
1.6
Symbols used
Front panel
Device name
It is preferable to charge/discharge the battery as fully as possible to ensure a long service life. Charge the
device to its maximum capacity and only charge it when it has reached a critical battery level.
To disconnect the device from the power supply, the USB power adapter must be disconnected.
OTOWIN User Guide
ECH001XN161-A4 - 07/2022
8
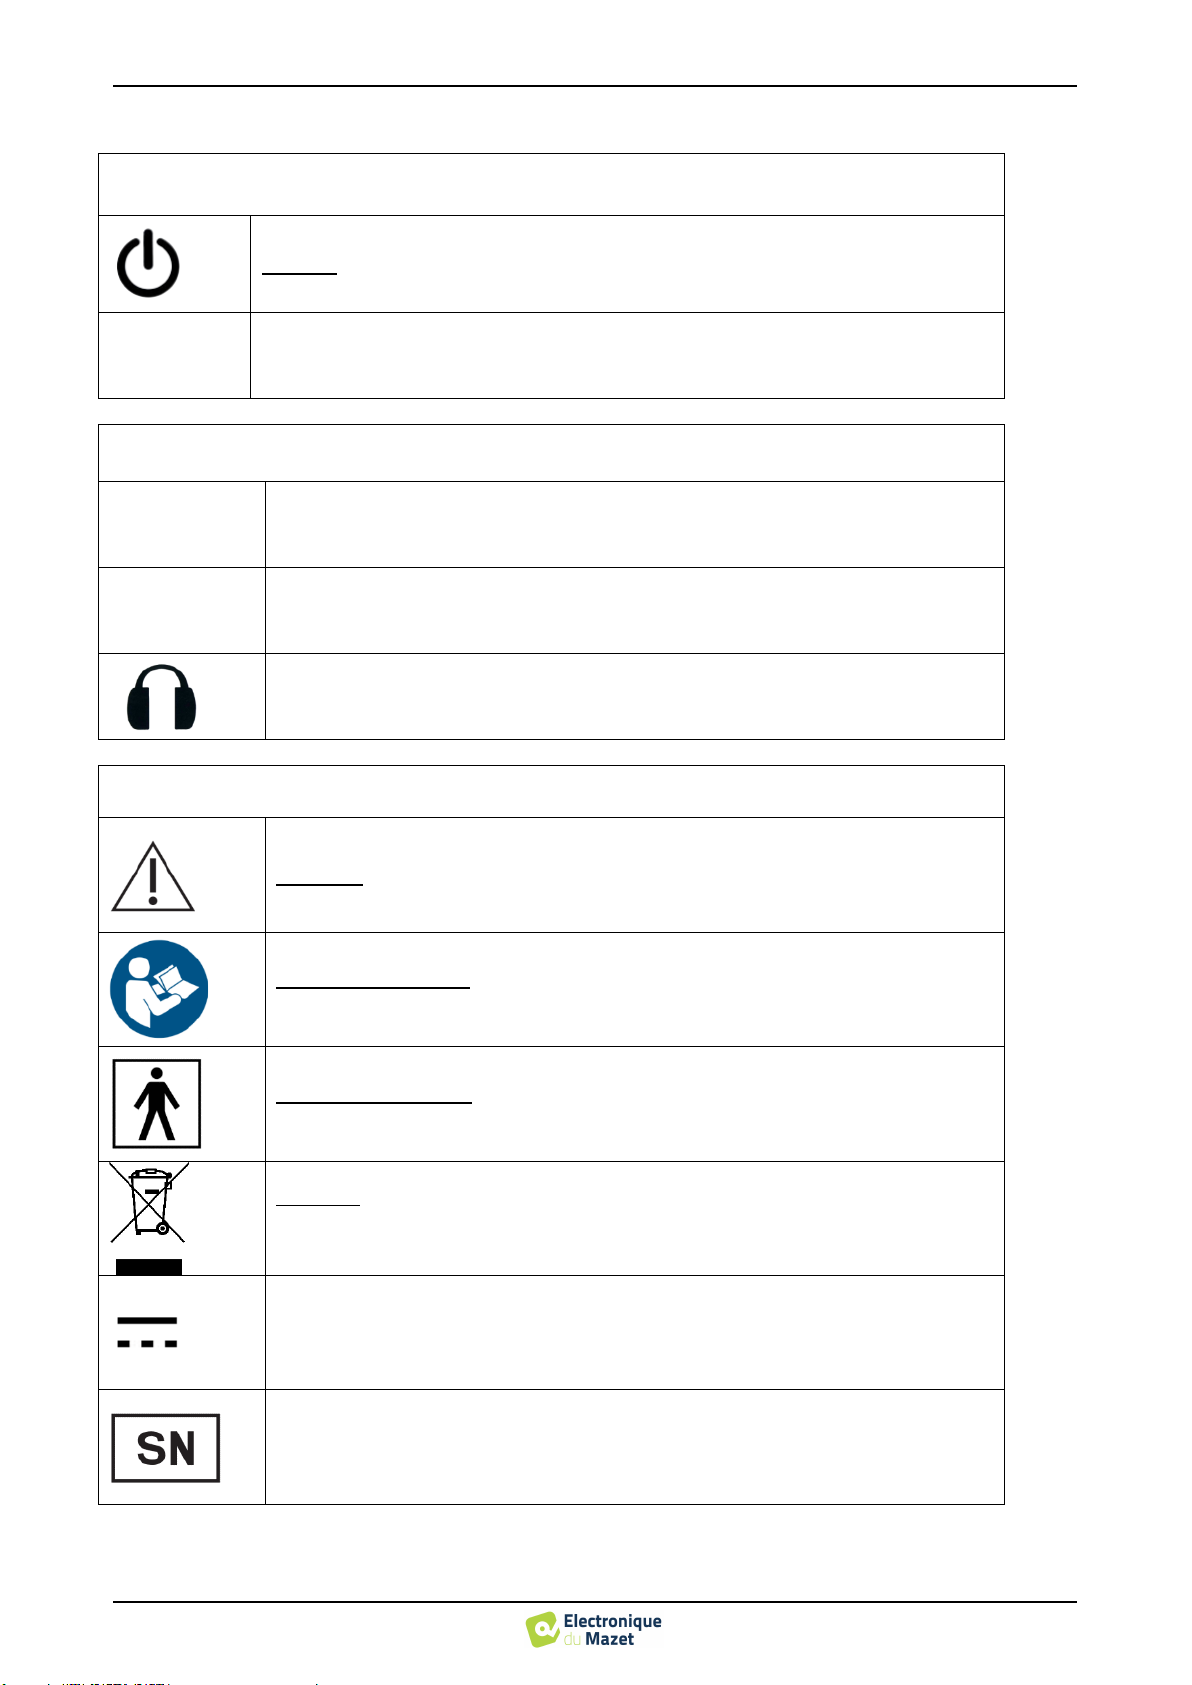
Chapter 1. Information and safety 1.6 Symbols used
Upper part of the device
Caution: Switching the device on/off
USB
Mini-USB port for recharging the device, or connecting to a PC (data exchange)
Lower part of the device
AUX
-Patient response switch connection
Audio
-Audiometry stimulator connection
Connection for headphones
Rear panel
Warning: this logo draws your attention to a specific point
Operating instructions: this logo informs you that the operating instructions must be
read for safe use of the appliance
Type BF applied part: applied parts not supplied by Electronique du Mazet are in elec-
trical contact with the patient, floating and not connected to earth.
Recycling: This appliance should be disposed of at an appropriate collection and recy-
cling facility. Consult the manufacturer.
Direct Current
Serial number
OTOWIN User Guide
ECH001XN161-A4 - 07/2022
9
Chapter 1. Information and safety 1.7 Nameplate label
Manufacturer
Year of manufacture
Country of production
Product reference
CE marking
1.7
Nameplate label
Information and specifications are given on the back of each device on a nameplate label:
Device :
Device type label
OTOWIN
ECH001KP160-A0
1.8
Confidentiality of patient data
The device collects data. It is the responsibility of the practitioner to apply and comply with the European Parliament's
General Data Protection Regulation 2016/679. When returning to the after-sales service, the user must delete the patient
data from the device so that it is not disclosed. The user has the possibility to make a backup copy of the data by saving
them in the OTOWIN software (see paragraph 5.3.2) before deleting the patients from the device (see section 5.3.3.2).
The OTOWIN device is intended for use by authorised healthcare professionals only. To ensure the confidentiality of
patient data and to prevent disclosure to unauthorised third parties, a password can be set when the device is first started.
Please refer to section 2.1.3 for more information.

OTOWIN User Guide
ECH001XN161-A4 - 07/2022
10
Chapter 1. Information and safety 1.9 Cybersecurity
1.9
Cybersecurity
As the device and its OTOWIN software are computer-based systems that are integrated into larger information sys-
tems, certain rules and good practices must be put in place to ensure the safety of patients and users.
Électronique du Mazet does not provide or control the operating environment of its products, so it is the responsibility of
the practitioner to ensure that the following recommendations are followed.
1.9.1
Good practices for computer security
-Keep your software up to date, including the operating system (Windows or MacOs)
-Use operating system accounts to manage access.
-Use strong passwords to access accounts
-Lock down the computer when not in use
-Back up the OTOWIN database regularly (see 5.4.1)
-Verify the authenticity of any third-party software you install
-Use anti-virus software and a firewall
-Since the device and OTOWIN do not need to access the Internet, isolate the computer from the network as much as possi-
ble.
-Check echodia.com periodically to see if updates are available.
1.9.2
Technical Information
-The OTOWIN software is a Java program
-It embeds its own java execution environment (JRE+JVM) in order not to interfere with other software. (installed in the
same folder, by default : C:\Program Files\Echodia\Otowin\jre)
-The configurations of the software as well as the database are saved in the .otowin folder of the user folder (ex: C:\Us-
ers\romain\.otowin).
-The software uses the port 32145 of the local loop (localhost / 127.0.0.1) in order to check that there are not several in-
stances of the software launched at the same time.
-The software uses a proprietary USB driver to communicate with the device
ECHODIA advises you to regularly renew the password of your device. It is also advisable to activate the
lock mechanism of the computers on which you have installed the OTOWIN software after a short pe-
riod of inactivity.
OTOWIN User Guide
ECH001XN161-A4 - 07/2022
11
Chapter 2
General information on the use of OTOWIN
2.1
Handling the device
2.1.1
Powering up / starting up
The unit can be turned on without any other device connected.
Turn on the power using the switch on top of the unit (if it does not start, make sure the unit's battery is charged)
2.1.2
Touch screen calibration
During the first start-up, a calibration step of the touch
screen is necessary. The following window appears:
This is a five-point calibration of the screen. Simply
hold the stylus down on the crosses in the centre of each
of the circles that appear in succession.
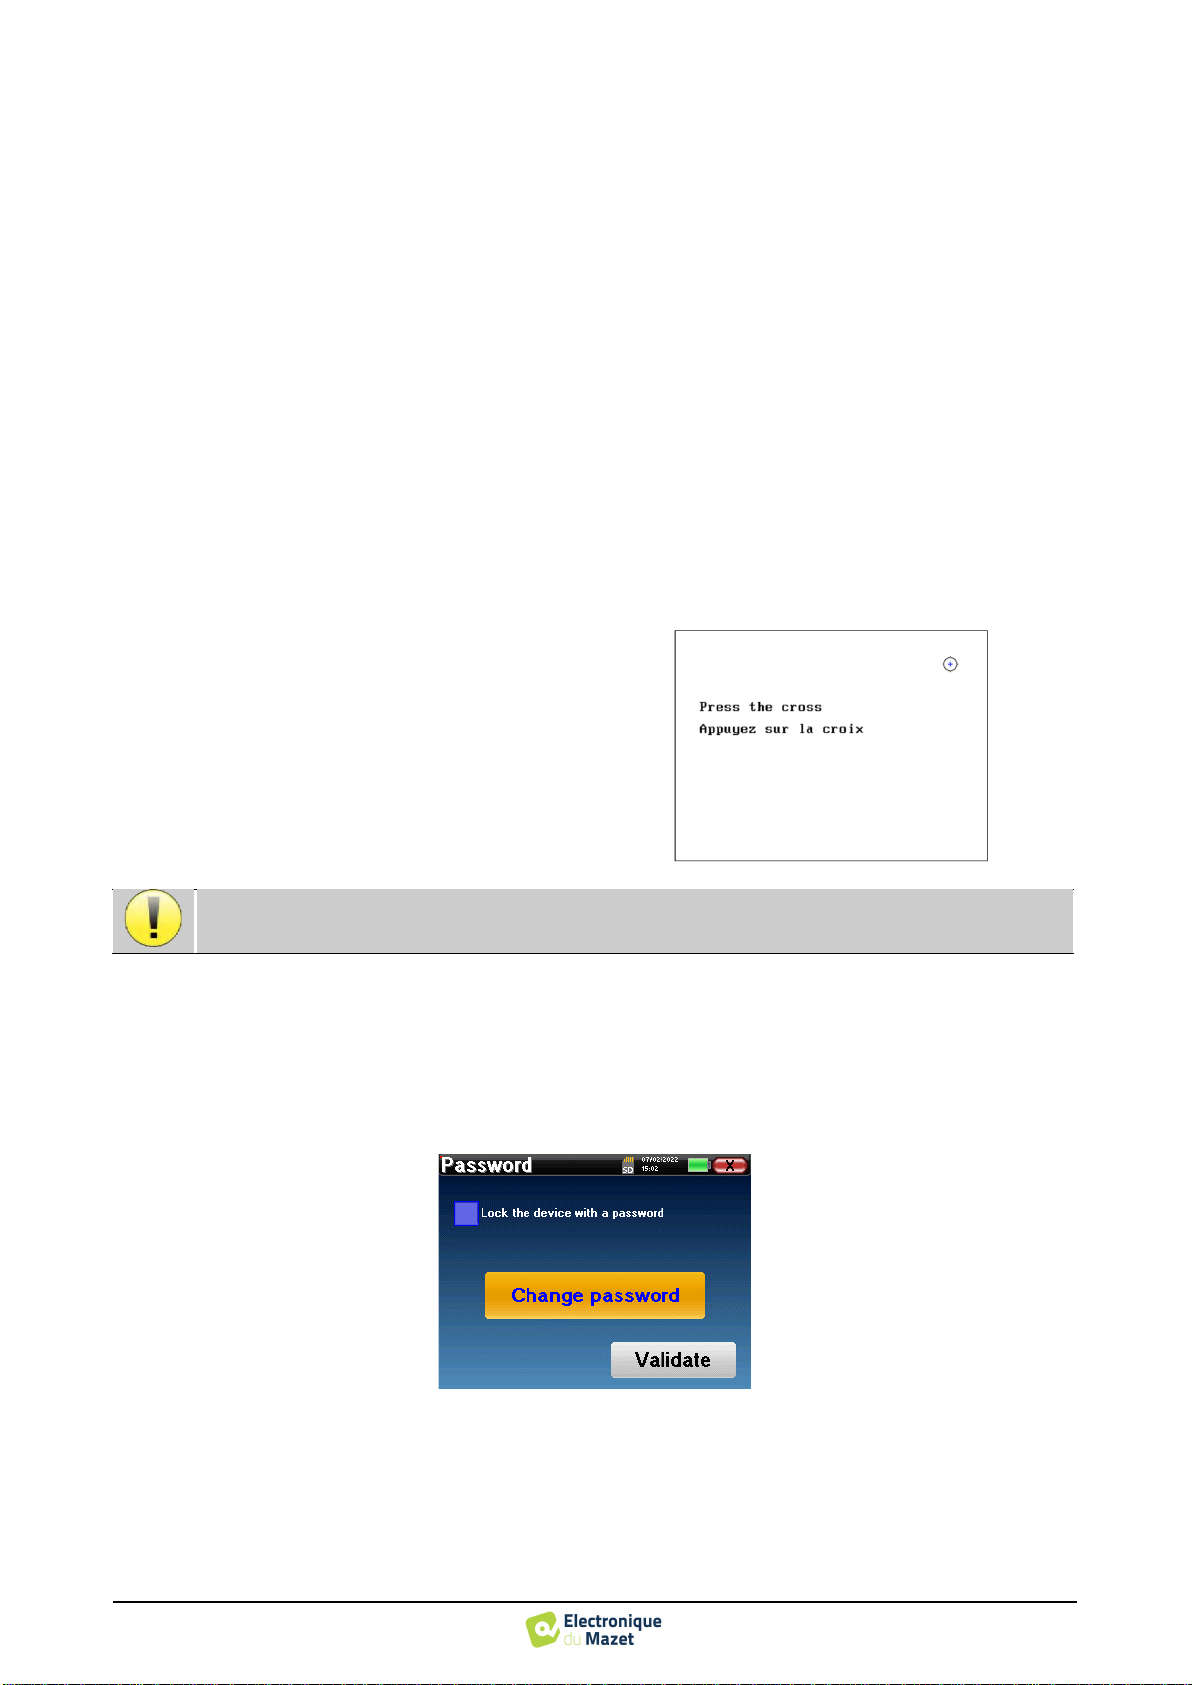
2.1.3
Password
After the screen has been calibrated, the password setting windows appear. If you choose to set a password, you will
be asked for it every time you start the device. To do this, click on "Lock the device with a password" and then set your
password by clicking on "Change password". The password must be between 1 and 15 characters long, and you will be
asked twice to ensure that you have entered it correctly.
You can access the password configuration window later from the "Config" menu and then "System". This window
allows you to change the password, but also to activate or deactivate the lock. If you forget your password, please contact
ECHODIA to receive an unlock code.
Calibration is important for user comfort. It is strongly recommended to perform it by placing the device
on a table and using the stylus.
OTOWIN User Guide
ECH001XN161-A4 - 07/2022
12
Chapter 2. General information on the use of OTOWIN 2.1 Handling the device
2.1.4
Home screen
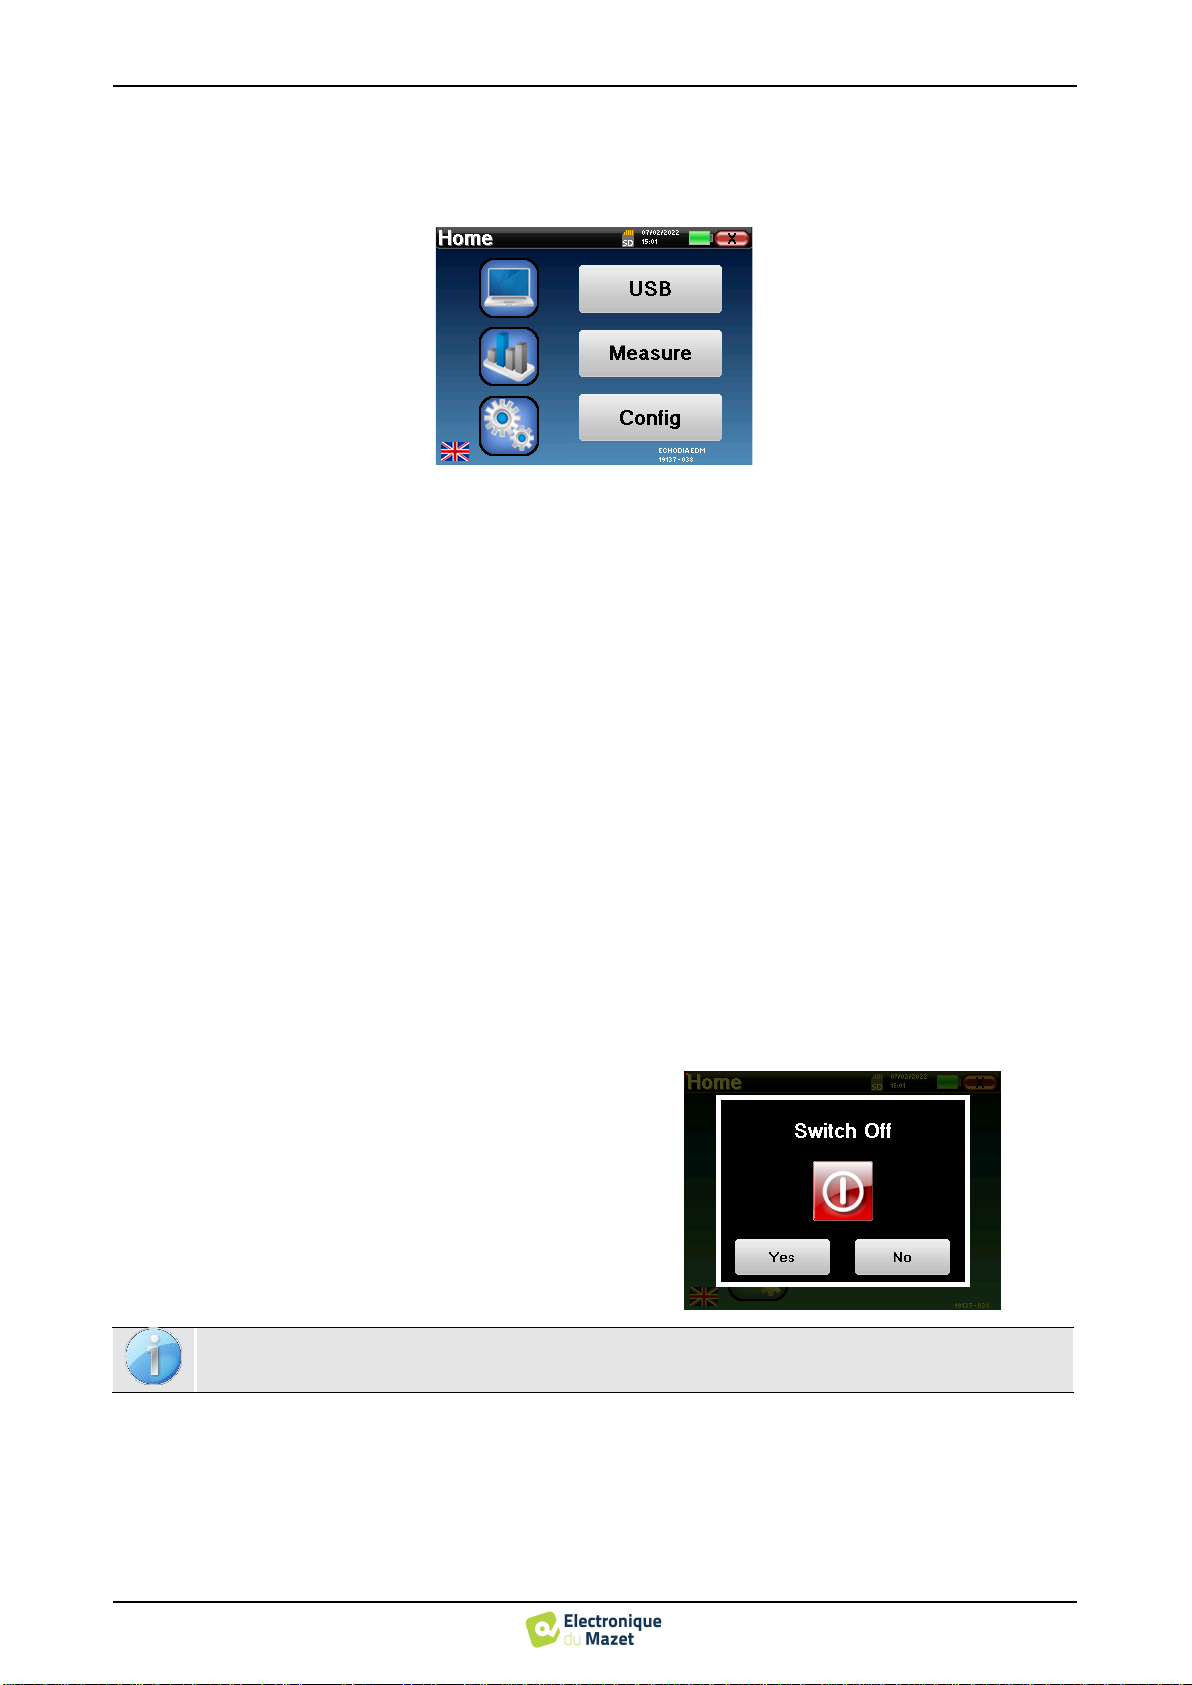
Once this step is completed, the home page appears:
Several pieces of information appear on this page. It contains the three main choices available when starting the
device:
•
USB: Allows you to activate the device's USB port in order to retrieve, store and analyse measurements made with
the device on a computer. The activation of the USB port of the device is also necessary to perform measurements
from a computer via the OTOWIN software.
•
Measure: main mode, it allows you to make and consult measurements.
•
Config: general configuration of the different options of the device.
The home page allows you to choose the language of the system. This choice is made by clicking on the flag at the
bottom left of the screen.
At the bottom right is the selected operator, and just below that, the serial number of the device.
A title bar is present on all windows of the device. From left to right are:
•
The title of the current window.
•
The charging indicator (Grey: device charging. Green: device charged).
•
The date and time.
•
The battery levels.
•
A button to return to the previous window (in the case of the home screen, it turns the device off).
2.1.5
Switching off the device
To turn off the device, you can click on the back button
at the top right of the home screen. A shutdown confir-
mation message will appear:
It is also possible to press the power button on the top
of the device to bring up this screen from any browser
window.
Power saves mode: when you are not measuring, the
unit automatically turns off after 5 minutes of inactivity.
The unit can be forced to shut down by pressing and holding the power button on top of the unit for 4
seconds.
OTOWIN User Guide
ECH001XN161-A4 - 07/2022
13
Chapter 2. General information on the use of OTOWIN 2.2 General configurations
2.2
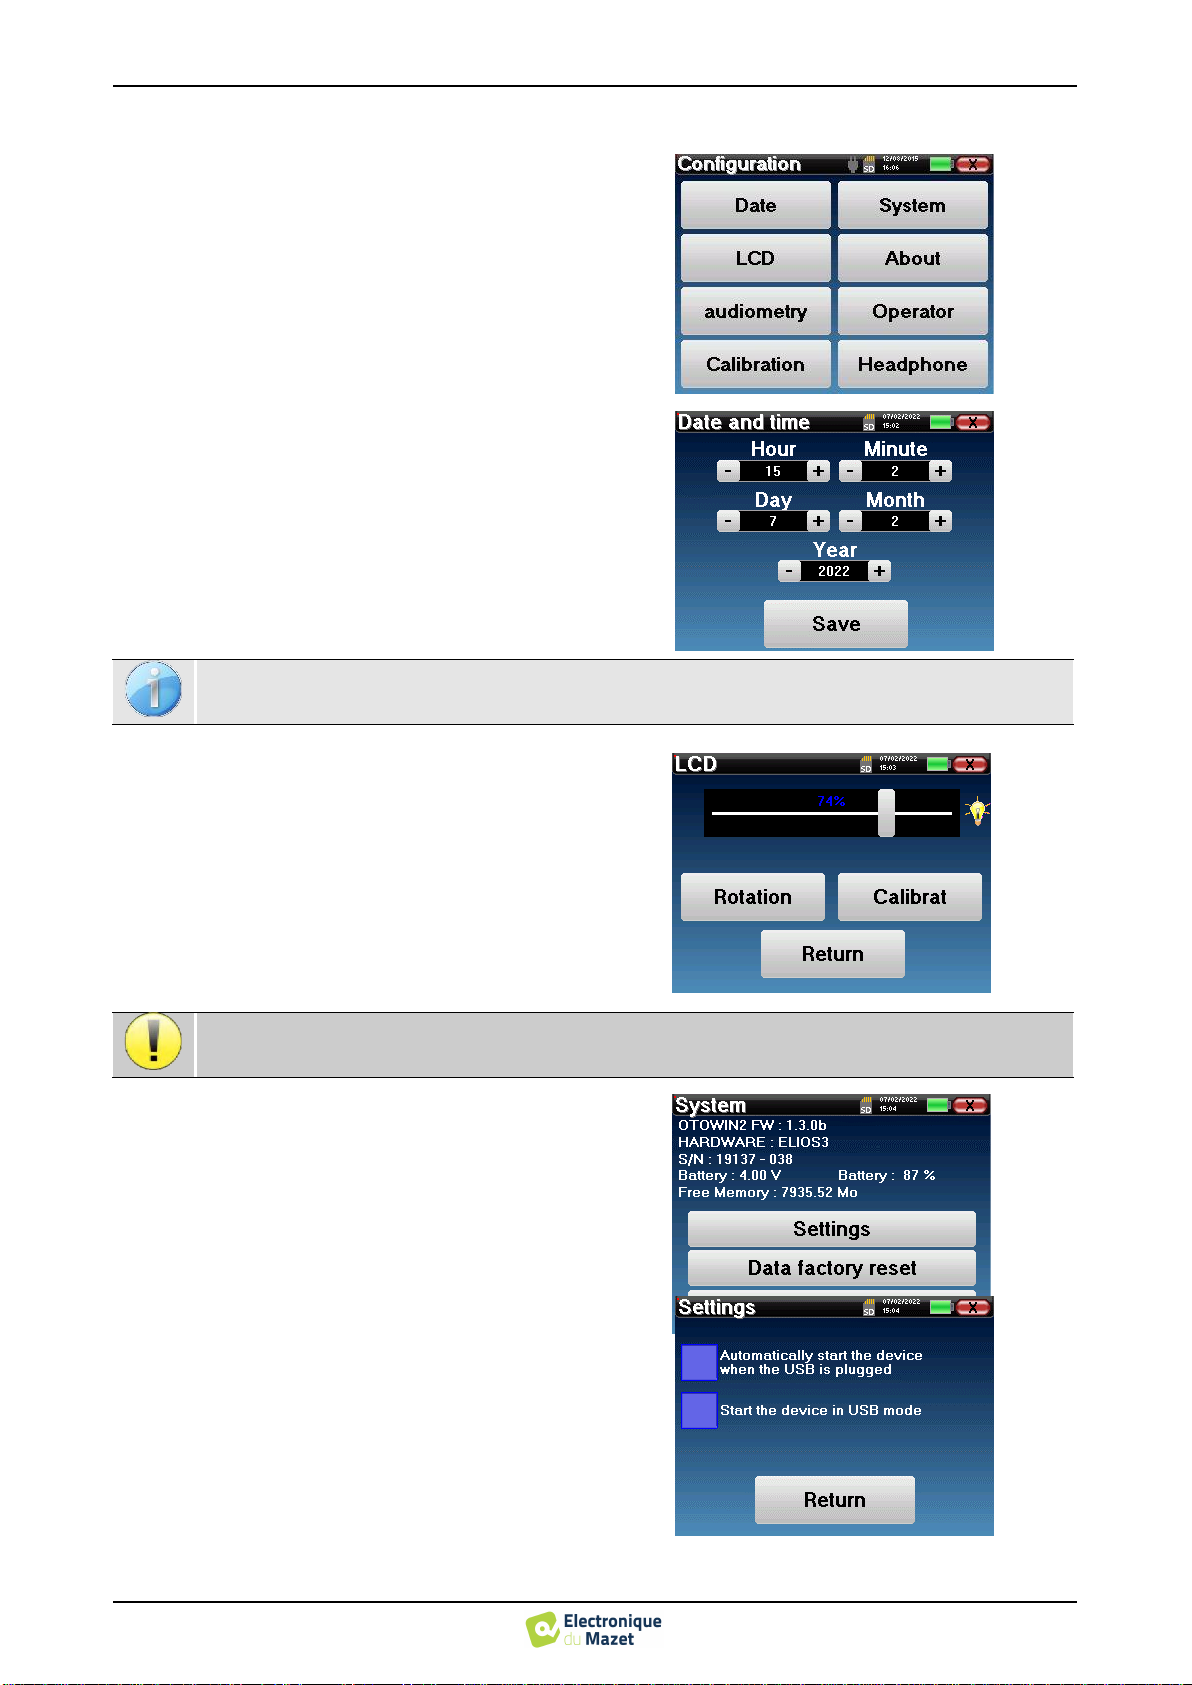
General configurations
Some of the general operating parameters of the device
are configurable. For example, the time, date, brightness
and orientation of the screen can be configured. To do
this, simply enter the configuration menu from the home
screen.
The date and time can be configured from the "Date
and Time" window.
The "LCD" menu allows you to adjust the brightness
of the screen with an adjustable gauge. The "Rotation"
button allows the display to be rotated by 180°. This can
be useful depending on the location and position in
which the device is used. It is also possible to recalibrate
the touch screen.
The "System" menu provides information about the
hardware and software versions of the device, as well as
the amount of free memory on the OTOWIN device.
The "Data factory reset" button resets the measure-
ment parameters to the default values .
If you choose to set up a password lock, you will be
asked for it every time you start the device (see 2.1.3).
The "Settings" button provides access to the menu for
activating the optimised start-up modes for operators
who use (mainly) the device connected to the computer
(OTOWIN). The settings allow the device to be started
directly in "USB mode" as well as the possibility of an
automatic start as soon as the connection to the com-
puter has been recognised.
The summer/winter time change is not automatic.
It is possible that after a certain period of use (several months), the touch screen may drift (e.g. the click
on the buttons becomes less precise). It is advisable to recalibrate the screen.
OTOWIN User Guide
ECH001XN161-A4 - 07/2022
14
Chapter 2. General information on the use of OTOWIN 2.2 General configurations
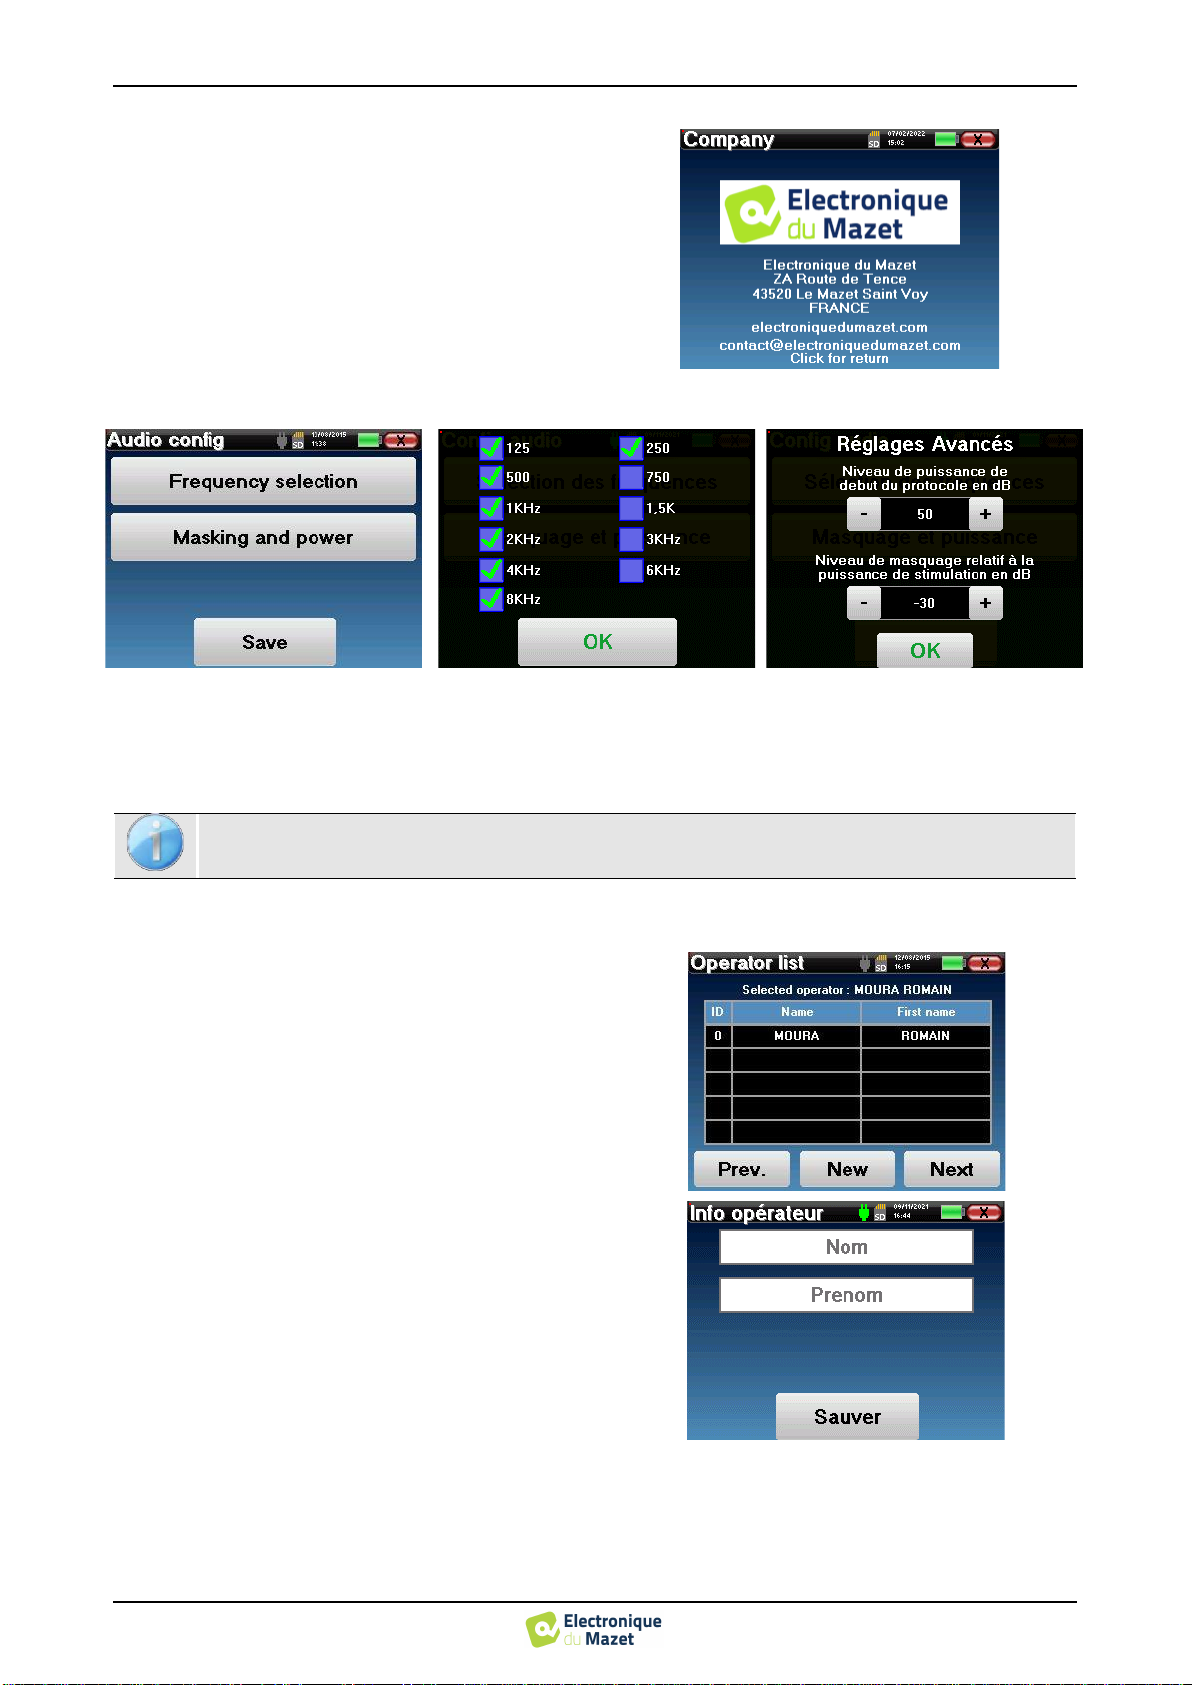
The "About" menu contains the contact details of the
company Electronique du Mazet.
2.2.1
Audiometry setup
Click on "Frequency Selection" to pre-configure the frequencies to be scanned during the test. Once the frequencies
have been chosen, click on "OK" to validate.
The "Masking and power" button opens a window where you can set the masking noise level and the start power
of the automatic protocols. Click on "OK" to confirm.
2.2.1
Operator management
This section allows you to select the operators who per-
form the measurements. Each measurement taken will
be linked to this operator.
The list of these operators is accessible in this window.
The selected operator appears at the top of the table and
on the home screen, just above the serial number of the
device.
When the device is started for the first time, no operator
exists. To create a new operator, click the "New" but-
ton, fill in the operator information and click "Save".
Once you have selected an operator, it will remain
stored even after the device is switched off. To change
the operator, you have to return to this menu.
All frequencies can be selected, however, the maximum and minimum stimulation frequencies may be
limited at the time of testing depending on the characteristics of the stimulator.

OTOWIN User Guide
ECH001XN161-A4 - 07/2022
15
Chapter 2. General information on the use of OTOWIN 2.2 General configurations
2.2.2
Calibration
The "Calibration" menu allows you to consult the
acoustic calibration values set on your device and the
connected stimulator.
2.2.3
Selection of the headphones connected to the jack
In most cases, the unit is shipped with only one headset,
which is properly configured at the factory. However,
you can change the type of headphones that will be rec-
ognised when connected to the jack. The settings win-
dow will open. Click on "Headset" to access the selec-
tion of the headset that will be recognised when con-
nected to the jack. Select the headset model you will use
and click "Save".
Do not change these values, only ECHODIA or your dealer are authorised to perform this calibration.
A calibration of the OTOWIN device should be performed once a year to ensure the quality of the meas-
urements. Please contact your distributor to schedule this calibration.
Some of these options require a password to be changed. This is the serial number of your device, which is
shown on the back of the device in the S/N line. This number is also displayed on the bottom right of the
start page.
Never connect headphones that have not been calibrated for your device!
It is extremely important to choose the right model of headphone to ensure that the calibration is correctly
taken into account when using it.
Stimulators connected to the "Audio" input are automatically recognised by the device.
OTOWIN User Guide
ECH001XN161-A4 - 07/2022
16
Chapter 3
Introduction and test setup
Audiometry is the basic hearing test. This test allows a quick check of the entire sound transmission chain to the
brain in a discriminating manner. The measurement is obtained by emitting a frequency-calibrated sound wave, the power
of which is reduced as long as the patient hears it. The sounds are emitted by an acoustic stimulator in one of the ears,
then in the other.
Pure-tone Audiometry allows the investigation of hearing thresholds for each ear, in a frequency range from 125𝐻𝑧
à 8𝑘𝐻𝑧. While bone conduction assesses the performance of the inner ear and the auditory nerve, air conduction tests
the entire acoustic function from the outer ear to the auditory nerve. The resulting audiogram is interpreted to measure
the degree of hearing loss and the type of hearing loss. Tone audiometry also allows the determination of the discomfort
threshold, or the search for the frequency of possible tinnitus.
3.1
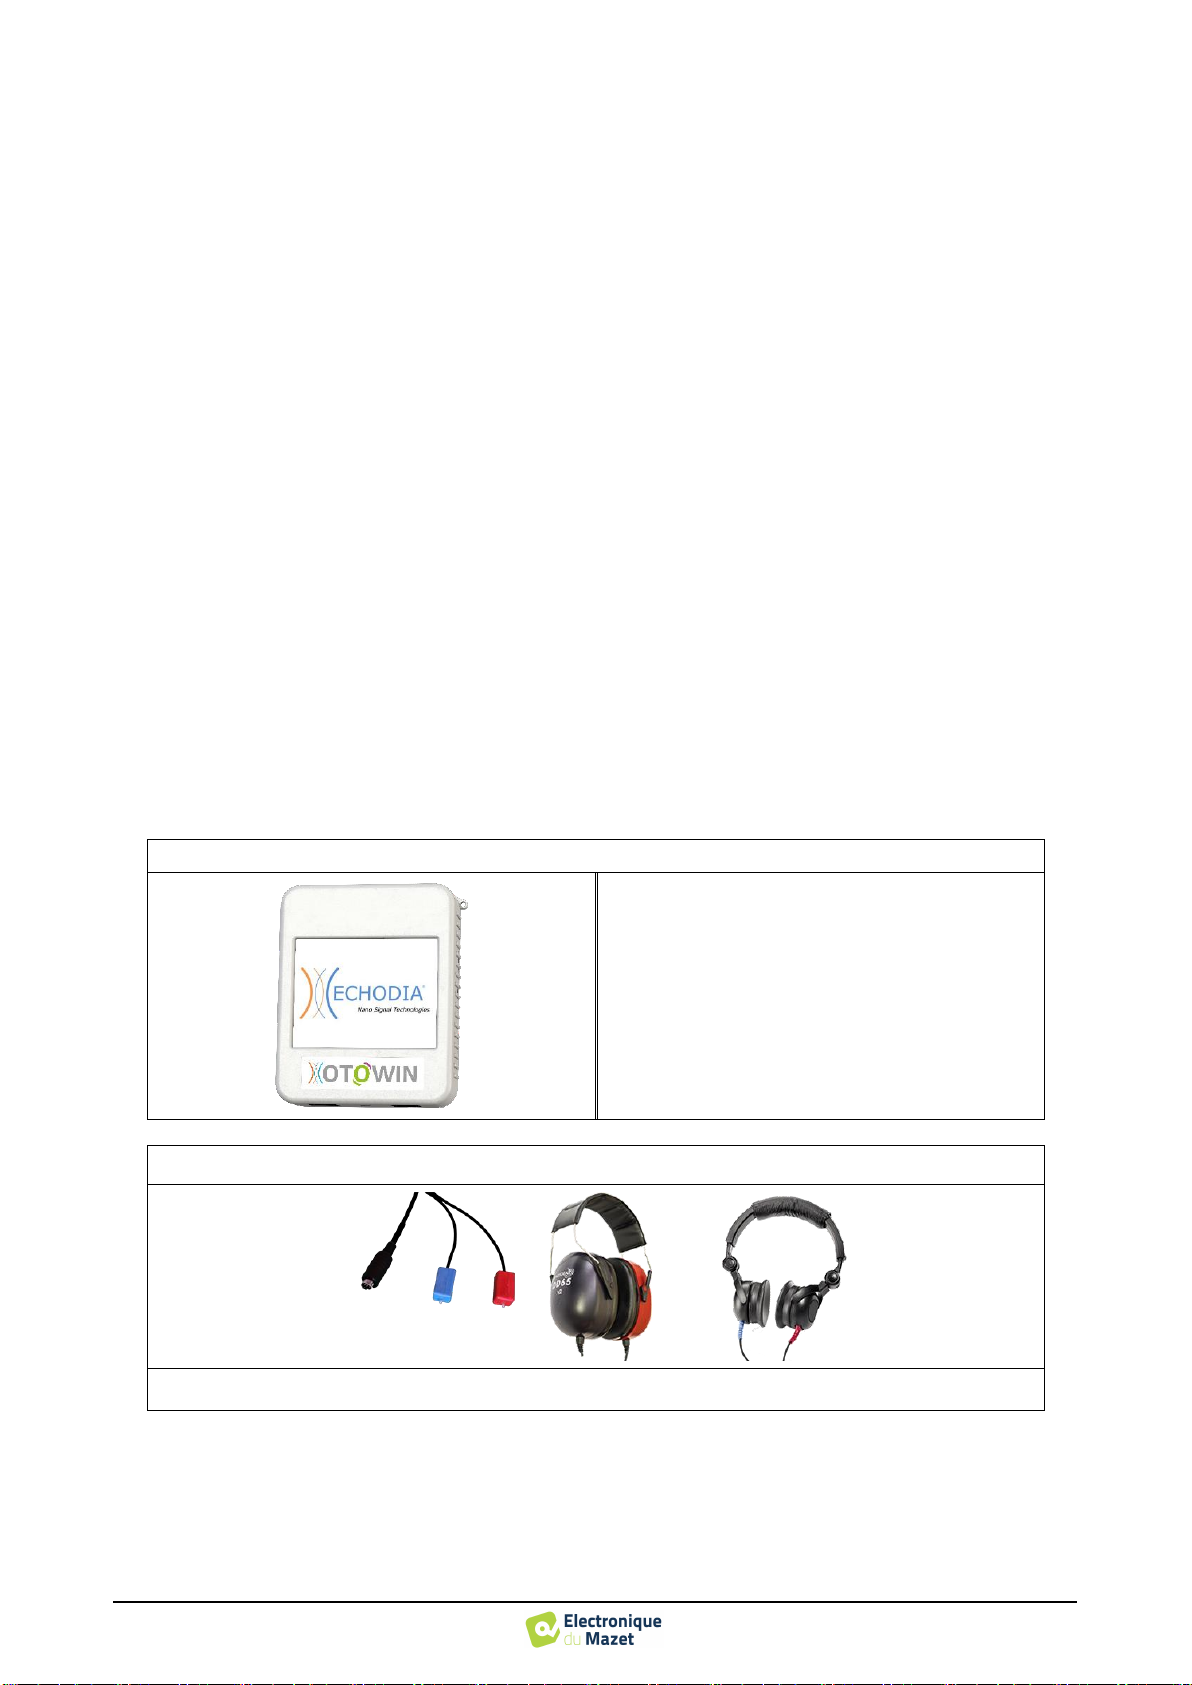
Material
To perform a Pure-tone audiometry, you need the following equipment:
Elements common to the different configurations
OTOWIN device
Air conduction audiometry
1 audiometry headset or inserts earphones

OTOWIN User Guide
ECH001XN161-A4 - 07/2022
17
Bone conduction audiometry
Bone vibrator B71
ER3-14A 13mm foam earplug
or
ER3-14B 10mm foam earplug
3.1.1
Patient setup
•
Connect the headphones to the "Audio" connector or to the jack on the OTOWIN.
•
Explain to the patient the procedure for performing an audiometry,
•
Place the audiometry headset on the patient's head.
Use an otoscope to ensure that the ear canal is not blocked by earwax. This procedure must be carried out
by a qualified person.
OTOWIN User Guide
ECH001XN161-A4 - 07/2022
18
Chapter 4
Measure in ambulatory mode
4.1
Patient management
The OTOWIN device allows a good organisation of the
measurements thanks to its advanced patient manage-
ment system.
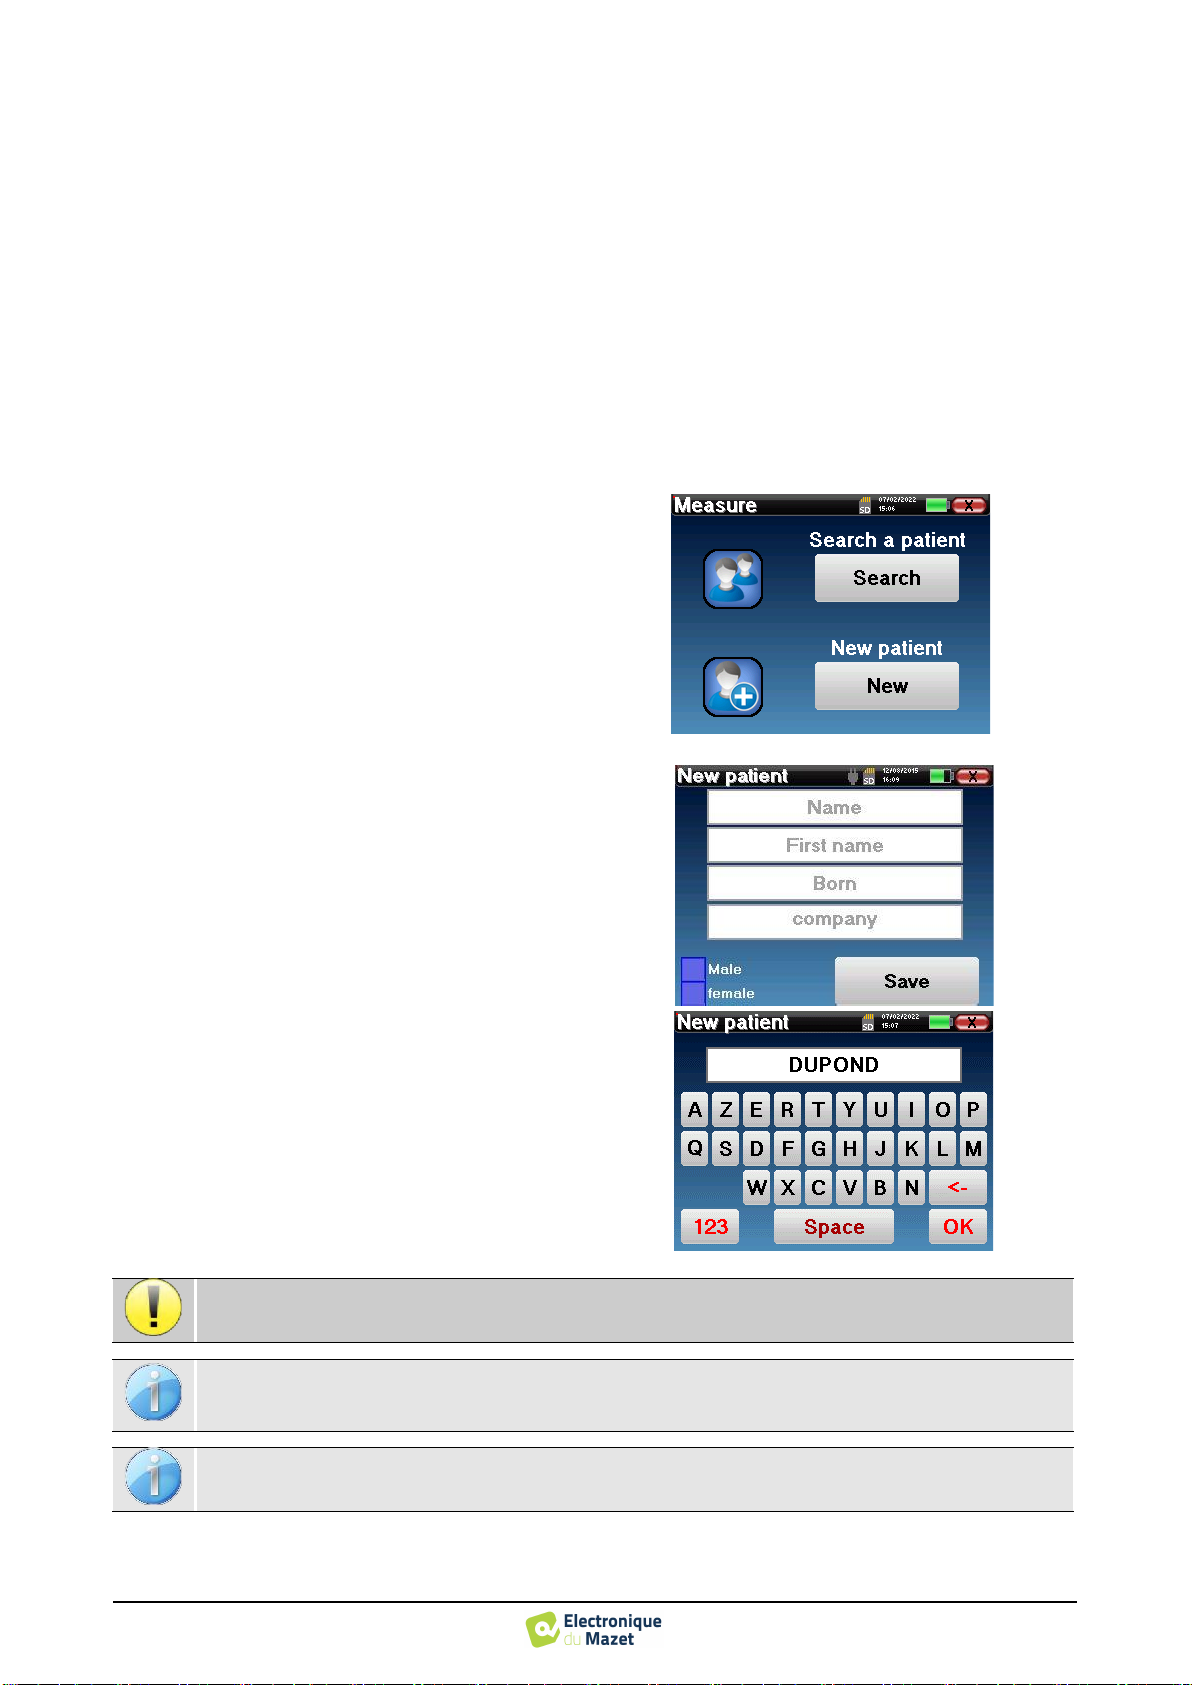
From the home page, select the "Measure" mode: you
can then choose to search for an existing patient or cre-
ate a new one.
4.1.1
Creating a patient
When creating a new patient, five pieces of information
are requested: name, first name, birth date, company
and gender.
To enter this information, simply click on the required
field and the keyboard will appear on the screen.
It is possible to use a numeric keypad by clicking on the
"123" key at the bottom left.
Here the patient information is brief. You will be able to fill in more details when exporting the data to OTOWIN.
Please refer to section 3.2
By entering the patient's date of birth and gender, the normal hearing thresholds can be plotted.
To create a new patient, it is imperative to indicate a Name and a First Name. Please note that it is recom-
mended to enter the date of birth in order to allow the OTOWIN software to organize the patients in the
database.
The date entry format must be in the form DD/MM/YYYY. The OTOWIN automatically formats the en-
try.

OTOWIN User Guide
ECH001XN161-A4 - 07/2022
19
Chapter 4. Measure in ambulatory mode 4.2 Audiometry
4.1.2
Patient follow-up
Once a patient has been created, his or her record is saved
on the
memory
card.
It is then possible to find it by click-
ing on the "Search" button.
A table is displayed with the list of patients sorted in
reverse order of their registrations (the last patient added
appears at the top of the list).
The list of patients is displayed with their name, first
name and company. It is possible to search by clicking
on the magnifying glass at the bottom of the screen.
To select a patient, click on the corresponding row. A
new page will appear with the patient's details.
Now there is the choice of taking a new measure or
viewing previously saved measurements.
The "Consultation" button gives access to a table of
measurements allowing you to go back to the diagnoses
previously made for this patient.
In order to find the measurements of the selected patient,
their
main information is displayed (type, date, time and
ear).
The "Diagnosis" button is used to start a new audiom-
etry.
4.2
Audiometry
Refer to the paragraph 4.1for instructions on how to create a patient and start a new measurement.
When you select "Diagnosis" you can choose from four
different modes:
•
Automatic patient mode,
•
Automatic doctor mode,
•
Manual doctor mode,
•
Weber mode.
The last button allows you to see which stimulator is
active and to switch between the two audio outputs.
Thus, it is possible to connect the headphones and the
bone vibrator (each to one of the audio outputs) and
switch between the two by clicking this button.
If the patient does not yet have an associated measurement, only the "Diagnosis" button is visible.
For the configuration of the frequencies used, start power of the automatic proto-
cols, please refer to paragraph 2.2.1.
Table of contents
Other ECHODIA Diagnostic Equipment manuals


