Echogear EGOS1 User manual
#YourGearUpgraded
OUTLET Shelf
Model EGOS
1
INSTRUCTION MANUAL
2
IMPORTANT SAFETY INSTRUCTIONS. READ ENTIRE MANUAL PRIOR TO USE. SAVE These INSTRUCTIONS.
Yea, the boring stuff ... but read it, so you don’t jack things up!
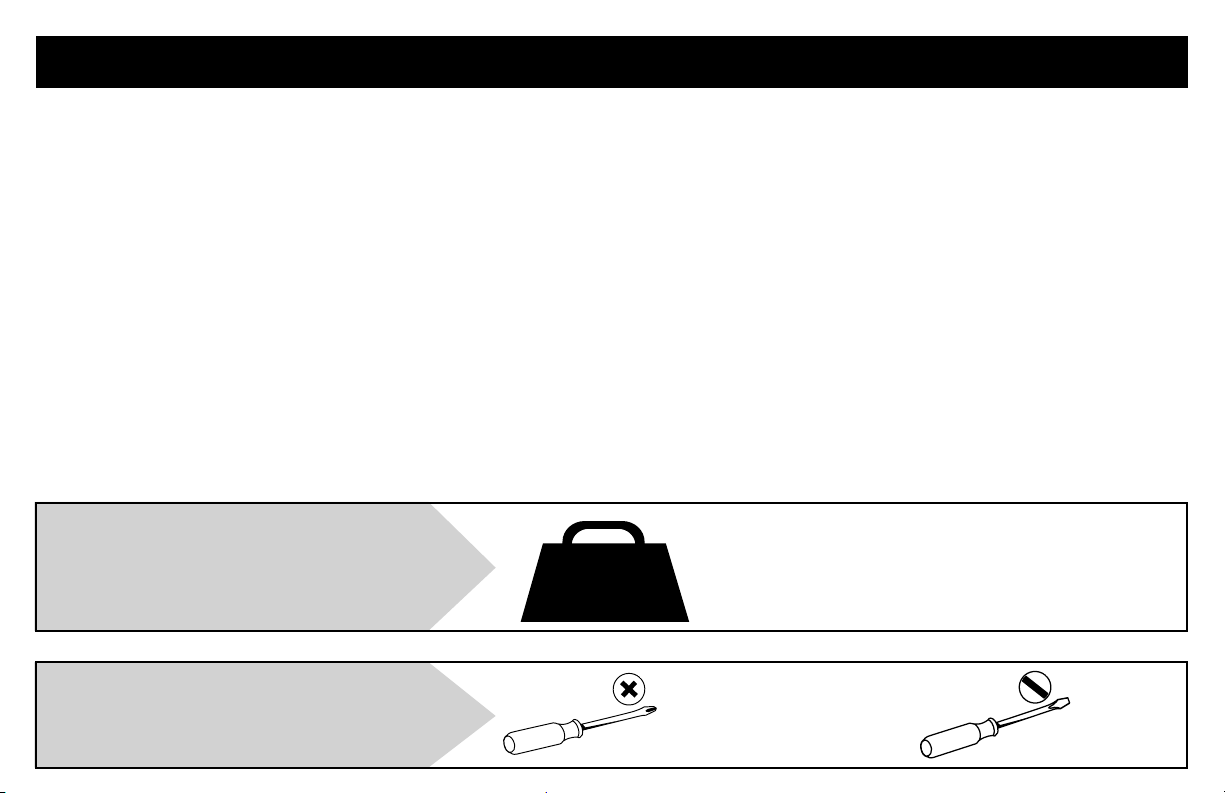
Phillips Screwdriver
Slotted
Screwdriver
Phil says,
"Git yer own!"
10 lbs.
(4.5 kg)
DO NOT EXCEED
10 lbs. (4.5 kg)
for this shelf.
“You can think
about it ... but
doooon’t do it.”
“apologies to all
the Jacks in the
world.”
●Check your speaker owner’s manual to see if there are any special requirements for mounting your speaker.
●Please read through these instructions completely to be sure you’re comfortable with this easy install process.
●This product is for household use only. Do not use this product for any purpose not explicitly specified by manufacturer.
●Manufacturer is not responsible for damage or injury caused by incorrect assembly or use.
●The wall must be capable of supporting five times the weight of the speaker and mount combined.
●For use only with UL/CUL/CN Listed receptacles (round or rectangular faces) installed in UL/CUL/CN Listed
single gang receptacle outlet boxes mounted in minimum 1/2" thick gypsum wall board.
●If you do not understand these instructions or have doubts about the safety of the installation,
assembly or use of this product, contact the ECHOGEAR Pros (see back page).
Speaker Weight Limit
DO NOT EXCEED
Tool Needed
3
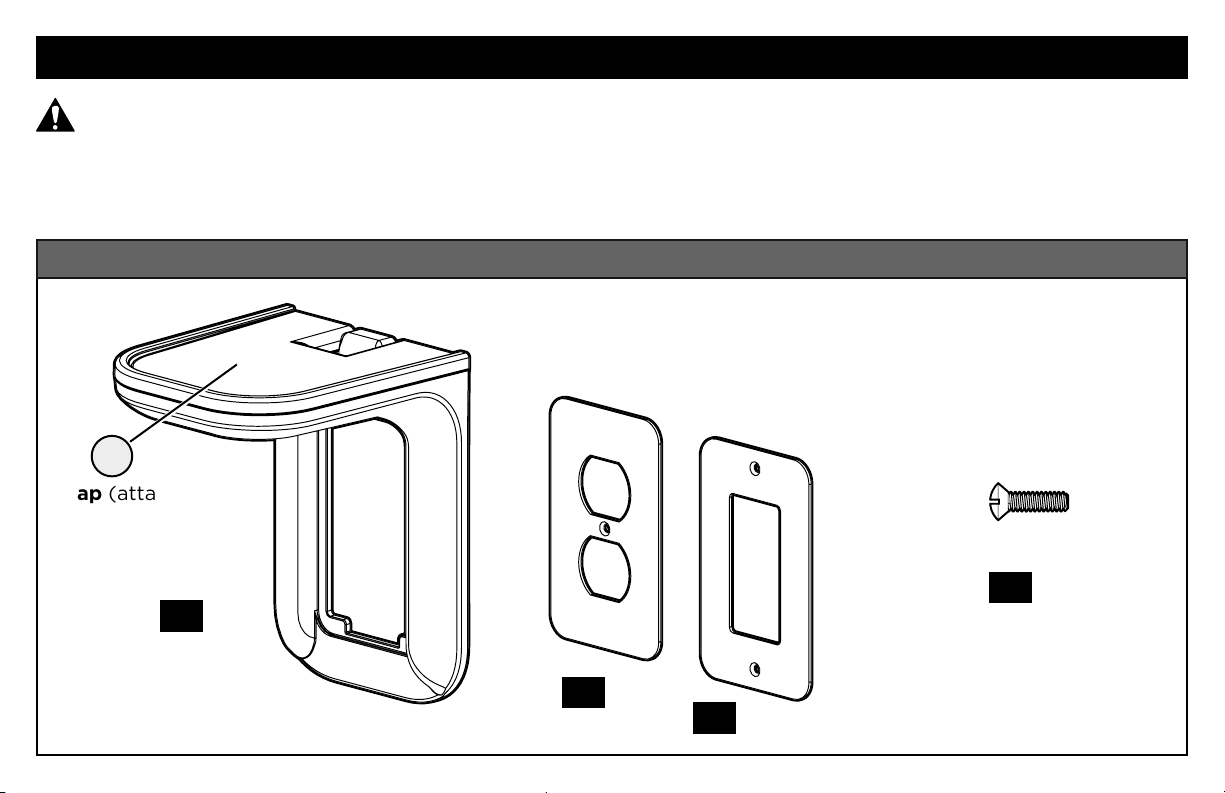
6-32 x 1/2 in.
What’s in the Box
DO NOT EXCEED
10 lbs. (4.5 kg)
for this shelf.
WARNING: DON'T FEED TO CHILDREN —This product contains small items that could
be a choking hazard if swallowed. Before starting assembly, verify all parts are included and
undamaged. If any parts are missing or damaged, DO NOT return the damaged item to your dealer;
contact the ECHOGEAR Pros (see back page). Never use damaged parts!
Outlet Cover Plate
Screw
Shelf
Cap (attached)
Outlet Cover Plates
01 x1
02 x1
03 x1
04 x2
C
STUFF FOR STEP 2

4
1.41in
35.8mm
0.86in
21.9mm
0.73in
18.7mm
6.84in
173.7mm
5.32in
135.2mm
2.65in
67.3mm
4.54in
115.3mm
1.32in
33.6mm
2.79in
70.9mm
2.66in
67.4mm
0.40in
10.2mm
1.07in
27.2mm
0.47in
12.0mm
1.28in
32.6mm
4.77in
121.2mm
DiGITS
"Don't care
WHAT your
face looks like
... take it o"
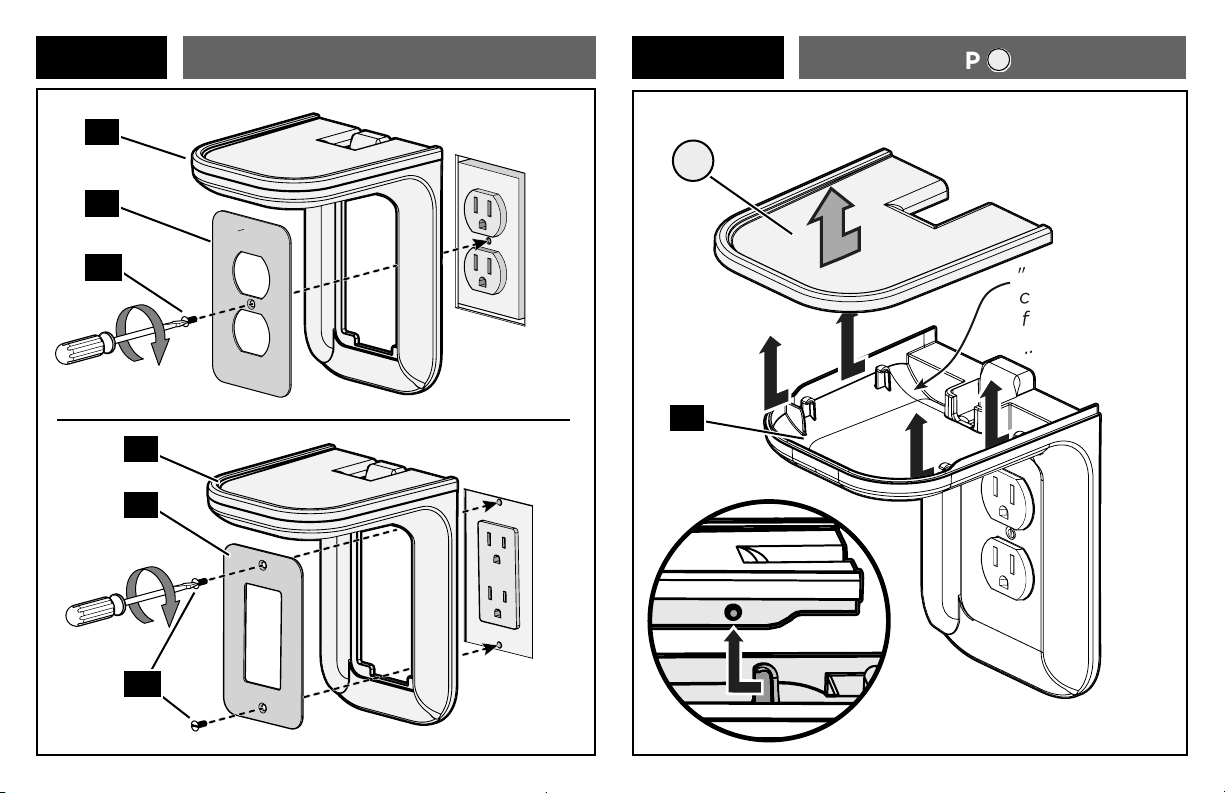
Remove cover plate
STEP 1
5
"Secret
compartment
for stashing stu
... just sayin'"
01
01
03
02
04
04
01
C
ASSEMMMBLLLLLE
STEP 3
Remove Cap
C
STEP 2
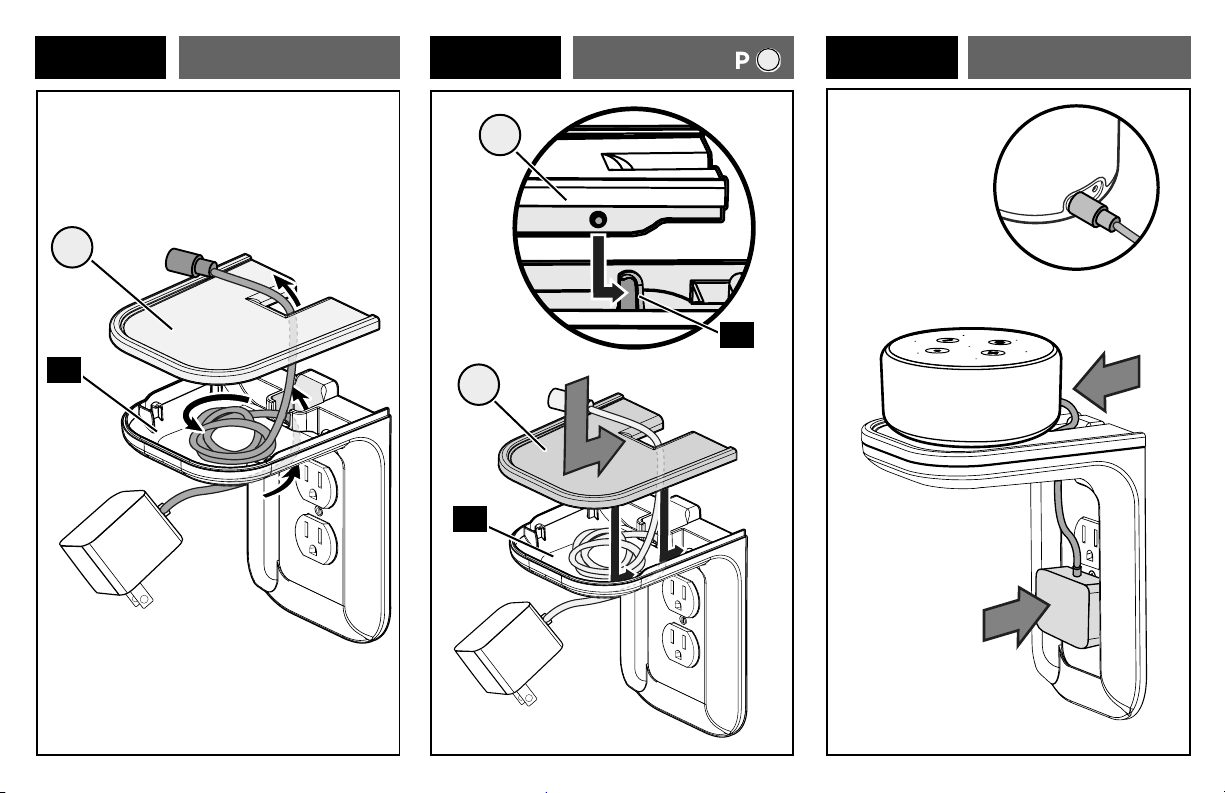
6
01
C
"whatever device ya got"
"It's THAT easy
... you're done!"
01
C
C
01
STEP 5STEP 4 STEP 6
Secure Cable Install Cap
C
Power Up

7
ESPAÑOL
●Consulte el manual del usuario de su altavoz para ver si existe algún
requisito especial para instalar su altavoz en la pared.
●Lea estas instrucciones en su totalidad para sentirse seguro y cómodo con
este fácil proceso de instalación.
●Este producto está diseñado sólo para uso doméstico. No utilice este producto para
ningún otro propósito que no sea el explícitamente especificado por el fabricante.
●El fabricante no se responsabiliza por ningún daño o lesión resultante del
montaje incorrecto o del uso indebido.
●La pared debe soportar cinco veces el peso del altavoz y del soporte juntos.
●Se debe utilizar solamente con receptáculos que cumplen con la norma UL/
CUL/CN (caras redondas o rectangulares) instalados en tomacorrientes de una
sola caja en una pared de yeso con un espesor mínimo de 1/2".
●Si no entiende las instrucciones o si tiene dudas acerca de la seguridad de la
instalación, del ensamblaje o del uso del producto, póngase en contacto con
los profesionales de ECHOGEAR (consulte la última página).
PASO2
Instale el estante
PASO1 Retire la placa de recubrimiento
(página 4)
PASO4
PASO5
PASO6
Asegure el cable
Instale la cubierta
C
Conecte a la corriente
PASO3
Retire la cubierta
C
FRANÇAIS
●Vérifiez le manuel du propriétaire de votre haut-parleur pour voir s'il y a des
exigences spéciales pour monter votre haut-parleur.
●Veuillez lire ces instructions entièrement pour être sûr d’être à l'aise avec ce
processus d'installation facile.
●Ce produit est conçu uniquement pour une utilisation domestique. Ne pas
utiliser ce produit à d’autres fins que celles spécifiées par le fabricant.
●Le fabricant n’est pas responsable des blessures ou des dommages causés
par une mauvaise utilisation ou un montage incorrect.
●Le mur doit pouvoir supporter cinq fois le poids combiné du haut-parleur et du support.
●Pour utilisation uniquement avec les réceptacles listés UL/CUL/CN (faces
ronde ou rectangulaire) installés dans des boîtes à réceptacle à branchement
simple listé UL/CUL/CN montés sur un panneau mural de gypse d’épaisseur
minimum de 1,3 cm (1/2po).
●Si vous ne comprenez pas toutes ces instructions ou si vous avez des doutes sur
la sécurité de l'installation, du montage ou de l’utilisation de ce produit, veuillez
communiquer avec le service à la clientèle ECHOGEAR Pros (voir la page arrière).
ÉTAPE 2
Installez l’étagère
ÉTAPE 1 Retirez les plaques de couverture
ÉTAPE 4
ÉTAPE 5
ÉTAPE 6
Serrez le câble
Installez le capuchon
C
Mettez sous tension
ÉTAPE 3
Retirez le capuchon
C
DIMENSIONES (página 4)
PIEZAS Y ELEMENTOS DE SUJECIÓN (página 3)
ADVERTENCIA: Este producto contiene piezas pequeñas que, si fuesen
tragadas, podrían producir asfixia.Antes de iniciar el ensamblaje, compruebe que
todas las piezas estén incluidas y en buenas condiciones. Si faltan piezas o alguna
está dañada, no devuelva el artículo al distribuidor. Póngase en contacto con el
servicio de atención al cliente. Nunca utilice piezas deterioradas.
NOTA: No todos los elementos de sujeción incluidos deberán utilizarse.
4,5 kg
(10 lbs.)
Peso máximo
NO LO EXCEDA
herramienta
necesaria
Destornillador
4,5 kg
(10 lbs.)
Poids limite
NE PAS DÉPASSER
Outil
nécessaire
Tournevis
DIMENSIONS (voir page 4)
PIÈCES ET QUINCAILLERIE (voir page 3)
AVERTISSEMENT : Ce produit contient de petites pièces qui peuvent
représenter un risque d’étouement si elles sont avalées. Avant de commencer
l’assemblage, assurez-vous que toutes les pièces sont présentes et qu’elles ne sont
pas endommagées. Si une pièce est manquante ou endommagée, contactez le
service clientèle et non le détaillant. N’utilisez jamais de pièces endommagées!
REMARQUE : Les pièces fournies ne doivent pas nécessairement être toutes utilisées.
Avant de commencer, assurons-nous que ce produit vous convient parfaitement !
Antes de comenzar, verifiquemos que este producto sea el ideal para sus necesidades.
INSTRUCCIONES IMPORTANTES DE SEGURIDAD: GUARDE ESTAS INSTRUCCIONES
Y LEA TODO EL MANUAL ANTES DE UTILIZAR ESTE PRODUCTO.
CONSIGNES DE SÉCURITÉ IMPORTANTES – CONSERVEZ CES INSTRUCTIONS
– VEUILLEZ LIRE ATTENTIVEMENT LE MANUEL AVANT D’UTILISER CE PRODUIT
(página 5)
(página 5)
(página 6)
(página 6)
(página 6)
(voir page 4)
(voir page 5)
(voir page 5)
(voir page 6)
(voir page 6)
(voir page 6)
6901-602611 00
“Want to show o your hard work?
Share a picture of your completed project with #YourGearUpgraded.
Who knows, it might not be as bad as you thought”
Confuzzled? Call the ECHOGEAR Pros:
Legrand AV Inc. and its aliated corporations and subsidiaries, intend to make this manual accurate and complete. However, Legrand
AV makes no claim that the information contained herein covers all details, conditions, or variations. Nor does it provide for every
possible contingency in connection with the installation or use of this product. The information contained in this document is subject
to change without notice or obligation of any kind. Legrand AV makes no representation of warranty, expressed or implied, regarding
the information contained herein. Legrand AV assumes no responsibility for accuracy, completeness or suciency of the information
contained in this document.
©2020 Legrand AV Inc. All Rights Reserved. ECHOGEAR is a Legrand AV Inc. brand and a registered trademark owned
by Legrand.
Legrand AV Inc. • 6436 City West Parkway • Eden Prairie, MN 55344 USA
Legrand AV Inc.
6436 City West Parkway
Eden Prairie, MN 55344 USA
1-855-428-2490 • ECHOGEAR.com
helpmehelpyou@echogear.com
Legrand AV Netherlands B.V.
Franklinstraat 14, 6003 DK Weert, NL
+44 (0)800 0568188 • ECHOGEAR.com
helpme@echogear.com
Table of contents
Other Echogear Indoor Furnishing manuals


Popular Indoor Furnishing manuals by other brands

Pinnacle
Pinnacle PRO Series User instructions

RiverRidge
RiverRidge X-FRAME 06-001/16-018 Assembly instructions

Audio Visual Furniture
Audio Visual Furniture TP800 Assembly and setup instructions

Safavieh Furniture
Safavieh Furniture Teagan MMT6002 Assembly

VABCHES
VABCHES D8L222HS03 manual

dams
dams Elev82 Mono Single Desk EVM-1200 Assembly instructions


Rockler
Rockler Blum 90788 instructions

Flash Furniture
Flash Furniture BT-7615-BK-CURV-GG Assembly instructions

JOANNA GAINES
JOANNA GAINES Magnolia Home 40000007 Assembly instruction

Möbel AS
Möbel AS RCQS12411 Assembling Instruction

Dorel Living
Dorel Living DL8715 Installation

JWA
JWA AMELIE 75120 Assembly instructions