Echowell a3 User manual

EN 0
ENGLISH / ITALIANO / DEUTSCH / FRANÇAIS / ESPANÓL / NEDERLANDS
Congratulations on having chosen the cycle computer with altimeter functions from ECHOWELL. The easy operation of your new Echo-a3
will let you enjoy much fun from riding. Please read this manual carefully before using the device to get familiar with the operation logic.
The altitude calculation of this cycle computer works by measuring the atmospheric pressure. Since the weather is changing, the altitude
(converted from the air pressure measurement) for the same location may be variable at different times. However, if there's no rapid
weather change, the altitude differences caused by the weather are limited and can be generally accepted. Do not use this computer as a
specialized device for altitude measurement.
The altitude value shown in each Echo-a3 computer is pre-calibrated by the precise instrument at the factory before shipment. However, to
get accurate basis altitude, we suggest that you calibrate the current altitude data before each ride. And the calibration of altitude for your
Echo-a series is quite easy. (Refer to the content about button operation.) You may obtain the altitude information from topographic maps
or the Internet. If you are unaware of your basis altitude or do not care about the home altitude, you may reset the altitude to zero before
riding. In this way, the cyclist can still enjoy the fun of learning the accumulated altitude gains during the trip. The altitude data can be your
reference for riding over the same hills or mountains next time.
There is a highly sensitive pressure sensor inside each Echo-a3 cycle computer, and there is a hole at the bottom of each main unit for
measuring the pressure. You should always keep the hole clean to avoid incorrect measurement and must not poke a needle or any
pointed article into it to avoid damage. The atmospheric pressure measured by the sensor will be converted into current altitude. After using
your Echo-a3, you are sure to get a lot of fun from riding with it.
INTRODUCTION

EN 1
1. BUTTON OPERATION EN 2
2. DATA SETTING MODE EN 4
A-1. User data setting EN 5
A-2. Calendar data setting EN 5
A-3. Clock setting EN 6
A-4. Target Zone setting EN 6
A-5. EL ON/OFF setting EN 7
A-6. Bike1/Bike2 setting EN 7
A-7. Circumference data setting EN 7
A-8. ODO data setting EN 8
A-9. T.RT data setting EN 8
A-10. Alti Gain data setting EN 8
A-11. Alti Loss data setting EN 9
A-12. Calory data setting EN 9
A-13. LCD setting EN 9
3. SETTING SHORT CUT EN 10
4. FUNCTION GROUP MAP EN 11
INDEX
5. FUNCTION GROUP SEQUENCY EN 12
B-1. INST. Function EN 13
B-2. SPEED function EN 14
B-3. PULSE function EN 14
B-4. ALTI function EN 15
B-5. TEMP function EN 15
B-6. TOTAL function EN 16
6. FUNCTION DESCRIPTION EN 17
7. BACK-LIGHT MODE EN 21
Altitude Adjust mode EN 21
8. HOW TO START SPEED, AND HEART RATE
MEASUREMENT EN 22
9. SPECIFICATIONS EN 23
Wheel Cirucmference Measurement EN 25
Popular Tires Circumference Reference Table EN 25
10. BATTERY CHANGE EN 26
11. TROUBLE SHOOTING EN 27
12. PRECAUTIONS EN 28

EN 2
BUTTON
OPERATION
1. Data setting mode:
Abutton: Press for change or increase setting digital.
Hold 1's for auto increase.
Bbutton: Press for change setting digital.
Cbutton: Press for quit data setting mode.
Dbutton: No function.
Ebutton: Press for enter next data setting mode.
Data setting Process (ex. Circumference Setting)
Current
BPM
Curren
t
A
ltitude
Current
Speed
Function
Data
Function
Abutton Bbutton Cbutton Dbutton
Ebutton
OK!

EN 3
2. Operating mode:
Abutton: Press for change function Group.
Hold 3's for data reset. (see figure at right)
Bbutton: Press for change function mode.
Cbutton: Press for enter/quit data setting mode.
Dbutton: Press for select Bike1 or Bike2.
Ebutton: Press for turn on back-light 5's.
Abutton+Bbutton: Hold 3's for enter altitude adjust mode.
3. Altitude adjust mode:
Abutton: Press for change or increase adjust digital.
Bbutton: Press for change to next adjust digital.
Abutton +Bbutton: Press for quick reset data to zero.
Hold 3's for quit altitude adjust mode.
(20's auto quit altitude adjust mode without
Press any button).
BUTTON
OPERATION
A
button: Press for change function Group.
Hold 3's for data reset.
ex. [SPEED] →MAX SPD.
By pressing “YES”, you will reset (to zero)
the trip data in the following function groups:
SPEED, PULSE, ALTI, and RPM.

EN 4
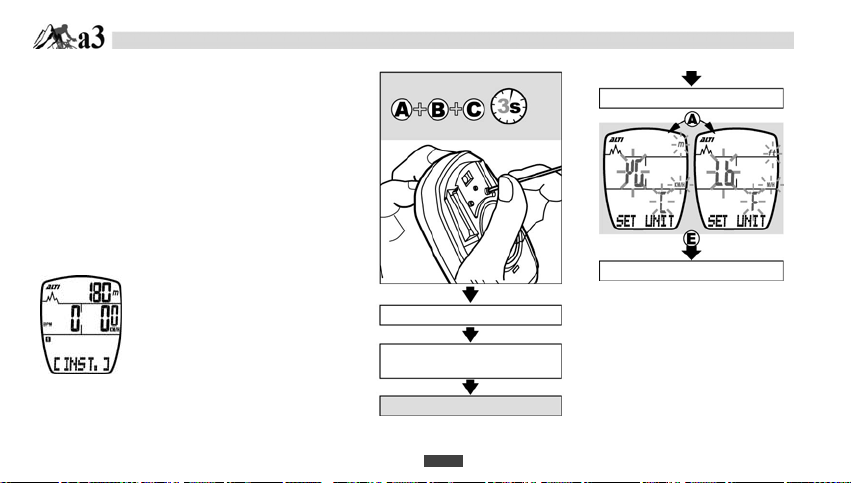
INITIATE THE MAIN UNIT
ENTER DATA SETTING MODE
1. Hold the Abutton, Bbutton and Cbutton
simultaneously for 3 seconds to initiate the computer
and clear all data.
2. The LCD segments will be tested automatically after
the unit is initiated.
3. Press any Button to stop LCD test in order to set UNIT.
4. Press Abutton to choose”KG” or “Lb”.(pound)
5. Press Ebuton to begin USER DATA SETTING.
QUIT DATA SETTING MODE
It will automatically quit the data
setting mode after 20 seconds
without press any btton, or press
Cbutton.
ALL CLEAR:
Auto-running display
Press any button to enter
Data setting mode
Data settin
g
mode
UNIT SELECTION
A-1. USER DATA SETTING
DAT
A
SETTING MODE

EN 5
A-1. USER DATA SETTING
A-2. CALENDAR DATA SETTING
1. Press A button to change “MALE” or “FEMALE”.
2. Press B button to change the setting digit.
3. Press A button to increase the age by 1.
4. Press B button to change the setting digit.
5. Press A button to increase the weight by 1.
A
-2.
CALENDAR
DATA
SETTING
1. Press E button to begin CALENDAR DATA SETTING..
2. Press A button to increase the YEAR by 1.
3. Press B button to set MONTH.
4. Press A button to increase the MONTH by 1.
5. Press B button to set DAY.
6. Press A button to increase the DAY by 1.
A
-3.
CLOCK
SETTING
DATA SETTING MODE

EN 6
A-3. CLOCK SETTING
A-4. TARGET ZONE SETTING
1. Press E button to begin CLOCK SETTING.
2. Press A button to select 12H or 24H.
3. Press B button to set HOUR.
4. Press A button to increase the HOUR b
y
1.
5. Press B button to set MINUTE.
6. Press A button to increase the MINUTE by 1.
7. Press B button to set SECOND.
8. Press A button to reset the SECOND to 00.
A
-4.
TARGET ZONE
SETTING
1. Press E button to begin TARGET ZONE
SETTING.
2. Press A button to set UP target zone by
increasing 1 for pressing each time.
Target zone UP (upper limit) is within 45~240.
3. Press B button to set LO Target zone.
4. Press A button to set LO Target zone by
increasing 1 for pressing each time.
Target zone LO (lower limit) is within 40~199.
A
-5.
EL ON/OFF
SETTING
DATA SETTING MODE

EN 7
A-5. EL ON/OFF SETTING A-6. BIKE1/BIKE2
A-7. CIRCUMFERENCE DATA SETTING
1. Press E button to change EL ON/OFF SETTING.
2. Press A button to ON or OFF the EL. (also see page EN21).
1. Press A button to set Bike1 or Bike2..
2. Press E button to set circumference.
A
-6.
BIKE1/
BIKE2
SETTING
1. Press E button to begin CIRCUMFERENCE SETTING.
2. It shows the default value “c2155” (2155 mm). Measure
your wheel circumference and refer to the Wheel Size
Chart. (page. EN25)
3. Adjust the CIRCUMFERENCE value as instruction in
DATA SETTING processes (page EN 2).
A
-8.
ODO DATA
SETTING
DATA SETTING MODE
A
-7.
CIRCUMFERENCE
DATA SETTING

EN 8
A-8. ODO DATA SETTING (Odometer bike1/2)
A-9. T.RT DATA SETTING (Total riding time bike1/2) A-10. ALTI GAIN DATA SETTING (Total altitude gain bike1/2)
1. Press E button to begin ODO SETTING.
ODO Data setting range is 0~999999Km (Mile).
2. Adjust the ODO as instruction in
DATA SETTING processes.
A
-9.
T.RT DATA SETTING
1. Press E button to begin T.RT SETTING.
T.RT Data setting range is 0000h00m~9999h59m.
2. Adjust the T.RT as instruction in DATA SETTING
processes.
1. Press E button to begin ALTI GAIN SETTING.
ALTI GAIN Data setting range is 0~999999m (ft).
2. Adjust the ALTI GAIN as instruction in DATA SETTING
processes.
A
-10.
A
LTI GAIN
DATA
SETTING
A
-11.
A
LTI LOSS
DATA
SETTING
DATA SETTING MODE

EN 9
A-11. ALTI LOSS DATA SETTING (Total altitude loss bike1/2) A-12. CALORY DATA SETTING (Calory consumption bike1/2)
A-13. LCD DATA SETTING (LCD Brightness setting)
1. Press E button to begin ALTI LOSS SETTING.
ALTI LOSS Data setting range is 0~999999 m (ft).
2. Adjust the ALTI LOSS as instruction in DATA SETTING
processes.
1. Press E button to begin CALORY SETTING.
CALORY Data setting range is 0~999999kcal.
2. Adjust the CALORY as instruction in DATA SETTING
processes.
A
-12.
CALORY
SETTING
1. Press E button to begin LCD SETTING.
2. Press A button to select level L1, L2, L3 or L4.
A
-1.
USER DATA
SETTING
A
-13.
LCD
SETTING
DATA SETTING MODE

EN 10
SETTING SHORT CUT
ODO T.RT ALTIGAIN ALTILOSS CALORY
You can directly enter setting
mode from these functions in
total function group
by pressing Cbutton.
Odometer bike1/2 Total riding time
bike1/2 Trip altitude gain
bike1/2 Trip altitude loss
bike1/2 Calory
consumption
bik 1/2
DATA SETTING MODE
A-9.
T.RT DATA
SETTING
EN 8
A-8.
ODO DATA
SETTING
EN 8
A-10.
ALTI GAIN DATA
SETTING
EN 8
A-12.
CALORY DATA
SETTING
EN 9
A-11.
ALTI LOSS
DATA SETTING
EN 9

EN 11
Odometer bike1/2
Total riding time bike1/2
Total altitude gain bike1/2
Total altitude loss bike1/2
Total caloryconsumption bike1/2
Total odometer
bike 1/2
Total riding time
bike 1/2
Total altitude gain bike1+2
Total altitude loss bike1+2
Total calory consumption bike 1+2
Averageg
HeartRatebike1/2
Maximum
Heart Rate bike1/2
Heart Rate
target zone setting
Time in
target zone bike1/2
Time over
target zone bike1/2
Calory consumption
bike1/2
Average speed
bike1/2
Maximum
speed bike1/2
Trip distance
bike1/2
Riding time
bike 1/2
Distance
per day
12/24Hclock
Calory consumption
per hour
Current
Heart Rate intensity
Current
altitude ascent
Current
altitude descent
Calendar
Instant
function group Speed
functiongroup Temperature
functiongroup
Heart Rate
function group Altitude
functiongroup Total
functiongroup
Trip altitude gain bike1/2
Trip altitude loss bike1/2
Maximun altitude bike1/2
Minimun altitude bike1/2
Trip Average
altitudeascentbike1/2
Trip Average
altitude descent
bike 1/2
Trip Maximum
altitudeascentbike1/2
Trip Maximum
altitude descent bike1/2
Barometer
Maximum
temperature
Minimum
temperature
FUNCTION GROUP MAP

EN 12
[INSTANT] [SPEED] [PULSE] [ALTITUDE] [TEMPERATURE] [TOTAL]
FUNCTION GROUP SE
Q
UENC
Y

EN 13
B-1. [INST.] INSTANT FUNCTION GROUP
A
SCENT% DESCENT %
B-2. SPEED Function
Shown only when riding.
Instant 12/24Hclock Caloryconsumption CurrentHeartRate Current Current
Temperature perhour intensity altitudeascent altitudedescent
Calendar
FUNCTION GROUP SE
Q
UENC
Y

EN 14
B-2. [SPEED] SPEED FUNCTION GROUP
B-3. [PULSE] PULSE FUNCTION GROUP
B-4.
A
LTI
Function
B-3. PULSE Function
Speed Average speed Maximum speed Trip distance Riding time Distance per day
bike1/2 bike1/2 bike1/2 bike1/2
Pulse AveragegHeartRate Maximum HeartRatetarget Timein Timeovertargetzone Calory
bike1/2 Heart Rate bike1/2 zone setting target zone bike1/2 bike1/2 consumption bike1/2
FUNCTION GROUP SE
Q
UENC
Y

EN 15
B-4. [ALTI] ALTITUDE FUNCTION GROUP
B-5. [TEMP] TEMPERATURE FUNCTION GROUP
B-6.
TOTAL Function
B-5. TEMP Function
A
ltitude Trip altitude gain
Trip altitude loss
Maximum
altitude
Minimum altitude
T
r
ip
A
verageg
altitude
Trip
A
verageg
Trip Maximum ascent
bike1/2 bike1/2 bike1/2 bike1/2 ascentbike1/2 altitudedescentbike1/2 altitude bike1/2
Barometer TripMaximum
descentaltitude
bike1/2
Temperature Maximum Minimum
temperature temperature
FUNCTION GROUP SE
Q
UENC
Y

EN 16
B-6. [TOTAL] TOTAL FUNCTION GROUP
ex.
Bike1Odometer Bike2TotalRidingTime Bike1+Bike2Calories
Total Odometer Totalridingtime Totalaltitudegain Totalaltitudeloss Totalcalory
bike1/2 bike1/2 bike1/2 bike1/2 consum
p
tion bike1/2
B-1.INSTANT Totalcalory Totalaltitudeloss Totalaltitudegain Totalridingtime Totalodometer
consumptionbike1+2 bike1+2 bike1+2 bike1+2 bike1+2
FUNCTION GROUP SE
Q
UENC
Y

EN 17
Clock & Temperature: 12HR AM/PM or 24HR Clock / °C or °F
1. When the user sets the clock time in Data Setting Mode, there are
two formats for option-- 12H and 24H.
2. 12H means 12 hours,24H means 24 hours.
3. With this function, this computer will display the current
temperature.
CALORY/H: Calories per hour
1. Calculates the expended calories per hour based on the current
heart rate.
2. Increasing or decreasing the heart rate intensity can control target
calorie consumption.
3. The range for calorie consumption per hour is from 0 to 3333 Kcal.
BPM%:Currentheartrateintensity
With this function, the computer will display the Current heart rate
intensity during riding.
Calendar
1. Calendar from the year 2010 to 2099.
2. Day of week will display automatically while the date is input.
3. Adjust the Calendar value as instruction in DATA SETTING
processes page EN 5.
Current altitude ascent/descent
With this function, the computer will display the Current altitude
ascent/ descent during riding.
-------------------------------------------------------------------------------------------
SPEED: Current Speed
1. The current speed is always shown on the middle display during
riding.
2. The speed data are updated per second.
3. For Bike 1, when you do not ride the bike for more than 4 seconds,
the speed data will be reset to zero. For Bike 2, when you do not
ride the bike for more than 2 seconds, the speed data will be reset
to zero.
AVGSPD:AverageSpeedbike1/2
1. With this function, the computer will display your average speed
during riding.
2. Whenever you reset the computer or change the battery, the
average speed record will be cleared.
3. It'll display "0.0" if the riding time is below 6 seconds.
4. It's updated every second on condition that the riding time is over 6
seconds.
5. The computer will automatically reset the following data to zero
once the RIDETIME is over 100 hours or the DISTANCE is over
1000KM (or miles): RIDETIME (riding time), DISTANCE (trip
distance), AVG SPD (average speed.)
MAXSPD:MaximumSpeedbike1/2
1. With this function, the computer will record the maximum speed you
reach during riding.
2. Whenever you reset the computer or change the battery,
FUNCTION DESCRIPTION

EN 18
AVG BPM: Average Heart Rate bike1/2
Calculate the average heart rate during exercise: using this value we can
tell if the cardiopulmonary condition has improved for the same intensity of
exercise.
MAXBPM:MaximumHeartRatebike1/2
Monitors and records the maximum heart rate during exercise.
BPMT-Z:HeartRateTargetzone
With this function, the computer will display the target zone upper limi
t
(UP) and lower limit (LO).
IN T-Z: Time In Target Zone bike1/2
Calculate and record the exercise time within the target zone.
OVER T-Z: Time Over Target Zone bike1/2
Calculate and record the exercise time over the target zone.
CALORY:Caloryconsumptionbike1/2
1. Calculates the calories expended for the whole exercise process,
not only from exercise.
2. Males expend more calories than females at the same heart rate,
likewise, the female heart rate will be higher than male heart rate
doing the same amount of exercise.
3. Calories consumption will be affected by Heart rate, sexuality,
weight and type of exercise.
4. The unit for calories is Kcal.
5. The range is from 0 Kcal to 9999.99 Kcal.
6. Calory will be calculated when the heart rate is equal or over
90bpm.
--------------------------------------------------------------------------------------------
FUNCTION DESCRIPTION
the maximum speed record will be cleared.
DISTANCE:TripDistancebike1/2
1. DISTANCE refers to the accumulated distance during a trip.
2. Whenever you reset the computer or change the battery, the trip
distance record will be cleared.
RIDETIME:RidingTimebike1/2
1. RIDETIME refers to the accumulated riding time of a trip.
2. Whenever you reset the computer or change the battery, the trip
distance record will be cleared.
3. The computer automatically starts measuring the riding time
upon receipt of wheel signals. If you are riding your Bike 1,
whenever you stop, the computer will continue to count the riding
time for 4 more seconds to make sure there're no more wheel
signals. If you are riding your Bike 2, the computer will count the
riding time for 2 more seconds for the same reason. Regarding the
riding time it over counts, the computer will automatically deduct it
and show the correct riding time.
DIST/DAY:Distanceperday
1. With the DIST/DAY function, the computer accumulates the
distance of your riding in one day.
2. The DIST/DAY data will be automatically cleared at 12:00:00 a.m.
(or 0:00:00) per day.
--------------------------------------------------------------------------------------------
PULSE:HeartRate
Display the current heart rate (BPM) on left side of middle display.

EN 19
ALTI:CurrentAltitude
1. The current altitude is always displayed on the upper display.
2. To get accurate basis altitude, the cyclist should calibrate the
altitude before each ride.
3. The measurement is based on the principle that atmospheric
pressure decreases as elevation increases.
4. The altitude is measured by means of the atmospheric pressure,
so it's weather- dependent.
5. You may obtain the altitude data from a topographic map or the
Internet.
6. The altitude of the altimeter is pre-calibrated by the precise
instrument
at the factory before shipment.
GAIN/LOSS: Trip altitude gain bike1/2 / Trip altitude loss bike1/2
1. With this function, it displays the accumulated altitude gains during
a trip.
2. When you ride over uphill paths, the altimeter will accumulate the
altitude gains. However, when you ride over downhill paths, the
computer will accumulate the altitude loss. The altimeter always
accumulates your altitude gains only.
MAX ALTI/MIN ALTI: Maximun altitude bike1-2 /
Minimunaltitudebike1-2
1. With this function, the computer displays the maximum/minimum
altitude you reach during a trip.
2. The maximum/ minimum altitude record will be cleared after you
reset the computer or change the battery.
AVG ASC/AVG DES: Trip AVG altitude ascent bike1/2 /
TripAVGaltitudedescentbike1/2
1. With this function, the computer will display the average altitude
asscent/decent during riding.
2. Whenever you reset the computer or change the battery, the
average altitude asscent/decent record will be cleared.
MAX ASC/MAX DES: Trip MAX altitude ascent bike1-2 /
TripMAXaltitudedescentbike1-2
1. With this function, the computer will record your
maximum/minimum
asscent/decent during riding.
2. Whenever you reset the computer or change the battery, the
maximum/minimum asscent/decent record for a trip will be cleared.
MILLIBAR:Barometer
1. The altimeter is essentially a barometer, and millibar is a unit of
atmospheric pressure. (e.g. Standard atmospheric pressure at sea
level is about 1013 millibars.)
2. The altimeter converts the millibar value of atmospheric pressure
into the current altitude.
3. Attention: There is a hole at the bottom of the main unit for
measuring the air pressure. The hole for measurement should be
always kept clean. Besides, do not poke anything into the hole to
avoid damage.
FUNCTION DESCRIPTION
Table of contents
Other Echowell Bicycle Accessories manuals