Ecobike CORTINA User guide

1

2

3
SPIS TREŚCI
1. INTRODUCE .............................................................................................................................................5
2. SAFETY......................................................................................................................................................5
2.1 FOR PARENTS / GUARDIANS .............................................................................................................5
3. USE ACCORDING TO THE INTENDING....................................................................................................6
3.1 TREKKING BICYCLE ............................................................................................................................6
3.2 REAR HUB MOTOR .............................................................................................................................6
4. STORAGE AND USING.............................................................................................................................6
5. BEFORE RIDDING.....................................................................................................................................6
6. TECHNICAL INFORMATION.....................................................................................................................7
6.1 RIMS....................................................................................................................................................7
6.2 SADDLE ..............................................................................................................................................7
6.3 BEARINGS OF HANDLEBAR ...............................................................................................................7
6.4 WHEELS...............................................................................................................................................8
6.5 TIRES ...................................................................................................................................................8
6.6 SPOKES...............................................................................................................................................8
6.7 BRAKES ...............................................................................................................................................8
6.8 CRANKSET ..........................................................................................................................................8
6.9 PEDALS...............................................................................................................................................9
6.10 DERAILLEUR......................................................................................................................................9
6.11 CHAIN ..............................................................................................................................................9
6.12 TROLLEY............................................................................................................................................9
6.13 RACK (OPTION) ...............................................................................................................................9
6.14 LIGHTING..........................................................................................................................................9
7. ASSMBLY................................................................................................................................................10
7.1 PREPARING ......................................................................................................................................10
7.2 FOLD THE FRAME .............................................................................................................................10
7.3 HANDLEBAR ASSEMBLY ...................................................................................................................10
7.4 PEDALS ASSEMBLY ...........................................................................................................................10
7.5 SADDLE ASSEMBLY ..........................................................................................................................10
8. GREASE..................................................................................................................................................11
9. USING BATTERY AND CHARGER...........................................................................................................11
9.1 BATTERY............................................................................................................................................11
9.2 IMPORTANT INFORMATION ABOUT BATTERIES ...............................................................................11
9.3 INSERTION AND REMOVAL THE BATTERY ........................................................................................12
9.4 CHARGING THE BATTERY.................................................................................................................12
10. FUNCTION DISPLAY ............................................................................................................................12
10.1 FULL VIEW AREA.............................................................................................................................12

4
10.2 ON/OFF DISPLAY ...........................................................................................................................12
10.3 USING POWER INDICATOR...........................................................................................................13
10.4 SPEED INDICATOR ........................................................................................................................13
10.5 KM/H & MPH .................................................................................................................................13
10.6 DISPLAY BACKLIGHT AND LIGHT (OPTIONAL).............................................................................13
10.7 WALK ASSISTANCE........................................................................................................................13
10.8 SELECT THE ASSISTANCE MODE ...................................................................................................13
10.9 ERROR CODE...............................................................................................................................14
10.10 error table...................................................................................................................................14
10.11 SETTINGS......................................................................................................................................14
10.12 RESET DATA .................................................................................................................................14
10.13 WHEEL SIZE SETTINGS...................................................................................................................14
10.14 KM/H & MPH ...............................................................................................................................15
10.15 MOTOR MODE SETTINGS (ECO, NORMAL, POWER).................................................................15
10.16 BATTERY LEVEL INDICATOR .........................................................................................................15
11. WARRANTY CARD...............................................................................................................................16
12. NOTES ..................................................................................................................................................17

5
1. INTRODUCE
First of all, we would like to thank you for purchasing our electric bike, which has been
carefully designed and manufactured in accordance with the requirements of the highest
international standards. We wish your new bike to be a new way of your life.
Please read the following instructions carefully before proceeding with the bicycle. The
manual contains important information related to the safety, operation and assembly of
the bicycle. The bike has electrical parts which, according to the Act, are considered
dangerous, which means the obligation to dispose of - it cannot be disposed of in standard
garbage. Please remember that it’s offence.
2. SAFETY
•We suggest using the appropriate helmet in accordance with the European
standards.
•Observe the traffic regulations.
•We recommend that you take extra care when moving with crowded traffic.
•Perform a bicycle service only at bicycle service points.
•Regular service will provide you with a greater safety of bicycle use and prolong its
life.
•Carry out regular maintenance according to the instructions.
•Do not make any repairs to electrical parts yourself, only at designated service points.
•Never ride a bicycle if you have drunk or taken other intoxicants.
•The user should have front and rear lights and reflectors on the wheels.
•When cleaning the bicycle, always use soft wiper.
•Hold the steering wheel with both hands while ridding.
•Do not catch or other vehicles.
•Avoid sudden braking.
•Do not wear loose clothing for cycling.
•Only use original spare parts for components.
•When installing bicycle accessories, it is recommended that you use these
accessories for assembly instructions.
•Parents should pay special attention to the safety of children while they are being
transported.
•Children should be transported in special chairs permanently attached to the
bicycle.
2.1 FOR PARENTS / GUARDIANS
Parents / guardians are responsible for the conduct and safety of their child. Before ridding
by a child, they should instruct them about the proper use of the bicycle. Before allowing
a child to ride, parents are required to:
✓Read the entire manual, and to familiarize the child with the warnings and functions
and principles of the bicycle.
✓Make sure that the child has an approved bicycle helmet when driving, and that he
understands all safety rules.

6
3. USE ACCORDING TO THE INTENDING
Improper use of the bike or use contrary to its intended use may involve danger and expose
you to loss of health or life. If you have any doubts whether the purpose of the bike matches
your ridding style - ask the seller.
3.1 TREKKING BICYCLE
This type of bicycle work well on paved surfaces and paths. They combine comfort and
driving dynamics. It has a sturdy frame and large, 28-inch wheels. The user’s position on the
bike is very comfortable and allows hours of riding. These types of bicycles, and in particular
their braking system, have been designed for a maximum load of 125 kg (bicycle + cyclist
+ luggage), the weight of the cyclist with luggage may not exceed 100 kg.
This bike is designed for recreational purposes, not for competitive purposes. For riding on
public roads, bicycles without standard accessories, should be equipped with front and
rear lighting, bell, reflections on the pedals and spokes of the wheels, in such a way that
the bike meets the requirements of the traffic regulations.
3.2 REAR HUB MOTOR
Optimal conditions for electric bikes equipped with a hub motor are evenly shaped and
paved surfaces. In the case of inclines on the road, the user should take the load off the
engine, using sufficient force to maintain continuous electrical assistance. The support
system has been equipped with a safety device that prevents further operation of the
engine when the overload causes a rapid increase of its temperature. The system will restart
the engine when the temperature returns to normal. Improper use of the bike or use
contrary to its intended use may involve danger and expose you to loss of health or life. If
you have any doubts whether the destination of the bicycle corresponds to your ridding
area (mountains, city, asphalt, etc ...) - ask the seller if the chosen model will be suitable.
4. STORAGE AND USING
➢The bicycle is not intended for long-term outdoor storage (max 12 hours a day.
➢The bicycle should be stored in a dry place at room temperature.
➢The bicycle should be stored away from corrosive products and places.
5. BEFORE RIDDING
Always check the technical condition of the bicycle before every ride, especially:
✓Air pressure in the wheels, remember to observe the pressure range specified by the
manufacturer on the tire.
✓Check the tire condition for deformation, cracks and whether the tire adheres to the
rim and does not stick out beyond the rim.
✓Checking wheel screws.
✓Checking the handlebar and stem (whether it does not rotate or is not loose).
✓Checking the screws of saddle (does not rotate or fall under the weight).
✓Check if the bicycle lighting (front and rear) works well.
✓Checking the beep (bell).
✓If there is no visible safety groove on the side surfaces of the rim, the rim should be
replaced.

7
6. TECHNICAL INFORMATION
6.1 RIMS
Before using your bike, always check that the wheels are centered and that the rims are
undamaged. During operation of the bicycle, and especially in any collisions, cracks and
cracks may appear. When you see a damaged rim, immediately contact an authorized
service center for replacement with a new one. A damaged rim may damage the tire, for
example, which may involve danger and expose you to health or life.
6.2 SADDLE
The saddle should be tightened after
setting the correct and most comfortable
height for the user. When setting the
saddle, pay attention to the maximum
extension of the saddle post. The seatpost
must be inserted in the frame in such a
way that the safety indicator (see picture)
on the seat post is invisible, if the indicator
is visible, there is a possibility of the saddle
post breaking through its low load.
The final adjustment of the saddle position
is carried out by moving the saddle in the
saddle clamping bracket forward or
backward. Please remember not to go out
of the scale placed on the saddle,
otherwise the saddle may be damaged,
due to excessive load.
Please remember to set the saddle
correctly (according to the figure below), it
is important for the user because the
incorrectly positioned saddle causes the
cyclist to tire more quickly, pain in the legs
and back.
6.3 BEARINGS OF HANDLEBAR
The handlebar, when placed in the most
comfortable position for the user, must be
tightened so that it does not loosen during riding.
In an a-head type, the clearance should be
removed by loosening the Allen screws on the
handlebar bracket and tightening the rudder bolt
(until the clearance is fully removed). After
adjusting the bearings, tighten the Allen screws on
the bracket - figure below.

8
6.4 WHEELS
Properly adjusted wheels should rotate slightly and smoothly, without jerks, perceptible
slack. In the case of loosening in the wheel hub, it must be eliminated by adjusting. In order
to adjust the wheel, you must have specialist tools, therefore, if a fault is found, please go
to an authorized service point.
6.5 TIRES
For tires, the pressure range specified by the manufacturer must be observed on the side
of the tire (pressure unit indicated on the tires 1000 kPa = 14.22 P.S.I = 1 bar = 1 at). The tire
should be placed in the direction indicated on its side (the arrow shows the direction of
rotation). The tire should not have any deformations or cracks and should adhere to the rim
in parallel. After finding out that the tire has any of the defects, immediately go to an
authorized service point.
6.6 SPOKES
Spokes in wheels should be evenly stretched. The spokes loosened during the bicycle's
operation may cause radial and axial runout of the wheels or rupture of the spokes, which
affects the service life of the rim and hub bearings, as well as negatively affects the braking
performance. These irregularities should be removed at service points.
6.7 BRAKES
Bicycle disc brakes are more efficient than v-brakes. They do not
require paying much attention, but from time to time there may
be necessity of adjusting the distance between the brake pads
and the disc. In mechanical brakes, the distance between the
pads and the disc is adjusted in such a way as to equalize the right
and left distance between the brake disc and brake pads. If the
brake pads are worn, the clearance on the outside and inside
must be evenly adjusted to prevent the brake pads from touching
only one side of the disc.
In addition, adjust the cable so that the rest is less than 20
mm. If the rest of cable is longer, the end of the cable may
get stuck in the disc brake rotor, which could block the
wheel while cycling and seriously injure yourself.
6.8 CRANKSET
The crank mechanism with cranks mounted on the axis with
the screw requires systematic control. The contribution of the
crank mechanism together with the screw-in bowls, showing
excessive clearance, is regulated by tightening the main
screw with an Allen wrench. Using a bicycle with a loose
crankset causes indentation of the crank seat and its
destruction.

9
6.9 PEDALS
The axles of the pedals should be sufficiently tightened to
the crank arm. Incorrect tightening will loosen the
threaded connection, which will consequently destroy
the thread of the pedal and crank! The right pedal axis
has a right-hand thread marked "R". The left pedal axis
has a left-hand thread marked "L".
6.10 DERAILLEUR
These are components with a complex structure that requires proper operation, operation
and maintenance. When using and storing the bicycle, make sure that the guide 1 (Figure
below) is not subjected to side impacts which do not occur when properly used. The
alignment of the guide will cause the derailleur to operate incorrectly. Further exploitation
may lead to pulling the derailleur into the spokes of the wheel and irreversibly damaging it.
To adjust the derailleurs, both front and rear, first
set the trailing edge of the rails out of the rack. For
this adjustment, use the extreme deflection
screws on the gears body. In a properly adjusted
derailleur the guide is in line with the smallest and
largest sprocket. Both the rear and front derailleur
should properly control the ratios.
6.11 CHAIN
Depending on the conditions and frequency of travel, the chain is worn and lengthened,
destroying the sprockets at the same time. To check the correct chain tension, set the gears
so that the chain is on the largest chainring in the front. Then try to pull the chain away from
the dial. If it sticks out more than 3 mm, it can be replaced and should be reported to an
authorized service center. Too strong strain can increase the effort put in pedaling and
reduce the chain's strength. Too little tension can cause the chain to fall. Regularly it should
be cleaned of dirt (sand, mud etc.) and treated with a special grease.
6.12 TROLLEY
Do not exceed the maximum capacity marked on the trolley by its manufacturer.
6.13 RACK (OPTION)
Before ridding, check that the rack is correctly attached to your bike. Regularly check that
the fasteners are properly tightened. Do not exceed the maximum capacity marked on
the luggage compartment (25 kg). The luggage compartment is not designed to tow a
bicycle trailer. If you plan to mount a child seat on the rack, make sure that its load does
not exceed the maximum load capacity of the rack and bicycle specified by the
manufacturer.
6.14 LIGHTING
Lighting is a basic element of the user's safety. If the bicycle is used on public roads and it
is not equipped with lighting and reflections, it should be additionally equipped with the
bicycle in accordance with the provisions of the traffic regulations.

10
7. ASSMBLY
7.1 PREPARING
Pull the bike out of the carton with all the elements in it. Be careful not to scratch the bike
and at the same time be careful not to damage any cable or other components. Make
sure that there is no missing item in the bike and report any comments to the seller.
7.2 FOLD THE FRAME
The front wheel is dismantled, therefore after opening the cartoon it is necessary to remove
the protective foils and mount it on the front fork.
Picture 1 –Put front wheel into the fork.
Picture 2 –insert the "pin" through the wheel, tighten the nut on the left side so that the
quick-release closure is tightened with the appropriate resistance.
Picture 3 - Put the fender together with the lamp on the wheel and tighten the screws.
7.3 HANDLEBAR ASSEMBLY
1. Put the handlebar in the most
comfortable position for you and tighten
all screws according to the picture below.
2. The handlebar should be mounted so
that there are no clearances.
7.4 PEDALS ASSEMBLY
➢Tighten the pedal with the letter "R" on the right side clockwise,
➢Tighten the pedal with the letter "L" on the left hand side clockwise.
7.5 SADDLE ASSEMBLY
1. Loosen the quick-release nut on the
bicycle frame and insert the saddle
post.
2. Tighten the clamps of the seatpost
clamp in such a way that the quick
coupling clamps with the
appropriate resistance.

11
8. GREASE
Lubricated elements must be clean. Before lubricating the bearing, after dismantling it
should be thoroughly cleaned and wiped dry with a clean cloth. Then apply a quantity of
grease to the balls of the balls to fill all the gaps.
Excess grease adversely affects the work of the ball bearing - its heating occurs. We
lubricate ball bearings with a grease at the following time intervals:
✓Every 6 months, the bearings of the front wheel hub of the rear hub bearing.
✓Every 12 months the steering bearings.
We lubricate the following moving parts of the bicycle every six months:
✓brake lever axles,
✓brake lining axles,
✓brakes,
✓gears,
✓moving parts of gears
Special oils and greases should be used to lubricate the shock absorbers. Do not use lithium-
containing greases - they may damage some internal components. In the case of more
complex activities, such as dismantling the fork, replacement of silencers, etc., we
recommend that you consult a professional bicycle service.
9. USING BATTERY AND CHARGER
9.1 BATTERY
ECOBIKE uses high-quality lithium-ion batteries in its bicycles, which are light and do not
cause environmental pollution. It’s a typical source of so-called green energy.
In addition, they are characterized by:
✓No memory effect when charging.
✓Large energy capacity at low volume.
✓Long lifetime.
✓A wide operating temperature range: -10 ° C to + 40 °.
9.2 IMPORTANT INFORMATION ABOUT BATTERIES
•If you do not intend to use the bicycle for a long period of time, recharge the
batteries to 80% and set aside at room temperature, repeat the operation after
approx. 3 months.
•The lithium-ion battery should be used at -10 ° C to + 40 ° C, humidity 65 ± 20%; stored
at room temperature.
•Never place the battery near a fire or hot element.
•Never shake, hit or drop the battery.
•Keep the battery out of the bicycle and keep it away from children.
•Never use any metal tools to connect the rechargeable battery as it may cause an
electric short circuit and damage the battery.

12
9.3 INSERTION AND REMOVAL THE BATTERY
To remove the battery, turn and hold the key,
then pull the lever on the side of the battery
towards you. To insert the battery, turn the key
and hold it in, then insert it from the bottom,
finally release the turned key.
9.4 CHARGING THE BATTERY
The battery charge level indicates segments on the display located on the handlebar.
Charge the battery at ambient temperature, on a non-flammable and dry surface, away
from heat, moisture or flammable materials. In addition, it cannot be covered. When
charging the battery, please observe the following steps:
A. Insert the charger plug into the socket in the battery, and then connect the charger
cable to the power socket.
B. When the charger light is red, the battery is charging. When the red light turns green it
means that the battery is fully charged (Fig.1).
C. After charging is complete, disconnect the cable from the wall outlet first and then from
the battery.
D. Never leave the rechargeable battery unattended.
10. FUNCTION DISPLAY
10.1 FULL VIEW AREA
10.2 ON/OFF DISPLAY
To turn on the display press and hold “M” for 3 seconds. To turn off the display press and
hold “M” for 3 seconds.

13
10.3 USING POWER INDICATOR
Indicator of current discharging of batteries,
each segment is 2A, six segments are > = 12A. All
lighting segments mean the work of the engine
itself, which results in faster battery discharge,
the fewer segments displayed, the more we
support the bike and the battery is enough to
drive a longer distance.
10.4 SPEED INDICATOR
The speed indicator displays the current
cycling speed.
10.5 KM/H & MPH
KMH / MPH shows the speed and distance
depending on the selection of the unit. At KM / H,
speed and distance are displayed in kilometers,
while MPH displays speed and distance in miles -
the display shows the selected unit.
10.6 DISPLAY BACKLIGHT AND LIGHT (OPTIONAL)
When the LCD is turned on, press and hold the
"+" button for 3 seconds to turn on the display
backlight. If the bike is factory-equipped with a
lamp, it will also light up. Repeat this step to turn
off the backlight.
10.7 WALK ASSISTANCE
Hold down the minus button for 3 seconds to enter the "walk assist" mode, then e-bike will
drive automatically at a speed of 6km / h, thus the icon will appear as in the picture below.
The support will be automatically stopped after moving the hand.
10.8 SELECT THE ASSISTANCE MODE
By clicking minus or plus, set the assistance mode
from 1 to 6, where 1 means low power, while 6
means maximum. Each mode supports up to the
appropriate speed, the higher the mode, the
stronger the support.
14
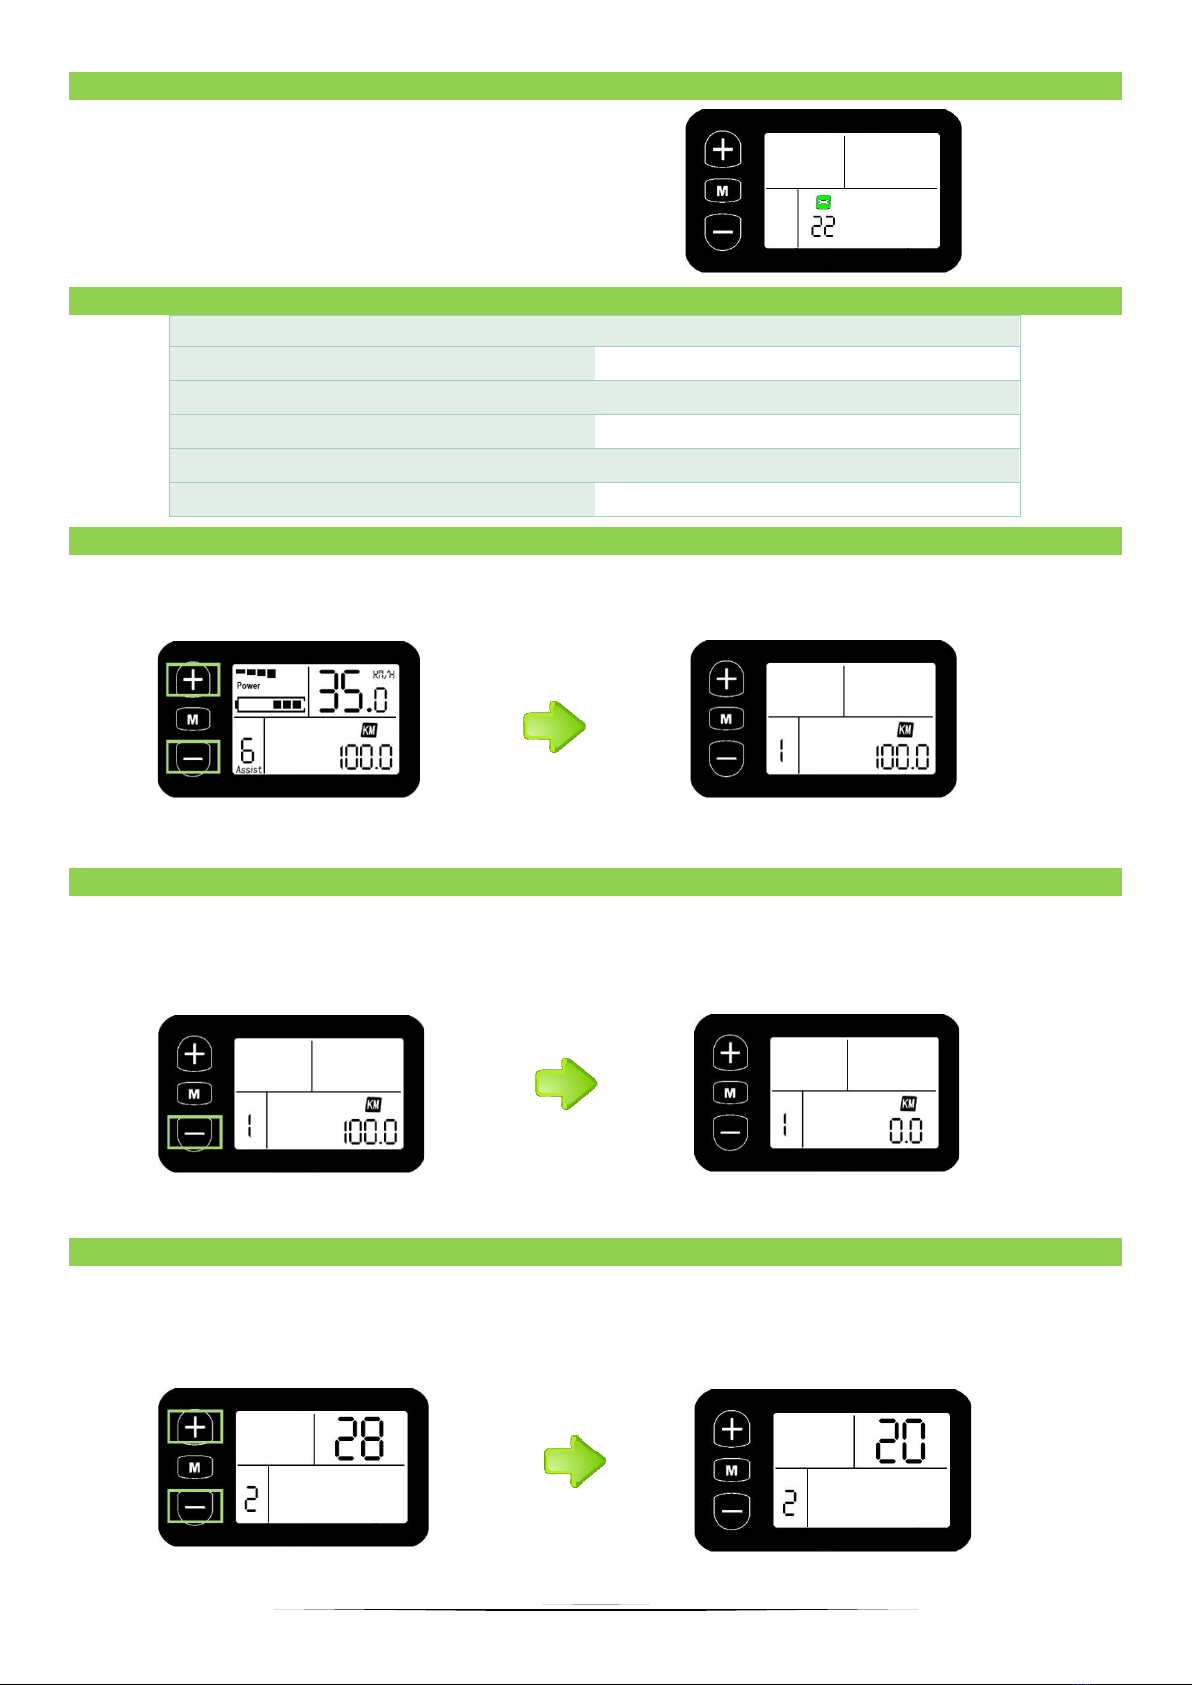
10.9 ERROR CODE
If an error appears on the display (icon with
number and key, as in the picture below),
check in the code table what an error
means and contact your dealer to fix the
fault - The code table is in item 10.10.
10.10 ERROR TABLE
Error code
Definition
22
Throttle fault
23
Motor fault
24
Hall sensor fault
25
Brake fault
9
Conection fault
10.11 SETTINGS
With the display turned on, hold down the minus and plus simultaneously for 3 seconds to
enter the main settings menu.
By clicking the M button you go to the next setting. Lack of any action will exit the MENU.
10.12 RESET DATA
Follow steps 10.11 to go to the settings menu, then by clicking "M" go to the "1" setting - in
this setting you can delete the distance traveled. If you want to delete the distance of the
traveled route, press the "minus" button.
*Press “plus” and “minus” at the same time to save.
10.13 WHEEL SIZE SETTINGS
W Follow steps 10.11 to go to the settings menu, then click the M button to go to the "2"
setting. Select the exact diameter of the circle using the minus and plus buttons to ensure
accurate display of speed and mileage.
*Press “plus” and “minus” at the same time to save.

15
10.14 KM/H & MPH
Follow steps 10.11 to go to the settings menu, then by clicking the M button go to the "3"
setting - by clicking plus or minus you switch the unit KM / H to MPH and reverse.
10.15 MOTOR MODE SETTINGS (ECO, NORMAL, POWER)
There are three motor modes in the bike - ECO, NORMAL AND POWER. Setting the "POWER"
mode means faster reaching the set speed, eg on the ECO mode the bike from 0 to 25km
/ h will accelerate in 15 seconds and in POWER mode in 7 seconds (the acceleration time
is given randomly). To switch to a given mode, perform steps from point 12.11 to go to the
settings menu, then by clicking the M button go to the "4" setting, using the "plus" or "minus"
buttons set the appropriate value:
ECO –choose „1”; NORMAL –choose „2”; POWER –choose „3”
10.16 BATTERY LEVEL INDICATOR
Kiedy poziom naładowania akumulatora jest wysoki, świeci się sześć segmentów natomiast
kiedy poziom akumulatora jest niski, obudowa akumulatora miga, oznacza to że poziom
akumulatora jest bardzo niski i wymaga natychmiastowego naładowania.

16
11. WARRANTY CARD
MODEL ROWERU : .........................................................
NUMER RAMY : ..............................................................
NUMER BATERII : ............................................................
NUMER SILNIKA : ............................................................
DATA ZAKUPU : ............................................................
PODPIS I PIECZĘĆ SPRZEDAWCY
………………………………………………………….……..
DOKONANE NAPRAWY
DATA
ZGŁOSZENIA
DATA
WYKONANIA
ZAKRES NAPRAW
PIECZĄTKA PUNKTU
SERWISOWEGO
PODPIS
OBOWIĄZKOWY PRZEGLĄD „ZEROWY” PO PRZEJECHANIU 70-120 KM ( przegląd podlega opłacie,)

17
12. NOTES
…………………………………………………………………………………………………………………………………………
…………………………………………………………………………………………………………………………………………
…………………………………………………………………………………………………………………………………………
………….………………………………………………………………………………………………………………………………
…………………………………………………………………………………………………………………………………………
…………………………………………………………………………………………………………………………………………
…………………….……………………………………………………………………………………………………………………
…………………………………………………………………………………………………………………………………………
…………………………………………………………………………………………………………………………………………
……………………………….…………………………………………………………………………………………………………
…………………………………………………………………………………………………………………………………………
…………………………………………………………………………………………………………………………………………
………………………………………….………………………………………………………………………………………………
…………………………………………………………………………………………………………………………………………
…………………………………………………………………………………………………………………………………………
…………………………………………………….……………………………………………………………………………………
…………………………………………………………………………………………………………………………………………
…………………………………………………………………………………………………………………………………………
……………………………………………………………….…………………………………………………………………………
…………………………………………………………………………………………………………………………………………
…………………………………………………………………………………………………………………………………………
………………………………………………………………………….………………………………………………………………
…………………………………………………………………………………………………………………………………………
…………………………………………………………………………………………………………………………………………
…………………………………………………………………………………….……………………………………………………
…………………………………………………………………………………………………………………………………………
…………………………………………………………………………………………………………………………………………
……………………………………………………………………………………………….…………………………………………
…………………………………………………………………………………………………………………………………………
…………………………………………………………………………………………………………………………………………
………………………………………………………………………………………………………….………………………………
…………………………………………………………………………………………………………………………………………
…………………………………………………………………………………………………………………………………………
…………………………………………………………………………………………………………………….……………………
…………………………………………………………………………………………………………………………………………
…………………………………………………………………………………………………………………………………………
……………………………………………………………………………………………………………………………….…………
…………………………………………………………………………………………………………………………………………
…………………………………………………………………………………………………………………………………………
………………………………………………………………………………………………………………………………………….
…………………………………………………………………………………………………………………………………………
…………………………………………………………………………………………………………………………………………
…………………………………………………………………………………………………………………………………………
………….………………………………………………………………………………………………………………………………
…………………………………………………………………………………………………………………………………………
…………………………………………………………………………………………………………………………………………
…………………….……………………………………………………………………………………………………………………
…………………………………………………………………………………………………………………………………………
…………………………………………………………………………………………………………………………………………
……………………………….…………………………………………………………………………………………………………
…………………………………………………………………………………………………………………………………………

18
…………………………………………………………………………………………………………………………………………
………………………………………….………………………………………………………………………………………………
…………………………………………………………………………………………………………………………………………
…………………………………………………………………………………………………………………………………………
…………………………………………………….……………………………………………………………………………………
…………………………………………………………………………………………………………………………………………
…………………………………………………………………………………………………………………………………………
……………………………………………………………….…………………………………………………………………………
…………………………………………………………………………………………………………………………………………
…………………………………………………………………………………………………………………………………………
………………………………………………………………………….………………………………………………………………
…………………………………………………………………………………………………………………………………………
…………………………………………………………………………………………………………………………………………
…………………………………………………………………………………….……………………………………………………
…………………………………………………………………………………………………………………………………………
…………………………………………………………………………………………………………………………………………
……………………………………………………………………………………………….…………………………………………
…………………………………………………………………………………………………………………………………………
…………………………………………………………………………………………………………………………………………
………………………………………………………………………………………………………….………………………………
…………………………………………………………………………………………………………………………………………
…………………………………………………………………………………………………………………………………………
…………………………………………………………………………………………………………………….……………………
…………………………………………………………………………………………………………………………………………
…………………………………………………………………………………………………………………………………………
……………………………………………………………………………………………………………………………….…………
…………………………………………………………………………………………………………………………………………
…………………………………………………………………………………………………………………………………………
………………………………………………………………………………………………………………………………………….
…………………………………………………………………………………………………………………………………………
…………………………………………………………………………………………………………………………………………
…………………………………………………………………………………………………………………………………………
………….………………………………………………………………………………………………………………………………
…………………………………………………………………………………………………………………………………………
…………………………………………………………………………………………………………………………………………
…………………….……………………………………………………………………………………………………………………
…………………………………………………………………………………………………………………………………………
…………………………………………………………………………………………………………………………………………
……………………………….…………………………………………………………………………………………………………
…………………………………………………………………………………………………………………………………………
…………………………………………………………………………………………………………………………………………
………………………………………….………………………………………………………………………………………………
…………………………………………………………………………………………………………………………………………
…………………………………………………………………………………………………………………………………………
…………………………………………………….……………………………………………………………………………………
…………………………………………………………………………………………………………………………………………
…………………………………………………………………………………………………………………………………………
……………………………………………………………….…………………………………………………………………………
…………………………………………………………………………………………………………………………………………
…………………………………………………………………………………………………………………………………………
………………………………………………………………………….………………………………………………………………
…………………………………………………………………………………………………………………………………………
…………………………………………………………………………………………………………………………………………

19

20
This manual suits for next models
7
Table of contents
Other Ecobike Bicycle manuals


