Ecoer EST01 User manual

EST Install and User Guide
07.2019
1/28 www.ecoer.com
Manufacturer reserves the right to change specifications or designs without notice.
Appearance of the product may vary. Log in www.ecoer.com or ESS Pro App
>Files >Installation to get the latest guide.
EST01 Wi-Fi
Programmable Thermostat
Install and User Guide
1. Introduction--------------------------------------
2. Install your Thermostat-------------------------
3. Setup-----------------------------------------------
3.1 Time setting--------------------------------------
3.2 Working mode----------------------------------
3.3 Setup Wi-Fi----------------------------------------
3.4 Schedule set-------------------------------------
3.5 User setup-----------------------------------------
3.6 Factory set----------------------------------------
3.7 Clean screen------------------------------
3.8 Reset--------------------------------------------
4. Warranty ---------------------------------------
5. Regulatory info.---------------------------------
3
6
8
8
9
11
14
17
20
27
27
28
28

EST Install and User Guide
07.2019
2/28 www.ecoer.com
Manufacturer reserves the right to change specifications or designs without notice.
Features
•Compatible with most 24V controlled heating, cooling, and heat pump systems
•Set your temperature remotely from your smart phone
•Wi-Fi connectivity through App
•Work with Amazon Echo and Google Assistant
•4.3’’ touch screen LCM display
•Quick connecting terminals to save installer’s time
•Be able to control fan speed of E Series Air Handlers for better dehumidification control
•3-year limited warranty
Caution
ELECTRICAL HAZARD
Can cause electrical shock or equipment damage. Disconnect power before beginning installation.
EQUIPMENT DAMAGE HAZARD
Compressor protection is bypassed for Ecoer condensing units. To prevent equipment damage, set
compressor protection accordingly for other brand condensing units.
MERCURY NOTICE
If this product is replacing a control that contains mercury in a sealed tube, do not place the old
control in the trash. Contact your local waste management authority for instructions regarding
recycling and proper disposal.
REQUIRED: 24 VAC POWER (“C” WIRE)

EST Install and User Guide
07.2019
3/28 www.ecoer.com
Manufacturer reserves the right to change specifications or designs without notice.
1. Introduction
Power supply AC 24V
Temp. Setting range 50°F ~ 90°F
Display Tempered touch sensitive screen
Dimensions (W x H x D) 4in. x 4in. x 0.79in.
Parts in the packaging box
Screws and anchors Install and User Guide
EST01 Wi-Fi Thermostat
Mounting System
Accessory for E
Series Air Handlers
Wiring Replacement
Guide* (See the
following page)
Stickers

EST Install and User Guide
07.2019
4/28 www.ecoer.com
Manufacturer reserves the right to change specifications or designs without notice.
Wiring Replacement Guide
Applied Model: Ecoer EAHATN-24/36/48/60 air handler
To get two-stage fan control for enhanced dehumidification, use the wiring in packaging box to
replace the one already connected to CN9 terminal of indoor PCB.
W1
RC G G2

EST Install and User Guide
07.2019
5/28 www.ecoer.com
Manufacturer reserves the right to change specifications or designs without notice.
Mode: Select system mode OFF, COOL, AUTO, HEAT and EM HEAT.
Fan: AUTO Runs based on working condition of the compressor.
ON: Keeps running all the time.
Adjust temperature: Touch +or –icon to set your desired temperature.
Menu (Back Button): Time setting, working mode, Wi-Fi, Schedule and other settings.
Thermostat Layout
Desired temperature Indoor humidity
Adjust temperature
Inside temperature *
Working status
Fan
(ON/AUTO)
Mode
Menu
(Back button)
Schedule
Wake/Away/Home/Sleep
* The screen will wake up by touching the inside temperature area

EST Install and User Guide
07.2019
6/28 www.ecoer.com
Manufacturer reserves the right to change specifications or designs without notice.
2. Install your Thermostat
Power off the system before remove your old thermostat.
Look at the wires going out of the wall and take a photo for reference. Label each wire going into
your old thermostat with the provided stickers.
The EST01 Wi-Fi thermostat
•Does not work for 120-240V systems.
•Does not work with millivolt systems.
•Required 24 VAC power supply (“C” wire)
•Does not need jumpers because RC and RH are connected already.
•Does not support universal input (S terminals) for indoor and outdoor sensors.
•Does not support universal relay (U terminals) for ventilation.
AnchorsScrews
EST01 Wi-Fi Thermostat Mounting System
3.3in.
2.3in.

EST Install and User Guide
07.2019
7/28 www.ecoer.com
Manufacturer reserves the right to change specifications or designs without notice.
Terminal Description
C Common
RH / RC 24 VAC power (RH and RC are already connected each other)
O Mode changeover
W2 (W) Second stage heating or first stage auxiliary heat for heat pump systems
G Fan for standard mode
Y1 Compressor
G2 Fan for dry mode
K Reserved
Wiring Terminals in Mounting System
CRH RC OW2 GY1 G2
K RESERVED
S: Single transformer
D: Double transformers S D
up
Connection to
touch screen

EST Install and User Guide
07.2019
8/28 www.ecoer.com
Manufacturer reserves the right to change specifications or designs without notice.
3.1 Time Setting
I. Press Menu at homepage, the screen will display DATE TIME.
II. Press Edit, the screen displays SETUP YEAR, press +or -to change.
III. Press Next to SETUP MONTH /DATE /HOUR /MINUTE, respectively.
IV. Press Done to save time setting.
NOTE: Press Menu during setting will exit you directly and nothing will be saved.
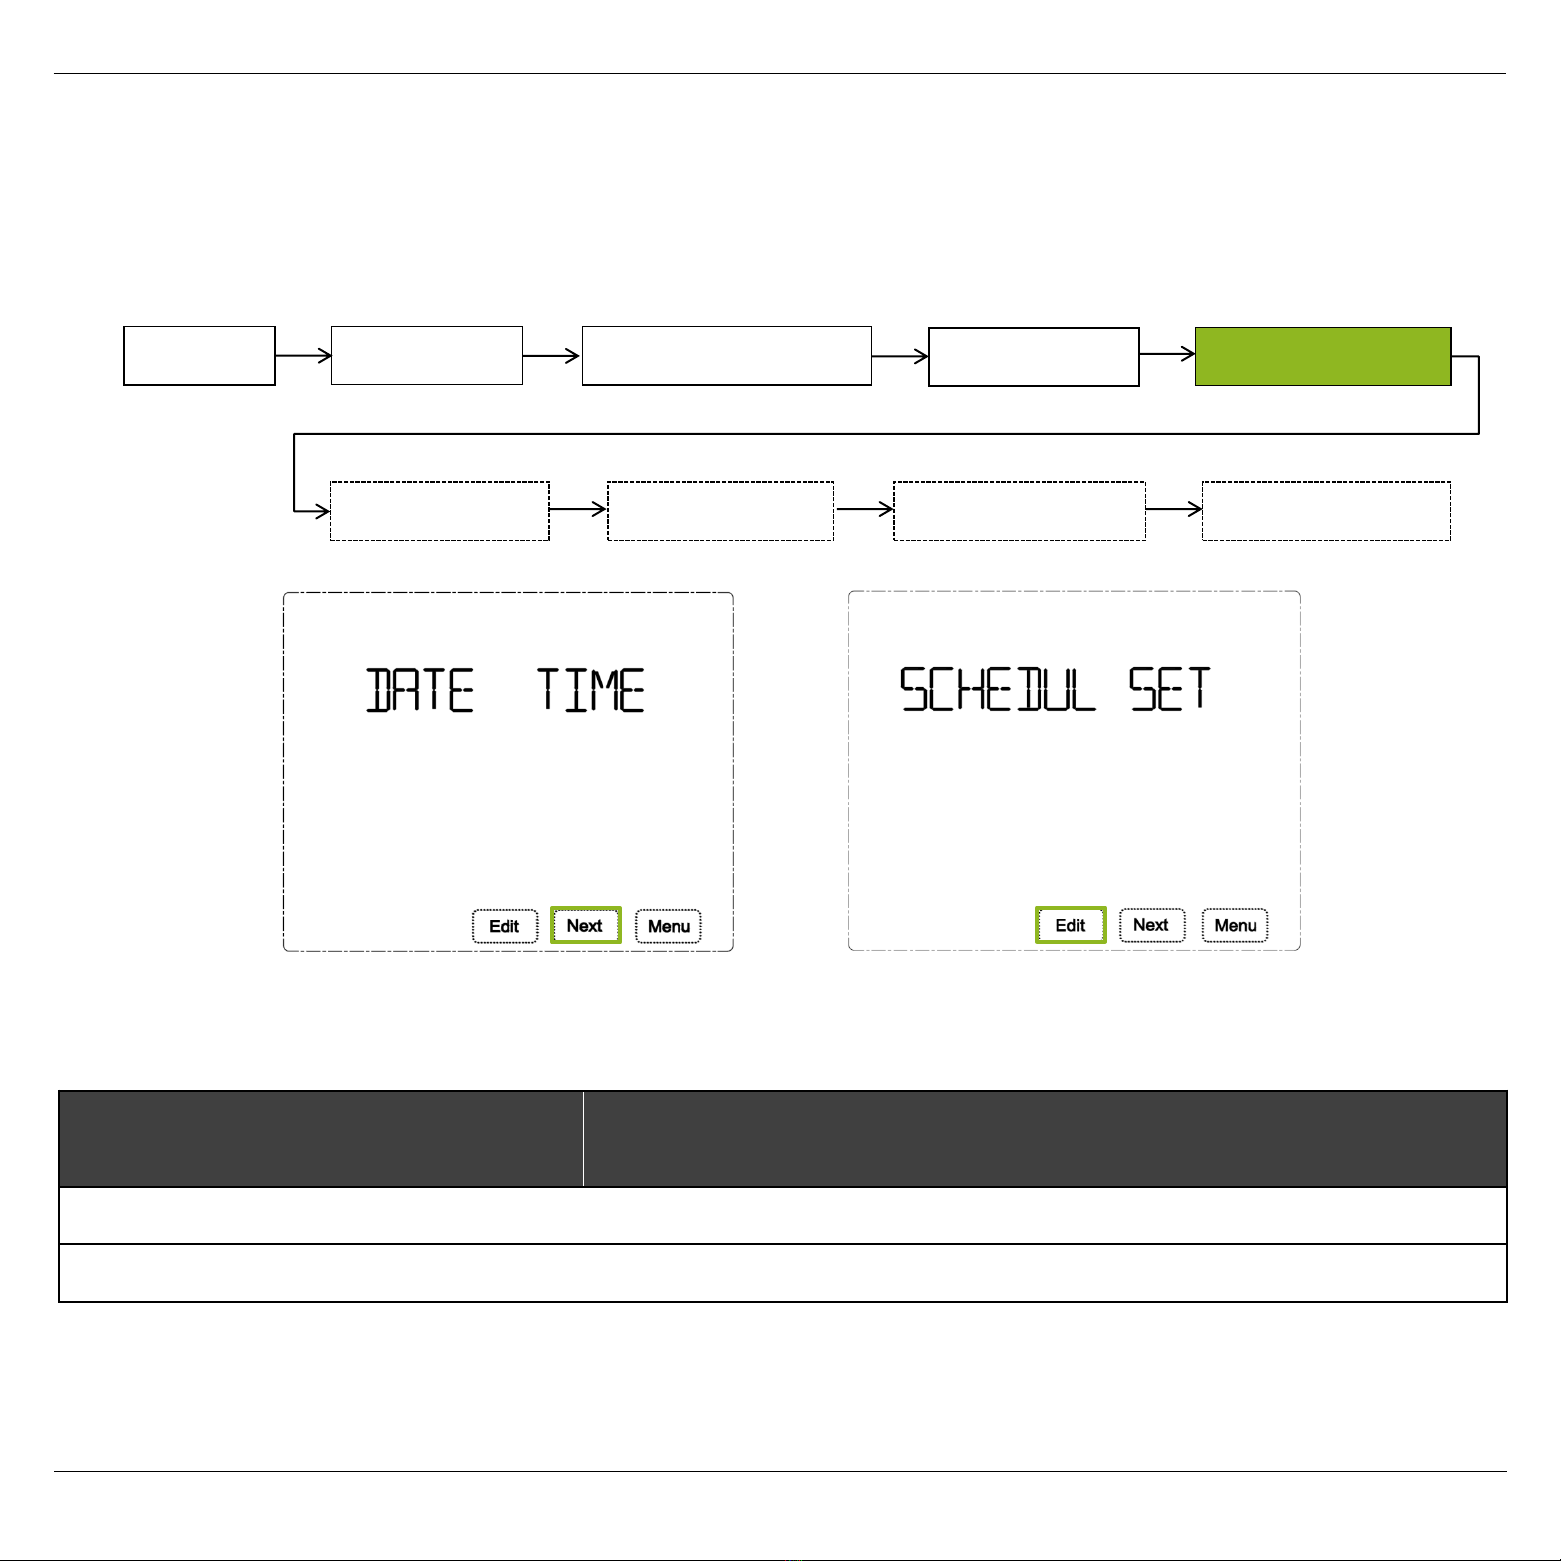
3. Setup
Menu DATE TIME WORKING MODE SCHEDULE SET
USER SETUP FACTORY SET CLEAN SCREEN RESET
SETUP WIFI
…

EST Install and User Guide
07.2019
9/28 www.ecoer.com
Manufacturer reserves the right to change specifications or designs without notice.
3.2 Working Mode
I. Press Menu at homepage, the screen will display DATE TIME, then press Next to WORKING
MODE.
II. Press Edit, the screen displays HOLD, press or to switch between HOLD and
SCHEDULE.
III. Press Done to save.
NOTE: Press Menu during setting will exit you directly and nothing will be saved.
Menu DATE TIME WORKING MODE SCHEDULE SET
USER SETUP FACTORY SET CLEAN SCREEN RESET
SETUP WIFI
HOLD: Keeps the desired temperature set all the time.
SCHEDULE: Follows 7-day plan (4 time periods per day) *
*To activate the scheduling, it’s required to choose AUTO at thermostat homepage or on ‘Ecoer
Home’ App control interface.

EST Install and User Guide
07.2019
10/28 www.ecoer.com
Manufacturer reserves the right to change specifications or designs without notice.
Activate 7-day Scheduling by Ecoer Home App
•Select Mode to Auto
•Turn ON Schedule (i.e. Choose ‘Follow Schedule’)

EST Install and User Guide
07.2019
11/28 www.ecoer.com
Manufacturer reserves the right to change specifications or designs without notice.
3.3 Setup Wi-Fi
Search ‘Ecoer Home'on Google Play or App Store to install the App. Register with your phone
number or email, log in App to add device.
I. Press Menu at homepage, the screen will display DATE TIME, press Next twice to SETUP
WIFI.
II. Press Edit, the screen displays SMART MODE*.
III. Press Done, then Wi-Fi icon will blink 90 seconds on the upper-right corner.
*You may need to try AP MODE (Wireless Access Point) to connect device if SMART MODE does
not work successfully.
Menu DATE TIME WORKING MODE SCHEDULE SET
USER SETUP FACTORY SET CLEAN SCREEN RESET
SETUP WIFI

EST Install and User Guide
07.2019
12/28 www.ecoer.com
Manufacturer reserves the right to change specifications or designs without notice.
Add device on ‘Ecoer Home’ App
•Press +icon (see Fig.1)on the upper-right corner of the App.
•Touch “Confirm signal icon is blinking”(see Fig.2)
•Connect your smart phone to Wi-Fi (Select 2.4 GHz Wi-Fi and input password), it takes 30 to 60
seconds to complete (see Fig.3). Touch “Help” to trouble shoot if you fail to make it online.
Fig. 1 Fig. 3
* The design of Ecoer Home App may subject to change.
Fig. 2

EST Install and User Guide
07.2019
13/28 www.ecoer.com
Manufacturer reserves the right to change specifications or designs without notice.
‘Ecoer Home’ App Control Interface
Set desired temp.
Display inside
temperature
Change mode
Schedule Status
•ON: Follow Schedule
•OFF: Hold On
Settings
•Device ID
•Rename thermostat
•Temp. scale switch
•Firmware update
Control fan
•On
•Auto
•Circulate indoor air
when AC/HP stops
* The design of Ecoer Home App may subject to change.
Display inside
humidity
7-day scheduling
(4 periods per day)
EST Install and User Guide
07.2019
14/28 www.ecoer.com
Manufacturer reserves the right to change specifications or designs without notice.
3.4 SCHEDULE SET
I. Press Menu at homepage, the screen displays DATE TIME.
II. Press Next until you see SCHEDUL SET.
III. Press Edit to set detailed schedule (Below table shows the default desired temperature from
Monday to Sunday).
IV. See the following page for detailed schedule setup, press Done to save it.
NOTE: Press Menu during setting will exit you directly and nothing will be saved.
Mon-Sun Wake
06:00
Away
08:00
Home
18:00
Sleep
22:00
Desired Temp. in cooling 78F 85F 78F 82F
Desired Temp. in heating 70F 62F 70F 62F
Menu DATE TIME WORKING MODE SCHEDULE SET
USER SETUP FACTORY SET CLEAN SCREEN RESET
SETUP WIFI

EST Install and User Guide
07.2019
15/28 www.ecoer.com
Manufacturer reserves the right to change specifications or designs without notice.
Detailed Schedule Setting from thermostat
I. Press +or -to choose the day of the week.
II. Press Next to set from the first period 06:00 of the selected day, press +or -to adjust time
(15 minutes per interval).
III. Press Next to set schedule for other period of the selected day.
IV. Continue to set schedule for other day of the week.
V. Press Done to save.
a) Press Next to set desired COOL temperature by press +or -icon.
b) Press Next to set desired HEAT temperature by press +or -icon.
❷
…
❹
❶
❸

EST Install and User Guide
07.2019
16/28 www.ecoer.com
Manufacturer reserves the right to change specifications or designs without notice.
Detailed Schedule Setting by ‘Ecoer Home’ App
I. Click to enter scheduling.
II. Click the period you want to set, then scroll start Time, Cool Temp. and Heat Temp.
III. Touch “COMPLETE”to save your settings.

EST Install and User Guide
07.2019
17/28 www.ecoer.com
Manufacturer reserves the right to change specifications or designs without notice.
3.5 USER SETUP
I. Press Menu at homepage, the screen will display DATE TIME, then press Next until you see
USER SETUP.
II. Press Edit to enter into user setup interface.
*Circulate the ventilation when Air Conditioner or Heat Pump stops for a long period.
Menu DATE TIME WORKING MODE SCHEDULE SET
USER SETUP FACTORY SET CLEAN SCREEN RESET
SETUP WIFI
Items Range Remarks
TEMP SCALE F/C Switch between Fahrenheit (Default) and Celsius
TEMP ADJ -6F ~ 6F
(Default 0F) Adjust compensation for inside temperature
TEMP EFF 1F ~ 4F
(Default 2F)
Adjust temperature difference between inside temp. and
desired temp. to start COOL or HEAT
BRIGHTNESS
0 (Default)Display current inside temperature and local time when
screen sleeps
1 Darken brightness but display all contents (never sleeps)
2 The screen keeps the top brightness (never sleeps)
TIME SYNC ON/OF ON: Synchronize local time when connect Wi-Fi
OF: Do not synchronize local time
FAN CIRC * OF/05/15/30
OF: Turn off CIRC function (Default)
05: Turn on 5 minutes per hour
15: Turn on 15 minutes per hour
30: Turn on 30 minutes per hour

EST Install and User Guide
07.2019
18/28 www.ecoer.com
Manufacturer reserves the right to change specifications or designs without notice.
NOTE: Press Menu during setting will exit you directly and nothing will be saved.

EST Install and User Guide
07.2019
19/28 www.ecoer.com
Manufacturer reserves the right to change specifications or designs without notice.
FAN CIRC Setting by Ecoer Home App
NOTE: App can set FAN CIRC* when Mode is Off (i.e. AC/HP stops).
* Circulate indoor air when Air Conditioner or Heat Pump stops for a long period.

EST Install and User Guide
07.2019
20/28 www.ecoer.com
Manufacturer reserves the right to change specifications or designs without notice.
3.6 FACTORY SET (Professional only)
I. Press Menu at homepage, the screen will display DATE TIME, then press Next until you see
FACTORY SET.
II. Press Edit, the screen will display SYSTEM TYPE (See the following pages for details)
III. Press +or -to set.
IV. Press Next to set COMP PROTECT /EM HEAT MODE /CHANGE OVER as of required.
V. Press Done to save the setting.
NOTE: Press Menu during setting will exit you directly and nothing will be saved.
COMP PROTECT
Delay 0
(Default) ~ 10min to start the compressor
EM HEAT MODE
ON / OF
(Default)
CHANGE OVER
Enable or Disable AUTO mode
ON:
HEAT or COOL switch automatically (Default)
Menu DATE TIME WORKING MODE SCHEDULE SET
USER SETUP FACTORY SET CLEAN SCREEN RESET
SETUP WIFI
Other manuals for EST01
1
Table of contents
Other Ecoer Thermostat manuals


Popular Thermostat manuals by other brands

Honeywell
Honeywell VisionPRO Wi-Fi TH8320WF Integration Release Notes

KingShield
KingShield THPW1-CA Installation & operating instructions

DEVI
DEVI DEVIreg 130 installation instructions

S+S Regeltechnik
S+S Regeltechnik Thermasreg RTR-S Series Operating Instructions, Mounting & Installation

Honeywell
Honeywell TB7200 Series Application guide

DEVI
DEVI DEVIreg Touch installation guide


